Flowable笔记
Flowable笔记
Getting Stated
官网文档地址:https://flowable.com/open-source/docs/bpmn/ch02-GettingStarted/
创建Maven项目,引入依赖:
<dependency>
    <groupId>org.flowable</groupId>
    <artifactId>flowable-engine</artifactId>
    <version>6.6.0</version>
</dependency>
<!-- Mysql驱动包 -->
<dependency>
    <groupId>mysql</groupId>
    <artifactId>mysql-connector-java</artifactId>
    <version>8.0.15</version>
</dependency>
<dependency>
    <groupId>org.slf4j</groupId>
    <artifactId>slf4j-log4j12</artifactId>
    <version>1.7.30</version>
</dependency>
在Mysql中创建一个空库。
创建一个BPMN流程holiday-request.bpmn20.xml,放到Resources目录下
添加一个Java类:
package org.flowable;

import org.flowable.engine.*;
import org.flowable.engine.impl.cfg.StandaloneProcessEngineConfiguration;
import org.flowable.engine.repository.Deployment;
import org.flowable.engine.repository.ProcessDefinition;
import org.flowable.engine.runtime.ProcessInstance;
import org.flowable.task.api.Task;

import java.util.HashMap;
import java.util.List;
import java.util.Map;
import java.util.Scanner;

public class HolidayRequest {
    public static void main(String[] args) {
        ProcessEngineConfiguration cfg = new StandaloneProcessEngineConfiguration()
                .setJdbcUrl("jdbc:mysql://localhost:3306/flowable?useUnicode=true&characterEncoding=utf8&zeroDateTimeBehavior=convertToNull&useSSL=true&serverTimezone=GMT%2B8")
                .setJdbcUsername("root")
                .setJdbcPassword("123123")
                .setJdbcDriver("com.mysql.cj.jdbc.Driver")
                .setDatabaseSchemaUpdate(ProcessEngineConfiguration.DB_SCHEMA_UPDATE_TRUE);

        ProcessEngine processEngine = cfg.buildProcessEngine();


        RepositoryService repositoryService = processEngine.getRepositoryService();
        Deployment deployment = repositoryService.createDeployment()
                .addClasspathResource("holiday-request.bpmn20.xml")
                .deploy();


        ProcessDefinition processDefinition = repositoryService.createProcessDefinitionQuery()
                .deploymentId(deployment.getId())
                .singleResult();
        System.out.println("Found process definition : " + processDefinition.getName());


        Scanner scanner = new Scanner(System.in);

        System.out.println("Who are you?");
        String employee = scanner.nextLine();

        System.out.println("How many holidays do you want to request?");
        Integer nrOfHolidays = Integer.valueOf(scanner.nextLine());

        System.out.println("Why do you need them?");
        String description = scanner.nextLine();


        RuntimeService runtimeService = processEngine.getRuntimeService();

        Map<String, Object> variables = new HashMap<String, Object>();
        variables.put("employee", employee);
        variables.put("nrOfHolidays", nrOfHolidays);
        variables.put("description", description);
        ProcessInstance processInstance =
                runtimeService.startProcessInstanceByKey("holidayRequest", variables);


        TaskService taskService = processEngine.getTaskService();
        List<Task> tasks = taskService.createTaskQuery().taskCandidateGroup("managers").list();
        System.out.println("You have " + tasks.size() + " tasks:");
        for (int i = 0; i < tasks.size(); i++) {
            System.out.println((i + 1) + ") " + tasks.get(i).getName());
        }


        System.out.println("Which task would you like to complete?");
        int taskIndex = Integer.valueOf(scanner.nextLine());
        Task task = tasks.get(taskIndex - 1);
        Map<String, Object> processVariables = taskService.getVariables(task.getId());
        System.out.println(processVariables.get("employee") + " wants " +
                processVariables.get("nrOfHolidays") + " of holidays. Do you approve this?");


        boolean approved = scanner.nextLine().toLowerCase().equals("y");
        variables = new HashMap<String, Object>();
        variables.put("approved", approved);
        taskService.complete(task.getId(), variables);
    }
}
这样就完成了一个简单的流程,创建流程图-》发布流程-》发起流程实例-》检索任务-》执行任务
SpringBoot
官网文档地址:https://flowable.com/open-source/docs/bpmn/ch05a-Spring-Boot/
创建一个SpringBoot项目
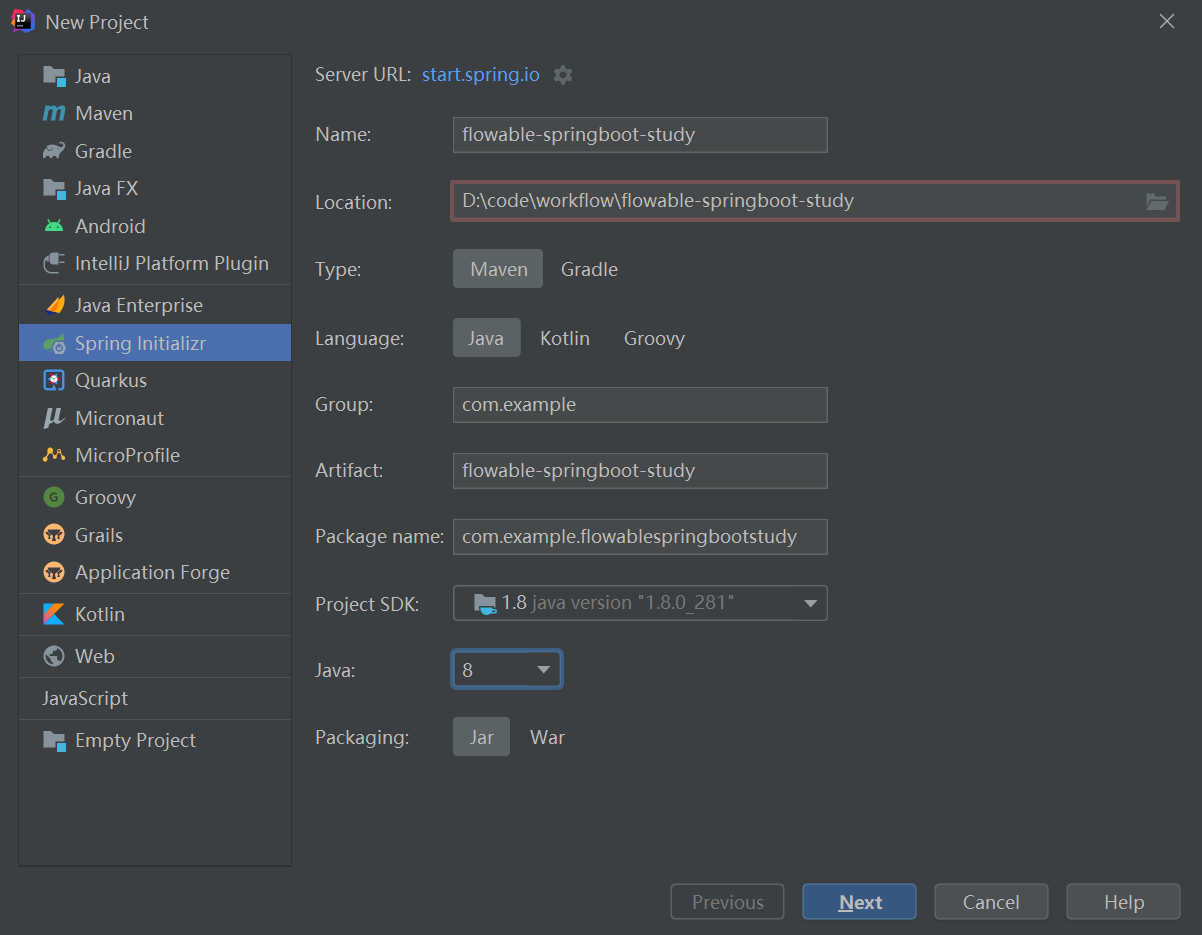
引入Mysql、Flowable相关依赖,POM文件如下:
<?xml version="1.0" encoding="UTF-8"?>
<project xmlns="http://maven.apache.org/POM/4.0.0" xmlns:xsi="http://www.w3.org/2001/XMLSchema-instance"
         xsi:schemaLocation="http://maven.apache.org/POM/4.0.0 https://maven.apache.org/xsd/maven-4.0.0.xsd">
    <modelVersion>4.0.0</modelVersion>
    <parent>
        <groupId>org.springframework.boot</groupId>
        <artifactId>spring-boot-starter-parent</artifactId>
        <version>2.5.4</version>
        <relativePath/> <!-- lookup parent from repository -->
    </parent>
    <groupId>com.example</groupId>
    <artifactId>flowable-springboot-study</artifactId>
    <version>0.0.1-SNAPSHOT</version>
    <name>flowable-springboot-study</name>
    <description>Demo project for Spring Boot</description>
    <properties>
        <java.version>1.8</java.version>
        <flowable.version>6.6.0</flowable.version>
    </properties>
    <dependencies>
        <dependency>
            <groupId>org.springframework.boot</groupId>
            <artifactId>spring-boot-starter-web</artifactId>
        </dependency>
        <dependency>
            <groupId>org.flowable</groupId>
            <artifactId>flowable-spring-boot-starter</artifactId>
            <version>${flowable.version}</version>
        </dependency>
        <dependency>
            <groupId>mysql</groupId>
            <artifactId>mysql-connector-java</artifactId>
            <scope>runtime</scope>
        </dependency>
        <dependency>
            <groupId>org.projectlombok</groupId>
            <artifactId>lombok</artifactId>
            <optional>true</optional>
        </dependency>
        <dependency>
            <groupId>org.springframework.boot</groupId>
            <artifactId>spring-boot-starter-test</artifactId>
            <scope>test</scope>
        </dependency>
    </dependencies>

    <build>
        <plugins>
            <plugin>
                <groupId>org.springframework.boot</groupId>
                <artifactId>spring-boot-maven-plugin</artifactId>
                <configuration>
                    <excludes>
                        <exclude>
                            <groupId>org.projectlombok</groupId>
                            <artifactId>lombok</artifactId>
                        </exclude>
                    </excludes>
                </configuration>
            </plugin>
        </plugins>
    </build>

</project>
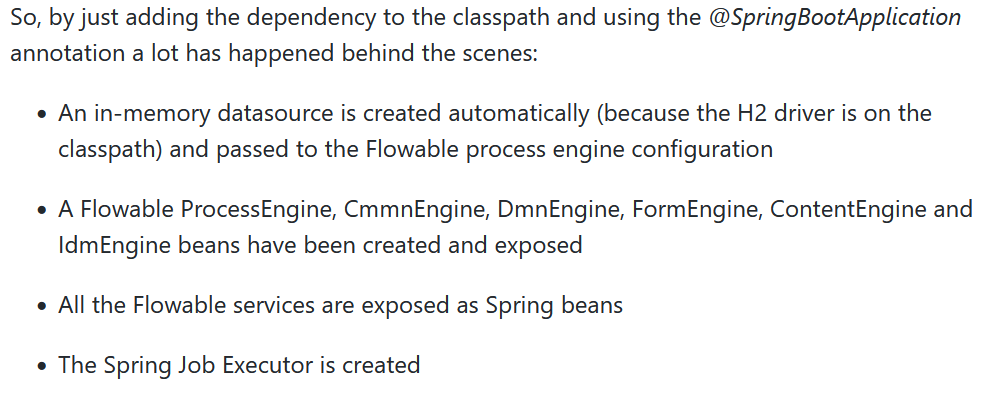
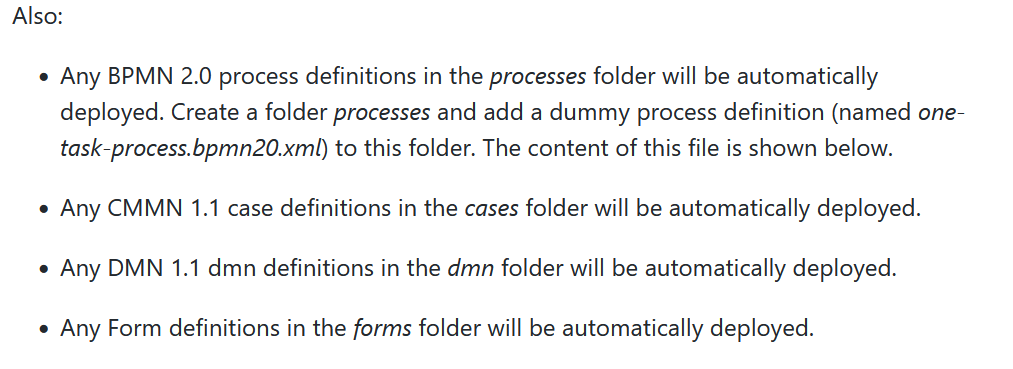
根据官网的描述,Springboot应用启动后,将会自动创建诸如ProcessEngin之类的常用Bean、所有定义的BPMN流程放在Resources\processes目录,将会自动发布。

创建一个测试类,即可愉快地使用Flowable的API了:
package com.example.flowablespringbootstudy;

import org.flowable.engine.RepositoryService;
import org.flowable.engine.RuntimeService;
import org.flowable.engine.TaskService;
import org.junit.jupiter.api.Test;
import org.springframework.beans.factory.annotation.Autowired;
import org.springframework.boot.test.context.SpringBootTest;

@SpringBootTest
class FlowableSpringbootStudyApplicationTests {
    @Autowired
    RepositoryService repositoryService;

    @Autowired
    private RuntimeService runtimeService;

    @Autowired
    private TaskService taskService;

    @Test
    void test01() {
        System.out.println("Number of process definitions : "
                + repositoryService.createProcessDefinitionQuery().count());
        System.out.println("Number of tasks : " + taskService.createTaskQuery().count());
        runtimeService.startProcessInstanceByKey("holidayRequest2");
        System.out.println("Number of tasks after process start: "
                + taskService.createTaskQuery().count());
    }

}

 浙公网安备 33010602011771号