
21-前端核心技术-VUE组合式API
第21章-前端核心技术-VUE组合式API
学习目标
- 掌握VUE响应式API的使用
- 掌握项目中常用开发技巧
VUE 组合式API概述
使用 (data、computed、methods、watch) 组件选项来组织逻辑通常都很有效。然而,当我们的组件变得更大时,每个功能的代码都会被分布到(data、computed、methods、watch) 等各个部分,不利于维护,功能封装性极差,这会导致组件难以阅读和理解。
使用组合式 API,首先需要一个可以实际使用它的地方。在 Vue 组件中,我们将此位置称为 setup。
setup 选项在组件创建**之前**执行,一旦 props 被解析,就将作为组合式 API 的入口。所有需要了解组件的创建过程,即生命周期。
VUE 生命周期
vue的组件整个生命周期过程如下:
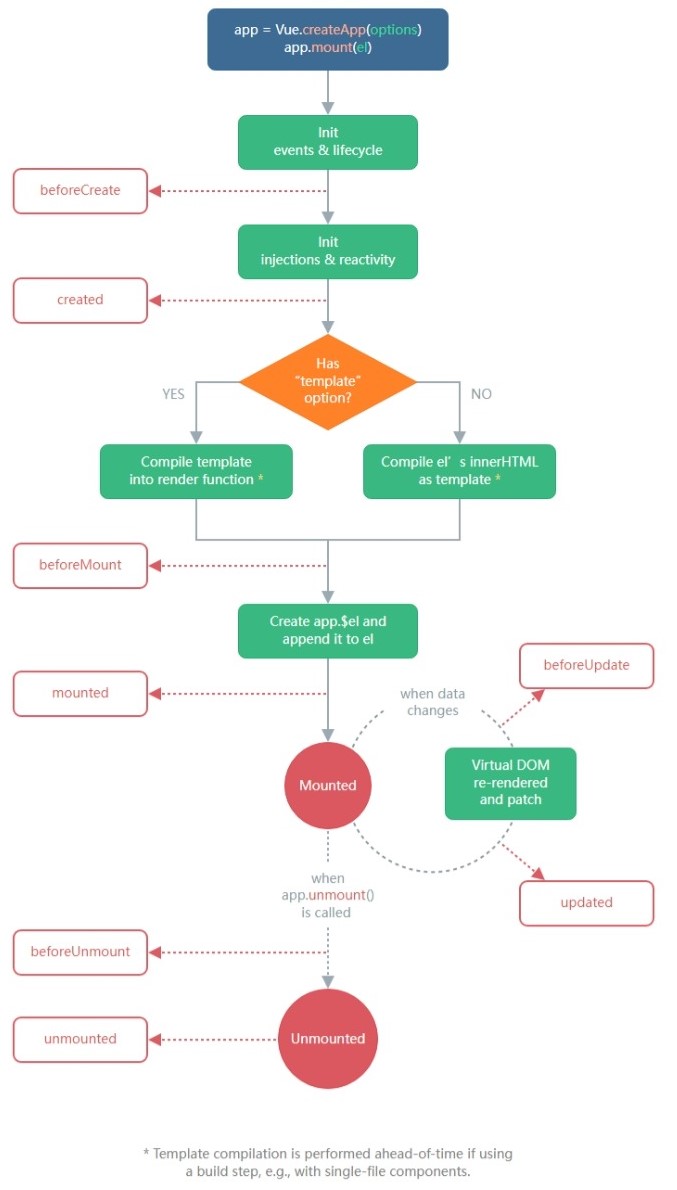
每个组件在被创建时都要经过一系列的初始化过程
例如:
设置数据监听 -> 编译模板 -> 将实例挂载到 DOM -> 在数据变化时更新 DOM 等。
同时在这个过程中也会运行一些叫做**生命周期钩子**的函数,这给了用户在不同阶段添加自己的代码的机会。
创建项目
1
2
3
4
# npm6.+
npm init vite@latest vue3 --template vue
# npm7.+
npm init vite@latest vue3 -- --template vue
下载依赖
npm i
在app.vue文件中引入各个组件
1
2
3
4
5
6
7
8
9
10
<script setup>
import Demo01 from "./components/Demo01.vue";
</script>
<template>

<Demo01></Demo01>

</template>
<style>

</style>
beforeCreate
-
类型:
Function -
详细:
在实例初始化**之后**、进行数据侦听和事件/侦听器的配置**之前**同步调用。所有data中的数据不能调用。
- 实例
1
2
3
4
5
6
7
8
9
10
11
12
13
14
15
16
17
18
19
20
21
22
<script>
export default {
  data() {
    return {
      a: "默认值",
    };
  },
  methods: {
    test: () => console.log("test"),
  },
  beforeCreate() {
    // this?.test() // ypeError: this.test is not a function
    console.log("beforeCreate在vue对象创建之前", "a =", this?.a); // a = undefined
  },
};
</script>
<template>

<p>VUE 生命周期钩子</p>

</template>
<style scoped></style>
created
-
类型:
Function -
详细:
在实例创建完成后被立即同步调用。在这一步中,实例已完成对选项的处理,意味着以下内容已被配置完毕:数据侦听、计算属性、方法、事件/侦听器的回调函数。然而,挂载阶段还没开始,且 $el property 目前尚不可用。
- 实例:
1
2
3
4
5
6
7
8
9
10
11
12
13
14
15
16
17
18
19
20
21
22
23
24
25
26
<script>
export default {
  data() {
    return {
      a: "默认值",
    };
  },
  methods: {
    test: () => console.log("test"),
  },
  beforeCreate() {
    // this?.test() // ypeError: this.test is not a function
    console.log("beforeCreate在vue对象创建之前", "a =", this?.a); // a = undefined
  },
  created() {
    this?.test() // 正常使用
    console.log("created在vue对象创建之后", "a =", this?.a); // 正常使用
  },
};
</script>
<template>

<p>VUE 生命周期钩子</p>

</template>
<style scoped></style>
beforeMount
-
类型:
Function -
详细:
在挂载开始之前被调用:相关的 render 函数首次被调用。将模板解析成渲染函数,准备渲染到页面上
该钩子在服务器端渲染期间不被调用。
- 实例:
1
2
3
4
5
6
7
8
9
10
11
12
13
14
15
16
17
18
19
20
21
22
23
24
25
26
27
28
29
30
<script>
export default {
  data() {
    return {
      a: "默认值",
    };
  },
  methods: {
    test: () => console.log("test"),
  },
  beforeCreate() {
    // this?.test() // ypeError: this.test is not a function
    console.log("beforeCreate在vue对象创建之前", "a =", this?.a); // a = undefined
  },
  created() {
    this?.test() // 正常使用
    console.log("created在vue对象创建之后", "a =", this?.a); // 正常使用
  },
  beforeMount(){
    this.a = 'beforeMount'
    console.log("beforeMount在vue渲染页面之前"); // 正常使用
  }
};
</script>
<template>

<p>VUE 生命周期钩子</p>

</template>
<style scoped></style>
mounted
-
类型:
Function -
详细:
在实例挂载完成后被调用,这时候传递给 app.mount 的元素已经被新创建的 vm.$el 替换了。如果根实例被挂载到了一个文档内的元素上,当 mounted 被调用时, vm.$el 也会在文档内。
注意 mounted 不会保证所有的子组件也都被挂载完成。如果你希望等待整个视图都渲染完毕,可以在 mounted 内部使用 vm.$nextTick:
- 实例:
1
2
3
4
5
6
7
8
9
10
11
12
13
14
15
16
17
18
19
20
21
22
23
24
25
26
27
28
29
30
31
32
33
34
35
36
<script>
export default {
  data() {
    return {
      a: "默认值",
    };
  },
  methods: {
    test: () => console.log("test"),
  },
  beforeCreate() {
    // this?.test() // ypeError: this.test is not a function
    console.log("beforeCreate在vue对象创建之前", "a =", this?.a); // a = undefined
  },
  created() {
    this?.test() // 正常使用
    console.log("created在vue对象创建之后", "a =", this?.a); // 正常使用
  },
  beforeMount(){
    this.a = 'beforeMount'
    console.log("beforeMount在vue渲染页面之前");
  },
  mounted() {
    console.log("mounted在vue渲染页面之后");
    this.$nextTick(function () {
      // 仅在整个视图都被渲染之后才会运行的代码
    })
  }
};
</script>
<template>

<p>VUE 生命周期钩子</p>

</template>
<style scoped></style>
beforeUpdate
-
类型:
Function -
详细:
在数据发生改变后,DOM 被更新之前被调用。这里适合在现有 DOM 将要被更新之前访问它,比如移除手动添加的事件监听器。
该钩子在服务器端渲染期间不被调用,因为只有初次渲染会在服务器端进行。
- 实例:
1
2
3
4
5
6
7
8
9
10
11
12
13
14
15
16
17
18
19
20
21
22
23
24
25
26
27
28
29
30
31
32
33
34
35
36
37
38
39
40
41
<script>
export default {
  data() {
    return {
      a: "默认值",
    };
  },
  methods: {
    test: () => console.log("test"),
  },
  beforeCreate() {
    // this?.test() // ypeError: this.test is not a function
    console.log("beforeCreate在vue对象创建之前", "a =", this?.a); // a = undefined
  },
  created() {
    this?.test() // 正常使用
    console.log("created在vue对象创建之后", "a =", this?.a); // 正常使用
  },
  beforeMount(){
    this.a = 'beforeMount'
    console.log("beforeMount在vue渲染页面之前");
  },
  mounted() {
    console.log("mounted在vue渲染页面之后");
    this.$nextTick(function () {
      // 仅在整个视图都被渲染之后才会运行的代码
    })
  },
  beforeUpdate(){
    console.log("beforeUpdate在vue组件页面每次有数据修改之前");
  }
};
</script>
<template>

<p>VUE 生命周期钩子</p>

<p>修改输入框值,触发Update事件</p>

<input type="text" v-model="a">

</template>
<style scoped></style>
updated
-
类型:
Function -
详细:
在数据更改导致的虚拟 DOM 重新渲染和更新完毕之后被调用。
当这个钩子被调用时,组件 DOM 已经更新,所以你现在可以执行依赖于 DOM 的操作。然而在大多数情况下,你应该避免在此期间更改状态。如果要相应状态改变,通常最好使用计算属性或侦听器取而代之。
注意,updated 不会保证所有的子组件也都被重新渲染完毕。如果你希望等待整个视图都渲染完毕,可以在 updated 内部使用 vm.$nextTick:
该钩子在服务器端渲染期间不被调用。
- 实例:
1
2
3
4
5
6
7
8
9
10
11
12
13
14
15
16
17
18
19
20
21
22
23
24
25
26
27
28
29
30
31
32
33
34
35
36
37
38
39
40
41
42
43
44
45
46
47
<script>
export default {
  data() {
    return {
      a: "默认值",
    };
  },
  methods: {
    test: () => console.log("test"),
  },
  beforeCreate() {
    // this?.test() // ypeError: this.test is not a function
    console.log("beforeCreate在vue对象创建之前", "a =", this?.a); // a = undefined
  },
  created() {
    this?.test() // 正常使用
    console.log("created在vue对象创建之后", "a =", this?.a); // 正常使用
  },
  beforeMount(){
    this.a = 'beforeMount'
    console.log("beforeMount在vue渲染页面之前");
  },
  mounted() {
    console.log("mounted在vue渲染页面之后");
    this.$nextTick(function () {
      // 仅在整个视图都被渲染之后才会运行的代码
    })
  },
  beforeUpdate(){
    console.log("beforeUpdate在vue组件页面每次有数据修改之前");
  },
  updated() {
    console.log("updated在vue组件页面每次有数据修改之后");
    this.$nextTick(function () {
      // 仅在整个视图都被重新渲染完毕之后才会运行的代码
    })
  }
};
</script>
<template>

<p>VUE 生命周期钩子</p>

<p>修改输入框值,触发Update事件</p>

<input type="text" v-model="a">

</template>
<style scoped></style>
beforeUnmount
-
类型:
Function -
详细:
在卸载组件实例之前调用。在这个阶段,实例仍然是完全正常的。通常用于清除 setTimeout 、setintval、addEventlistener等
该钩子在服务器端渲染期间不被调用。
- 实例:
1
2
3
4
5
6
7
8
9
10
11
12
13
14
15
16
17
18
19
20
<script>
export default {
  beforeMount(){
    timer = setInterval(() => {count.value++}, 1000)
    window.addEventListener('resize', onResize)
  },
  beforeUnmount(){
    clearInterval(timer)
    window.removeEventListener('resize', onResize)
  }
};
</script>
<template>

<p>VUE 生命周期钩子</p>

<p>修改输入框值,触发Update事件</p>

<input type="text" v-model="a">

</template>
<style scoped></style>
unmounted
-
类型:
Function -
详细:
卸载组件实例后调用。调用此钩子时,组件实例的所有指令都被解除绑定,所有事件侦听器都被移除,所有子组件实例被卸载。
该钩子在服务器端渲染期间不被调用。
activated
-
类型:
Function -
详细:
被 keep-alive 缓存的组件激活时调用。在一个多标签的界面中使用 is attribute 来切换不同的组件的时候被调用
1
2
vue-html
  <component :is="currentTabComponent"></component>
该钩子在服务器端渲染期间不被调用。
- 实例:
C1
1
2
3
4
5
6
7
8
9
10
11
12
13
<script>
export default{
  activated(){
    console.log("activated在C1组件被激活");
  }
}
</script>
<template>

<p>测试组件1</p>

</template>
<style scoped></style>
C2
1
2
3
4
5
6
7
8
9
10
11
12
13
<script>
export default{
  activated(){
    console.log("activated在C2组件被激活");
  }
}
</script>
<template>

<p>测试组件2</p>

</template>
<style scoped></style>
Demo01
1
2
3
4
5
6
7
8
9
10
11
12
13
14
15
16
17
18
19
20
21
22
23
24
25
26
27
28
29
30
31
32
33
34
35
36
37
38
39
40
41
42
43
44
45
46
47
48
49
50
51
52
53
54
55
56
57
58
59
60
<script>
import C1 from "./C1.vue";
import C2 from "./C2.vue";
export default {
  data() {
    return {
      a: "默认值",
      cname: 'C1'
    };
  },
  methods: {
    test: () => console.log("test"),
  },
  components:{
    C1,C2
  },
  beforeCreate() {
    // this?.test() // ypeError: this.test is not a function
    console.log("beforeCreate在vue对象创建之前", "a =", this?.a); // a = undefined
  },
  created() {
    this?.test() // 正常使用
    console.log("created在vue对象创建之后", "a =", this?.a); // 正常使用
  },
  beforeMount(){
    this.a = 'beforeMount'
    console.log("beforeMount在vue渲染页面之前");
  },
  mounted() {
    console.log("mounted在vue渲染页面之后");
    this.$nextTick(function () {
      // 仅在整个视图都被渲染之后才会运行的代码
    })
  },
  beforeUpdate(){
    console.log("beforeUpdate在vue组件页面每次有数据修改之前");
  },
  updated() {
    console.log("updated在vue组件页面每次有数据修改之后");
    this.$nextTick(function () {
      // 仅在整个视图都被重新渲染完毕之后才会运行的代码
    })
  }
};
</script>
<template>

<p>VUE 生命周期钩子</p>

<p>修改输入框值,触发Update事件</p>

<input type="text" v-model="a">

<div>

<button @click="cname = 'C1'">切换组件1</button>

<button @click="cname = 'C2'">切换组件2</button>

</div>

<keep-alive>

<component :is="cname"></component>

</keep-alive>

</template>
<style scoped></style>
deactivated
-
类型:
Function -
详细:
被 keep-alive 缓存的组件失活时调用。
该钩子在服务器端渲染期间不被调用。
- 实例:
C1
1
2
3
4
5
6
7
8
9
10
11
12
13
14
15
16
<script>
export default{
  activated(){
    console.log("activated在C1组件被激活");
  },
  deactivated(){
    console.log("deactivated在C1组件失活时");
  }
}
</script>
<template>

<p>测试组件1</p>

</template>
<style scoped></style>
C2
1
2
3
4
5
6
7
8
9
10
11
12
13
14
15
16
<script>
export default{
  activated(){
    console.log("activated在C2组件被激活");
  },
  deactivated(){
    console.log("deactivated在C2组件失活时");
  }
}
</script>
<template>

<p>测试组件2</p>

</template>
<style scoped></style>
所有生命周期钩子的 this 上下文将自动绑定至实例中,因此你可以访问 data、computed 和 methods。这意味着**你不应该使用箭头函数来定义一个生命周期方法** (例如 created: () => this.fetchTodos())。因为箭头函数绑定了父级上下文,所以 this 不会指向预期的组件实例,并且this.fetchTodos 将会是 undefined。
如:
1
2
3
4
5
6
7
8
9
Vue.createApp({
  data() {
    return { count: 1}
  },
  created() {
    // `this` 指向 vm 实例
    console.log('count is: ' + this.count) // => "count is: 1"
  }
})
VUE Setup函数
setup 选项在组件创建**之前**执行。 setup 是围绕 beforeCreate 和 created 生命周期钩子运行的。执行 setup 时,组件实例尚未被创建。**无法访问**以下组件选项:
-
this -
data computedmethods
setup 函数时,它将接收两个参数:
propscontext
Props
setup 函数中的第一个参数是 props。正如在一个标准组件中所期望的那样,setup 函数中的 props 是响应式的,当传入新的 prop 时,它将被更新。
1
2
3
4
5
6
7
8
export default {
  props: {
    title: String
  },
  setup(props) {
    console.log(props.title)
  }
}
Context
传递给 setup 函数的第二个参数是 context。context 是一个普通的 JavaScript 对象,它暴露组件的三个 property:
attrs、slots 和 emit 分别等同于 $attrs、$slots 和 $emit 实例 property。
1
2
3
4
5
6
7
8
9
10
11
12
export default {
  setup(props, context) {
    // Attribute (非响应式对象)
    console.log(context.attrs)
<span class="hljs-comment">// 插槽 (非响应式对象)</span>
<span class="hljs-built_in">console</span>.log(context.slots)

<span class="hljs-comment">// 触发事件 (方法)</span>
<span class="hljs-built_in">console</span>.log(context.emit)

}

}
context 是一个普通的 JavaScript 对象,也就是说,它不是响应式的,这意味着你可以安全地对 context 使用 ES6 解构。
1
2
3
4
5
6
// MyBook.vue
export default {
  setup(props, { attrs, slots, emit }) {
    ...
  }
}
script setup
<script setup> 是在单文件组件 (SFC) 中使用组合式 API 的编译时语法糖。
要使用这个语法,需要将 setup 属性添加到 <script> 代码块上:
1
2
3
4
5
6
7
8
9
10
11
12
13
<script setup>
// 变量
const msg = 'Hello!'
// 函数

function log() {

console.log(msg)

}

</script>
<template>

<div @click="log">{{ msg }}</div>

</template>
里面的代码会被编译成组件 setup() 函数的内容。这意味着与普通的 <script> 只在组件被首次引入的时候执行一次不同,<script setup> 中的代码会在**每次组件实例被创建的时候执行**。
import 导入的内容也会以同样的方式暴露。意味着可以在模板表达式中直接使用导入的 helper 函数,并不需要通过 methods 选项来暴露它:
1
2
3
4
5
6
7
<script setup>
import { capitalize } from './helpers'
</script>
<template>

<div>{{ capitalize('hello') }}</div>

</template>
<script setup> 范围里的值也能被直接作为自定义组件的标签名使用:将 组件看做被一个变量所引用。
1
2
3
4
5
6
7
<script setup>
import MyComponent from './MyComponent.vue'
</script>
<template>

<MyComponent />

</template>
可以使用带点的组件标记,例如 <Foo.Bar> 来引用嵌套在对象属性中的组件。这在需要从单个文件中导入多个组件的时候非常有用:
1
2
3
4
5
6
7
8
9
<script setup>
import * as Form from './form-components'
</script>
<template>

<Form.Input>

<Form.Label>label</Form.Label>

</Form.Input>

</template>
useSlots 和 useAttrs
在 <script setup> 使用 slots 和 attrs 的情况应该是很罕见的,因为可以在模板中通过 $slots 和 $attrs 来访问它们。在你的确需要使用它们的罕见场景中,可以分别用 useSlots 和 useAttrs 两个辅助函数:
1
2
3
4
5
6
<script setup>
import { useSlots, useAttrs } from 'vue'
const slots = useSlots()

const attrs = useAttrs()

</script>
生命周期钩子
可以通过在生命周期钩子前面加上 “on” 来访问组件的生命周期钩子。
下表包含如何在 setup () 内部调用生命周期钩子:
| 选项式 API | Hook inside setup |
|---|---|
beforeCreate |
Not needed* |
created |
Not needed* |
beforeMount |
onBeforeMount |
mounted |
onMounted |
beforeUpdate |
onBeforeUpdate |
updated |
onUpdated |
beforeUnmount |
onBeforeUnmount |
unmounted |
onUnmounted |
errorCaptured |
onErrorCaptured |
renderTracked |
onRenderTracked |
renderTriggered |
onRenderTriggered |
activated |
onActivated |
deactivated |
onDeactivated |
这些函数接受一个回调函数,当钩子被组件调用时将会被执行:
如:
1
2
3
4
5
6
7
export default {
  setup() {
    onMounted(() => {
      console.log('Component is mounted!')
    })
  }
}
defineProps 和 defineEmits
在 <script setup> 中必须使用 defineProps 和 defineEmits API 来声明 props 和 emits ,它们在 <script setup> 中直接用:
1
2
3
4
5
6
7
8
<script setup>
const props = defineProps({
  foo: String
})
const emit = defineEmits(['change', 'delete'])

// setup code

</script>
特征:
defineProps和defineEmits都是只在<script setup>中才能使用的**编译器宏**。他们不需要导入且会随着<script setup>处理过程一同被编译掉。defineProps接收与props选项相同的值,defineEmits也接收emits选项同的值。defineProps和defineEmits在选项传入后,会提供恰当的类型推断。- 传入到
defineProps和defineEmits的选项会从 setup 中提升到模块的范围。因此,传入的选项不能引用在 setup 范围中声明的局部变量。这样做会引起编译错误。但是,它*可以*引用导入的绑定,因为它们也在模块范围内。
在 setup() 内部,this 不是该活跃实例的引用,因为 setup() 是在解析其它组件选项之前被调用的,所以 setup() 内部的 this 的行为与其它选项中的 this 完全不同。这使得 setup() 在和其它选项式 API 一起使用时可能会导致混淆。
为了避免混淆,建议在setup函数中使用**生命周期钩子**,而不是直接使用生命周期函数。
expose
在 Vue 3.2 中新增的 expose 是一个函数,该函数允许通过公共组件实例暴露特定的 property。默认情况下,通过 ref、$parent 或 $root 获取的公共实例等同于模板所使用的内部实例。调用 expose 将以指定的 property 创建一个独立的实例:
1
2
3
4
5
6
7
8
9
10
11
12
13
14
15
const MyComponent = {
  setup(props, { expose }) {
    const count = ref(0)
    const reset = () => count.value = 0
    const increment = () => count.value++
<span class="hljs-comment">// 只有 reset 能被外部访问,例如通过 $refs</span>
expose({
  reset
})

<span class="hljs-comment">// 在组件内部,模板可以访问 count 和 increment</span>
<span class="hljs-keyword">return</span> { count, increment }

}

}
defineExpose
使用 <script setup> 的组件是**默认关闭**的,也即通过模板 ref 或者 $parent 链获取到的组件的公开实例,不会暴露任何在 <script setup> 中声明的绑定。
为了在 <script setup> 组件中明确要暴露出去的属性,使用 defineExpose 编译器宏:
1
2
3
4
5
6
7
8
9
10
11
<script setup>
import { ref } from 'vue'
const a = 1

const b = ref(2)
defineExpose({

a,

b

})

</script>
当父组件通过模板 ref 的方式获取到当前组件的实例,获取到的实例会像这样 { a: number, b: number } (ref 会和在普通实例中一样被自动解包)
VUE 组合式 Provide / Inject
在 setup() 中Provide / Inject也需要改变写法。
Provide
在 setup() 中使用 provide 时,我们首先从 vue 显式导入 provide 方法。这使我们能够调用 provide 来定义每个 property。
provide 函数允许你通过两个参数定义 property:
- name (
<String>类型) - value
如:
1
2
3
4
5
6
7
8
9
10
11
12
13
14
15
16
17
18
19
20
21
<template>
  <MyMarker />
</template>
<script>

import { provide } from 'vue'

import MyMarker from './MyMarker.vue'
export default {

components: {

MyMarker

},

setup() {

provide('location', 'North Pole') // 给子组件提供值

provide('geolocation', { // 给子组件提供值

longitude: 90,

latitude: 135

})

}

}

</script>
inject
在 setup() 中使用 inject 时,也需要从 vue 显式导入。导入以后,我们就可以调用它来定义暴露给我们的组件方式。
inject 函数有两个参数:
- 要 inject 的 property 的 name
- 默认值 (**可选**)
如:
1
2
3
4
5
6
7
8
9
10
11
12
13
14
15
<script>
import { inject } from 'vue'
export default {

setup() {

const userLocation = inject('location', '默认值') // 子组件获取值

const userGeolocation = inject('geolocation') // 子组件获取值
<span class="hljs-keyword">return</span> {
  userLocation,
  userGeolocation
}

}

}

</script>
VUE 响应式函数
响应式和组合式时两个完全不同的概念。响应式指的是数据变化会动态的变更相关的一切特性,一般用于将普通非响应式变量转变成响应式的。
ref
在 Vue 3.0 中,可以通过一个新的 ref 函数,用于将普通变量编程响应式的变量(即对象),并使任何响应式变量在任何地方起作用,如下所示:
1
2
3
import { ref } from 'vue'
const counter = ref(0)
ref 实际上是将接收参数包裹在一个带有 value 属性的对象中,然后可以使用该 value 属性访问或更改响应式变量的值:
1
2
3
4
5
6
7
8
9
import { ref } from 'vue'
const counter = ref(0)
console.log(counter) // { value: 0 }

console.log(counter.value) // 0
counter.value++

console.log(counter.value) // 1
将值封装在一个对象中,看似没有必要,但为了保持 JavaScript 中不同数据类型的行为统一,这是必须的。这是因为在 JavaScript 中,Number 或 String 等基本类型是通过值而非引用传递的。
这个特性就像一切皆对象,面向对象编程。
(TS语法)有时我们可能需要为 ref 的内部值指定复杂类型。想要简洁地做到这一点,我们可以在调用 ref 覆盖默认推断时传递一个泛型参数:
1
2
3
const foo = ref<string | number>('foo') // foo 的类型:Ref<string | number>
foo.value = 123 // ok!
unref
unref 用户获取响应式变量的普通值,如果参数是一个 ref,则返回内部值,否则返回参数本身。
相当于是 val = isRef(val) ? val.value : val 的语法糖函数。
所以 isRef 函数用于判断变量是否是响应式变量
toRef
可以用来为源响应式对象上的某个 属性新创建一个 ref。然后,ref 可以被传递,它会保持对其源 property 的响应式连接。也就是还是指针,一改全改。
1
2
3
4
5
6
7
8
9
10
11
12
const state = reactive({
  foo: 1,
  bar: 2
})
const fooRef = toRef(state, 'foo')
fooRef.value++

console.log(state.foo) // 2
state.foo++

console.log(fooRef.value) // 3
当你要将 prop 的 ref 传递给复合函数时,toRef 很有用:
1
2
3
4
5
export default {
  setup(props) {
    useSomeFeature(toRef(props, 'foo'))
  }
}
即使源 属性不存在,toRef 也会返回一个可用的 ref。这使得它在使用可选 prop 时特别有用。
toRefs
可以用来为源响应式对象上的 全部 属性新创建 ref。返回结果对象的每个 属性 都是指向原始对象相应 属性的 ref上,也就是还有响应式的特征。但是返回结果对象是普通对象,方便展开/解构
1
2
3
4
5
6
7
8
9
10
11
12
13
14
15
16
17
18
19
20
21
const state = reactive({
  foo: 1,
  bar: 2
})
const stateAsRefs = toRefs(state)

/*

stateAsRefs 的类型:
{

foo: Ref<number>,

bar: Ref<number>

}

*/
// ref 和原始 property 已经“链接”起来了

state.foo++

console.log(stateAsRefs.foo.value) // 2
stateAsRefs.foo.value++

console.log(state.foo) // 3
当从组合式函数返回响应式对象时,toRefs 非常有用,这样组件就可以在不丢失响应性的情况下对返回的对象进行解构/展开:
1
2
3
4
5
6
7
8
9
10
11
12
13
14
15
16
17
18
19
20
21
22
23
function useFeatureX() {
  const state = reactive({
    foo: 1,
    bar: 2
  })
// 操作 state 的逻辑
// 返回时转换为ref

return toRefs(state)

}
export default {

setup() {

// 可以在不失去响应性的情况下解构

const { foo, bar } = useFeatureX()
<span class="hljs-keyword">return</span> {
  foo,
  bar
}

}

}
toRefs 只会为源对象中包含的 property 生成 ref。如果要为特定的 property 创建 ref,则应当使用 toRef
reactive
reactive 用于将对象中的每一个属性都变成响应式的。响应式转换是“深层”的——它影响所有嵌套 property。
如果源对象本来就是响应式的,reactive 将返回响应式对象的响应式副本,同时维持每个 ref 属性的响应性。
1
2
3
4
5
6
7
8
9
10
11
12
13
14
15
const count = ref(1)
const obj = reactive({ count })
// ref 会被解包

console.log(obj.count === count.value) // true
// 它会更新 obj.count

count.value++

console.log(count.value) // 2

console.log(obj.count) // 2
// 它也会更新 count ref

obj.count++

console.log(obj.count) // 3

console.log(count.value) // 3
isReactive检查对象是否是由 reactive 创建的响应式代理。
1
2
3
4
5
6
7
8
9
import { reactive, isReactive } from 'vue'
export default {
  setup() {
    const state = reactive({
      name: 'John'
    })
    console.log(isReactive(state)) // -> true
  }
}
readonly
接受一个对象 (响应式或纯对象) 或 ref 并返回原始对象的只读代理。只读代理是深层的:任何被访问的嵌套 property 也是只读的。
1
2
3
4
5
6
7
8
9
10
11
12
13
14
const original = reactive({ count: 0 })
const copy = readonly(original)
watchEffect(() => {

// 用于响应性追踪

console.log(copy.count)

})
// 变更 original 会触发依赖于副本的侦听器

original.count++
// 变更副本将失败并导致警告

copy.count++ // 警告!
isReadonly检查对象是否是由 readonly 创建的只读代理。
toRaw
返回 reactive 或 readonly始对象。这是一个“逃生舱”,可用于临时读取数据而无需承担代理访问/跟踪的开销,也可用于写入数据而避免触发更改。**不**建议保留对原始对象的持久引用。请谨慎使用。
1
2
3
4
const foo = {}
const reactiveFoo = reactive(foo)
console.log(toRaw(reactiveFoo) === foo) // true
markRaw
标记一个对象,使其永远不会转换为 proxy。返回对象本身。
1
2
3
4
5
6
const foo = markRaw({})
console.log(isReactive(reactive(foo))) // false
// 嵌套在其他响应式对象中时也可以使用

const bar = reactive({ foo })

console.log(isReactive(bar.foo)) // false
computed
computed()函数接受一个 getter 函数,并根据 getter 的返回值返回一个不可变的响应式 ref 对象。
1
2
3
4
5
6
const count = ref(1)
const plusOne = computed(() => count.value + 1)
console.log(plusOne.value) // 2
plusOne.value++ // 错误
或者,接受一个具有 get 和 set 函数的对象,用来创建可变的 ref 对象。
1
2
3
4
5
6
7
8
9
10
const count = ref(1)
const plusOne = computed({
  get: () => count.value + 1,
  set: val => {
    count.value = val - 1
  }
})
plusOne.value = 1

console.log(count.value) // 0
watchEffect
watchEffect() 函数立即执行传入其中的一个函数,同时响应式追踪其依赖,并在其依赖变更时重新运行该函数。
1
2
3
4
5
6
7
8
9
const count = ref(0)
watchEffect(() => console.log(count.value))

// -> logs 0
setTimeout(() => {

count.value++

// -> logs 1

}, 100)
watch
watch API 侦听特定的数据源,并在单独的回调函数中执行处理函数。默认情况下,它也是惰性的——即回调仅在侦听源发生变化时被调用。
- 与 watchEffect 相比,
watch的特征: - 惰性地执行副作用;
- 更具体地说明应触发侦听器重新运行的状态;
- 能够访问被侦听状态的先前值和当前值。
侦听单一源
语法
1
2
3
watch(变量, (newValue, oldValue) => {
  /* ... */
})
侦听器数据源可以是一个具有返回值的 getter 函数,也可以直接是一个 ref:
1
2
3
4
5
6
7
8
9
10
11
12
13
14
// 侦听一个 getter
const state = reactive({ count: 0 })
watch(
  () => state.count,
  (count, prevCount) => {
    /* ... */
  }
)
// 直接侦听一个 ref

const count = ref(0)

watch(count, (count, prevCount) => {

/* ... */

})
侦听多个源
侦听器还可以使用数组以同时侦听多个源:
1
2
3
watch([foo, bar], ([newFoo, newBar], [oldFoo, oldar]) => {
  /* ... */
})
停止侦听
当 watchEffect 在组件的 setup() 函数或生命周期钩子被调用时,侦听器会被链接到该组件的生命周期,并在组件卸载时自动停止。
在一些情况下,也可以显式调用返回值以停止侦听:
1
2
3
4
5
6
const stop = watchEffect(() => {
  /* ... */
})
// later

stop()
听响应式对象
使用侦听器来比较一个数组或对象的值,这些值是响应式的,要求它有一个由值构成的副本。
1
2
3
4
5
6
7
8
9
10
const numbers = reactive([1, 2, 3, 4])
watch(

() => [...numbers],

(numbers, prevNumbers) => {

console.log(numbers, prevNumbers)

}

)
numbers.push(5) // logs: [1,2,3,4,5] [1,2,3,4]
尝试检查深度嵌套对象或数组中的 property 变化时,需要将 deep 选项设置为 true。
1
2
3
4
5
6
7
8
9
10
11
12
13
14
15
16
17
18
19
20
21
22
23
const state = reactive({
  id: 1,
  attributes: {
    name: '',
  }
})
watch(

() => state,

(state, prevState) => {

console.log('not deep', state.attributes.name, prevState.attributes.name)

}

)
watch(

() => state,

(state, prevState) => {

console.log('deep', state.attributes.name, prevState.attributes.name)

},

{ deep: true }

)
state.attributes.name = 'Alex' // 日志: "deep" "Alex" "Alex"
作业
使用响应式API实现如下功能

使用vue实现如下动态分页

使用vue实现如下文件上传
</article>

 浙公网安备 33010602011771号