
20-前端核心技术-VUE高级组件
第20章-前端核心技术-VUE高级组件
学习目标
- 掌握VUE组件的使用
- 掌握VUE组件数据传递
重点难点 - 掌握VUE响应式API
重点
VUE 组件
组件(Component)是 Vue.js 最强大的功能之一。
组件就是一个特定功能的html、css、js组合,可以嵌入一个vue文件中,也可以在独立的vue文件中。
组件需要创建出来,并且引入到 vue 对象实例中中才能使用。创建组件的方法有:
- 全局注册
- 局部注册
推荐遵循 W3C 规范来给自定义标签命名:
- 全部小写
- 包含连字符 (及:即有多个单词与连字符符号连接)
这样会帮助我们避免与当前以及未来的 HTML 元素发生冲突。
全局组件
直接通过 全局 app 注册组件,也就是说它们在注册之后可以用在任何新创建的组件实例的模板中。
案例01
1
2
3
4
5
6
7
8
9
10
11
12
13
14
15
16
17
18
19
20
21
22
23
24
25
26
27
28
29
30
31
32
33
34
35
36
37
38
39
<!DOCTYPE html>
<html>
<span class="hljs-tag"><<span class="hljs-title">head</span>></span>
<span class="hljs-tag"><<span class="hljs-title">meta</span> <span class="hljs-attribute">charset</span>=<span class="hljs-value">"UTF-8"</span> /></span>
<span class="hljs-tag"><<span class="hljs-title">title</span>></span><span class="hljs-tag"></<span class="hljs-title">title</span>></span>
<span class="hljs-tag"><<span class="hljs-title">script</span> <span class="hljs-attribute">src</span>=<span class="hljs-value">"../js/vue.min.js"</span> <span class="hljs-attribute">type</span>=<span class="hljs-value">"text/javascript"</span> <span class="hljs-attribute">charset</span>=<span class="hljs-value">"utf-8"</span>></span><span class="javascript"></span><span class="hljs-tag"></<span class="hljs-title">script</span>></span>
<span class="hljs-tag"></<span class="hljs-title">head</span>></span>
<span class="hljs-tag"><<span class="hljs-title">body</span>></span>
<span class="hljs-tag"><<span class="hljs-title">div</span> <span class="hljs-attribute">id</span>=<span class="hljs-value">"app"</span>></span>
<span class="hljs-tag"><<span class="hljs-title">component-a</span>></span><span class="hljs-tag"></<span class="hljs-title">component-a</span>></span>
<span class="hljs-tag"><<span class="hljs-title">component-b</span>></span><span class="hljs-tag"></<span class="hljs-title">component-b</span>></span>
<span class="hljs-tag"><<span class="hljs-title">component-c</span>></span><span class="hljs-tag"></<span class="hljs-title">component-c</span>></span>
<span class="hljs-tag"></<span class="hljs-title">div</span>></span>
<span class="hljs-tag"></<span class="hljs-title">body</span>></span>
<span class="hljs-tag"><<span class="hljs-title">script</span> <span class="hljs-attribute">type</span>=<span class="hljs-value">"text/javascript"</span>></span><span class="javascript">
<span class="hljs-keyword">const</span> App = {}
<span class="hljs-keyword">const</span> app = Vue.createApp(App)
<span class="hljs-comment">// 去找你局组件在任何页面使用的时候直接使用,无需额外引入</span>
<span class="hljs-comment">// 组件需要在 mount 渲染之前引入</span>
app.component(<span class="hljs-string">'component-a'</span>, {
template: `<h1>组件<span class="hljs-number">1</span><<span class="hljs-regexp">/h1>`,
})
app.component('component-b', {
template: `<h2>组件2</</span>h2>`,
})
app.component(<span class="hljs-string">'component-c'</span>, {
template: `<h3>组件<span class="hljs-number">3</span><<span class="hljs-regexp">/h3>`,
})
/</span><span class="hljs-regexp">/ 组件加载后再渲染页面
app.mount("#app")
</span></span><span class="hljs-tag"></<span class="hljs-title">script</span>></span>
</html>
而且,在所有子组件中也是如此,也就是说这三个组件在*各自内部*也都可以相互使用。
案例02
1
2
3
4
5
6
7
8
9
10
11
12
13
14
15
16
17
18
19
20
21
22
23
24
25
26
27
28
29
30
31
32
33
34
35
36
37
38
39
40
41
42
43
44
45
46
47
<!DOCTYPE html>
<html>
<span class="hljs-tag"><<span class="hljs-title">head</span>></span>
<span class="hljs-tag"><<span class="hljs-title">meta</span> <span class="hljs-attribute">charset</span>=<span class="hljs-value">"UTF-8"</span> /></span>
<span class="hljs-tag"><<span class="hljs-title">title</span>></span><span class="hljs-tag"></<span class="hljs-title">title</span>></span>
<span class="hljs-tag"><<span class="hljs-title">script</span> <span class="hljs-attribute">src</span>=<span class="hljs-value">"../js/vue.min.js"</span> <span class="hljs-attribute">type</span>=<span class="hljs-value">"text/javascript"</span> <span class="hljs-attribute">charset</span>=<span class="hljs-value">"utf-8"</span>></span><span class="javascript"></span><span class="hljs-tag"></<span class="hljs-title">script</span>></span>
<span class="hljs-tag"></<span class="hljs-title">head</span>></span>
<span class="hljs-tag"><<span class="hljs-title">body</span>></span>
<span class="hljs-tag"><<span class="hljs-title">div</span> <span class="hljs-attribute">id</span>=<span class="hljs-value">"app"</span>></span>
<span class="hljs-tag"><<span class="hljs-title">component-a</span>></span><span class="hljs-tag"></<span class="hljs-title">component-a</span>></span>
<span class="hljs-tag"><<span class="hljs-title">component-b</span>></span><span class="hljs-tag"></<span class="hljs-title">component-b</span>></span>
<span class="hljs-tag"><<span class="hljs-title">component-c</span>></span><span class="hljs-tag"></<span class="hljs-title">component-c</span>></span>
<span class="hljs-tag"></<span class="hljs-title">div</span>></span>
<span class="hljs-tag"></<span class="hljs-title">body</span>></span>
<span class="hljs-tag"><<span class="hljs-title">script</span> <span class="hljs-attribute">type</span>=<span class="hljs-value">"text/javascript"</span>></span><span class="javascript">
<span class="hljs-keyword">const</span> App = {}
<span class="hljs-keyword">const</span> app = Vue.createApp(App)
<span class="hljs-comment">// 去找你局组件在任何页面使用的时候直接使用,无需额外引入</span>
<span class="hljs-comment">// 组件需要在 mount 渲染之前引入</span>
app.component(<span class="hljs-string">'component-a'</span>, {
template:
`
<h1>组件<span class="hljs-number">1</span><<span class="hljs-regexp">/h1>
<component-b></</span>component-b>
`,
})
app.component(<span class="hljs-string">'component-b'</span>, {
template:
`
<h2>组件<span class="hljs-number">2</span><<span class="hljs-regexp">/h2>
<component-c></</span>component-c>
`,
})
app.component(<span class="hljs-string">'component-c'</span>, {
template: `<h3>组件<span class="hljs-number">3</span><<span class="hljs-regexp">/h3>`,
})
/</span><span class="hljs-regexp">/ 组件加载后再渲染页面
app.mount("#app")
</span></span><span class="hljs-tag"></<span class="hljs-title">script</span>></span>
</html>
局部组件
全局注册往往是不够理想的。全局注册所有的组件意味着即便你已经不再使用其中一个组件了,它仍然会被包含在最终的构建结果中。这造成了用户下载的 JavaScript 的无谓的增加。
在这些情况下,你可以在子组件中通过普通对象定义组件,然后在组件的内部使用 components 选项中定义当前页面需要使用的组件
对于 components 对象中的每个 property 来说,其 property 名就是自定义元素的名字,其 property 值就是这个组件的选项对象。
如:
1
2
3
4
5
6
const app = Vue.createApp({
  components: {
    ComponentA, // 默认标签名 component-a
    'c-b': ComponentB // 自定义标签名c-b
  }
})
案例03
1
2
3
4
5
6
7
8
9
10
11
12
13
14
15
16
17
18
19
20
21
22
23
24
25
26
27
28
29
30
31
32
33
34
35
36
37
38
39
40
41
42
43
44
45
46
47
48
49
50
51
52
53
<!DOCTYPE html>
<html>
<span class="hljs-tag"><<span class="hljs-title">head</span>></span>
<span class="hljs-tag"><<span class="hljs-title">meta</span> <span class="hljs-attribute">charset</span>=<span class="hljs-value">"UTF-8"</span> /></span>
<span class="hljs-tag"><<span class="hljs-title">title</span>></span><span class="hljs-tag"></<span class="hljs-title">title</span>></span>
<span class="hljs-tag"><<span class="hljs-title">script</span> <span class="hljs-attribute">src</span>=<span class="hljs-value">"../js/vue.min.js"</span> <span class="hljs-attribute">type</span>=<span class="hljs-value">"text/javascript"</span> <span class="hljs-attribute">charset</span>=<span class="hljs-value">"utf-8"</span>></span><span class="javascript"></span><span class="hljs-tag"></<span class="hljs-title">script</span>></span>
<span class="hljs-tag"></<span class="hljs-title">head</span>></span>
<span class="hljs-tag"><<span class="hljs-title">body</span>></span>
<span class="hljs-tag"><<span class="hljs-title">div</span> <span class="hljs-attribute">id</span>=<span class="hljs-value">"app"</span>></span>
<span class="hljs-comment"><!-- componentA 默认转换成 component-a --></span>
<span class="hljs-tag"><<span class="hljs-title">component-a</span>></span><span class="hljs-tag"></<span class="hljs-title">component-a</span>></span>
<span class="hljs-comment"><!-- 如果自定义了组件的标签名则是由标签名 --></span>
<span class="hljs-tag"><<span class="hljs-title">c-b</span>></span><span class="hljs-tag"></<span class="hljs-title">c-b</span>></span>
<span class="hljs-tag"><<span class="hljs-title">component-c</span>></span><span class="hljs-tag"></<span class="hljs-title">component-c</span>></span>
<span class="hljs-tag"></<span class="hljs-title">div</span>></span>
<span class="hljs-tag"></<span class="hljs-title">body</span>></span>
<span class="hljs-tag"><<span class="hljs-title">script</span> <span class="hljs-attribute">type</span>=<span class="hljs-value">"text/javascript"</span>></span><span class="javascript">
<span class="hljs-comment">// 使用普通js对象定义组件</span>
componentA = {
template: `<h1>组件<span class="hljs-number">1</span><<span class="hljs-regexp">/h1>`,
}
componentB = {
template: `<h2>组件2</</span>h2>`,
}
<span class="hljs-comment">// C组件引用A\B组件</span>
componentC = {
template: `
<h3>组件<span class="hljs-number">3</span><<span class="hljs-regexp">/h3>
<component-b></</span>component-b>
<span class="xml"><span class="hljs-tag"><<span class="hljs-title">component-a</span>></span><span class="hljs-tag"></<span class="hljs-title">component-a</span>></span>
`,
components: {
componentA,
componentB,
}
}
const App = {
components: {
componentA, // 默认标签名 component-a
'c-b':componentB, // 自定义标签名c-b
componentC,
}
}
const app = Vue.createApp(App)
app.mount("#app")
</span></span><span class="hljs-tag"></<span class="hljs-title">script</span>></span>
</html>
但是,如果通过 Babel 和 webpack 使用 ES2015 模块,那么代码应该像这样:
1
2
3
4
5
6
7
8
import ComponentA from './ComponentA.vue'
export default {

components: {

ComponentA

}

// ...

}
注意:在 ES2015+ 中,在对象中放一个类似 ComponentA 的变量名其实是 ComponentA: ComponentA 的缩写,即这个变量名同时是:
- 用在模板中的自定义元素的名称
- 包含了这个组件选项的变量名
自定义属性 props
props可以理解为组件的自定义属性,就像html元素的属性一样,如<c-b xxx='yyy'>。
props的作用就是定义组件上的自定义属性,通常有两种写法:
(1)以字符串数组形式列出的 prop:
props: ['title', 'likes', 'isPublished', 'commentIds', 'author']
(2)指定的类型以对象形式列出 prop:
1
2
3
4
5
6
7
8
9
10
11
12
13
14
15
16
17
18
19
20
21
22
23
24
25
26
27
28
29
30
31
32
33
34
35
36
37
38
39
40
41
42
43
props: {
	// 基础的类型检查 (`null` 和 `undefined` 会通过任何类型验证)
	propA: Number,
	// 多个可能的类型
	propB: [String, Number],
	callback: Function,
	contactsPromise: Promise, // 或任何其他构造函数
	// 必填的字符串
	propC: {
		type: String,
		required: true
	},
	// 带有默认值的数字
	propD: {
		type: Number,
		default: 100
	},
	// 带有默认值的对象
	propE: {
		type: Object,
		// 对象或数组默认值必须从一个工厂函数获取
		default () {
			return {
				message: 'hello'
			}
		}
	},
	// 自定义验证函数
	propF: {
		validator(value) {
			// 这个值必须匹配下列字符串中的一个
			return ['success', 'warning', 'danger'].includes(value)
		}
	},
	// 具有默认值的函数
	propG: {
		type: Function,
		// 与对象或数组默认值不同,这不是一个工厂函数 —— 这是一个用作默认值的函数
		default () {
			return 'Default function'
		}
	}
}
这不仅为组件提供了文档说明,还会在它们遇到错误的类型时从浏览器的 JavaScript 控制台看到提示。
案例04
1
2
3
4
5
6
7
8
9
10
11
12
13
14
15
16
17
18
19
20
21
22
23
24
25
26
27
28
29
30
31
32
33
34
35
36
37
38
39
40
41
42
43
<!DOCTYPE html>
<html>
<span class="hljs-tag"><<span class="hljs-title">head</span>></span>
<span class="hljs-tag"><<span class="hljs-title">meta</span> <span class="hljs-attribute">charset</span>=<span class="hljs-value">"UTF-8"</span> /></span>
<span class="hljs-tag"><<span class="hljs-title">title</span>></span><span class="hljs-tag"></<span class="hljs-title">title</span>></span>
<span class="hljs-tag"><<span class="hljs-title">script</span> <span class="hljs-attribute">src</span>=<span class="hljs-value">"../js/vue.min.js"</span> <span class="hljs-attribute">type</span>=<span class="hljs-value">"text/javascript"</span> <span class="hljs-attribute">charset</span>=<span class="hljs-value">"utf-8"</span>></span><span class="javascript"></span><span class="hljs-tag"></<span class="hljs-title">script</span>></span>
<span class="hljs-tag"></<span class="hljs-title">head</span>></span>
<span class="hljs-tag"><<span class="hljs-title">body</span>></span>
<span class="hljs-tag"><<span class="hljs-title">div</span> <span class="hljs-attribute">id</span>=<span class="hljs-value">"app"</span>></span>
<span class="hljs-comment"><!-- componentA 默认转换成 component-a --></span>
<span class="hljs-comment"><!-- min:静态属性; :max:动态属性 --></span>
<span class="hljs-tag"><<span class="hljs-title">component-a</span> <span class="hljs-attribute">min</span>=<span class="hljs-value">"100"</span> <span class="hljs-attribute">:max</span>=<span class="hljs-value">"abc"</span>></span><span class="hljs-tag"></<span class="hljs-title">component-a</span>></span>
<span class="hljs-tag"></<span class="hljs-title">div</span>></span>
<span class="hljs-tag"></<span class="hljs-title">body</span>></span>
<span class="hljs-tag"><<span class="hljs-title">script</span> <span class="hljs-attribute">type</span>=<span class="hljs-value">"text/javascript"</span>></span><span class="javascript">
<span class="hljs-comment">// 使用普通js对象定义组件</span>
componentA = {
props: [<span class="hljs-string">'min'</span>, <span class="hljs-string">'max'</span>],
template: `
<h1>组件<span class="hljs-number">1</span><<span class="hljs-regexp">/h1>
{{min}}<input type="range"/</span>>{{max}}
`,
}
<span class="hljs-keyword">const</span> App = {
data: <span class="hljs-function"><span class="hljs-keyword">function</span><span class="hljs-params">()</span> </span>{
<span class="hljs-keyword">return</span> {
abc: <span class="hljs-number">999</span>
}
},
components: {
componentA, <span class="hljs-comment">// 默认标签名 component-a</span>
}
}
<span class="hljs-keyword">const</span> app = Vue.createApp(App)
app.mount(<span class="hljs-string">"#app"</span>)
</span><span class="hljs-tag"></<span class="hljs-title">script</span>></span>
</html>
属性值类型
prop 属性值可以是任意类型。
prop 可以使用静态值,也可以通过 v-bind 或简写 : 动态赋值,任何类型的值都可以传给一个 prop例如:
1
2
3
4
5
6
7
8
9
10
11
12
13
14
15
16
17
18
19
20
21
22
23
24
25
26
27
28
29
30
31
32
33
34
35
36
37
38
39
40
41
42
43
44
45
46
47
48
<!-- 给 prop 传入一个静态的值 -->
<blog-post title="My journey with Vue"></blog-post>
<!-- 动态赋予一个变量的值 -->

<blog-post :title="post.title"></blog-post>

<!-- 动态赋予一个复杂表达式的值 -->

<blog-post :title="post.title + ' by ' + post.author.name"></blog-post>
<!-- 传入一个数字 -->

<!-- 即便 42 是静态的,我们仍然需要 v-bind 来告诉 Vue     -->

<!-- 这是一个 JavaScript 表达式而不是一个字符串。             -->

<blog-post :likes="42"></blog-post>

<!-- 用一个变量进行动态赋值。-->

<blog-post :likes="post.likes"></blog-post>
<!-- 传入一个布尔值 -->

<!-- 包含该 prop 没有值的情况在内,都意味着 true。          -->

<!-- 如果没有在 props 中把 is-published 的类型设置为 Boolean,则这里的值为空字符串,而不是“true” 。 -->

<blog-post is-published></blog-post>

<!-- 即便 false 是静态的,我们仍然需要 v-bind 来告诉 Vue  -->

<!-- 这是一个 JavaScript 表达式而不是一个字符串。             -->

<blog-post :is-published="false"></blog-post>

<!-- 用一个变量进行动态赋值。                                -->

<blog-post :is-published="post.isPublished"></blog-post>
<!-- 传入一个数组 -->

<!-- 即便数组是静态的,我们仍然需要 v-bind 来告诉 Vue        -->

<!-- 这是一个 JavaScript 表达式而不是一个字符串。             -->

<blog-post :comment-ids="[234, 266, 273]"></blog-post>

<!-- 用一个变量进行动态赋值。                                -->

<blog-post :comment-ids="post.commentIds"></blog-post>
<!-- 传入一个对象 -->

<!-- 即便对象是静态的,我们仍然需要 v-bind 来告诉 Vue        -->

<!-- 这是一个 JavaScript 表达式而不是一个字符串。             -->

<blog-post

:author="{

name: 'Veronica',

company: 'Veridian Dynamics'

}"

></blog-post>

<!-- 用一个变量进行动态赋值。                                 -->

<blog-post :author="post.author"></blog-post>
传入一个对象的所有属性
如果你想要将一个对象的所有 property 都作为 prop 传入,你可以使用不带参数的 v-bind (取代 v-bind:prop-name)。例如,对于一个给定的对象 post:
1
2
3
4
post: {
  id: 1,
  title: 'My Journey with Vue'
}
下面的模板:
<blog-post v-bind="post"></blog-post>
等价于:
<blog-post v-bind:id="post.id" v-bind:title="post.title"></blog-post>
单向数据流
所有的 prop 都使得其父子 prop 之间形成了一个**单向下行绑定**:父级 prop 的更新会向下流动到子组件中,但是反过来则不行。这样会防止从子组件意外变更父级组件的状态,从而导致你的应用的数据流向难以理解。
另外,每次父级组件发生变更时,子组件中所有的 prop 都将会刷新为最新的值。这意味着你**不**应该在一个子组件内部改变 prop。如果你这样做了,Vue 会在浏览器的控制台中发出警告。
这里有两种常见的试图变更一个 prop 的情形:
- 这个
prop用来传递一个初始值;这个子组件接下来希望将其作为一个本地的prop数据来使用 。在这种情况下,最好定义一个本地的data属性并将这个prop作为其初始值:
1
2
3
4
5
6
props: ['initialCounter'],
data() {
  return {
    counter: this.initialCounter
  }
}
- 这个
prop以一种原始的值传入且需要进行转换。在这种情况下,最好使用这个prop的值来定义一个计算属性:
1
2
3
4
5
6
props: ['size'],
computed: {
  normalizedSize() {
    return this.size.trim().toLowerCase()
  }
}
提示
注意在 JavaScript 中对象和数组是通过引用传入的,所以对于一个数组或对象类型的 prop 来说,在子组件中改变变更这个对象或数组本身**将会**影响到父组件的状态。
非 Props属性 $attrs
当一个组件添加一个非 prop 的 属性时,如果该组件并没有相应 props 属性,当组件中只有一个 root 根节点时,非 prop 属性将会自动添加到根节点上。
案例05
1
2
3
4
5
6
7
8
9
10
11
12
13
14
15
16
17
18
19
20
21
22
23
24
25
26
27
28
29
30
31
32
33
34
35
36
37
38
39
40
41
42
43
44
45
<!DOCTYPE html>
<html>
<span class="hljs-tag"><<span class="hljs-title">head</span>></span>
<span class="hljs-tag"><<span class="hljs-title">meta</span> <span class="hljs-attribute">charset</span>=<span class="hljs-value">"UTF-8"</span> /></span>
<span class="hljs-tag"><<span class="hljs-title">title</span>></span><span class="hljs-tag"></<span class="hljs-title">title</span>></span>
<span class="hljs-tag"><<span class="hljs-title">script</span> <span class="hljs-attribute">src</span>=<span class="hljs-value">"../js/vue.min.js"</span> <span class="hljs-attribute">type</span>=<span class="hljs-value">"text/javascript"</span> <span class="hljs-attribute">charset</span>=<span class="hljs-value">"utf-8"</span>></span><span class="javascript"></span><span class="hljs-tag"></<span class="hljs-title">script</span>></span>
<span class="hljs-tag"></<span class="hljs-title">head</span>></span>
<span class="hljs-tag"><<span class="hljs-title">body</span>></span>
<span class="hljs-tag"><<span class="hljs-title">div</span> <span class="hljs-attribute">id</span>=<span class="hljs-value">"app"</span>></span>
<span class="hljs-comment"><!-- componentA 默认转换成 component-a --></span>
<span class="hljs-comment"><!-- 组件中为定义的 props 属性自动添加到根节点 --></span>
<span class="hljs-tag"><<span class="hljs-title">component-a</span> <span class="hljs-attribute">x</span>=<span class="hljs-value">"1"</span> <span class="hljs-attribute">y</span>=<span class="hljs-value">"2"</span>></span><span class="hljs-tag"></<span class="hljs-title">component-a</span>></span>
<span class="hljs-tag"></<span class="hljs-title">div</span>></span>
<span class="hljs-tag"></<span class="hljs-title">body</span>></span>
<span class="hljs-tag"><<span class="hljs-title">script</span> <span class="hljs-attribute">type</span>=<span class="hljs-value">"text/javascript"</span>></span><span class="javascript">
<span class="hljs-comment">// 使用普通js对象定义组件</span>
componentA = {
props: [<span class="hljs-string">'x'</span>],
template: `
<div>
<span class="xml"><span class="hljs-tag"><<span class="hljs-title">p</span>></span>子组件<span class="hljs-tag"></<span class="hljs-title">p</span>></span>
<span class="hljs-tag"><<span class="hljs-title">p</span>></span>子组件中只有一个根节点<span class="hljs-tag"></<span class="hljs-title">p</span>></span>
<span class="hljs-tag"></<span class="hljs-title">div</span>></span>
`,
}
const App = {
data: function() {
return {
abc: 999
}
},
components: {
componentA, // 默认标签名 component-a
}
}
const app = Vue.createApp(App)
app.mount("#app")
</span></span><span class="hljs-tag"></<span class="hljs-title">script</span>></span>
</html>
效果

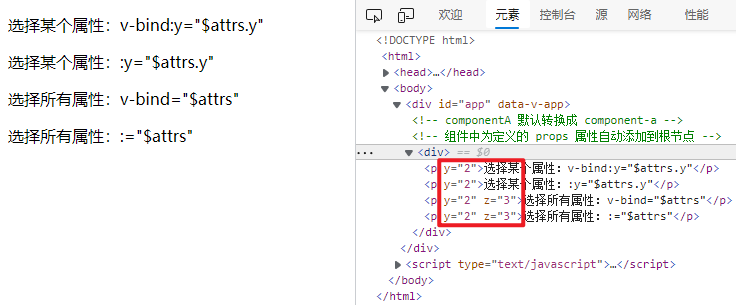
禁用 props 继承
如果**不**希望组件的根元素继承非 props 属性,你可以在组件的选项中设置 inheritAttrs: false。
如果想获取非 props 属性,可以通过组件的 $attrs 属性获取,该 属性包括组件 props 和 emits 中未包含的所有属性 (例如,class、style、v-on 监听器等)。
同时可以使用 v-bind 缩写来绑定到除了根节点以外的其他节点上
案例06
1
2
3
4
5
6
7
8
9
10
11
12
13
14
15
16
17
18
19
20
21
22
23
24
25
26
27
28
29
30
31
32
33
34
35
36
37
38
39
40
41
42
43
44
45
46
47
48
<!DOCTYPE html>
<html>
<span class="hljs-tag"><<span class="hljs-title">head</span>></span>
<span class="hljs-tag"><<span class="hljs-title">meta</span> <span class="hljs-attribute">charset</span>=<span class="hljs-value">"UTF-8"</span> /></span>
<span class="hljs-tag"><<span class="hljs-title">title</span>></span><span class="hljs-tag"></<span class="hljs-title">title</span>></span>
<span class="hljs-tag"><<span class="hljs-title">script</span> <span class="hljs-attribute">src</span>=<span class="hljs-value">"../js/vue.min.js"</span> <span class="hljs-attribute">type</span>=<span class="hljs-value">"text/javascript"</span> <span class="hljs-attribute">charset</span>=<span class="hljs-value">"utf-8"</span>></span><span class="javascript"></span><span class="hljs-tag"></<span class="hljs-title">script</span>></span>
<span class="hljs-tag"></<span class="hljs-title">head</span>></span>
<span class="hljs-tag"><<span class="hljs-title">body</span>></span>
<span class="hljs-tag"><<span class="hljs-title">div</span> <span class="hljs-attribute">id</span>=<span class="hljs-value">"app"</span>></span>
<span class="hljs-comment"><!-- componentA 默认转换成 component-a --></span>
<span class="hljs-comment"><!-- 组件中为定义的 props 属性自动添加到根节点 --></span>
<span class="hljs-tag"><<span class="hljs-title">component-a</span> <span class="hljs-attribute">x</span>=<span class="hljs-value">"1"</span> <span class="hljs-attribute">y</span>=<span class="hljs-value">"2"</span> <span class="hljs-attribute">z</span>=<span class="hljs-value">"3"</span>></span><span class="hljs-tag"></<span class="hljs-title">component-a</span>></span>
<span class="hljs-tag"></<span class="hljs-title">div</span>></span>
<span class="hljs-tag"></<span class="hljs-title">body</span>></span>
<span class="hljs-tag"><<span class="hljs-title">script</span> <span class="hljs-attribute">type</span>=<span class="hljs-value">"text/javascript"</span>></span><span class="javascript">
<span class="hljs-comment">// 使用普通js对象定义组件</span>
componentA = {
inheritAttrs: <span class="hljs-literal">false</span>,
props: [<span class="hljs-string">'x'</span>],
template: `
<div>
<span class="xml"><span class="hljs-tag"><<span class="hljs-title">p</span> <span class="hljs-attribute">v-bind:y</span>=<span class="hljs-value">"$attrs.y"</span>></span>选择某个属性:v-bind:y="$attrs.y"<span class="hljs-tag"></<span class="hljs-title">p</span>></span>
<span class="hljs-tag"><<span class="hljs-title">p</span> <span class="hljs-attribute">:y</span>=<span class="hljs-value">"$attrs.y"</span>></span>选择某个属性::y="$attrs.y"<span class="hljs-tag"></<span class="hljs-title">p</span>></span>
<span class="hljs-tag"><<span class="hljs-title">p</span> <span class="hljs-attribute">v-bind</span>=<span class="hljs-value">"$attrs"</span>></span>选择所有属性:v-bind="$attrs"<span class="hljs-tag"></<span class="hljs-title">p</span>></span>
<span class="hljs-tag"><<span class="hljs-title">p</span> <span class="hljs-attribute">:</span>=<span class="hljs-value">"$attrs"</span>></span>选择所有属性::="$attrs"<span class="hljs-tag"></<span class="hljs-title">p</span>></span>
<span class="hljs-tag"></<span class="hljs-title">div</span>></span>
`,
}
const App = {
data: function() {
return {
abc: 999
}
},
components: {
componentA, // 默认标签名 component-a
}
}
const app = Vue.createApp(App)
app.mount("#app")
</span></span><span class="hljs-tag"></<span class="hljs-title">script</span>></span>
</html>
效果
自定义事件 emits
在组件中可以通过 emits 选项在组件上定义发出的事件。
一般用于在外部组件中调用组件中的方法,因为子组件都是封装好的,外部组件不能在子组件的某个元素上添加事件。
这时候就可以选择将子组件的事件暴露到外部组件中,将事件的执行功能交给外部组件。
通常有两种写法:
(1)以字符串数组形式
1
2
3
4
5
app.component('custom-form', {
    // 定义当前组件暴露到外部的事件
    // 外部组件可以电影这两个事件,就像在子组件本身调用一样
	emits: ['inFocus', 'submit']
})
(2)以对象的形式,添加验证
1
2
3
4
5
6
7
8
9
10
11
12
13
14
15
16
app.component('custom-form', {
emits: {
// 没有验证
click: null,
<span class="hljs-comment">// 验证submit 事件</span>
submit: ({ email, password }) => {
<span class="hljs-keyword">if</span> (email && password) {
<span class="hljs-keyword">return</span> <span class="hljs-literal">true</span>
} <span class="hljs-keyword">else</span> {
<span class="hljs-built_in">console</span>.warn(<span class="hljs-string">'Invalid submit event payload!'</span>)
<span class="hljs-keyword">return</span> <span class="hljs-literal">false</span>
}
}
},
})
emits事件定义了还不够,事件必须被调用才会触发,所以必须在子组件中 调用 this.$emit('submit')或者$emit('submit')
案例07
1
2
3
4
5
6
7
8
9
10
11
12
13
14
15
16
17
18
19
20
21
22
23
24
25
26
27
28
29
30
31
32
33
34
35
36
37
38
39
40
41
42
43
44
45
46
47
48
49
<!DOCTYPE html>
<html>
<head>
<meta charset="UTF-8" />
<title></title>
<script src="../js/vue.min.js" type="text/javascript" charset="utf-8"></script>
</head>
<body>
<div id="app">
<!-- componentA 默认转换成 component-a -->
<!-- 将子组件的 submit 方法暴露到外部组件 -->
<component-a @submit="test()"></component-a>
</div>
</body>
<script type="text/javascript">
// 使用普通js对象定义组件
const componentA = {
emits: {
// 验证submit 事件
submit: () => {
console.warn('子组件事件')
return true
}
},
template: <div> <span class="xml"><span class="hljs-tag"><<span class="hljs-title">button</span> @<span class="hljs-attribute">click</span>=<span class="hljs-value">"$emit('submit')"</span>></span>点击触发子组件中的 submit 事件<span class="hljs-tag"></<span class="hljs-title">button</span>></span> <span class="hljs-tag"></<span class="hljs-title">div</span>></span> ,
}
const App = {
methods: {
test() {
console.log('外部')
}
},
components: { componentA }
}
const app = Vue.createApp(App)
app.mount("#app")
</script>
</html>
当在 emits 选项中定义了原生事件 (如 click) 时,将使用组件中自定义的事件**替代**原生事件侦听器。
注意:建议定义所有发出的事件,以便更好地记录组件应该如何工作。
emits + props + v-mode
v-mode 可以实现输入元素双向绑定数据,变量值变化输入元素内容改变,返过来输入元素内容改变变量值也会改变。
但是如果把 v-mode 添加到子组件上,子组件就不能在双向绑定数据了,这时候可以考虑 emits 配合 v-mode 来实现双向绑定。而且可以添加多个 v-mode 属性。
利用emits 可以将子组件的事件暴露给外部组件的特性,可以将子组件的输入元素输入事件传递到外部组件,外部组件监听到后通过 v-mode 将数据传入子组件。
案例08
1
2
3
4
5
6
7
8
9
10
11
12
13
14
15
16
17
18
19
20
21
22
23
24
25
26
27
28
29
30
31
32
33
34
35
36
37
38
39
40
41
42
43
44
45
46
47
48
49
50
51
52
53
54
55
56
57
58
<!DOCTYPE html>
<html>
<head>
<meta charset="UTF-8" />
<title></title>
<script src="../js/vue.min.js" type="text/javascript" charset="utf-8"></script>
</head>
<body>
<div id="app">
<!-- componentA 默认转换成 component-a -->
<!-- 将子组件的 submit 方法暴露到外部组件 -->
<component-a v-model:first="first" v-model:second="second" @first="onFirst" @second="onSecond"></component-a>
<br>
first<input type="range" v-model="first">{{first}}<br>
second<input type="range" v-model="second">{{second}}
</div>
</body>
<script type="text/javascript">
// 使用普通js对象定义组件
const componentA = {
props: ['first', 'second',],
emits: ['first', 'second',],
template: <div> <span class="xml"><span class="hljs-tag"><<span class="hljs-title">input</span> <span class="hljs-attribute">type</span>=<span class="hljs-value">"text"</span> @<span class="hljs-attribute">keyup</span>=<span class="hljs-value">"$emit('first',$event.target.value)"</span> <span class="hljs-attribute">:value</span>=<span class="hljs-value">"first"</span>></span> <span class="hljs-tag"><<span class="hljs-title">br</span>></span> <span class="hljs-tag"><<span class="hljs-title">input</span> <span class="hljs-attribute">type</span>=<span class="hljs-value">"text"</span> @<span class="hljs-attribute">keyup</span>=<span class="hljs-value">"$emit('second',$event.target.value)"</span> <span class="hljs-attribute">:value</span>=<span class="hljs-value">"second"</span>></span> <span class="hljs-tag"></<span class="hljs-title">div</span>></span> ,
}
const App = {
data() {
return {
first: '0',
second: '1',
}
},
methods: {
onFirst(value) {
this.first = value
},
onSecond(value) {
this.second = value
}
},
components: { componentA }
}
const app = Vue.createApp(App)
app.mount("#app")
</script>
</html>
效果:

v-model 自定义修饰符
在 3.x 中,组件可以支持自定义修饰符,添加到组件 v-model 的修饰符在子组件中将通过 modelModifiers prop 提供给组件。
v-model 内置修饰符.trim、.number 和 .lazy
自定义修饰符一般用于区别多个 v-model 属性。
案例09:将输入的值首字母变成大写
1
2
3
4
5
6
7
8
9
10
11
12
13
14
15
16
17
18
19
20
21
22
23
24
25
26
27
28
29
30
31
32
33
34
35
36
37
38
39
40
41
42
43
44
45
46
47
48
49
50
51
52
53
54
55
56
57
58
59
60
61
62
<!DOCTYPE html>
<html>
<head>
<meta charset="UTF-8" />
<title></title>
<script src="../js/vue.min.js" type="text/javascript" charset="utf-8"></script>
</head>
<body>
<div id="app">
<!-- componentA 默认转换成 component-a -->
<!-- 将子组件的 submit 方法暴露到外部组件 -->
<component-a v-model.xxx="x"></component-a>
</div>
</body>
<script type="text/javascript">
// 使用普通js对象定义组件
const componentA = {
props: {
modelModifiers: {
default: () => ({})
},
},
data() {
return {
value: ''
}
},
methods: {
emitValue(e) {
let value = e.target.value
if (this.modelModifiers.xxx) {
this.value = value.charAt(0).toUpperCase() + value.slice(1)
}
}
},
template: <div> <span class="xml"><span class="hljs-tag"><<span class="hljs-title">input</span> <span class="hljs-attribute">type</span>=<span class="hljs-value">"text"</span> @<span class="hljs-attribute">input</span>=<span class="hljs-value">"emitValue"</span> <span class="hljs-attribute">:value</span>=<span class="hljs-value">"value"</span>></span> <span class="hljs-tag"><<span class="hljs-title">br</span>></span> {{value}} <span class="hljs-tag"></<span class="hljs-title">div</span>></span> ,
}
const App = {
data() {
return {
x: '0',
}
},
components: { componentA }
}
const app = Vue.createApp(App)
app.mount("#app")
</script>
</html>
如果 v-model 带参数,则生成的 prop 名称将为 arg + "Modifiers"。
如:
<my-component v-model:description.capitalize="myText"></my-component>
使用时对应的方式为:
1
2
3
4
5
6
app.component('my-component', {
  props: ['descriptionModifiers'],
  created() {
    console.log(this.descriptionModifiers) // { capitalize: true }
  }
})
插槽 slot
如果组件的 template 中**没有**包含一个 <slot> 元素,则该组件起始标签和结束标签之间的任何内容都会被抛弃
插槽可以让组件具有普通双标签的特性:直接在双标签中间的内容将被显示到页面上。如:
1
2
3
4
5
6
7
app.component('todo-button', {
	template: `
        <button>
  			<slot>默认值</slot>
		</button>
        `,
})
使用的时候
1
2
3
<todo-button>
  	可以直接显示在组件中的插槽
</todo-button>
不过,字符串只是开始!插槽还可以包含任何模板代码,包括 HTML:
1
2
3
4
5
<todo-button>
  	<!-- 添加一个Font Awesome 图标 -->
  	<i class="fas fa-plus"></i>
    <div>可以直接显示在组件中的插槽</div>div>
</todo-button>
插槽可以配合 {{}} 一起使用
1
2
3
4
<todo-button>
  	{{number}}
    <div>可以直接显示在组件中的插槽</div>div>
</todo-button>
案例10
1
2
3
4
5
6
7
8
9
10
11
12
13
14
15
16
17
18
19
20
21
22
23
24
25
26
27
28
29
30
31
32
33
34
35
36
37
38
39
40
<!DOCTYPE html>
<html>
<head>
<meta charset="UTF-8" />
<title></title>
<script src="../js/vue.min.js" type="text/javascript" charset="utf-8"></script>
</head>
<body>
<div id="app">
<component-a>哈哈 {{x}}</component-a>
</div>
</body>
<script type="text/javascript">
// 使用普通js对象定义组件
const componentA = {
template: <div> <span class="xml"><span class="hljs-tag"><<span class="hljs-title">slot</span>></span>默认值<span class="hljs-tag"></<span class="hljs-title">slot</span>></span> <span class="hljs-tag"></<span class="hljs-title">div</span>></span> ,
}
const App = {
data() {
return {
x: '0',
}
},
components: { componentA }
}
const app = Vue.createApp(App)
app.mount("#app")
</script>
</html>
多插槽
有时我们需要多个插槽。例如对于一个带有如下模板的 <base-layout> 组件:
1
2
3
4
5
6
7
8
9
10
11
<div class="container">
  <header>
    <!-- 我们希望把页头放这里 -->
  </header>
  <main>
    <!-- 我们希望把主要内容放这里 -->
  </main>
  <footer>
    <!-- 我们希望把页脚放这里 -->
  </footer>
</div>
对于这样的情况,<slot> 元素有一个特殊的 attribute:name。这个 attribute 可以用来定义额外的插槽:
1
2
3
4
5
6
7
8
9
10
11
<div class="container">
  <header>
    <slot name="header"></slot>
  </header>
  <main>
    <slot></slot>
  </main>
  <footer>
    <slot name="footer"></slot>
  </footer>
</div>
一个不带 name 的 <slot> 出口会带有隐含的名字“default”。
在向具名插槽提供内容的时候,我们可以在一个 <template> 元素上使用 v-slot 指令,并以 v-slot 的参数的形式提供其名称:
1
2
3
4
5
6
7
8
9
10
11
12
13
14
<base-layout>
  <template v-slot:header>
    <h1>Here might be a page title</h1>
  </template>
<template v-slot:default>

<p>A paragraph for the main content.</p>

<p>And another one.</p>

</template>
<template v-slot:footer>

<p>Here's some contact info</p>

</template>

</base-layout>
现在 <template> 元素中的所有内容都将会被传入相应的插槽。
渲染的 HTML 将会是:
1
2
3
4
5
6
7
8
9
10
11
12
<div class="container">
  <header>
    <h1>Here might be a page title</h1>
  </header>
  <main>
    <p>A paragraph for the main content.</p>
    <p>And another one.</p>
  </main>
  <footer>
    <p>Here's some contact info</p>
  </footer>
</div>
注意,**v-slot 只能添加在 <template> 上**只有一种情况例外:
当只有一个插槽并且是默认插槽时,组件的标签才可以被当作插槽的模板来使用。这样我们就可以把 v-slot 直接用在组件上:
1
2
3
4
<todo-list v-slot:default="slotProps">
  <i class="fas fa-check"></i>
  <span class="green">{{ slotProps.item }}</span>
</todo-list>
这种写法还可以更简单。就像假定未指明的内容对应默认插槽一样,不带参数的 v-slot 被假定对应默认插槽:
1
2
3
4
<todo-list v-slot="slotProps">
  <i class="fas fa-check"></i>
  <span class="green">{{ slotProps.item }}</span>
</todo-list>
组件引用 ref
尽管存在 prop 和事件,但有时你可能仍然需要直接访问 JavaScript 中的子组件。为此,可以使用 ref 属性为子组件或 HTML 元素指定引用 ID。
ref 用来获取元素或子组件的引用对象。
引用对象将会被注册在父组件的 $refs 对象上。
如果在普通的 DOM 元素上使用,引用指向的就是那个 DOM 元素;如果用在子组件上,引用就指向组件实例:
1
2
3
4
5
6
7
8
<!-- vm.$refs.p 会是 DOM 节点 -->
<p ref="p">hello</p>
<!-- vm.$refs.child 会是子组件实例 -->

<child-component ref="child"></child-component>
<!-- 当动态绑定时,我们可以将 ref 定义为回调函数,显式地传递元素或组件实例 -->

<child-component :ref="(el) => child = el"></child-component>
因为 ref 本身是渲染函数结束后创建的,在渲染完毕后才能访问!$refs 也是非响应式的,不能在模板中做数据绑定。
如:
在组件挂载时,以编程的方式 focus 到这个 input 上,这可能有用
1
2
3
4
5
6
7
8
9
10
11
12
13
14
15
const app = Vue.createApp({})
app.component('base-input', {
template: <input ref=<span class="hljs-string">"input"</span> /> ,
methods: {
focusInput() {
this.$refs.input.focus()
}
},
mounted() {
this.focusInput()
}
})
此外,还可以向组件本身添加另一个 ref,并使用它从父组件触发 focusInput 事件:
<base-input ref="usernameInput"></base-input>
this.$refs.usernameInput.focusInput()
案例11
1
2
3
4
5
6
7
8
9
10
11
12
13
14
15
16
17
18
19
20
21
22
23
24
25
26
27
28
29
30
31
32
33
34
35
36
37
38
39
40
41
42
43
44
<!DOCTYPE html>
<html>
<head>

<meta charset="UTF-8" />

<title></title>

<script src="../js/vue.min.js" type="text/javascript" charset="utf-8"></script>

</head>
<body>

<div id="app">

<!-- 普通元素和组件都可以 -->

<!-- 异步组件不能使用 -->

<a-component ref="input"></a-component>

</div>

</body>
<script type="text/javascript">

const AComponent = {

emits: ['focusInput'],

methods: {

focusInput() {

this.$refs.input.focus()

}

},

template: '<div> <input type="text" ref="input"/> </div>'

}
<span class="hljs-keyword">const</span> App = {
	mounted() {
		<span class="hljs-comment">// 普通元素使用方法</span>
		<span class="hljs-comment">// this.$refs.input.focus()</span>

		<span class="hljs-comment">// 组件使用方法</span>
		<span class="hljs-keyword">this</span>.$refs.input.focusInput()
	},
}

<span class="hljs-keyword">const</span> app = Vue.createApp(App)
app.component(<span class="hljs-string">'a-component'</span>, AComponent)
app.mount(<span class="hljs-string">"#app"</span>)

</script>
</html>
$refs 只会在组件渲染完成之后生效。这仅作为一个用于直接操作子元素的“逃生舱”——你应该避免在模板或计算属性中访问 $refs。
嵌套组件数据传递 Provide / Inject
通常,当需要从父组件向子组件传递数据时,会使用 props。
但是如果组件嵌套多层,如果仍然将 prop 沿着组件链逐级传递下去,可能会很麻烦。
对于这种情况,可以使用一对 provide 和 inject。无论组件层次结构有多深,父组件都可以作为其所有子组件的依赖提供者。
这个特性有两个部分:
(1)父组件使用 provide 选项来提供数据,
(2)子组件使用 inject 选项来开始使用这些数据。
例如,有这样的层次结构:
1
2
3
4
5
Root
└─ A
   └─ B
      └─ C
      	└─ D
通过 provide/inject 方法,可以直接将 A 的属性值直接传递给 D
案例12
1
2
3
4
5
6
7
8
9
10
11
12
13
14
15
16
17
18
19
20
21
22
23
24
25
26
27
28
29
30
31
32
33
34
35
36
37
38
39
40
41
42
43
44
45
46
47
48
49
50
51
52
53
54
55
<!DOCTYPE html>
<html>
<head>
<meta charset="UTF-8" />
<title></title>
<script src="../js/vue.min.js" type="text/javascript" charset="utf-8"></script>
</head>
<body>
<div id="app">
</div>
</body>
<script type="text/javascript">
const D = {
inject: ['todoLength'],
template: <div>d中 获取: {{todoLength}}<<span class="hljs-regexp">/div>
}
const C = {
inject: ['todoLength'],
components: { D },
template: <div>c中 获取: {{todoLength}}</</span>div> <span class="xml"><span class="hljs-tag"><<span class="hljs-title">d</span>></span><span class="hljs-tag"></<span class="hljs-title">d</span>></span>
}
const B = {
inject: ['todoLength'],
components: { C },
template: <span class="hljs-tag"><<span class="hljs-title">div</span>></span>b中 获取: {{todoLength}}<span class="hljs-tag"></<span class="hljs-title">div</span>></span> <span class="hljs-tag"><<span class="hljs-title">c</span>></span><span class="hljs-tag"></<span class="hljs-title">c</span>></span>
}
const A = {
data() {
return {
todos: ['1', '2']
}
},
provide() {
return {
todoLength: this.todos.length
}
},
components: { 'bb': B },
template: <span class="hljs-tag"><<span class="hljs-title">div</span>></span>a中 起始传递: {{todos.length}}<span class="hljs-tag"></<span class="hljs-title">div</span>></span> <span class="hljs-tag"><<span class="hljs-title">bb</span>></span><span class="hljs-tag"></<span class="hljs-title">bb</span>></span>
}
const App = {
components: { 'aa': A },
template: `<span class="hljs-tag"><<span class="hljs-title">div</span>></span>最外层组件<span class="hljs-tag"></<span class="hljs-title">div</span>></span> <span class="hljs-tag"><<span class="hljs-title">aa</span>></span><span class="hljs-tag"></<span class="hljs-title">aa</span>></span>`
}
const app = Vue.createApp(App)
app.mount("#app")
</script>
</html>
暴露属性 expose 3.2+
-
类型:
Array<string> -
详细:
一个将暴露在公共组件实例上的 property 列表。
默认情况下,通过 $refs、$parent 或 $root 访问到的公共实例与模板使用的组件内部实例是一样的。expose 选项暴露的属性和方法可以在外部通过 $refs 访问。
- 用法:
```js
export default {
// increment 将被暴露,
// 但 count 只能被内部访问
expose: [‘increment’],
1
2
3
4
5
6
7
8
9
10
11
data() {
  return {
    count: 0
  }
},
methods: {

increment() {

this.count++

}

}
}
```
动态组件 is
如果有多个组件需要切换,可以使用 is 属性来切换不同的组件:
<component :is="currentTabComponent"></component>
currentTabComponent 为组件的名称,这样就可以动态切换组件显示
1
2
3
4
5
6
7
8
9
10
11
12
13
14
15
16
17
18
19
const app = Vue.createApp({
  data() {
    return {
      currentTab: 'Home',
      tabs: ['Home', 'Posts']
    }
  },
  computed: {
    currentTabComponent() {
      return 'tab-' + this.currentTab.toLowerCase()
    }
  }
})
app.component('tab-home', {
  template: `<div class="demo-tab">Home component</div>`
})
app.component('tab-posts', {
  template: `<div class="demo-tab">Posts component</div>`
})
案例13
1
2
3
4
5
6
7
8
9
10
11
12
13
14
15
16
17
18
19
20
21
22
23
24
25
26
27
28
29
30
31
32
33
34
35
36
37
38
39
40
41
42
43
44
45
46
47
48
<!DOCTYPE html>
<html>
<head>
<meta charset="UTF-8" />
<title></title>
<script src="../js/vue.min.js" type="text/javascript" charset="utf-8"></script>
</head>
<body>
<div id="app">
<button v-for="tab in tabs" :key="tab" :class="['tab-button', { active: currentTab === tab }]"
@click="currentTab = tab">
{{ tab }}
</button>
<span class="hljs-tag"><<span class="hljs-title">component</span> <span class="hljs-attribute">:is</span>=<span class="hljs-value">"currentTabComponent"</span>></span><span class="hljs-tag"></<span class="hljs-title">component</span>></span>
<span class="hljs-tag"></<span class="hljs-title">div</span>></span>
</body>
<script type="text/javascript">
const App = {
data() {
return {
currentTab: 'Home',
tabs: ['Home', 'Posts']
}
},
computed: {
currentTabComponent() {
return 'tab-' + this.currentTab.toLowerCase()
}
}
}
<span class="hljs-keyword">const</span> app = Vue.createApp(App)
app.component(<span class="hljs-string">'tab-home'</span>, {
template: `<div <span class="hljs-keyword">class</span>=<span class="hljs-string">"demo-tab"</span>>Home component<<span class="hljs-regexp">/div>`
})
app.component('tab-posts', {
template: `<div class="demo-tab">Posts component</</span>div>`
})
app.mount(<span class="hljs-string">"#app"</span>)
</script>
</html>
如果切换到 posts 标签,然后再切换回 home,是不会继续展示之前选择的内容的。这是因为每次切换新标签的时候,Vue 都创建了一个新的 currentTabComponent 实例。
<keep-alive> 缓存
重新创建动态组件的行为通常是非常有用的,但是在这个案例中,我们更希望那些标签的组件实例能够被在它们第一次被创建的时候缓存下来。为了解决这个问题,我们可以用一个 <keep-alive> 元素将其动态组件包裹起来。
1
2
3
4
<!-- 失活的组件将会被缓存!-->
<keep-alive>
  <component :is="currentTabComponent"></component>
</keep-alive>
<keep-alive> 包裹动态组件时,会缓存不活动的组件实例,而不是销毁它们。和 <transition> 相似,<keep-alive> 是一个抽象组件:它自身不会渲染一个 DOM 元素,也不会出现在组件的父组件链中。
当组件在 <keep-alive> 内被切换时,它的 mounted 和 unmounted 生命周期钩子不会被调用,取而代之的是 activated 和 deactivated。(这会运用在 <keep-alive> 的直接子节点及其所有子孙节点。)
主要用于保留组件状态或避免重新渲染。
1
2
3
4
5
6
7
8
9
10
11
12
13
14
15
16
17
<!-- 基本 -->
<keep-alive>
<component :is="view"></component>
</keep-alive>
<!-- 多个条件判断的子组件 -->
<keep-alive>
<comp-a v-if="a > 1"></comp-a>
<comp-b v-else></comp-b>
</keep-alive>
<!-- 和 <transition> 一起使用 -->
<transition>
<keep-alive>
<component :is="view"></component>
</keep-alive>
</transition>
注意,<keep-alive> 是用在其一个直属的子组件被切换的情形。如果你在其中有 v-for 则不会工作。如果有上述的多个条件性的子元素,<keep-alive> 要求同时只有一个子元素被渲染。
include和exclude
include 和 exclude prop 允许组件有条件地缓存。二者都可以用逗号分隔字符串、正则表达式或一个数组来表示:
1
2
3
4
5
6
7
8
9
10
11
12
13
14
<!-- 逗号分隔字符串 -->
<keep-alive include="a,b">
  <component :is="view"></component>
</keep-alive>
<!-- regex (使用 v-bind) -->

<keep-alive :include="/a|b/">

<component :is="view"></component>

</keep-alive>
<!-- Array (使用 v-bind) -->

<keep-alive :include="['a', 'b']">

<component :is="view"></component>

</keep-alive>
匹配首先检查组件自身的 name 选项,如果 name 选项不可用,则匹配它的局部注册名称 (父组件 components 选项的键值)。匿名组件不能被匹配。
max
最多可以缓存多少组件实例。一旦这个数字达到了,在新实例被创建之前,已缓存组件中最久没有被访问的实例会被销毁掉。
1
2
3
<keep-alive :max="10">
  <component :is="view"></component>
</keep-alive>
和其它组件结合
以下示例展示了如何嵌套这些组件以让它们的表现符合预期。若要简化这个组合你可以移除不需要的组件:
1
2
3
4
5
6
7
8
9
10
11
12
13
14
15
16
<router-view v-slot="{ Component }">
  <template v-if="Component">
    <transition mode="out-in">
      <keep-alive>
        <suspense>
          <component :is="Component"></component>
          <template #fallback>
            <div>
              Loading...
            </div>
          </template>
        </suspense>
      </keep-alive>
    </transition>
  </template>
</router-view>
异步组件
在大型应用中,可能需要将应用分割成小一些的代码块,并且只在需要的时候才从服务器加载一个模块。为了简化,Vue 有一个 defineAsyncComponent 方法,实现异步任务。
此方法接受返回 Promise 的工厂函数。从服务器检索组件定义后,应调用 Promise 的 resolve 回调。你也可以调用 reject(reason),来表示加载失败。
也可以在工厂函数中返回一个 Promise
1
2
3
4
5
6
7
8
9
10
11
12
13
14
const { createApp, defineAsyncComponent } = Vue
const app = createApp({})
const AsyncComp = defineAsyncComponent(

() =>

new Promise((resolve, reject) => {

resolve({

template: '<div>I am async!</div>'

})

})

)
app.component('async-example', AsyncComp)
如果在 webpack2 和 ES2015 中,需要这样使用动态地导入:
1
2
3
4
5
6
7
import { defineAsyncComponent } from 'vue'
const AsyncComp = defineAsyncComponent(() =>

import('./components/AsyncComponent.vue')

)
app.component('async-component', AsyncComp)
案例14
1
2
3
4
5
6
7
8
9
10
11
12
13
14
15
16
17
18
19
20
21
22
23
24
25
26
27
28
29
30
31
32
33
34
35
36
37
38
39
<!DOCTYPE html>
<html>
<head>

<meta charset="UTF-8" />

<title></title>

<script src="../js/vue.min.js" type="text/javascript" charset="utf-8"></script>

</head>
<body>

<div id="app">

<async-component></async-component>

</div>

</body>
<script type="text/javascript">

const { createApp, defineAsyncComponent } = Vue

const AsyncComponent = defineAsyncComponent(

() => new Promise((resolve, reject) => {

ran = Math.floor(Math.random() * 10)

if (ran % 2 == 0) {

resolve({

template: '<div>I am async!</div>'

})

} else {

reject()

}

})

)
<span class="hljs-keyword">const</span> App = {
}

<span class="hljs-keyword">const</span> app = createApp(App)
app.component(<span class="hljs-string">'async-component'</span>, AsyncComponent)
app.mount(<span class="hljs-string">"#app"</span>)

</script>
</html>
VUE 单文件组件
Vue 单文件组件(又名 *.vue 文件,缩写为 SFC)是一种特殊的文件格式,它允许将 Vue 组件的模板、逻辑 与 样式封装在单个文件中。下面是 SFC 示例:
1
2
3
4
5
6
7
8
9
10
11
12
13
14
15
16
17
18
19
20
<script>
export default {
  data() {
    return {
      greeting: 'Hello World!'
    }
  }
}
</script>
<template>

<p class="greeting">{{ greeting }}</p>

</template>
<style>

.greeting {

color: red;

font-weight: bold;

}

</style>
正如所见,Vue SFC 是经典的 HTML、CSS 与 JavaScript 三个经典组合的自然延伸。每个 *.vue 文件由三种类型的顶层代码块组成:<template>、<script> 与 <style>:
<script>部分是一个标准的JavaScript模块。它应该导出一个Vue组件定义作为其默认导出。<template>部分定义了组件的模板。<style>部分定义了与此组件关联的CSS。
详细课查询 SFC 语法规范 查看更多
Vue SFC 是框架指定的文件格式,必须由 @vue/compiler-sfc 预编译为标准的 JavaScript 与 CSS。编译后的 SFC 是一个标准的 JavaScript(ES)模块——这意味着通过正确的构建配置,可以像模块一样导入 SFC:
1
2
3
4
5
6
7
import MyComponent from './MyComponent.vue'
export default {

components: {

MyComponent

}

}
SFC 中的 <style> 标签通常在开发过程中作为原生 <style> 标签注入以支持热更新。
在实际项目中,通常会将 SFC 编译器与 Vite 或 Vue CLI(基于 webpack)等构建工具集成在一起,Vue 提供的官方脚手架工具,可以更快地开始使用 SFC。
VUE 项目搭建
CLI安装
node安装
安装Node.js,下载地址:
http://nodejs.cn/download/
查看Node版本
node -v
查看npm版本
npm -v
设置镜像
npm config set registry https://registry.npm.taobao.org --global
查看正在使用的镜像
npm get registry
如果没有切换成功可以手动切换
npx nrm use taobao
npm安装CLI
如果之前本地有安装vue2.x的脚手架需要先进行卸载
npm uninstall vue-cli -g
安装vue3
npm install @vue/cli -g
上面两句命令也可以合并一行执行
npm uninstall vue-cli -g && npm install @vue/cli -g
如果需要升级vue
npm update -g @vue/cli
查看vue版本(大V)
vue -V
cnpm安装CLI
也可以使用cnpm来代替npm
npm install -g cnpm --registry=https://registry.npm.taobao.org
cnpm是中国 npm 镜像的客户端,以后就可以使用cnpm来安装插件了
查看cnpm版本信息
cnpm -v
安装CLI脚手架
cnpm uninstall -g vue-cli && cnpm install -g @vue/cli
查看vue版本(大V)
vue -V
pnpm安装CLI
pnpm速度比npm更快,可以使用npm的所有命令
安装pnpm
npm install -g pnpm --registry=https://registry.npm.taobao.org
查看pnpm版本
pnpm -v
安装 @vue/cli
pnpm install -g @vue/cli
查看vue版本(大V)
vue -V
yarn安装CLI
安装yarn
npm install -g yarn --registry=https://registry.npm.taobao.org
查看yarn版本
yarn -v
安装CLI
yarn global add @vue/cli
CLI命令行创建项目
让一个 npm 版本太高需要降低版本
npm install npm@6.14.15 -g
切换到项目路径
D:
cd C:\Users\star\WebstormProjects
创建项目
vue create project02
使用上下键切换选项
1
2
3
4
5
Vue CLI v4.5.12
? Please pick a preset: (Use arrow keys)
  Default ([Vue 2] babel, eslint)						使用默认配置自动vue2项目
  Default (Vue 3 Preview) ([Vue 3] babel, eslint)		使用默认配置自动vue3项目
> Manually select features								自定义创建项目
重点讲一下自定义创建项目
1
2
3
4
5
6
7
8
9
10
11
12
13
14
Vue CLI v4.5.12
? Please pick a preset: Manually select features		请选择
? Check the features needed for your project: (Press <space> to select, <a> to toggle all, <i> to invert selection)												空格键选择,a键全选,i键反选
>(*) Choose Vue version									是否自定义选择vue版本
 (*) Babel												是否使用babel以支持ES6等语言
 (*) TypeScript											是否使用TypeScripyt
 (*) Progressive Web App (PWA) Support					PWA渐进式web app支持
 (*) Router												路由插件
 (*) Vuex												vue状态管理插件
 (*) CSS Pre-processors									CSS预处理插件
 (*) Linter / Formatter									代码 / 格式检查插件
 (*) Unit Testing										是否开启单元测试
 (*) E2E Testing										支持 E2E 测试
输入y回车
1
2
3
4
5
6
7
Vue CLI v4.5.12
? Please pick a preset: Manually select features
? Check the features needed for your project: Choose Vue version, Babel, TS, PWA, Router, Vuex, CSS Pre-processors, Lint
er, Unit, E2E
? Choose a version of Vue.js that you want to start the project with
  2.x
> 3.x (Preview)											选择3
输入y回车
1
2
3
4
5
6
Vue CLI v4.5.12
? Please pick a preset: Manually select features
? Check the features needed for your project: Choose Vue version, Babel, TS, PWA, Router, Vuex, CSS Pre-processors, Lint
er, Unit, E2E
? Choose a version of Vue.js that you want to start the project with 3.x (Preview)
? Use class-style component syntax? (y/N) y				输入y
输入y回车
1
2
3
4
5
6
7
Vue CLI v4.5.12
? Please pick a preset: Manually select features
? Check the features needed for your project: Choose Vue version, Babel, TS, PWA, Router, Vuex, CSS Pre-processors, Lint
er, Unit, E2E
? Choose a version of Vue.js that you want to start the project with 3.x (Preview)
? Use class-style component syntax? Yes
? Use Babel alongside TypeScript (required for modern mode, auto-detected polyfills, transpiling JSX)? (Y/n) y
输入y回车
1
2
3
4
5
6
7
8
Vue CLI v4.5.12
? Please pick a preset: Manually select features
? Check the features needed for your project: Choose Vue version, Babel, TS, PWA, Router, Vuex, CSS Pre-processors, Lint
er, Unit, E2E
? Choose a version of Vue.js that you want to start the project with 3.x (Preview)
? Use class-style component syntax? Yes
? Use Babel alongside TypeScript (required for modern mode, auto-detected polyfills, transpiling JSX)? Yes
? Use history mode for router? (Requires proper server setup for index fallback in production) (Y/n) y
选择CSS预处理方式
1
2
3
4
5
6
7
8
9
10
11
12
13
Vue CLI v4.5.12
? Please pick a preset: Manually select features
? Check the features needed for your project: Choose Vue version, Babel, TS, PWA, Router, Vuex, CSS Pre-processors, Lint
er, Unit, E2E
? Choose a version of Vue.js that you want to start the project with 3.x (Preview)
? Use class-style component syntax? Yes
? Use Babel alongside TypeScript (required for modern mode, auto-detected polyfills, transpiling JSX)? Yes
? Use history mode for router? (Requires proper server setup for index fallback in production) Yes
? Pick a CSS pre-processor (PostCSS, Autoprefixer and CSS Modules are supported by default): (Use arrow keys)
> Sass/SCSS (with dart-sass)
  Sass/SCSS (with node-sass)
  Less
  Stylus
选择格式校验模式
1
2
3
4
5
6
7
8
9
10
11
12
13
14
15
Vue CLI v4.5.12
? Please pick a preset: Manually select features
? Check the features needed for your project: Choose Vue version, Babel, TS, PWA, Router, Vuex, CSS Pre-processors, Lint
er, Unit, E2E
? Choose a version of Vue.js that you want to start the project with 3.x (Preview)
? Use class-style component syntax? Yes
? Use Babel alongside TypeScript (required for modern mode, auto-detected polyfills, transpiling JSX)? Yes
? Use history mode for router? (Requires proper server setup for index fallback in production) Yes
? Pick a CSS pre-processor (PostCSS, Autoprefixer and CSS Modules are supported by default): Sass/SCSS (with dart-sass)
? Pick a linter / formatter config: (Use arrow keys)
  ESLint with error prevention only				仅错误预防
  ESLint + Airbnb config						Airbnb配置
  ESLint + Standard config						标准配置
> ESLint + Prettier								两者同时用
  TSLint (deprecated)							TS的格式检查
选择检查方式
1
2
3
4
5
6
7
8
9
10
11
12
13
Vue CLI v4.5.12
? Please pick a preset: Manually select features
? Check the features needed for your project: Choose Vue version, Babel, TS, PWA, Router, Vuex, CSS Pre-processors, Lint
er, Unit, E2E
? Choose a version of Vue.js that you want to start the project with 3.x (Preview)
? Use class-style component syntax? Yes
? Use Babel alongside TypeScript (required for modern mode, auto-detected polyfills, transpiling JSX)? Yes
? Use history mode for router? (Requires proper server setup for index fallback in production) Yes
? Pick a CSS pre-processor (PostCSS, Autoprefixer and CSS Modules are supported by default): Sass/SCSS (with dart-sass)
? Pick a linter / formatter config: Prettier
? Pick additional lint features: (Press <space> to select, <a> to toggle all, <i> to invert selection)
>(*) Lint on save								保存时检查
 ( ) Lint and fix on commit (requires Git)		提交时检查
选择单元测试
1
2
3
4
5
6
7
8
9
10
11
12
13
14
Vue CLI v4.5.12
? Please pick a preset: Manually select features
? Check the features needed for your project: Choose Vue version, Babel, TS, PWA, Router, Vuex, CSS Pre-processors, Lint
er, Unit, E2E
? Choose a version of Vue.js that you want to start the project with 3.x (Preview)
? Use class-style component syntax? Yes
? Use Babel alongside TypeScript (required for modern mode, auto-detected polyfills, transpiling JSX)? Yes
? Use history mode for router? (Requires proper server setup for index fallback in production) Yes
? Pick a CSS pre-processor (PostCSS, Autoprefixer and CSS Modules are supported by default): Sass/SCSS (with dart-sass)
? Pick a linter / formatter config: Prettier
? Pick additional lint features: Lint on save
? Pick a unit testing solution: (Use arrow keys)
> Mocha + Chai
  Jest
选择E2E**端对端测试**测试
1
2
3
4
5
6
7
8
9
10
11
12
13
14
15
16
Vue CLI v4.5.12
? Please pick a preset: Manually select features
? Check the features needed for your project: Choose Vue version, Babel, TS, PWA, Router, Vuex, CSS Pre-processors, Lint
er, Unit, E2E
? Choose a version of Vue.js that you want to start the project with 3.x (Preview)
? Use class-style component syntax? Yes
? Use Babel alongside TypeScript (required for modern mode, auto-detected polyfills, transpiling JSX)? Yes
? Use history mode for router? (Requires proper server setup for index fallback in production) Yes
? Pick a CSS pre-processor (PostCSS, Autoprefixer and CSS Modules are supported by default): Sass/SCSS (with dart-sass)
? Pick a linter / formatter config: Prettier
? Pick additional lint features: Lint on save
? Pick a unit testing solution: Mocha
? Pick an E2E testing solution: (Use arrow keys)
  Cypress (Chrome only)
  Nightwatch (WebDriver-based)
> WebdriverIO (WebDriver/DevTools based)
选择测试浏览器
1
2
3
4
5
6
7
8
9
10
11
12
13
14
15
16
Vue CLI v4.5.12
? Please pick a preset: Manually select features
? Check the features needed for your project: Choose Vue version, Babel, TS, PWA, Router, Vuex, CSS Pre-processors, Lint
er, Unit, E2E
? Choose a version of Vue.js that you want to start the project with 3.x (Preview)
? Use class-style component syntax? Yes
? Use Babel alongside TypeScript (required for modern mode, auto-detected polyfills, transpiling JSX)? Yes
? Use history mode for router? (Requires proper server setup for index fallback in production) Yes
? Pick a CSS pre-processor (PostCSS, Autoprefixer and CSS Modules are supported by default): Sass/SCSS (with dart-sass)
? Pick a linter / formatter config: Prettier
? Pick additional lint features: Lint on save
? Pick a unit testing solution: Mocha
? Pick an E2E testing solution: WebdriverIO
? Pick browsers to run end-to-end test on
> Chrome
  FireFox
选择 Babel, PostCSS, ESLint 等自定义配置的存放位置
1
2
3
4
5
6
7
8
9
10
11
12
13
14
15
16
17
18
Vue CLI v4.5.12
? Please pick a preset: Manually select features
? Check the features needed for your project: Choose Vue version, Babel, TS, PWA, Router, Vuex, CSS Pre-processors, Lint
er, Unit, E2E
? Choose a version of Vue.js that you want to start the project with 3.x (Preview)
? Use class-style component syntax? Yes
? Use Babel alongside TypeScript (required for modern mode, auto-detected polyfills, transpiling JSX)? Yes
? Use history mode for router? (Requires proper server setup for index fallback in production) Yes
? Pick a CSS pre-processor (PostCSS, Autoprefixer and CSS Modules are supported by default): Sass/SCSS (with dart-sass)
? Pick a linter / formatter config: Prettier
? Pick additional lint features: Lint on save
? Pick a unit testing solution: Mocha
? Pick an E2E testing solution: WebdriverIO
? Pick browsers to run end-to-end test on
> Chrome
? Where do you prefer placing config for Babel, ESLint, etc.? (Use arrow keys)
> In dedicated config files						在专用的配置文件中
  In package.json
是否保存为预设
1
2
3
4
5
6
7
8
9
10
11
12
13
14
15
16
Vue CLI v4.5.12
? Please pick a preset: Manually select features
? Check the features needed for your project: Choose Vue version, Babel, TS, PWA, Router, Vuex, CSS Pre-processors, Lint
er, Unit, E2E
? Choose a version of Vue.js that you want to start the project with 3.x (Preview)
? Use class-style component syntax? Yes
? Use Babel alongside TypeScript (required for modern mode, auto-detected polyfills, transpiling JSX)? Yes
? Use history mode for router? (Requires proper server setup for index fallback in production) Yes
? Pick a CSS pre-processor (PostCSS, Autoprefixer and CSS Modules are supported by default): Sass/SCSS (with dart-sass)
? Pick a linter / formatter config: Prettier
? Pick additional lint features: Lint on save
? Pick a unit testing solution: Mocha
? Pick an E2E testing solution: WebdriverIO
? Pick browsers to run end-to-end test on Chrome
? Where do you prefer placing config for Babel, ESLint, etc.? In dedicated config files
? Save this as a preset for future projects? (y/N) n
如果报错,管理员权限打开执行:
npm install --global --production windows-build-tools
完成后开始安装cli插件
1
2
3
Vue CLI v4.5.12
✨  Creating project in C:\Users\star\WebstormProjects\project02.
⚙️  Installing CLI plugins. This might take a while...
安装成功后
1
2
3
4
5
6
7
8
9
10
11
12
13
14
15
...
added 53 packages from 36 contributors in 9.62s
74 packages are looking for funding

run npm fund for details
⚓  Running completion hooks...
📄  Generating README.md...
🎉  Successfully created project project02.

👉  Get started with the following commands:
$ cd project03

$ npm run serve
CLI图形界面创建项目
vue ui
过程如上,只是全部操作在浏览器中都有图形界面
安装运行
1
2
cd project04
npm run serve
webpack安装
安装cli-init
npm i -g @vue/cli-init
创建项目
vue init webpack project05
选择选项
1
2
3
4
5
6
7
8
9
10
11
? Project name project05
? Project description A Vue.js project
? Author
? Vue build standalone
? Install vue-router? Yes
? Use ESLint to lint your code? Yes
? Pick an ESLint preset Standard
? Set up unit tests Yes
? Pick a test runner jest
? Setup e2e tests with Nightwatch? Yes
? Should we run `npm install` for you after the project has been created? (recommended) npm
完成后
1
2
3
4
5
6
7
8
9
# Project initialization finished!
# ========================
To get started:
cd project05

npm run dev
Documentation can be found at https://vuejs-templates.github.io/webpack
安装运行
1
2
cd project05
npm run dev
Vite安装
Vite需要Node.js版本 > = 12.0.0。
Vite是一个 web 开发构建工具,由于其原生 ES 模块导入方式,可以实现闪电般的冷服务器启动。可以使用 Vite 快速构建 Vue 项目。
安装cli-init,如果每有安装
npm i -g @vue/cli-init
创建项目
1
2
3
4
5
6
7
# 老版
npm init @vitejs/app project06
# 新版

npm init vite@latest project06

pnpm dlx create-vite project06

yarn create vite project06
当然也可以直接指定模板安装
1
2
3
4
5
6
7
8
# npm 6.x
npm init vite@latest my-vue-app --template vue
# npm 7+, 需要额外的双横线:

npm init vite@latest my-vue-app -- --template vue
# yarn

yarn create vite my-vue-app --template vue
支持的模板预设包括:
1 2 3 4 5 6 7 8 9vanilla vue vue-ts react react-ts preact preact-ts lit-element lit-element-ts
选择一个模板
1 2 3 4 5 6 7 8 9 10 11 12? Select a template: ... vanilla > vue vue-ts react react-ts preact preact-ts lit-element lit-element-ts svelte svelte-ts
安装运行
1
2
3
cd project06
npm install
npm run dev
安装VSCode
Visual Studio Code是微软2015年推出的一个轻量但功能强大的源代码编辑器,基于 Electron 开发,支持 Windows、Linux 和 macOS 操作系统。它内置了对JavaScript,TypeScript和Node.js的支持并且具有丰富的其它语言和扩展的支持,功能超级强大。
下载安装,下载地址
https://code.visualstudio.com/
设置中文
按快捷键ctrl + shift + p在弹出来的窗口中输入configure display language选中回车,在左边列出来的列表中选择Chinese安装即可。最后重启VSCode生效。
安装插件
安装完成后打开,并安装Vetur插件
安装Vetur插件
Vetur插件是Vue官方提供的VSCode完美支持Vue的插件,提供对Vue语法良好支持。包括语法高亮、语法代码提示、语法lint检测等
点击VSCode节目最左边的最下面的图标
输入vetur后,在搜索出来的列表中选择vetur右下角的安装按钮即可安装。
使用快捷键:
Alt+Shift+F(格式化全文)Ctrl+K或者Ctrl+F(格式化选中代码,两个Ctrl需要同时按着)
常用的插件还有几个
-
Path Intellisense(必备)
自动提示文件路径,支持各种快速引入文件 -
Prettier - Code formatter(必备)
代码格式化 -
open in browser (必备)
支持快捷键与鼠标右键快速在浏览器中打开html文件 -
npm Intellisense(node必备)
import、require npm模块是自动补全 -
IntelliSense for CSS class names (推荐)
智能提示 css 的 class 名 -
Class autocomplete for HTML(必备)
智能提示HTML class =“”属性
- HTML Snippets (必备)
智能提示HTML标签,以及标签含义
-
HTML CSS Support(必备)
让 html 标签上写class 智能提示当前项目所支持的样式 -
Auto Close Tag(必备)
自动闭合HTML/XML标签 -
Auto Rename Tag(必备)
自动完成另一侧标签的同步修改 -
GitLens (使用git的必备)
Git提示,方便查看git日志,git重度使用者必备 -
Vue VSCode Snippets(Vue必备)
Vue 语法片段扩展 -
Beautify (必备)
格式化 html ,js,css,快捷键ctrl + b
-
JavaScript(ES6) code snippets(必备)
ES6语法智能提示以及快速输入,除js外还支持.ts,.jsx,.tsx,.html,.vue,省去了配置其支持各种包含js代码文件的时间 -
Bracket Pair Colorizer(必备)
给括号加上不同的颜色,便于区分不同的区块,使用者可以定义不同括号类型和不同颜色 -
jQuery Code Snippets (推荐)
jQuery代码智能提示
- ESLint (推荐)
js语法纠错,可以自定义配置,不过配置较为复杂,建议使用网上一些广泛使用的eslint配置
- language-stylus(推荐)
stylus语法支持
导入项目
创建项目,切换到对应的文件夹中,打开cmd
npm init vite@latest project
vscode 中项目即是文件夹,打开 vscode 工具 , 选择文件 - 打开文件夹 ,选择项目所在的路径即可。
按 Ctrl + ~ 键 ( Esc 下面的那个 ) 调出终端 ,执行 相关命令即可运行
如:
1 2npm install npm run dev
项目结构
vue项目结构如下:

其中main.js是入口文件,包括vue对象的创建。每个 Vue 应用都是通过用 Vue 创建一个新的 Vue 对象开始。
1
2
3
4
5
6
import { createApp } from 'vue'
import App from './App.vue'
//创建 vue 对象,并且将App.vue文件作为模板页面,同时绑定到 id=app 的元素上

//id=app 的元素在index.html中定义的

createApp(App).mount('#app')
在main.js入口文件文件中引入了 App.vue 文件,vue 文件等价于 html 文件
1
2
3
4
5
6
7
8
9
10
11
12
13
14
15
16
17
18
19
<script setup>
import HelloWorld from './components/HelloWorld.vue'
</script>
<template>

<img alt="Vue logo" src="./assets/logo.png" />

<HelloWorld msg="Hello Vue 3 + Vite" />

</template>
<style>

#app {

font-family: Avenir, Helvetica, Arial, sans-serif;

-webkit-font-smoothing: antialiased;

-moz-osx-font-smoothing: grayscale;

text-align: center;

color: #2c3e50;

margin-top: 60px;

}

</style>
App.vue 文件中又引入了 HelloWorld 组件,组件就是写好的特定功能的 vue 文件,可以直接引入过来使用,方便、通用
1
2
3
4
5
6
7
8
9
10
11
12
13
14
15
16
17
18
19
20
21
22
23
24
25
26
27
28
29
30
31
32
33
34
35
36
37
38
39
40
<script setup>
import { ref } from 'vue'
defineProps({

msg: String

})
const count = ref(0)

</script>
<template>

<h1>{{ msg }}</h1>
<p>

Recommended IDE setup:

<a href="https://code.visualstudio.com/" target="_blank">VSCode</a>

+

<a href="https://github.com/johnsoncodehk/volar" target="_blank">Volar</a>

</p>
<p>

<a href="https://vitejs.dev/guide/features.html" target="_blank">

Vite Documentation

</a>

|

<a href="https://v3.vuejs.org/" target="_blank">Vue 3 Documentation</a>

</p>
<button type="button" @click="count++">count is: {{ count }}</button>

<p>

Edit

<code>components/HelloWorld.vue</code> to test hot module replacement.

</p>

</template>
<style scoped>

a {

color: #42b983;

}

</style>
模板语法
每个 vue 文件的语法结构一样
1
2
3
4
5
6
7
8
9
10
11
12
13
14
15
16
<!-- JS模块 -->
<script>
export default {
  // JS代码
};
</script>
<!-- HTML模块 -->

<template>
</template>
<!-- CSS模块 -->

<style scoped>

/* CSS代码 */

</style>
案例
1
2
3
4
5
6
7
8
9
10
11
12
13
14
15
16
17
18
19
20
21
22
23
24
25
26
27
28
29
30
31
32
33
34
35
36
37
38
39
40
41
42
43
44
45
46
47
48
<!-- JS模块 -->
<script>
export default {
  // JS代码
  data() {
    return {
      count: 4,
      text: '<span style="color: blue;">132456</span>',
      clas: {
        isActive: false,
        hasError: true
      }
    };
  },
  computed: {
    isCount() {
      // `this` 指向 vue 对象实例
      return this.count > 0 ? "Yes" : "No";
    },
  },
};
</script>
<!-- HTML模块 -->

<template>

<div>从vue传过来的数据:<b>{{ count }}</b></div>

<div>库存是否足够:<b>{{ isCount }}</b></div>
<div>{{}}类似与使用v-text绑定的:<b v-text="text"></b></div>

<div>使用v-html绑定的可以识别html标签:<span v-html="text"></span></div>
<div :class="{active: clas.isActive,'error': clas.hasError}">

v-bind:id="id"相当于setAttribute方法设置id属性值,

<br>

v-bind:id="id"可以省略为 :id

</div>

</template>
<!-- CSS模块 -->

<style scoped>

/* CSS代码 */

.active{

background-color: darkcyan;

}

.error{

color: red;

}

</style>
作业
使用vue实现如下动态表格

</article>

 浙公网安备 33010602011771号