
18-前端核心技术-node核心模块
第18章-前端核心技术-node核心模块
学习目标
- 掌握node的模块导入方式
- 掌握npm包管理配置文件
- 掌握npm常用命令
重点 - 掌握Express模块的使用
重点难点
Node 概述
Node.js® 是一个基于 Chrome V8 引擎 的 JavaScript 运行时环境。
Node.js 是运行在服务端的 JavaScript,它对 ES6 的支持度更高。
下载安装,下载地址:https://nodejs.org/zh-cn/download/

选择对应版本下载,下载后直接安装即可
Node 应用
接下来我们使用 http.createServer() 方法创建服务器,并使用 listen 方法绑定 8888 端口。 函数通过 request, response 参数来接收和响应数据。
实例如下,在你项目的根目录下创建一个叫 server.js 的文件,并写入以下代码:
1
2
3
4
5
6
7
8
9
10
11
12
13
14
15
var http = require('http');
console.log(http);
http.createServer(function (request, response) {
<span class="hljs-comment">// 发送 HTTP 头部 </span>
<span class="hljs-comment">// HTTP 状态值: 200 : OK</span>
<span class="hljs-comment">// 内容类型: text/plain</span>
response.writeHead(<span class="hljs-number">200</span>, {<span class="hljs-string">'Content-Type'</span>: <span class="hljs-string">'text/plain'</span>});

<span class="hljs-comment">// 发送响应数据 "Hello World"</span>
response.end(<span class="hljs-string">'Hello World\n'</span>);

}).listen(8888);
// 终端打印如下信息

console.log('服务器地址 http://127.0.0.1:8888/');
以上代码我们完成了一个可以工作的 HTTP 服务器。
使用 node 命令执行以上的代码:
1
2
3
4
5
6
7
8
9
10
11
12
13
14
15
16
17
18
19
20
21
22
23
24
25
26
27
28
29
30
31
32
33
34
35
36
37
38
39
40
41
42
43
44
45
46
47
48
49
50
51
52
53
54
55
56
57
58
59
60
61
62
63
64
65
66
67
68
69
70
71
72
73
74
75
76
77
78
79
80
81
82
83
84
85
86
87
88
89
90
91
92
93
94
95
96
97
PS C:\Users\star\Desktop\Node\案例01> node server.js
{
  _connectionListener: [Function: connectionListener],
  METHODS: [
    'ACL',        'BIND',        'CHECKOUT',
    'CONNECT',    'COPY',        'DELETE',
    'GET',        'HEAD',        'LINK',
    'LOCK',       'M-SEARCH',    'MERGE',
    'MKACTIVITY', 'MKCALENDAR',  'MKCOL',
    'MOVE',       'NOTIFY',      'OPTIONS',
    'PATCH',      'POST',        'PRI',
    'PROPFIND',   'PROPPATCH',   'PURGE',
    'PUT',        'REBIND',      'REPORT',
    'SEARCH',     'SOURCE',      'SUBSCRIBE',
    'TRACE',      'UNBIND',      'UNLINK',
    'UNLOCK',     'UNSUBSCRIBE'
  ],
  STATUS_CODES: {
    '100': 'Continue',
    '101': 'Switching Protocols',
    '102': 'Processing',
    '103': 'Early Hints',
    '200': 'OK',
    '201': 'Created',
    '202': 'Accepted',
    '203': 'Non-Authoritative Information',
    '204': 'No Content',
    '205': 'Reset Content',
    '206': 'Partial Content',
    '207': 'Multi-Status',
    '208': 'Already Reported',
    '226': 'IM Used',
    '300': 'Multiple Choices',
    '301': 'Moved Permanently',
    '302': 'Found',
    '303': 'See Other',
    '304': 'Not Modified',
    '305': 'Use Proxy',
    '307': 'Temporary Redirect',
    '308': 'Permanent Redirect',
    '400': 'Bad Request',
    '401': 'Unauthorized',
    '402': 'Payment Required',
    '403': 'Forbidden',
    '404': 'Not Found',
    '405': 'Method Not Allowed',
    '406': 'Not Acceptable',
    '407': 'Proxy Authentication Required',
    '408': 'Request Timeout',
    '409': 'Conflict',
    '410': 'Gone',
    '411': 'Length Required',
    '412': 'Precondition Failed',
    '413': 'Payload Too Large',
    '414': 'URI Too Long',
    '415': 'Unsupported Media Type',
    '416': 'Range Not Satisfiable',
    '417': 'Expectation Failed',
    '418': "I'm a Teapot",
    '421': 'Misdirected Request',
    '422': 'Unprocessable Entity',
    '423': 'Locked',
    '424': 'Failed Dependency',
    '425': 'Too Early',
    '426': 'Upgrade Required',
    '428': 'Precondition Required',
    '429': 'Too Many Requests',
    '431': 'Request Header Fields Too Large',
    '451': 'Unavailable For Legal Reasons',
    '500': 'Internal Server Error',
    '501': 'Not Implemented',
    '502': 'Bad Gateway',
    '503': 'Service Unavailable',
    '504': 'Gateway Timeout',
    '505': 'HTTP Version Not Supported',
    '506': 'Variant Also Negotiates',
    '507': 'Insufficient Storage',
    '508': 'Loop Detected',
    '509': 'Bandwidth Limit Exceeded',
    '510': 'Not Extended',
    '511': 'Network Authentication Required'
  },
  Agent: [Function: Agent] { defaultMaxSockets: Infinity },
  ClientRequest: [Function: ClientRequest],
  IncomingMessage: [Function: IncomingMessage],
  OutgoingMessage: [Function: OutgoingMessage],
  Server: [Function: Server],
  ServerResponse: [Function: ServerResponse],
  createServer: [Function: createServer],
  validateHeaderName: [Function: hidden],
  validateHeaderValue: [Function: hidden],
  get: [Function: get],
  request: [Function: request],
  maxHeaderSize: [Getter],
  globalAgent: [Getter/Setter]
}
服务器地址 http://127.0.0.1:8888/

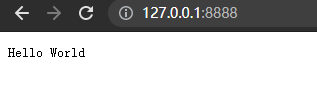
接下来,打开浏览器访问 http://127.0.0.1:8888/,你会看到一个写着 “Hello World”的网页。
Node 模块
为了让Node.js的文件可以相互调用,Node.js提供了一个简单的模块系统。
模块是Node.js 应用程序的基本组成部分,文件和模块是一一对应的。换言之,一个 Node.js 文件就是一个模块,这个文件可能是JavaScript 代码、JSON 或者编译过的C/C++ 扩展。
Node.js 提供了 exports 和 require 两个对象,其中 exports 是模块公开的接口,require 用于从外部获取一个模块的接口,即所获取模块的 exports 对象。
第一步:创建 hello.js 文件(模块),导出函数或者变量
1
2
3
exports.world = function() {
  console.log('Hello World');
}
有时候想把一个对象封装到模块中,使用 module.exports = Hello 代替了exports.world = function(){}。格式如下:
1
2
3
4
5
6
7
8
9
10
11
//hello.js
function Hello() {
    var name;
    this.setName = function(thyName) {
        name = thyName;
    };
    this.sayHello = function() {
        console.log('Hello ' + name);
    };
};
module.exports = Hello;
exports 和 module.exports 的区别
如果要对外暴露属性或方法,就用 exports 就行,要暴露对象(类似class,包含了很多属性和方法),就用 module.exports。
引入模块
在 Node.js 中,引入一个模块非常简单,如下我们创建一个 main.js 文件并引入 hello 模块,代码如下:
1
2
var hello = require('./hello');
hello.world();
以上实例中,代码 require(‘./hello’) 引入了当前目录下的 hello.js 文件(./ 为当前目录,node.js 默认后缀为 js)。
文件加载规则
Node.js 中存在 4 类模块(原生模块和3种文件模块)
Node.js 的 require 方法中的文件查找策略如下:

从文件模块缓存中加载
尽管原生模块与文件模块的优先级不同,但是都会优先从文件模块的缓存中加载已经存在的模块。
从原生模块加载
原生模块的优先级仅次于文件模块缓存的优先级。require 方法在解析文件名之后,优先检查模块是否在原生模块列表中。以http模块为例,尽管在目录下存在一个 http/http.js/http.node/http.json 文件,require(“http”) 都不会从这些文件中加载,而是从原生模块中加载。
原生模块也有一个缓存区,同样也是优先从缓存区加载。如果缓存区没有被加载过,则调用原生模块的加载方式进行加载和执行。
从文件加载
当文件模块缓存中不存在,而且不是原生模块的时候,Node.js 会解析 require 方法传入的参数,并从文件系统中加载实际的文件,加载过程中的包装和编译细节在前一节中已经介绍过,这里我们将详细描述查找文件模块的过程,其中,也有一些细节值得知晓。
require方法接受以下几种参数的传递:
- http、fs、path等,原生模块。
- ./mod 或 ../mod,相对路径的文件模块。
- /pathtomodule/mod,绝对路径的文件模块。
- mod,非原生模块的文件模块。
Node NPM 包管理
NPM是随同 NodeJS 一起安装的包管理工具,能解决 NodeJS 代码部署上的很多问题,常见的使用场景有以下几种:
- 允许用户从NPM服务器下载别人编写的第三方包到本地使用。
- 允许用户从NPM服务器下载并安装别人编写的命令行程序到本地使用。
- 允许用户将自己编写的包或命令行程序上传到NPM服务器供别人使用。
通过输入 “npm -v” 来测试是否成功安装。命令如下,出现版本提示表示安装成功:
1
2
$ npm -v
2.3.0
如果安装的是旧版本的 npm,可以通过 npm 命令来升级,命令如下:
npm install npm -g
淘宝 NPM 镜像
国内直接使用 npm 的官方镜像是非常慢的,推荐使用淘宝 NPM 镜像。
淘宝 NPM 镜像是一个完整 npmjs.org 镜像,可以用此代替官方版本(只读),同步频率目前为 10分钟 一次以保证尽量与官方服务同步。
临时使用
npm --registry https://registry.npm.taobao.org install express
永久使用
npm config set registry https://registry.npm.taobao.org
通过如下命令可以查看是否配置成功
1
2
3
npm config get registry
# 或者
npm info express
如果需要恢复成原来的官方地址只需要执行如下命令:
npm config set registry https://registry.npmjs.org
如果没有切换成功可以手动切换
npx nrm use taobao
还可以使用淘宝定制的 cnpm (gzip 压缩支持) 命令行工具代替默认的 npm:
$ npm install -g cnpm --registry=https://registry.npm.taobao.org
这样就可以使用 cnpm 命令来安装模块了:
$ cnpm install [name]
package.json
每个项目的根目录下面,一般都有一个package.json文件,定义了这个项目所需要的各种模块,以及项目的配置信息(比如名称、版本、许可证等元数据)。npm install命令根据这个配置文件,自动下载所需的模块,也就是配置项目所需的运行和开发环境。
下面是一个最简单的package.json文件,只定义两项元数据:项目名称和项目版本。
1
2
3
4
{
  "name" : "xxx",
  "version" : "0.0.0",
}
package.json文件就是一个JSON对象,该对象的每一个成员就是当前项目的一项设置。比如name就是项目名称,version是版本(遵守“大版本.次要版本.小版本”的格式)。
下面是一个更完整的package.json文件。
1
2
3
4
5
6
7
8
9
10
11
12
13
14
15
16
17
18
19
20
21
22
23
24
25
26
27
28
29
30
31
32
33
34
35
{
	"name": "Hello World",
	"version": "0.0.1",
	"author": "张三",
	"description": "第一个node.js程序",
	"keywords":["node.js","javascript"],
	"repository": {
		"type": "git",
		"url": "https://path/to/url"
	},
	"license":"MIT",
	"engines": {"node": "0.10.x"},
	"bugs":{"url":"http://path/to/bug","email":"bug@example.com"},
	"contributors":[{"name":"李四","email":"lisi@example.com"}],
	"scripts": {
		"start": "node index.js"
	},
	"dependencies": {
		"express": "latest",
		"mongoose": "~3.8.3",
		"handlebars-runtime": "~1.0.12",
		"express3-handlebars": "~0.5.0",
		"MD5": "~1.2.0"
	},
	"devDependencies": {
		"bower": "~1.2.8",
		"grunt": "~0.4.1",
		"grunt-contrib-concat": "~0.3.0",
		"grunt-contrib-jshint": "~0.7.2",
		"grunt-contrib-uglify": "~0.2.7",
		"grunt-contrib-clean": "~0.5.0",
		"browserify": "2.36.1",
		"grunt-browserify": "~1.3.0",
	}
}
下面详细解释package.json文件的各个字段。
scripts字段
scripts指定了运行脚本命令的npm命令行缩写,比如start指定了运行npm run start时,所要执行的命令。
下面的设置指定了npm run preinstall、npm run postinstall、npm run start、npm run test时,所要执行的命令。
1
2
3
4
5
6
"scripts": {
    "preinstall": "echo here it comes!",
    "postinstall": "echo there it goes!",
    "start": "node index.js",
    "test": "tap test/*.js"
}
dependencies字段
dependencies字段指定了项目运行所依赖的模块,devDependencies指定项目开发所需要的模块。
它们都指向一个对象。该对象的各个成员,分别由模块名和对应的版本要求组成,表示依赖的模块及其版本范围。
1
2
3
4
5
6
{
  "devDependencies": {
    "browserify": "~13.0.0",
    "karma-browserify": "~5.0.1"
  }
}
对应的版本可以加上各种限定,主要有以下几种:
- 指定版本:比如
1.2.2,遵循“大版本.次要版本.小版本”的格式规定,安装时只安装指定版本。 - 波浪号(tilde)+指定版本:比如
~1.2.2,表示安装1.2.x的最新版本(不低于1.2.2),但是不安装1.3.x,也就是说安装时不改变大版本号和次要版本号。 - 插入号(caret)+指定版本:比如ˆ1.2.2,表示安装1.x.x的最新版本(不低于1.2.2),但是不安装2.x.x,也就是说安装时不改变大版本号。需要注意的是,如果大版本号为0,则插入号的行为与波浪号相同,这是因为此时处于开发阶段,即使是次要版本号变动,也可能带来程序的不兼容。
- latest:安装最新版本。
package.json文件可以手工编写,也可以使用npm init命令自动生成。
$ npm init
这个命令采用互动方式,要求用户回答一些问题,然后在当前目录生成一个基本的package.json文件。所有问题之中,只有项目名称(name)和项目版本(version)是必填的,其他都是选填的。
有了package.json文件,直接使用npm install命令,就会在当前目录中安装所需要的模块。
$ npm install
如果一个模块不在package.json文件之中,可以单独安装这个模块,并使用相应的参数,将其写入package.json文件之中。
1
2
$ npm install express --save
$ npm install express --save-dev
上面代码表示单独安装express模块,--save参数表示将该模块写入dependencies属性,--save-dev表示将该模块写入devDependencies属性。
peerDependencies
有时,你的项目和所依赖的模块,都会同时依赖另一个模块,但是所依赖的版本不一样。比如,你的项目依赖A模块和B模块的1.0版,而A模块本身又依赖B模块的2.0版。
大多数情况下,这不构成问题,B模块的两个版本可以并存,同时运行。但是,有一种情况,会出现问题,就是这种依赖关系将暴露给用户。
最典型的场景就是插件,比如A模块是B模块的插件。用户安装的B模块是1.0版本,但是A插件只能和2.0版本的B模块一起使用。这时,用户要是将1.0版本的B的实例传给A,就会出现问题。因此,需要一种机制,在模板安装的时候提醒用户,如果A和B一起安装,那么B必须是2.0模块。
peerDependencies字段,就是用来供插件指定其所需要的主工具的版本。
1
2
3
4
5
6
{
  "name": "chai-as-promised",
  "peerDependencies": {
    "chai": "1.x"
  }
}
上面代码指定,安装chai-as-promised模块时,主程序chai必须一起安装,而且chai的版本必须是1.x。如果你的项目指定的依赖是chai的2.0版本,就会报错。
注意,从npm 3.0版开始,peerDependencies不再会默认安装了。
bin字段
bin项用来指定各个内部命令对应的可执行文件的位置。
1
2
3
"bin": {
  "someTool": "./bin/someTool.js"
}
上面代码指定,someTool 命令对应的可执行文件为 bin 子目录下的 someTool.js。Npm会寻找这个文件,在node_modules/.bin/目录下建立符号链接。在上面的例子中,someTool.js会建立符号链接node_modules/.bin/someTool。由于node_modules/.bin/目录会在运行时加入系统的PATH变量,因此在运行npm时,就可以不带路径,直接通过命令来调用这些脚本。
因此,像下面这样的写法可以采用简写。
1
2
3
4
5
6
7
8
9
scripts: {
  start: './node_modules/bin/someTool.js build'
}
// 简写为


scripts: {

  start: 'someTool build'

}
所有node_modules/.bin/目录下的命令,都可以用npm run [命令]的格式运行。在命令行下,键入npm run,然后按tab键,就会显示所有可以使用的命令。
main字段
main字段指定了加载的入口文件,require('moduleName')就会加载这个文件。这个字段的默认值是模块根目录下面的index.js。
config 字段
config字段用于添加命令行的环境变量。
下面是一个package.json文件。
1
2
3
4
5
{
  "name" : "foo",
  "config" : { "port" : "8080" },
  "scripts" : { "start" : "node server.js" }
}
然后,在server.js脚本就可以引用config字段的值。
1
2
3
http
  .createServer(...)
  .listen(process.env.npm_package_config_port)
用户执行npm run start命令时,这个脚本就可以得到值。
$ npm run start
用户可以改变这个值。
$ npm config set foo:port 80
browser字段
browser指定该模板供浏览器使用的版本。Browserify这样的浏览器打包工具,通过它就知道该打包那个文件。
1
2
3
"browser": {
  "tipso": "./node_modules/tipso/src/tipso.js"
},
engines 字段
engines字段指明了该模块运行的平台,比如 Node 的某个版本或者浏览器。
{ "engines" : { "node" : ">=0.10.3 <0.12" } }
该字段也可以指定适用的npm版本。
{ "engines" : { "npm" : "~1.0.20" } }
man字段
man用来指定当前模块的man文档的位置。
"man" :[ "./doc/calc.1" ]
preferGlobal字段
preferGlobal的值是布尔值,表示当用户不将该模块安装为全局模块时(即不用–global参数),要不要显示警告,表示该模块的本意就是安装为全局模块。
style字段
style指定供浏览器使用时,样式文件所在的位置。样式文件打包工具parcelify,通过它知道样式文件的打包位置。
1
2
3
"style": [
  "./node_modules/tipso/src/tipso.css"
]
安装模块
npm 安装 Node.js 模块语法格式如下:
$ npm install <Module Name>
安装好之后,包就放在了工程目录下的 node_modules 目录中,因此在代码中只需要通过 require(‘express’) 的方式就可以使用
var express = require('express');
npm 的包安装分为本地安装(local)、全局安装(global)两种,从敲的命令行来看,差别只是有没有 -g 而已,
如:
1
2
npm install express          # 本地安装
npm install express -g   # 全局安装
如果出现以下错误:
npm err! Error: connect ECONNREFUSED 127.0.0.1:8087
解决办法为:
$ npm config set proxy null
本地安装
- 将安装包放在 ./node_modules 下(运行 npm 命令时所在的目录),如果没有 node_modules 目录,会在当前执行 npm 命令的目录下生成 node_modules 目录。
- 可以通过 require() 来引入本地安装的包。
全局安装
- 将安装包放在 /usr/local 下或者你 node 的安装目录。
- 可以直接在命令行里使用。
查看安装信息
你可以使用以下命令来查看所有全局安装的模块:
1
2
3
4
5
6
7
8
9
10
11
$ npm list -g
├─┬ cnpm@4.3.2

│ ├── auto-correct@1.0.0

│ ├── bagpipe@0.3.5

│ ├── colors@1.1.2

│ ├─┬ commander@2.9.0

│ │ └── graceful-readlink@1.0.1

│ ├─┬ cross-spawn@0.2.9

│ │ └── lru-cache@2.7.3

……
如果要查看某个模块的版本号,可以使用命令如下:
1
2
3
4
$ npm list grunt
projectName@projectVersion /path/to/project/folder

└── grunt@0.4.1
卸载模块
我们可以使用以下命令来卸载 Node.js 模块。
$ npm uninstall express
卸载后,你可以到 /node_modules/ 目录下查看包是否还存在,或者使用以下命令查看:
$ npm ls
更新模块
我们可以使用以下命令更新模块:
$ npm update express
搜索模块
使用以下来搜索模块:
$ npm search express
创建模块
创建模块,package.json 文件是必不可少的。我们可以使用 NPM 生成 package.json 文件,生成的文件包含了基本的结果。
1
2
3
4
5
6
7
8
9
10
11
12
13
14
15
16
17
18
19
20
21
22
23
24
25
26
27
28
29
30
31
$ npm init
This utility will walk you through creating a package.json file.
It only covers the most common items, and tries to guess sensible defaults.
See npm help json for definitive documentation on these fields
and exactly what they do.
Use npm install <pkg> <span class="hljs-comment">--save afterwards to install a package and
save it as a dependency in the package.json file.
Press ^C at any time to quit.
name: (node_modules) runoob # 模块名
version: (1.0.0)
description: Node.js 测试模块(www.runoob.com) # 描述
entry point: (index.js)
test command: make test
git repository: https😕/github.com/runoob/runoob.git # Github 地址
keywords:
author:
license: (ISC)
About to write to ……/node_modules/package.json: # 生成地址
{
"name": "runoob",
"version": "1.0.0",
"description": "Node.js 测试模块(www.runoob.com)",
……
}
Is this ok? (yes) yes
以上的信息,你需要根据你自己的情况输入。在最后输入 “yes” 后会生成 package.json 文件。
接下来我们可以使用以下命令在 npm 资源库中注册用户(使用邮箱注册):
1
2
3
4
$ npm adduser
Username: mcmohd
Password:
Email: (this IS public) mcmohd@gmail.com
接下来我们就用以下命令来发布模块:
$ npm publish
如果你以上的步骤都操作正确,你就可以跟其他模块一样使用 npm 来安装。
版本号
使用NPM下载和发布代码时都会接触到版本号。NPM使用语义版本号来管理代码,这里简单介绍一下。
语义版本号分为X.Y.Z三位,分别代表主版本号、次版本号和补丁版本号。当代码变更时,版本号按以下原则更新。
- 如果只是修复bug,需要更新Z位。
- 如果是新增了功能,但是向下兼容,需要更新Y位。
- 如果有大变动,向下不兼容,需要更新X位。
版本号有了这个保证后,在申明第三方包依赖时,除了可依赖于一个固定版本号外,还可依赖于某个范围的版本号。例如“argv”: “0.0.x”表示依赖于0.0.x系列的最新版argv。
NPM支持的所有版本号范围指定方式可以查看官方文档。
NPM 常用命令
除了本章介绍的部分外,NPM还提供了很多功能,package.json里也有很多其它有用的字段。
除了可以在npmjs.org/doc/查看官方文档外,这里再介绍一些NPM常用命令。
NPM提供了很多命令,例如install和publish,使用npm help可查看所有命令。
- NPM提供了很多命令,例如
install和publish,使用npm help可查看所有命令。 - 使用
npm help <command>可查看某条命令的详细帮助,例如npm help install。 - 在
package.json所在目录下使用npm install . -g可先在本地安装当前命令行程序,可用于发布前的本地测试。 - 使用
npm update <package>可以把当前目录下node_modules子目录里边的对应模块更新至最新版本。 - 使用
npm update <package> -g可以把全局安装的对应命令行程序更新至最新版。 - 使用
npm cache clear可以清空NPM本地缓存,用于对付使用相同版本号发布新版本代码的人。 - 使用
npm unpublish <package>@<version>可以撤销发布自己发布过的某个版本代码。
Node 文件系统
Node.js 提供一组类似 UNIX(POSIX)标准的文件操作API。 Node 导入文件系统模块(fs)语法如下所示:
var fs = require("fs")
Node.js 文件系统(fs 模块)模块中的方法均有异步和同步版本,例如读取文件内容的函数有异步的 fs.readFile() 和同步的 fs.readFileSync()。
异步的方法函数最后一个参数为回调函数,回调函数的第一个参数包含了错误信息(error)。
如:
创建 input.txt 文件,内容如下:
文件读取实例
创建 file.js 文件, 代码如下:
1
2
3
4
5
6
7
8
9
10
11
12
13
14
15
var fs = require("fs");
// 异步读取

fs.readFile('input.txt', function (err, data) {

if (err) {

return console.error(err);

}

console.log("异步读取: " + data.toString());

});
// 同步读取

var data = fs.readFileSync('input.txt');

console.log("同步读取: " + data.toString());
console.log("程序执行完毕。");
以上代码执行结果如下:
1
2
3
4
5
$ node file.js
文件读取实例
程序执行完毕。

文件读取实例
打开文件
语法
以下为在异步模式下打开文件的语法格式:
fs.open(path, flags[, mode], callback)
参数
参数使用说明如下:
- path - 文件的路径。
- flags - 文件打开的行为。具体值详见下文。
- mode - 设置文件模式(权限),文件创建默认权限为 0666(可读,可写)。
- callback - 回调函数,带有两个参数如:callback(err, fd)。
flags 参数可以是以下值:
| Flag | 描述 |
|---|---|
| r | 以读取模式打开文件。如果文件不存在抛出异常。 |
| r+ | 以读写模式打开文件。如果文件不存在抛出异常。 |
| rs | 以同步的方式读取文件。 |
| rs+ | 以同步的方式读取和写入文件。 |
| w | 以写入模式打开文件,如果文件不存在则创建。 |
| wx | 类似 ‘w’,但是如果文件路径存在,则文件写入失败。 |
| w+ | 以读写模式打开文件,如果文件不存在则创建。 |
| wx+ | 类似 ‘w+’, 但是如果文件路径存在,则文件读写失败。 |
| a | 以追加模式打开文件,如果文件不存在则创建。 |
| ax | 类似 ‘a’, 但是如果文件路径存在,则文件追加失败。 |
| a+ | 以读取追加模式打开文件,如果文件不存在则创建。 |
| ax+ | 类似 ‘a+’, 但是如果文件路径存在,则文件读取追加失败。 |
实例
接下来我们创建 file.js 文件,并打开 input.txt 文件进行读写,代码如下所示:
1
2
3
4
5
6
7
8
9
10
var fs = require("fs");
// 异步打开文件

console.log("准备打开文件!");

fs.open('input.txt', 'r+', function(err, fd) {

if (err) {

return console.error(err);

}

console.log("文件打开成功!");

});
以上代码执行结果如下:
1 2 3$ node file.js 准备打开文件! 文件打开成功!
获取文件信息
语法
以下为通过异步模式获取文件信息的语法格式:
fs.stat(path, callback)
参数
参数使用说明如下:
- path - 文件路径。
- callback - 回调函数,带有两个参数如:(err, stats), stats 是 fs.Stats 对象。
fs.stat(path)执行后,会将stats类的实例返回给其回调函数。可以通过stats类中的提供方法判断文件的相关属性。例如判断是否为文件:
1
2
3
4
5
var fs = require('fs');
fs.stat('fs.js', function (err, stats) {

console.log(stats.isFile());         //true

})
stats类中的方法有:
| 方法 | 描述 |
|---|---|
| stats.isFile() | 如果是文件返回 true,否则返回 false。 |
| stats.isDirectory() | 如果是目录返回 true,否则返回 false。 |
| stats.isBlockDevice() | 如果是块设备返回 true,否则返回 false。 |
| stats.isCharacterDevice() | 如果是字符设备返回 true,否则返回 false。 |
| stats.isSymbolicLink() | 如果是软链接返回 true,否则返回 false。 |
| stats.isFIFO() | 如果是FIFO,返回true,否则返回 false。FIFO是UNIX中的一种特殊类型的命令管道。 |
| stats.isSocket() | 如果是 Socket 返回 true,否则返回 false。 |
实例
接下来我们创建 file.js 文件,代码如下所示:
1
2
3
4
5
6
7
8
9
10
11
12
13
14
var fs = require("fs");
console.log("准备打开文件!");

fs.stat('input.txt', function (err, stats) {

if (err) {

return console.error(err);

}

console.log(stats);

console.log("读取文件信息成功!");
// 检测文件类型

console.log("是否为文件(isFile) ? " + stats.isFile());

console.log("是否为目录(isDirectory) ? " + stats.isDirectory());

});
以上代码执行结果如下:
1
2
3
4
5
6
7
8
9
10
11
12
13
14
15
16
17
18
$ node file.js
准备打开文件!
{ dev: 16777220,
  mode: 33188,
  nlink: 1,
  uid: 501,
  gid: 20,
  rdev: 0,
  blksize: 4096,
  ino: 40333161,
  size: 61,
  blocks: 8,
  atime: Mon Sep 07 2015 17:43:55 GMT+0800 (CST),
  mtime: Mon Sep 07 2015 17:22:35 GMT+0800 (CST),
  ctime: Mon Sep 07 2015 17:22:35 GMT+0800 (CST) }
读取文件信息成功!
是否为文件(isFile) ? true
是否为目录(isDirectory) ? false
写入文件
语法
以下为异步模式下写入文件的语法格式:
fs.writeFile(file, data[, options], callback)
writeFile 直接打开文件默认是 w 模式,所以如果文件存在,该方法写入的内容会覆盖旧的文件内容。
参数
参数使用说明如下:
- file - 文件名或文件描述符。
- data - 要写入文件的数据,可以是 String(字符串) 或 Buffer(缓冲) 对象。
- options - 该参数是一个对象,包含 {encoding, mode, flag}。默认编码为 utf8, 模式为 0666 , flag 为 ‘w’
- callback - 回调函数,回调函数只包含错误信息参数(err),在写入失败时返回。
实例
接下来我们创建 file.js 文件,代码如下所示:
1
2
3
4
5
6
7
8
9
10
11
12
13
14
15
16
17
var fs = require("fs");
console.log("准备写入文件");

fs.writeFile('input.txt', '我是通 过fs.writeFile 写入文件的内容',  function(err) {

if (err) {

return console.error(err);

}

console.log("数据写入成功!");

console.log("--------我是分割线-------------")

console.log("读取写入的数据!");

fs.readFile('input.txt', function (err, data) {

if (err) {

return console.error(err);

}

console.log("异步读取文件数据: " + data.toString());

});

});
以上代码执行结果如下:
1 2 3 4 5 6$ node file.js 准备写入文件 数据写入成功! --------我是分割线------------- 读取写入的数据! 异步读取文件数据: 我是通 过fs.writeFile 写入文件的内容
读取文件
语法
以下为异步模式下读取文件的语法格式:
fs.read(fd, buffer, offset, length, position, callback)
该方法使用了文件描述符来读取文件。
参数
参数使用说明如下:
- fd - 通过 fs.open() 方法返回的文件描述符。
- buffer - 数据写入的缓冲区。
- offset - 缓冲区写入的写入偏移量。
- length - 要从文件中读取的字节数。
- position - 文件读取的起始位置,如果 position 的值为 null,则会从当前文件指针的位置读取。
- callback - 回调函数,有三个参数err, bytesRead, buffer,err 为错误信息, bytesRead 表示读取的字节数,buffer 为缓冲区对象。
实例
input.txt 文件内容为:
哈哈哈哈哈
接下来我们创建 file.js 文件,代码如下所示:
1
2
3
4
5
6
7
8
9
10
11
12
13
14
15
16
17
18
19
20
21
22
var fs = require("fs");
var buf = new Buffer.alloc(1024);
console.log("准备打开已存在的文件!");
fs.open('input.txt', 'r+', function(err, fd) {
if (err) {
return console.error(err);
}
console.log("文件打开成功!");
console.log("准备读取文件:");
fs.read(fd, buf, 0, buf.length, 0, function(err, bytes){
if (err){
console.log(err);
}
console.log(bytes + " 字节被读取");
<span class="hljs-comment">// 仅输出读取的字节</span>
<span class="hljs-keyword">if</span>(bytes > <span class="hljs-number">0</span>){
<span class="hljs-built_in">console</span>.log(buf.slice(<span class="hljs-number">0</span>, bytes).toString());
}
});
});
以上代码执行结果如下:
1
2
3
4
5
6
$ node file.js
准备打开已存在的文件!
文件打开成功!
准备读取文件:
42  字节被读取
哈哈哈哈哈
关闭文件
语法
以下为异步模式下关闭文件的语法格式:
fs.close(fd, callback)
该方法使用了文件描述符来读取文件。
参数
参数使用说明如下:
- fd - 通过 fs.open() 方法返回的文件描述符。
- callback - 回调函数,没有参数。
实例
input.txt 文件内容为:
哈哈哈哈哈
接下来我们创建 file.js 文件,代码如下所示:
1
2
3
4
5
6
7
8
9
10
11
12
13
14
15
16
17
18
19
20
21
22
23
24
25
26
27
28
29
var fs = require("fs");
var buf = new Buffer.alloc(1024);
console.log("准备打开文件!");
fs.open('input.txt', 'r+', function(err, fd) {
if (err) {
return console.error(err);
}
console.log("文件打开成功!");
console.log("准备读取文件!");
fs.read(fd, buf, 0, buf.length, 0, function(err, bytes){
if (err){
console.log(err);
}
<span class="hljs-comment">// 仅输出读取的字节</span>
<span class="hljs-keyword">if</span>(bytes > <span class="hljs-number">0</span>){
<span class="hljs-built_in">console</span>.log(buf.slice(<span class="hljs-number">0</span>, bytes).toString());
}
<span class="hljs-comment">// 关闭文件</span>
fs.close(fd, <span class="hljs-function"><span class="hljs-keyword">function</span><span class="hljs-params">(err)</span></span>{
<span class="hljs-keyword">if</span> (err){
<span class="hljs-built_in">console</span>.log(err);
}
<span class="hljs-built_in">console</span>.log(<span class="hljs-string">"文件关闭成功"</span>);
});
});
});
以上代码执行结果如下:
1 2 3 4 5 6$ node file.js 准备打开文件! 文件打开成功! 准备读取文件! 哈哈哈哈哈 文件关闭成功
截取文件
语法
以下为异步模式下截取文件的语法格式:
fs.ftruncate(fd, len, callback)
该方法使用了文件描述符来读取文件。
参数
参数使用说明如下:
- fd - 通过 fs.open() 方法返回的文件描述符。
- len - 文件内容截取的长度。
- callback - 回调函数,没有参数。
实例
input.txt 文件内容为:
哈哈哈哈哈
接下来我们创建 file.js 文件,代码如下所示:
1
2
3
4
5
6
7
8
9
10
11
12
13
14
15
16
17
18
19
20
21
22
23
24
25
26
27
28
29
30
31
32
33
34
35
36
37
38
var fs = require("fs");
var buf = new Buffer.alloc(1024);
console.log("准备打开文件!");
fs.open('input.txt', 'r+', function(err, fd) {
if (err) {
return console.error(err);
}
console.log("文件打开成功!");
console.log("截取10字节内的文件内容,超出部分将被去除。");
// 截取文件
fs.ftruncate(fd, 10, function(err){
if (err){
console.log(err);
}
console.log("文件截取成功。");
console.log("读取相同的文件");
fs.read(fd, buf, 0, buf.length, 0, function(err, bytes){
if (err){
console.log(err);
}
<span class="hljs-comment">// 仅输出读取的字节</span>
<span class="hljs-keyword">if</span>(bytes > <span class="hljs-number">0</span>){
<span class="hljs-built_in">console</span>.log(buf.slice(<span class="hljs-number">0</span>, bytes).toString());
}
<span class="hljs-comment">// 关闭文件</span>
fs.close(fd, <span class="hljs-function"><span class="hljs-keyword">function</span><span class="hljs-params">(err)</span></span>{
<span class="hljs-keyword">if</span> (err){
<span class="hljs-built_in">console</span>.log(err);
}
<span class="hljs-built_in">console</span>.log(<span class="hljs-string">"文件关闭成功!"</span>);
});
});
});
});
以上代码执行结果如下:
1
2
3
4
5
6
7
8
$ node file.js
准备打开文件!
文件打开成功!
截取10字节内的文件内容,超出部分将被去除。
文件截取成功。
读取相同的文件
哈哈哈哈哈
文件关闭成功
删除文件
语法
以下为删除文件的语法格式:
fs.unlink(path, callback)
参数
参数使用说明如下:
- path - 文件路径。
- callback - 回调函数,没有参数。
实例
input.txt 文件内容为:
哈哈哈哈哈
接下来我们创建 file.js 文件,代码如下所示:
1
2
3
4
5
6
7
8
9
var fs = require("fs");
console.log("准备删除文件!");

fs.unlink('input.txt', function(err) {

if (err) {

return console.error(err);

}

console.log("文件删除成功!");

});
以上代码执行结果如下:
1 2 3$ node file.js 准备删除文件! 文件删除成功!
再去查看 input.txt 文件,发现已经不存在了。
创建目录
语法
以下为创建目录的语法格式:
fs.mkdir(path[, options], callback)
参数
参数使用说明如下:
- path - 文件路径。
- options 参数可以是:
- recursive - 是否以递归的方式创建目录,默认为 false。
- mode - 设置目录权限,默认为 0777。
- callback - 回调函数,没有参数。
实例
接下来我们创建 file.js 文件,代码如下所示:
1
2
3
4
5
6
7
8
9
var fs = require("fs");
// tmp 目录必须存在
console.log("创建目录 /tmp/test/");
fs.mkdir("/tmp/test/",function(err){
   if (err) {
       return console.error(err);
   }
   console.log("目录创建成功。");
});
以上代码执行结果如下:
1
2
3
$ node file.js
创建目录 /tmp/test/
目录创建成功。
可以添加 recursive: true 参数,不管创建的目录 /tmp 和 /tmp/a 是否存在:
1
2
3
fs.mkdir('/tmp/a/apple', { recursive: true }, (err) => {
  if (err) throw err;
});
读取目录
语法
以下为读取目录的语法格式:
fs.readdir(path, callback)
参数
参数使用说明如下:
- path - 文件路径。
- callback - 回调函数,回调函数带有两个参数err, files,err 为错误信息,files 为 目录下的文件数组列表。
实例
接下来我们创建 file.js 文件,代码如下所示:
1
2
3
4
5
6
7
8
9
10
11
var fs = require("fs");
console.log("查看 /tmp 目录");

fs.readdir("/tmp/",function(err, files){

if (err) {

return console.error(err);

}

files.forEach( function (file){

console.log( file );

});

});
以上代码执行结果如下:
1 2 3 4 5 6$ node file.js 查看 /tmp 目录 input.out output.out test test.txt
删除目录
语法
以下为删除目录的语法格式:
fs.rmdir(path, callback)
参数
参数使用说明如下:
- path - 文件路径。
- callback - 回调函数,没有参数。
实例
接下来我们创建 file.js 文件,代码如下所示:
1
2
3
4
5
6
7
8
9
10
11
12
13
14
15
16
17
var fs = require("fs");
// 执行前创建一个空的 /tmp/test 目录
console.log("准备删除目录 /tmp/test");
fs.rmdir("/tmp/test",function(err){
   if (err) {
       return console.error(err);
   }
   console.log("读取 /tmp 目录");
   fs.readdir("/tmp/",function(err, files){
      if (err) {
          return console.error(err);
      }
      files.forEach( function (file){
          console.log( file );
      });
   });
});
以上代码执行结果如下:
1 2 3 4$ node file.js 准备删除目录 /tmp/test 读取 /tmp 目录 ……
文件模块方法参考手册
以下为 Node.js 文件模块相同的方法列表:
| 方法 & 描述 |
|---|
| fs.rename(oldPath, newPath, callback) 异步 rename().回调函数没有参数,但可能抛出异常。 |
| fs.ftruncate(fd, len, callback) 异步 ftruncate().回调函数没有参数,但可能抛出异常。 |
| fs.ftruncateSync(fd, len) 同步 ftruncate() |
| fs.truncate(path, len, callback) 异步 truncate().回调函数没有参数,但可能抛出异常。 |
| fs.truncateSync(path, len) 同步 truncate() |
| fs.chown(path, uid, gid, callback) 异步 chown().回调函数没有参数,但可能抛出异常。 |
| fs.chownSync(path, uid, gid) 同步 chown() |
| fs.fchown(fd, uid, gid, callback) 异步 fchown().回调函数没有参数,但可能抛出异常。 |
| fs.fchownSync(fd, uid, gid) 同步 fchown() |
| fs.lchown(path, uid, gid, callback) 异步 lchown().回调函数没有参数,但可能抛出异常。 |
| fs.lchownSync(path, uid, gid) 同步 lchown() |
| fs.chmod(path, mode, callback) 异步 chmod().回调函数没有参数,但可能抛出异常。 |
| fs.chmodSync(path, mode) 同步 chmod(). |
| fs.fchmod(fd, mode, callback) 异步 fchmod().回调函数没有参数,但可能抛出异常。 |
| fs.fchmodSync(fd, mode) 同步 fchmod(). |
| fs.lchmod(path, mode, callback) 异步 lchmod().回调函数没有参数,但可能抛出异常。Only available on Mac OS X. |
| fs.lchmodSync(path, mode) 同步 lchmod(). |
| fs.stat(path, callback) 异步 stat(). 回调函数有两个参数 err, stats,stats 是 fs.Stats 对象。 |
| fs.lstat(path, callback) 异步 lstat(). 回调函数有两个参数 err, stats,stats 是 fs.Stats 对象。 |
| fs.fstat(fd, callback) 异步 fstat(). 回调函数有两个参数 err, stats,stats 是 fs.Stats 对象。 |
| fs.statSync(path) 同步 stat(). 返回 fs.Stats 的实例。 |
| fs.lstatSync(path) 同步 lstat(). 返回 fs.Stats 的实例。 |
| fs.fstatSync(fd) 同步 fstat(). 返回 fs.Stats 的实例。 |
| fs.link(srcpath, dstpath, callback) 异步 link().回调函数没有参数,但可能抛出异常。 |
| fs.linkSync(srcpath, dstpath) 同步 link(). |
| fs.symlink(srcpath, dstpath[, type], callback) 异步 symlink().回调函数没有参数,但可能抛出异常。 type 参数可以设置为 ‘dir’, ‘file’, 或 ‘junction’ (默认为 ‘file’) 。 |
| fs.symlinkSync(srcpath, dstpath[, type]) 同步 symlink(). |
| fs.readlink(path, callback) 异步 readlink(). 回调函数有两个参数 err, linkString。 |
| fs.realpath(path[, cache], callback) 异步 realpath(). 回调函数有两个参数 err, resolvedPath。 |
| fs.realpathSync(path[, cache]) 同步 realpath()。返回绝对路径。 |
| fs.unlink(path, callback) 异步 unlink().回调函数没有参数,但可能抛出异常。 |
| fs.unlinkSync(path) 同步 unlink(). |
| fs.rmdir(path, callback) 异步 rmdir().回调函数没有参数,但可能抛出异常。 |
| fs.rmdirSync(path) 同步 rmdir(). |
| fs.mkdir(path[, mode], callback) S异步 mkdir(2).回调函数没有参数,但可能抛出异常。 访问权限默认为 0777。 |
| fs.mkdirSync(path[, mode]) 同步 mkdir(). |
| fs.readdir(path, callback) 异步 readdir(3). 读取目录的内容。 |
| fs.readdirSync(path) 同步 readdir().返回文件数组列表。 |
| fs.close(fd, callback) 异步 close().回调函数没有参数,但可能抛出异常。 |
| fs.closeSync(fd) 同步 close(). |
| fs.open(path, flags[, mode], callback) 异步打开文件。 |
| fs.openSync(path, flags[, mode]) 同步 version of fs.open(). |
| fs.utimes(path, atime, mtime, callback) |
| fs.utimesSync(path, atime, mtime) 修改文件时间戳,文件通过指定的文件路径。 |
| fs.futimes(fd, atime, mtime, callback) |
| fs.futimesSync(fd, atime, mtime) 修改文件时间戳,通过文件描述符指定。 |
| fs.fsync(fd, callback) 异步 fsync.回调函数没有参数,但可能抛出异常。 |
| fs.fsyncSync(fd) 同步 fsync. |
| fs.write(fd, buffer, offset, length[, position], callback) 将缓冲区内容写入到通过文件描述符指定的文件。 |
| fs.write(fd, data[, position[, encoding]], callback) 通过文件描述符 fd 写入文件内容。 |
| fs.writeSync(fd, buffer, offset, length[, position]) 同步版的 fs.write()。 |
| fs.writeSync(fd, data[, position[, encoding]]) 同步版的 fs.write(). |
| fs.read(fd, buffer, offset, length, position, callback) 通过文件描述符 fd 读取文件内容。 |
| fs.readSync(fd, buffer, offset, length, position) 同步版的 fs.read. |
| fs.readFile(filename[, options], callback) 异步读取文件内容。 |
| fs.readFileSync(filename[, options]) |
| fs.writeFile(filename, data[, options], callback) 异步写入文件内容。 |
| fs.writeFileSync(filename, data[, options]) 同步版的 fs.writeFile。 |
| fs.appendFile(filename, data[, options], callback) 异步追加文件内容。 |
| fs.appendFileSync(filename, data[, options]) The 同步 version of fs.appendFile. |
| fs.watchFile(filename[, options], listener) 查看文件的修改。 |
| fs.unwatchFile(filename[, listener]) 停止查看 filename 的修改。 |
| fs.watch(filename, options) 查看 filename 的修改,filename 可以是文件或目录。返回 fs.FSWatcher 对象。 |
| fs.exists(path, callback) 检测给定的路径是否存在。 |
| fs.existsSync(path) 同步版的 fs.exists. |
| fs.access(path[, mode], callback) 测试指定路径用户权限。 |
| fs.accessSync(path[, mode]) 同步版的 fs.access。 |
| fs.createReadStream(path[, options]) 返回ReadStream 对象。 |
| fs.createWriteStream(path[, options]) 返回 WriteStream 对象。 |
| fs.symlink(srcpath, dstpath[, type], callback) 异步 symlink().回调函数没有参数,但可能抛出异常。 |
Node Express模块
Express 是一个简洁而灵活的 node.js Web应用框架, 提供了一系列强大特性帮助你创建各种 Web 应用,和丰富的 HTTP 工具。
使用 Express 可以快速地搭建一个完整功能的网站。参考地址
Express 框架核心特性:
- 可以设置中间件来响应 HTTP 请求。
- 定义了路由表用于执行不同的 HTTP 请求动作。
- 可以通过向模板传递参数来动态渲染 HTML 页面。
安装 Express 并将其保存到依赖列表中:
$ npm install express --save
以上命令会将 Express 框架安装在当前目录的 node_modules 目录中, node_modules 目录下会自动创建 express 目录。以下几个重要的模块是需要与 express 框架一起安装的:
- cookie-parser - 这就是一个解析Cookie的工具。通过req.cookies可以取到传过来的cookie,并把它们转成对象。
- multer - node.js 中间件,用于处理 enctype=“multipart/form-data”(设置表单的MIME编码)的表单数据。
1 2$ npm install cookie-parser --save $ npm install multer --save
安装完后,我们可以查看下 express 使用的版本号:
1
2
3
$ npm list express
/data/www/node
└── express@4.15.2  -> /Users/tianqixin/www/node/node_modules/.4.15.2@express
接下来我们使用 Express 框架来输出 “Hello World”。
创建 express_demo.js 文件,代码如下所示:
1
2
3
4
5
6
7
8
9
10
11
12
13
14
15
16
//express_demo.js 文件
var express = require('express');
var app = express();
app.get('/', function (req, res) {

res.send('Hello World');

})
var server = app.listen(8081, function () {
var host = server.address().address

var port = server.address().port
console.log("应用实例,访问地址为 http://%s:%s", host, port)
})
执行以上代码:
1
2
$ node express_demo.js
应用实例,访问地址为 http://0.0.0.0:8081
Express 应用使用回调函数的参数: request 和 response 对象来处理请求和响应的数据。
1
2
3
app.get('/', function (req, res) {
   // --
})
Request 请求对象
Request 对象 - request 对象表示 HTTP 请求,包含了请求查询字符串,参数,内容,HTTP 头部等属性。常见属性有:
- req.app:当callback为外部文件时,用req.app访问express的实例
- req.baseUrl:获取路由当前安装的URL路径
- req.body / req.cookies:获得「请求主体」/ Cookies
- req.fresh / req.stale:判断请求是否还「新鲜」
- req.hostname / req.ip:获取主机名和IP地址
- req.originalUrl:获取原始请求URL
- req.params:获取路由的parameters
- req.path:获取请求路径
- req.protocol:获取协议类型
- req.query:获取URL的查询参数串
- req.route:获取当前匹配的路由
- req.subdomains:获取子域名
- req.accepts():检查可接受的请求的文档类型
- req.acceptsCharsets / req.acceptsEncodings / req.acceptsLanguages:返回指定字符集的第一个可接受字符编码
- req.get():获取指定的HTTP请求头
- req.is():判断请求头Content-Type的MIME类型
Response 响应对象
Response 对象 - response 对象表示 HTTP 响应,即在接收到请求时向客户端发送的 HTTP 响应数据。常见属性有:
- res.app:同req.app一样
- res.append():追加指定HTTP头
- res.set()在res.append()后将重置之前设置的头
- res.cookie(name,value [,option]):设置Cookie
- opition: domain / expires / httpOnly / maxAge / path / secure / signed
- res.clearCookie():清除Cookie
- res.download():传送指定路径的文件
- res.get():返回指定的HTTP头
- res.json():传送JSON响应
- res.jsonp():传送JSONP响应
- res.location():只设置响应的Location HTTP头,不设置状态码或者close response
- res.redirect():设置响应的Location HTTP头,并且设置状态码302
- res.render(view,[locals],callback):渲染一个view,同时向callback传递渲染后的字符串,如果在渲染过程中有错误发生next(err)将会被自动调用。callback将会被传入一个可能发生的错误以及渲染后的页面,这样就不会自动输出了。
- res.send():传送HTTP响应
- res.sendFile(path [,options] [,fn]):传送指定路径的文件 -会自动根据文件extension设定Content-Type
- res.set():设置HTTP头,传入object可以一次设置多个头
- res.status():设置HTTP状态码
- res.type():设置Content-Type的MIME类型
静态文件
Express 提供了内置的中间件 express.static 来设置静态文件如:图片, CSS, JavaScript 等。
可以使用 express.static 中间件来设置静态文件路径。
例如,如果你将图片, CSS, JavaScript 文件放在 public 目录下,可以这么写:
app.use('/public', express.static('public'));
我们可以到 public/images 目录下放些图片,如下所示:
1 2 3 4 5node_modules server.js public/ public/images public/images/img.jpeg
创建 express_demo3.js 文件,代码如下所示:
1
2
3
4
5
6
7
8
9
10
11
12
13
14
15
16
17
var express = require('express');
var app = express();
app.use('/public', express.static('public'));
app.get('/', function (req, res) {

res.send('Hello World');

})
var server = app.listen(8081, function () {
var host = server.address().address

var port = server.address().port
console.log("应用实例,访问地址为 http://%s:%s", host, port)
})
执行以上代码:
1
2
$ node express_demo3.js
应用实例,访问地址为 http://0.0.0.0:8081
在浏览器中访问 http://127.0.0.1:8081/public/images/img.jpeg,即可访问图片

URL 地址映射(路由)
可以使用路由的形式使用html文件响应到前端。
1
2
3
4
5
6
7
8
9
10
11
12
13
14
15
16
17
18
19
20
21
22
23
var express = require('express');
var app = express();
app.use('/public', express.static('public'));
app.get('/', function (req, res) {
res.sendFile( __dirname + "/" + "index.html" );
})
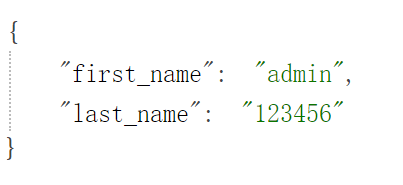
app.get('/json', function (req, res) {
// 输出 JSON 格式
var response = {
"first_name":req.query.username,
"last_name":req.query.password
};
res.end(JSON.stringify(response));
})
var server = app.listen(8081, function () {
var host = server.address().address
var port = server.address().port
console.log("应用实例,访问地址为 http://%s:%s", host, port)
})
对应的html
1
2
3
4
5
6
7
8
9
10
11
12
<!DOCTYPE html>
<html lang="en">
    <head>
        <meta charset="UTF-8">
        <meta http-equiv="X-UA-Compatible" content="IE=edge">
        <meta name="viewport" content="width=device-width, initial-scale=1.0">
        <title>主页</title>
    </head>
    <body>
        这是使用路由展示的html页面内容
    </body>
</html>
访问http://127.0.0.1:8081/

访问http://127.0.0.1:8081/json?username=admin&password=123456
文件上传
上传文件的表单,使用 POST 方法,表单 enctype 属性设置为 multipart/form-data。
新建 file.html
1
2
3
4
5
6
7
8
9
10
11
12
13
14
15
16
17
18
<!DOCTYPE html>
<html lang="en">
    <head>
        <meta charset="UTF-8">
        <meta http-equiv="X-UA-Compatible" content="IE=edge">
        <meta name="viewport" content="width=device-width, initial-scale=1.0">
        <title>主页</title>
    </head>
    <body>
        <h3>文件上传:</h3>
        选择一个文件上传: <br />
        <form action="/file" method="post" enctype="multipart/form-data">
            <input type="file" name="image" size="50" />
            <br />
            <input type="submit" value="上传文件" />
        </form>
    </body>
</html>
js代码
1
2
3
4
5
6
7
8
9
10
11
12
13
14
15
16
17
18
19
20
21
22
23
24
25
26
27
28
29
30
31
32
33
34
35
36
37
38
39
40
41
42
43
44
45
46
47
48
49
50
51
52
53
54
var express = require('express');
var app = express();
// 今天资源

app.use('/public', express.static('public'));
// 主页

app.get('/', function (req, res) {

res.sendFile( __dirname + "/" + "index.html" );

})
// 返回json

app.get('/json', function (req, res) {

// 输出 JSON 格式

var response = {

"first_name":req.query.username,

"last_name":req.query.password

};

res.end(JSON.stringify(response));

})
// 文件上传页面

app.get('/file.html', function (req, res) {

res.sendFile( __dirname + "/" + "file.html" );

})
// 文件上传

var fs = require("fs");

var multer  = require('multer');

app.use(multer({ dest: '/tmp/'}).array('image'));

app.post('/file', function (req, res) {

console.log(req.files);  // 上传的文件信息

var des_file = __dirname + "/public/images/" + req.files[0]?.originalname;

fs.readFile( req.files[0]?.path, function (err, data) {

fs.writeFile(des_file, data, function (err) {

if( err ){

console.log( err );

}else{

response = {

message:'File uploaded successfully',

filename:req.files[0]?.originalname

};

}

res.type('json') // application/json 的简写

res.end( JSON.stringify( response ) );

});

});

})
var server = app.listen(8081, function () {

var host = server.address().address

var port = server.address().port

console.log("应用实例,访问地址为 http://%s:%s", host, port)

})
Node 工具模块
util 是一个Node.js 核心模块,提供常用函数的集合,用于弥补核心 JavaScript 的功能 过于精简的不足。
使用方法如下:
const util = require('util');
util.callbackify
util.callbackify(original) 将 async 异步函数(或者一个返回值为 Promise 的函数)转换成遵循异常优先的回调风格的函数,例如将 (err, value) => ... 回调作为最后一个参数。 在回调函数中,第一个参数为拒绝的原因(如果 Promise 解决,则为 null),第二个参数则是解决的值。
如:
1
2
3
4
5
6
7
8
9
10
11
const util = require('util');
async function fn() {

return 'hello world';

}

const callbackFunction = util.callbackify(fn);
callbackFunction((err, ret) => {

if (err) throw err;

console.log(ret);

});
以上代码输出结果为:
hello world
回调函数是异步执行的,并且有异常堆栈错误追踪。 如果回调函数抛出一个异常,进程会触发一个 ‘uncaughtException’ 异常,如果没有被捕获,进程将会退出。
null 在回调函数中作为一个参数有其特殊的意义,如果回调函数的首个参数为 Promise 拒绝的原因且带有返回值,且值可以转换成布尔值 false,这个值会被封装在 Error 对象里,可以通过属性 reason 获取。
1
2
3
4
5
6
7
8
9
function fn() {
  return Promise.reject(null);
}
const callbackFunction = util.callbackify(fn);
callbackFunction((err, ret) => {

// 当 Promise 被以 null 拒绝时,它被包装为 Error 并且原始值存储在 reason 中。

err && err.hasOwnProperty('reason') && err.reason === null;  // true

});
original 为 async 异步函数。该函数返回传统回调函数。
util.inherits
util.inherits(constructor, superConstructor) 是一个实现对象间原型继承的函数。
JavaScript 的面向对象特性是基于原型的,与常见的基于类的不同。JavaScript 没有提供对象继承的语言级别特性,而是通过原型复制来实现的。
在这里我们只介绍 util.inherits 的用法,示例如下:
1
2
3
4
5
6
7
8
9
10
11
12
13
14
15
16
17
18
19
20
21
22
23
var util = require('util');
function Base() {
    this.name = 'base';
    this.base = 1991;
    this.sayHello = function() {
    console.log('Hello ' + this.name);
    };
}
Base.prototype.showName = function() {
    console.log(this.name);
};
function Sub() {
    this.name = 'sub';
}
util.inherits(Sub, Base);
var objBase = new Base();
objBase.showName();
objBase.sayHello();
console.log(objBase);
var objSub = new Sub();
objSub.showName();
//objSub.sayHello();
console.log(objSub);
我们定义了一个基础对象 Base 和一个继承自 Base 的 Sub,Base 有三个在构造函数内定义的属性和一个原型中定义的函数,通过util.inherits 实现继承。运行结果如下:
1
2
3
4
5
base
Hello base
{ name: 'base', base: 1991, sayHello: [Function] }
sub
{ name: 'sub' }
注意:Sub 仅仅继承了Base 在原型中定义的函数,而构造函数内部创造的 base 属 性和 sayHello 函数都没有被 Sub 继承。
util.inspect
util.inspect(object,[showHidden],[depth],[colors]) 是一个将任意对象转换 为字符串的方法,通常用于调试和错误输出。它至少接受一个参数 object,即要转换的对象。
showHidden 是一个可选参数,如果值为 true,将会输出更多隐藏信息。
depth 表示最大递归的层数,如果对象很复杂,你可以指定层数以控制输出信息的多 少。如果不指定depth,默认会递归 2 层,指定为 null 表示将不限递归层数完整遍历对象。 如果 colors 值为 true,输出格式将会以 ANSI 颜色编码,通常用于在终端显示更漂亮 的效果。
特别要指出的是,util.inspect 并不会简单地直接把对象转换为字符串,即使该对 象定义了 toString 方法也不会调用。
1
2
3
4
5
6
7
8
9
10
var util = require('util');
function Person() {
    this.name = 'byvoid';
    this.toString = function() {
    return this.name;
    };
}
var obj = new Person();
console.log(util.inspect(obj));
console.log(util.inspect(obj, true));
运行结果是:
1
2
3
4
5
6
7
8
9
10
Person { name: 'byvoid', toString: [Function] }
Person {
  name: 'byvoid',
  toString:
   { [Function]
     [length]: 0,
     [name]: '',
     [arguments]: null,
     [caller]: null,
     [prototype]: { [constructor]: [Circular] } } }
util.isArray(object)
如果给定的参数 “object” 是一个数组返回 true,否则返回 false。
1
2
3
4
5
6
7
8
var util = require('util');
util.isArray([])

// true

util.isArray(new Array)

// true

util.isArray({})

// false
util.isRegExp(object)
如果给定的参数 “object” 是一个正则表达式返回true,否则返回false。
1
2
3
4
5
6
7
8
var util = require('util');
util.isRegExp(/some regexp/)

// true

util.isRegExp(new RegExp('another regexp'))

// true

util.isRegExp({})

// false
util.isDate(object)
如果给定的参数 “object” 是一个日期返回true,否则返回false。
1
2
3
4
5
6
7
8
var util = require('util');
util.isDate(new Date())

// true

util.isDate(Date())

// false (without 'new' returns a String)

util.isDate({})

// false
Node 项目搭建
初始化项目信息
在当前目录产生package.json文件,有一个dependencies用来记录该项目所有依赖包
1
2
3
npm init  #(自定义配置)
# 或者
npm init -y  #(一切配置采用默认值)
搭建服务器
-
express - 框架
-
multer - node.js 中间件,用于处理 enctype=“multipart/form-data”(设置表单的MIME编码)的表单数据。
1 2npm install express --save npm install multer --save
编写服务器代码,在根目录新建index.js文件
1
2
3
4
5
6
7
8
9
10
11
12
const express = require('express')
const router = require('./src/router/index.js')
//开启服务器(端口号随意此处为3000)

var server = router.listen(3000, function () {

var host = server.address().address

var port = server.address().port

console.log("服务器 http://%s:%s", host, port)

})
//托管静态资源

router.use('/assets',express.static('./src/assets'))
创建工作目录

创建路由
在router文件中创建index.js文件

代码
1
2
3
4
5
6
7
8
9
10
11
12
13
14
15
16
17
18
19
20
21
22
23
24
25
//1.导入express模块
const express = require('express')
const multer = require('multer')
const api = require('../api/index.js')
//2.创建应用

const app = express()
//3.前置配置

//用于处理 enctype="multipart/form-data"

mul = multer({ 'dest': 'tmp' })

//解析 JSON 格式的请求体数据(仅在 4.16.0+ 版本中可用)

app.use(express.json())

//解析 URL-encoded 格式的请求体数据(仅在 4.16.0+ 版本中可用)

app.use(express.urlencoded({ extended: false }))
//4.路由分发

var path = process.cwd() // 命令行所在路径

app.get('/', (req, resp) => resp.sendFile(path + '/src/views/index.html'))

app.get('/user', (req, resp) => resp.sendFile(path + '/src/views/user/index.html'))

app.get('/upload', (req, resp) => resp.sendFile(path + '/src/views/upload/index.html'))

app.post('/api/upload', mul.array('image'), (req, resp) => api.upload(req, resp))
//5.导出路由模块

module.exports = app
创建视图
在views文件中创建如下文件
index.html
代码
1
2
3
4
5
6
7
8
9
10
11
12
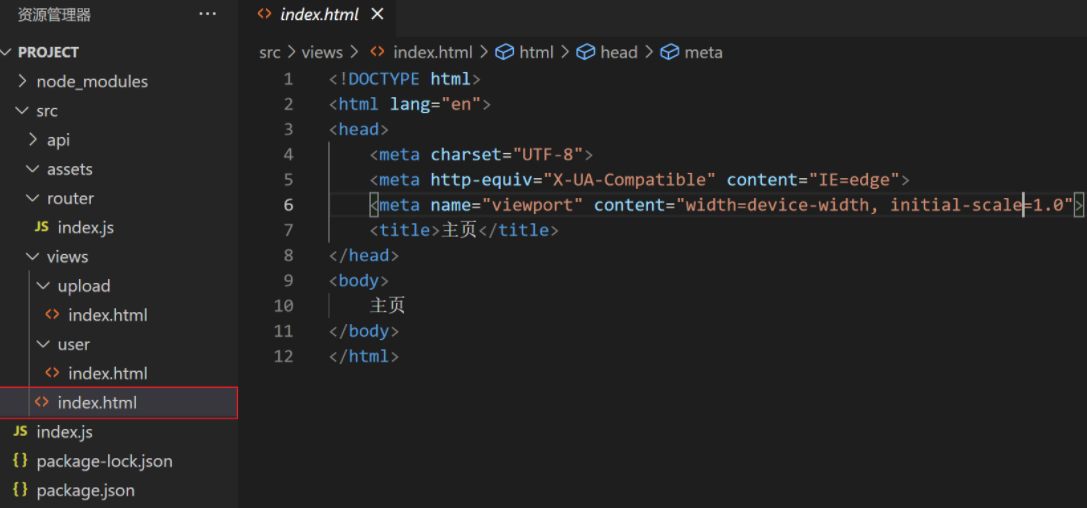
<!DOCTYPE html>
<html lang="en">
<head>
<meta charset="UTF-8">
<meta http-equiv="X-UA-Compatible" content="IE=edge">
<meta name="viewport" content="width=device-width, initial-scale=1.0">
<title>主页</title>
</head>
<body>
主页
</body>
</html>
user/index.html
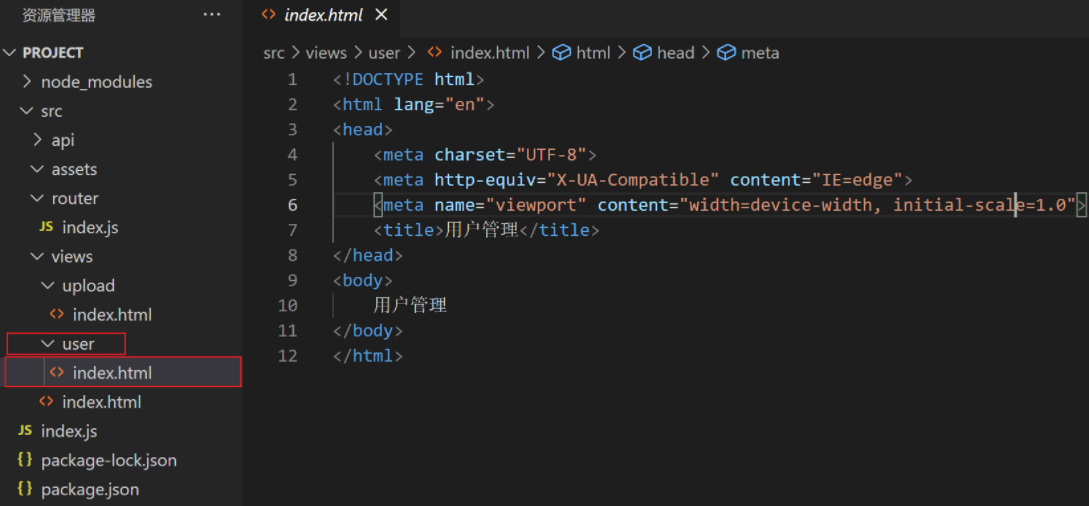
代码
1
2
3
4
5
6
7
8
9
10
11
12
<!DOCTYPE html>
<html lang="en">
<head>
    <meta charset="UTF-8">
    <meta http-equiv="X-UA-Compatible" content="IE=edge">
    <meta name="viewport" content="width=device-width, initial-scale=1.0">
    <title>用户管理</title>
</head>
<body>
    用户管理
</body>
</html>
upload/index.html
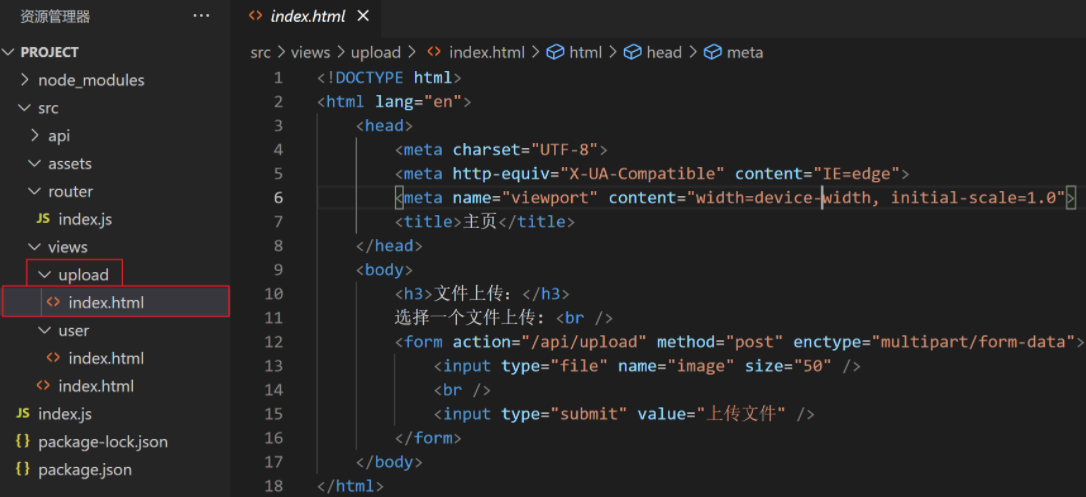
代码
1
2
3
4
5
6
7
8
9
10
11
12
13
14
15
16
17
18
<!DOCTYPE html>
<html lang="en">
    <head>
        <meta charset="UTF-8">
        <meta http-equiv="X-UA-Compatible" content="IE=edge">
        <meta name="viewport" content="width=device-width, initial-scale=1.0">
        <title>主页</title>
    </head>
    <body>
        <h3>文件上传:</h3>
        选择一个文件上传: <br />
        <form action="/api/upload" method="post" enctype="multipart/form-data">
            <input type="file" name="image" size="50" />
            <br />
            <input type="submit" value="上传文件" />
        </form>
    </body>
</html>
创建API接口
在api文件夹中创建index.js
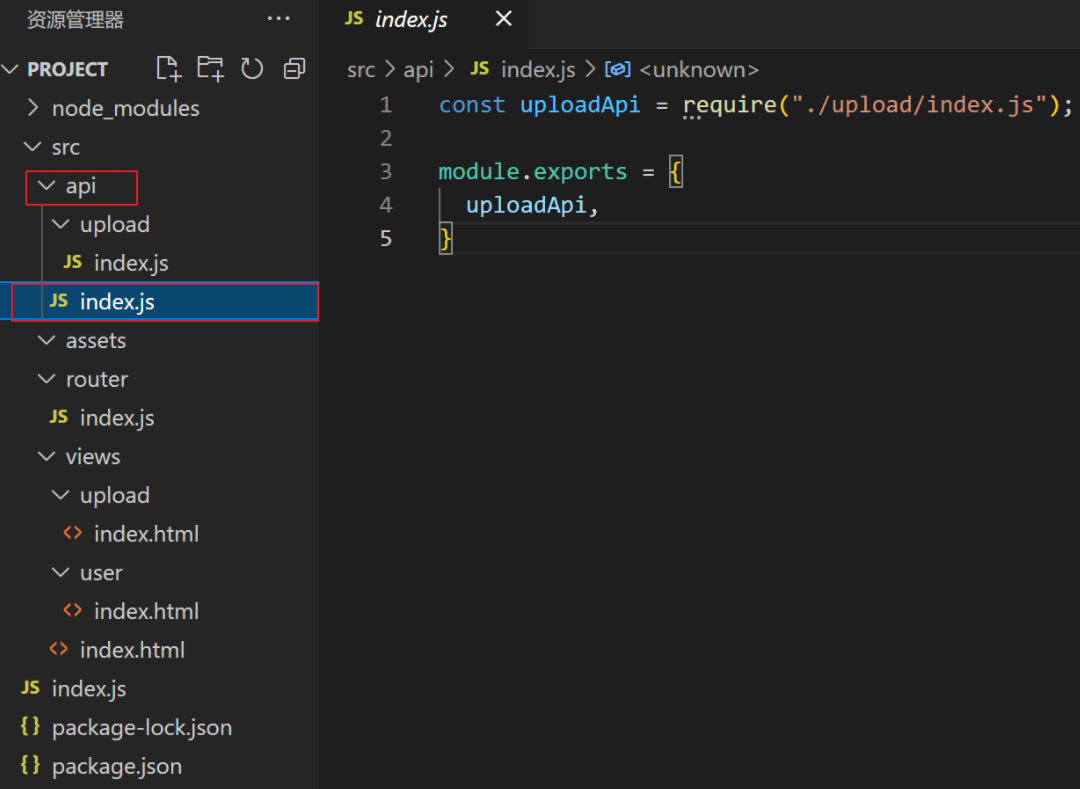
代码
1
2
3
4
5
const uploadApi = require("./upload/index.js");
module.exports = {

uploadApi,

}
upload/index.js

代码
1
2
3
4
5
6
7
8
9
10
11
12
13
14
15
16
17
18
19
20
21
22
23
var fs = require("fs");
const path = process.cwd()
module.exports = {
    upload: (req, resp) => {
        console.log(req.files);  // 上传的文件信息
        var des_file = path + "/src/assets/" + req.files[0]?.originalname;
        fs.readFile(req.files[0]?.path, function (err, data) {
            fs.writeFile(des_file, data, function (err) {
                response = {}
                if (err) {
                    console.log(err)
                } else {
                    response = {
                        message: '文件上传成功',
                        filename: req.files[0]?.originalname
                    }
                }
                resp.type('json') // application/json 的简写
                resp.end(JSON.stringify(response));
            })
        })
    },
}
运行
在项目根目录中打开控制台运行如下代码
1
2
node index.js
服务器 http://:::3000
也可以修改package.json文件,在scripts中添加如下代码
1
2
3
4
5
6
7
8
9
10
11
12
13
14
15
16
17
{
  "name": "project",
  "version": "1.0.0",
  "description": "",
  "main": "index.js",
  "scripts": {
    "test": "echo \"Error: no test specified\" && exit 1",
    "dev": "node index.js" // 添加的代码
  },
  "keywords": [],
  "author": "",
  "license": "ISC",
  "dependencies": {
    "express": "^4.17.1",
    "multer": "^1.4.3"
  }
}
在使用如下命令运行
1
2
3
npm run dev
> project@1.0.0 dev C:\Users\star\Desktop\Node\project
> node index.js
访问
主页:http://127.0.0.1:3000/
用户页:http://127.0.0.1:3000/user
文件上传页:http://127.0.0.1:3000/upload
作业
使用node搭建项目环境
</article>

 浙公网安备 33010602011771号