
iOS Category实现原理
iOS Category实现原理
实现原理
-
我们不主动引入 Category 的头文件,Category 中的方法都会被添加进主类中。我们可以通过 - performSelector: 等方式 对 Category 中的相应方法进行调用
- a) 将 Category 和它的主类(或元类)注册到哈希表中;
- b)如果主类(或元类)已实现,那么重建它的方法列表。
-
在这里分了两种情况进行处理:Category 中的实例方法和属性被整合到主类中;而类方法则被整合到元类中(关于对象、类和元类的更多细节,可以参考我前面的博文《Objective-C对象模型》)。另外,对协议的处理比较特殊,Category 中的协议被同时整合到了主类和元类中。
-
注意到,不管是哪种情况,最终都是通过调用 staticvoid remethodizeClass(Class cls) 函数来重新整理类的数据的。
1.category结构体
-
所有的OC类和对象,在runtime层都是用struct表示的,category也不例外,在runtime层,category用结构体category_t.
-
category结构体的定义:
struct category_t {

      const char *name;     //类的名字(name)

      classref_t cls;       //类(cls)

      struct method_list_t *instanceMethods; //category中所有给类添加的实例方法的列表(instanceMethods)

      struct method_list_t *classMethods;  //category中所有添加的类方法的列表(classMethods)

      struct protocol_list_t *protocols;  //category实现的所有协议的列表(protocols)

      struct property_list_t *instanceProperties;  //category中添加的所有属性(instanceProperties)

};
从category的定义也可以看出category可以添加实例方法,类方法;可以遵守协议,添加属性;但无法添加实例变量。
注意,在category中可以有属性(property),但是该属性只是生成了getter和setter方法的声明,并没有产生对应的实现,更不会添加对应的实例变量。如果想为实例对象添加实例变量,可以尝试使用关联引用技术。
2. 当调用分类的方法时,步骤是否和调用对象方法一样呢?
- 分类中的对象方法依然是存储在类对象中的,同本类对象方法在同一个地方,调用步骤也同调用对象方法一样。如果是类方法的话,也同样是存储在元类对象中。
分类方法是如何存储在类对象中的?
- 分类的源码就是上述category_t 结构体
-
通过以下命令可以将分类转化为c++文件,查看其中的编译过程。
xcrun -sdk iphoneos clang -arch arm64 -rewrite-objc YLCustom+Test.m -
在分类转化为c++文件中可以看出_category_t结构体中,存放着类名,对象方法列表,类方法列表,协议列表,以及属性列表。
struct _category_t { const char *name; struct _class_t *cls; const struct _method_list_t *instance_methods; const struct _method_list_t *class_methods; const struct _protocol_list_t *protocols; const struct _prop_list_t *properties; }; -
在_method_list_t类型的结构体中源码实现
static struct /*_method_list_t*/ { unsigned int entsize; // sizeof(struct _objc_method) unsigned int method_count; struct _objc_method method_list[2]; } _OBJC_$_CATEGORY_INSTANCE_METHODS_YLCustom_$_Test __attribute__ ((used, section ("__DATA,__objc_const"))) = { sizeof(_objc_method), 2, {{(struct objc_selector *)"test", "v16@0:8", (void *)_I_YLCustom_Test_test}, {(struct objc_selector *)"test1", "v16@0:8", (void *)_I_YLCustom_Test_test1}} };- 由此我们发现这个结构体_OBJC_$CATEGORY_INSTANCE_METHODS_YLCustom$_Test从名称可以看出是INSTANCE_METHODS对象方法,并且一一对应为上面结构体内赋值。我们可以看到结构体中存储了方法占用的内存,方法数量,以及方法列表。并且从上图中找到分类中我们实现对应的对象方法test , test1两个方法
-
在另一个_method_list_t类型的结构体中
static struct /*_method_list_t*/ { unsigned int entsize; // sizeof(struct _objc_method) unsigned int method_count; struct _objc_method method_list[2]; } _OBJC_$_CATEGORY_CLASS_METHODS_YLCustom_$_Test __attribute__ ((used, section ("__DATA,__objc_const"))) = { sizeof(_objc_method), 1, {{(struct objc_selector *)"eat2", "v16@0:8", (void *)_C_YLCustom_Test_Test2}} };- 同上面对象方法列表一样,这个我们可以看出是类方法列表结构体 OBJC$CATEGORY_CLASS_METHODS_Preson$_Test,同对象方法结构体相同,同样可以看到我们实现的类方法,Test2。
3.协议方法列表
 static const char *_OBJC_PROTOCOL_METHOD_TYPES_NSCoding [] __attribute__ ((used, section ("__DATA,__objc_const"))) =
 {
     "v24@0:8@\"NSCoder\"16",
     "@24@0:8@\"NSCoder\"16"
 };

 static struct /*_method_list_t*/ {
     unsigned int entsize;  // sizeof(struct _objc_method)
     unsigned int method_count;
     struct _objc_method method_list[2];
 } _OBJC_PROTOCOL_INSTANCE_METHODS_NSCoding __attribute__ ((used, section ("__DATA,__objc_const"))) = {
     sizeof(_objc_method),
     2,
     {{(struct objc_selector *)"encodeWithCoder:", "v24@0:8@16", 0},
     {(struct objc_selector *)"initWithCoder:", "@24@0:8@16", 0}}
 };

 struct _protocol_t _OBJC_PROTOCOL_NSCoding __attribute__ ((used)) = {
     0,
     "NSCoding",
     0,
     (const struct method_list_t *)&_OBJC_PROTOCOL_INSTANCE_METHODS_NSCoding,
     0,
     0,
     0,
     0,
     sizeof(_protocol_t),
     0,
     (const char **)&_OBJC_PROTOCOL_METHOD_TYPES_NSCoding
 };
 struct _protocol_t *_OBJC_LABEL_PROTOCOL_$_NSCoding = &_OBJC_PROTOCOL_NSCoding;

 static struct /*_protocol_list_t*/ {
     long protocol_count;  // Note, this is 32/64 bit
     struct _protocol_t *super_protocols[2];
 } _OBJC_CATEGORY_PROTOCOLS_$_YLCustom_$_Test __attribute__ ((used, section ("__DATA,__objc_const"))) = {
     2,
     &_OBJC_PROTOCOL_NSCopying,
     &_OBJC_PROTOCOL_NSCoding
 };
 ```

- 通过上述源码可以看到先将协议方法通过_method_list_t结构体存储,之后通过_protocol_t结构体存储在_OBJC_CATEGORY_PROTOCOLS_$_Preson_$_Test中同_protocol_list_t结构体一一对应,分别为protocol_count 协议数量以及存储了协议方法的_protocol_t结构体。
- YLCustom遵守两个协议<NSCoding,NSCopying>

### 4.最后我们可以看到属性列表
static struct /*_prop_list_t*/ {
    unsigned int entsize;  // sizeof(struct _prop_t)
    unsigned int count_of_properties;
    struct _prop_t prop_list[2];
} _OBJC_$_PROP_LIST_YLCustom_$_Test __attribute__ ((used, section ("__DATA,__objc_const"))) = {
    sizeof(_prop_t),
    2,
    {{"weight","Ti,N"},
    {"height","Td,N"}}
};
- 属性列表结构体_OBJC_$_PROP_LIST_YLCustom_$_Test同_prop_list_t结构体对应,存储属性的占用空间,属性属性数量,以及属性列表,从上面代码中可以看到我们自己写的weight,height属性。
- 最后我们可以看到_OBJC_$_CATEGORY_YLCustom_$_Test结构体,并且将以上结构体赋值。
```
extern "C" __declspec(dllimport) struct _class_t OBJC_CLASS_$_YLCustom;
static struct _category_t _OBJC_$_CATEGORY_YLCustom_$_Test __attribute__ ((used, section ("__DATA,__objc_const"))) =
{
"YLCustom",
0, // &OBJC_CLASS_$_YLCustom,
(const struct _method_list_t *)&_OBJC_$_CATEGORY_INSTANCE_METHODS_YLCustom_$_Test,
(const struct _method_list_t *)&_OBJC_$_CATEGORY_CLASS_METHODS_YLCustom_$_Test,
(const struct _protocol_list_t *)&_OBJC_CATEGORY_PROTOCOLS_$_YLCustom_$_Test,
(const struct _prop_list_t *)&_OBJC_$_PROP_LIST_YLCustom_$_Test,
};
```
- 由此可知定义_class_t类型的OBJC_CLASS_$_YLCustom结构体,最后将_OBJC_$_CATEGORY_YLCustom_$_Test的cls指针指向OBJC_CLASS_$_YLCustom结构体地址。我们这里可以看出,cls指针指向的应该是分类的主类类对象的地址。
- 通过以上分析我们发现。分类源码中确实是将我们定义的对象方法,类方法,属性等都存放在catagory_t结构体中。
### 5.在runtime源码分析catagory_t存储的方法,属性,协议等是如何存储在类对象中的。
1. 在 objc-os.mm 文件中,/* _objc_init */runtime初始化函数
```
void _objc_init(void)
{
static bool initialized = false;
if (initialized) return;
initialized = true;
// fixme defer initialization until an objc-using image is found?
environ_init();
tls_init();
static_init();
lock_init();
exception_init();
_dyld_objc_notify_register(&map_images, load_images, unmap_image);
}
```
2. 接着我们来到 &map_images读取模块(images这里代表模块),来到map_images_nolock函数中找到_read_images函数,在_read_images函数中我们找到分类相关代码
```
// Discover categories.
for (EACH_HEADER) {
category_t **catlist =
_getObjc2CategoryList(hi, &count);
bool hasClassProperties = hi->info()->hasCategoryClassProperties();
for (i = 0; i < count; i++) {
category_t *cat = catlist[i];
Class cls = remapClass(cat->cls);
if (!cls) {
// Category's target class is missing (probably weak-linked).
// Disavow any knowledge of this category.
catlist[i] = nil;
if (PrintConnecting) {
_objc_inform("CLASS: IGNORING category \?\?\?(%s) %p with "
"missing weak-linked target class",
cat->name, cat);
}
continue;
}
// Process this category.
// First, register the category with its target class.
// Then, rebuild the class's method lists (etc) if
// the class is realized.
bool classExists = NO;
if (cat->instanceMethods || cat->protocols
|| cat->instanceProperties)
{
addUnattachedCategoryForClass(cat, cls, hi);
if (cls->isRealized()) {
remethodizeClass(cls);
classExists = YES;
}
if (PrintConnecting) {
_objc_inform("CLASS: found category -%s(%s) %s",
cls->nameForLogging(), cat->name,
classExists ? "on existing class" : "");
}
}
if (cat->classMethods || cat->protocols
|| (hasClassProperties && cat->_classProperties))
{
addUnattachedCategoryForClass(cat, cls->ISA(), hi);
if (cls->ISA()->isRealized()) {
remethodizeClass(cls->ISA());
}
if (PrintConnecting) {
_objc_inform("CLASS: found category +%s(%s)",
cls->nameForLogging(), cat->name);
}
}
}
}
```
3. 上述代码中我们可以知道这段代码是用来查找有没有分类的。通过_getObjc2CategoryList函数获取到分类列表之后,进行遍历,获取其中的方法,协议,属性等。可以看到最终都调用了remethodizeClass(cls);函数。我们来到remethodizeClass(cls);函数内部查看。
```
/***********************************************************************
* remethodizeClass
* Attach outstanding categories to an existing class.
* Fixes up cls's method list, protocol list, and property list.
* Updates method caches for cls and its subclasses.
* Locking: runtimeLock must be held by the caller
**********************************************************************/
static void remethodizeClass(Class cls)
{
category_list *cats;
bool isMeta;
runtimeLock.assertWriting();
isMeta = cls->isMetaClass();
// Re-methodizing: check for more categories
if ((cats = unattachedCategoriesForClass(cls, false/*not realizing*/))) {
if (PrintConnecting) {
_objc_inform("CLASS: attaching categories to class '%s' %s",
cls->nameForLogging(), isMeta ? "(meta)" : "");
}
attachCategories(cls, cats, true /*flush caches*/);
free(cats);
}
}
```
4. 通过上述代码我们发现attachCategories函数接收了类对象cls和分类数组cats,如我们一开始写的代码所示,一个类可以有多个分类。之前我们说到分类信息存储在category_t结构体中,那么多个分类则保存在category_list中。我们来到attachCategories函数内部。图片加源码。图片上注释
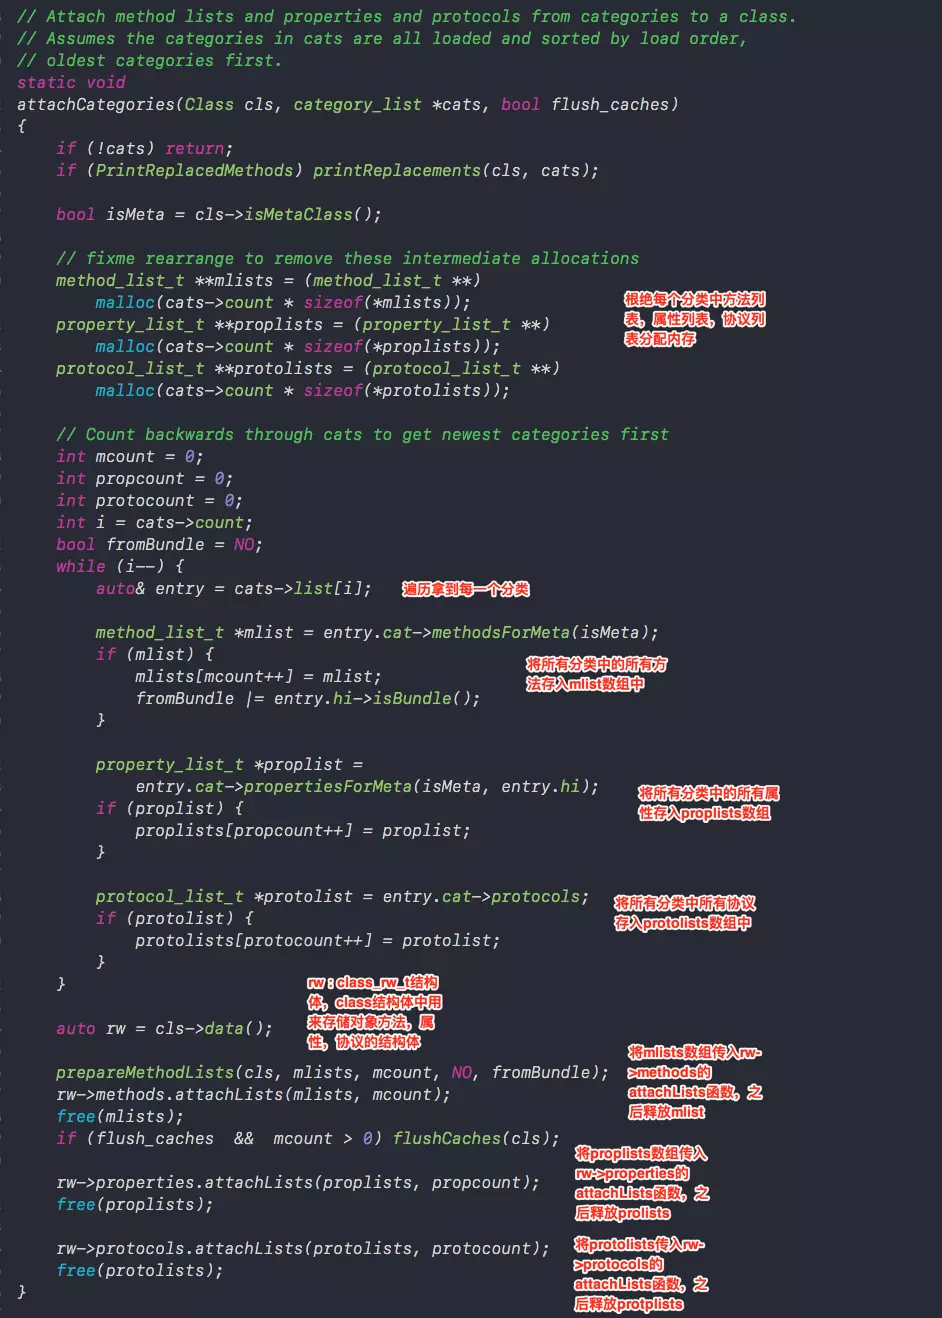
```
// Attach method lists and properties and protocols from categories to a class.
// Assumes the categories in cats are all loaded and sorted by load order,
// oldest categories first.
static void
attachCategories(Class cls, category_list *cats, bool flush_caches)
{
if (!cats) return;
if (PrintReplacedMethods) printReplacements(cls, cats);
bool isMeta = cls->isMetaClass();
// fixme rearrange to remove these intermediate allocations
method_list_t **mlists = (method_list_t **)
malloc(cats->count * sizeof(*mlists));
property_list_t **proplists = (property_list_t **)
malloc(cats->count * sizeof(*proplists));
protocol_list_t **protolists = (protocol_list_t **)
malloc(cats->count * sizeof(*protolists));
// Count backwards through cats to get newest categories first
int mcount = 0;
int propcount = 0;
int protocount = 0;
int i = cats->count;
bool fromBundle = NO;
while (i--) {
auto& entry = cats->list[i];
method_list_t *mlist = entry.cat->methodsForMeta(isMeta);
if (mlist) {
mlists[mcount++] = mlist;
fromBundle |= entry.hi->isBundle();
}
property_list_t *proplist =
entry.cat->propertiesForMeta(isMeta, entry.hi);
if (proplist) {
proplists[propcount++] = proplist;
}
protocol_list_t *protolist = entry.cat->protocols;
if (protolist) {
protolists[protocount++] = protolist;
}
}
auto rw = cls->data();
prepareMethodLists(cls, mlists, mcount, NO, fromBundle);
rw->methods.attachLists(mlists, mcount);
free(mlists);
if (flush_caches && mcount > 0) flushCaches(cls);
rw->properties.attachLists(proplists, propcount);
free(proplists);
rw->protocols.attachLists(protolists, protocount);
free(protolists);
}
```
5. 上述源码中可以看出,首先根据方法列表,属性列表,协议列表,malloc分配内存,根据多少个分类以及每一块方法需要多少内存来分配相应的内存地址。之后从分类数组里面往三个数组里面存放分类数组里面存放的分类方法,属性以及协议放入对应mlist、proplists、protolosts数组中,这三个数组放着所有分类的方法,属性和协议。
之后通过类对象的data()方法,拿到类对象的class_rw_t结构体rw,在class结构中我们介绍过,class_rw_t中存放着类对象的方法,属性和协议等数据,rw结构体通过类对象的data方法获取,所以rw里面存放这类对象里面的数据。
之后分别通过rw调用方法列表、属性列表、协议列表的attachList函数,将所有的分类的方法、属性、协议列表数组传进去,我们大致可以猜想到在attachList方法内部将分类和本类相应的对象方法,属性,和协议进行了合并。
- 分析attachLists函数内部。
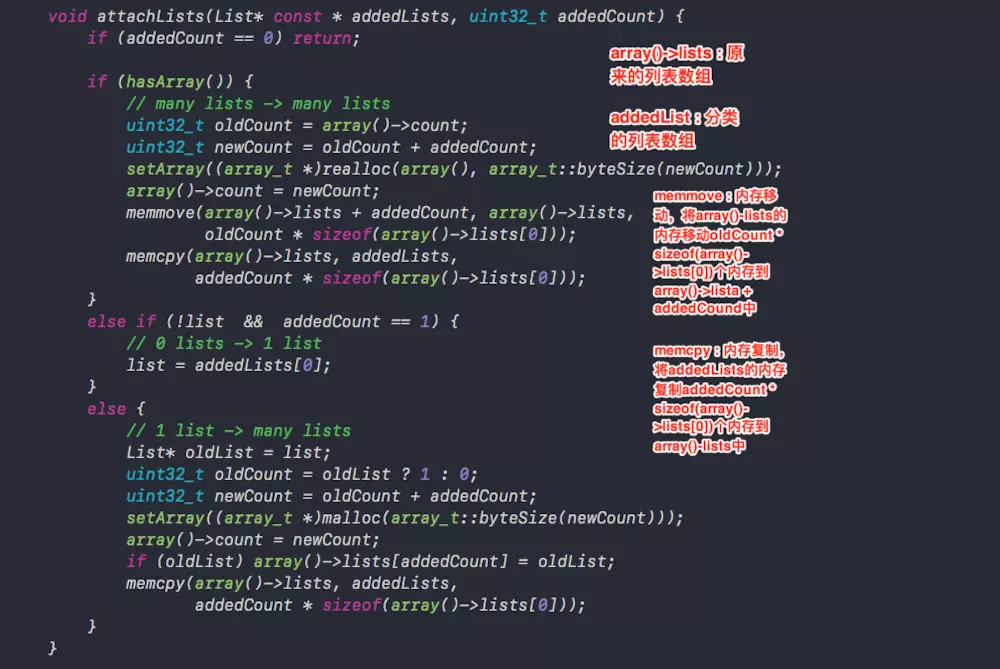
```
void attachLists(List* const * addedLists, uint32_t addedCount) {
if (addedCount == 0) return;
if (hasArray()) {
// many lists -> many lists
uint32_t oldCount = array()->count;
uint32_t newCount = oldCount + addedCount;
setArray((array_t *)realloc(array(), array_t::byteSize(newCount)));
array()->count = newCount;
memmove(array()->lists + addedCount, array()->lists,
oldCount * sizeof(array()->lists[0]));
memcpy(array()->lists, addedLists,
addedCount * sizeof(array()->lists[0]));
}
else if (!list && addedCount == 1) {
// 0 lists -> 1 list
list = addedLists[0];
}
else {
// 1 list -> many lists
List* oldList = list;
uint32_t oldCount = oldList ? 1 : 0;
uint32_t newCount = oldCount + addedCount;
setArray((array_t *)malloc(array_t::byteSize(newCount)));
array()->count = newCount;
if (oldList) array()->lists[addedCount] = oldList;
memcpy(array()->lists, addedLists,
addedCount * sizeof(array()->lists[0]));
}
}
```
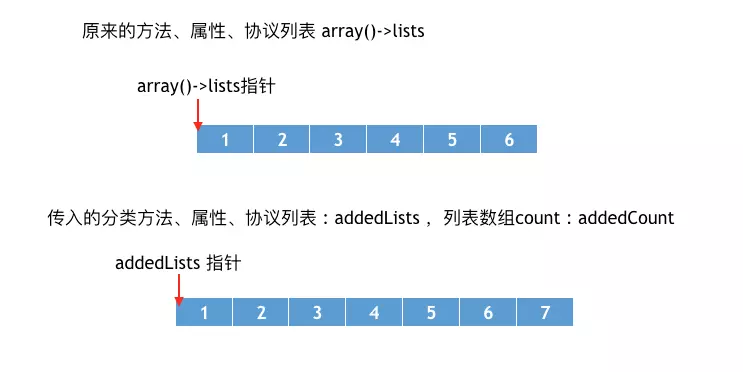
6. 上述源代码中有两个重要的数组
- array()->lists: 类对象原来的方法列表,属性列表,协议列表。
- addedLists:传入所有分类的方法列表,属性列表,协议列表。
- attachLists函数中最重要的两个方法为memmove内存移动和memcpy内存拷贝。我们先来分别看一下这两个函数
```
// memmove :内存移动。
/* __dst : 移动内存的目的地
* __src : 被移动的内存首地址
* __len : 被移动的内存长度
* 将__src的内存移动__len块内存到__dst中
*/
void *memmove(void *__dst, const void *__src, size_t __len);
// memcpy :内存拷贝。
/* __dst : 拷贝内存的拷贝目的地
* __src : 被拷贝的内存首地址
* __n : 被移动的内存长度
* 将__src的内存移动__n块内存到__dst中
*/
void *memcpy(void *__dst, const void *__src, size_t __n);
```
7. 下面我们图示经过memmove和memcpy方法过后的内存变化。
- 经过memmove方法之后,内存变化为
```
// array()->lists 原来方法、属性、协议列表数组
// addedCount 分类数组长度
// oldCount * sizeof(array()->lists[0]) 原来数组占据的空间
memmove(array()->lists + addedCount, array()->lists,
oldCount * sizeof(array()->lists[0]));
```
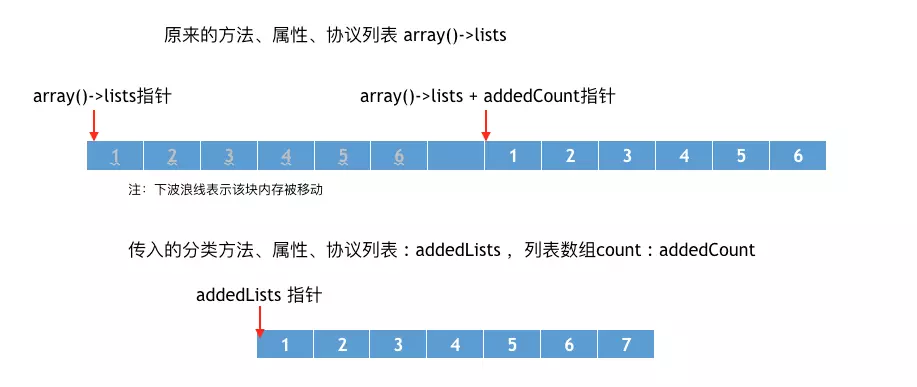
- 经过memmove方法之后,我们发现,虽然本类的方法,属性,协议列表会分别后移,但是本类的对应数组的指针依然指向原始位置。
- memcpy方法之后,内存变化
```
// array()->lists 原来方法、属性、协议列表数组
// addedLists 分类方法、属性、协议列表数组
// addedCount * sizeof(array()->lists[0]) 原来数组占据的空间
memcpy(array()->lists, addedLists,
addedCount * sizeof(array()->lists[0]));
```
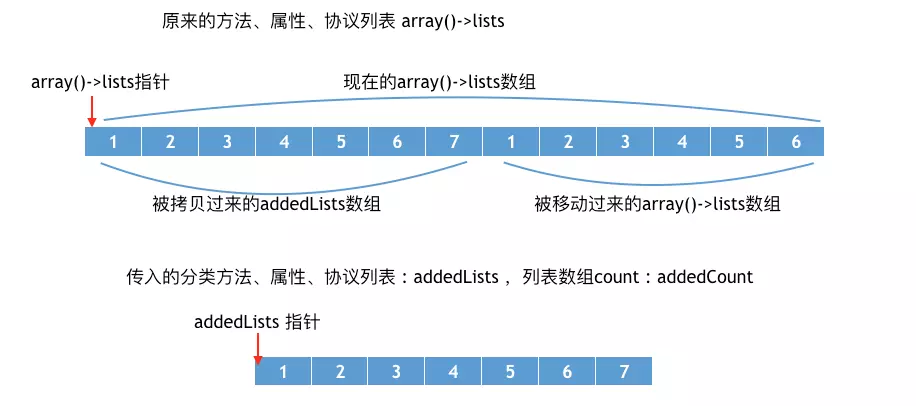
- 我们发现原来指针并没有改变,至始至终指向开头的位置。并且经过memmove和memcpy方法之后,分类的方法,属性,协议列表被放在了类对象中原本存储的方法,属性,协议列表前面。
- 那么为什么要将分类方法的列表追加到本来的对象方法前面呢,这样做的目的是为了保证分类方法优先调用,我们知道当分类重写本类的方法时,会覆盖本类的方法。
- 其实经过上面的分析我们知道本质上并不是覆盖,而是优先调用。本类的方法依然在内存中的。我们可以通过打印所有类的所有方法名来查看
```
- (void)printMethodNamesOfClass:(Class)cls
{
unsigned int count;
// 获得方法数组
Method *methodList = class_copyMethodList(cls, &count);
// 存储方法名
NSMutableString *methodNames = [NSMutableString string];
// 遍历所有的方法
for (int i = 0; i < count; i++) {
// 获得方法
Method method = methodList[i];
// 获得方法名
NSString *methodName = NSStringFromSelector(method_getName(method));
// 拼接方法名
[methodNames appendString:methodName];
[methodNames appendString:@", "];
}
// 释放
free(methodList);
// 打印方法名
NSLog(@"%@ - %@", cls, methodNames);
}
```
#### 总结
1. Category的实现原理,以及Category为什么只能加方法不能加属性。
- 分类的实现原理是将category中的方法,属性,协议数据放在category_t结构体中,然后将结构体内的方法列表拷贝到类对象的方法列表中。
Category可以添加属性,但是并不会自动生成成员变量及set/get方法。因为category_t结构体中并不存在成员变量。通过之前对对象的分析我们知道成员变量是存放在实例对象中的,并且编译的那一刻就已经决定好了。而分类是在运行时才去加载的。那么我们就无法再程序运行时将分类的成员变量中添加到实例对象的结构体中。因此分类中不可以添加成员变量。
[引用](https://www.jianshu.com/p/fa66c8be42a2)
 浙公网安备 33010602011771号