使用Jest和React Test library 进行React单元测试
React单元测试,就是把React 组件渲染出来,看看渲染出来的内容符不符合我们的预期。比如组件加载的时候有loading, 那就渲染组件,看看渲染出的内容中有没有loading. 再比如,ajax请求完成后,组件要显示返回的数据, 那就渲染组件, 等待请求完成,然后看看渲染出来内容是不是请求返回的数据。那怎么渲染?怎么查看渲染出来内容呢?因为我们是在命令行中跑测试,而不是在浏览器中进行测试, 渲染使用@testing-library/react, 提供了渲染方法。查看内容,则是Jest内置了jsdom, jsdom提供了DOM的无头实现,也就是说在命令行中跑测试,在测试中仍然可以获取到document, document.body 等DOM 元素,也就可以使用documet.getElementId() 等DOM 方法来查出内容,也可以click 来测试浏览器的交互形为。jsdom也称为Jest浏览器环境。
@testing-library/react也鼓励我们,写测试要把注意力放到用户身上,测试要模拟真实用户的形为,而不是测试组件的实现细节,这样,测试完成后,对组件更有信心。什么是测试实现细节呢?就是测试组件状态是不是对的,直接调用组件中的方法。如果你了解Enzyme的话,它就提供了wrapper.state方法,可以直接获取到组件的状态,wapper.instance可以直接调用组件的方法。为什么不测试组件的实现细节?测试组件的实现细节有什么不好吗?有两个不好的地方,一是使用组件时,谁管你内部是怎么实现的,用户只管好不好用,有没有达到预期效果,测试实现细节显得没有什么意义。二是维护成本太高,今天组件的状态叫curValue, 明天可能叫currentValue, 这样测试就要改来改去,但这样的修改对组件来说,功能没有受到任何的影响,按理说,测试是不需要改的。@testing-library/react并没有提供测试实现细节的功能,只提供了getByText()等测试dom的功能。
自己配置一个测试环境,稍微有点麻烦,create-react-app内置了@test-library/react,使用它创建项目,可以直接写测试。使用create-react-app 创建项目后,就可以看一下@test-library/react库了。React单元测试,就是渲染,查找元素,进行判断,是不是符合预期,也就是断言。React test libaray 提供了render()方法进行渲染,它接受一个React element, 然后把它渲染成DOM, 插入到body元素上。提供了*Text()等方法来查找元素,jest-dom提供了断言。写一个简单的例子,组件加载的时候显示loading, 然后请求数据, 展示数据。App.js修改如下
import React from 'react';

export default class App extends React.Component {
    state = { todo: null}
    componentDidMount() {
        fetch('https://jsonplaceholder.typicode.com/todos/1')
            .then(res => res.json())
            .then(todo => this.setState({todo}))
            .catch(e => console.log(e));
    }

    render() {
        return (
            <React.Fragment>
                {
                    this.state.todo ?
                    <p className="title">title: {this.state.todo.title}</p>
                    : <p className="spinner">loading</p>
                }
            </React.Fragment>
        )
    }
}
测试的第一种情况是组件有没有显示 loading, 这和用户的形为是一致的。浏览器先渲染loading, 再渲染todo的title。用户先看到的是loading, 再看到的是title。按照测试步骤,先渲染组件,再查找loading ,最后断言其存在,如果测试通过,就表示组件功能没有问题。渲染直接调用render()方法,查找则要用@testing-library/react提供的screen对象,断言就用toBeInTheDocument()。 App.test.js 修改如下
import React from 'react';
import { render, screen } from '@testing-library/react';
import App  from './App';

describe('app test', () => {
    test('render a loading when component shows', () => {
        render(<App></App>);
        const hello = screen.getByText(/loading/);
        expect(hello).toBeInTheDocument();
    });
});
自己配置一个Jest环境,稍微有点麻烦,mkdir react-test && cd react-test && npm init -y 新建项目react-test,npm install jest @testing-library/react --save-dev, 还要npm install react react-dom 安装react react-dom,由于node并不支持jsx,还要安装babel, @babel/core, @babel/preset-env, @babel/preset-react, 并配置.babelrc
{
    "presets": ["@babel/preset-env", "@babel/preset-react"]
}
Jest 27版本,test environment默认值是node,而不是jest dom, 所以还要配置test environment,jest.config.js
module.exports = {
    testEnvironment: 'jsdom'
}
写一个Hello.js
import React from "react"
export function Hello(){
    return <div>Hello</div>
}
新建Hello.test.js测试一下
import React from 'react';
import { render, screen } from '@testing-library/react';
import { Hello } from './Hello';

test('Hello', () => {
    render(<Hello></Hello>);
    const hello = screen.getByText(/Hello/);
    expect(hello).toBeTruthy();
})
npx jest, 测试成功,expect(hello).toBeTruthy()表明Hello 存在,但是语义不太清晰,如果toBeInTheDocument() 就好了,那要安装@testing-library/jest-dom, npm install --save-dev @testing-library/jest-dom ,然后在测试中import '@testing-library/jest-dom',由于在每一个测试中都要写这个配置比较麻烦,Jest 有一个配置项setupFilesAfterEnv,是一个路径数组,如果把某个文件所在的路径放到这个数组中,那么在跑测试之前Jest都会先运行这些文件中内容,路径数组中的各个文件相当于对Jest 进行了初始配置。在跑每个测试之前,都要配置jest-dom, 所以把jest-dom的配置文件放到setupFilesAfterEnv 中,那就要配置setupFilesAfterEnv。jest.config.js
module.exports = {
    testEnvironment: 'jsdom',
    setupFilesAfterEnv: ['<rootDir>/jest-setup.js']
}
再在项目根目录下建jest-setup.js
import '@testing-library/jest-dom'
把Hello.test.js中import jest-dom去掉,npx jest, 测试成功。
npx jest, 报错了,ReferenceError: fetch is not defined,为什么呢?因为跑单元测试,实际上是用node.js来执行单元测试的代码(JS代码)。在代码中,render()渲染组件,调用了组件的componentDidMount() 方法,在componentDidMount() 方法中,调用了fetch去请求数据,node.js中并没有fetch,所以报错了。现在只能由我们自己提供fetch了。提供fecth,直接给window对象添加fetch属性,因为现在是jest-dom环境, 在测试中,并不是真正地去请求数据,要mock fetch. 由于刚开始请求,请求是一种promise的pedding状态,所以直接返回一个promise 对象就可以了。
test('render a loading when component shows', () => {
        window.fetch = jest.fn(() => {
            return new Promise((resolve, reject) => { });
        })
        render(<App></App>);
        const hello = screen.getByText(/loading/);
        expect(hello).toBeInTheDocument();
    });
看一下React组件的执行过程,state.todo是null,render 方法返回<p className="spinner">loading</p>, 然后调用componentDidMount() 方法,fetch去请求数据(异步的),而在测试中,渲染出组件以后,直接断言了(同步),并没有等待fetch请求回来,fetch 在请求的过程中,测试已结束,所以渲染出的wrapper 只包含<p className="spinner">loading</p>, 测试通过,可以console.log(wrapper.debug()) 看组件的渲染结果。这也引出了测试的第二种情况,等待fetch请求结束,看返回的数据有没有正确渲染出来。有两个问题需要解决,一个是fetch, 在测试中,不是真正地去请求数据,所以要对fetch 进行mock. fetch是window 对象的属性,所以对fetch的mock, 就是让window.fetch = jest.fn()。 jest.fn接受一个函数作为参数,函数的返回值就是mock函数的返回值。fetch的mock如下
window.fetch = jest.fn(() => {
    return Promise.resolve({
        status: 200,
        json: () => {
            return Promise.resolve({"title": "delectus aut autem"
            })
        }
    })
})
一个是等待, 等待fetch请求成功。等待用的是Jest测试的done参数,只要一个test测试中,参数有done, Jest 在测试的时候,就会等待这个done 的调用,如果done 不调用,Jest就会停在这个测试中。那么现在的问题变成了什么时候调用done(). fetch 返回的是promise, 所有注册的回调函数都放到异步队列中。异步队列的执行是node 的事件循环机制,还是无法知道,所有的回调函数什么时候执行完,什么时候调用done()。 但我们可以注册一个回调函数,只要保证fetch中注册的回调函数都执行完了,再执行我们注册的回调函数就可以了。这让我想到了setTimeout(), 同一个事件循环中,promise中的回调函数会在setTimeOut中的回调函数之前执行,那就在setTimeout 中调用done 就可以了
test('should render todo.title when fetch successfully ', (done) => {
    window.fetch = jest.fn(() => {
        return Promise.resolve({
            status: 200,
            json: () => {
                return Promise.resolve({"title": "delectus aut autem"
                })
            }
        })
    })

    const wrapper = shallow(<App></App>);

    setTimeout(() => {
        expect(wrapper.find("p.title").text()).toContain("delectus");
        expect(wrapper.find(".spinner").length).toBe(0);
        done();
    }, 10);
});
});
看一下执行顺序,shallow(<App></App>) -> componentDidMount() 执行 -> fetch发送请求,由于fetch是异步的,所以 shallow(<App></App>); 这一行代码算是执行完了,但由于mock, fetch立即resolve了,在执行下一行代码代码之前,fetch注册的回调函数已到异步队列中。再执行setTimeout, 告诉node, 10ms 之后注册断言的回调函数。顺序执行完毕,开始执行队列。执行res => res.json(),setState(), React 重新渲染,10ms 之后,断言的回调函数注册并执行,由于也执行了done() 测试结束,这时测试的就是fetch 返回数据之后的组件内容。注意,这里的setTimeout的延迟10s 只是举例,真正起作用的是事件循环队列的micro-task 和macro-task。promise是micro-task, setTimeout是micro-task。
两种情况都通过测试,这个React组件就算测试完成了,因为它只有这两种情况。再稍微延伸一下,有人使用fetch的时候喜欢return
 componentDidMount() {
        return fetch('https://jsonplaceholder.typicode.com/todos/1')
            .then(res => res.json())
            .then(todo => this.setState({todo}))
            .catch(e => console.log(e));
    }
或有人喜欢使用async/await
    async componentDidMount() {
        try {
            const res = await fetch('https://jsonplaceholder.typicode.com/todos/1');
            const todo = await res.json();
            this.setState({todo})
        } catch (e) {
            console.log(e);
        }
    }
这时componentDidMount() 调用的时候,就会返回promise, 在测试的时候,给这个promise注册回调函数,在回调函数里面时进行测试,可以保证fetch请求结束再进行断言。这时,你就想手动调用componentDidMount(). 在shallow 渲染下是可以的,它接受第二个参数,是个对象,对shallow进行配置,disableLifecycleMethods: true, 表示渲染组件的时候不会调用生命周期函数。它返回的wrapper 有一个instance() 方法,返回react 实例,用它调用componentDidMount(), 测试内容修改如下, 还有一点要注意,在mock数据使用完成之后,最好把mock的函数进行还原。
test('should render todo.title when fetch successfully ', (done) => {
    window.fetch = jest.fn(() => {
        return Promise.resolve({
            status: 200,
            json: () => {
                return Promise.resolve({"title": "delectus aut autem"
                })
            }
       })
    })

    const wrapper = shallow(<App></App>, {disableLifecycleMethods: true});
    let didMount = wrapper.instance().componentDidMount();

    didMount.then(() => {
        expect(wrapper.find("p.title").text()).toContain("delectus");
        expect(wrapper.find(".spinner").length).toBe(0);
        console.log("ues");
        fetch.mockClear(); // mock 还原
        done();
    })
fetch 还有一种使用情况,对其进行封装,新建一个request.js 文件,定义一个getData()
export function getData(url) {
    return fetch(url).then(res => res.json())
}
在App.js 中就要引入getData, 然后compentDidMount() 中使用它
    componentDidMount() {
        return getData('https://jsonplaceholder.typicode.com/todos/1')
            .then(todo => this.setState({todo}))
            .catch(e => console.log(e));
    }
现在要怎么测试呢?组件依赖了另外一个模块,如果不想受这个模块影响,那就mock 这个模块。jest.mock() 一个模块,这个模块暴露出来的函数都变成了mock 函数,再从这个模块中引入函数,引入的都是mock函数,mock函数就可以mock实现,返回值等。
jest.mock('./request.js');
import { getData } from './request';
这时,你会发现两个测试都报错了。第一个测试,shallow并没有禁止调用生命周期函数,compentDidMount会调用getData(), getData() 返回的是jest.fn() 没有then, 所以报错了,第二个也是如此。第一个可以禁止生命周期函数的调用。
const wrapper = shallow(<App></App>, {disableLifecycleMethods: true});
第二个对getData mock 实现
测试通过。这时,两个测试中都有const wrapper = shallow(<App></App>, {disableLifecycleMethods: true}); 可以进行抽取,因为在每一个测试之前都会shallow, 所以使用beforeEach()。mock的还原可以使用afterEach()
import React from 'react';
import { shallow } from 'enzyme';
import App from './App';
jest.mock('./request.js');
import { getData } from './request';

describe('app test', () => {

    let wrapper;
    beforeEach(() => {
        wrapper = shallow(<App></App>, {disableLifecycleMethods: true});
    });
    afterEach(() => {
        getData.mockClear(); // mock 还原
    });

    test('render a loading when component shows', () => {
       expect(wrapper.find('.spinner').exists()).toBeTruthy();
    });

    test('should render todo.title when fetch successfully ', (done) => {
        getData.mockResolvedValue({
            "title": "delectus aut autem",
        })
        let didMount = wrapper.instance().componentDidMount();

        didMount.then(() => {
            expect(wrapper.find("p.title").text()).toContain("delectus");
            expect(wrapper.find(".spinner").length).toBe(0);
            done();
        })
    });
});
这里要注意,每个test之间要相互独立,不要使用共享数据,尤其是使用window 和document 对象的时候。当把变量提升到test 外面,放到describe中的时候,使用这个变量之前,一定要先进行赋值操作,可以使用beforeEach, 也可以在每一个test 的第一句,每一个test 都要使用它自己创建的变量。

在form表单中,label的for 标签,对应input 的id 属性,点击label标签,input就会选中,focus。选择label标签,就能选中input标签,因为它们是一对。user.click(label), user.keybord('asss) 输入内容。user中@react/user-event 库 的export default

当渲染完组件后,如果不知道怎么选择元素,可以使用screen.logTestingPlaygroundURL, 测试跑起来,终端生成一个url, 把url 输入到浏览器中,上面左侧显示,渲染成html元素,右侧相当于显示页面的样子,选择哪个元素,下面就会显示推荐。如果右侧的元素不好选择,可以在左侧html中添加style样式,比如margin, padding 让元素更容易选择一下。
如果使用getRole 不好找元素,可以给 元素一个testId, 使用getByTestId. @react-test/libaray 还提供了within(), 接受查到的元素作为参数,表示,在元素下面进行查询。还有一种是直接使用dom的查询方式,querySelector. render() 方法会返回 container. container.querySelect
findBy 返回的是promise, 所以要 expect(await findby).tobeIndocument()
act() warning: 就是unepected state updates
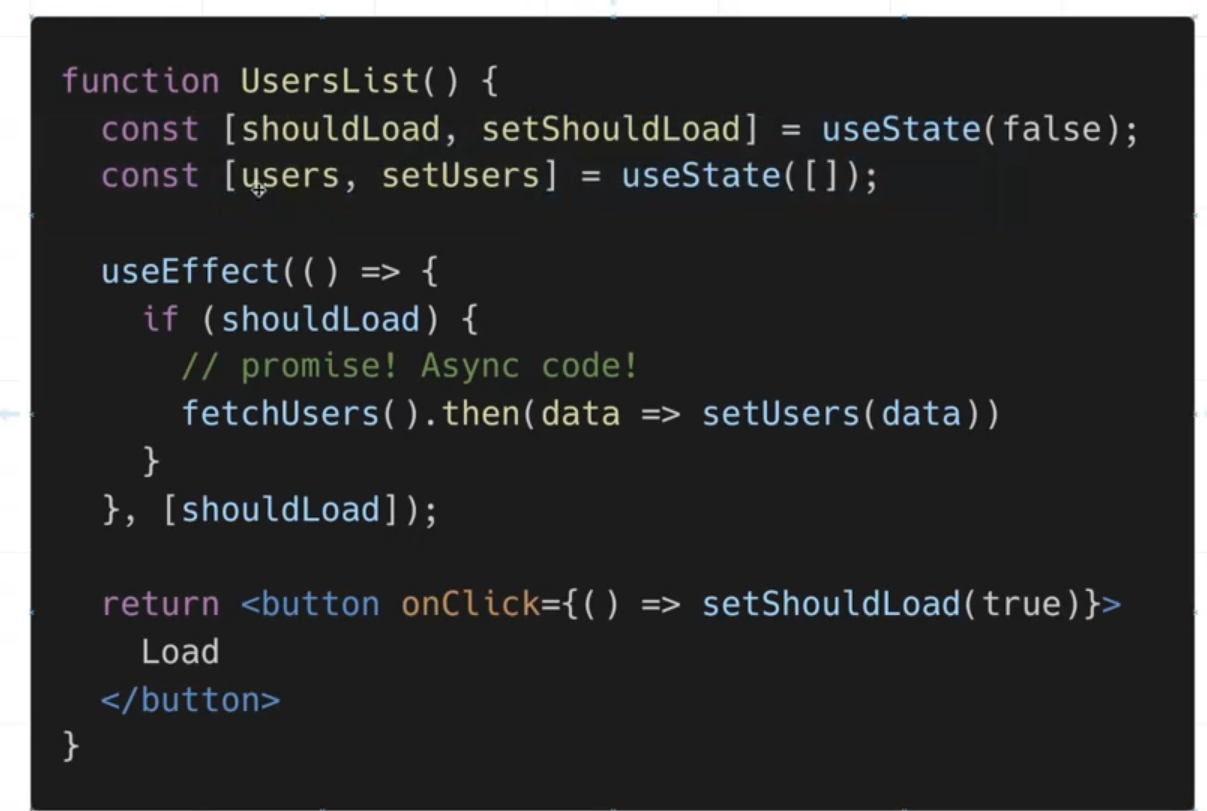
点击button
act 函数定义了时间窗口,状态的更新应该在里面发生。

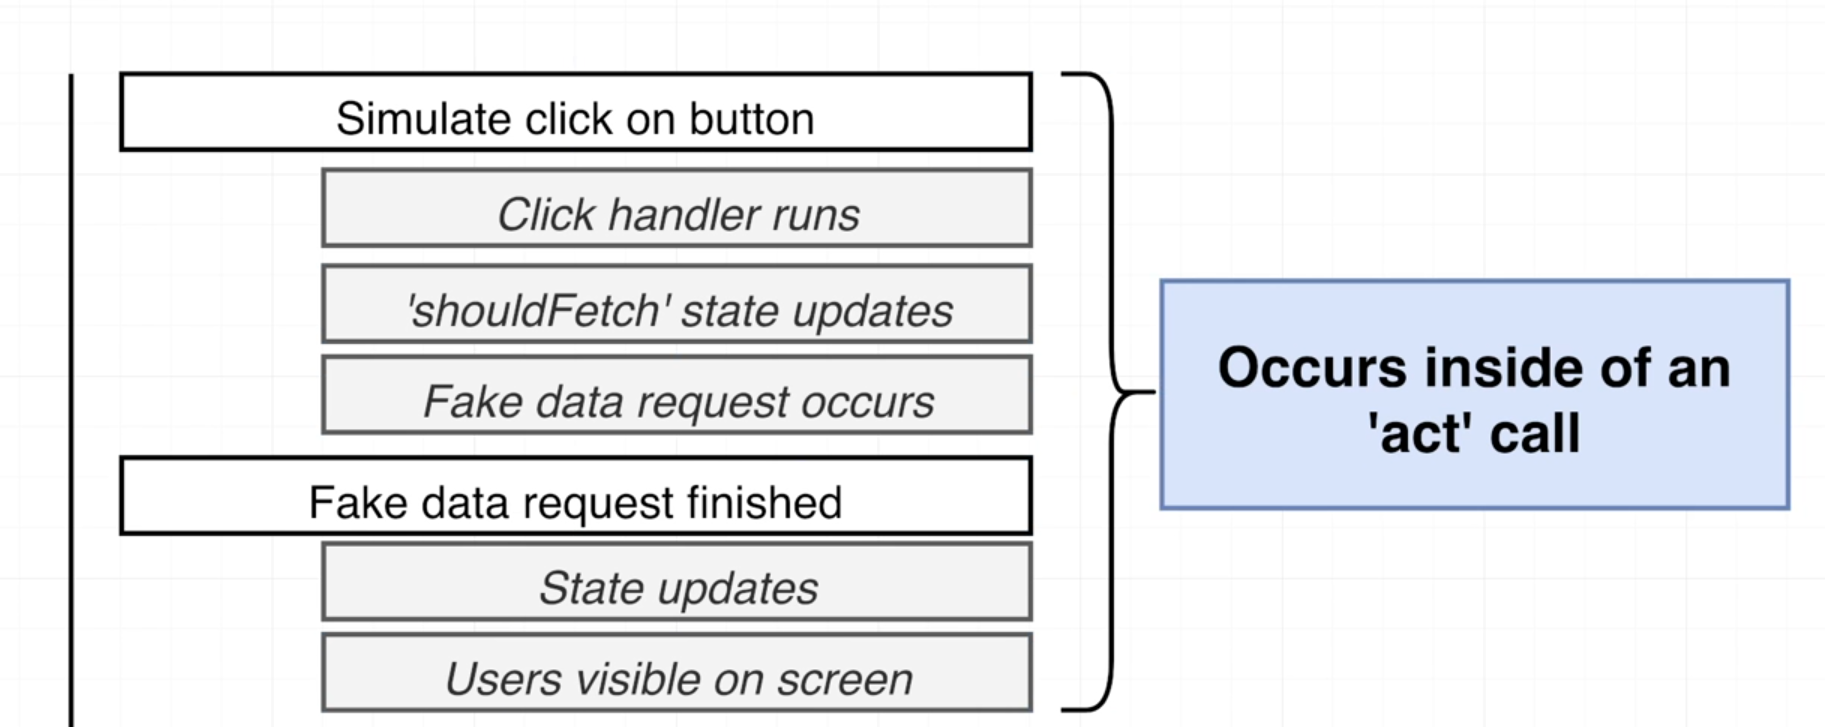
但在react test-libary里面你不会手动调用act
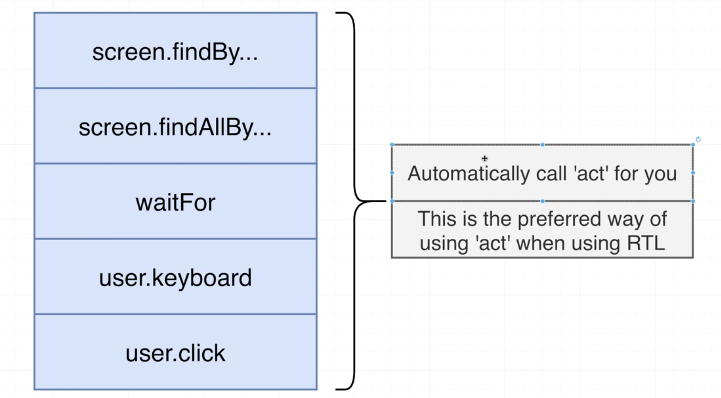
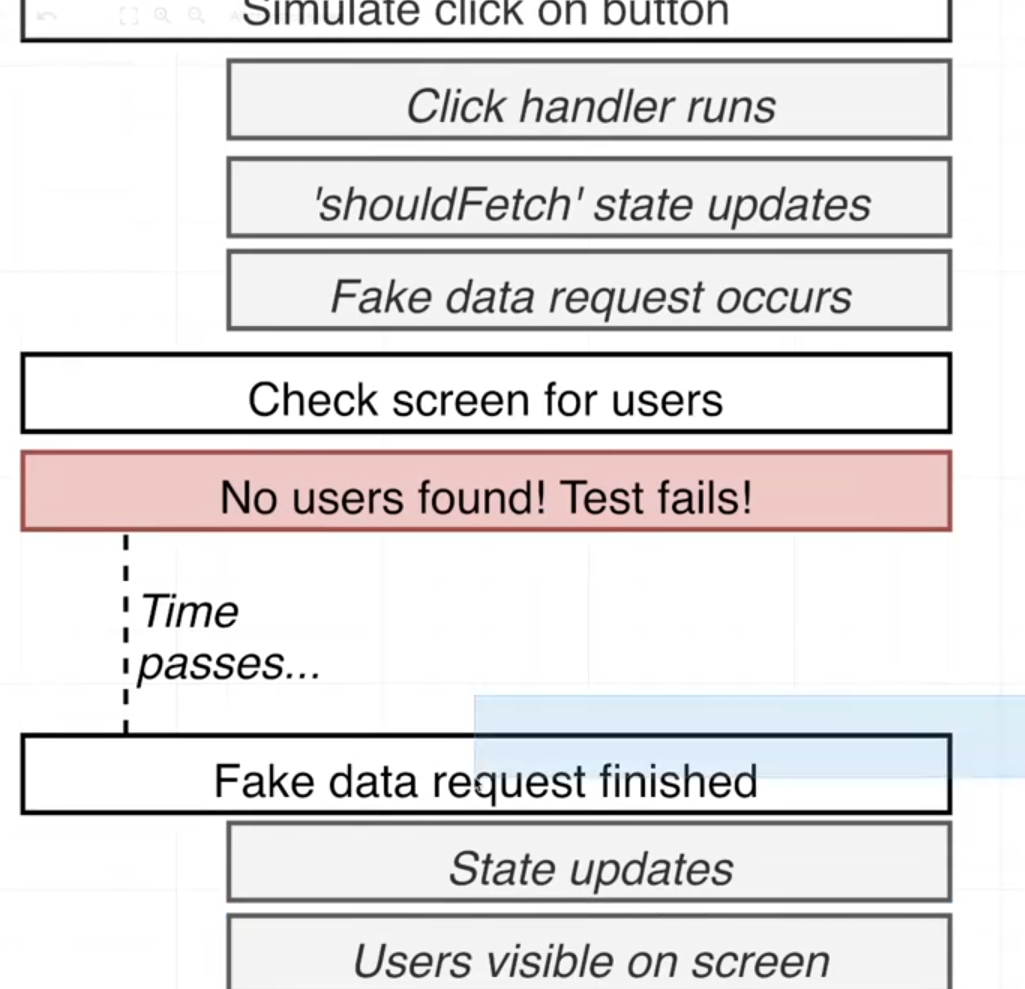
user.keyboard和user.click 是同步的,也就是说,当点击之后,会更新状态(setstate)。如果调用了promise,可以需要find和waitfor。 为了解决act warning, 通常 用findby, 而不是直接调用act函数。
可以看到有什么状态发生了改变,页面上多出了什么元素,直接await 这个元素就可以了。
findby 等待 data fetch 回来,然后再获取元素,做测试
当axios 和fetch 的时候,可以mock 服务器的api,msw 库,拦截请求,返回mock数据。
// src/mocks/server.js

import { setupServer } from 'msw/node'

import { handlers } from './handlers'


// This configures a request mocking server with the given request handlers.

export const server = setupServer(...handlers)
import { server } from './mocks/server.js'

// Establish API mocking before all tests.

beforeAll(() => server.listen())


// Reset any request handlers that we may add during the tests,

// so they don't affect other tests.

afterEach(() => server.resetHandlers())


// Clean up after the tests are finished.

afterAll(() => server.close())
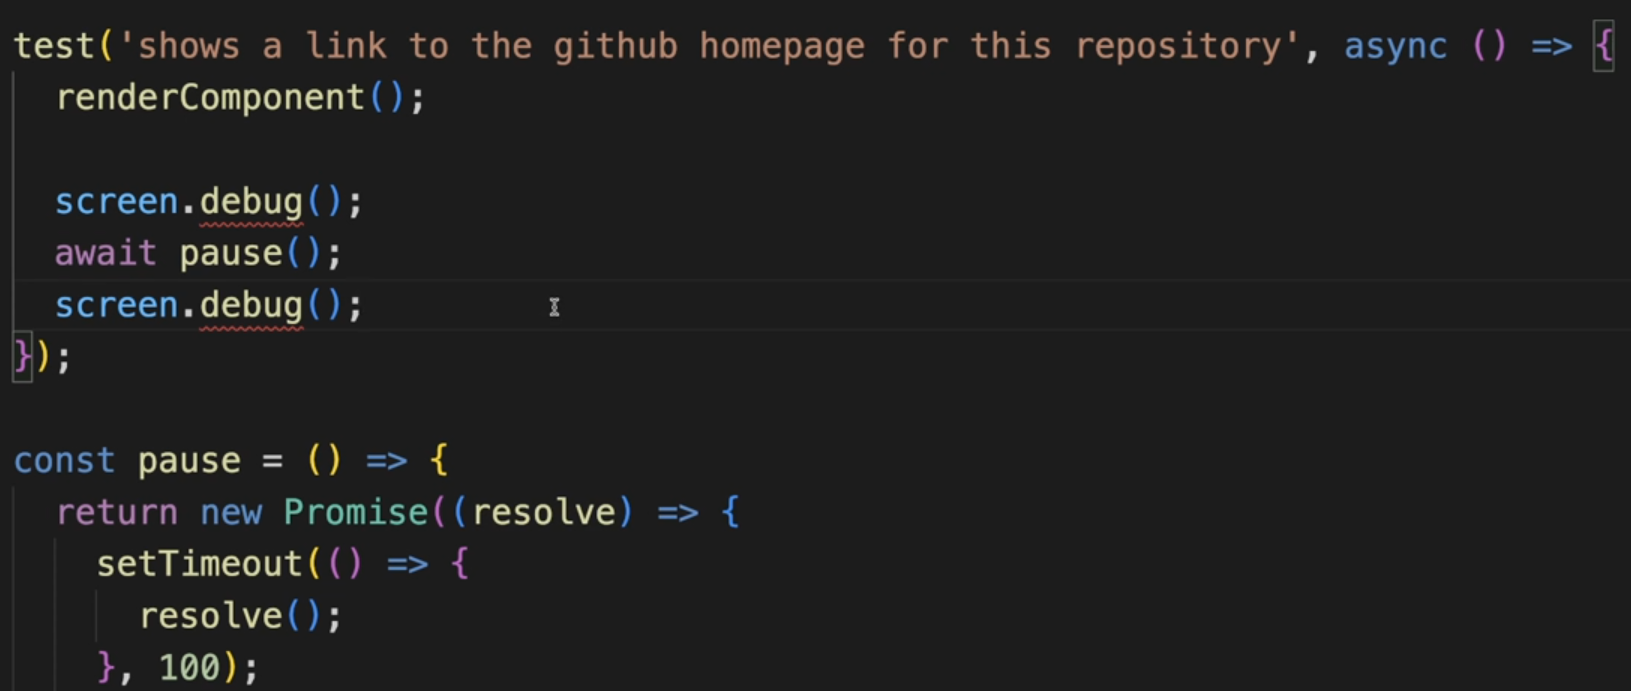
如果使用create-react-app,可以调置debug 命令, 在package.json中的script 中:"test:debug": "react-scripts --inspect-brk test --runInBand --no-cache". 然后在测试文件中, 需要debug的地y方加debugger; 语句, 可以使用test.only, 只测试要debug的测试. npm run test:debug开启测试. 在chrome 浏览器地址栏中 输入about:inspect
It is necessary to write additional code to clean up our test in many testing frameworks. For example, if a component is rendered into the DOM for one test, it needs to be removed before the next test is executed. Removing the component from the DOM allows the following test to start from a clean slate and not be affected by code from previous tests. React Testing Library's render method makes test cleanup easier by automatically taking care of removing components from the DOM, so there is no need to write additional code to clean up the state affected by previous tests.
test presentational components
Typically, you use presentational components to display data passed down from parent components as props or to display hardcoded data directly in the component itself.
Snapshot tests are provided by Jest and are great to use when you simply want to make sure the HTML output of a component does not change unexpectedly --- > hardcoded data
Suppose a developer does change the component's HTML structure, for example, by adding another paragraph element with static text. In that case, the snapshot test will fail and provide a visual of the changes so you can respond accordingly.
const { container } = render(<Travel />) // container represents the resulting HTML output of the component.
expect(container).toMatchInlineSnapshot(`
<div>
<div
class="card text-center m-1"
style="width: 18rem;"
>
<i
class="material-icons"
style="font-size: 4rem;"
>
airplanemode_active
</i>
npm test -- -u update the snapshot.
screen.debug() log the entire DOM output of a component when you run your test
You can use the debug method to log specific elements of the resulting component DOM to the screen:
it('displays the header and paragraph text', () => {
render(<Travel />)
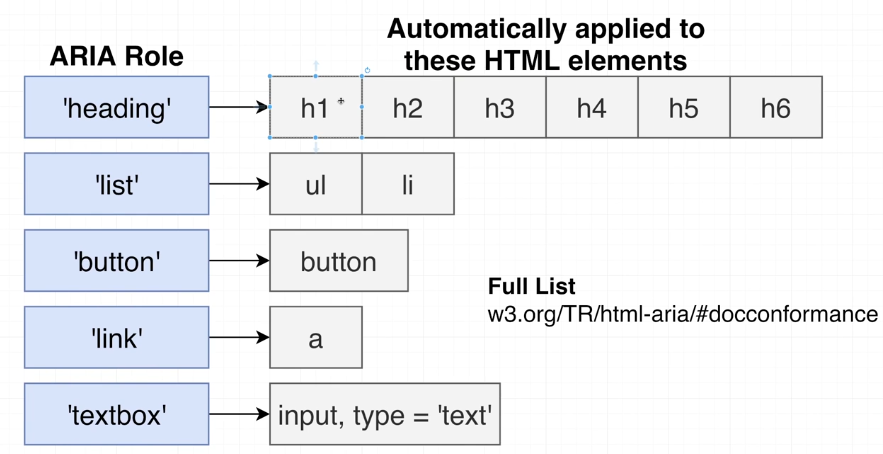
const header = screen.getByRole('heading', { name: /travel anywhere/i })
screen.debug(header)
})
Testing user events The DOM Testing Library provides two libraries to simulate user actions, fireEvent and user-event, which we are going to see in the following sections.
fireEvent.click(screen.getByRole('button', { name: /thumbs up/i }))
expect(screen.getByRole('button', { name: /thumbs up/i
})).toHaveStyle(
'background: green'
)
npm install --save-dev @testing-library/user-event
import user from '@testing-library/user-event'
user.click(screen.getByRole('button', { name: /thumbs up/i }))
const input = screen.getByRole('textbox', { name: /enter
your name/i })
user.type(input, 'jane doe')
Creating mock API data with MSW npm install msw --save-dev
MSW is a tool we can use to capture API requests initiated by our components and return mocked responses. When our frontend React application makes an HTTP request to an API server, MSW will intercept the request before it reaches the network and respond with mock data.
redux
import { configureStore } from '@reduxjs/toolkit'
import { render as rtlRender } from '@testing-library/react'
import faker from 'faker'
import { Provider } from 'react-redux'
import retailReducer from '../retailSlice'

const fakeStore = {
  retail: {
    products: [
      {
        id: faker.random.uuid(),
        title: faker.commerce.productName(),
        price: faker.commerce.price(),
        description: faker.commerce.productDescription(),
        category: faker.commerce.department(),
        image: faker.image.fashion()
      },
      {
        id: faker.random.uuid(),
        title: faker.commerce.productName(),
        price: faker.commerce.price(),
        description: faker.commerce.productDescription(),
        category: faker.commerce.department(),
        image: faker.image.fashion()
      }
    ],
    cartItems: [],
    favorites: [],
    showProductDetails: null
  }
}

function render(
  ui,
  {
    initialState,
    store = configureStore({
      reducer: { retail: retailReducer },
      preloadedState: initialState
    }),
    ...renderOptions
  } = {}
) {
  function Wrapper({ children }) {
    return <Provider store={store}>{children}</Provider>
  }
  return rtlRender(ui, { wrapper: Wrapper, ...renderOptions })
}

export * from '@testing-library/react'
export { render, fakeStore }
testEnvironme nt

 浙公网安备 33010602011771号