

Day12-微信小程序实战-交友小程序-优化“附近的人”页面与serach组件的布局和样式以及搜索历史记录和本地缓存*内附代码)
回顾/:我们已经实现了显示附近的人的功能了,可以多个人看到附近的人页面了
但是还是要进行优化有几个问题:1、我们用户选择了其他的自定义头像之后,在首页可以看到头像的变化,但是在附近的人中头像会变成报错的样式:如:
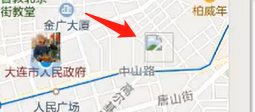
也就是500了,也就是找不到这个图片了,解决方法:看开发文档-》云开发
https://developers.weixin.qq.com/miniprogram/dev/wxcloud/guide/storage/api.html
其中有一个 “换取临时链接”的功能(通过这个方法可以临时的拿到一个图片的路径了),然后这个路径就可以对应到我们的iconpath中了,有直接看demo
wx.cloud.getTempFileURL({
  fileList: ['cloud://xxx.png'],
  success: res => {
    // fileList 是一个有如下结构的对象数组
    // [{
    //    fileID: 'cloud://xxx.png', // 文件 ID
    //    tempFileURL: '', // 临时文件网络链接
    //    maxAge: 120 * 60 * 1000, // 有效期
    // }]
    console.log(res.fileList)
  },
  fail: console.error
})
我们刚刚换了头像的测试号,可以看到在数据库中

正常的试https这样的,但是我们修改了之后,它的路径变成了我们设置的默认的,cloud开始的了
所以我们就可以直接在near.js里面用for来判断每个字段符不符合条件即可了,一旦找到了这个cloud开头的路径的话,也就是if里面进行的东西
我们就要换取临时的路径即可了,如果else的话,我们还是和之前一样的,直接push进去即可了
if里面的话直接copy文档里面的demo即可了
我们通过

里面的那个tempFileURL就是一个临时的路径了
 getNearUsers(){
    db.collection('users').where({
      location: _.geoNear({
        geometry: db.Geo.Point(this.data.longitude, this.data.latitude),
        minDistance: 0,
        maxDistance: 5000
        //这1000和5000的单位是米
      }),
      islocation : true
    }).field({
      longitude : true,
      latitude : true ,
      userPhoto : true
    }).get().then((res)=>{
      console.log(res.data);
      let data = res.data;
      let result = [];
      if(data.length){

        for(let i=0;i<data.length;i++){
          if(data[i].userPhoto.includes('cloud://')){
            wx.cloud.getTempFileURL({
              fileList: [data[i].userPhoto ],
              success: res => {
                // console.log(res.fileList[0].tempFileURL)
                result.push({
                  // 然后就是把我们获取到的临时路径直接赋值给iconpath即可了
                  iconPath: res.fileList[0].tempFileURL,
                  id: data[i]._id,
                  latitude: data[i].latitude,
                  longitude: data[i].longitude,
                  width: 30,
                  height: 30
                });

              }
            })
          }
          else{
            result.push({
              iconPath: data[i].userPhoto,
              id: data[i]._id,
              latitude: data[i].latitude,
              longitude: data[i].longitude,
              width: 30,
              height: 30
            });
          }

        }
        this.setData({
          markers : result
        });
      }
    });
  }
如果只是这个代码的话,会发现我们测试账号的如何信息都无法渲染出来,这个是因为js是异步操作的,我们要在if之后立马就进行 setdata操作即可了
如何在全部for结束之后也再次的进行setdata操作即可了,完整代码就是
getNearUsers(){
    db.collection('users').where({
      location: _.geoNear({
        geometry: db.Geo.Point(this.data.longitude, this.data.latitude),
        minDistance: 0,
        maxDistance: 5000
        //这1000和5000的单位是米
      }),
      islocation : true
    }).field({
      longitude : true,
      latitude : true ,
      userPhoto : true
    }).get().then((res)=>{
      console.log(res.data);
      let data = res.data;
      let result = [];
      if(data.length){

        for(let i=0;i<data.length;i++){
          if(data[i].userPhoto.includes('cloud://')){
            wx.cloud.getTempFileURL({
              fileList: [data[i].userPhoto ],
              success: res => {
                // console.log(res.fileList[0].tempFileURL)
                result.push({
                  // 然后就是把我们获取到的临时路径直接赋值给iconpath即可了
                  iconPath: res.fileList[0].tempFileURL,
                  id: data[i]._id,
                  latitude: data[i].latitude,
                  longitude: data[i].longitude,
                  width: 30,
                  height: 30
                });
                this.setData({
                  markers: result
                });
              }
            })
          }
          else{
            result.push({
              iconPath: data[i].userPhoto,
              id: data[i]._id,
              latitude: data[i].latitude,
              longitude: data[i].longitude,
              width: 30,
              height: 30
            });
          }

        }
        this.setData({
          markers : result
        });
      }
    });
  }
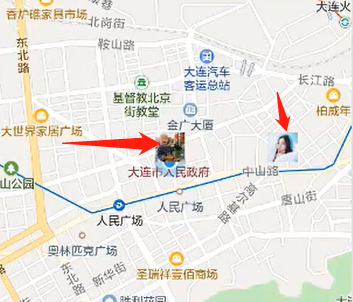
得到的效果就是,可以看到另外一个用户刚刚它换的头像了
(后面的优化就是可以点击这个用户的头像之后我们就可以跳转到它的详情页面了
这个功能在实现起来其实页不复杂的,有一个和markers对应的事件,也就是点击了这个markers就会触发这个事件了
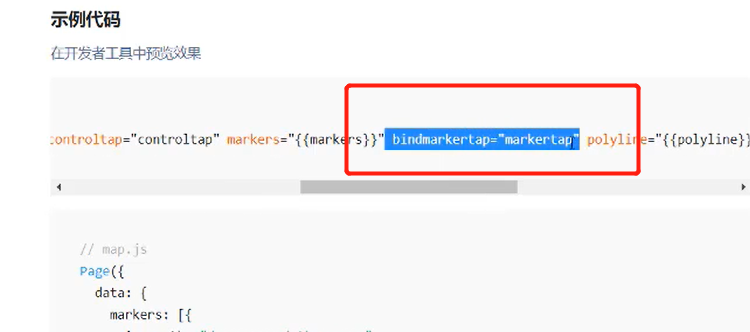
通过这个事件其实我们是可以拿到id值得

 markertap(ev){
    console.log(ev);
  }
通过在near.js里面得这个函数,然后我们点击一下地图里面的marker图片之后,我们得到的值就是:

这个markerID其实对应的就是用户的id值了
  markertap(ev){
    // console.log(ev);
    wx.navigateTo({
      url: '/pages/detail/detail?userId=' + ev.markerId
    })
  }
通过这个代码其实就可以实现,点击地图里面的图标的话我们就可以跳转到这个用户的详情页面去了
3、后面要测试的就是假如测试账号关闭了共享位置的话
通过测试我们发现,测试号关闭了共享位置的话,在地图里面即使是刷新了还是会看到这个用户的头像的
(其实代码是没有错的,把项目关了再重启之后会看到这个关闭了共享位置的用户头像就消失了
(其实还有其他可以优化的,就是可以在地图的头像上面加一段语音介绍自己等等的,因为小程序其实也是支持的,或者是可以计算我和你的距离
或者是我去你那边的话我过去的导航和路线是怎么样的
二、search组件的布局和样式
(就是在主页的上面添加一个查找的框)
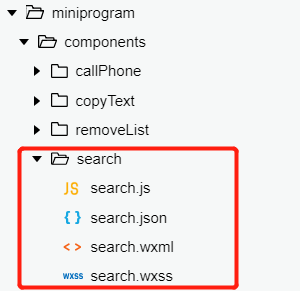
1、实现新建一个叫search的组件
创立好了之后,就可以在首页进行引用了
2、先在index.JSON文件里面引入这个组件
{
  "usingComponents": {
    "search" : "/components/search/search"
  }
}
3、在主页里面和用标签一样引用就可以了
可以直接在index.wxml中通过 <search /> 来使用即可了

该search组件就被引入了
通过基本的结构wxml
<!--components/search/search.wxml-->
<view class="container">
  <view class="search">
    <view class="search-text">
      <text class="iconfont iconsousuo"></text>
      <input type="text" placeholder="搜索喵星人" />
    </view>
    <view class="search-cancel">取消</view>
  </view>
</view>
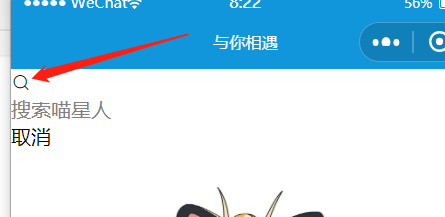
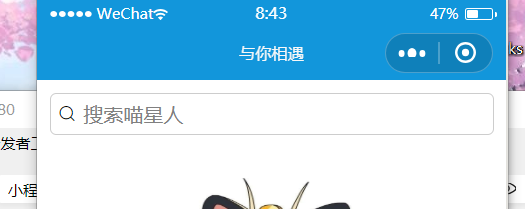
得到的效果:

会发现我们放大镜图标没有显示出来,所以我们要配置一下,让这个图标可以穿透出来即可了
也就是之前copyText.js写过的
  options: {
    styleIsolation: 'apply-shared'
  },
就是为了让这个图标可以生效的
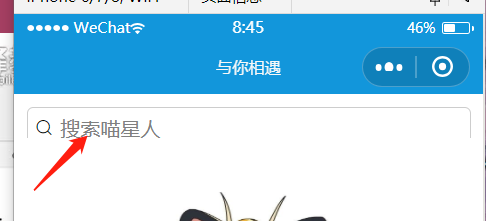
这样的话,我们的放大镜就进来了
之后就可以对search.wxss的样式进行设计了
/* components/search/search.wxss */
.container{position: fixed;left: 0;top: 0;width: 100%;height: 70rpx;z-index: 999;}
.search{ display: flex ; align-items: center;}
.search-text{ display: flex; align-items: center;flex: 1;}
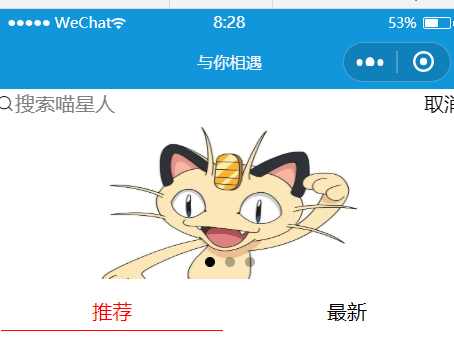
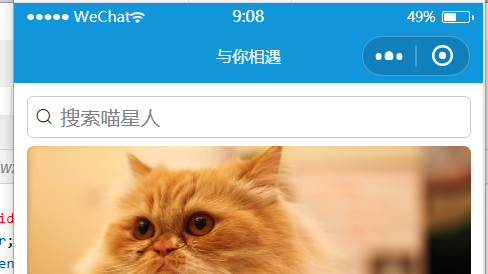
但是发现,图片和这个组件融合在一起了

这是因为因为是组件的引入的话,就不像在主页面一样,可以占位置的,所以就要到index.wxss设置一下让index腾出一个空间来放这个搜索框的
通过在

就是直接通过margin来腾出位置即可了
上面其实是在index.wxss中给上面的腾出来100rpx的空间
/* components/search/search.wxss */
.container{position: fixed;left: 0;top: 0;width: 100%;height: 70rpx;z-index: 999;}
.search{ display: flex ; align-items: center; margin:20rpx;}
.search-text{ display: flex; align-items: center;flex: 1;border: 1px #cdcdcd solid;border-radius:10rpx; height: 65rpx}
.search-text .iconsousuo{margin: 0 10rpx;}
.search-cancel{margin: 0 10rpx;}
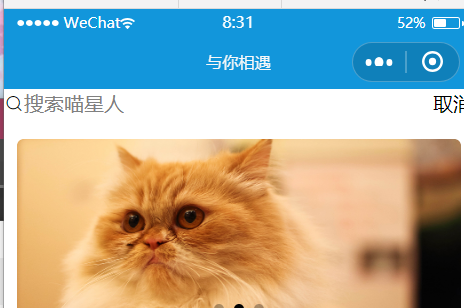
得到的效果就是:
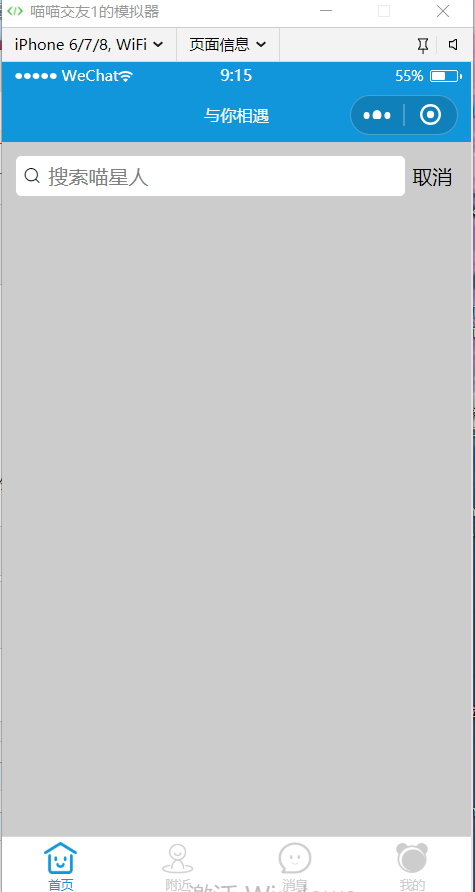
但是有一个问题就是:我们在还没点击搜索的时候,其实不用显示后面的“取消”按钮的,这个的话就要通过js逻辑来实现了
定义了一个isfocus来表示光标有没有显示的(这个取消的按钮其实是在我们获取了光标之后才会有的)
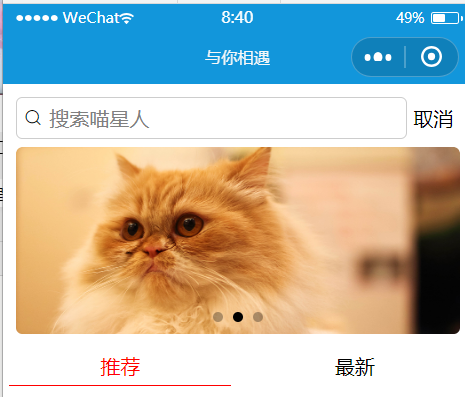
通过在取消按钮加上了一个wx:if判断之后,得到的效果就是:
并且当我们获取到了光标之后,这个搜索框会适应整个页面的高度了
给contaner加上了 overflow: hidden; 之后得到的效果就是这个搜索框的下边框“不见了”
这个是因为,我们得container这个大得块要比我们输入框得高度要小了,这个时候就可以在wxss里面通过调节container得height
即可了
因为如果我们点击了那个输入框得胡,也就是聚焦了得话,我们得上面得搜索框的大容器显示的样式是和没聚焦的时候显示的不同的,所以我们就可以用三目运算符来通过这个isfocus来决定使用哪个容器,也就是说我们可以定义两个样式不同的容器了
<view class="{{ isFocus ? 'containerFocus' : 'container' }}">
.containerFocus{position: fixed;left: 0;top: 0;width: 100%;height: 100%;z-index: 999;
background: #ccc}
然后我们自行的吧js文件里面定义的isFocus变量 定义weighted是true来看看我们获取光标之后的效果是怎么样的:
之后我们就要通过逻辑里控制他们的聚焦切换不同的container了,如果是已经点击聚焦的了话,还有一个就是可以看到我们搜索的历史记录,还有列表等等
通过:
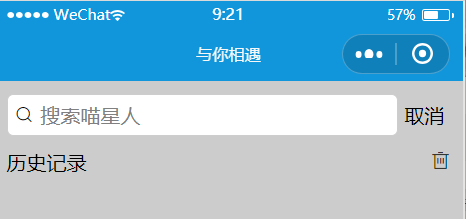
<view class="search-history">
    <text>历史记录</text>
    <text class="iconfont iconshanchu"></text>
  </view>
.search-history{ display: flex;justify-content: space-between;margin:20rpx;}
效果:
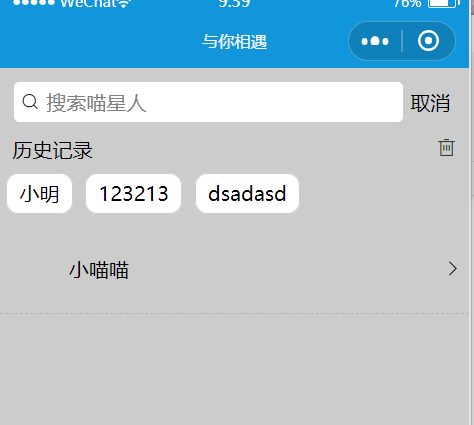
然后就是要搞一个搜索池了:
  <view class="search-history-btn">
    <text>小明</text>
    <text>123213</text>
    <text>dsadasd</text>
  </view>
.search-history{ display: flex;justify-content: space-between;margin:20rpx;}
.search-history-btn text{ border: 1px #cdcdcd solid; padding: 10rpx 20rpx;background: white;
border-radius: 20rpx; margin:10rpx;}
效果:(注意上面是给每一个搜索的text进行样式的定义

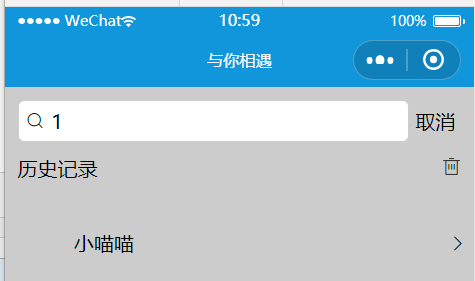
上面就吧搜索的关键词的布局搞好了,下面就是要对搜索的列表进行定义了(其实这个搜索的列表和我们好友的列表是很像的,可以直接直接copy 在friendList.wxml里面的这个结构了
  <navigator wx:for="{{ friendList }}" wx:key="{{ index }}" url="{{ '../detail/detail?userId=' + item._id}}" open-type="navigate">
      <view class="friendList-item">
        <view>
         <image src="{{ item.userPhoto }}" />
         <text> {{ item.nickName }} </text>
        </view>
        <text class="iconfont iconyoujiantou"></text>
      </view>
     </navigator>
然后对 searchList-item 的样式也是直接拷贝friendList的wxss
.friendList-item{
  /* 这里可以直接把user.wxss中的样式复印过来了 */
  height: 120rpx;border-bottom:1px #b4b5b6 dashed;
padding: 10rpx; display: flex;align-items: center;justify-content: space-between;
}
.friendList-item view{display : flex; align-items: center;}
.friendList-item image{width: 100rpx;height: 100rpx;border-radius: 50%;}
综上所述,我们的代码就是:
 CSS
CSS

<!--components/search/search.wxml-->
<view class="{{ isFocus ? 'containerFocus' : 'container' }}">
  <view class="search">
    <view class="search-text">
      <text class="iconfont iconsousuo"></text>
      <input type="text" placeholder="搜索喵星人" />
    </view>
    <view wx:if="{{ isFocus }}" class="search-cancel">取消</view>
  </view>

  <view class="search-history">
    <text>历史记录</text>
    <text class="iconfont iconshanchu"></text>
  </view>
  <view class="search-history-btn">
    <text>小明</text>
    <text>123213</text>
    <text>dsadasd</text>
  </view>

    <navigator url="" open-type="navigate">
      <view class="searchList-item">
        <view>
         <image src="" />
         <text>小喵喵</text>
        </view>
        <text class="iconfont iconyoujiantou"></text>
      </view>
     </navigator>

</view>
然后还要在search.js里面通过
(未选中搜索框时
三、实现搜索历史记录及本地缓存
1、我们先在searc.wxml的输入框标签加一个处理点击这个输入框的一个点击事件
还有我们在取消的标签中,也要加一个点击事件,点击了的话就吧isFocus变成是false即可了
 <input type="text" placeholder="搜索喵星人" bindfocus="handleFocus" />


<view wx:if="{{ isFocus }}" class="search-cancel" bindtap="handleCancel">取消</view>
 methods: {
    handleFocus(){
     this.setData({
       isFocus : true
     });
    },
    handleCancel(){
      this.setData({
        isFocus: false
      });
    }
  }
得到的效果就是:点击输入框,就跳转到输入,点击取消,就跳转到首页
还有一个小bug就是,因为输入框的话,会默认只有在一个范围以内,才可以输入的,所以我们就可以让这个输入框适应整个范围,可以在
给 search.wxss中添加一个代码:
.search-text input {flex: 1;}
就让这个输入框可以自动的填满整个的搜索框了
3、之后就是对输入的东西进行处理了,可以是边输入边搜索,也可以是输入之后回车了才进行搜索,如果是边输入就边搜索的话,我们可以通过bindinput来进行监听的,那如果要是按回车的时候搜索怎么办呢---这个其实小程序帮我们搞好了
https://developers.weixin.qq.com/miniprogram/dev/wxcloud/guide/storage/api.html
就可以通过在input中加上 bindconfirm 这个属性来完成的,我们就定义了一个 handleConfirm 这个方法是只有我们回车了才会进行触发的

在手机端里面的回车 其实默认的是 “完成”两个字的(就是点击这个输入框的时候,手机就会弹出软键盘了,它的确定按钮是“搜索”两个字的,那这个该怎么样去修改呢==微信也提供了
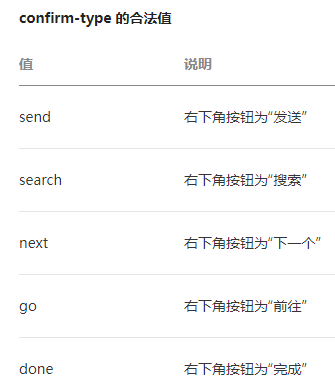
默认的是我们的 done 也就是完成
所以就在input标签中,吧confirm-type 属性变成是 search 即可了,(这样的话在手机的软键盘就会显示 搜索 两个字了)
(下面我们要做的就是 吧这个搜索的 放在历史里面管理起来了)
https://developers.weixin.qq.com/miniprogram/dev/wxcloud/guide/storage/api.html
demo:
wx.setStorage({
  key:"key",
  data:"value"
})
设置的话,就是我们用户点击回车 之后,就可以吧这个搜索里面的 ev.detail.value放到本地存储里面即可了
因为这个setStorage的话,我们要让这个data是一个数组才行的,然后我们先通过
data : [111]看看能不能吧这个111存放到这个数组里面
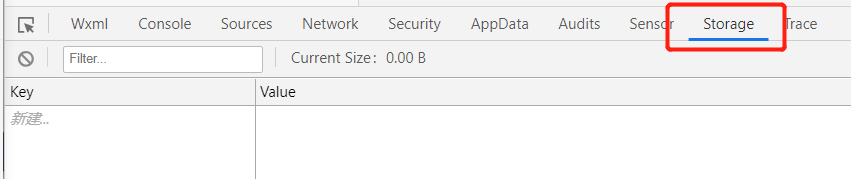
可以在下面的调试板中 找到Storage 让我们查看一下
可以看到,我们随便输入一点东西,然后按 回车 之后可以看到
先在search.js的data里面定义一个 数组
然后我们就可以在wxml中,吧我们的历史消息text,用一个数组来for出来了
 <view class="search-history-btn">
    <text wx:for="{{ historyList }}" wx:key="{{ index }}">{{ item }}</text>
  </view>

然后我们在一开始 聚焦了之后,就立马从storage里面吧数组拿出来,用getStorage方法:
https://developers.weixin.qq.com/miniprogram/dev/wxcloud/guide/storage/api.html
wx.getStorage({
  key: 'key',
  success (res) {
    console.log(res.data)
  }
})

使用上面的demo之后,会报错,这个报错一般都是因为success的回调的时候要用箭头函数才行的
   wx.getStorage({
        key: 'searchHistory',
        success:(res)=> {
          this.setData({
            historyList: res.data
          });
        }
      })
修改了之后,我们点击 聚焦 之后
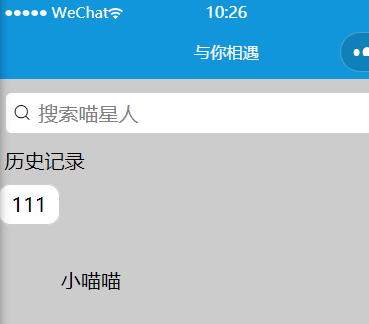
这个 111 就是我们刚刚写入到 searchStorage 数组里面的
(这个有一个小bug,就是,假如我们输入了两次相同的搜索,然后存入到历史记录再打印出来的话,会有两个的,我们不应该有两个相同的历史记录的
但是我们搜索重复词的话,我们也是显示一次,然后把这个搜索的提升到最前面去),表示最近搜索,并且历史记录也要有一个数量的,不能把在一年之间的全部搜索记录都显示出来的
这个去重的功能:1、实现克隆一份数组
(unshift的话就是往数组的头添加东西的,ES6本身就带有一个set来完成去重功能的)
   handleConfirm(ev){
      // console.log(ev.detail.value);
      let cloneHistoryList = [...this.data.historyList];
      cloneHistoryList.unshift(ev.detail.value);
      wx.setStorage({
        key: "searchHistory",
        data: [...new Set(cloneHistoryList)]
      })
    }
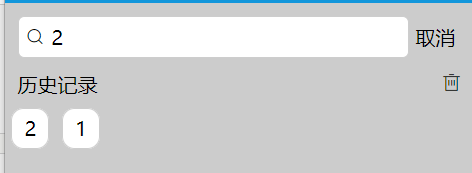
我们的效果就达到了,重复输入的话,会被提前,=
然后下面我们就要实现 历史记录的删除功能了
就可以直接在这个删除图标的wxml中添加一个 bindtap点击事件 handleDelete 即可了(这个删除的话,是删除掉全部的历史记录的)
(微信给我们提供的对storage的操作中,remove是操作某一项的,而clear是删除掉所有的
https://developers.weixin.qq.com/miniprogram/dev/wxcloud/guide/storage/api.html
wx.clearStorage()
直接这样写即可了
====**但是这样可能如果我们后面在storage里面也定义了其他的东西,这个语句的话会把其他缓存也会清理掉的,所以我们这里还是使用remove好点的
wx.removeStorage({
  key: 'key',
  success (res) {
    console.log(res)
  }
})
因为我们也是要在这个成功的回到中,把这个历史数据数组设置为空数组,所以我们就要使用成功返回的箭头函数才行的
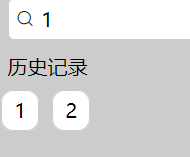
即可实现删除功能了,
效果就是:
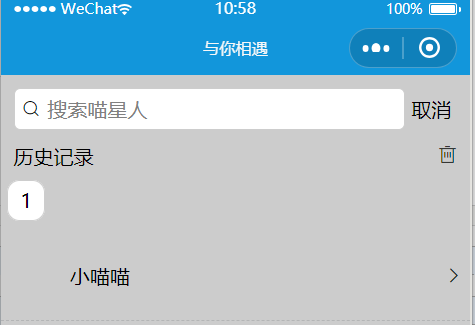
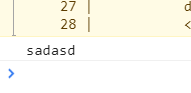
之后再次输入1的时候,
然后就是清空 历史记录:
下面是这个部分的代码
//components/search/search.js
Component({
  /**
   * 组件的属性列表
   */
  options: {
    styleIsolation: 'apply-shared'
  },
  properties: {

  },

  /**
   * 组件的初始数据
   */
  data: {
    isFocus : false,
    historyList : []
  },

  /**
   * 组件的方法列表
   */
  methods: {

    handleFocus(){

      wx.getStorage({
        key: 'searchHistory',
        success:(res)=> {
          this.setData({
            historyList: res.data
          });
        }
      })

     this.setData({
       isFocus : true
     });
    },
    handleCancel(){
      this.setData({
        isFocus: false
      });
    },
    handleConfirm(ev){
      // console.log(ev.detail.value);
      let cloneHistoryList = [...this.data.historyList];
      cloneHistoryList.unshift(ev.detail.value);
      wx.setStorage({
        key: "searchHistory",
        data: [...new Set(cloneHistoryList)]
      })
    },
    handleHistoryDelete(){
      wx.removeStorage({
        key: 'searchHistory',
        success:(res)=>{
          this.setData({
            historyList : []
          });

        }
      })
    }
  }
})
<!--components/search/search.wxml-->
<view class="{{ isFocus ? 'containerFocus' : 'container' }}">
  <view class="search">
    <view class="search-text">
      <text class="iconfont iconsousuo"></text>
      <input type="text" placeholder="搜索喵星人" bindfocus="handleFocus" bindconfirm="handleConfirm" confirm-type="search"/>
    </view>
    <view wx:if="{{ isFocus }}" class="search-cancel" bindtap="handleCancel">取消</view>
  </view>

  <view class="search-history">
    <text>历史记录</text>
    <text bindtap="handleHistoryDelete" class="iconfont iconshanchu"></text>
  </view>
  <view class="search-history-btn">
    <text wx:for="{{ historyList }}" wx:key="{{ index }}">{{ item }}</text>
  </view>

    <navigator url="" open-type="navigate">
      <view class="searchList-item">
        <view>
         <image src="" />
         <text>小喵喵</text>
        </view>
        <text class="iconfont iconyoujiantou"></text>
      </view>
     </navigator>

</view>
/* components/search/search.wxss */
.container{position: fixed;left: 0;top: 0;width: 100%;height: 90rpx;z-index: 999;overflow: hidden;}
.containerFocus{position: fixed;left: 0;top: 0;width: 100%;height: 100%;z-index: 999;
background: #ccc}
.search{ display: flex ; align-items: center; margin:20rpx;}
.search-text{ display: flex; align-items: center;flex: 1;border: 1px #cdcdcd solid;border-radius:10rpx; height: 65rpx; background: white;}
.search-text input {flex: 1;}
.search-text .iconsousuo{margin: 0 10rpx;}
.search-cancel{margin: 0 10rpx;}

.search-history{ display: flex;justify-content: space-between;margin:20rpx;margin-bottom: 30rpx;}
.search-history-btn{ margin-bottom: 30rpx; }
.search-history-btn text{ border: 1px #cdcdcd solid; padding: 10rpx 20rpx;background: white;
border-radius: 20rpx; margin:10rpx;}


.searchList-item{
  /* 这里可以直接把user.wxss中的样式复印过来了 */
  height: 120rpx;border-bottom:1px #b4b5b6 dashed;
padding: 10rpx; display: flex;align-items: center;justify-content: space-between;
}
.searchList-item view{display : flex; align-items: center;}
.searchList-item image{width: 100rpx;height: 100rpx;border-radius: 50%;}

 浙公网安备 33010602011771号