路飞学城前后端协同开发
一、在做前后端交互问题的时候遇到的问题
在后端处理数据的时候是通过serialize来实现的,从数据库中查出自己想要的数据,直接返回数据。
在前端发送ajax请求获取数据并且在页面上以好看的形式渲染。
1、相关的表
class Course(models.Model):
    """课程"""
    name = models.CharField(max_length=128, unique=True)
    course_img = models.CharField(max_length=255)
    sub_category = models.ForeignKey("CourseSubCategory")

    course_type_choices = ((0, '付费'), (1, 'VIP专享'), (2, '学位课程'))
    course_type = models.SmallIntegerField(choices=course_type_choices)
    degree_course = models.ForeignKey("DegreeCourse", blank=True, null=True, help_text="若是学位课程,此处关联学位表")

    brief = models.TextField(verbose_name="课程概述", max_length=2048)
    level_choices = ((0, '初级'), (1, '中级'), (2, '高级'))
    level = models.SmallIntegerField(choices=level_choices, default=1)
    pub_date = models.DateField(verbose_name="发布日期", blank=True, null=True)
    period = models.PositiveIntegerField(verbose_name="建议学习周期(days)", default=7)
    order = models.IntegerField("课程顺序", help_text="从上一个课程数字往后排")
    attachment_path = models.CharField(max_length=128, verbose_name="课件路径", blank=True, null=True)
    status_choices = ((0, '上线'), (1, '下线'), (2, '预上线'))
    status = models.SmallIntegerField(choices=status_choices, default=0)
    template_id = models.SmallIntegerField("前端模板id", default=1)

    coupon = GenericRelation("Coupon")

    # 用于GenericForeignKey反向查询,不会生成表字段,切勿删除
    price_policy = GenericRelation("PricePolicy")

    def __str__(self):
        return "%s(%s)" % (self.name, self.get_course_type_display())

    def save(self, *args, **kwargs):
        if self.course_type == 2:
            if not self.degree_course:
                raise ValueError("学位课程必须关联对应的学位表")
        super(Course, self).save(*args, **kwargs)


class OftenAskedQuestion(models.Model):
    """常见问题"""
    content_type = models.ForeignKey(ContentType,
                                     limit_choices_to={'model__contains': 'course'})  # 关联course or degree_course
    object_id = models.PositiveIntegerField()
    content_object = GenericForeignKey('content_type', 'object_id')

    question = models.CharField(max_length=255)
    answer = models.TextField(max_length=1024)

    def __str__(self):
        return "%s-%s" % (self.content_object, self.question)

    class Meta:
        unique_together = ('content_type', 'object_id', 'question')
serializer
class CourseQuestionSerializer(ModelSerializer):
    class Meta:
        model = models.OftenAskedQuestion
        fields = ['question','answer']
        depth = 2
由上面的表发现是课程和问题是通过content_type 关联的。所以我们在通过课程去查询问题的时候。要利用contenttype去查找
2、后端开发
from django.contrib.contenttypes.models import ContentType
print(course_obj._meta.model_name,'表名')  #查看当前的表名

course_obj = model.Course.objects.filter(pk=kwargs.get('pk')).first() #首先找到课程的id
ct_id = ContentType.objects.filter(app_label='api', model=course_obj._meta.model_name).first().id #找到表类型的id
o_list = models.OftenAskedQuestion.objects.filter(content_type_id=ct_id, object_id=course_obj.id) #然后通过课程的id去找课程相关联的问题
ser = my_seri.CourseQuestionSerializer(instance=o_list, many=True) #吧查到的所有问题进行序列化

print(ser.data)

res["data"] = ser.data
return JsonResponse(res) #返回数据
3、前端开发
通过vue框架发送ajax请求
<ul class="tab">
      <li @click="coursebrief()">课程概述</li>
      <li @click="coursechapters()">课程章节</li>
      <li @click="coursequestion">常见问题</li>
    </ul>
coursequestion(){
       var that = this;
       this.$axios.request({
              url:'http://127.0.0.1:8000/api/course/'+ this.pk+'.json'+'?data_type=question',
                  method:'GET',
                  responseType:'json'
                }).then(function (response) {
                  console.log(response.data);
                  that.question_list = response.data.data;  #保存后端发过来的数据
                  console.log(that.question_list)
                })
        }
    }
一开始设置默认
 data () {
    return {
      question_list:[],
    }
  },
 <div>
        <h1>常见问题</h1>
        <ul v-for="item in question_list">
          <li>问:{{ item.question }}</li>
          <li>答:{{ item.answer }}</li>
        </ul>
      </div>
二、vue在前端实现tab切换
代码实现
 <ul class="tab">
      <!--<li v-for="(item, index) in tabs" :class="{active:index == num}" @click="tab(index)">{{item}}</li>-->

      <li @click="tab('detail')">课程概述</li>
      <li @click="tab('chapters')">课程章节</li>
      <li @click="tab('question')">常见问题</li>
    </ul>


 1 <div class="detail box">
 2       <h3>可以根据不同的学习情况购买不一样的学习套餐哦!</h3>
 3       <ul>
 4         <li v-for="item in box.detail.priceList">{{item.price}}/{{item.valid_period}}</li>
 5       </ul>
 6       <div>
 7         <h3>课程概述</h3>
 8         <p>{{box.detail.brief}}</p>
 9       </div>
10       <div>
11         <h3>为什么学习这门课程</h3>
12         <p>{{box.detail.why_study}}</p>
13       </div>
14       <div>
15         <h3>我将学到的内容</h3>
16         <ol>
17           <li v-for="item in box.detail.outlineList">{{item.title}}
18             <div>{{item.content}}</div>
19           </li>
20         </ol>
21       </div>
22       <div>
23         <h3>此项目如何有助于我的职业生涯?</h3>
24         <p>{{box.detail.career_improvement}}</p>
25       </div>
26       <div>
27         <h3>课程先修要求</h3>
28         <p>{{box.detail.prerequisite}}</p>
29       </div>
30       <div>
31         <h3>课程讲师简介</h3>
32         <ul>
33           <li v-for="item in box.detail.teacherList">
34             {{item.name}}  {{item.title}} {{item.brief}}
35           </li>
36         </ul>
37       </div>
38     </div>
39     <div class="chapters box">
40       <ul>
41         <li v-for="item in box.chapters">
42           第{{item.chapter}}章 | {{item.name}}
43           <ul>
44             <li v-for="section in item.coursesections">
45               {{section.name}}
46             </li>
47           </ul>
48         </li>
49       </ul>
50     </div>
51     <div class="comment box">
52
53     </div>
54     <div class="question box">
55        <h1>常见问题</h1>
56         <ul v-for="item in box.question_list">
57           <li>问:{{ item.question }}</li>
58           <li>答:{{ item.answer }}</li>
59         </ul>
60     </div>
61
62 coursedetail.vue
  methods:{
    tab(cls) {  //实现tab切换
      $(".box").each(function (index, ele) {
        console.log(index,ele,'........');
        $(ele).css("display", "none") //循环一开始都设置成none,不显示
      });
      $("."+cls).css("display", "block") //然后把当前点击的那个设置成显示
    },
上面是参考别人的,和自己写的有些不同:
路飞学城项目使用的axios和后台做交互。
配置routes:
前面需要导入组件:比如 import Course from './views/Home.vue'
routes:[
{
path:自己设置,别人访问需要输入的路由,比如'course/',
name:组件名小写,
component:直接写组件名,不加vue
},
{},
]
通过APP.vue组件(APP.vue是整个项目的入口,里面存放着路由)里的template里的路径到route.js里面找,找到route.js里的routes配置,找到里面的path,然后找到相应的组件,并跳到该组件对应的页面。
各个组件里的script里的export default里配置组件的数据,方法。
export default {
data:function(){
return {
courselist:[ ]
}
}
类似于Bootstrap的模板 ---element -ui
npm安装:npm i element-ui -s
安装后需要在main.js里配置,配置如下
import ElementUI from 'element-ui';
import 'element-ui/lib/theme-chalk/index.css';
Vue.use(ElementUI);
在组件里使用element -ui 直接把对应的template和style等拷贝过来即可
如果需要使用CDN,在index.html里正常导入即可。
}
后台写好数据,不需要把整个项目交给前端,只需要写个文档把接口给前端。
axios的导入及使用
import axios from 'axios'
Vue.prototype.$http = axios(这里的http可以随意命名,就是配置的全局变量)
把axios赋值给http, 以后用这个$http变量可以直接在全局使用。相当于在Vue环境里放了一个全局变量.
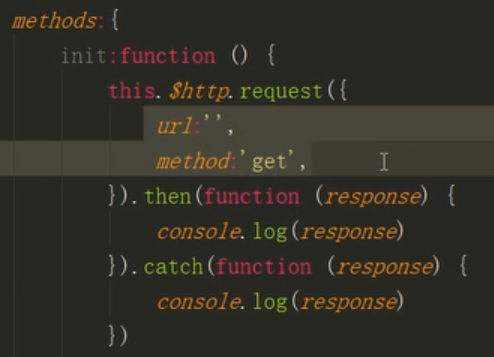
axios的基本使用,都是固定格式。
配好url,浏览器请求的地址,发送请求的方式
url可以直接写完整的url,也可以this.$ss = 'http://127.0.0.1:8000' 然后在course.vue里的url写上this.$ss+'/course/'
this是Vue的对象,调用$http(刚赋值的变量,request是里面的方法),then是成功以后执行的函数,catch是失败以后执行

this.courselist = response.data 这里的this不是vue对象 而是this.$http产生的对象,所以我们需要在上面自定义this这个对象,var _this = this
组件挂载 组建需要挂载函数才能点击路由就触发数据的渲染。
挂载后
mounted:function() {
this.init()
}
django下建立media目录,存放公共资源,留待访问者查看。
需要在settings里配置
MEDIA_ROOT=os.path.join(BASE_DIR,'media')
urls里配置
from django.views.static import serve
from luffy_boy import settings

完整路由:
url(r'media/(?P<path>.*)', serve,{'document_root':settings.MEDIA_ROOT}),
前端如何获取后端的图片:
script里
export default {
        name: 'home',
        data:function () {
            return{
                imags:['http://127.0.0.1:8000/media/lhf.jpg','http://127.0.0.1:8000/media/lhf.jpg','http://127.0.0.1:8000/media/lhf.jpg','http://127.0.0.1:8000/media/lhf.jpg']

            }

        }
    }
template里
<div class="home">
        <el-carousel indicator-position="outside">
            <el-carousel-item v-for="item in imags">
                <!--<h3>{{ item }}</h3>-->
                <img :src="item" >
            </el-carousel-item>
        </el-carousel>
</div>
django创建好的表需要在admin里配置,才能通过url进入admin对这些操作进行修改。

 浙公网安备 33010602011771号