SpringBoot 项目实战 | 瑞吉外卖 Day01
一、软件开发整体介绍
1、软件开发流程

2、角色分工
- 项目经理:对整个项目负责,任务分配、把控进度
- 产品经理:进行需求调研,输出需求调研文档、产品原型等
- UI设计师:根据产品原型输出界面效果图
- 架构师:项目整体架构设计、技术选型等
- 开发工程师:代码实现
- 测试工程师:编写测试用例,输出测试报告
- 运维工程师:软件环境搭建、项目上线
3、软件环境
- 开发环境(development):开发人员在开发阶段使用的环境,一般外部用户无法访问
- 测试环境(testing):专门给测试人员使用的环境,用户测试项目,一般外部用户无法访问
- 上产环境(production):即线上环境,正式提供对外服务的环境
二、瑞吉外卖项目介绍
1、项目介绍
- 本项目(瑞吉外卖)时专门为餐饮企业(餐厅、饭店)定制的一款软件产品,包括系统管理后台和移动端应用两部分。
- 其中系统管理后台主要提供给餐饮企业内部员工使用,可以对餐厅的菜品、套餐、订单等进行管理维护。
- 移动端应用主要提供给消费者使用,可以在线浏览菜品、添加购物车、下单等
本项目共分为3期进行开发:
- 实现基本需求,其中移动端应用通过H5实现
- 针对移动端应用进行改进,使用微信小程序实现,用户使用起来更加方便
- 针对系统进行优化升级,提高系统的访问性能
2、产品原型展示
产品原型:就是通过一款产品成型之前的一个简单的框架,就是将页面的排版布局展现出来,使产品的初步构思有一个可视化的展示。通过原型展示,可以更加直观的了解项目的需求和提供的功能
注意:产品原型主要用户展示项目的功能,并不是最终的页面效果
3、技术选型
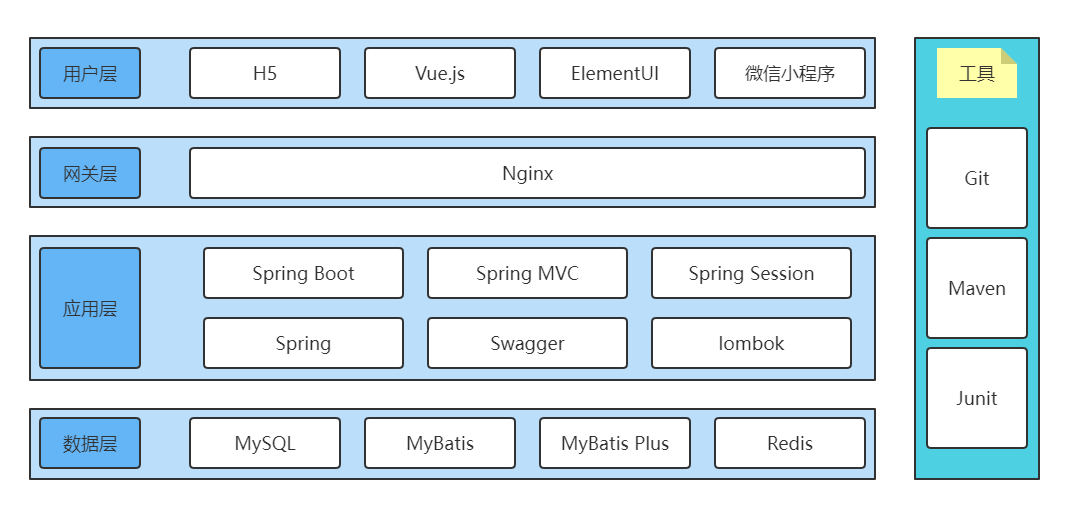
4、功能架构

5、角色
- 后台系统管理员:登录后台系统,拥有后台系统中的所有操作权限
- 后台系统普通员工:登录后台系统,对菜品、套餐、订单等进行管理
- C端用户:登录移动端应用,可以浏览商品、添加购物车、设置地址、在线下单等+
三、开发环境搭建
环境版本:
MySQL 5.7 x64
1、数据库环境搭建
- DataBaseName:
Reggie- Char Set:
utf8mb4
mysql -u root -p
# password
show databases;
create database reggie character set utf8mb4;
use reggie;
source D:\File\db_reggie.sql
运行SQL文件
db_reggie.sql导入 table (11张表)
| 序号 | 表名 | 说明 |
|---|---|---|
| 1 | address_book | 地址簿表 |
| 2 | category | 菜品和套餐分类表 |
| 3 | dish | 菜品表 |
| 4 | dish_flavor | 菜品口味关系表 |
| 5 | employee | 员工表 |
| 6 | order_detail | 订单详细表 |
| 7 | orders | 订单表 |
| 8 | setmeal | 套餐表 |
| 9 | setmeal_dish | 套餐菜品关系表 |
| 10 | shopping_cart | 购物车表 |
| 11 | user | 用户表(C端) |
2、Maven项目搭建
创建maven项目
我们的代码开发采用IDEA的Maven搭建:
-
创建maven(直接创建即可)
-
pom.xml相对应依赖坐标导入
<?xml version="1.0" encoding="UTF-8"?> <project xmlns="http://maven.apache.org/POM/4.0.0" xmlns:xsi="http://www.w3.org/2001/XMLSchema-instance" xsi:schemaLocation="http://maven.apache.org/POM/4.0.0 http://maven.apache.org/xsd/maven-4.0.0.xsd"> <modelVersion>4.0.0</modelVersion> <parent> <groupId>org.springframework.boot</groupId> <artifactId>spring-boot-starter-parent</artifactId> <version>2.4.5</version> <relativePath/> <!-- lookup parent from repository --> </parent> <groupId>org.riotian</groupId> <artifactId>Reggie_take_out</artifactId> <version>1.0-SNAPSHOT</version> <properties> <maven.compiler.source>8</maven.compiler.source> <maven.compiler.target>8</maven.compiler.target> <project.build.sourceEncoding>UTF-8</project.build.sourceEncoding> </properties> <dependencies> <dependency> <groupId>org.springframework.boot</groupId> <artifactId>spring-boot-starter</artifactId> </dependency> <dependency> <groupId>org.springframework.boot</groupId> <artifactId>spring-boot-starter-test</artifactId> <scope>test</scope> </dependency> <dependency> <groupId>org.springframework.boot</groupId> <artifactId>spring-boot-starter-web</artifactId> <scope>compile</scope> </dependency> <dependency> <groupId>com.baomidou</groupId> <artifactId>mybatis-plus-boot-starter</artifactId> <version>3.4.2</version> </dependency> <dependency> <groupId>org.projectlombok</groupId> <artifactId>lombok</artifactId> <version>1.18.20</version> </dependency> <dependency> <groupId>com.alibaba</groupId> <artifactId>fastjson</artifactId> <version>1.2.76</version> </dependency> <dependency> <groupId>commons-lang</groupId> <artifactId>commons-lang</artifactId> <version>2.6</version> </dependency> <dependency> <groupId>mysql</groupId> <artifactId>mysql-connector-java</artifactId> <scope>runtime</scope> </dependency> <dependency> <groupId>com.alibaba</groupId> <artifactId>druid-spring-boot-starter</artifactId> <version>1.1.23</version> </dependency> </dependencies> <build> <plugins> <plugin> <groupId>org.springframework.boot</groupId> <artifactId>spring-boot-maven-plugin</artifactId> <version>2.4.5</version> </plugin> </plugins> </build> </project> -
yml配置文件导入
server: port: 8080 spring: application: name: reggie_take_out datasource: druid: driver-class-name: com.mysql.cj.jdbc.Driver url: jdbc:mysql://localhost:3306/reggie?serverTimezone=Asia/Shanghai&useUnicode=true&characterEncoding=utf-8&zeroDateTimeBehavior=convertToNull&useSSL=false&allowPublicKeyRetrieval=true username: root password: root mybatis-plus: configuration: #在映射实体或者属性时,将数据库中表名和字段名中的下划线去掉,按照驼峰命名法映射 map-underscore-to-camel-case: true log-impl: org.apache.ibatis.logging.stdout.StdOutImpl global-config: db-config: id-type: ASSIGN_ID -
书写主方法
package org.riotian.reggie; import lombok.extern.slf4j.Slf4j; import org.springframework.boot.SpringApplication; import org.springframework.boot.autoconfigure.SpringBootApplication; // 我们添加注解@Slf4j,可以使用log的方法添加日志,便于程序管理 @Slf4j @SpringBootApplication // 表示是程序的启动类 public class ReggieApplication { public static void main(String[] args) { SpringApplication.run(ReggieApplication.class,args); log.info("项目启动成功....."); } } -
前端页面导入
我们该项目主要侧重后端开发,前端知识我们直接采用资料中所给数据即可
前端页面:backend和front文件,我们放置于resources文件夹下即可
-
书写配置类设置静态资源
package org.riotian.reggie.config; import lombok.extern.slf4j.Slf4j; import org.springframework.beans.factory.annotation.Configurable; import org.springframework.context.annotation.Configuration; import org.springframework.web.servlet.config.annotation.ResourceHandlerRegistry; import org.springframework.web.servlet.config.annotation.WebMvcConfigurationSupport; @Slf4j @Configuration // 设置为配置类,让Spring可以读取到该配置类 public class WebMvcConfig extends WebMvcConfigurationSupport { /** * 设置静态资源类 * 设置静态资源的映射关系,继承方法addResourceHandlers即可 * @param registry */ @Override protected void addResourceHandlers(ResourceHandlerRegistry registry) { log.info("开始静态资源映射....."); // 将请求路径 /backend/** 映射到 项目静态资源目录 resources/backend 下 registry.addResourceHandler("/backend/**").addResourceLocations("classpath:/backend/"); registry.addResourceHandler("/front/**").addResourceLocations("classpath:/front/"); } } -
查看网页是否映射成功
3、后台登录功能开发
我们在进行功能开发时一般分为三个步骤进行开发
需求分析
首先我们需要得知,登录是在前端哪个页面通过什么方法请求数据
我们打开页面后,通过F12来查看点击相关功能后所进行的页面请求或者直接在后端查看请求
页面F12获取请求:(这里由于我这里已经完成功能,点击后直接跳转,无法获得数据)
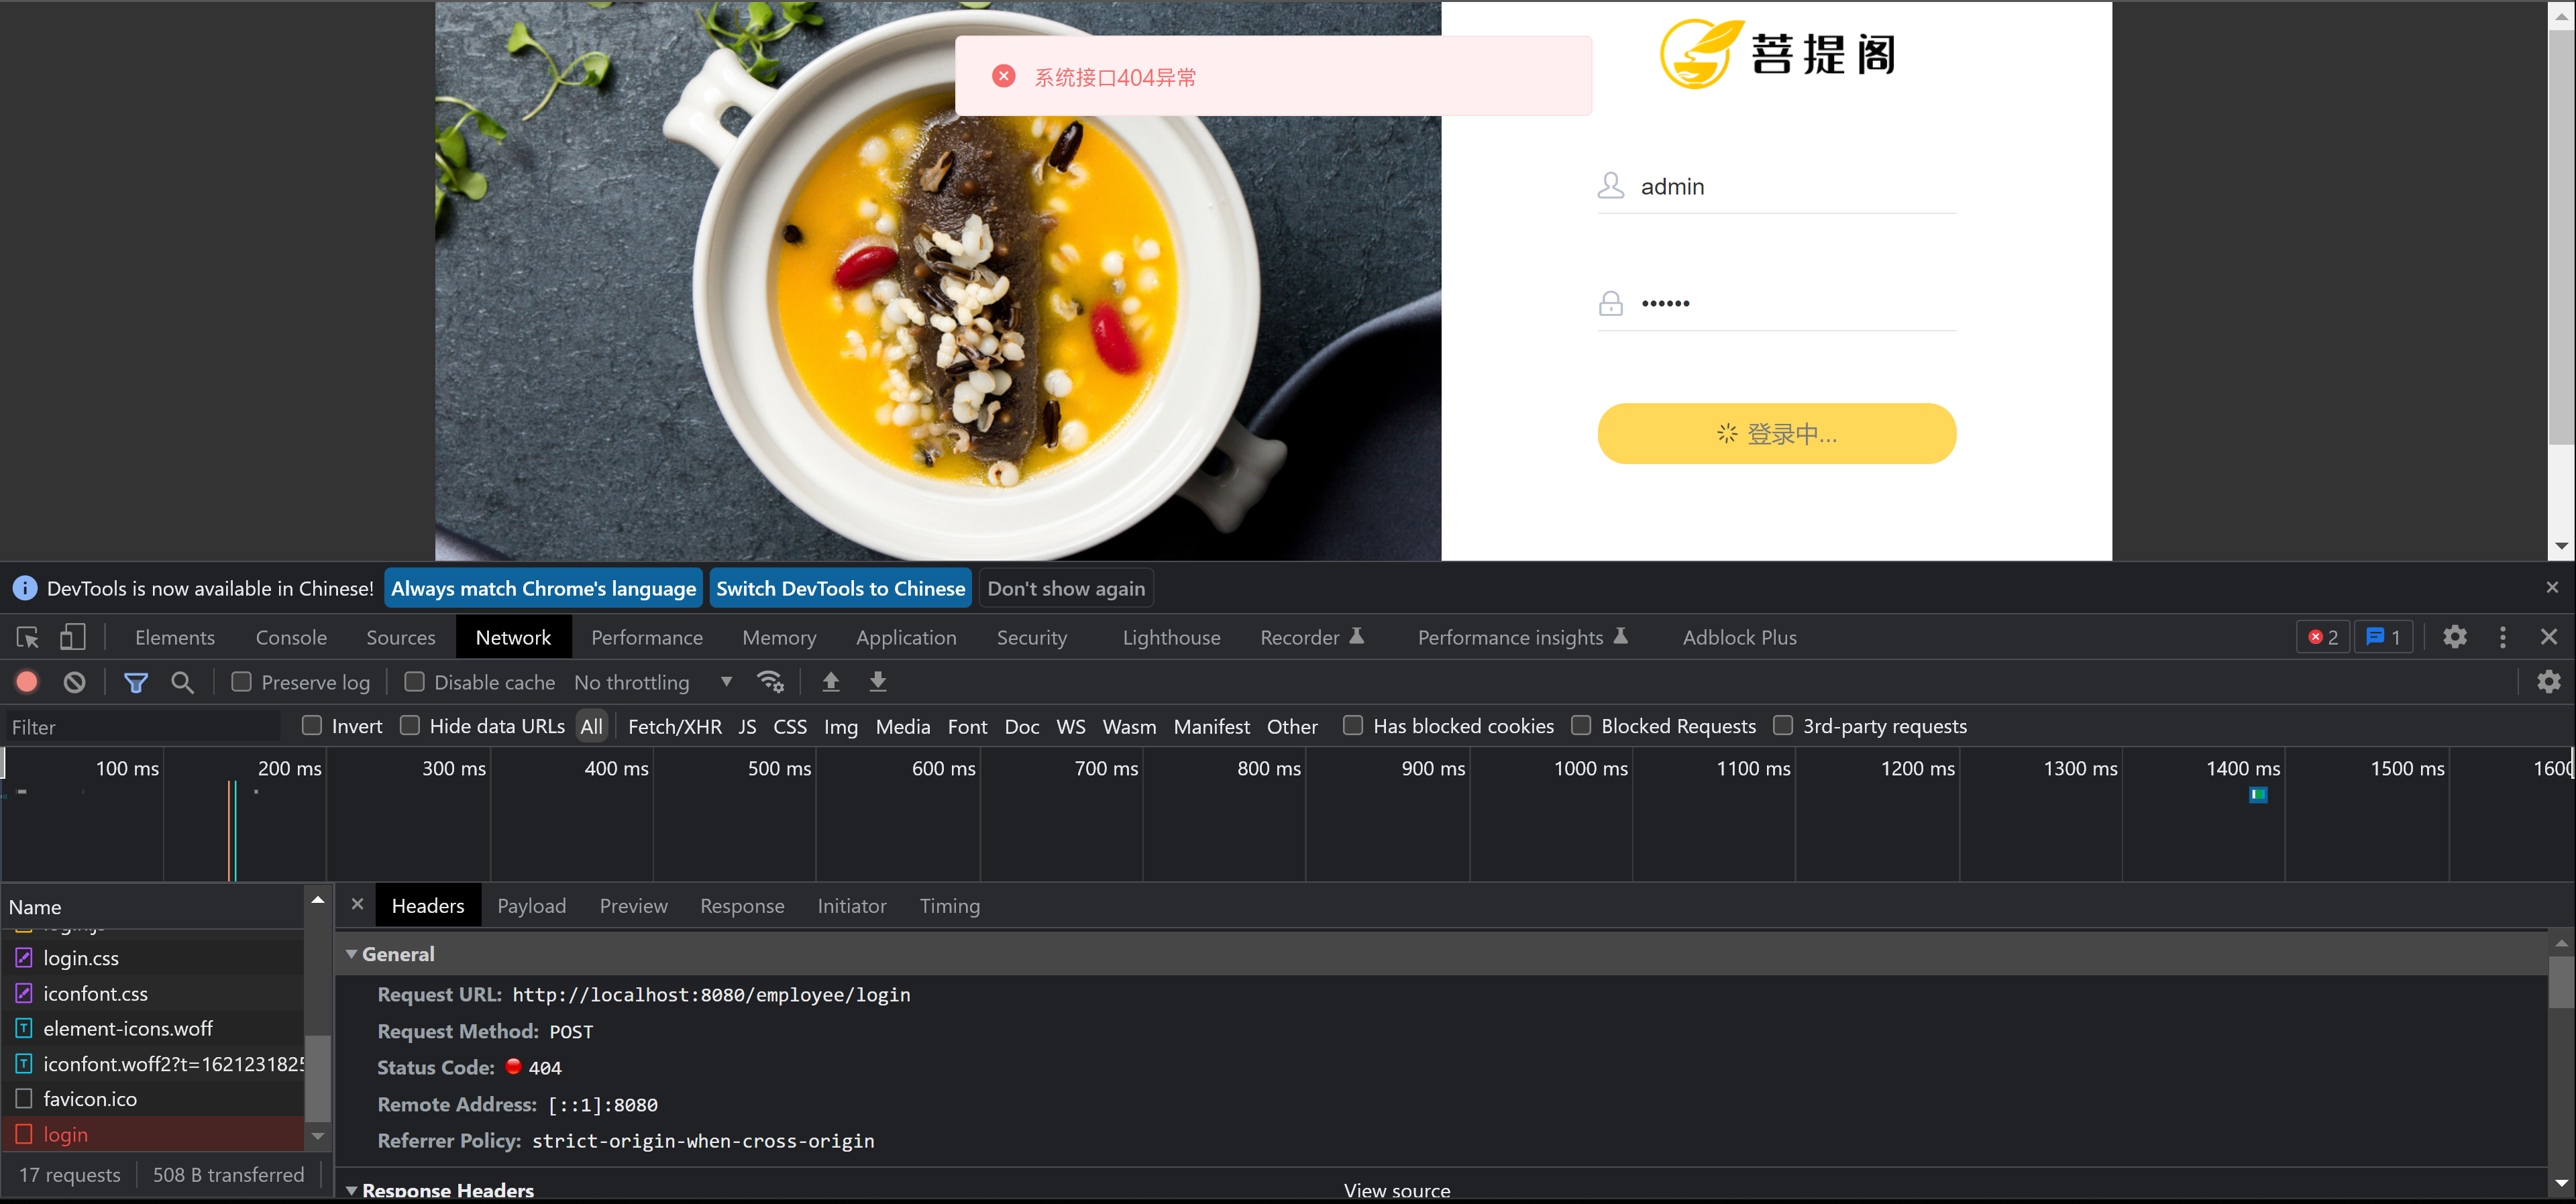
后端查看请求:
function loginApi(data) {
  return $axios({
    'url': '/employee/login',
    'method': 'post',
    data
  })
}
通过查询后我们可以发现点击登录后发送请求格式为下列:
URL:http://localhost:8080/employee/login
Request Method:POST
4、后台退出功能开发
我们在进行功能开发时一般分为三个步骤进行开发
需求分析
员工登录成功后,页面跳转到系统首页页面(backend/index.html),此时显示当前用户名
当我们点击退出时,直接点击退出按钮即可退出页面,回到登录页面
同样我们采用F12或者后台请求查看:
URL:http://localhost:8080/employee/logout
Request Method:POST
代码开发
我们回到 EmployeeController 程序中开发请求地址为 employee/logout 的POST请求即可
具体步骤包括有:
- 清理Session中的id
- 返回结果
我们的实际开发步骤分为两步:
-
在EmployeeController中开发相对应的功能
package org.riotian.reggie.controller; import com.baomidou.mybatisplus.core.conditions.query.LambdaQueryWrapper; import javax.servlet.http.HttpServlet; import javax.servlet.http.HttpServletRequest; import lombok.extern.slf4j.Slf4j; import org.riotian.reggie.common.R; import org.riotian.reggie.entity.Employee; import org.riotian.reggie.service.EmployeeService; import org.springframework.beans.factory.annotation.Autowired; import org.springframework.util.DigestUtils; import org.springframework.web.bind.annotation.PostMapping; import org.springframework.web.bind.annotation.RequestBody; import org.springframework.web.bind.annotation.RequestMapping; import org.springframework.web.bind.annotation.RestController; @Slf4j @RestController @RequestMapping("/employee") public class EmployeeController { @Autowired private EmployeeService employeeService; /** * 员工登录 * @param request * @param employee * @return */ @PostMapping("/login") public R<Employee> login(HttpServletRequest request ,@RequestBody Employee employee) { // 1. 将页面提交的密码经过md5加密(DigestUtils.md5DigestAsHex方法需要byte参数) String password = employee.getPassword(); password = DigestUtils.md5DigestAsHex(password.getBytes()); // 2.根据页面提交的用户名username查询数据库(采用LambdaQueryWrapper进行条件筛选) LambdaQueryWrapper<Employee> queryWrapper = new LambdaQueryWrapper<>(); queryWrapper.eq(Employee::getUsername,employee.getUsername()); Employee emp = employeeService.getOne(queryWrapper);// getOne 是因为数据库中已经唯一约束 // 3.如果没有查询到,判定失败 if(emp == null) { return R.error("登录失败!!"); } // 4.密码比对,密码不一致失败 if(!emp.getPassword().equals(password)) { return R.error("登录失败!!"); } // 5.查看员工状态 if(emp.getStatus() == 0) { // 0 表示员工状态禁用 return R.error("账号已禁用!!"); } // 6.登录成功,并将员工id存入Session并返回登录成功结果 request.getSession().setAttribute("employee",emp.getId()); return R.success(emp); } /** * 员工退出 * @param request * @return */ @PostMapping("/logout") public R<String> logout(HttpServletRequest request) { // 清楚 Session 中保存的当前员工的id request.getSession().removeAttribute("employee"); return R.success("退出成功!"); } } -
实际测试(点击退出键返回登录页面即可)
5、易错点
在这里我们会点出该项目目前容易出错的位置,当然是对于我来说可能~
设置静态资源映射
易错点位置:
- 开发环境搭建中的Maven项目搭建
易错原因:
- 书写过少,内容不够了解
易错点:
- 设置静态映射属于配置类,需要添加
@Configuration注解 - 该类本身不具有配置功能,需要继承
WebMvcConfigurationSupport类实现其方法 - 设置静态类的方法为
addResourceHandlers方法,采用内置参数registry的相关方法 - registry的方法
addResourceHandler后跟请求路径,addResourceLocations后跟映射的静态资源路径
// 正常情况下,我们的页面访问时会被Contoller拦截下来返回数据,这时我们就需要设置静态资源的转发路径
import lombok.extern.slf4j.Slf4j;
import org.springframework.context.annotation.Configuration;
import org.springframework.web.servlet.config.annotation.ResourceHandlerRegistry;
import org.springframework.web.servlet.config.annotation.WebMvcConfigurationSupport;

// @Configuration设置为配置类,让Spring可以读取到该配置类
@Slf4j
@Configuration
// 注意:主要继承WebMvcConfigurationSupport成为配置类
public class WebMvcConfig extends WebMvcConfigurationSupport {


    // 设置静态资源的映射关系,继承方法addResourceHandlers即可
    @Override
    protected void addResourceHandlers(ResourceHandlerRegistry registry) {
        // 日志输出
        log.info("即将进行静态资源的映射:");

        // 将请求路径 /backend/** 映射到 项目静态资源目录 resources/backend 下
        // 特别注意:后面的路径需要加classpath:
        registry.addResourceHandler("/backend/**").addResourceLocations("classpath:/backend/");
        registry.addResourceHandler("/front/**").addResourceLocations("classpath:/front/");

    }
}
结束语
该篇内容到这里就结束了,希望能为你带来帮助~
附录
该文章属于学习内容,具体参考B站黑马程序员的Java项目实战《瑞吉外卖》
这里附上视频链接:业务开发Day1-01-本章内容介绍_哔哩哔哩_bilibili

 浙公网安备 33010602011771号