

手写数字识别总结
项目介绍:
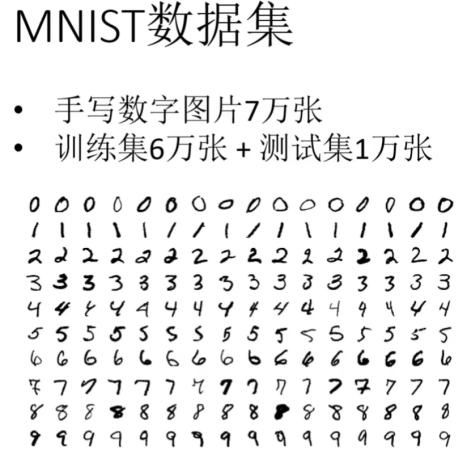
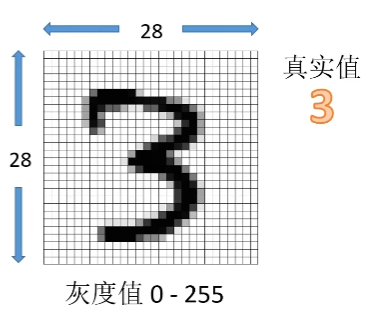
每张图片都是28*28的像素
1,使用全连接层
图像拆分成一维像素阵列作为输入值,输入到神经网络中。打包多个图像输入称为一个batch
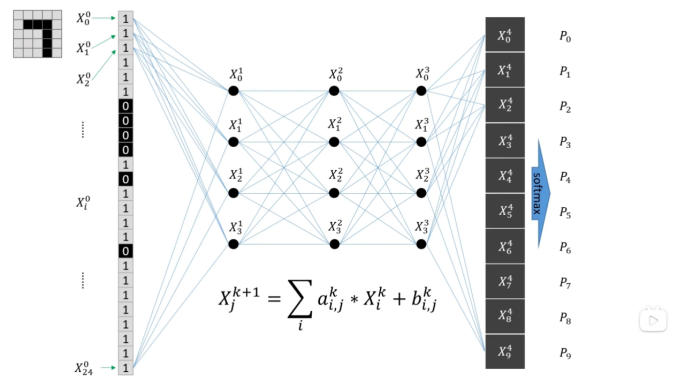
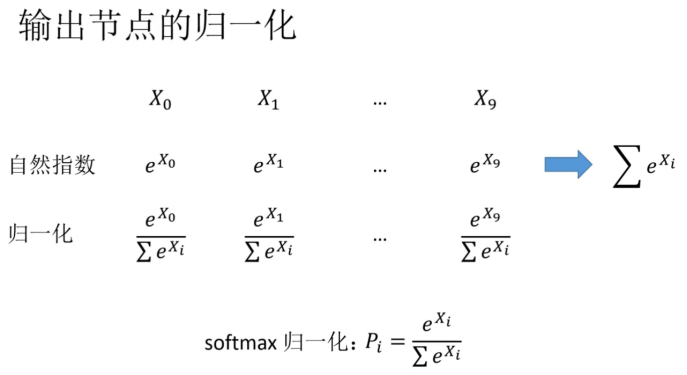
2,输出数据需要做归一化,使数据概率在0-1之间
3,一个batch_size设置为15,共训练两次
通过调节a和b,使训练值与真实值的误差减小,形成一个最优解的问题

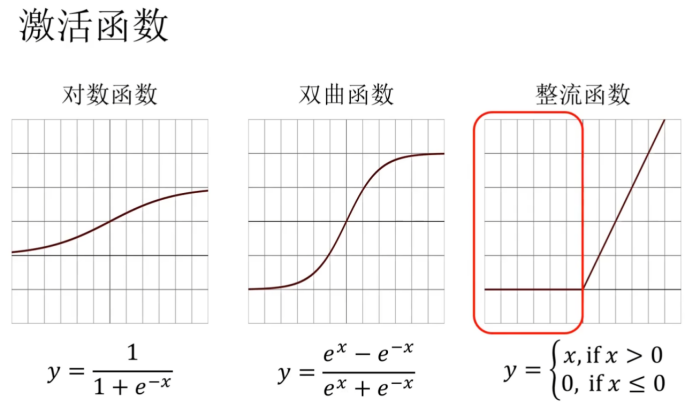
4,加入激活函数,使之变成非线性问题
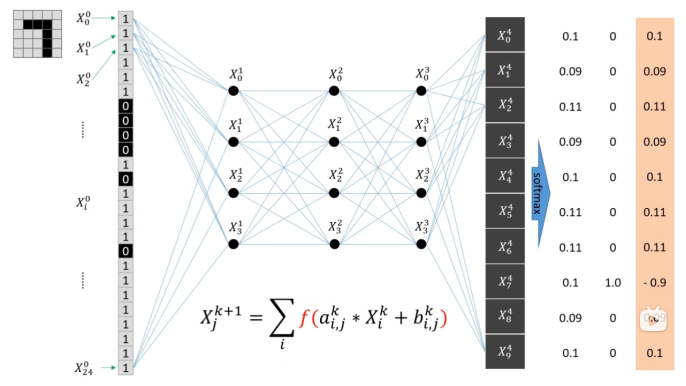
本次项目激活函数使用整流函数,也称为线性整流函数(Rectified Linear Unit, ReLU)
使用GPU训练网络
数据会自动放在cpu中
使用GPU训练主要有三部分,网络模型、数据(输入、标注)、损失函数
必须确保这三部分在都CPU中或GPU上,否则报错
使用方式:使用if torch.cuda.is_available()判断GPU是否可用
- xx.cuda()放到GPU上 或者 xx.cpu()放回到cpu上
- device = torch.device("cpu")
device1 = torch.device("cuda")
xx.to(device)放回到cpu上
xx.to(device1)放到gpu上 - device = torch.device("cuda" if torch.cuda.is_available() else "cpu")
mnist数据集下载问题
如果网络可以,pytorch会自动下载mnist数据集,如果下载失败,下面介绍手动下载
手动下载mnist数据集文件,并导入pytorch的方法
- 下载原始文件,如下图所示
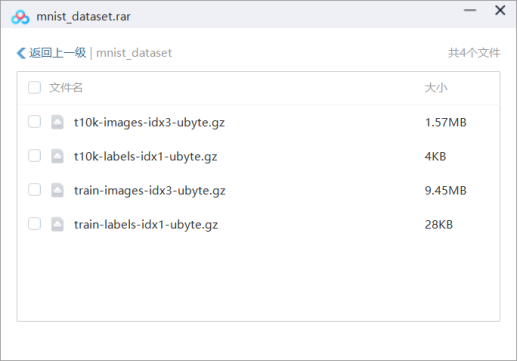
- 执行dataset.MNIST()下载失败之后会生成MNIST-raw文件夹


- 将第一步的文件放入raw文件夹,再次执行dataset.MNIST()即可完成,数据集导入
matplotlib.pyplot报错
使用matplotlib.pyplot遇到can‘t convert cuda:0 device type tensor to numpy. Use Tensor.cpu() to copy the tensor to host memory问题
解决问题:matplotlib.pyplot执行之前需要将神经网络和数据都转移到cpu中
  net = net.cpu()
  x = x.cpu()
代码
# -*- coding = utf-8 -*-
# @Time : 2024/9/8 22:39
# @Author : 邢彪
# @File : HandwritingDigitsModel.py
# @Software : PyCharm
import torch
from torch.utils.data import DataLoader
# 下载数据集
from torchvision import datasets, transforms
# from torchvision import transforms
from torchvision.datasets import MNIST
import matplotlib.pyplot as plt
# 使用GPU训练主要有三部分,网络模型、数据(输入、标注)、损失函数,这三部分放到GPU上。
# 使用方式:1,xx.cuda()放到GPU上 或者xx.cpu()放回到cpu上
# 2,device = torch.device("cpu")
# device1 = torch.device("cuda")
# xx.to(device)放回到cpu上
# xx.to(device1)放到GPU上
# 定义训练的设备
# device1 = torch.device("cpu")
# device = torch.device("cuda") # 使用 GPU 方式一
#device = torch.device("cuda:0") # 使用 GPU 方式二
device = torch.device("cuda" if torch.cuda.is_available() else "cpu")
#神经网络主体
class Net(torch.nn.Module):
def __init__(self):
super().__init__()
# 包含4个全链接层,输入是28 * 28像素尺寸的图像,转化为64个节点的一维数列,输出为10个数字类别
self.fc1 = torch.nn.Linear(28 * 28, 64)
self.fc2 = torch.nn.Linear(64, 64)
self.fc3 = torch.nn.Linear(64, 64)
self.fc4 = torch.nn.Linear(64, 10)
# 前向传播过程,参数x是图像输入
# 每层传播,先做全连接线性计算,再加上relu激活函数
# 输出层通过softmax做归一化
# log_softmax()是为了计算的稳定性,在softmax之外又套上了一个对数运算
def forward(self, x):
x = torch.nn.functional.relu(self.fc1(x))
x = torch.nn.functional.relu(self.fc2(x))
x = torch.nn.functional.relu(self.fc3(x))
x = torch.nn.functional.log_softmax(self.fc4(x), dim=1)
return x
# 导入数据
def get_data_loader(is_train):
# 用transforms定义步骤,将数据转化为tensor
to_tensor = transforms.Compose([transforms.ToTensor()])
# 下载MNIST数据集(第一个字符串为空,表示当前目录,is_train表示导入训练集还是测试集)
data_set = MNIST("./mnist_dataset", is_train, transform=to_tensor, download=True)
# DataLoader是数据加载器,将数据集导入到神经网络中
# batch_size=15表示一个批次包含15张图片,shuffle=True表示数据随机打乱
return DataLoader(data_set, batch_size=15, shuffle=True)
# 评估神经网络的识别正确率
def evaluate(test_data, net):
n_correct = 0
n_total = 0
with torch.no_grad():
# 从测试集中按批次取出数据
for (x, y) in test_data:
# 数据使用GPU
x = x.to(device)
y = y.to(device)
# 计算神经网络的预测值
outputs = net.forward(x.view(-1, 28 * 28))
# 对批次中的每个结果进行比较,累加正确预测的数量
for i, output in enumerate(outputs):
# argmax()计算一个数列中最大值的序号,也就是预测的数字手写结果
if torch.argmax(output) == y[i]:
n_correct += 1
n_total += 1
# 函数返回正确率
return n_correct / n_total
def main():
# 导入训练集和测试集
train_data = get_data_loader(is_train=True)
test_data = get_data_loader(is_train=False)
# 初始化神经网络
net = Net()
# 网络模型使用GPU
net.to(device)
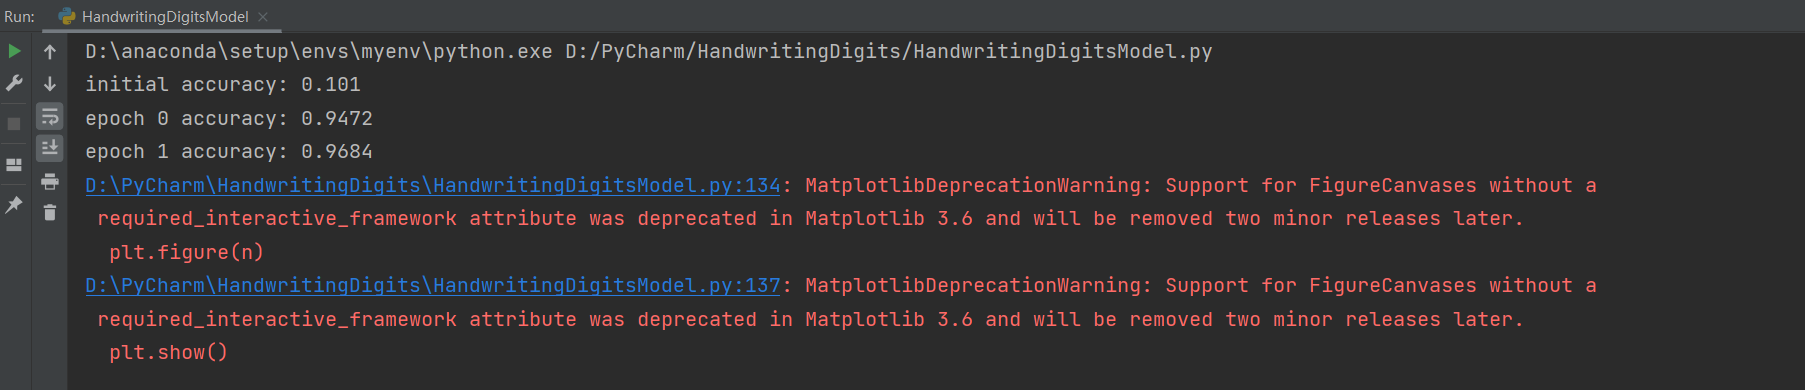
# 训练之前打印初始网络的正确率,一般接近0.1,因为数字共10中结果,随机的概率是0.1
print("initial accuracy:", evaluate(test_data, net))
# Adam自适应矩估计优化器
optimizer = torch.optim.Adam(net.parameters(), lr=0.001)
# 训练两个轮次
for epoch in range(2):
for (x, y) in train_data:
# 数据使用GPU
x = x.to(device)
y = y.to(device)
# 初始化,将神经网络与优化器梯度清零
net.zero_grad()
optimizer.zero_grad()
# 正向传播
output = net.forward(x.view(-1, 28 * 28))
# 计算差值,nll_loss()对数损失函数,为了匹配前面log_softmax()中的对数运算,损失函数使用GPU
loss = torch.nn.functional.nll_loss(output, y).to(device)
# 反向误差传播
loss.backward()
# 优化网络参数
optimizer.step()
# 打印当前网络的正确率
print("epoch", epoch, "accuracy:", evaluate(test_data, net))
# 使用matplotlib.pyplot遇到can‘t convert cuda:0 device type tensor to numpy. Use Tensor.cpu() to copy the tensor to host memory问题
# 解决方法:matplotlib.pyplot执行之前需要将神经网络和数据转移到cpu中
net = net.cpu()
# 随机抽取三张图像,显示网络的预测结果
for (n, (x, _)) in enumerate(test_data):
if n > 3:
break
x = x.cpu()
predict = torch.argmax(net.forward(x[0].view(-1, 28 * 28)))
plt.figure(n)
plt.imshow(x[0].view(28, 28))
plt.title("prediction: " + str(int(predict)))
plt.show()
if __name__ == "__main__":
main()
运行结果


 浙公网安备 33010602011771号