一. 前期准备
1. LVGL源码下载,选择v8.4版本https://github.com/lvgl/lvgl
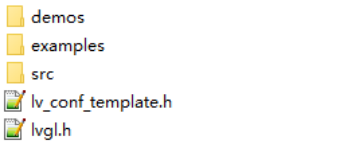
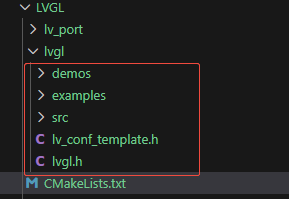
2. LVGL源码精简
保留examples文件夹、src文件夹、lv_conf_template.h和 lvgl.h,其他删除
![image]()
3. ESP32驱动屏幕
以ESP32C6为例,屏幕驱动相关代码,需要根据自己的屏幕进行调整
需要引用组件:esp_lcd
LCD.h文件
#define LCD_PIN_NUM_SCLK           7
#define LCD_PIN_NUM_MOSI           6
#define LCD_PIN_NUM_MISO           5
#define LCD_PIN_NUM_LCD_CS         14
#define LCD_PIN_NUM_LCD_DC         15
#define LCD_PIN_NUM_LCD_RST        21
#define LCD_PIN_NUM_BK_LIGHT       22

#define LCD_HOR_RES              172
#define LCD_VER_RES              320

#define LCD_OFFSET_X 34
#define LCD_OFFSET_Y 0


#define LEDC_HS_TIMER          LEDC_TIMER_0
#define LEDC_LS_MODE           LEDC_LOW_SPEED_MODE
#define LEDC_HS_CH0_GPIO       EXAMPLE_PIN_NUM_BK_LIGHT
#define LEDC_HS_CH0_CHANNEL    LEDC_CHANNEL_0
#define LEDC_TEST_DUTY         (4000)
#define LEDC_ResolutionRatio   LEDC_TIMER_13_BIT
#define LEDC_MAX_Duty          ((1 << LEDC_ResolutionRatio) - 1)


extern volatile uint8_t refresh_done_flag;
extern esp_lcd_panel_handle_t panel_handle;

void LCD_Init(void);
void LCD_Flush(uint16_t color);
void Backlight_Init(void);
void Backlight_Light(uint8_t Light);
LCD.c文件
esp_lcd_panel_io_handle_t io_handle = NULL;
esp_lcd_panel_handle_t panel_handle = NULL;
static ledc_channel_config_t ledc_channel;

volatile uint8_t refresh_done_flag;

static bool notify_lcd_flush_ready(esp_lcd_panel_io_handle_t panel_io, esp_lcd_panel_io_event_data_t *edata, void *user_ctx)
{
    refresh_done_flag = 1;
    return false;
}

uint16_t lcd_buff[LCD_HOR_RES * 10];
void LCD_Flush(uint16_t color)
{
    uint16_t color_tmp = ((color & 0x00FF) << 8) | ((color & 0xFF00) >> 8); /* 需要转换一下颜色值 */

    for (uint32_t i = 0; i < sizeof(lcd_buff) / sizeof(lcd_buff[0]); i++)
        lcd_buff[i] = color_tmp;

    refresh_done_flag = 0;

    for (uint16_t y = 0; y < LCD_VER_RES; y += 10)
        esp_lcd_panel_draw_bitmap(panel_handle, 0 + LCD_OFFSET_X, y + LCD_OFFSET_Y, LCD_HOR_RES + LCD_OFFSET_X, y + 10 + LCD_OFFSET_Y, lcd_buff);

    do
    {
        /* 等待内部缓存刷新完成 */
        vTaskDelay(10);
    } while (refresh_done_flag != 1);
}

void LCD_Init(void)
{
    spi_bus_config_t buscfg = {
        .sclk_io_num = LCD_PIN_NUM_SCLK,                                 /* 时钟引脚 */
        .mosi_io_num = LCD_PIN_NUM_MOSI,                                 /* 主机输出从机输入引脚 */
        .miso_io_num = LCD_PIN_NUM_MISO,                                 /* 主机输入从机输出引脚 */
        .quadwp_io_num = -1,                                             /* 用于Quad模式的WP引脚,未使用时设置为-1 */
        .quadhd_io_num = -1,                                             /* 用于Quad模式的HD引脚,未使用时设置为-1 */
        .max_transfer_sz = LCD_HOR_RES * LCD_VER_RES * sizeof(uint16_t), /* 最大传输大小(整屏(RGB565格式)) */
    };
    /* 初始化SPI总线 */
    ESP_ERROR_CHECK(spi_bus_initialize(LCD_HOST, &buscfg, SPI_DMA_CH_AUTO));

    esp_lcd_panel_io_handle_t io_handle = NULL; /* LCD IO设备句柄 */
    /* spi配置 */
    esp_lcd_panel_io_spi_config_t io_config = {
        .dc_gpio_num = LCD_PIN_NUM_LCD_DC, /* DC IO */
        .cs_gpio_num = LCD_PIN_NUM_LCD_CS, /* CS IO */
        .pclk_hz = 60 * 1000 * 1000,       /* PCLK为60MHz */
        .lcd_cmd_bits = 8,                 /* 命令位宽 */
        .lcd_param_bits = 8,               /* LCD参数位宽 */
        .spi_mode = 0,                     /* SPI模式 */
        .trans_queue_depth = 10,           /* 传输队列 */
    };
    /* 将LCD设备挂载至SPI总线上 */
    ESP_ERROR_CHECK(esp_lcd_new_panel_io_spi((esp_lcd_spi_bus_handle_t)LCD_HOST, &io_config, &io_handle));

    /* LCD设备配置 */
    esp_lcd_panel_dev_config_t panel_config = {
        .reset_gpio_num = LCD_PIN_NUM_LCD_RST,        /* RTS IO */
        .rgb_ele_order = COLOR_RGB_ELEMENT_ORDER_RGB, /* 颜色格式 */
        .bits_per_pixel = 16,                         /* 颜色深度 */
        .data_endian = LCD_RGB_DATA_ENDIAN_LITTLE,    /* 大端顺序 */
    };

    /* 为ST7789创建LCD面板句柄,并指定SPI IO设备句柄 */
    ESP_ERROR_CHECK(esp_lcd_new_panel_st7789(io_handle, &panel_config, &panel_handle));
    /* 复位LCD */
    ESP_ERROR_CHECK(esp_lcd_panel_reset(panel_handle));
    /* 反显 */
    ESP_ERROR_CHECK(esp_lcd_panel_invert_color(panel_handle, true));
    /* 初始化LCD句柄 */
    ESP_ERROR_CHECK(esp_lcd_panel_init(panel_handle));
    // 镜像
    // ESP_ERROR_CHECK(esp_lcd_panel_mirror(panel_handle, true, false));
    /* 打开屏幕 */
    ESP_ERROR_CHECK(esp_lcd_panel_disp_on_off(panel_handle, true));
    // 传输完成回调
    const esp_lcd_panel_io_callbacks_t cbs = {
        .on_color_trans_done = notify_lcd_flush_ready,
    };
    /* 注册屏幕刷新完成回调函数 */
    ESP_ERROR_CHECK(esp_lcd_panel_io_register_event_callbacks(io_handle, &cbs, NULL));
}

// 背光初始化
void Backlight_Init(void)
{
    gpio_config_t bk_gpio_config = {
        .mode = GPIO_MODE_OUTPUT,
        .pin_bit_mask = 1ULL << LCD_PIN_NUM_BK_LIGHT};
    ESP_ERROR_CHECK(gpio_config(&bk_gpio_config));

    // 配置LEDC
    ledc_timer_config_t ledc_timer = {
        .duty_resolution = LEDC_TIMER_13_BIT,
        .freq_hz = 5000,
        .speed_mode = LEDC_LS_MODE,
        .timer_num = LEDC_HS_TIMER,
        .clk_cfg = LEDC_AUTO_CLK};
    ledc_timer_config(&ledc_timer);

    ledc_channel.channel = LEDC_HS_CH0_CHANNEL;
    ledc_channel.duty = 0;
    ledc_channel.gpio_num = LCD_PIN_NUM_BK_LIGHT;
    ledc_channel.speed_mode = LEDC_LS_MODE;
    ledc_channel.timer_sel = LEDC_HS_TIMER;
    ledc_channel_config(&ledc_channel);
    ledc_fade_func_install(0);
}

void Backlight_Light(uint8_t Light)
{
    static uint8_t last_ligtht = 0xff;
    if (last_ligtht == Light)
        return;
    last_ligtht = Light;
    if (Light > 100)
        Light = 100;
    uint16_t Duty = LEDC_MAX_Duty - (81 * (100 - Light));
    if (Light == 0)
        Duty = 0;
    // 设置PWM占空比
    ledc_set_duty(ledc_channel.speed_mode, ledc_channel.channel, Duty);
    ledc_update_duty(ledc_channel.speed_mode, ledc_channel.channel);
}
主函数中调用
void app_main(void)
{
LCD_Init();
Backlight_Init();
Backlight_Light(100);
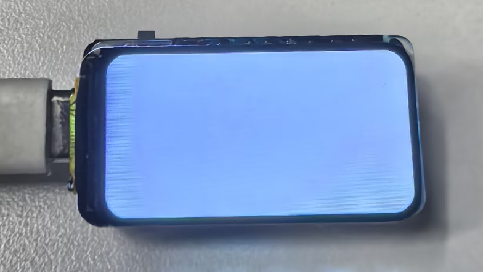
LCD_Flush(0xffff);
while (1)
{
vTaskDelay(pdMS_TO_TICKS(10));
}
}
实际效果
![image]()
二. 开始移植
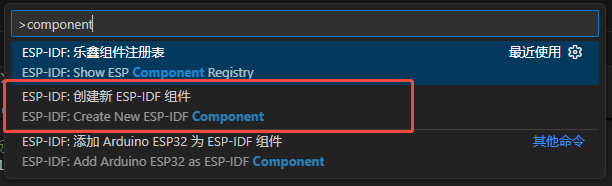
1. 创建LVGL组件
命名为创建一个组件,命名为LVGL
![image]()
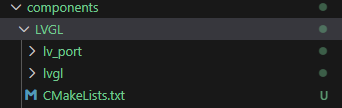
并添加新建2个文件夹,分别命名为lvgl和lv_port。完成后如下
![image]()
2. 添加LVGL代码文件
把上面精简的源文件添加到lvgl文件夹中
![image]()
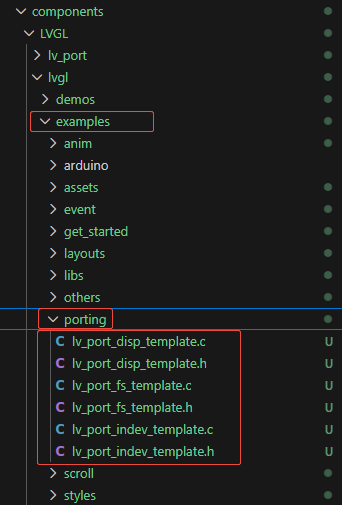
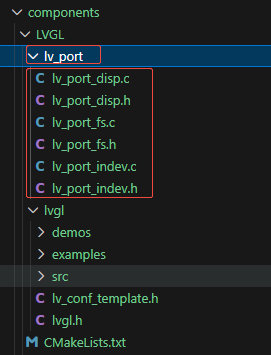
在路径lvgl->examples->porting下有移植相关的接口文件,复制到lv_port文件夹,并重命名删除_template字段
![image]()
![image]()
3. 修改lv_port_disp代码
lv_port_disp.h打开宏开关
![image]()
lv_port_disp.c打开宏开关
![image]()
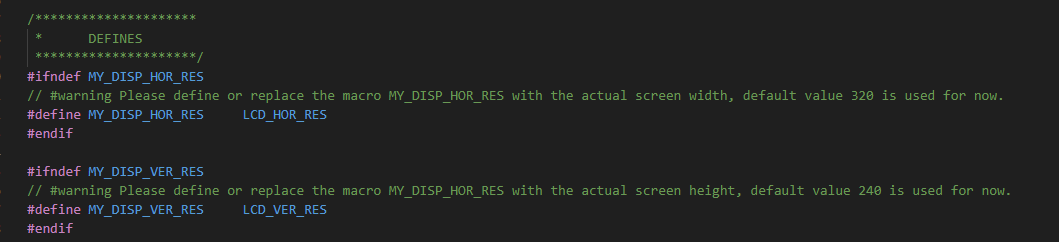
配置屏幕大小
![image]()
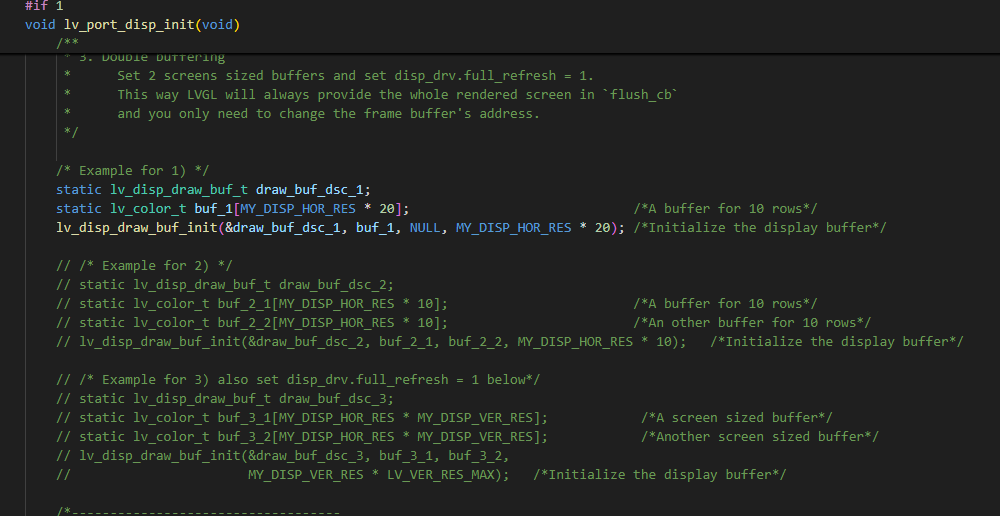
配置缓存
简单移植,直接用第一种缓存模式,把其它的都注释掉
![image]()
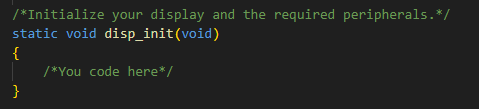
添加屏幕初始化函数
把上面的屏幕初始化添加到这里。
![image]()
添加刷屏函数
/*Flush the content of the internal buffer the specific area on the display
 *You can use DMA or any hardware acceleration to do this operation in the background but
 *'lv_disp_flush_ready()' has to be called when finished.*/
static void disp_flush(lv_disp_drv_t *disp_drv, const lv_area_t *area, lv_color_t *color_p)
{
    if (disp_flush_enabled)
    {
        /*The most simple case (but also the slowest) to put all pixels to the screen one-by-one*/

        // int32_t x;
        // int32_t y;
        // for(y = area->y1; y <= area->y2; y++) {
        //     for(x = area->x1; x <= area->x2; x++) {
        //         /*Put a pixel to the display. For example:*/
        //         /*put_px(x, y, *color_p)*/
        //         color_p++;
        //     }
        // }

        int offsetx1 = area->x1;
        int offsetx2 = area->x2;
        int offsety1 = area->y1;
        int offsety2 = area->y2;
        // copy a buffer's content to a specific area of the display
        esp_lcd_panel_draw_bitmap(panel_handle, offsetx1 + LCD_OFFSET_X, offsety1 + LCD_OFFSET_Y, offsetx2 + LCD_OFFSET_X + 1, offsety2 + LCD_OFFSET_Y + 1, color_p);

        // 阻塞等待传输完成
        refresh_done_flag = 0;
        while (refresh_done_flag != 1);
    }

    /*IMPORTANT!!!
     *Inform the graphics library that you are ready with the flushing*/
    lv_disp_flush_ready(disp_drv);
}
4. 修改lv_port_indev代码
lv_port_indev.h打开宏开关
![image]()
lv_port_indev.c打开宏开关
![image]()
暂时没用上任何输入,因此在初始化中把全部输入设备注册代码注释
void lv_port_indev_init(void)
{
    /**
     * Here you will find example implementation of input devices supported by LittelvGL:
     *  - Touchpad
     *  - Mouse (with cursor support)
     *  - Keypad (supports GUI usage only with key)
     *  - Encoder (supports GUI usage only with: left, right, push)
     *  - Button (external buttons to press points on the screen)
     *
     *  The `..._read()` function are only examples.
     *  You should shape them according to your hardware
     */

    static lv_indev_drv_t indev_drv;

    // /*------------------
    //  * Touchpad
    //  * -----------------*/

    // /*Initialize your touchpad if you have*/
    // touchpad_init();

    // /*Register a touchpad input device*/
    // lv_indev_drv_init(&indev_drv);
    // indev_drv.type = LV_INDEV_TYPE_POINTER;
    // indev_drv.read_cb = touchpad_read;
    // indev_touchpad = lv_indev_drv_register(&indev_drv);

    // /*------------------
    //  * Mouse
    //  * -----------------*/

    // /*Initialize your mouse if you have*/
    // mouse_init();

    // /*Register a mouse input device*/
    // lv_indev_drv_init(&indev_drv);
    // indev_drv.type = LV_INDEV_TYPE_POINTER;
    // indev_drv.read_cb = mouse_read;
    // indev_mouse = lv_indev_drv_register(&indev_drv);

    // /*Set cursor. For simplicity set a HOME symbol now.*/
    // lv_obj_t * mouse_cursor = lv_img_create(lv_scr_act());
    // lv_img_set_src(mouse_cursor, LV_SYMBOL_HOME);
    // lv_indev_set_cursor(indev_mouse, mouse_cursor);

    // /*------------------
    //  * Keypad
    //  * -----------------*/

    // /*Initialize your keypad or keyboard if you have*/
    // keypad_init();

    // /*Register a keypad input device*/
    // lv_indev_drv_init(&indev_drv);
    // indev_drv.type = LV_INDEV_TYPE_KEYPAD;
    // indev_drv.read_cb = keypad_read;
    // indev_keypad = lv_indev_drv_register(&indev_drv);

    // /*Later you should create group(s) with `lv_group_t * group = lv_group_create()`,
    //  *add objects to the group with `lv_group_add_obj(group, obj)`
    //  *and assign this input device to group to navigate in it:
    //  *`lv_indev_set_group(indev_keypad, group);`*/

    // /*------------------
    //  * Encoder
    //  * -----------------*/

    // /*Initialize your encoder if you have*/
    // encoder_init();

    // /*Register a encoder input device*/
    // lv_indev_drv_init(&indev_drv);
    // indev_drv.type = LV_INDEV_TYPE_ENCODER;
    // indev_drv.read_cb = encoder_read;
    // indev_encoder = lv_indev_drv_register(&indev_drv);

    // /*Later you should create group(s) with `lv_group_t * group = lv_group_create()`,
    //  *add objects to the group with `lv_group_add_obj(group, obj)`
    //  *and assign this input device to group to navigate in it:
    //  *`lv_indev_set_group(indev_encoder, group);`*/

    // /*------------------
    //  * Button
    //  * -----------------*/

    // /*Initialize your button if you have*/
    // button_init();

    // /*Register a button input device*/
    // lv_indev_drv_init(&indev_drv);
    // indev_drv.type = LV_INDEV_TYPE_BUTTON;
    // indev_drv.read_cb = button_read;
    // indev_button = lv_indev_drv_register(&indev_drv);

    // /*Assign buttons to points on the screen*/
    // static const lv_point_t btn_points[2] = {
    //     {10, 10},   /*Button 0 -> x:10; y:10*/
    //     {40, 100},  /*Button 1 -> x:40; y:100*/
    // };
    // lv_indev_set_button_points(indev_button, btn_points);
}
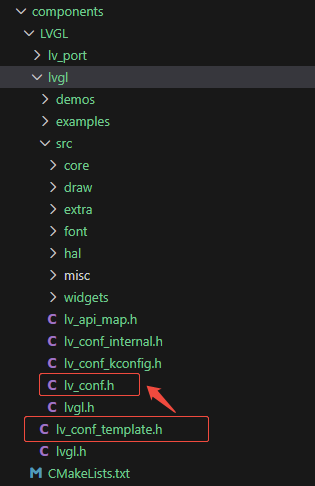
5. 配置lv_conf.h
将lv_conf_template.h文件复制到lvgl->src文件夹,并重命名为lv_conf.h
![image]()
打开宏开关
![image]()
根据所用的屏幕参数配置颜色深度和颜色格式
![image]()
6. 编写CMakeLists文件
由于lvgl源码中有很多层文件夹,所以要对lvgl的文件夹进行递归查找,否则编译的时候可能会因为找不到某个.c或.h文件而报错
# idf_component_register(SRCS "LVGL.c"
#                     INCLUDE_DIRS "include")

# 用户配置

# .c递归目录:自动查找所有子目录的.c文件
set(C_RECURSIVE_DIRS
    lvgl
)

# .c非递归目录:只包含直接.c文件,不查找子目录
set(C_NON_RECURSIVE_DIRS
    .
    lv_port
)

# .h递归目录:自动查找所有子目录的.h文件
set(H_RECURSIVE_DIRS
    lvgl
)

# .h非递归目录:只包含直接.h文件,不查找子目录
set(H_NON_RECURSIVE_DIRS
    .
    lv_port
)

# 设置排除编译的文件(单个文件,可选)
set(exclude_srcs
    # aaa.c
    # XX/bbb.c
)

# 设置依赖库
set(requires
    driver
    esp_common
    esp_timer
    USER_DRIVER  #我这里新建了个组件存放上面LCD驱动的代码,因此要添加引用
)

# 自动处理逻辑
# 初始化变量
set(ALL_SOURCES "")
set(INCLUDE_DIRS "")

# 1. 处理.c递归目录
foreach(dir ${C_RECURSIVE_DIRS})
    file(GLOB_RECURSE sources "${dir}/*.c")
    list(APPEND ALL_SOURCES ${sources})
endforeach()

# 2. 处理.c非递归目录
foreach(dir ${C_NON_RECURSIVE_DIRS})
    file(GLOB sources "${dir}/*.c")
    list(APPEND ALL_SOURCES ${sources})
endforeach()

# 3. 处理.h递归目录(收集头文件目录)
foreach(dir ${H_RECURSIVE_DIRS})
    # 递归查找所有.h文件
    file(GLOB_RECURSE headers "${dir}/*.h")

    # 提取头文件所在目录
    foreach(header ${headers})
        get_filename_component(hdir ${header} DIRECTORY)
        list(APPEND INCLUDE_DIRS ${hdir})
    endforeach()

    # 添加基目录(即使没有找到.h文件)
    list(APPEND INCLUDE_DIRS ${dir})
endforeach()

# 4. 处理.h非递归目录(收集头文件目录)
foreach(dir ${H_NON_RECURSIVE_DIRS})
    # 只查找直接.h文件(不递归)
    file(GLOB headers "${dir}/*.h")

    # 提取头文件所在目录
    foreach(header ${headers})
        get_filename_component(hdir ${header} DIRECTORY)
        list(APPEND INCLUDE_DIRS ${hdir})
    endforeach()

    # 添加基目录(即使没有找到.h文件)
    list(APPEND INCLUDE_DIRS ${dir})
endforeach()

# 5. 清理和去重
if(ALL_SOURCES)
    list(REMOVE_DUPLICATES ALL_SOURCES)
endif()

if(INCLUDE_DIRS)
    list(REMOVE_DUPLICATES INCLUDE_DIRS)
endif()

# 6. 调试输出
# message("源文件总数: ${#ALL_SOURCES}")
# foreach(src ${ALL_SOURCES})
#     message("   ${src}")
# endforeach()
#
# message("头文件目录: ${INCLUDE_DIRS}")
# foreach(inc ${INCLUDE_DIRS})
#     message("   ${inc}")
# endforeach()

# 注册组件
idf_component_register(
    SRCS ${ALL_SOURCES}
    INCLUDE_DIRS ${INCLUDE_DIRS}
    EXCLUDE_SRCS ${exclude_srcs}
    REQUIRES ${requires}
)

# 编译选项
# -O3: 最高优化级别,最大化性能
# -ffast-math: 加速浮点运算(如果项目中使用了浮点数)
# -Wno-error=format: 不把格式字符串警告当作错误
# -Wno-format: 不显示格式字符串警告
component_compile_options(-O3 -ffast-math -Wno-error=format -Wno-format)
至此,移植已经基本完成了。
三. 使用测试
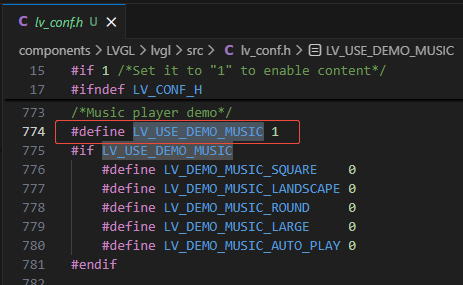
demo配置
打开移植好的lv_conf.h文件,找到LV_USE_DEMO_MUSIC,打开该宏定义
![image]()
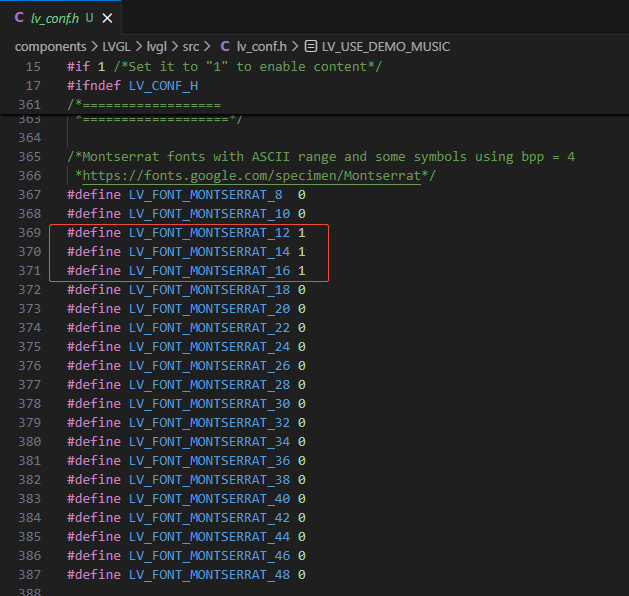
在开启LV_USE_DEMO_MUSIC的同时,找到字体开启处,开启下面3种字体
![image]()
使用测试
1. 使用定时器定时调用LVGL时基单元
2. 初始化屏幕
3. 初始化lvgl
4. 循环调用lvgl处理函数
static esp_timer_handle_t lvgl_tick_timer = NULL;

// 定时回调函数,每 1ms 触发
static void lv_tick_task(void *arg)
{
    lv_tick_inc(1);
}

// 初始化 LVGL Tick 定时器
void lvgl_tick_timer_init(void)
{
    const esp_timer_create_args_t timer_args = {
        .callback = &lv_tick_task,
        .arg = NULL,
        .dispatch_method = ESP_TIMER_TASK,
        .name = NULL};

    esp_timer_create(&timer_args, &lvgl_tick_timer);
    esp_timer_start_periodic(lvgl_tick_timer, 1000); // 1ms 触发
}

void app_main(void)
{
    LCD_Init();
    Backlight_Init();
    Backlight_Light(100);

    lvgl_tick_timer_init();
    lv_init();
    lv_port_disp_init();
    lv_port_indev_init();

    /********************* Demo *********************/
    // lv_demo_widgets();
    // lv_demo_keypad_encoder();
    // lv_demo_benchmark();
    // lv_demo_stress();
    // lv_demo_music();

    while (1)
    {
        lv_task_handler();
        // Backlight_Light(100);

        vTaskDelay(pdMS_TO_TICKS(10));
    }
}
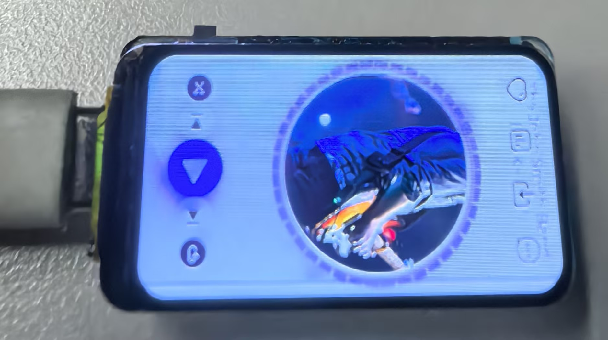
实际效果
![image]()
五. 源码
四. Q&A
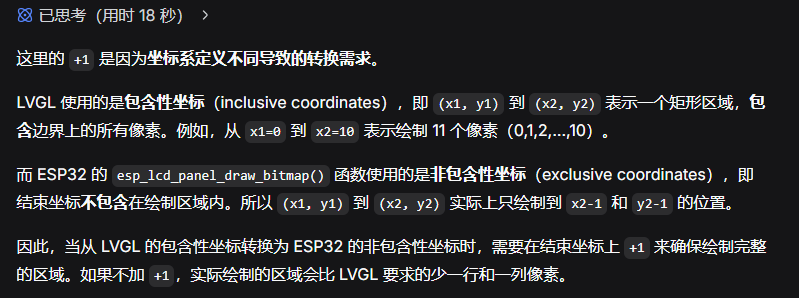
可能有人问x2和y2坐标为什么要加1?有请Deepseek
![image]()
不想阻塞等待传输完成,如何更改?
1. 修改lv_port_disp_init函数,把disp_drv变量改为全局变量,并在lv_port_disp.h中声明
2. 修改LCD驱动函数
![image]()
![image]()
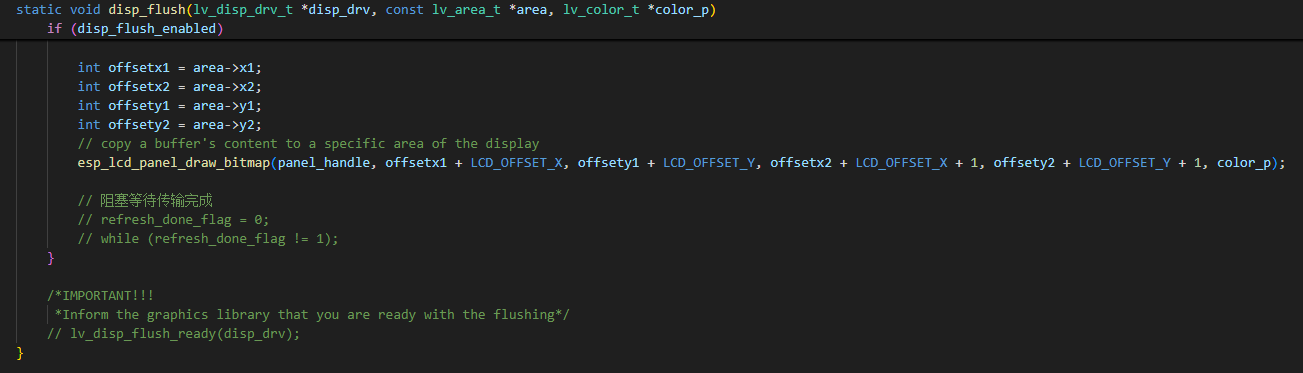
3. 修改lv_port_disp.c中的disp_flush函数
![image]()


 浙公网安备 33010602011771号