Python摘记
安装
pip 换源
- 查看当前 pip 配置
pip config list
- linux 永久换源:创建并修改
~/.pip/pip.conf文件内容为如下所示
[global]
index-url = https://pypi.tuna.tsinghua.edu.cn/simple
[install]
trusted-host = https://pypi.tuna.tsinghua.edu.cn
参考资料
https://blog.csdn.net/m0_62140641/article/details/140601125
https://www.cnblogs.com/137point5/p/15000954.html
pip 缓存
# 查看缓存目录
pip cache dir

# 清理缓存
pip cache purge

# 设置新地址(未验证)
pip config set global.cache-dir "D:\Software\python3.6\pipcache"
参考资料
https://blog.csdn.net/weixin_45653897/article/details/131254542
pip 更新
https://blog.csdn.net/xiaojun1288/article/details/121357721
学习笔记
W3School:https://www.w3school.com.cn/python/index.asp
菜鸟教程:https://www.runoob.com/python3/python3-tutorial.html
以C++为基础快速入门:https://blog.csdn.net/m0_62951223/article/details/126624414
python快速入门,仅包括最基础的内容:https://zhuanlan.zhihu.com/p/625830867
python简介
用任何编程语言来开发程序,都是为了让计算机干活。而计算机干活的CPU只认识机器指令,所以,尽管不同的编程语言差异极大,最后都得“翻译”成CPU可以执行的机器指令。而不同的编程语言,干同一个活,编写的代码量,差距也很大。
那Python适合开发哪些类型的应用呢?首选是网络应用,包括网站、后台服务等等;其次是许多日常需要的小工具,包括系统管理员需要的脚本任务等等;另外就是把其他语言开发的程序再包装起来,方便使用。
python的缺点:python是解释性语言,运行速度慢;代码无法加密,要发布python程度就需要发布源代码
基础
基本输入输出
a + b 程序
a, b = map(int, input().split())
print(a + b)
- 输入一行一个数组
arr = input()
a = [int(i) for i in arr.split()]
或者
a = [int(i) for i in input().split()]
或者
a = list(map(int, input().split()))
- 输入 n 行 n 列
n = int(input())
a = [[int(x) for x in input().split()] for i in range(n)]
- 可以用 "+" 来构造想要输出的字符串
比如 a="123"
print("b " + a)
就会打出: b 123
运算符优先级
link: https://blog.csdn.net/yc_chengzhi/article/details/79476088
列表
创建多维列表
- 推导式开 n 行 n 列数组
vis = [[False for j in range(n)] for j in range(n) ]
函数
函数参数部分中,*args 和 **kwargs 的区别日后摘记
菜鸟教程 link:https://www.runoob.com/python3/python3-function.html
内置函数
- isinstance(object, classinfo)
# 使用元组判断类型
x = 10
print(isinstance(x, (int, float)))
# 输出 True,因为 x 是 int 类型,int 是元组的一部分
官方文档 link:https://docs.python.org/zh-cn/3.13/library/functions.html
菜鸟教程:https://www.runoob.com/python/python-built-in-functions.html
推导式
可用于快速生成元组、列表、集合、字典,从一个数据序列构建另一个新的数据序列
元组推导式返回的结果是一个生成器对象
列表推导式格式:[out_exp_res for out_exp in input_list (if condition)],(if condition) 为可选项
x = 10
print(isinstance(x, int))  # 输出 True,因为 x 是 int 类型

names = ['Bob','Tom','alice','Jerry','Wendy','Smith']
new_names = [name.upper() for name in names if len(name)>3]
print(new_names)
# ['ALICE', 'JERRY', 'WENDY', 'SMITH']
菜鸟教程 - 推导式:https://www.runoob.com/python3/python-comprehensions.html
迭代器与生成器
菜鸟教程link:https://www.runoob.com/python3/python3-iterator-generator.html
各种模块、库 (按照字典序)
argparse 库 - 解析命令行参数和选项
import argparse
### 解析命令行参数和选项
def parse_opt(known=False):
	# 1.创建参数总容器
	parser = argparse.ArgumentParser()
	# 2.添加参数
	## 2.1 位置参数(必须)
	parser.add_argument('numa', type=int, help='The first int')
	parser.add_argument('floatb', type=float, help='The second float')
	## 2.2 选项参数(可选)
	parser.add_argument('-w', '--weights', type=str, help='initial weights path')
	parser.add_argument("--name", type=str, default='qiansui', help='The name')# default 设置未输入时的默认值
	parser.add_argument('--require', type=str, required=True, help='Show require')# require 设置必须要
	## 2.3 杂
	parser.add_argument('--save_period', type=int, default=-1, help='number')
	parser.add_argument('--artifact-alias', type=str, default="latest", help='test string') ## '-'连接自动转为下划线
	## 2.4 别的,以后用到再摘记
	### choices、nargs、...
	# 3.解析参数(根据 known 选择解析模式)
	opt = parser.parse_known_args()[0] if known else parser.parse_args()
	return opt
# 4. 使用参数
opt = parse_opt(True)
print(opt, f"sum of numa and floatb is {opt.numa + opt.floatb}.", sep="\n")
# python cs.py 1 2.5 --require require_yes
# 输出
Namespace(numa=1, floatb=2.5, weights=None, name='qiansui', require='require_yes', save_period=-1, artifact_alias='latest')
sum of numa and floatb is 3.5.
参考资料
- 基础介绍(详细):https://zhuanlan.zhihu.com/p/24029272523
- 基础介绍(简略):https://blog.csdn.net/Q52099999/article/details/137028697
- parse_known_args()与函数parse_args()的区别:link1、link2
bypy - 百度云/百度网盘Python客户端
使用教程
# 查看bypy文件夹下的内容
bypy list
# 下载
bypy downfile filename
bypy downdir -v 或 bypy downdir filename -v
# 上传
bypy upload [localpath] [remotepath] [ondup] - upload a file or directory (recursively)
参考资料
- https://blog.csdn.net/qq_45794091/article/details/145543379
- https://blog.csdn.net/crazyjinks/article/details/140290187
h5py 库
支持增量式添加数据,索引式读取
示例代码:
# --- 工具类:HDF5 增量写入器 ---
# 封装为一个类,更为便捷~
class PredictionH5Writer:
    def __init__(self, save_path):
        self.save_path = save_path
        # 'w' 模式会覆盖旧文件,确保从头开始
        with h5py.File(save_path, 'w') as f:
            # 1. 核心数据: (样本数, 8时间步, 3波段)
            f.create_dataset('data', shape=(0, 8, 3), maxshape=(None, 8, 3),
                             dtype=np.float32, chunks=(1024, 8, 3), compression="gzip")

            # 2. 元数据: 经纬度 (样本数, 2)
            f.create_dataset('geo', shape=(0, 2), maxshape=(None, 2),
                             dtype=np.float32)

            # 3. 元数据: 时间 (样本数,) 字符串
            dt_str = h5py.string_dtype(encoding='utf-8', length=12)
            f.create_dataset('start_time', shape=(0,), maxshape=(None,), dtype=dt_str)

            self.cursor = 0

    def append(self, batch_data, batch_geo, time_str):
        n_new = len(batch_data)
        if n_new == 0: return

        # 准备时间数据 (广播)
        batch_times = [time_str] * n_new

        with h5py.File(self.save_path, 'a') as f:
            # 扩展数据集大小
            f['data'].resize(self.cursor + n_new, axis=0)
            f['geo'].resize(self.cursor + n_new, axis=0)
            f['start_time'].resize(self.cursor + n_new, axis=0)

            # 写入数据
            f['data'][self.cursor:] = batch_data
            f['geo'][self.cursor:] = batch_geo
            f['start_time'][self.cursor:] = batch_times

        self.cursor += n_new
logging - 输出日志信息
- 基本使用
import logging
import os

if __name__ == '__main__':
	# logging
	if os.path.exists("log.log"): os.remove('log.log')
	logging.basicConfig(
		filename="log.log",
		filemode='a',
		format="%(levelname)s : %(message)s",
		level=logging.INFO
	)

	for i in range(10):
		logging.info(f"The id now is {i}.")
		print("ok")
- 控制台和文件双输出,详细内容见参考链接!
%(asctime)s:字符串形式的当前时间。默认格式是 “2003-07-08 16:49:45,896”。逗号后面的是毫秒
import logging
import logging.handlers

def set_logging(filename):
    log = logging.getLogger()
    if log.handlers:
        return log
    log.setLevel(logging.INFO)
    fmt = logging.Formatter('%(asctime)s - %(message)s')
    sh = logging.StreamHandler(sys.stdout)
    sh.setFormatter(fmt)
    th = logging.FileHandler(filename, encoding='UTF-8')
    th.setFormatter(fmt)
    log.addHandler(sh)
    log.addHandler(th)
    return log

if __name__ == '__main__':
	LOGGER = set_logging('cs.log')
	LOGGER.debug('debug')
	LOGGER.info('info')
	LOGGER.warning('警告')
	LOGGER.error('报错')
	LOGGER.critical('严重')
参考资料
- Python + logging 输出到屏幕,将log日志写入文件
- 最棒总结!Python日志库 logging 使用指南来了
- 写得更好的一个控制台文件双输出日志代码:https://blog.csdn.net/weixin_44688529/article/details/126160744
matplotlib 库
- 支持图像中文显示
import matplotlib.pyplot as plt
## linux
plt.rcParams['font.sans-serif'] = ['Noto Sans CJK SC', 'WenQuanYi Micro Hei', 'AR PL UMing CN']  # 中文字体
plt.rcParams['axes.unicode_minus'] = False  # 正常显示负号

## win
plt.rcParams['font.sans-serif'] = ['SimHei']  # 黑体,支持中文
plt.rcParams['axes.unicode_minus'] = False    # 正确显示负号

## 查看可用字体
import matplotlib.font_manager as fm
for font in fm.findSystemFonts(fontpaths=None, fontext='ttf'):
    print(font)
- 支持 pandas 便捷绘图
## 例子
df['train_loss'].plot(label='Train Loss')
df['val_loss'].plot(label='Val Loss')

## 函数例子
def draw_curves_multiple(vis_save_dir, results, labels, ylabel):
    plt.figure()
    for k, v in results.items(): ## v 为 df 对象
        for label in labels:
            plt.plot(v['epoch'], v[label], label=f"{k}_{label}")
    plt.xlabel("Epoch")
    plt.ylabel(ylabel)
    plt.title(f"Models {ylabel} Curve")
    plt.legend()
    plt.grid()
    plt.savefig(os.path.join(vis_save_dir, f"models_{ylabel}.png"))
    plt.close()
natsorted 库 - 自然排序
对列表进行自然排序,类似于 windows 名称排序,对名称里的数字字符视为数字进行排序
# 安装
pip install natsort

# 使用
from natsort import natsorted
a = [...]
a = natsorted(a)
print(a)
参考资料
【Python】自然排序(natsort)
https://blog.csdn.net/qq_41780234/article/details/126588966
openpyxl 库 - 操作excel
安装:pip install openpyxl
参考:https://blog.csdn.net/weixin_44288604/article/details/120731317
pathlib 库
和 os 库的路径操作有点重复?但是 demo 中的父路径获取确实更加方便,此处留个坑
demo:
from pathlib import Path

print(Path.cwd())
print(Path.cwd().parent)
link:https://blog.csdn.net/qq_43965708/article/details/122537713
Python中List的复制(直接复制、浅拷贝、深拷贝)
深拷贝方式
import copy
old = [1,[1,2,3],3]
new = copy.deepcopy(old)
tqdm 库
link:https://blog.csdn.net/u013172930/article/details/146208332
杂
包和模块的区别,导入与运行
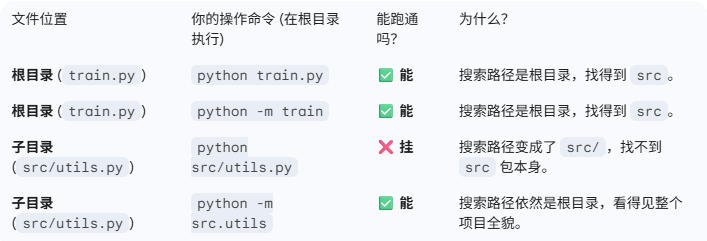
文件位置,你的操作命令 (在根目录执行),能跑通吗?,为什么?
根目录 (train.py),python train.py,✅ 能,搜索路径是根目录,找得到 src。
根目录 (train.py),python -m train,✅ 能,搜索路径是根目录,找得到 src。
子目录 (src/utils.py),python src/utils.py,❌ 挂,搜索路径变成了 src/,找不到 src 包本身。
子目录 (src/utils.py),python -m src.utils,✅ 能,搜索路径依然是根目录,看得见整个项目全貌。
__init__.py文件的作用
https://www.cnblogs.com/BlueSkyyj/p/9415087.html
requirements.txt 相关
【Pip】深入理解 requirements.txt 文件:Python 项目依赖管理的核心工具
是否为主程序执行?
__name__ 是 Python 内置的一个特殊变量,在不同的情境下有不同的值
- 如果 python 文件是直接执行的,
__name__的值会被设置为'__name__' - 如果该文件作为模块被导入到其他 Python 文件中,
__name__的值会被设置为该文件的模块名(即文件名,不带 .py 后缀)
if __name__ == '__main__':
	print("ok")
浅拷贝和深拷贝问题
python 默认都是浅拷贝?就是 C++ 的传地址
想要创建独立新对象需要使用 copy.deepcopy()
import copy
a = [1, 2, 3]
print(a)
b = a
a[1] = 99
print(a, b)
c = copy.deepcopy(a)
a[1] = 100
print(a, b, c)
# output
# [1, 2, 3]
# [1, 99, 3] [1, 99, 3]
# [1, 100, 3] [1, 100, 3] [1, 99, 3]
求解逆序对个数(python 代码)
https://blog.csdn.net/weixin_45527999/article/details/123302747
测试 pytorch 能否使用 cuda 和 cudnn 以及对应的版本的 python 代码
# import os
# os.environ["CUDA_VISIBLE_DEVICES"] = "0"
import torch
print(torch.__version__) # 查看torch版本

print(torch.cuda.is_available()) # 看安装好的torch和cuda能不能用,也就是看GPU能不能用
# 检查是否有可用的 CUDA 设备
if torch.cuda.is_available():
	# 获取支持 CUDA 的 GPU 数量
	num_gpus = torch.cuda.device_count()
	print(f"支持 CUDA 的 GPU 数量:{num_gpus}")
	# 打印每个 GPU 的名称
	for i in range(num_gpus):
		print(f"GPU {i}: {torch.cuda.get_device_name(i)}")

print(torch.version.cuda) # 输出一个 cuda 版本,注意:上述输出的 cuda 的版本并不一定是 Pytorch 在实际系统上运行时使用的 cuda 版本,而是编译该 Pytorch release 版本时使用的 cuda 版本,详见:https://blog.csdn.net/xiqi4145/article/details/110254093

import torch.utils
import torch.utils.cpp_extension
print(torch.utils.cpp_extension.CUDA_HOME) #输出 Pytorch 运行时使用的 cuda

# 测试CUDNN
from torch.backends import cudnn
print("Support cudnn?:", cudnn.is_available())
print(cudnn.version())

 浙公网安备 33010602011771号