
Linux学习88 Mysql常见服务搭档-php-fpm基础应用与实战
一、上集练习题
1、练习1答案
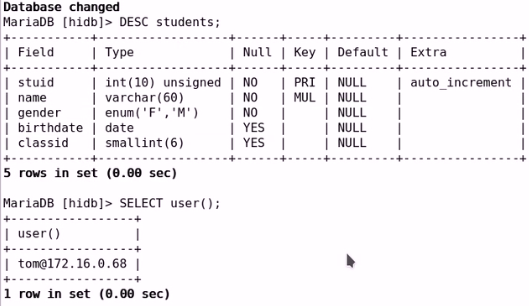
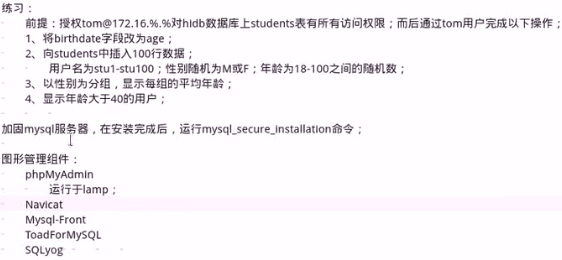
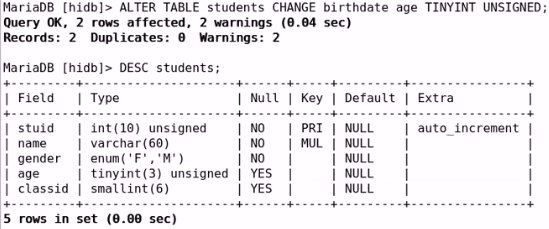
a、将birthdate字段改为age答案
b 、向students中插入100行数据,用户名为stu1-stu100;性别随机为M或F;年龄为18-100之间的随机数的答案。
c、以性别为分组,显示每组的平均年龄
d、显示年龄大于40的用户
2、加固mysql服务器,在安装完成后,运行mysql_secure_installation命令。(因为mysql安装后默认是没有密码的)
a、我们运行mysql_secure_installation命令会让你设置root用户的密码,删除匿名用户,删除test测试数据库并重载授权表。
二、httpd+php结合的方式
1、module:php
2、fastcgi:php-fpm
三、php-fpm
1、CentOS 6:
a、PHP-5.3.2:默认不支持fpm机制;需要自行打补丁并编译安装
b、httpd-2.2:默认不支持fcgi协议,需要自行编译此模块
c、解决方案:编译安装httpd-2.4,php-5.3.3+;
2、CentOS 7
a、httpd-2.4:rpm包默认编译支持了fcgi模块
b、php-fpm包:专用于将php运行于fpm模式
c、配置文件
(1)、服务配置文件:/etc/php-fpm.conf,/etc/php-fpm.d/*.conf
(2)、php环境配置文件:/etc/php.ini,/etc/php.d/*.ini
(3)、连接池:
1)、pm = static|dynamic
static:固定数量的子进程;pm.max_children;
dynamic:子进程数据以动态模式管理
pm.start_servers
pm.min_spare_servers
pm.max_spare_servers
;pm.max_requests = 500
(4)、创建session目录,并确保运行php-fpm进程的用户对此目录有读写权限
mkdir /var/lib/php/session
chown apache.apache /var/lib/php/session
d、配置httpd,添加/etc/httpd/conf.d/fcgi.conf配置文件,内容类似
DirectoryIndex index.php #主页支持index.php
ProxyRequests Off #关闭正向代理
ProxyPassMatch ^/(.*\.php)$ fcgi://127.0.0.1:9000/var/www/html/$1 #模式匹配如果用户请求的URL是以任意内容开头但以.php结尾的那么就将其反代到fcgi://127.0.0.1:9000/var/www/html/这个网页存放路径下。$1表示前面括号括起来的内容。这个^/(.*\.php)中的/表示以URL开始,只匹配路径,不包含http:host这个字段
e、虚拟主机配置(如果没有虚拟主机就用上面的,如果有虚拟主机就用下面的配置)
DirectoryIndex index.php
<VirtualHost *:80>
ServerName www.b.net
DocumentRoot /apps/vhosts/b.net
ProxyRequests Off
ProxyPassMatch ^/(.*\.php)$ fcgi://127.0.0.1:9000/apps/vhosts/b.net/$1
<Directory "/apps/vhosts/b.net">
Options None
AllowOverride None
Require all granted
</Directory>
</VirtualHost>
f、假设fpm的status页面输出URL为/pmstatus
ProxyPassMatch ^/(ping|pmstatus.*)$ fcgi://127.0.0.1:9000/$1
3、示例
a、我们在192.168.10.14安装mysql并且在配置文件中添加相应的项然后重启
[root@node2 ~]# cat /etc/my.cnf.d/server.cnf |grep -Ev "^$|^#"
[server]
[mysqld]
#编辑跳过名称解析
#innodb表每个表使用单独的表空间文件
skip_name_resolve=ON
innodb_file_per_table=ON
[embedded]
[mysqld-5.5]
[mariadb]
[mariadb-5.5]
[root@node2 ~]# systemctl restart mariadb
[root@node2 ~]# netstat -anpt|grep mysql
tcp        0      0 0.0.0.0:3306            0.0.0.0:*               LISTEN      5680/mysqld
b、安全加固
[root@node2 ~]# mysql_secure_installation

NOTE: RUNNING ALL PARTS OF THIS SCRIPT IS RECOMMENDED FOR ALL MariaDB
      SERVERS IN PRODUCTION USE!  PLEASE READ EACH STEP CAREFULLY!

In order to log into MariaDB to secure it, we'll need the current
password for the root user.  If you've just installed MariaDB, and
you haven't set the root password yet, the password will be blank,
so you should just press enter here.

Enter current password for root (enter for none):  #输入当前root密码,默认为空
OK, successfully used password, moving on...

Setting the root password ensures that nobody can log into the MariaDB
root user without the proper authorisation.

Set root password? [Y/n] Y #是否要设置root密码
New password:  #新密码
Re-enter new password: #再次输入新密码
Password updated successfully!
Reloading privilege tables..
 ... Success!


By default, a MariaDB installation has an anonymous user, allowing anyone
to log into MariaDB without having to have a user account created for
them.  This is intended only for testing, and to make the installation
go a bit smoother.  You should remove them before moving into a
production environment.

Remove anonymous users? [Y/n] Y #是否移除匿名用户
 ... Success!

Normally, root should only be allowed to connect from 'localhost'.  This
ensures that someone cannot guess at the root password from the network.

Disallow root login remotely? [Y/n] Y #是否禁用root用户远程登录
 ... Success!

By default, MariaDB comes with a database named 'test' that anyone can
access.  This is also intended only for testing, and should be removed
before moving into a production environment.

Remove test database and access to it? [Y/n] Y #是否移除test库
 - Dropping test database...
 ... Success!
 - Removing privileges on test database...
 ... Success!

Reloading the privilege tables will ensure that all changes made so far
will take effect immediately.

Reload privilege tables now? [Y/n] Y #是否重新刷新权限
 ... Success!

Cleaning up...

All done!  If you've completed all of the above steps, your MariaDB
installation should now be secure.

Thanks for using MariaDB!
c、然后我们用root登录后添加一个用户myuser,并用该用户创建一个数据库
[root@node2 ~]# mysql -uroot -p123456 -h127.0.0.1
Welcome to the MariaDB monitor.  Commands end with ; or \g.
Your MariaDB connection id is 10
Server version: 5.5.56-MariaDB MariaDB Server

Copyright (c) 2000, 2017, Oracle, MariaDB Corporation Ab and others.

Type 'help;' or '\h' for help. Type '\c' to clear the current input statement.

MariaDB [(none)]>
MariaDB [(none)]> GRANT ALL ON testdb.* TO 'myuser'@'192.168.10.%' IDENTIFIED BY '123456';
Query OK, 0 rows affected (0.00 sec)

MariaDB [(none)]> FLUSH PRIVILEGES;
Query OK, 0 rows affected (0.00 sec)

MariaDB [(none)]>
MariaDB [(none)]> CREATE DATABASE testdb CHARACTER SET 'utf8';
Query OK, 1 row affected (0.00 sec)
d、在192.168.10.14中安装php-fpm,注意是php-fpm不是php,他和php不是同一个东西
(1)、安装相应包

(2)、查看有哪些文件
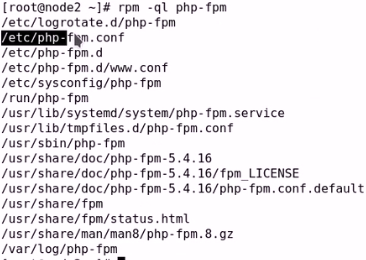
(3)、我们编辑/etc/php-fpm.d/这个目录下的www.conf文件
listen = 127.0.0.1:9000 #监听的端口和地址
listen.backlog = -1 #后援队列。即假如我们服务器只支持50个并发如果你来了70个人怎么办呢?后面就得派队,我们这个参数就是定义排队队列有多长,-1表示无限制
listen.allowed_clients = 127.0.0.1 #允许来自于哪些地址的客户端来连接请求。即这是一个授权连接
user:运行进程的用户
group:运行进程的组
pm = dynamic #即我们子进程的管理方式。
static:表示由pm.max_children直接创建。如果定义为最大并发为100个那么其会立即创建100个子进程。
dynamic:表示受控于pm.max_children,即最大多少;pm.start_servers,即刚启动服务的时候启动几个空闲进程;pm.min_spare_servers,即最少空闲几个;pm.max_spare_servers,即最大空闲几个
pm.status_path = /pm-status:访问php-fpm的status的路径
ping.path = /ping #表示ping这个进程的时候的路径
ping.response = pong #表示ping的时候的反馈
php_value[session.save_handler] = files #在服务器端保留客户端访问的活动操作
php_value[session.save_path] = /varlib/php/session #会话持久保存在这个目录下。这个目录默认是不存在的,我们需要手动创建并将其属主和数组都改为apache
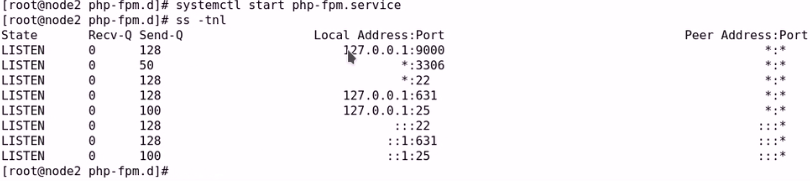
(4)、然后我们重启php-fpm服务并查看相应的端口,并且通过ps -axu查看相应的进程

(5)、然后我们在192.168.10.14上安装httpd,并且我们要确保其有fcgi模块,否则其无法与后端php-fpm进行交互通信。然后我们来进行配置。我们的配置文件为/etc/httpd/conf.d/vhosts.conf。
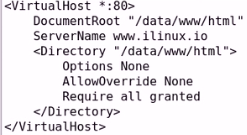
(6)、然后创建测试网页/data/www/html/index.html并启动服务

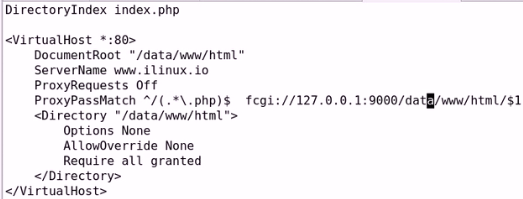
(7)、然后我们配置相应的动态内容反代给php-fpm进程。继续在/etc/httpd/conf.d/vhosts.conf文件中配置。然后再重启服务
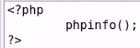
(8)、然后我们编辑/data/www/html/index.php。然后我们访问可以发现访问成功
(9)、我们还可以安装php-xcache包,用来加速php访问,可以提高两到三倍的性能。

 浙公网安备 33010602011771号