60天shell脚本计划-2/12-渐入佳境
--作者:飞翔的小胖猪
--创建时间:2021年2月1日
--修改时间:2021年2月5日
说明
每日上传更新一个shell脚本,周期为60天。如有需求的读者可根据自己实际情况选用合适的脚本,也可在评论区留言提出脚本需求,作者会尽快根据需求编写相关脚本对功能进行实现。
每篇文章包含5个脚本。
总进度:2/12
上一篇脚本链接:https://www.cnblogs.com/Pigs-Will-Fly/p/14333284.html
下一篇脚本链接:https://www.cnblogs.com/Pigs-Will-Fly/p/14380780.html
主要内容
21年2月1日-系统监控脚本(简易)
************************************************************************************************************************************************************************************************************************************
脚本说明
脚本获取Linux操作系统中内存、cpu、根目录及message日志信息,展示当前的系统的资源使用情况。 判断当前系统中是否存在僵尸进程,/var/log/message文件最后100行是否存在错误日志。
文件说明
System_health_check.sh:脚本主体程序文件
脚本主体
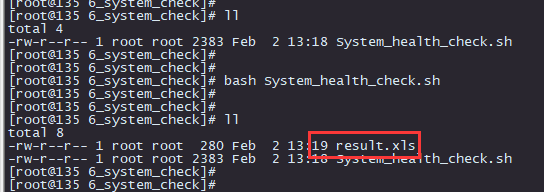
[root@135 6_system_check]# cat System_health_check.sh
#!/bin/bash
#ip地址
ip_address=`ip a|grep -i -A2 'MULTICAST,UP,LOWER_UP' | grep -E -o "(25[0-5]|2[0-4][0-9]|[01]?[0-9][0-9]?)\.(25[0-5]|2[0-4][0-9]|[01]?[0-9][0-9]?)\.(25[0-5]|2[0-4][0-9]|[01]?[0-9][0-9]?)\.(25[0-5]|2[0-4][0-9]|[01]?[0-9][0-9]?)" |grep -E -v "(25[0-5]|2[0-4][0-9]|[01]?[0-9][0-9]?)\.(25[0-5]|2[0-4][0-9]|[01]?[0-9][0-9]?)\.(25[0-5]|2[0-4][0-9]|[01]?[0-9][0-9]?)\.255"  |grep -E '^80|^10|^192' | head -1  `


Total_Swap=`cat /proc/meminfo |grep SwapTotal | awk '{printf ("%d\n",$2/1024)}'`       #结果为一个数字,代表总的Swap值,单位为M
Free_Swap=`cat /proc/meminfo |grep SwapFree | awk '{printf ("%d\n",$2/1024)}'`   #结果为一个数字,代表空闲的Free值,单位为M
#Mem_info=`free -m | awk 'NR==2{print $2,$3,$4,$5,$7}'`
Mem_info=`free -m | awk 'BEGIN { OFS="|"};NR==2{print $2,$3,$4}'`
#只要前面4个字段,total   use   free   share
Cpu_Num=`cat /proc/cpuinfo | grep -i process | wc -l`   #获取逻辑CPU的个数
Avage_five_cpu=`uptime  | sed 's/.*load average: //g'   | sed 's#\,##g'|awk '{print $2}'` #采集5分钟CPU负载情况
System_start_time=`uptime | awk '{print $1}'`   #得开机时间
System_uptime=`uptime |awk -F ',' '{print $1}'  |sed 's#.*up##g'`  #得到运行时常


#查看确认近100行日志是否有告警。
tail -100  /var/log/messages | grep -i -E 'warning|warn|error|crit|alert|emerg|err' &> /dev/null
#cat  /var/log/messages | grep -i -E 'warning|warn|error|crit|alert|emerg|err' &> /dev/null
log_check=`echo $?`

if [[ $log_check -eq 0  ]];then
        log_notice=waring
else
        log_notice=no_waring

fi

echo "hostname | ip_address | Total_Swap  |   Free_Swap |  total_mem| use_mem | free_mem| Cpu_Num |  Avage_five_cpu | zombie | log_notice| System_start_time  |  System_uptime " | awk  -F'|'  'BEGIN { OFS="\t"} ;{ $1=$1 ; print $0} '  > result.xls

if [[ `ps -A -o stat,ppid,pid,cmd | grep -e '^[Zz]'`   ]];then
        echo "`hostname` | $ip_address | $Total_Swap  |   $Free_Swap |  $Mem_info | $Cpu_Num |  $Avage_five_cpu | yes |  $log_notice| $System_start_time  |  $System_uptime "  | awk  -F'|'  'BEGIN { OFS="\t"} ;{ $1=$1 ; print $0} ' >> result.xls
else
        echo "`hostname`  | $ip_address | $Total_Swap  |   $Free_Swap |  $Mem_info | $Cpu_Num |  $Avage_five_cpu |  no   | $log_notice | $System_start_time  |  $System_uptime  "  | awk  -F'|'  'BEGIN { OFS="\t"} ;{ $1=$1 ; print $0} '  >> result.xls
fi
结果
执行命令结果:
生成execl文件格式:

**************************************************************************************************************2021年2月1日脚本结束*****************************************************************************************************************
21年2月2日-一键修改ip地址
************************************************************************************************************************************************************************************************************************************
脚本说明
通过脚本获取当前主机的网口名和网口ip地址,再根据脚本中定义的字典获取到将要修改的新的ip地址,最后调用sed命令对网络配置文件进行修改。
使用脚本时注意由于该脚本为定制编写的在获取当前系统ip和网口名时需要更具自己环境指定。
单台设备修改IP地址时就不要采用该脚本了,单台修改时老老实实的手动修改配置文件嘛 。
文件说明
Batch_edit_add.sh:脚本主体程序文件
脚本主体
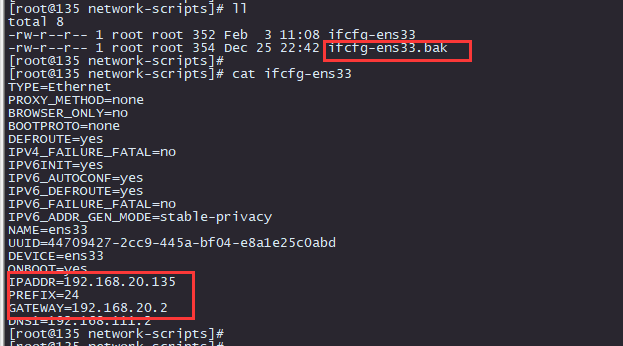
[root@135 7_edit_address]# cat Batch_edit_add.sh
#!/bin/bash
#修改静态路由函数
#该脚本仅仅适用于network的网络,NetworkManager不用这么麻烦。
edit_yw_ip(){
  #获取主机当前接口和ip地址。
  net_ip=`ifconfig | grep 192.168.111. | awk '{print $2}'`
  net_name=`ifconfig | egrep  -B1  '192.168.111.'| grep -i ens | awk -F':' '{print $1}'`

  #define old_ip and new_ip dict
  declare -A dict_ip_b
  dict_ip_b=([192.168.111.4]="192.168.20.4"  \
  [192.168.111.1]="192.168.20.1"  \
  [192.168.111.2]="192.168.20.2"  \
  [192.168.111.135]="192.168.20.135"  \
  [192.168.111.3]="192.168.20.3"  )

  new_ip=${dict_ip_b[$net_ip]}
  echo "This Machine new ip and old ip info:"
  echo "New addres ${new_ip} , old address: $net_ip"

  #开始修改网络配置文件,测试时sed 不要加i参数
  if [ -f /etc/sysconfig/network-scripts/ifcfg-${net_name}.bak ]; then
    cp -p /etc/sysconfig/network-scripts/ifcfg-${net_name} /etc/sysconfig/network-scripts/ifcfg-${net_name}.bak2
  else
    cp -p /etc/sysconfig/network-scripts/ifcfg-${net_name} /etc/sysconfig/network-scripts/ifcfg-${net_name}.bak
  fi

  if [ -f /etc/sysconfig/network-scripts/ifcfg-${net_name}.bak ] ||  [ -f /etc/sysconfig/network-scripts/ifcfg-${net_name}.bak2 ]; then
    sed -i "s/${net_ip}/${new_ip}/" /etc/sysconfig/network-scripts/ifcfg-${net_name}
    sed -i "s/GATEWAY\=192.168.111.2/GATEWAY\=192.168.20.2/" /etc/sysconfig/network-scripts/ifcfg-${net_name}
    if [ $? -eq 0 ];then
      echo "重启网络服务,并修改相关静态路由,测试状态下注释掉了"
      #systemctl restart network
    else
      echo "network config file edit failed,not restart network progroam."
    fi
  else
    echo "文件备份不存在,not change network config file........."
  fi

}

#申明主函数
main(){
  read -p 'Make sure you want to make network configuration changes。Please input YES(y) or NO(n):  ' answer
  if [ $answer == y ] || [ $answer == YES  ];then
    edit_yw_ip
  elif [ $answer == n ] || [ $answer == NO  ];then
    echo "input NO or n,program will exited..................."
    exit 1
  fi
}
#调用主函数
main
结果
执行前展示

执行命令展示

结果文件
**************************************************************************************************************2021年2月2日脚本结束*****************************************************************************************************************
21年2月3日-获取远程主机磁盘信息
************************************************************************************************************************************************************************************************************************************
脚本说明
获取既定主机磁盘根分区使用情况。
文件说明
System_root_mount_check.sh:脚本主体程序文件
配置文件
[root@135 8_get_remote_df]# cat machine_list.txt
192.168.111.11  root   yinwan
192.168.111.12  root   yinwan
192.168.111.124 root   yinwan
脚本主体
[root@135 8_get_remote_df]# cat Get_remote_mount.sh
#!/bin/bash
generate_rsa(){
  #判断是否有密钥对文件没有的化自动生成密钥对。
  if [ ! -f /root/.ssh/id_rsa  ];then
    ssh-keygen -N "" -b 4096 -t rsa -C "`hostname`" -f /root/.ssh/id_rsa &>/dev/null
  else
    echo 'rsa config file exits !! ' >> /var/log/message
  fi
}

send_file_rsa(){
  #发送rsa到远程主机中,如果已经存在则可以忽略,不用执行该函数
  cat machine_list.txt | while read ipaddr  user  passwd
  do
    echo "exec send rsa file to $ipaddr  "  &>/dev/null
    timeout 2 sshpass -p $passwd /usr/bin/ssh-copy-id -i /root/.ssh/id_rsa $user@$ipaddr  &>/dev/null
  done
}


get_remote_df(){
  #远程执行命令把结果置入到临时文件中。
  echo "Ipadress" >> result_ip.txt
  echo "Filesystem           Size  Used Avail Use% Mounted" >> result.txt
  for ipaddr in 192.168.111.11 192.168.111.12 192.168.111.124
  do
    echo "$ipaddr" >> result_ip.txt
    ssh -T $ipaddr df -hP | grep -i /$ >> result.txt
  done
  paste  result_ip.txt  result.txt | awk 'BEGIN { OFS="\t"} ;{ $1=$1 ; print $0} ' > result.xls
  echo -e "Remote Machine / Info:\n`cat result.xls`  "
}


clear_env(){
  #清除执行过后的环境文件
  rm -rf result_ip.txt
  rm -rf result.txt
}


#定义主函数
main(){
  > result_ip.txt
  > result.txt
  generate_rsa
  send_file_rsa
  get_remote_df
  clear_env
}


#调用主函数
main
结果

**************************************************************************************************************2021年2月3日脚本结束*****************************************************************************************************************
21年2月4日-批量修改ipmi用户脚本
************************************************************************************************************************************************************************************************************************************
脚本说明
通过用户之前规划的ipmi密码,写入到指定的配置文件中。脚本循环读取配置文件中的ipmi地址及用户信息等参数实现批量修改ipmi密码,用户密码修改后再测试是否能够使用新的密码连接ipmi口,如果可以连接则把能够连接的结果置入到文件中。
该脚本只作为参考,由于各厂商的产品迭代比较厉害使用脚本前还请先确认每个品牌和型号的用户id号,再根据具体情况加以修改脚本。
文件说明
machine_list.txt:物理主机ipmi表
Batch_edit_ipmi_user.sh:脚本主体程序文件
配置文件
[root@135 9_edit_ipmi_password]# cat machine_list.txt
#ip_addr          manufacturer    user             old_pass          new_pass
192.168.111.3     dell            root             calvin            calvin123456
192.168.111.4     inspur          admin            admin             admin123456
192.168.111.5     hw              root             Huawei_123        Huawei_12345
192.168.111.6     ibm             USERID           PASSW0RD          PASSW0RD12345
192.168.111.7     hp              administrator    hp123456          hp123456789
192.168.111.8     hw              root             Huawei_123        Huawei_12345
192.168.111.9     ibm             USERID           PASSW0RD          PASSW0RD12345
192.168.111.10    hw              administrator    hp123456          hp123456789
脚本主体
[root@135 9_edit_ipmi_password]# cat edit_ipmi_password.sh
#!/bin/bash
edit_pass(){
cat machine_list.txt |while read ip_addr type  user old_pass  new_pass
do
  echo $ip_addr | grep '\#' &>/dev/null
  if [ $? -eq 0 ];then
    echo "注释掉了"
    continue
  fi
  echo "Ip Address Info: $ip_addr"
  case $type in
    'dell')
     echo "this type dell"
     ipmitool -H ${ip_addr}  -I lanplus -U ${user} -P ${old_pass} user set password  1 ${new_pass}
     ;;

    'hw')
     echo "this type hw"
     ipmitool -H ${ip_addr}  -I lanplus -U ${user} -P ${old_pass} user set password  2 ${new_pass}
     ;;

    'inspur')
     echo "this type inspur"
     ipmitool -H ${ip_addr}  -I lanplus -U ${user} -P ${old_pass} user set password  1 ${new_pass}
     ;;

    'ibm')
     echo "this type ibm"
     ipmitool -H ${ip_addr}  -I lanplus -U ${user} -P ${old_pass} user set password  2 ${new_pass}
     ;;

    'hp')
     echo "this type hp"
     ipmitool -H ${ip_addr}  -I lanplus -U ${user} -P ${old_pass} user set password  1 ${new_pass}
     ;;
     *)
     echo "Sorry this Model not supported for program."
     ;;
  esac
done
}

check_new_pass_status(){
  > result_eidt_pass.txt
  cat machine_list.txt |while read ip_addr type  user old_pass  new_pass
  do
    timeout 2 ipmitool -H ${ip_addr}  -I lanplus -U ${user} -P ${new_pass} user list
    if [ $? -eq 0 ];then
      echo "${ip_addr} edit ${user} password succeed"  >> result_eidt_pass.txt
    else
      echo "${ip_addr} edit ${user} password failed"   >> result_eidt_pass.txt
    fi
  done
}

result_file_info(){
  echo "######################ipmi地址修改结果统计######################"
  total_n=`cat result_eidt_pass.txt|wc -l`
  success_n=`cat result_eidt_pass.txt | grep  success$|wc -l`
  failed_n=`cat result_eidt_pass.txt | grep failed$|wc -l`
  echo -e "statistics:\n待修改主机数:${total_n}\n成功修改数:${success_n}\n失败修改数:${failed_n}"
  echo "######################ipmi地址修改结果统计结束######################"
}

mian(){
 edit_pass
 check_new_pass_status
 result_file_info
}


#IBM USERID账户id为 2
#ipmitool -H 192.168.111.1  -I lanplus -U root -P old_password user set password  2 new_password
#华为 root账户id为 2
#ipmitool -H 192.168.111.1  -I lanplus -U root -P old_password user set password  2 new_password
#浪潮 admin账户id为 1
#ipmitool -H 192.168.111.1  -I lanplus -U root -P old_password user set password  1 new_password
#dell root账户id为 1
#ipmitool -H 192.168.111.1  -I lanplus -U root -P old_password user set password  1 new_password
#hp   root账户id为 2     admin账户id为 1
#ipmitool -H 192.168.111.1  -I lanplus -U root -P old_password user set password  1 new_password
#查看用户id
#ipmitool -H 192.168.111.1  -I lanplus -U root -P password user list
**************************************************************************************************************2021年2月4日脚本结束*****************************************************************************************************************
21年2月5日-ping判断系统类型
************************************************************************************************************************************************************************************************************************************
脚本说明
脚本读取配置文件中的主机ip地址列表,使用ping命令截取返回ttl值根据已知的规则判断系统大致类型。
读者可以根据自己的了解在case中添加对应的行实现对更多系统的识别。
文件说明
machine.txt:配置文件
Dis_host_system.sh:脚本主体脚本
配置文件
[root@135 10_Dis_Host_Systems]# cat machine.txt
192.168.111.1
192.168.111.2
192.168.111.11
192.168.111.12
192.168.111.135
192.168.111.200
192.168.300.12
脚本主体
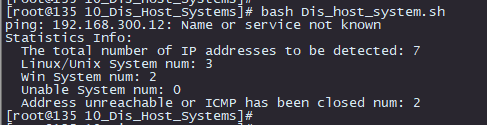
[root@135 10_Dis_Host_Systems]# cat Dis_host_system.sh
#!/bin/bash


Dis_host_system(){
  > tmp_result.txt
  for i in `cat machine.txt`
  do
    ttl_num=`timeout 1 ping -c 1 ${i} | grep 'ttl='  | awk -F'ttl=' '{print $2}'| awk  '{print $1}'`
    timeout 1 ping -c 1 ${i} &>/dev/null
    if [ $? -eq 0  ];then
      case ${ttl_num} in
        64)
         echo "This ${i} System os Linux" >> tmp_result.txt
         ;;
        128)
         echo "This ${i} System os Windows NT/2000/xp And later versions" >> tmp_result.txt
         ;;
        32)
         echo "This ${i} System os Windows 98" >> tmp_result.txt
         ;;
        255)
         echo "This ${i} System os UNIX/Linux" >> tmp_result.txt
         ;;
         *)
         echo "Sorry ${i} Unable to identify the operating system" >> tmp_result.txt
         ;;
      esac
    else
      echo "The ${i} address is unreachable or ICMP has been closed" >> tmp_result.txt
    fi
  done
}


statistics(){
  total_num=`cat tmp_result.txt|wc -l`
  Linux=`cat tmp_result.txt | grep Linux|wc -l`
  Win=`cat tmp_result.txt | grep Windows|wc -l`
  Unable=`cat tmp_result.txt | grep Unable|wc -l`
  not_ping=`cat tmp_result.txt | grep unreachable|wc -l`
  echo  -e "Statistics Info:\n  The total number of IP addresses to be detected: ${total_num}\n  Linux/Unix System num: ${Linux}\n  Win System num: ${Win}\n  Unable System num: ${Unable}"
  echo "  Address unreachable or ICMP has been closed num: ${not_ping}"
  rm -rf tmp_result.txt
}

main(){
Dis_host_system
statistics
}

main
结果
**************************************************************************************************************2021年2月5日脚本结束*****************************************************************************************************************

 浙公网安备 33010602011771号