60天shell脚本计划-1/12-渐入佳境
--作者:飞翔的小胖猪
--创建时间:2021年1月27日
--修改时间:2021年2月1日
说明
每日上传更新一个shell脚本,周期为60天。如有需求的读者可根据自己实际情况选用合适的脚本,也可在评论区留言提出脚本需求,作者会尽快根据需求编写相关脚本对功能进行实现。
每篇文章包含5个脚本。
总进度:1/12
上一篇脚本链接:null
下一篇脚本链接:https://www.cnblogs.com/Pigs-Will-Fly/p/14356727.html
主要内容
21年1月27日-批量ping脚本
************************************************************************************************************************************************************************************************************************************
脚本说明
脚本读取用户自定义的ip地址文件,依次ping读取到的ip地址,并把结果置入到指定的文件中。同时判断该次ping过程中是否存在不能ping通的地址,如果存在则主动给用户发送邮件。
使用脚本时配置文件、脚本文件及返回日志文件请放置在同一目录下。
文件说明
ping_check.sh:脚本主体程序文件
ip_list.txt :ip地址列表文件
result_ping_check.log:ping结果返回日志,每次执行都会被覆盖
配置文件
配置文件采用一行一个ip地址的形式进行添加,ip地址前加#的表示不执行ping,如示例中的192.168.111.13这一行
[root@135 1_ping_check]# cat ip_list.txt
192.168.111.11
192.168.111.12
192.168.111.124
192.168.111.135
#192.168.111.13
192.168.111.300
192.168.111.301
脚本主体
[root@135 1_ping_check]# cat ping_check.sh
#!/bin/bash
#Initialize the result file
echo "" > result_ping_check.log

#Executing shell ping command
#循环读取ip_list.txt文件,如果读取到包含#的行则跳过。没有包含#号的行则执行ping命令。
cat ip_list.txt | while read ip
do
  echo $ip | grep '\#' &>/dev/null
  if [ $? -eq 0 ];then
    echo "注释掉了" &> /dev/null
  else
    timeout 1 ping -c 1 $ip &>/dev/null
      if [ $? -eq 0 ];then
              echo "$ip success" >> result_ping_check.log
      else
              echo "$ip faile" >> result_ping_check.log
      fi
  fi
done

#Cleaning result data
#判断结果文件是否存在有faile的行如果没有则表示没有ping不通的。
tmp_result=`cat result_ping_check.log | grep faile`
if [ `expr length "$tmp_result"` -eq 0 ];then
        echo "`date` 此次没有ip ping检测不通过。" >> /var/log/message
else
        echo "$tmp_result" | mail -s "Ip address detection failed"  xxxxxx@163.com xxxxxx@qq.com
fi
结果
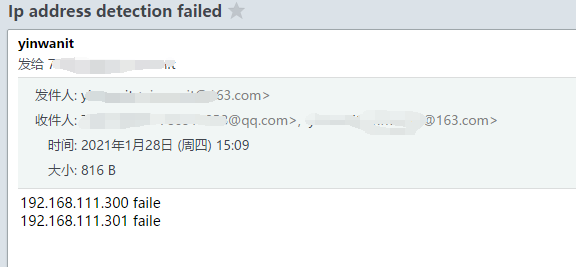
**************************************************************************************************************2021年1月27日脚本结束*****************************************************************************************************************
21年1月28日-网址检测脚本
************************************************************************************************************************************************************************************************************************************
脚本说明
脚本循环读取用户在数组中定义的网页地址,通过wget命令来访问指定的网页。根据访问的结果生成对应的sql语句,并插入到sql文件中,再一次性的把数据插入到数据库。同时把生成的sql文件上传到指定的ftp上。
如果待检测的网页较多则不建议使用在脚本中定义数组的方式实现,可以单独拿出来一个文件保存待检测的web地址。
文件说明
web_check.sh:脚本主体文件
result_sql_stat_file.sql:生成的sql语句文件
数据表结构
create table check_host_web_status(
id int(10) primary key not null auto_increment,
url varchar(30),
time datetime,
status int(4)
)
脚本主体
[root@lvs 2_web_check]# cat web_check.sh
#!/bin/bash
#重置sql语句保存文件
> result_sql_stat_file.sql


#循环测试网页,并把结果置入到sql文件中。
for i in 'http://www.baidu.com/' 'https://www.cnblogs.com/'
do
/usr/bin/timeout 1 wget --no-cache --spider $i &> /dev/null
  if [[ $?  -eq 0 ]];then
     echo " status ok !!  $i"
     echo "insert into check_host_web_status(url,time,status) values('$i',now(),1);" >> result_sql_stat_file.sql
  else
     echo " status faile !!  $i"
     echo "insert into check_host_web_status(url,time,status) values('$i',now(),0);" >> result_sql_stat_file.sql
  fi
done
sleep 1
echo 'commit;'  >> result_sql_stat_file.sql


#数据置入到数据库中
mysql -ulvan -plvan123456  testdb < result_sql_stat_file.sql
if [ $? -eq 0 ];then
   echo "`date` insert data insert into db success!" >> /var/log/messages
else
   echo "`date` insert data insert into db faile!" >> /var/log/messages
fi

#数据上传到指定的ftp中(可选)
ftp -v -i -n<<!
open 192.168.111.135
user lvan lvan123456
binary
prompt
passive
put result_sql_stat_file.sql
close
bye
!
结果
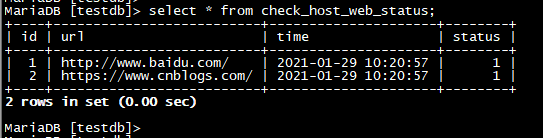
**************************************************************************************************************2021年1月28日脚本结束*****************************************************************************************************************
21年1月29日-bond配置脚本
************************************************************************************************************************************************************************************************************************************
脚本说明
脚本通过读取用户自定义的参数配置bond。如果用户不指定参数时默认参数为 bond名:bond0 子接口1:eth0 子接口2: eth1 bond模式:1 ip地址:192.168.1.1
为了保险起见,脚本最终生成的文件都是bak结尾的。用户需要手动在文件生成后修改文件名或在脚本中取消掉bak。
文件说明
bond_add.sh:脚本主体文件
脚本主体
[root@135 3_bond_edit]# cat bond_add.sh
#!/bin/bash
#自动生成bond配置文件,执行脚本时需要指定 bond端口  子接口1 子接口2  bond模式  bond后ip地址,也可以不输入保持默认命令范例:
#edit_bond  bond0  eth0 eth1 1 192.168.1.1

#如果操作是7以上的先关闭NetworkManager程序。
close_NetworkManager(){
  cat /proc/version | egrep -i "centos7/redhat7" &>/dev/null
  if [ $? -eq 0 ];then
          echo "this is system Version  is higher than version 7"
  else
          echo "this is system Version  is lower than version 7 "
  fi
}

#添加bond的主体函数
edit_bond(){
  #初始化待调用参数
  aa=${1:-bond0}
  bb=${2:-eth0}
  cc=${3:-eth1}
  dd=${4:-1}
  ee=${5:-192.168.1.1}
  #备份原有的文件,该功能还未写完。
  #判断是否存在ifcfg-bond0文件,如果存在则退出并请用户检查是否存在配置冲突。
  if [ -f /etc/sysconfig/network-scripts/ifcfg-$aa ];then
          echo "The bond file exists. Please confirm if there is a configuration conflict."
          exit 2
  else
          echo "The bond file not exists.You can do it later."
  fi

  if [ -f /etc/sysconfig/network-scripts/ifcfg-$bb ];then
          echo "this  $bb  file exits"
  else
          echo "this  $bb  file not exits."
  fi

  if [ -f /etc/sysconfig/network-scripts/ifcfg-$cc ];then
          echo "this  $cc file exits"
  else
          echo "this  $cc file not exits."
  fi
  #备份原文件结束,还未完成。

  if  echo $@ | grep -i 'help' &> /dev/null  ;then
        echo -e "edit_bond: usage: edit_bond [bond_file_name] [sub_interface_name_1] [sub_interface_name_2] [mode_type] [ip_address]"
        echo -e "default var:\n      bond_file_name=bond \n      sub_interface_name_1=eth0 \n      sub_interface_name_2=eth1 \n      mode_type=1"
  elif [ $# -le 5  ];then
        echo '**************************************************************************************************'
        echo '################################## bond config start #############################################'
        echo "input values: ifcfg-$aa    ifcfg-$bb    ifcfg-$cc    mode-$dd"echo '################################## add bond config   #############################################'
        echo -e "DEVICE=$aa\nONBOOT=yes\nBOOTPROTO=static\nIPADDR=$ee\nNETMASK=255.255.255.0\nGATEWAY=$ee\nBONDING_OPTS=\"mode=$dd miimon=100\"\nDNS1=8.8.8.8\nDNS2=114.114.114.114 " > /etc/sysconfig/network-scripts/ifcfg-${aa}.bak
        echo '################################ add subinterface 1/2 ############################################'
        echo -e "DEVICE=$bb\nMASTER=$aa\nSLAVE=yes\nBOOTPROTO=none\nONBOOT=yes"  > /etc/sysconfig/network-scripts/ifcfg-${bb}.bak
        echo '################################ add subinterface 2/2 ############################################'
        echo -e "DEVICE=$cc\nMASTER=$aa\nSLAVE=yes\nBOOTPROTO=none\nONBOOT=yes" > /etc/sysconfig/network-scripts/ifcfg-${cc}.bak
        echo '################################ add bond config end  ############################################'
        echo '**************************************************************************************************'
  else
        echo -e "command exec error: \n      too many parameters ,more than 5 parameters \nexec command: edit_bond --help ,get help !!!"
  fi
}

#主函数
main(){
  edit_bond
}

#调用执行主函数
main
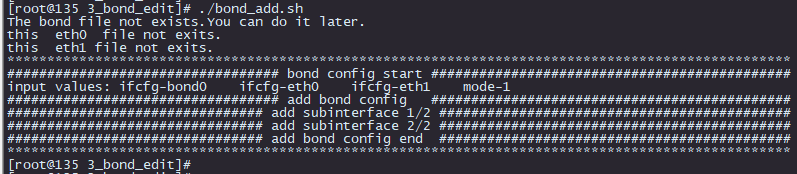
结果
脚本执行提示:
文件结果:
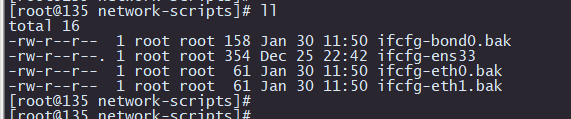
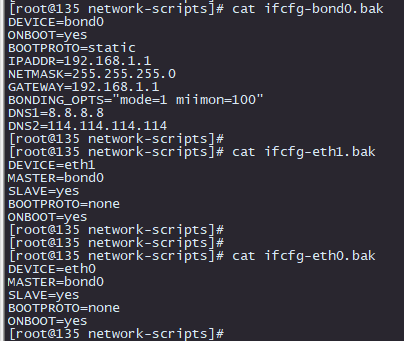
**************************************************************************************************************2021年1月29日脚本结束*****************************************************************************************************************
21年1月30日-乘法表脚本
************************************************************************************************************************************************************************************************************************************
脚本说明
用户根据用户输入的值生成乘法口诀表,如果用户不输入值则默认输出99乘法表。
文件说明
cic_disp.sh:脚本主体文件
脚本主体
[root@135 4_chenfa]# vim cic_disp.sh
#!/bin/bash
read -p "Please input the num for Maximum value in the multiplication table: " max_n


display_cic(){
  #判断用户是否输入值,用户没有输入值则提示使用默认值,用户输入则提示使用用户输入的值。
  #同时判断用户输入的值是否为0,输入0则退出。
  if [ -z "$max_n" ];then
    echo "user not input values,The program will use the default values : 9 "
  else
    if [ $max_n -eq 0  ];then
      echo "The input value cannot be 0 "
      exit 1
    else
      echo "user input max_num value: $max_n"
    fi
  fi
  max_num=${max_n:-9}


  #生成乘法口诀表程序
  echo "this is value: $max_num"

  for i in `seq 1 $max_num`
  do
    for e in `seq 1 $i`
    do
      let num=i*e
      echo -en "$e * $i = $num \t"
    done
    echo ""
  done
}

#定义主函数
main(){
  display_cic
}

#调用主函数
main
结果
默认不输入值:

输入自定义值:

**************************************************************************************************************2021年1月30日脚本结束*****************************************************************************************************************
21年1月31日-批量创建用户
************************************************************************************************************************************************************************************************************************************
脚本说明
脚本通过配置文件读取待创建的用户参数,实现批量的创建用户并设置密码的功能。最后把创建结果置入到同级目录下的result_user.log文件中。
使用脚本时请注意配置文件和主体脚本脚本必须放置在同一目录中。
文件说明
user_list.txt:待创建用户列表
Batch_Create_Users.sh:脚本主体文件
result_user.log:用户创建返回文件
配置文件
每一行为一个待创建的用户,第一列为用户名 第二列为密码 第三列为组名。 行首加#表示注释。
密码和组名可以为空。如果密码为空时默认密码为123456,用户组不指定时默认和用户同名。
[root@135 5_add_user]# cat user_list.txt
#user_name     user_password    group_name
lvan           123_456#8         lvan
wan            Huawei_45#         wan
tom            12345678         tom
jack           12345678         jone
jone
xiaohong       12345678
脚本主体
[root@135 5_add_user]# cat Batch_Create_Users.sh
#!/bin/bash
read_file(){
  > result_user.log
  line_num=1
  echo -e  "Notice:\n1.If no user group name is specified, it will have the same name as the user.\n2.Default password 123456 if no password is specified in the file.\n"
  while read user_name user_passwd group_name
  do
    echo "Read line $line_num"
    #行首有#表示该行已经注释掉了
    if echo $user_name| egrep -i '^#' &>/dev/null;then
      #echo "这一行注释掉了,跳过这行不写."
      continue
    fi
    #初始化收到的参数
    group_name=${group_name:-${user_name}}
    user_passwd=${user_passwd:-123456}

    #判断该用户是否已经存在,存在则退出该次循环并记录到日志中。
    if id ${user_name} &>/dev/null;then
            echo "exist user $user_name and cannot be created!!!!"   >> result_user.log
            continue
    fi

    #调用创建用户的函数创建用户
    if cat /etc/group | awk -F':' '{print $1}' | grep  ^"${group_name}"$ &>/dev/null ;then
       #如果存在组名直接指定用户名和组名创建就行了。
       useradd -g ${group_name}  ${user_name} &>/dev/null
       if [ $? -eq  0 ];then
               echo  ${user_passwd} | passwd --stdin ${user_name} &>/dev/null
               echo "success create user $user_name ,group_name $group_name , password $user_passwd   !!"  >> result_user.log
       else
               echo "failed create user $user_name !!"  >> result_user.log
       fi
    else
       #如果用户组不存。
       #echo "System not exits  $group_name group_name"
       groupadd ${group_name}
       useradd -g ${group_name}  ${user_name} &>/dev/null
       if [ $? -eq 0 ];then
               echo  ${user_passwd} | passwd --stdin ${user_name} &>/dev/null
               echo "success create user $user_name ,group_name $group_name , password $user_passwd   !!"  >> result_user.log
       else
               echo "failed create user $user_name !!"  >> result_user.log
       fi
    fi
  let line_num=$line_num+1
done < user_list.txt
}

#统计用户创建结果,输出到屏幕
result_stat(){
  echo "######################创建结果统计######################"
  success_n=`cat result_user.log | grep  ^success|wc -l`
  failed_n=`cat result_user.log | grep ^failed|wc -l`
  exits_n=`cat result_user.log | grep ^exist|wc -l`
  user_n=`cat result_user.log | wc -l`
  echo -e "statistics:\n待创建用户数:${user_n}\n成功创建数:${success_n}\n失败创建数:${failed_n}\n已存在用户数:${exits_n}"
  echo "######################结果统计结束######################"
}

#定义主函数
main(){
  read_file
  result_stat
}

#调用主函数
main
结果
执行结果:
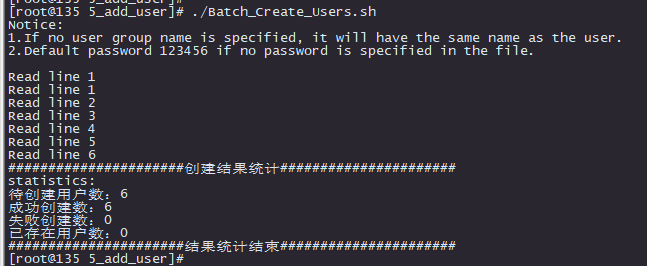
返回文件结果:

**************************************************************************************************************2021年1月31日脚本结束*****************************************************************************************************************

 浙公网安备 33010602011771号