2023数据采集与融合技术实践作业3
2023数据采集与融合技术实践作业3
作业的gitee仓库链接:https://gitee.com/PicaPicasso/crawl_project.git
1.作业
1.1作业过程
-
要求:指定一个网站爬取这个网站的所有图片,如中国气象网,使用scrapy框架分别实现单线程和多线程爬取
-
输出信息:将下载的url信息在控制台输出,并将下载的图片存储在images子文件当中,并给出截图
-
(作业1的博客写好后没保存,大虐。最后只列了主要的步骤,类似的步骤可以参考作业2、3两题。)
1.1.1 在终端分别执行如下指令创建工程,并在其spiders子目录下创建爬虫文件weather.py
cd D:\笔记\大三上\数据采集作业\数据采集实践\作业3
scrapy startproject weatherPro
cd weatherPro
scrapy genspider weather http://www.weather.com.cn/
1.1.2 改写item.py,设置要爬取的字段
import scrapy
class WheatherItem(scrapy.Item):
    number = scrapy.Field()
    pic_url = scrapy.Field()
1.1.3 编写爬虫代码weather.py
import scrapy
import re
from wheather.items import WheatherItem


class WeatherSpider(scrapy.Spider):
    name = 'weather'
    allowed_domains = ['www.weather.com.cn']
    start_urls = ['http://www.weather.com.cn/']

    count = 0
    total = 0

    def parse(self, response):
        html = response.text
        # 获取所有网页的的连接
        urlList = re.findall('<a href="(.*?)" ', html, re.S)
        for url in urlList:
            self.url = url
            try:
                yield scrapy.Request(self.url, callback=self.picParse)

            except Exception as e:
                print("err:", e)
                pass

            # 设定爬取6页的图片即可
            if (self.count >= 6):
                break

    def picParse(self, response):

        # 找到所有的图片
        imgList = response.xpath("//img/@src")
        # imgList = re.findall(r'<img.*?src="(.*?)"', response.text, re.S)
        for k in imgList:
            k = k.extract()
            # 最多106张图片
            if self.total > 106:
                return
            try:
                item = WheatherItem()
                item['pic_url'] = k
                item['number'] = self.total
                self.total += 1
                yield item
            except Exception as e:
                print(e)
                # pass
1.1.4 单线程的pipeline.py
import urllib.request

def download(url,count):
    headers={
    "User-Agent":"Mozilla/5.0 (Windows NT 10.0; Win64; x64) AppleWebKit/537.36 (KHTML, like Gecko) Chrome/117.0.0.0 Safari/537.36"
    }
    try:
        if(url[len(url)-4]=="."):#获取文件后缀名
            ext=url[len(url)-4:]
        else:
            ext=""
        req =urllib.request.Request(url,headers=headers)
        data=urllib.request.urlopen(req,timeout=15)
        data=data.read()
        with open(".\\images\\"+str(count)+ext,"wb") as fp:
            fp.write(data)
        print("downloaded "+str(count)+ext)

    except Exception as err:
         print(err)

class WheatherPipeline:
    def open_spider(self, spider):
        pass
    def process_item(self, item, spider):
        img_url = item['pic_url']
        number = item['number']
        download(img_url,number)
        return item
    def close_spider(self,spider):
        pass
1.1.5 多线程的Pipeline.py
import urllib.request

def download(url,count):
    headers={
    "User-Agent":"Mozilla/5.0 (Windows NT 10.0; Win64; x64) AppleWebKit/537.36 (KHTML, like Gecko) Chrome/117.0.0.0 Safari/537.36"
    }
    try:
        if(url[len(url)-4]=="."):#获取文件后缀名
            ext=url[len(url)-4:]
        else:
            ext=""
        req =urllib.request.Request(url,headers=headers)
        data=urllib.request.urlopen(req,timeout=15)
        data=data.read()
        with open(".\\images\\"+str(count)+ext,"wb") as fp:
            fp.write(data)
        print("downloaded "+str(count)+ext)

    except Exception as err:
         print(err)

class WheatherPipeline:

    def open_spider(self, spider):
        pass
        # self.threads=[]
        # self.count=0

    def process_item(self, item, spider):
        img_url = item['pic_url']
        number = item['number']
        T = threading.Thread(target=download, args=(img_url, number))
        T.setDaemon(False)
        T.start()
        self.threads.append(T)
        self.count += 1
        return item

    def close_spider(self,spider):
         for thread in self.threads:
             thread.join()
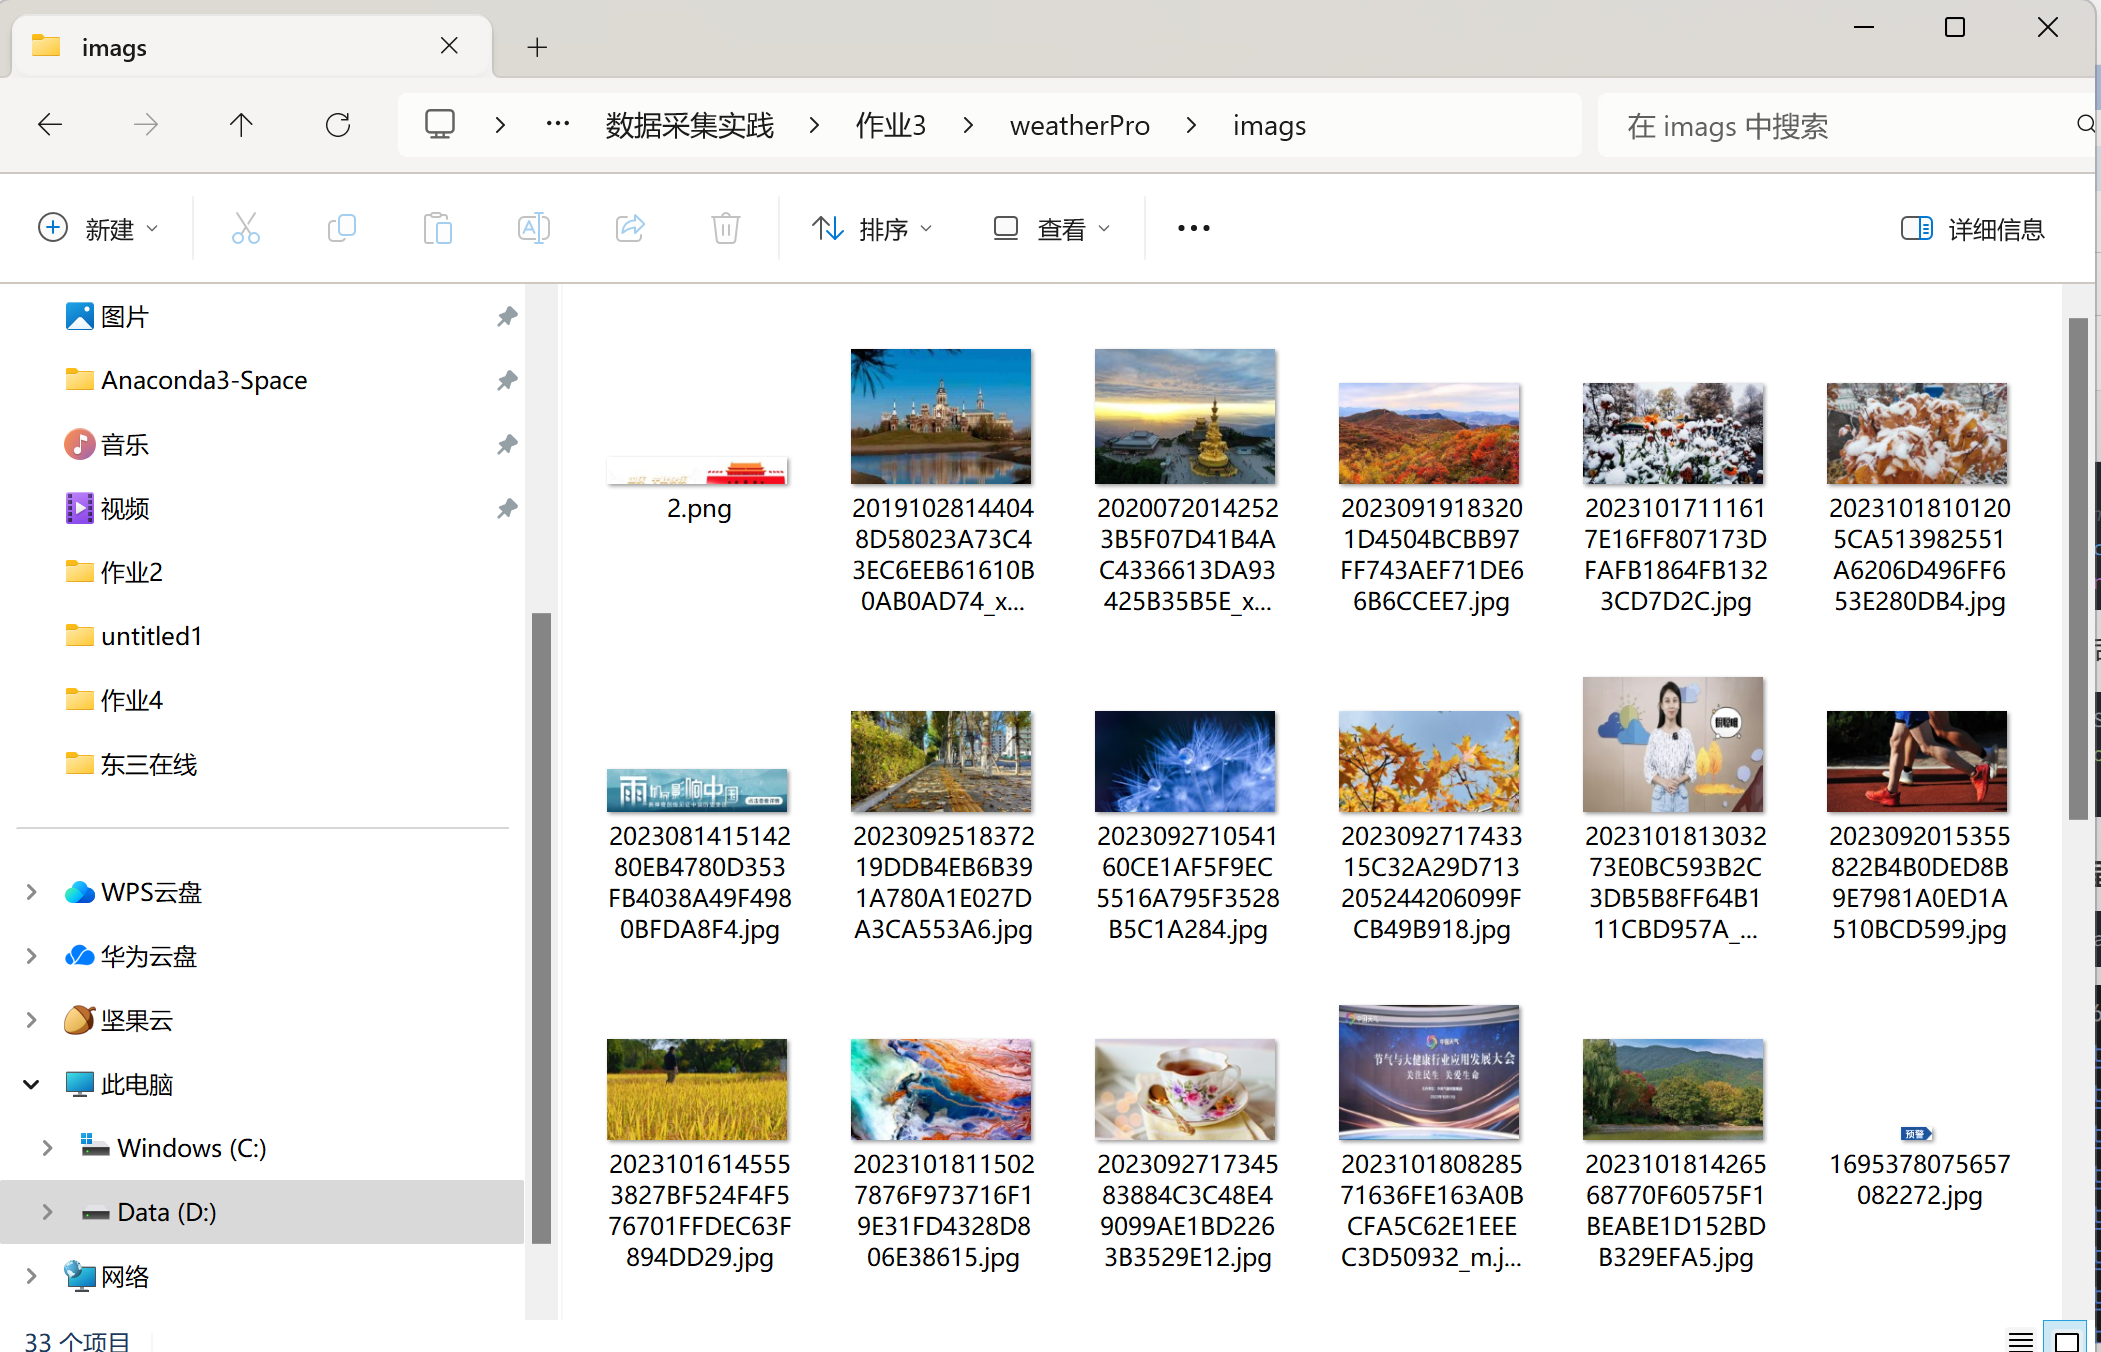
结果截图:
1.2作业心得
1.多线程确实极大提升了爬取效率。
2.scrapy初上手。
3.后面了解到scrapy中专门用于图像存储的ImagesPipeline类,于是在此尝试了下
1.2.1 改写settings.py(进行UA伪装)
ROBOTSTXT_OBEY = False
USER_AGENT = 'Mozilla/5.0 (Macintosh; Intel Mac OS X 10_12_0) AppleWebKit/537.36 (KHTML, like Gecko) Chrome/74.0.3729.169 Safari/537.36'
LOG_LEVEL = 'ERROR'
1.2.2 改写item.py,设置要爬取的字段
import scrapy


class WeatherproItem(scrapy.Item):
    number = scrapy.Field()
    pic_url = scrapy.Field()
1.2.3改写weather.py,进行数据解析(记得注释掉allow_domain)
由于下一步进行持久化存储时用到了scrapy中专门用于图像存储的ImagesPipeline类,这一步只需将图片的src封装给item,提交给管道后会自动向src发起请求下载图片至指定位置。
import scrapy,re
from weatherPro.items import WeatherproItem
class WeatherSpider(scrapy.Spider):
name = "weather"
#allowed_domains = ["www.weather.com.cn"]
start_urls = ["http://www.weather.com.cn/"]
def parse(self, response):
# 构造正则表达式,得到图片所对应的url
obj = re.compile(r'img src="(.*?)"', re.S)
srclist = obj.findall(response.text)
for src in srclist:
item=WeatherproItem()
item['src']=src
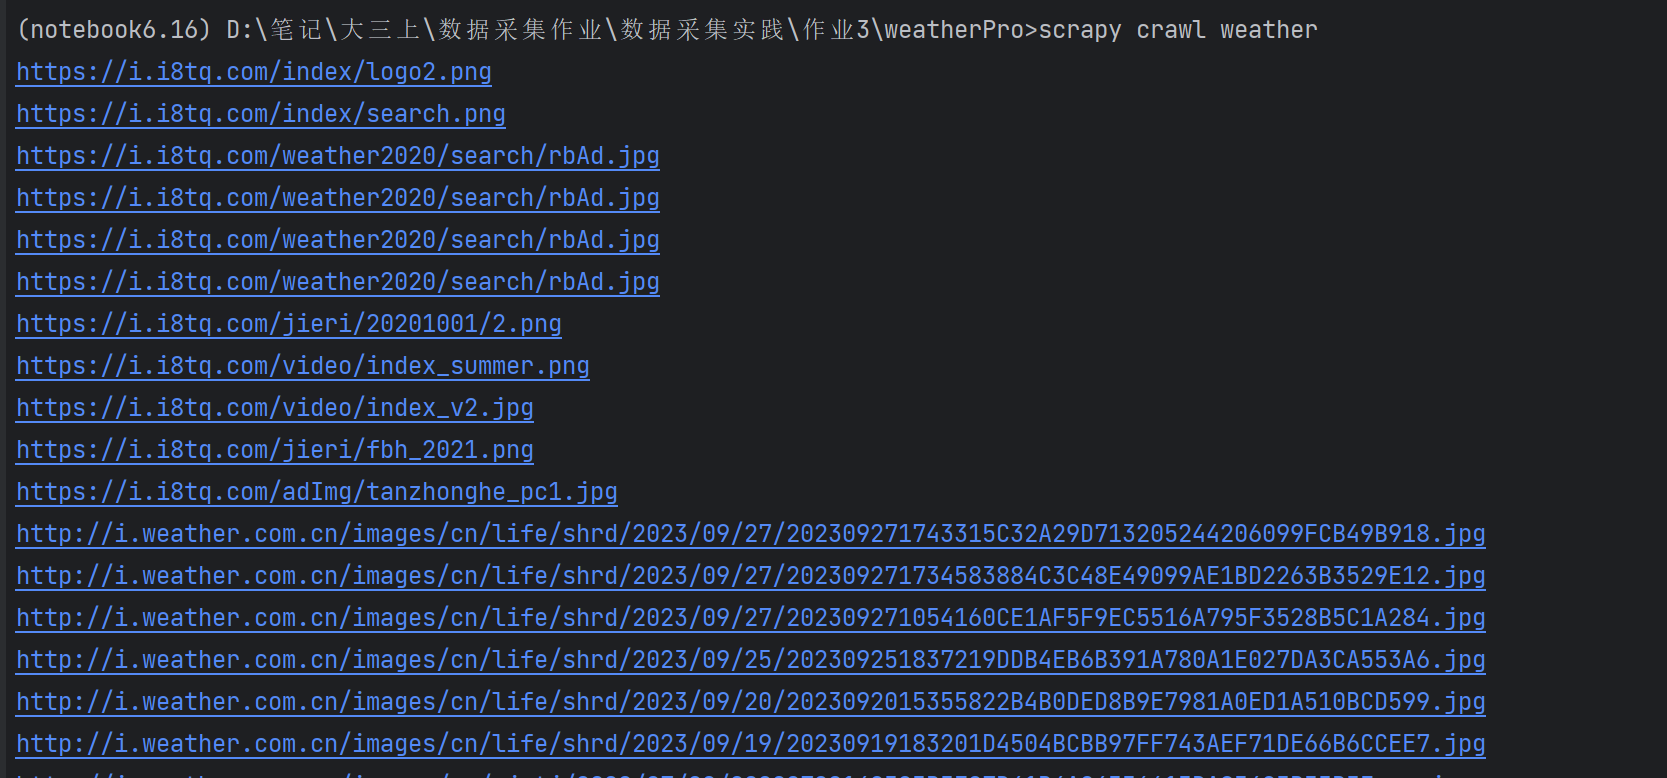
print(src)
yield item
1.2.4改写pipeline.py,进行数据持久化存储
from scrapy.pipelines.images import ImagesPipeline
import scrapy

class imgsPipeLine(ImagesPipeline):
    # 重写父类ImagesPipeline的三个方法

    # 就是可以根据图片地址进行图片数据的请求
    def get_media_requests(self, item, info):
        yield scrapy.Request(item['src'])  # yield手动发请求

    # 指定图片存储的路径
    def file_path(self, request, response=None, info=None):  # request就是刚才手动发请求,请求到的对象
        imgName = request.url.split('/')[-1]
        return imgName

    # 在setting.py中增加一行IMAGES_STORE ='./imgs'
    def item_completed(self, results, item, info):
        return item  # 返回给下一个即将被执行的管道类,若没有下一个执行需执行的管道类,可以不重写该方法
编写完管道类之后,要在setting.py中开启相应的管道类,即ITEM_PIPELINES
ITEM_PIPELINES = {
   "weatherPro.pipelines.imgsPipeLine": 300,
}
1.2.5 执行工程:
scrapy crawl spiderName
2.作业
2.1作业过程
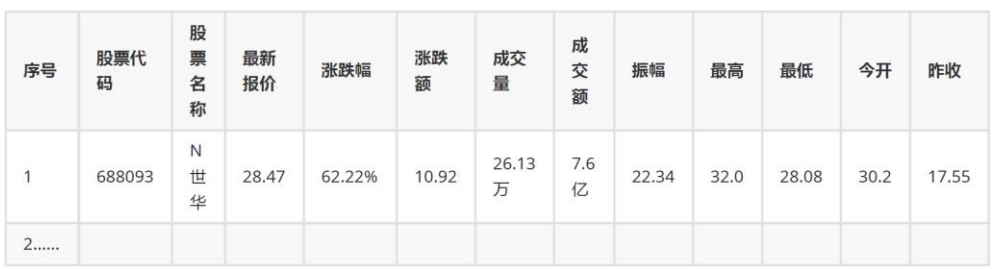
- 要求:熟练掌握scrapy中的item,pipeline 数据序列化输出方法;Scrapy+Xpath+MySQL数据库存储技术路线爬取股票先关信息(东方财富网:https://www.eastmoney.com/)
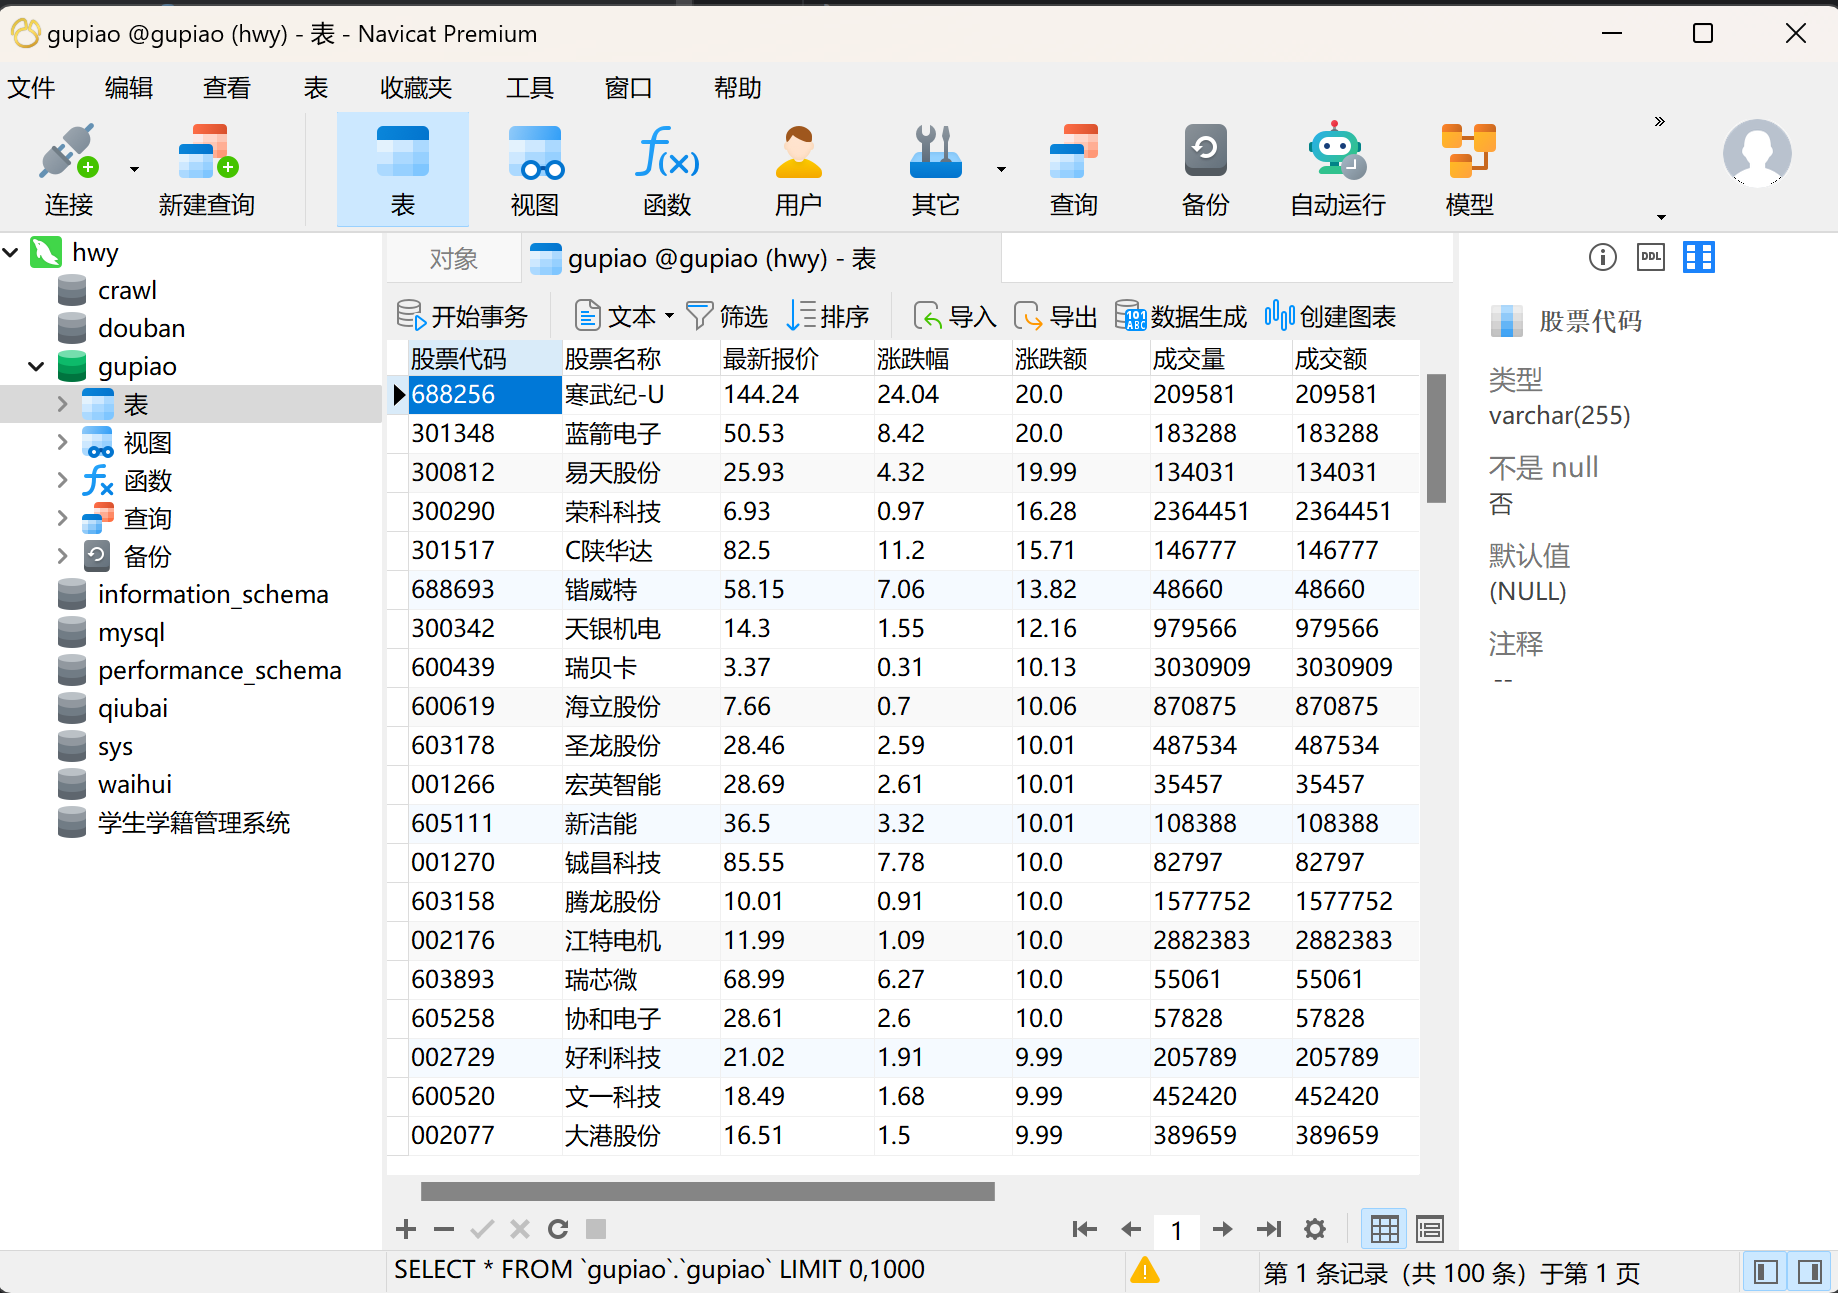
- 输出信息:MySQL数据库存储和输出格式如下,表头应该是英文名命名,自定义设计
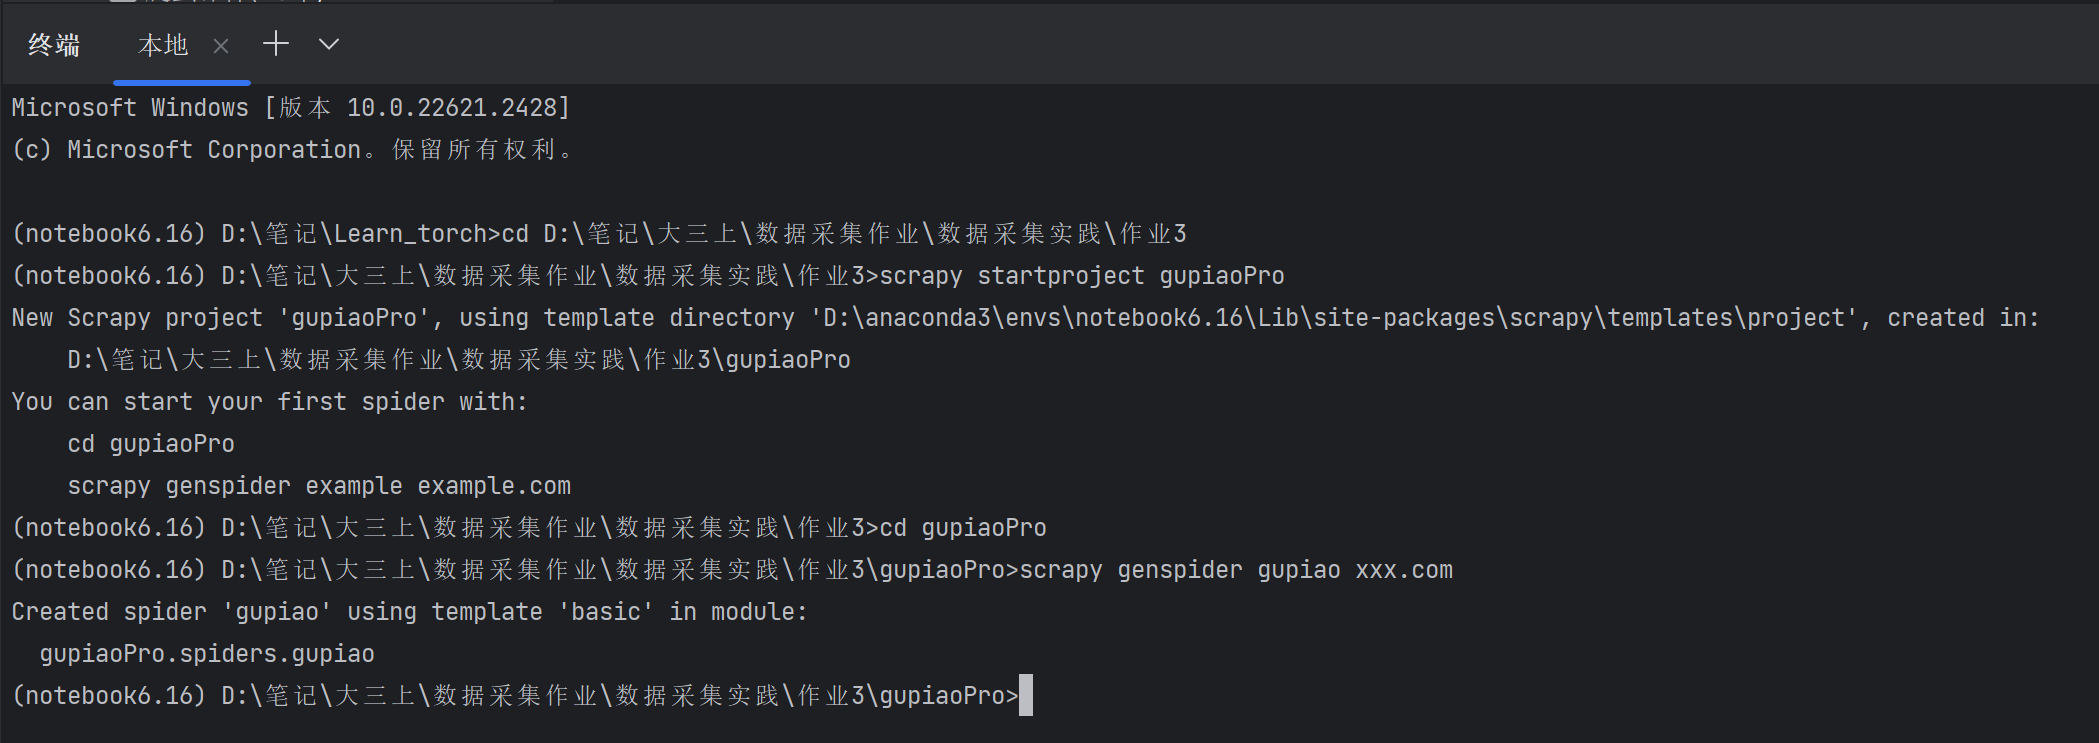
2.1.1在终端创建工程并在其spiders子目录下创建爬虫文件gupiao.py
在终端分别执行如下指令:
cd D:\笔记\大三上\数据采集作业\数据采集实践\作业3
scrapy startproject gupiaoPro
cd gupiaoPro
scrapy genspider gupiao
2.1.2 改写settings.py(进行UA伪装)
ROBOTSTXT_OBEY = False
USER_AGENT = 'Mozilla/5.0 (Macintosh; Intel Mac OS X 10_12_0) AppleWebKit/537.36 (KHTML, like Gecko) Chrome/74.0.3729.169 Safari/537.36'
LOG_LEVEL = 'ERROR'
2.1.3 改写item.py,设置要爬取的字段
import scrapy

class GupiaoproItem(scrapy.Item):
    # define the fields for your item here like:
    # name = scrapy.Field()
    code=scrapy.Field()
    name=scrapy.Field()
    latestprice=scrapy.Field()
    change_amount=scrapy.Field()
    Rise_and_fall=scrapy.Field()
    trading_volume=scrapy.Field()
    turnover_value=scrapy.Field()
    amplitude=scrapy.Field()#振幅
    max=scrapy.Field()
    min=scrapy.Field()
    open_today=scrapy.Field()
    received_yesterday=scrapy.Field()
    pass
2.1.4改写gupiao.py,进行数据解析(记得注释掉allow_domain)
由于下一步进行持久化存储时用到了scrapy中专门用于图像存储的ImagesPipeline类,这一步只需将图片的src封装给item,提交给管道后会自动向src发起请求下载图片至指定位置。
import scrapy
from gupiaoPro.items import GupiaoproItem
import json


class GupiaoSpider(scrapy.Spider):
    name = "gupiao"
    # allowed_domains = ["xxx.com"]
    start_urls = [
        "http://65.push2.eastmoney.com/api/qt/clist/get?cb=jQuery1124008516432775777205_1697696898159&pn=1&pz=100&po=1&np=1&ut=bd1d9ddb04089700cf9c27f6f7426281&fltt=2&invt=2&wbp2u=|0|0|0|web&fid=f3&fs=m:0+t:6,m:0+t:80,m:1+t:2,m:1+t:23,m:0+t:81+s:2048&fields=f2,f3,f4,f5,f6,f7,f12,f14,f15,f16,f17,f18&_=1697696898163"]

    def parse(self, response):
        jsonp_response = response.text
        # 从JSONP响应中提取JSON字符串(去头去尾操作)
        json_str = jsonp_response[len("jQuery1124008516432775777205_1697696898159("):len(jsonp_response) - 2]

        # 解析JSON字符串(蒋json格式的字符串转化为python对象)
        data = json.loads(json_str)
        # 提取data的值
        data_values = data['data']['diff']
        for data_value in data_values:  # 遍历列表,处理每个字典
            item = GupiaoproItem()
            item['code'] = data_value['f12']  # 涨跌额
            item['name'] = data_value['f14']  # 涨跌额
            item['latestprice'] = data_value['f2']  # 涨跌额
            item['change_amount'] = data_value['f4']  # 涨跌额
            item['Rise_and_fall'] = data_value['f3']  # 涨跌额
            item['trading_volume'] = data_value['f5']  # 成交量
            item['turnover_value'] = data_value['f5']  # 成交额
            item['amplitude'] = data_value['f7']  # 振幅
            item['max'] = data_value['f15']  # 最高
            item['min'] = data_value['f16']  # 最低
            item['open_today'] = data_value['f17']  # 今开
            item['received_yesterday'] = data_value['f18']  # 今开
            yield item #返回每只股票的信息
编写完管道类之后,要在setting.py中开启相应的管道类,即ITEM_PIPELINES
ITEM_PIPELINES = {
   "gupiaoPro.pipelines.GupiaoproPipeline": 300,
}
2.1.5 执行工程:
在终端输入:scrapy crawl gupiao,然后可以打开数据库查看结果
2.2作业心得
复现之前的实验,只不过加上了scrapy框架,拿下!
3.作业
3.1作业过程
3.1.1在终端创建工程并在其spiders子目录下创建爬虫文件waihui.py
cd D:\笔记\大三上\数据采集作业\数据采集实践\作业3
scrapy startproject waihuiPro
cd waihuiPro
scrapy genspider weather xxx
3.1.2 改写settings.py(进行UA伪装)
ROBOTSTXT_OBEY = False
USER_AGENT = 'Mozilla/5.0 (Macintosh; Intel Mac OS X 10_12_0) AppleWebKit/537.36 (KHTML, like Gecko) Chrome/74.0.3729.169 Safari/537.36'
LOG_LEVEL = 'ERROR'
3.1.3 改写item.py,设置要爬取的字段
import scrapy

class WaihuiproItem(scrapy.Item):
    # define the fields for your item here like:
    # name = scrapy.Field()
    Currency=scrapy.Field()
    TBP=scrapy.Field()
    CBP=scrapy.Field()
    TSP=scrapy.Field()
    CSP=scrapy.Field()
    Time=scrapy.Field()
3.1.4改写waihui.py,进行数据解析
import scrapy
from waihuiPro.items import WaihuiproItem

class WaihuiSpider(scrapy.Spider):
    name = "waihui"
    #allowed_domains = ["xxx.com"]
    start_urls = ["https://www.boc.cn/sourcedb/whpj/"]

    def parse(self, response):
        tr_list=response.xpath("//div[@class='publish']/div[2]/table//tr")
        # print(tr_list)
        for tr in tr_list[2:]:
            item=WaihuiproItem()
            item['Currency']=tr.xpath('./td[1]/text()').extract_first()
            item['TBP'] = tr.xpath('./td[2]/text()').extract_first()
            item['CBP'] = tr.xpath('./td[3]/text()').extract_first()
            item['TSP'] = tr.xpath('./td[4]/text()').extract_first()
            item['CSP'] = tr.xpath('./td[5]/text()').extract_first()
            item['Time'] = tr.xpath('./td[7]/text()').extract_first()
            yield item
3.1.5改写pipeline.py,进行数据持久化存储
from itemadapter import ItemAdapter


import pymysql

class WaihuiproPipeline:

    def open_spider(self, spider):
        self.conn = pymysql.connect(host='127.0.0.1', port=3306, user='root', password='123', charset='utf8')  # 有中文
        self.cursor = self.conn.cursor()

        # 创建数据库
        self.cursor.execute('CREATE DATABASE IF NOT EXISTS waihui')
        self.conn.commit()

        # 选择数据库
        self.conn.select_db('waihui')

        # 创建表
        create_table_sql = """
            CREATE TABLE IF NOT EXISTS waihui (
                Currency VARCHAR(255),
                TBP VARCHAR(255),
                CBP VARCHAR(255),
                TSP VARCHAR(255),
                CSP VARCHAR(255),
                Time VARCHAR(255)
            )
            """
        self.cursor.execute(create_table_sql)
        self.conn.commit()

    def process_item(self, item, spider):
        self.cursor = self.conn.cursor()  # cursor创建游标对象,来执行数据库语句

        try:
            self.cursor.execute('insert into waihui values("%s","%s","%s","%s","%s","%s")' % (
            item["Currency"], item["TBP"], item["CBP"], item["TSP"], item["CSP"], item["Time"],))
            self.conn.commit()
        except Exception as e:
            print(e)
            self.conn.rollback()  # 有异常先打印错误信息后回滚,每一场直接提交
        return item

    def close_spider(self, spider):
        self.cursor.close()
        self.conn.close()
3.1.6 执行工程:
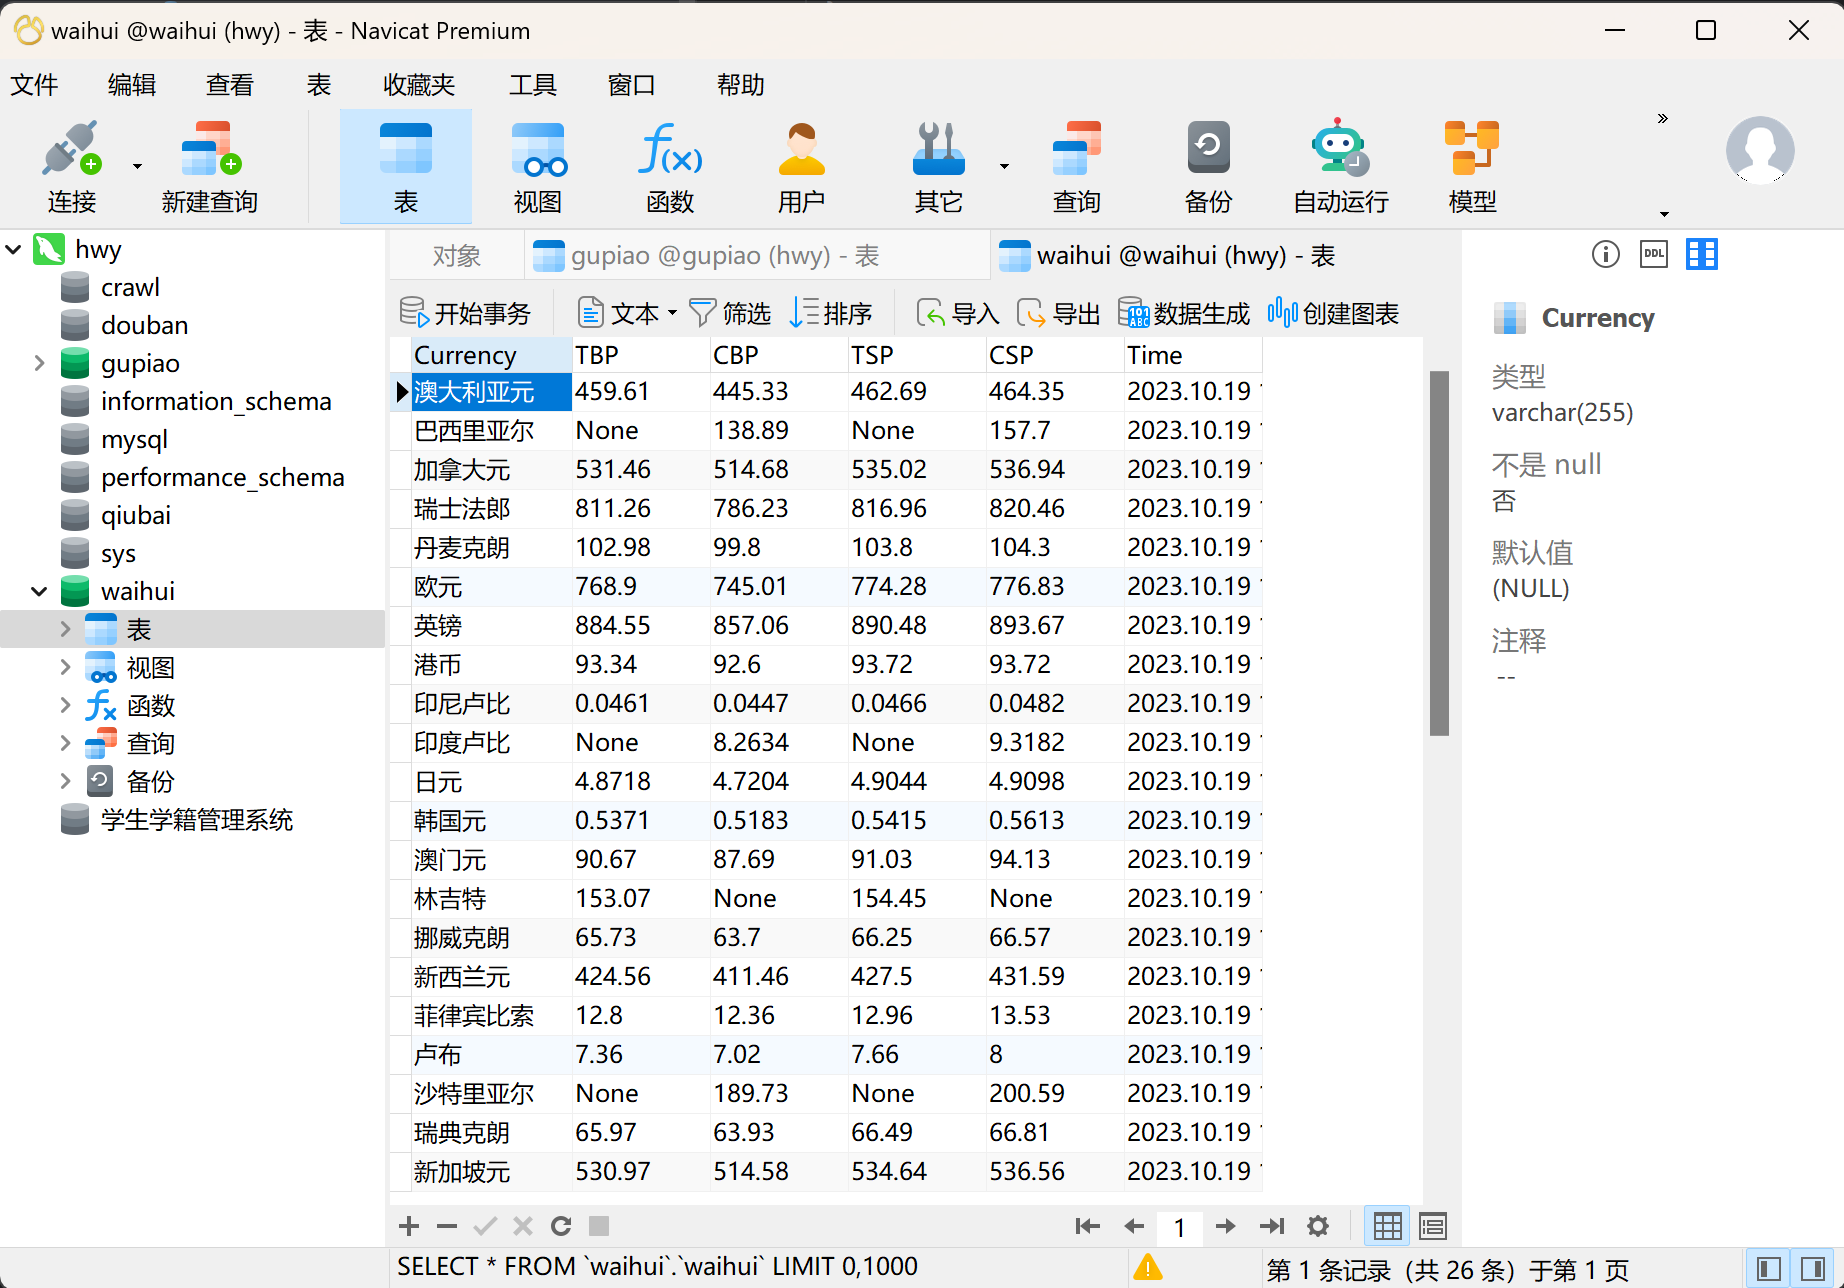
在终端输入scrapy crawl spiderName后,就可以在数据库中查看结果
3.2作业心得
第一次是直接右键复制网页自动提供的xpath,真的很神奇,结果一直出不来,明明路径是对的,但是就是爬不出来。最好自己观察结构直接写xparh路径,然后一步步print()看看能不能获取到元素,不要复制!!

 浙公网安备 33010602011771号