Android 高级控件SlidingMenu视图的创建
文章来自http://www.cnblogs.com/lichenwei/p/4111252.html , 请尊重作者的劳动成果,向作者表示感谢
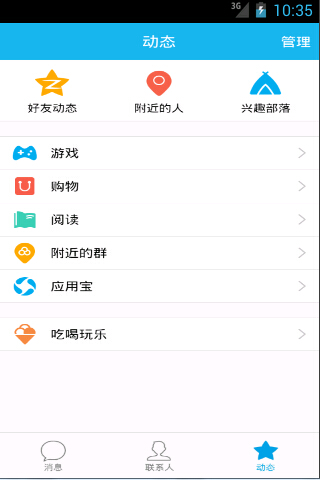
1、所谓的SlidingMenu,就是像下面这样的QQ菜单页面视图:
相信大家都不陌生,下面我们自来开发一个这样的SlidingView组件,实际上非常的简单,我们主要的工作就是创建一个自定的HorizontalScrollView,之后重新定义这个HorizontalScrollView的显示方式就可以了
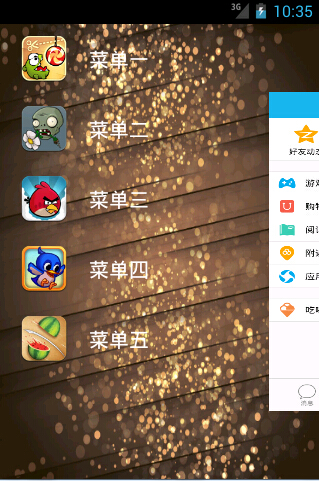
2、我们最终实现的效果是:

整体的思路是这样的:
①首先自定义一个HorizontalScrollView组件,称为:MyHorizontalScrollView,定义一下这个组件的显示方式,当然其中必然使用一些和缩放有关的动画设置,我们可以使用第三方的NineOldAndroids开源项目中提供的相关类,实现这样的功能是非常的简单的
②只用这个组件和使用普通的HorizontalScrollView组件一样,我们将一个横向的LinearLayout布局放在这个MyHorizontalScrollView之中
③之后在上面的横向布局中放入一次放入两个布局组件,一个布局组件用于显示左边的菜单视图,一个用于显示右边的内容视图
3、好了,废话少说,直接上代码:
菜单视图文件 menu.xml文件
  1 <RelativeLayout xmlns:android="http://schemas.android.com/apk/res/android"
  2     xmlns:tools="http://schemas.android.com/tools"
  3     android:layout_width="match_parent"
  4     android:layout_height="match_parent" >
  5
  6     <LinearLayout
  7         android:layout_width="match_parent"
  8         android:layout_height="match_parent"
  9         android:orientation="vertical">
 10
 11         <RelativeLayout
 12             android:layout_width="match_parent"
 13             android:layout_height="wrap_content">
 14
 15             <ImageView
 16                 android:id="@+id/image_1"
 17                 android:layout_width="60dp"
 18                 android:layout_height="60dp"
 19                 android:layout_centerVertical="true"  //设置为垂直居中
 20                 android:layout_marginStart="20dp"
 21                 android:layout_marginTop="20dp"
 22                 android:src="@drawable/img_1"/>
 23
 24             <TextView
 25                 android:id="@+id/textview_1"
 26                 android:layout_width="wrap_content"
 27                 android:layout_height="wrap_content"
 28                 android:layout_centerVertical="true"
 29                 android:layout_toEndOf="@id/image_1"
 30                 android:layout_marginStart="20dp"
 31                 android:layout_marginTop="20dp"
 32                 android:text="@string/menu_1"
 33                 android:textSize="20sp"
 34                 android:textColor="@android:color/white"/>
 35
 36         </RelativeLayout>
 37
 38        <RelativeLayout
 39             android:layout_width="match_parent"
 40             android:layout_height="wrap_content">
 41
 42             <ImageView
 43                 android:id="@+id/image_2"
 44                 android:layout_width="60dp"
 45                 android:layout_height="60dp"
 46                 android:layout_centerVertical="true"
 47                 android:layout_marginStart="20dp"
 48                 android:layout_marginTop="20dp"
 49                 android:src="@drawable/img_2"/>
 50
 51             <TextView
 52                 android:id="@+id/textview_2"
 53                 android:layout_width="wrap_content"
 54                 android:layout_height="wrap_content"
 55                 android:layout_centerVertical="true"
 56                 android:layout_toEndOf="@id/image_2"
 57                 android:layout_marginStart="20dp"
 58                 android:layout_marginTop="20dp"
 59                 android:text="@string/menu_2"
 60                 android:textSize="20sp"
 61                 android:textColor="@android:color/white"/>
 62
 63         </RelativeLayout>
 64
 65        <RelativeLayout
 66            android:layout_width="match_parent"
 67             android:layout_height="wrap_content">
 68
 69             <ImageView
 70                 android:id="@+id/image_3"
 71                 android:layout_width="60dp"
 72                 android:layout_height="60dp"
 73                 android:layout_centerVertical="true"
 74                 android:layout_marginStart="20dp"
 75                 android:layout_marginTop="20dp"
 76                 android:src="@drawable/img_3"/>
 77
 78             <TextView
 79                 android:id="@+id/textview_3"
 80                 android:layout_width="wrap_content"
 81                 android:layout_height="wrap_content"
 82                 android:layout_centerVertical="true"
 83                 android:layout_toEndOf="@id/image_3"
 84                 android:layout_marginStart="20dp"
 85                 android:layout_marginTop="20dp"
 86                 android:text="@string/menu_3"
 87                 android:textSize="20sp"
 88                 android:textColor="@android:color/white"/>
 89
 90         </RelativeLayout>
 91         <RelativeLayout
 92            android:layout_width="match_parent"
 93             android:layout_height="wrap_content">
 94
 95             <ImageView
 96                 android:id="@+id/image_4"
 97                 android:layout_width="60dp"
 98                 android:layout_height="60dp"
 99                 android:layout_centerVertical="true"
100                 android:layout_marginStart="20dp"
101                 android:layout_marginTop="20dp"
102                 android:src="@drawable/img_4"/>
103
104             <TextView
105                 android:id="@+id/textview_4"
106                 android:layout_width="wrap_content"
107                 android:layout_height="wrap_content"
108                 android:layout_centerVertical="true"
109                 android:layout_toEndOf="@id/image_4"
110                 android:layout_marginStart="20dp"
111                 android:layout_marginTop="20dp"
112                 android:text="@string/menu_4"
113                 android:textSize="20sp"
114                 android:textColor="@android:color/white"/>
115
116         </RelativeLayout>
117
118          <RelativeLayout
119             android:layout_width="match_parent"
120             android:layout_height="wrap_content">
121
122             <ImageView
123                 android:id="@+id/image_5"
124                 android:layout_width="60dp"
125                 android:layout_height="60dp"
126                 android:layout_centerVertical="true"
127                 android:layout_marginStart="20dp"
128                 android:layout_marginTop="20dp"
129                 android:src="@drawable/img_5"/>
130
131             <TextView
132                 android:id="@+id/textview_5"
133                 android:layout_width="wrap_content"
134                 android:layout_height="wrap_content"
135                 android:layout_centerVertical="true"
136                 android:layout_toEndOf="@id/image_5"
137                 android:layout_marginStart="20dp"
138                 android:layout_marginTop="20dp"
139                 android:text="@string/menu_5"
140                 android:textSize="20sp"
141                 android:textColor="@android:color/white"/>
142
143         </RelativeLayout>
144
145     </LinearLayout>
146
147
148 </RelativeLayout>
主布局文件 activity.xml文件
 1 <RelativeLayout xmlns:android="http://schemas.android.com/apk/res/android"
 2     xmlns:tools="http://schemas.android.com/tools"
 3     android:layout_width="match_parent"
 4     android:layout_height="match_parent"
 5     android:background="@drawable/img_frame_background">
 6
 7     <com.penglee.slidingmenu_test.MyHorizontalScrollView
 8         android:layout_width="match_parent"
 9         android:layout_height="match_parent"
10         android:scrollbars="none">
11
12         <LinearLayout
13             android:layout_width="match_parent"
14             android:layout_height="match_parent"
15             android:orientation="horizontal">
16
17             <include layout="@layout/menu"/>
18             <LinearLayout
19                 android:layout_width="match_parent"
20                 android:layout_height="match_parent"
21                 android:background="@drawable/qq"/>
22             也就是说内容视图我们只是使用了一张QQ图片
23         </LinearLayout>
24
25     </com.penglee.slidingmenu_test.MyHorizontalScrollView>
26
27 </RelativeLayout>
主Activity只要加载上面的布局文件就好了,不在多说,下面来看看MyhorizontalScrollView代码
  1 package com.penglee.slidingmenu_test;
  2
  3 import android.content.Context;
  4 import android.util.AttributeSet;
  5 import android.util.DisplayMetrics;
  6 import android.util.Log;
  7 import android.util.TypedValue;
  8 import android.view.MotionEvent;
  9 import android.view.ViewGroup;
 10 import android.view.WindowManager;
 11 import android.widget.HorizontalScrollView;
 12 import android.widget.LinearLayout;
 13 import com.nineoldandroids.view.ViewHelper;   这是一个第三方的开源的包,我们需要导入一下 只有ViewHelper要用到这个第三方包
 14
 15 public class MyHorizontalScrollView extends HorizontalScrollView{
 16
 17     private int screenWidth ;  //屏幕的宽度
 18     private int myMenuPaddingRight = 50 ; //向右活动结束时菜单与屏幕右侧的距离
 19     private int myMenuWidth ; // 当Menu视图显示最大化时的宽度 , 也就是屏幕的宽度减去myMenuPaddingRight
 20     private boolean once = false ; //控制onMeasure中的代码只执行一次就行了,避免程序的资源浪费
 21     private LinearLayout linearLayout ;  // 在HorizontalScrollView有个LinearLayout,对照一下上面的主布局文件
 22     private ViewGroup myMenu ;  // 在HorizontalScrollView中的LinearLayout中添加了菜单  , 对照主布局文件
 23     private ViewGroup myContent ;  // 在HorizontalScrollView中的LinearLayout中添加了内容视图组件, 对照主布局文件
 24
 25
 26     //注意自定义组件的构造方法的选择和使用,否则就会崩了,之前在自定义的View中已经说过这个问题了
 27     public MyHorizontalScrollView(Context context, AttributeSet attrs) {
 28         super(context, attrs);
 29
 30              // 获取屏幕宽度
 31              WindowManager windowManager = (WindowManager) context
 32                             .getSystemService(Context.WINDOW_SERVICE);
 33              DisplayMetrics outMetrics = new DisplayMetrics();
 34              windowManager.getDefaultDisplay().getMetrics(outMetrics);
 35              screenWidth = outMetrics.widthPixels;// 屏幕宽度
 36
 37               // 将单位转换为dp,即为50dp
 38               myMenuPaddingRight = (int) TypedValue.applyDimension(
 39               TypedValue.COMPLEX_UNIT_DIP,myMenuPaddingRight , context.getResources()
 40                               .getDisplayMetrics());
 41
 42     }
 43
 44     /**
 45      *
 46      * 设置一下MyHorizontalScrollView中添加的各个组件的大小
 47      *
 48      * */
 49     @Override
 50     protected void onMeasure(int widthMeasureSpec, int heightMeasureSpec) {
 51          super.onMeasure(widthMeasureSpec, heightMeasureSpec);
 52          if (!once) {//使其只调用一次
 53               // this指的是HorizontalScrollView,获取各个元素
 54                linearLayout = (LinearLayout) this.getChildAt(0);// 第一个子元素,对应着主布局文件中的MyHorizontalScrollView中的组件看,就会一目了然
 55                myMenu = (ViewGroup) linearLayout.getChildAt(0);// HorizontalScrollView下LinearLayout的第一个子元素
 56                myContent = (ViewGroup) linearLayout.getChildAt(1);// HorizontalScrollView下LinearLayout的第二个子元素
 57
 58                // 设置子View的宽高,高与屏幕一致
 59                myMenuWidth=myMenu.getLayoutParams().width = screenWidth - myMenuPaddingRight;// 菜单的宽度=屏幕宽度-右边距
 60                myContent.getLayoutParams().width = screenWidth;// 内容宽度=屏幕宽度
 61                // 决定自身View的宽高,高与屏幕一致
 62                // 由于这里的LinearLayout里只包含了Menu和Content所以就不需要额外的去指定自身的宽
 63                once = true;
 64               }
 65           }
 66
 67           /**
 68            *
 69            * 设置MyHorizontalScrollView中的子组件View的位置,
 70            * 在初始时,先将Menu隐藏(在Myeclipse中ScrollView的画面内容(非滚动条)正数表示向左移,向上移)
 71            * 只显示内容界面
 72            */
 73         @Override
 74         protected void onLayout(boolean changed, int l, int t, int r, int b) {
 75             super.onLayout(changed, l, t, r, b);
 76             //刚载入界面的时候隐藏Menu菜单也就是ScrollView向左滑动菜单自身的大小
 77             if(changed){
 78                this.scrollTo(myMenuWidth, 0);//向左滑动,相当于把右边的内容页拖到正中央,菜单隐藏
 79             }
 80         }
 81
 82         /**
 83          * 当手指在页面上滑动时,就会回调这个方法
 84          */
 85        @Override
 86        public boolean onTouchEvent(MotionEvent ev) {
 87                 int action=ev.getAction();
 88                 switch (action) {
 89                 case MotionEvent.ACTION_UP: //A pressed gesture has finished
 90                     int scrollX=this.getScrollX();//获得当前的滑动距离,非常明显,这个getScrollX()方法的返回值会随着滑动而动态的更新
 91                     if(scrollX>=myMenuWidth/2){ // 如果当前的滑动距离超过了Menu视图宽度的一半,那么就自动的显示整个内容视图
 92                         this.smoothScrollTo(myMenuWidth,0);//向左滑动展示内容
 93                     }else{ //否则就不自动滑动到内容视图
 94                         this.smoothScrollTo(0, 0);
 95                     }
 96                     return true;
 97                 }
 98                 return super.onTouchEvent(ev);
 99             }
100
101        /**
102         *
103         * 关于HorizontalScrollView的滑动,我们可以用onScrollChanged来监听参数L:
104         *打印日志:可以发现,当滚动条向左(画面向右滑动)的时候,L的值是逐渐增大的,
105         *所以我们可以通过它来作为动画的变化梯度值,也就是说,当手指在滑动时会回调这个方法
106         *
107         */
108
109          @Override
110          protected void onScrollChanged(int l, int t, int oldl, int oldt) {
111                 super.onScrollChanged(l, t, oldl, oldt);
112                 Log.i("tuzi",l+"");
113
114
115                 float scale = l * 1.0f / myMenuWidth; // 1 ~ 0
116                 float rightScale = 0.7f + 0.3f * scale;
117                 float leftScale = 1.0f - scale * 0.3f;
118                 float leftAlpha = 0.6f + 0.4f * (1 - scale);
119
120                 // 调用属性动画,设置TranslationX
121                 ViewHelper.setTranslationX(myMenu, myMenuWidth * scale * 0.8f);
122                 ViewHelper.setScaleX(myMenu, leftScale);
123                 ViewHelper.setScaleY(myMenu, leftScale);
124                 ViewHelper.setAlpha(myMenu, leftAlpha);
125                 // 设置内容缩放的中心点
126                 ViewHelper.setPivotX(myContent, 0);
127                 ViewHelper.setPivotY(myContent, myContent.getHeight() / 2);
128                 ViewHelper.setScaleX(myContent, rightScale);
129                 ViewHelper.setScaleY(myContent, rightScale);
130            }
131 }
出示一下文件资源列表

图片资源


 浙公网安备 33010602011771号