研究了个把礼拜Avalonia,发现生态并不是很完善
首先是国内.NET人数少,且市场占有率也低,导致Avalonia相关的文档和教学视频也少
其次是对于Avalonia这个新事务来讲,控件库不完善,虽然官方提供了很多控件库,也有其他一些控件库,但是还是有很多控件没有,例如,富文本编辑器,word,报表,流媒体控件好像官方需要付费才能使用.....
在这个情况下,因为本身行业和之前项目的关系,有用到流媒体控件,需要调用摄像头来呈现影像,但是找了一圈发现并没有满足的控件....
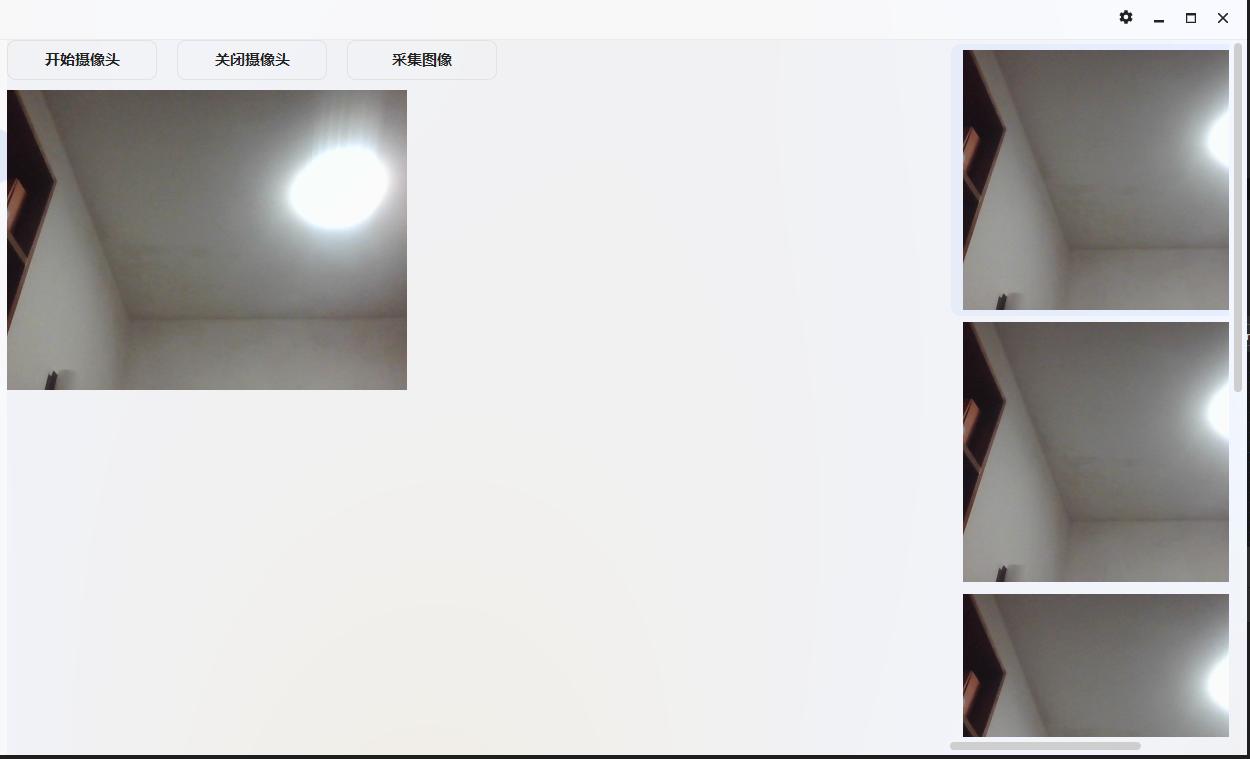
那我们应该怎么办呢,没办法,只能手撸一个,话不多说,先上效果图,左边是开启的视频窗口,右侧为采集的帧画面
那这个效果是怎么实现的呢,我们需要了解几个点
-
影像是什么
首先我们需要知道相机或者说摄像头捕获的影像是什么,是一帧一帧的画面,你也可以理解为照片,一帧即一张照片。那知道了这个我们就清楚,影像无非就是连续帧画面播放出来的效果,也就是一帧一帧的画面切换,形成了我们眼中看到的视频影像
-
如何自定义控件
自定义控件分两种,第一种就是用空模板从零开始创建一个控件,第二个就是基于已有控件来定义自己想要的用户控件
话不多说,开干,这里操作影像使用的库是OpenCvSharp4,在你的项目中引入下面的包,根据自己平台引入对应的runtime包,这里我使用的是win平台测试
<PackageReference Include="OpenCvSharp4" Version="4.10.0.20241108" />
<PackageReference Include="OpenCvSharp4.Extensions" Version="4.10.0.20241108" />
<PackageReference Include="OpenCvSharp4.runtime.win" Version="4.10.0.20241108" />
首先我们新建一个UserControl,放入一个Image控件

接下来,我们需要定义一些必要的属性和方法,这些属性是对外暴露的,且需要注册到用户控件中,建议不了解的小伙伴去官网了解一下自定义控件基础。Avalonia自定义控件官方文档
完整代码如下
public partial class Camera : UserControl
{
	private VideoCapture? _capture;//视频捕捉器
	private CancellationTokenSource? _cancellationTokenSource;//线程令牌
	private bool _isRunning;//视频状态

	public static readonly StyledProperty<bool> IsOpenCameraProperty =
    AvaloniaProperty.Register<Camera, bool>(
        nameof(IsOpenCamera), defaultValue: false);

	public static readonly StyledProperty<WriteableBitmap> CurrentBitmapProperty =
    AvaloniaProperty.Register<Camera, WriteableBitmap>(
        nameof(CurrentBitmap));

	public event EventHandler<string>? CameraErrorOccurred;
	public Camera()
	{
    	InitializeComponent();
    	this.GetObservable(IsOpenCameraProperty).Subscribe(OnIsOpenCameraChanged);
	}

	public bool IsOpenCamera
	{
    	get => GetValue(IsOpenCameraProperty);
    	set => SetValue(IsOpenCameraProperty, value);
	}

	public WriteableBitmap CurrentBitmap
	{
    	get => GetValue(CurrentBitmapProperty);
    	set => SetValue(CurrentBitmapProperty, value);
	}

	private void OnIsOpenCameraChanged(bool isOpen)
	{
    	if (isOpen)
        	StartCamera();
    	else
        	StopCamera();
	}

	/// <summary>
	/// 开启摄像头
	/// </summary>
	private void StartCamera()
	{
    	if (_isRunning) return;
    	_capture = new VideoCapture(0);
    	if (!_capture.IsOpened())
    	{
        	_capture.Dispose();
        	_capture = null;

        	CameraErrorOccurred?.Invoke(this, "未找到可用的摄像头或设备已被占用。");
        	return;
    	}
    	_cancellationTokenSource = new CancellationTokenSource();
    	_isRunning = true;

    	Task.Run(() => CaptureLoop(_cancellationTokenSource.Token));
	}

	/// <summary>
	/// 关闭摄像头
	/// </summary>
	private void StopCamera()
	{
    		if (!_isRunning) return;
    		_cancellationTokenSource?.Cancel();
    		_capture?.Release();
    		_capture?.Dispose();
    		_isRunning = false;
	}

	/// <summary>
	/// 捕获帧画面更新到Image控件上
	/// </summary>
	/// <param name="token"></param>
	private void CaptureLoop(CancellationToken token)
	{
    	using var mat = new Mat();
    	while (!token.IsCancellationRequested && _capture!.IsOpened())
    	{
        	_capture.Read(mat);
        	if (mat.Empty())
            	continue;

        	var bitmap = ConvertMatToBitmap(mat);
        	Dispatcher.UIThread.InvokeAsync(() =>
        	{
            	CurrentBitmap = bitmap;
            	VideoImage.Source = bitmap;
        	});

        	Thread.Sleep(30); // 控制帧率
    	}
	}

	/// <summary>
	/// 用户控件销毁时释放资源
	/// </summary>
	/// <param name="e"></param>
	protected override void OnDetachedFromVisualTree(VisualTreeAttachmentEventArgs e)
	{
		base.OnDetachedFromVisualTree(e);
		StopCamera();
	}

	/// <summary>
	/// 将帧画面转换为Bitmap
	/// </summary>
	/// <param name="mat"></param>
	/// <returns></returns>
	private static WriteableBitmap ConvertMatToBitmap(Mat mat)
	{
		using var ms = mat.ToMemoryStream();
		ms.Seek(0, SeekOrigin.Begin);
		return WriteableBitmap.Decode(ms);
	}
}
这里可以看到,我们定义了IsOpenCamera来控制是否开启摄像头,CurrentBitmap为当前帧画面。
我们还需监听一下这个IsOpenCamera的状态来控制视频的捕捉,在构造函数中有这么一句代码
public Camera()
{
    InitializeComponent();
    this.GetObservable(IsOpenCameraProperty).Subscribe(OnIsOpenCameraChanged);
}
在构造函数中我们需注入属性的监听来执行某些事件
在开启摄像头事件StartCamera中我们使用了线程来循环执行视频捕捉事件,通过捕捉每一帧的画面,更新到Image控件上,实现视频的实时预览。
接下来,我们在别的地方使用这个控件
<UserControl xmlns="https://github.com/avaloniaui"
         xmlns:x="http://schemas.microsoft.com/winfx/2006/xaml"
         xmlns:d="http://schemas.microsoft.com/expression/blend/2008"
         xmlns:mc="http://schemas.openxmlformats.org/markup-compatibility/2006"
         mc:Ignorable="d" d:DesignWidth="800" d:DesignHeight="450"
         xmlns:local="using:GeneralPurposeProgram.Controls"
         xmlns:vm="using:GeneralPurposeProgram.ViewModels.UserViewModels"
         x:DataType="vm:HomeViewModel"
         x:Class="GeneralPurposeProgram.Views.UserViews.HomeView">
<Design.DataContext>
    <vm:HomeViewModel></vm:HomeViewModel>
</Design.DataContext>
<Grid ColumnDefinitions="*,300">
    <Grid Grid.Column="0" RowDefinitions="50,300,*">
        <StackPanel Spacing="20" Grid.Row="0" Orientation="Horizontal">
            <Button Content="开始摄像头" HotKey="F5" Command="{Binding StartCameraCommand}" Margin="0,0,0,10" Width="150" />
            <Button Content="关闭摄像头" HotKey="F6" Command="{Binding StopCameraCommand}" Margin="0,0,0,10" Width="150" />
            <Button Content="采集图像" HotKey="F10" Command="{Binding CaptureFrameCommand}" Margin="0,0,0,10" Width="150" />
        </StackPanel>
        <StackPanel Orientation="Horizontal" Grid.Row="1">
            <local:Camera x:Name="CameraVideo"
                              IsOpenCamera="{Binding IsOpenCamera,Mode=TwoWay}"
                              CurrentBitmap="{Binding PreviewImage,Mode=TwoWay}" />
        </StackPanel>
    </Grid>

    <Grid Grid.Column="1">
        <ScrollViewer VerticalScrollBarVisibility="Auto" HorizontalScrollBarVisibility="Auto">
            <ListBox ItemsSource="{Binding Images}">
                <ListBox.ItemTemplate>
                    <DataTemplate>
                        <Image Source="{Binding}" Height="260" Stretch="Uniform" />
                    </DataTemplate>
                </ListBox.ItemTemplate>
            </ListBox>
        </ScrollViewer>
    </Grid>
</Grid>
</UserControl>
public class HomeViewModel : ViewModelBase
{
	private WriteableBitmap? _previewImage;
	public WriteableBitmap? PreviewImage
	{
		get => _previewImage;
		set => this.RaiseAndSetIfChanged(ref _previewImage, value);
	}

	private ObservableCollection<WriteableBitmap> _images = [];

	public ObservableCollection<WriteableBitmap> Images
	{
		get => _images;
		set => this.RaiseAndSetIfChanged(ref _images, value);
	}

	public ReactiveCommand<Unit, Unit> StartCameraCommand { get; }
	public ReactiveCommand<Unit, Unit> StopCameraCommand { get; }
	public ReactiveCommand<Unit, Unit> CaptureFrameCommand { get; }

	private bool _isOpenVideo = false;

	public bool IsOpenVideo
	{
		get => _isOpenVideo;
		set => this.RaiseAndSetIfChanged(ref _isOpenVideo, value);
	}

	public HomeViewModel()
	{
		StartCameraCommand = ReactiveCommand.Create(StartCamera);
		StopCameraCommand = ReactiveCommand.Create(StopCamera);
		CaptureFrameCommand = ReactiveCommand.Create(CaptureFrame);
		Images = [];
	}

	private void StartCamera()
	{
		IsOpenVideo = true;
	}

	private void CaptureFrame()
	{
		if (PreviewImage != null && IsOpenVideo)
		{
			Images.Add(PreviewImage);
		}
	}

	private void StopCamera()
	{
		IsOpenVideo = false;
	}
}
通过上面的完整使用代码可以看出,我们前面注册的视频控件的两个属性IsOpenCamera和CurrentBitmap直接暴露给了父控件,通过事件修改IsOpenCamera的值就能实现视频的开启和关闭。采集图像则只需要将CurrentBitmap当前帧画面保存起来,存入Images集合中给ListBox显示出来即完成了采图功能。
相信大家看到这应该都能理解里面的原理了,通过捕捉摄像头的帧画面,一帧一帧更新到Image控件上,其实和动画、漫画一样。
鉴于上期便利性在这补充一点,相对于WPF来讲,Avalonia可以更方便的给按钮绑定键盘Key来触发事件,只需要加上HotKey="Key"即可

可以看到,我在这绑定了F5、F6、F10键,当然,也可以绑定复合按键,例如HotKey="Ctrl+F5"。
好了,本文就讲到这,后续博主还会出一些自定义控件的合集,我本人是有计划想手搓一个word文档编辑器的,但现在还是想法,不确定能不能行,这是个工作量很大的工作,祝我好运吧。由于平时要上班,博主大概率是在周末更新。
都看到这了,不点个赞再走吗

 浙公网安备 33010602011771号