
06-泛型、可变参数、Collections、Map
泛型、可变参数、Collections、Map
1、泛型
1.1、泛型引入
-
如果没有泛型,元素看作Object类型,任何数据的数据都可以添加到集合中,再运行时强制转换就会报错
-
加了泛型,限定集合只能存储一种引用类型,就可以避免类型转换异常
-
demo
-
ArrayList<String> list = new ArrayList();
list.add("迪丽热巴");
list.add("古力娜扎");
list.add("马尔扎哈");
list.add("摩托罗拉");
// list.add(888);
for (String name : list) {
    System.out.println(name.length());
}
-
1.2、泛型概念
- 是JDK1.5中引入的特性
- 参数化类型,不确定的类型,这个类型可以变化
1.3、泛型的格式
- <引用类型名称>
1.4、泛型的好处
- 限定了集合只能存储一种类型
- 避免了类型转换异常
1.5、泛型的注意事项
- 泛型只支持引用数据类型
1.6、泛型分类
- 泛型类
- 泛型方法
- 泛型接口
1.7、泛型精髓
- 定义类时不确定数据类型,使用泛型
- 实用类时指定泛型的类型
1.8、泛型类
-
格式
- 修饰符 class 类名 <名称> {}
- public class ArrayList
{}
- public class ArrayList
- 修饰符 class 类名 <名称> {}
-
创建泛型类的对象时,必须要给这个泛型确定具体的数据类型。把出现泛型变量的地方全部替换成传输的真实数据类型。
-
demo:
-
ArrayList源码的简化: 1.定义类时不确定类型,使用泛型 public class ArrayList<E> { public boolean add(E e) { } public E get(int index) { } } -
// 2.使用类时指定泛型类型
ArrayList<String> list = new ArrayList<>();
// list.add(String e)
// String list.get(0);
ArrayList<Integer> list2 = new ArrayList<>();
// list2.add(Integer e);
// Integer list2.get(0)
1.9、泛型方法
-
泛型定义在方法上
-
格式:
- 修饰符
返回值类型 方法名(E 变量名) {}
- 修饰符
-
和普通方法的区别
- 1.在返回值类型前面添加
- 2.在使用类型的地方换成E
-
demo:
-
public class Demo04 {
    public static void main(String[] args) {
        show(11);
        show(6.66);
        show("很好");
        show(true);
    }

    // 定义泛型方法
    public static <T> void show(T o) {
        System.out.println(o);
    }
}
1.10、泛型接口
-
泛型在接口上
-
格式
- interface 接口名
{}
- interface 接口名
-
使用方式
-
1.定义实现类时指定泛型类型
-
public class Student implements Swimmable <String> {
  @Override
  public void say(String msg) {}
}
-
-
2.定义实现类时接着使用泛型, 这种方式更灵活
-
public class Teacher <T> implements Swimmable <T> {
  @Override
  public void say(T msg) {
    System.out.println(msg);
  }
}
-
-
-
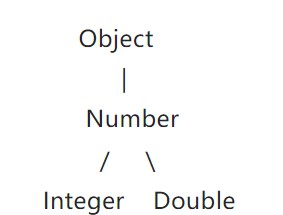
泛型限定
- demo:
- 泛型通配符----?
- 泛型可以是任意类型
- :泛型可以是Number及其子类,向上限定
- :泛型可以是Number及其父类,向下限定
- demo:
2、可变参数
2.1、引入
-
求2个int的和,求3个int的和----Demo
-
// 计算2个数的和
public static int add(int a, int b) {
    return a + b;
}

// 计算3个数的和。
public static int add(int a, int b, int c) {
    return a + b + c;
}
-
-
需要写很多重载方法比较麻烦
2.2、概念
- JDK1.5推出的新特性
- 参数的数量可以变化
2.3、格式
- 修饰符 返回值类型 方法名(数据类型 ... 变量名){}
2.4、示例代码
-
// 计算n个数的和,使用可变参数
// 可变参数本质是数组,就像操作数组一样
public static int add (int... x) {
    int sum = 0;
    for (int n : x) {
        sum += n;
    }
    return sum;
}
public static void main(String[] args) {
    add();
    add(1);
    add(1, 2, 3);
    int sum = add(1, 2, 3, 6, 8);
}
2.5、注意事项
-
- 一个方法中只能有一个可变参数
- 可变参数需要在参数列表的最后面
- 调用方法传递的形参可以是0到多个
3、Collections
3.1、介绍
- Collections是集合工具类,他里面有很多方法,帮我们我方便操作集合
- 构造器被私有,可以通过类名去调用它的静态方法
3.2、常用功能
3.2.1、addAll
-
static boolean addAll(Collection c, T... elements)
-
-
将后面的数据放到前面的集合中
-
ArrayList<String> list = new ArrayList<>();
Collections.addAll(list, "x", "a", "b", "g");
-
3.2.2、shuffle
- 对集合中的元素随机打乱顺序
- Collections.shuffle(list);
3.2.3、sort(1)
- static void sort(List list)
- 使用元素的自然顺序排序
3.2.4、sort(2)
- static void sort(List list, Comparator c)
- 使用比较器排序
3.3、示例代码
public class Demo09 {
    public static void main(String[] args) {
        ArrayList<Integer> list = new ArrayList<>();
        Collections.addAll(list, 88, 11, 22, 77, 55);
        System.out.println("排序前: " + list);

        Collections.sort(list);
        System.out.println("排序后: " + list);

        Collections.sort(list, new Comparator<Integer>() {
            @Override
            public int compare(Integer o1, Integer o2) {
                return o2 - o1; // 降序
            }
        });

        System.out.println("排序后2: " + list);
}
4、斗地主案例
4.1、介绍
4.2、规则
-
1.定义纸牌类Poker
- 每张牌包含花色和数字两个属性。
-
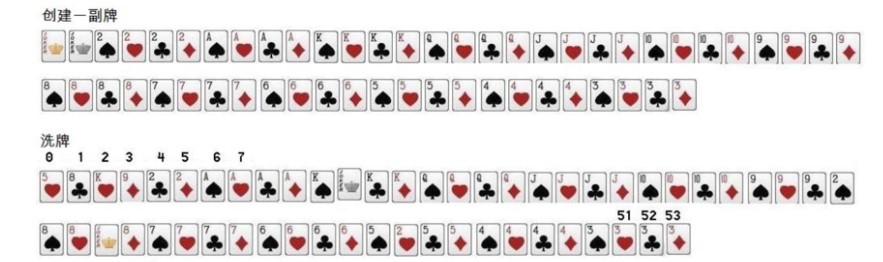
2.准备牌
- 一副牌有54张,使用ArrayList集合存储所有的纸牌对象。
- 每张牌由花色数字两部分组成,可以使用花色数组与数字数组嵌套迭代完成每张牌的组装,并添加到集合中。
-
3.洗牌
- 使用Collections类的shuffle()方法对集合元素随机打乱。
-
4.发牌
- 每个玩家对应一手牌,创建3个ArrayList集合分别存储每个玩家的纸牌,通过对3取模依次发牌。
- 将最后3张牌直接存放于底牌集合中。
-
5.看牌
- 直接打印每个集合。
4.3、代码示例
-
package Day06.demo10斗地主案例;

import java.util.ArrayList;
import java.util.Collections;

/*
目标:
按照斗地主的规则,完成洗牌发牌的动作。 具体规则:使用54张牌打乱顺序,三个玩家参与游戏,三人交替摸牌,每人17张牌,最后三张留作底牌。
 */
public class Demo10 {
    private static ArrayList<Poker> pokers = new ArrayList<>();
    static {    // 初始化牌
        String[] colors = {"♦", "♣", "♥", "♠"};
        String[] numbers = {"2", "A", "K", "Q", "J", "10", "9", "8", "7", "6", "5", "4", "3"};

        // 大王小王
        pokers.add(new Poker("大王", ""));
        pokers.add(new Poker("小王", ""));
        for (String color : colors) {
            for (String number : numbers) {
                pokers.add(new Poker(color, number));
            }
        }

//        System.out.println("pokers = " + pokers);
    }
    public static void main(String[] args) {
        // 牌初始结束之后要发牌
        ArrayList<Poker> player1 = new ArrayList<>();
        ArrayList<Poker> player2 = new ArrayList<>();
        ArrayList<Poker> player3 = new ArrayList<>();
        ArrayList<Poker> diPai = new ArrayList<>();
        // 指定一个发牌规则
        // 一张一张发,最后三张是地主牌
        // 先打乱牌序
        Collections.shuffle(pokers);

        for (int i = 0; i < pokers.size(); i++) {
            if (i >= 51) {
                diPai.add(pokers.get(i));
            }
            else if (i % 3 == 0) {
                player1.add(pokers.get(i));
            }
            else if (i % 3 == 1) {
                player2.add(pokers.get(i));
            }
            else {
                player3.add(pokers.get(i));
            }
        }
        System.out.println("player1 = " + player1);
        System.out.println("player2 = " + player2);
        System.out.println("player3 = " + player3);
        System.out.println("diPai = " + diPai);

    }
}

class Poker {
    private String color;   // 花色
    private String number;  // 数字

    public Poker(String color, String number) {
        this.color = color;
        this.number = number;
    }

    public Poker() {
    }

    public String getColor() {
        return color;
    }

    public void setColor(String color) {
        this.color = color;
    }

    public String getNumber() {
        return number;
    }

    public void setNumber(String number) {
        this.number = number;
    }

    @Override
    public String toString() {
        return getColor() + getNumber();
    }
}
5、Map
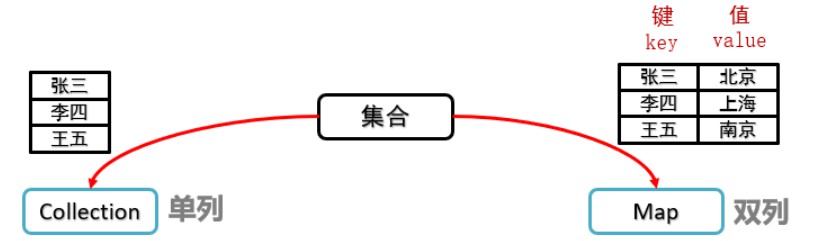
5.1、Map介绍
- Map集合是双列,并且每个元素包含两个元素(Key-Value)
- Map集合的每个元素是键值对:key=value(键值对元素)
- demo
5.2、Map接口特点
- 键不能重复
- 一个键对应一个值
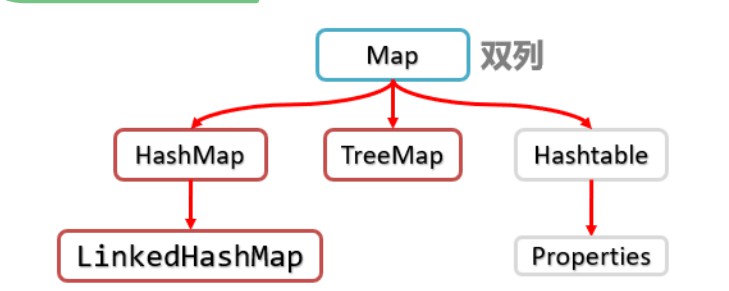
5.3、Map集合体系
5.4、Map集合的常用API
5.4.1、put
- V put(K key, V value) 键不存在添加数据,返回null, 键存在修改数据,返回修改前的数据
5.4.2、get
- V get(Object key) 通过键获取值
5.4.3、remove
- V remove(Object key) 通过键删除这对数据
5.4.4、containsKey
- boolean containsKey(Object key) 判断集合是否包含指定的键
5.4.5、containsValue
- boolean containsValue(Object value) 判断集合是否包含指定的值
5.4.6、clear
- void clear() 清空数据
5.4.7 size
- int size() 数量
5.5、Map集合遍历
5.5.1、Map遍历1__键找值方式(keySet())
-
步骤:
- 1.获取所有的键
- 2.遍历获取的每个键
- 3.通过键获取值
-
示例代码
-
public class Demo12 {
    public static void main(String[] args) {
        // 创建Map集合
        HashMap<String, String> map = new HashMap<>();

        // 添加数据
        map.put("邓超", "孙俪");
        map.put("李晨", "范冰冰");
        map.put("黄晓明", "杨颖");
        map.put("老干爹", "老干妈");

        // Map遍历方式一:键找值遍历
        // 1.获取所有的键
        Set<String> keySet = map.keySet();
        // 2.遍历获取每个键
        for (String key : keySet) {
            // 3.通过键获取值
            String value = map.get(key);
            System.out.println(key + " @@ " + value);
        }
    }
}
-
5.5.2、Map遍历2__Entry键值对方式(entrySet())
-
Entry介绍
- 是一个接口,JDK会有实现类,Entry会存放一个键和一个值(键值对对象)
-
如何获取Entry
- Set<Map.Entry> entrySet() 获取Map中所有的Entry
-
步骤
- 1.获取所有的Entry
- 2.遍历取出的每个Entry
- 3.取出Entry中的键和值
-
demo
-
public class Demo13 {
    public static void main(String[] args) {
        // 创建Map集合
        HashMap<String, String> map = new HashMap<>();

        // 添加数据
        map.put("邓超", "孙俪");
        map.put("李晨", "范冰冰");
        map.put("黄晓明", "杨颖");
        map.put("老干爹", "老干妈");

        // Map遍历方式二:Entry键值对遍历, 建议使用这种,因为Map底层就是使用Entry来存储的.效率高一点
        // 1.取出所有的Entry
        Set<Map.Entry<String, String>> entrySet = map.entrySet();
        // 2.遍历获取每个Entry
        for (Map.Entry<String, String> entry : entrySet) {
            // 3.取出Entry中的键和值
            String key = entry.getKey();
            String value = entry.getValue();
            System.out.println(key + " --> " + value);
        }
    }
}
-
5.6、HashMap存储自定义类型
-
每位学生(姓名,年龄)都有自己的家庭住址。那么,既然有对应关系,则将学生对象和家庭住址存储到map集合中。学生作为键, 家庭住址作为值。注意,学生姓名相同并且年龄相同视为同一名学生。
-
分析
-
- 1.定义学生类
- 2.创建HashMap集合对象,键是学生,值是家庭住址
- 3.创建学生对象
- 4.把学生添加到集合
- 5.遍历集合
-
HashMap底层是哈希表结构的, 依赖hashCode()方法和equals()方法确定键是否相同, 如果键要存储的是自定义对象,需要重写hashCode()和equals()方法
-
Demo
-
package Day06.demo14HashMap存储自定义类型_重点;

import java.util.HashMap;
import java.util.Map;

/*
目标:学习HashMap存储自定义类型

练习:每位学生(姓名,年龄)都有自己的家庭住址。那么,既然有对应关系,
    则将学生对象和家庭住址存储到map集合中。学生作为键, 家庭住址作为值。

    注意,学生姓名相同并且年龄相同视为同一名学生。

分析:
    1.定义学生类
    2.创建HashMap集合对象,键是学生,值是家庭住址
    3.创建学生对象
    4.把学生添加到集合
    5.遍历集合

HashMap的特点
    HashMap底层是哈希表结构的
    依赖hashCode()方法和equals()方法确定键是否相同
    如果键要存储的是自定义对象,需要重写hashCode()和equals()方法
    我们现在是Student做为键,所以在Student类中重写hashCode和equals方法
 */
public class Demo14 {
    public static void main(String[] args) {
        // 1.定义学生类
        // 2.创建HashMap集合对象,键是学生,值是家庭住址
        HashMap<Student, String> studentStringHashMap = new HashMap<>();
        // 3.创建学生对象
        // 4.把学生添加到集合
        studentStringHashMap.put(new Student("刘德华", 18), "香港");
        studentStringHashMap.put(new Student("黎明", 18), "北京");
        studentStringHashMap.put(new Student("郭富城", 18), "上海");
        studentStringHashMap.put(new Student("张学友", 18), "香港");
        studentStringHashMap.put(new Student("梁志伟", 18), "广州");
        // 5.遍历集合
        for (Map.Entry<Student, String> studentStringEntry : studentStringHashMap.entrySet()) {
            System.out.println("studentStringEntry = " + studentStringEntry);
        }
    }
}

class Student {
    private String name;
    private int age;

    public Student(String name, int age) {
        this.name = name;
        this.age = age;
    }

    public Student() {
    }

    public String getName() {
        return name;
    }

    public void setName(String name) {
        this.name = name;
    }

    public int getAge() {
        return age;
    }

    public void setAge(int age) {
        this.age = age;
    }

    @Override
    public String toString() {
        return "Student{" +
                "name='" + name + '\'' +
                ", age=" + age +
                '}';
    }
}
-
5.7、LinkedHashMap的使用
-
HashMap存储和取出是没有顺序的.LinkedHashMap继承了HashMap,通过链表保存元素存储和取出的顺序
-
Demo
-
public class Demo01 {
    public static void main(String[] args) {
        Map<String, Integer> map = new LinkedHashMap<>();
        map.put("aa", 11);
        map.put("bb", 22);
        map.put("cc", 33);
        map.put("dd", 44);

        // 1.键找值
        // 1.1 获取所有的键
        Set<String> keySet = map.keySet();
        // 1.2 遍历获取每个键
        for (String key : keySet) {
            Integer value = map.get(key);
            System.out.println(key + " :: " + value);
        }
    }}
-
5.8、TreeMap的使用
5.8.1、TreeMap介绍
- TreeMap实现Map接口,并没有新增方法
- TreeMap底层是红黑树
5.8.2、TreeMap特点
-
不重复
-
无索引
-
一定要排序
- 键的自然排序
- 比较器排序
-
Demo
-
public class Demo021 {
    public static void main(String[] args) {
        // TreeMap() 使用键的自然顺序排序(数字默认升序)
        // TreeMap<Integer, String> treeMap = new TreeMap<>();

        // TreeMap(Comparator<? super K> comparator) 使用比较器的规则排序
        TreeMap<Integer, String> treeMap = new TreeMap<>(new Comparator<Integer>() {
            @Override
            public int compare(Integer o1, Integer o2) {
                return o2 - o1;
            }
        });

        treeMap.put(88, "aa");
        treeMap.put(23, "xx");
        treeMap.put(18, "bb");
        treeMap.put(8, "cc");

        Set<Map.Entry<Integer, String>> entrySet = treeMap.entrySet();
        for (Map.Entry<Integer, String> entry : entrySet) {
            Integer key = entry.getKey();
            String value = entry.getValue();
            System.out.println(key + " :: " + value);
        }
    }
}
-
5.9、Map集合练习
-
需求
-
- 假设15个同学做一道选择题,统计每个答案的选择次数。"aababcabcdabcdd" 答案a出现5次 答案b出现4次 答案c出现3次 答案d出现3次
-
步骤
-
- 1.创建Map集合中,键存字符,值存出现的次数
- 2.遍历字符串,得到每一个字符
- 3.判断Map键是否包含这个字符
- 4.如果不包含,设置为1次
- 5.如果包含,次数+1
- 6.遍历Map按照格式输出
![]()
-
Demo
-
package Day07.demo03Map集合练习_重要;

import java.util.HashMap;
import java.util.Map;
import java.util.Set;
import java.util.function.BiConsumer;

public class Practise01 {
    /*
    假设15个同学做一道选择题,统计每个答案的选择次数。
    "aababcabcdabcdd"     答案a出现5次     答案b出现4次     答案c出现3次     答案d出现3次
     */

//    public static void main(String[] args) {
//        String str = "aababcabcdabcdd";
//        statisticalCount(str);
//    }
//
//    // 统计字符出现次数
//    public static void statisticalCount(String str) {
//        int aCount = 0;
//        int bCount = 0;
//        int cCount = 0;
//        int dCount = 0;
//
//        for (int i = 0; i < str.length(); i++) {
//            if (str.charAt(i) == 'a') {
//                aCount ++;
//            }else if (str.charAt(i) == 'b') {
//                bCount ++;
//            }else if (str.charAt(i) == 'c') {
//                cCount ++;
//            }else if (str.charAt(i) == 'd') {
//                dCount ++;
//            }
//        }
//        System.out.println("aCount = " + aCount);
//        System.out.println("bCount = " + bCount);
//        System.out.println("cCount = " + cCount);
//        System.out.println("dCount = " + dCount);
//    }

    /*
        - 步骤
            - 1.创建Map集合中,键存字符,值存出现的次数
            - 2.遍历字符串,得到每一个字符
            - 3.判断Map键是否包含这个字符
            - 4.如果不包含,设置为1次
            - 5.如果包含,次数+1
            - 6.遍历Map按照格式输出

     */

    public static void main(String[] args) {
        HashMap<Character, Integer> hashMap = new HashMap<>();
        String str = "aababcabcdabcdd";
        for (int i = 0; i < str.length(); i++) {
            if (hashMap.containsKey(str.charAt(i))) {
                hashMap.put(str.charAt(i), (hashMap.get(str.charAt(i))) + 1);
            }
            else {
                hashMap.put(str.charAt(i), 1);
            }
        }

        System.out.println("stringIntegerHashMap = " + hashMap);

        // 遍历Map集合

        // 1. 键找值方式(keySet)
        Set<Character> characters = hashMap.keySet();
        for (Character character : characters) {
            System.out.println("stringIntegerHashMap.get(" + character + ") = " + hashMap.get(character));
        }
        System.out.println("--------------------------------------------");
        System.out.println("--------------------------------------------");

        // 2. Entry键值对形式(entrySet)
        Set<Map.Entry<Character, Integer>> entrySet = hashMap.entrySet();
        for (Map.Entry<Character, Integer> characterIntegerEntry : entrySet) {
//            System.out.println("characterIntegerEntry = " + characterIntegerEntry);
            System.out.println("characterIntegerEntry.getKey() = " + characterIntegerEntry.getKey());
            System.out.println("characterIntegerEntry.getValue() = " + characterIntegerEntry.getValue());
            System.out.println("--------------------------------------------");
        }

        // forEach 形式
        hashMap.forEach(new BiConsumer<Character, Integer>() {
            @Override
            public void accept(Character key, Integer value) {
                System.out.println(key + " = " + value);
            }
        });
    }

}
-


 浙公网安备 33010602011771号