
VC6下OpenGL 开发环境的构建外加一个简单的二维网络棋盘绘制示例
一、安装GLUT 工具包
GLUT 不是OpenGL 所必须的,但它会给我们的学习带来一定的方便,推荐安装。
Windows 环境下的GLUT 本地下载地址:glut-install.zip(大小约为150k)。
也可直接去官方网站下载:http://www.opengl.org/resources/libraries/glut/glutdlls37beta.zip
Windows 环境下安装GLUT 的步骤:
1)将下载的压缩包解压,得到5 个文件放到以下三个指定位置:
2)glut.h 放到GL 文件夹(VC6 中一般是:C:\Program Files\Microsoft VisualStudio\VC98\Include\GL

3)glut.lib 和glut32.lib 放到静态函数库所在文件夹(VC6 中一般是:C:\Program Files\MicrosoftVisual Studio\VC98\Lib

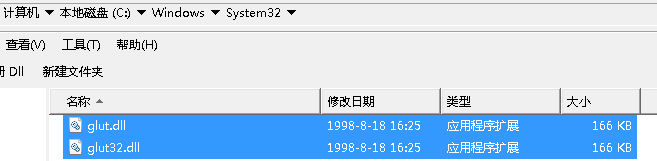
4)glut.dll 和glut32.dll 放到操作系统目录下面的system32 文件夹内。(典型的位置为:C:\Windows\System32,有些机器可能为C:\WINNT\System32)
二、VC6 下OpenGL 工程的创建
这里以VC6.0 为例:首先从开始->所有程序->Microsoft Visual C++ 6.0 菜单中打开VC,也可单击文件:C:\Program Files\Microsoft Visual Studio\VisualC++6\Common\MSDev98\Bin\msdev.exe
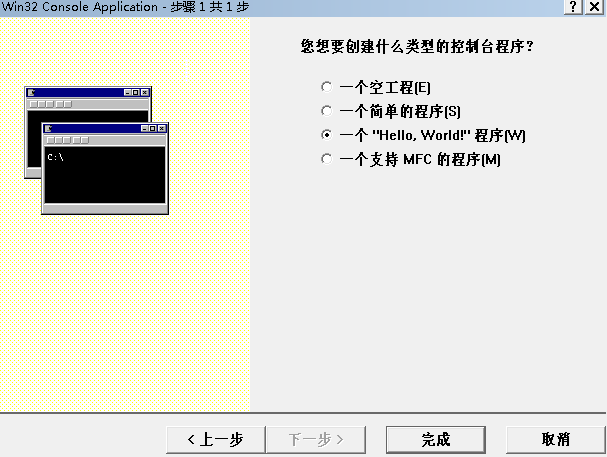
打开VC,在VC 中选择 文件->新建->工程(File->New->Project),然后选择Win32 Console Application,输入一个工程名,设为opengltest1,然后按确定。

在弹出的对话框左边点Application Settings,选择一个 "Hello world" 程序 并勾上,选择完成。
在opengtest1.cpp 中的#include "stdafx.h"行后面,粘贴OpenGL代码,编译运行。
注意:按上述方法建立的项目,不能删除#include "stdafx.h"。
三、一个简单的二维网格棋盘绘制示例
// opengltest1.cpp : Defines the entry point for the console application.
//

#include "stdafx.h"
#include <GL/glut.h>
const GLfloat d = 0.04;
//主函数每次显示调用的用户自定义显示函数
void myDisplay(void)
{
    //清除色彩位缓冲区
    glClear(GL_COLOR_BUFFER_BIT);
    for (int i = -25; i < 25; i++)
    {
        for (int j = -25; j < 25; j++)
        {
            if (j%2==0)
            {
                if (i%2==0)
                {
                    //glRectf 按浮点坐标与矩形宽度和高度参数绘制矩形
                    glRectf(j*d , d *i, (j + 1)*d , d *(i + 1));
                }
            }
            else
            {
                if ((i+200)%2==1)
                {
                    glRectf(j*d , d *i, (j + 1)*d , d *(i + 1));
                }
            }
        }
    }
    //按上述命令绘制图形,glFlush命令只适用于单缓冲模式
    glFlush();
}

int main(int argc, char *argv[])
{
    //初始化opengl工具箱函数库
    glutInit(&argc,argv);
    //设置RGB色彩模式与单缓冲绘图模式
    glutInitDisplayMode(GLUT_RGB|GLUT_SINGLE);
    //设置图像显示窗口的左上角位置(0,0)
    glutInitWindowPosition(0,0);
    //设置窗口大小(600,600)
    glutInitWindowSize(600,600);
    //设置窗口标题
    glutCreateWindow("Open GL 程序 Step 1");
    //设置主程序循环显示过程中所调用的显示函数
    //&myDisplay,表示取得函数名所对应的地址(函数地址)
    glutDisplayFunc(&myDisplay);
    //程序主循环
    glutMainLoop();
    return 0;
}

至此,VC6下的OpenGL环境搭建完成!
祝各位Coding 愉快~


 浙公网安备 33010602011771号