6.IDEA用maven新建带spring框架的工程
5.IDEA用maven新建带spring框架的工程
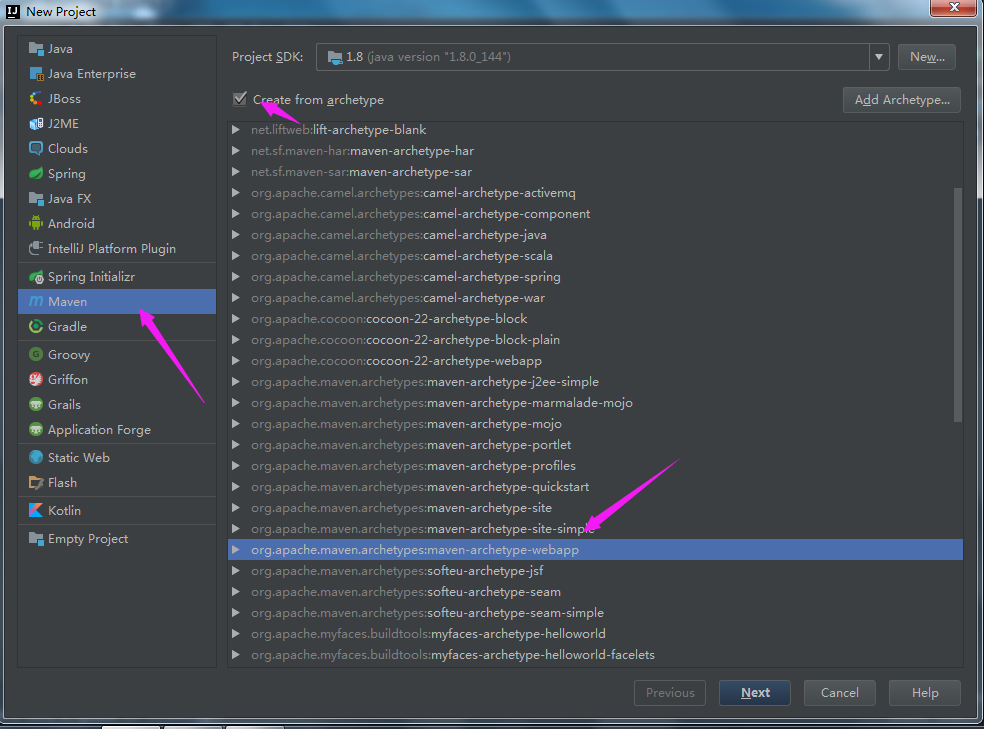
1.使用maven骨架新建web工程
1.1新建web工程
1.2新建好包,并制定好文件类型

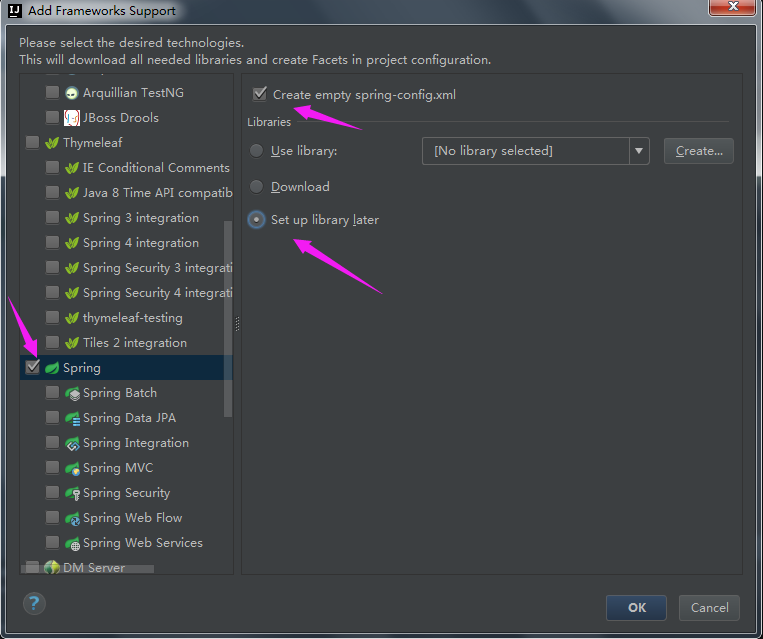
1.3添加框架支持(本文核心,不建议手动添加框架支持)

2.添加spring框架的支持,并添加空白的配置文件
3.配置web.xml(除了springmvc的核心配置,之外如果不需要继承spring的话其他配置可不用添加)
<?xml version="1.0" encoding="UTF-8"?>
<web-app xmlns="http://java.sun.com/xml/ns/javaee"
         xmlns:xsi="http://www.w3.org/2001/XMLSchema-instance"
         xsi:schemaLocation="http://java.sun.com/xml/ns/javaee http://java.sun.com/xml/ns/javaee/web-app_2_5.xsd"
         version="2.5">
  <!-- 1.加入Spring和mybatis的配置文件 -->
  <context-param>
    <param-name>contextConfigLocation</param-name>
    <param-value>classpath:spring-mybatis.xml</param-value>
  </context-param>
<!--2.配置spring监听器:读取配置文件中的JavaBean-->
  <listener>
    <listener-class>org.springframework.web.context.ContextLoaderListener</listener-class>
  </listener>
<!-- 3.加载springmvc的核心控制器:所有请求由这个控制器进行分配处理 -->
  <servlet>
    <servlet-name>dispatcherServlet</servlet-name>
    <servlet-class>org.springframework.web.servlet.DispatcherServlet</servlet-class>
    <init-param>
      <param-name>contextConfigLocation</param-name>
      <param-value>classpath:spring-mvc.xml</param-value>
    </init-param>
    <load-on-startup>1</load-on-startup>
  </servlet>
  <servlet-mapping>
    <servlet-name>dispatcherServlet</servlet-name>
    <url-pattern>/</url-pattern>
  </servlet-mapping>

  <!-- 4.配置字符编码,解决中文乱码问题:仅限post请求 -->
  <filter>
    <filter-name>CharacterEncodingFilter</filter-name>
    <filter-class>org.springframework.web.filter.CharacterEncodingFilter</filter-class>
    <init-param>
      <param-name>encoding</param-name>
      <param-value>UTF-8</param-value>
    </init-param>
  </filter>
  <filter-mapping>
    <filter-name>CharacterEncodingFilter</filter-name>
    <url-pattern>/*</url-pattern>
  </filter-mapping>
</web-app>
4.配置spring-mvc.xml
<?xml version="1.0" encoding="UTF-8"?>
<beans
        xmlns="http://www.springframework.org/schema/beans"
        xmlns:context="http://www.springframework.org/schema/context"
        xmlns:xsi="http://www.w3.org/2001/XMLSchema-instance"
        xmlns:aop="http://www.springframework.org/schema/aop"
        xmlns:mvc="http://www.springframework.org/schema/mvc"
        xmlns:jee="http://www.springframework.org/schema/jee"
        xmlns:tx="http://www.springframework.org/schema/tx"
        xsi:schemaLocation="
    http://www.springframework.org/schema/beans http://www.springframework.org/schema/beans/spring-beans.xsd
    http://www.springframework.org/schema/context http://www.springframework.org/schema/context/spring-context.xsd
    http://www.springframework.org/schema/aop http://www.springframework.org/schema/aop/spring-aop.xsd
    http://www.springframework.org/schema/mvc http://www.springframework.org/schema/mvc/spring-mvc.xsd
    http://www.springframework.org/schema/jee http://www.springframework.org/schema/jee/spring-jee.xsd
    http://www.springframework.org/schema/tx http://www.springframework.org/schema/tx/spring-tx.xsd">
    <!--1.配置业务层的扫描-->
    <context:component-scan base-package="nick.controller"/>
    <context:component-scan base-package="nick.service"/>
    <context:component-scan base-package="nick.dao"/>

    <!--2.启用注解-->
    <mvc:annotation-driven/>

    <!-- 3.配置视图转发器 -->
    <bean id="viewResolver"
          class="org.springframework.web.servlet.view.InternalResourceViewResolver">
        <property name="prefix" value="/" />
        <property name="suffix" value=".jsp" />
    </bean>
</beans>
5.至此就配置好了,接下来使用tomcat配置好,运行起来测试即可

 浙公网安备 33010602011771号