

SpringBoot

什么是springboot
回顾什么是Spring
Spring是为了解决企业级应用开发的复杂性而创建的,简化开发。
Spring是如何简化Java开发的
为了降低Java开发的复杂性,Spring采用了以下4种关键策略:
1、基于POJO的轻量级和最小侵入性编程,所有东西都是bean;
2、通过IOC,依赖注入(DI)和面向接口实现松耦合;
3、基于切面(AOP)和惯例进行声明式编程;
4、通过切面和模版减少样式代码,RedisTemplate,xxxTemplate;
Spring Boot的主要优点:
1、为所有Spring开发者更快的入门
2、开箱即用,提供各种默认配置来简化项目配置
3、内嵌式容器简化Web项目
4、没有冗余代码生成和XML配置的要求
Spring Boot 以约定大于配置的核心思想,默认帮我们进行了很多设置,多数 Spring Boot 应用只需要很少的 Spring 配置。同时它集成了大量常用的第三方库配置(例如 Redis、MongoDB、Jpa、RabbitMQ、Quartz 等等),Spring Boot 应用中这些第三方库几乎可以零配置的开箱即用。
简单来说就是SpringBoot其实不是什么新的框架,它默认配置了很多框架的使用方式,就像maven整合了所有的jar包,spring boot整合了所有的框架 。
Spring开发-HelloWord
1、创建方式
a\可以在官网下载后,导入idea开发https://start.spring.io
b\直接使用idea创建一个springboot项目,本质 也是连接上面的网站
spring因为还要挂一个tomcat,所以都不写main入口,springboot因为是内置了tomcat,所以有一个main入口文件
项目结构分析:
通过上面步骤完成了基础项目的创建。就会自动生成以下文件。
1、程序的主启动类
2、一个 application.properties 配置文件
3、一个 测试类
4、一个 pom.xml

程序主入口
package com.cjj.helloworld;

import org.springframework.boot.SpringApplication;
import org.springframework.boot.autoconfigure.SpringBootApplication;
//程序的主入口
@SpringBootApplication
public class HelloworldApplication {

    public static void main(String[] args) {
        SpringApplication.run(HelloworldApplication.class, args);
    }

}
核心配置文件
spring.application.name=helloworld
#springboot核心配置文件
--springboot因为没有再挂一个tomcat,所以不再有Out文件夹,只有target文件夹
--可以用maven的package打包,将项目打包成一个jar包,jar包含需要的lib依赖和class文件
看下Pom.xml配置
<?xml version="1.0" encoding="UTF-8"?>
<project xmlns="http://maven.apache.org/POM/4.0.0" xmlns:xsi="http://www.w3.org/2001/XMLSchema-instance"
   xsi:schemaLocation="http://maven.apache.org/POM/4.0.0 https://maven.apache.org/xsd/maven-4.0.0.xsd">
   <modelVersion>4.0.0</modelVersion>
   <!--有一个父项目-->
   <parent>
      <groupId>org.springframework.boot</groupId>
      <artifactId>spring-boot-starter-parent</artifactId>
      <version>2.6.2</version>
      <relativePath/> <!-- lookup parent from repository -->
   </parent>
   <groupId>com.example</groupId>
   <artifactId>demo</artifactId>
   <version>0.0.1-SNAPSHOT</version>
   <name>demo</name>
   <description>Demo project for Spring Boot</description>
   <properties>
      <java.version>1.8</java.version>
   </properties>
   <dependencies>
      <!--所有的SpringBoot依赖都是spring-boot-starte 开头的-->
      <dependency>
         <groupId>org.springframework.boot</groupId>
         <artifactId>spring-boot-starter-web</artifactId>
      </dependency>

      <dependency>
         <groupId>org.springframework.boot</groupId>
         <artifactId>spring-boot-starter-test</artifactId>
         <scope>test</scope>
      </dependency>
   </dependencies>

   <build>
      <plugins>
         <plugin>
            <groupId>org.springframework.boot</groupId>
            <artifactId>spring-boot-maven-plugin</artifactId>
         </plugin>
      </plugins>
   </build>

</project>
springboot核心配置文件
server.port=8081
springboot自动装配的原理
SpringBoot所有的自动配置,都在启动类中被扫描并加载:所有的自动配置类都在这里面,但是不一定生效,要判断条件是否成立,只要导入了对应的starter们就有对应的启动器了,有了启动器,我们的自动装配就会生效,然后就配置成功了
1\SpringBoot在启动的时候,从类路径下/META-INF/spring.factories获取指定的值
2\将这些自动配置的类导入容器,自动配置类就会生效,帮我们进行自动配置
3\以前我们需要自动配置的东西,现在不需要了
4\整合javaEE,解决方案和自动配置的东西都在Spring-boot-autoconfigure下
5\它会把所有需要导入的组件,以类名的方式返回这些组件,这些组件就会被添加到容器
6\容器中也会存在非常多的XXXAutoConfigure的文件(@Bean),就是这个类给容器导入了这个场景所需要的所有组件并自动配置
主启动类怎么运行
SpringApplication.run分析
分析该方法主要分两部分,一部分是SpringApplication的实例化,二是run方法的执行;
SpringApplication
这个类主要做了以下四件事情:
1、推断应用的类型是普通的项目还是Web项目
2、查找并加载所有可用初始化器 , 设置到initializers属性中
3、找出所有的应用程序监听器,设置到listeners属性中
4、推断并设置main方法的定义类,找到运行的主类
关于SpringBoot,谈谈你的理解:
自动装配:如何加载
run方法:如何启动
全面接管SpringMVC的配置!
yaml语法讲解
配置文件
SpringBoot使用一个全局的配置文件 , 配置文件名称是固定的
application.properties
语法结构 :key=value
application.yml
语法结构 :key:空格 value
以前的配置文件,大多数都是使用xml来配置;比如一个简单的端口配置,我们来对比下yaml和xml
传统xml配置:
<server>
	<port>8081<port>
</server>
yaml配置:
server:
	prot: 8080
yaml基础语法
# k-v键值对
#对空格的要求十分高
#注入到我们的配置类
name: xiaoqi
#相当于name=xiaoqi
# 存对象
student:
  name: xiaoqi
  age: 12

# 行内写法
student1: {name: xiaoqi,age: 13}

#数组
pets:
  - cat
  - dog
  - pyg

pets1: [cat,dog]
给属性赋值的几种方式
1、用yaml文件赋值
先写dog类
package com.cjj.helloworld.pojo;

import org.springframework.stereotype.Component;

@Component
public class Dog {
    private String name;
    private int age;
//此处省略了无参有参setget
再写person类
import org.springframework.stereotype.Component;

import java.util.Date;
import java.util.List;
import java.util.Map;
@Component
@ConfigurationProperties(prefix = "person")
public class Person {

    private String name;

    private int age;
    private Boolean happy;
    private Date birthday;
    private Map<String, Object> map;
    private List<Object> list;
    private Dog dog;
    public Person() {

    }
//注意上面要绑定yaml文件
编写yaml文件
Person:
  name: xiaoqi
  age: 13
  happy: false
  birthday: 2009/01/15
  map: {k1: v1,k2: v2}
  list:
    - code
    - dog
  dog:
    name: qq
    age: 1
测试类
package com.cjj.helloworld;
//单元测试
import com.cjj.helloworld.pojo.Dog;
import com.cjj.helloworld.pojo.Person;
import org.junit.jupiter.api.Test;
import org.springframework.beans.factory.annotation.Autowired;
import org.springframework.boot.test.context.SpringBootTest;

@SpringBootTest
class HelloworldApplicationTests {
@Autowired
private Person person;

    @Test
    void contextLoads() {
        System.out.println(person);
    }

}
//输出:Person{name='xiaoqi', age=13, happy=false, birthday=Thu Jan 15 00:00:00 CST 2009, map={k1=v1, k2=v2}, list=[code, dog], dog=Dog{name='qq', age=1}}
2、用properties配置文件(非主流,不推荐)

yaml文件的好处
配置文件还可以编写占位符生成随机
Person:
  name: xiaoqi${random.uuid} # 随机uuid
  age: ${random.int}  # 随机int
  happy: false
  birth: 2009/01/15
  maps: {k1: v1,k2: v2}
  lists:
    - code
    - dog
  dog:
    name: ${person.hello:other}_旺财 #如果hello没有那么就默认值hello+旺财
    age: 1
1、@ConfigurationProperties只需要写一次即可 , @Value则需要每个字段都添加--@value指的是写properties文件
2、松散绑定:这个什么意思呢? 比如我的yml中写的last-name,这个和lastName是一样的, - 后面跟着的字母默认是大写的。这就是松散绑定。可以测试一下
3、JSR303数据校验 , 这个就是我们可以在字段是增加一层过滤器验证 , 可以保证数据的合法性
4、复杂类型封装,yml中可以封装对象 , 使用value就不支持
结论:
配置yml和配置properties都可以获取到值 , 强烈推荐 yml;
如果我们在某个业务中,只需要获取配置文件中的某个值,可以使用一下 @value;
如果说,我们专门编写了一个JavaBean来和配置文件进行一一映射,就直接@configurationProperties,不要犹豫!
JSR303
import org.springframework.validation.annotation.Validated;

import java.util.Date;
import java.util.List;
import java.util.Map;
@Component
@ConfigurationProperties(prefix = "person")
@Validated//数据校验
public class Person {
@Email()
    private String name;

    private int age;
空检查
@Null 验证对象是否为null
@NotNull 验证对象是否不为null, 无法查检长度为0的字符串
@NotBlank 检查约束字符串是不是Null还有被Trim的长度是否大于0,只对字符串,且会去掉前后空格.
@NotEmpty 检查约束元素是否为NULL或者是EMPTY.

Booelan检查
@AssertTrue 验证 Boolean 对象是否为 true
@AssertFalse 验证 Boolean 对象是否为 false

长度检查
@Size(min=, max=) 验证对象(Array,Collection,Map,String)长度是否在给定的范围之内
@Length(min=, max=) Validates that the annotated string is between min and max included.

日期检查
@Past 验证 Date 和 Calendar 对象是否在当前时间之前,验证成立的话被注释的元素一定是一个过去的日期
@Future 验证 Date 和 Calendar 对象是否在当前时间之后 ,验证成立的话被注释的元素一定是一个将来的日期
@Pattern 验证 String 对象是否符合正则表达式的规则,被注释的元素符合制定的正则表达式,regexp:正则表达式 flags: 指定 Pattern.Flag 的数组,表示正则表达式的相关选项。

数值检查
建议使用在Stirng,Integer类型,不建议使用在int类型上,因为表单值为“”时无法转换为int,但可以转换为Stirng为”“,Integer为null
@Min 验证 Number 和 String 对象是否大等于指定的值
@Max 验证 Number 和 String 对象是否小等于指定的值
@DecimalMax 被标注的值必须不大于约束中指定的最大值. 这个约束的参数是一个通过BigDecimal定义的最大值的字符串表示.小数存在精度
@DecimalMin 被标注的值必须不小于约束中指定的最小值. 这个约束的参数是一个通过BigDecimal定义的最小值的字符串表示.小数存在精度
@Digits 验证 Number 和 String 的构成是否合法
@Digits(integer=,fraction=) 验证字符串是否是符合指定格式的数字,interger指定整数精度,fraction指定小数精度。
@Range(min=, max=) 被指定的元素必须在合适的范围内
@Range(min=10000,max=50000,message=”range.bean.wage”)
@Valid 递归的对关联对象进行校验, 如果关联对象是个集合或者数组,那么对其中的元素进行递归校验,如果是一个map,则对其中的值部分进行校验.(是否进行递归验证)
@CreditCardNumber信用卡验证
@Email 验证是否是邮件地址,如果为null,不进行验证,算通过验证。
@ScriptAssert(lang= ,script=, alias=)
@URL(protocol=,host=, port=,regexp=, flags=)]()]()
多环境切换
profile是Spring对不同环境提供不同配置功能的支持,可以通过激活不同的环境版本,实现快速切换环境;
多配置文件
我们在主配置文件编写的时候,文件名可以是 application-{profile}.properties/yml , 用来指定多个环境版本;
例如:
application-test.properties 代表测试环境配置
application-dev.properties 代表开发环境配置
但是Springboot并不会直接启动这些配置文件,它默认使用application.properties主配置文件;
我们需要通过一个配置来选择需要激活的环境:
我们需要通过一个配置来选择需要激活的环境:
比如在配置文件中指定使用dev环境,我们可以通过设置不同的端口号进行测试;
我们启动SpringBoot,就可以看到已经切换到dev下的配置了;
spring.profiles.active=dev
yaml的多文档块
和properties配置文件中一样,但是使用yml去实现不需要创建多个配置文件,更加方便了 !
server:
  port: 8081

---
server:
  port: 8082
Spring:
  profiles: dev #命名

---
server:
  port: 8083
注意:如果yml和properties同时都配置了端口,并且没有激活其他环境 , 默认会使用properties配置文件的!
配置文件加载位置
外部加载配置文件的方式十分多,我们选择最常用的即可,在开发的资源文件中进行配置!
官方外部配置文件说明参考文档

springboot 启动会扫描以下位置的application.properties或者application.yml文件作为Spring boot的默认配置文件:
优先级1:项目路径下的config文件夹配置文件优先级
2:项目路径下配置文件优先级
3:资源路径下的config文件夹配置文件优先级
4:资源路径下配置文件
优先级由高到底,高优先级的配置会覆盖低优先级的配置;
SpringBoot会从这四个位置全部
加载主配置文件;互补配置;
我们在最低级的配置文件中设置一个项目访问路径的配置来测试互补问题;
#配置项目的访问路径server.servlet.context-path=/kuang
自动配置原理
一句话总结 :根据当前不同的条件判断,决定这个配置类是否生效!
一但这个配置类生效;这个配置类就会给容器中添加各种组件;
这些组件的属性是从对应的properties类中获取的,这些类里面的每一个属性又是和配置文件绑定的;
所有在配置文件中能配置的属性都是在xxxxProperties类中封装着;
配置文件能配置什么就可以参照某个功能对应的这个属性类
//从配置文件中获取指定的值和bean的属性进行绑定
@ConfigurationProperties(prefix = "spring.http")
public class HttpProperties {
    // .....
}
这就是自动装配的原理!
精髓
1、SpringBoot启动会加载大量的自动配置类
2、我们看我们需要的功能有没有在SpringBoot默认写好的自动配置类当中;
3、我们再来看这个自动配置类中到底配置了哪些组件;(只要我们要用的组件存在在其中,我们就不需要再手动配置了)
4、给容器中自动配置类添加组件的时候,会从properties类中获取某些属性。我们只需要在配置文件中指定这些属性的值即可;
xxxxAutoConfigurartion:自动配置类;给容器中添加组件
xxxxProperties:封装配置文件中相关属性;
SpringBootWeb开发
speingboot到底帮我们配置了什么?我们能不能修改?能修改哪些东西?能不能扩展?
xxxAutoconfiguration:向容器中自动配置组件
xxxxProperties:自动配置类,装配配置文件中自定义的一些内容
解决问题:
导入静态资源
首页
jsp,模板引擎Thymeleaf
装配扩展SpringMVC
增删改查
拦截器
国际化
静态资源
拿到静态资源的第一种方式
http://localhost:8080/webjars/github-com-jquery-jquery/3.4.1/jquery.js
使用/**/static或者/resources或者/public来访问静态资源
localhost:8080/**/
优先级:resources>static(默认)>puiblic
很少使用webjars
Thymeleaf模板引擎
模板引擎
前端交给我们的页面,是html页面。如果是我们以前开发,我们需要把他们转成jsp页面,jsp好处就是当我们查出一些数据转发到JSP页面以后,我们可以用jsp轻松实现数据的显示,及交互等。
jsp支持非常强大的功能,包括能写Java代码,但是呢,我们现在的这种情况,SpringBoot这个项目首先是以jar的方式,不是war,像第二,我们用的还是嵌入式的Tomcat,所以呢,他现在默认是不支持jsp的。
那不支持jsp,如果我们直接用纯静态页面的方式,那给我们开发会带来非常大的麻烦,那怎么办呢?
SpringBoot推荐你可以来使用模板引擎:
导入依赖
<dependency>
            <!--都是基于3.xx开发的-->
            <groupId>org.thymeleaf</groupId>
            <artifactId>thymeleaf-spring5</artifactId>
        </dependency>
Thymeleaf 语法学习
要学习语法,还是参考官网文档最为准确,我们找到对应的版本看一下;
员工管理系统
跳转到首页有两个方式
controller包写一个类
package com.cjj.controller;

import org.springframework.stereotype.Controller;
import org.springframework.web.bind.annotation.RequestMapping;

@Controller
public class IndexController {
    @RequestMapping(value = {"/", "/index"})
    public String index() {
        return "index";
    }

}
或者用mvcconfig

package com.cjj.config;

import org.springframework.context.annotation.Configuration;
import org.springframework.web.servlet.config.annotation.EnableWebMvc;
import org.springframework.web.servlet.config.annotation.ViewControllerRegistry;
import org.springframework.web.servlet.config.annotation.WebMvcConfigurer;

@Configuration

public class MyMvcConfig implements WebMvcConfigurer {
    @Override
    public void addViewControllers(ViewControllerRegistry registry) {
        registry.addViewController("/").setViewName("index");

    }
}
国际化
[(https://blog.csdn.net/weixin_45629285/article/details/116462484)]
整合JDBC的使用
springboot创建的时候已经可以直接选要哪些maven,而且不会有版本冲突,不像spring一样还要外部找mavaen,容易引起版本冲突

注意,controler包要和主程序在同一路径
1、配置文件连接数据库,用yaml
spring:
  datasource:
    username: root
    password: 123456
    url: jdbc:mysql://localhost:3306/mybatis?serverTimezone=UTC&useUnicode=true&characterEncoding=utf8
    driver-class-name: com.mysql.cj.jdbc.Driver
2、在controllor用jdbctemlate模板,但是企业一般用mybatis-plus,这个Jdbctemlate也是内置可以快速查询数据库的,但是还是要写sql语句,没有mybatis-plus方便,sql语句都不用写
JDBCTemplate
1、有了数据源(com.zaxxer.hikari.HikariDataSource),然后可以拿到数据库连接(java.sql.Connection),有了连接,就可以使用原生的 JDBC 语句来操作数据库;
2、即使不使用第三方第数据库操作框架,如 MyBatis等,Spring 本身也对原生的JDBC 做了轻量级的封装,即JdbcTemplate。
3、数据库操作的所有 CRUD 方法都在 JdbcTemplate 中。
4、Spring Boot 不仅提供了默认的数据源,同时默认已经配置好了 JdbcTemplate 放在了容器中,程序员只需自己注入即可使用
5、JdbcTemplate 的自动配置是依赖 org.springframework.boot.autoconfigure.jdbc 包下的 JdbcTemplateConfiguration 类
JdbcTemplate主要提供以下几类方法:
execute方法:可以用于执行任何SQL语句,一般用于执行DDL语句;
update方法及batchUpdate方法:update方法用于执行新增、修改、删除等语句;batchUpdate方法用于执行批处理相关语句;
query方法及queryForXXX方法:用于执行查询相关语句;
call方法:用于执行存储过程、函数相关语句。
测试CRUD
package com.example.springboot04date.controller;
import org.springframework.beans.factory.annotation.Autowired;
import org.springframework.jdbc.core.JdbcTemplate;
import org.springframework.web.bind.annotation.GetMapping;
import org.springframework.web.bind.annotation.PathVariable;
import org.springframework.web.bind.annotation.RestController;
import java.util.List;
import java.util.Map;
@RestController
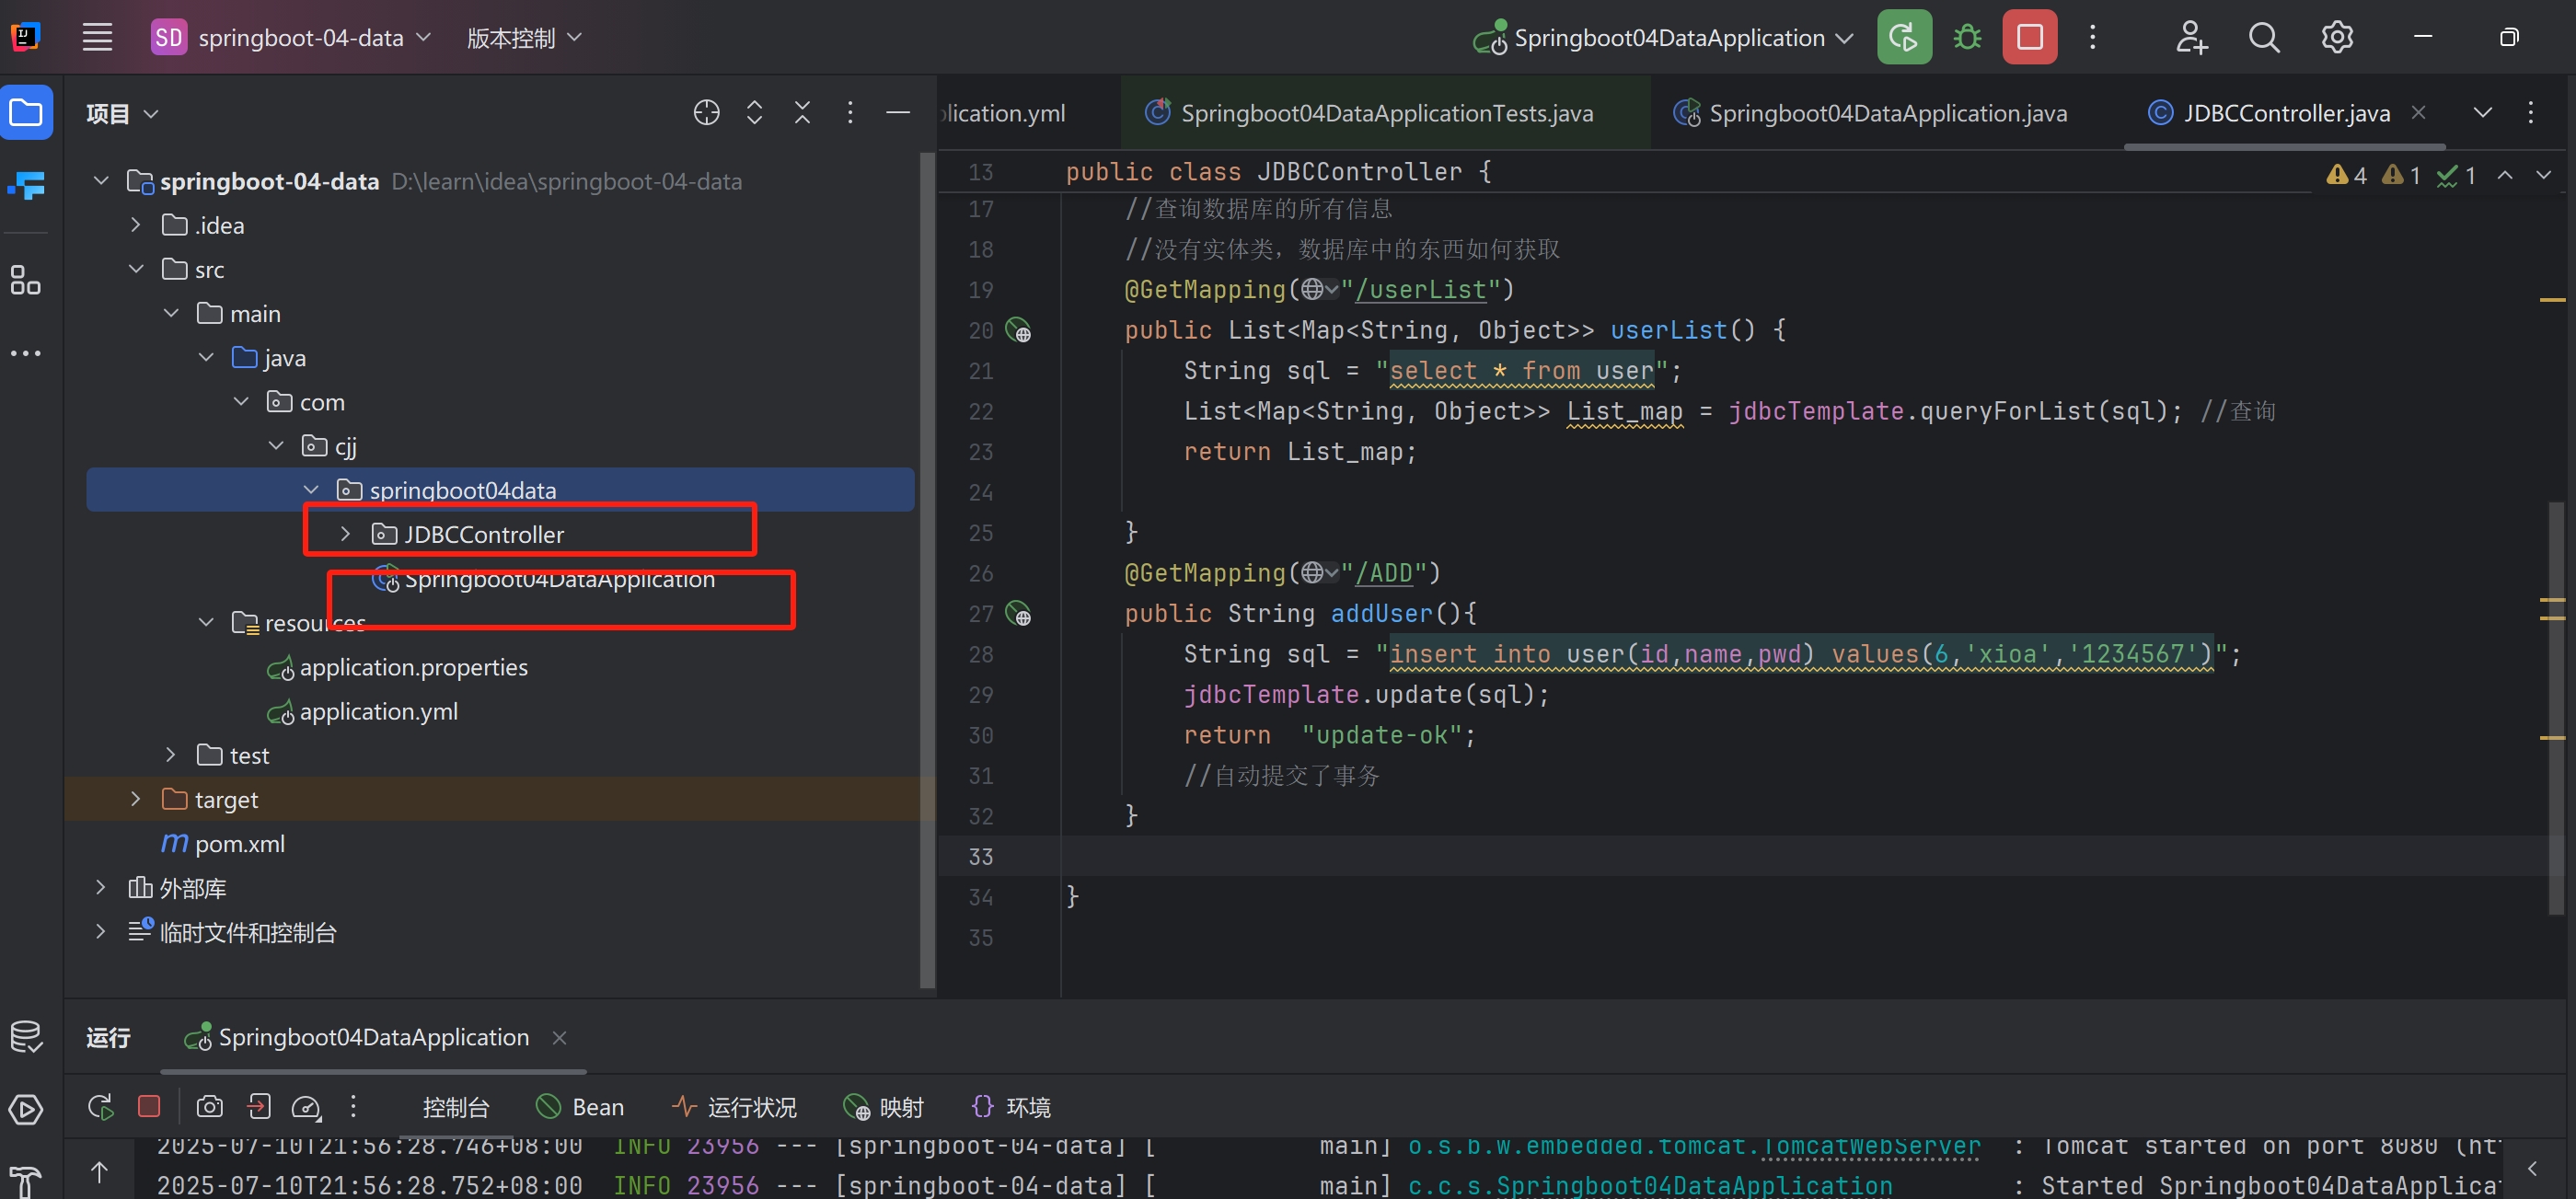
public class JDBCController {
@Autowired
JdbcTemplate jdbcTemplate;
//查询数据库的所有信息
//没有实体类,数据库中的东西如何获取
@GetMapping("/userList")
public List<Map<String,Object>> userList(){
String sql = "select * from user";
List<Map<String,Object>> List_map= jdbcTemplate.queryForList(sql); //查询
return List_map;
}
@GetMapping("/ADD")
public String addUser(){
String sql = "insert into user(id,name,pwd) values(6,'xioa','1234567')";
jdbcTemplate.update(sql);
return "update-ok";
//自动提交了事务
}
@GetMapping("/update/{id}")
public String update(@PathVariable("id") int id){
String sql = "update user set name = ? ,pwd= ?where id ="+id;
//封装
Object[] objects = new Object[2];
objects[0] = "qq";
objects[1] = "12345678";
jdbcTemplate.update(sql,objects);
return "update-ok2";
}
@GetMapping("/delete/{id}")
public String delete(@PathVariable("id") int id){
String sql = "delete from user where id = ?";
jdbcTemplate.update(sql,id);
return "delet-ok";
}
}
整合Druid数据源
Druid 是阿里巴巴开源平台上一个数据库连接池实现,结合了 C3P0、DBCP 等 DB 池的优点,同时加入了日志监控。
Druid 可以很好的监控 DB 池连接和 SQL 的执行情况,天生就是针对监控而生的 DB 连接池。
1\添加依赖
<dependency>
    <groupId>com.alibaba</groupId>
    <artifactId>druid</artifactId>
    <version>1.1.23</version>
</dependency>
2、去配置Druid,配置自定义的数据源
spring:
  datasource:
    username: root
    password: 123456
    url: jdbc:mysql://localhost:3306/mybatis?useSSL=true&userUniceode=true&characterEncoding=utf8
    driver-class-name: com.mysql.cj.jdbc.Driver
    type: com.alibaba.druid.pool.DruidDataSource
3、接下来就可以设置数据源连接初始化大小、最大连接数、等待时间、最小连接数 等设置项;可以查看源码
  #Spring Boot 默认是不注入这些属性值的,需要自己绑定
    #druid 数据源专有配置
    initialSize: 5
    minIdle: 5
    maxActive: 20
    maxWait: 60000
    timeBetweenEvictionRunsMillis: 60000
    minEvictableIdleTimeMillis: 300000
    validationQuery: SELECT 1 FROM DUAL
    testWhileIdle: true
    testOnBorrow: false
    testOnReturn: false
    poolPreparedStatements: true

    #配置监控统计拦截的filters,stat:监控统计、log4j:日志记录、wall:防御sql注入
    #如果允许时报错  java.lang.ClassNotFoundException: org.apache.log4j.Priority
    #则导入 log4j 依赖即可,Maven 地址:https://mvnrepository.com/artifact/log4j/log4j
    filters:
      commons-log.connection-logger-name: stat,wall,log4j
    maxPoolPreparedStatementPerConnectionSize: 20
    useGlobalDataSourceStat: true
    connectionProperties: druid.stat.mergeSql=true;druid.stat.slowSqlMillis=500
4、因为Druid中包含log4j所以需要导入依赖
 <dependency>
            <groupId>log4j</groupId>
            <artifactId>log4j</artifactId>
            <version>1.2.17</version>
        </dependency>
5、现在需要程序员自己为 DruidDataSource 绑定全局配置文件中的参数,再添加到容器中,而不再使用 Spring Boot 的自动生成了;我们需要 自己添加 DruidDataSource 组件到容器中,并绑定属性
public class DruidConfig {
    @Bean
    @ConfigurationProperties(prefix = "spring.datasource")
    //绑定到application.xml文件中 生效
    public DataSource druidDateSource(){
        return new DruidDataSource();
    }
}
6、Druid具有看监控功能,可以方便用户在web端看见后台的操作,配置后台监控和过滤器,后期登陆域名+druid/sql.html就可以上监控的web端
package com.example.springboot04date.config;

import com.alibaba.druid.pool.DruidDataSource;
import com.alibaba.druid.support.http.StatViewServlet;
import com.alibaba.druid.support.http.WebStatFilter;
import org.springframework.boot.context.properties.ConfigurationProperties;
import org.springframework.boot.web.servlet.FilterRegistrationBean;
import org.springframework.boot.web.servlet.ServletRegistrationBean;
import org.springframework.context.annotation.Bean;
import org.springframework.context.annotation.Configuration;

import javax.sql.DataSource;
import java.io.File;
import java.util.HashMap;

@Configuration
public class DruidConfig {
    @Bean
    @ConfigurationProperties(prefix = "spring.datasource")
    //绑定到application.xml文件中 生效
    public DataSource druidDateSource(){
        return new DruidDataSource();
    }

    //因为iSpringBoot内置了servlet容器,所有没有web.xml,替代方法、:ServletRegistrationBean
    //后台监控功能
    @Bean
    public ServletRegistrationBean statViewServlet(){
        ServletRegistrationBean<StatViewServlet> bean = new ServletRegistrationBean<>(new StatViewServlet(), "/druid/*");//访问这个就可以进入后台监控页面,写死的
        //后台需要有人登录
        //账号密码配置也是死的
        HashMap<String,String> initParameters = new HashMap<>();
        //增加配置
        initParameters.put("loginUsername","admin");
        initParameters.put("loginPassword","123456");//key是固定的

        //允许谁能访问
        initParameters.put("allow","");

        bean.setInitParameters(initParameters);//设置初始化参数
        return bean;
    }

    //filter后台过滤
    @Bean
    public FilterRegistrationBean webServletFilter(){
        FilterRegistrationBean bean = new FilterRegistrationBean();
        bean.setFilter(new WebStatFilter());
        //可以过滤哪些请求
        HashMap<String,String> map = new HashMap<>();
        map.put("exclusions","*.js,*.css,/druid/*");//这些东西不进行统计
        bean.setInitParameters(map);
        return bean;
    }

}
整合Mybatis框架
1、导入依赖
 <!-- https://mvnrepository.com/artifact/org.mybatis.spring.boot/mybatis-spring-boot-starter -->
        <dependency>
            <groupId>org.mybatis.spring.boot</groupId>
            <artifactId>mybatis-spring-boot-starter</artifactId>
            <version>2.1.3</version>
        </dependency>
2、连接数据库
spring.datasource.username=root
spring.datasource.password=123456
spring.datasource.url=jdbc:mysql://localhost:3306/mybatis?userUnicode=true&useSSL=true&characterEncoding=utf8
spring.datasource.driver-class-name=com.mysql.cj.jdbc.Driver
3、mapper
package com.example.springboot05mybatis.mapper;

import com.example.springboot05mybatis.pojo.User;
import org.apache.ibatis.annotations.Mapper;
import org.springframework.stereotype.Repository;

import java.util.List;

//这个实体类既需要具有增删改查的功能又需要注册到spring中托管所有需要Repository和mapper
@Mapper
@Repository //Dao层
//这个注解代表了这是一个mybatis的mapper接口
public interface UserMapper {
    List<User> queryUserList();

    User queryUserById(int id);

    int updateUser(User user);

    int addUser(User user);

    int deleteUser(int id);

}
4\整合mybatis,让spring可以识别mappper
spring.datasource.username=root
spring.datasource.password=123456
spring.datasource.url=jdbc:mysql://localhost:3306/mybatis?userUnicode=true&useSSL=true&characterEncoding=utf8
spring.datasource.driver-class-name=com.mysql.cj.jdbc.Driver

#整合Mybatis
#让spring识别到mapper文件
mybatis.type-aliases-package=com.example.springboot05mybatis.pojo
mybatis.mapper-locations=classpath:mybatis/mapper/*.xml
5\编写controller测试
package com.example.springboot05mybatis.controller;

import com.example.springboot05mybatis.mapper.UserMapper;
import com.example.springboot05mybatis.pojo.User;
import org.springframework.beans.factory.annotation.Autowired;
import org.springframework.web.bind.annotation.GetMapping;
import org.springframework.web.bind.annotation.PathVariable;
import org.springframework.web.bind.annotation.RestController;

import java.util.List;

@RestController
public class UserController {
    @Autowired
    private UserMapper userMapper;

    @GetMapping("/query")
    public List<User> quertyUserList(){
        List<User> users = userMapper.queryUserList();
        for (User user : users){
            System.out.println(user);
        }
        return users;
    }

    @GetMapping("/byid/{id}")
    public User queryUserById(@PathVariable("id") int id){
        User user = userMapper.queryUserById(id);
        System.out.println(user);
        return user;
    }

    @GetMapping("/updata")
    public String updateUser(){
        User user = new User(4,"xiaoqi","123456");
        if (userMapper.updateUser(user)!=0){
            return "ok";
        }
        return "false";

    }
}
SpringSecurity(安全)
在web开发中,安全第一位,原来可以用过滤器,拦截器
shiro,spirngsecurity,除了类不一样,名字不一样
解决认证,授权问题
--功能权限
--访问权限
--菜单权限
mvc-spring-sprigboot一路在简化
1、添加启动器,thymeleaf和Security依赖
2、加入thymeleaf模板,模板网上找
3、写controller
package com.cjj.springboot07security.controller;

import org.springframework.stereotype.Controller;
import org.springframework.web.bind.annotation.PathVariable;
import org.springframework.web.bind.annotation.RequestMapping;
@Controller
public class RouterController {
    @RequestMapping({"/", "/index"})
    public String index() {
        return "index";
    }
    @RequestMapping("toLogin")
    public String toLogin() {
        return "views/login";
    }
    //可以实现公用
    @RequestMapping("/level1/{id}")
    public String level(@PathVariable("id") int id){
        return "views/level1/" +id;
    }

    @RequestMapping("/level2/{id}")
    public String level2(@PathVariable("id") int id){
        return "views/level2/" +id;
    }

    @RequestMapping("/level3/{id}")
    public String level3(@PathVariable("id") int id){
        return "views/level3/" +id;
    }
}
4、认证和授权--但是现在已经没有这个方法了,了解就行,大概就是在方法里面,设立认证和授权的规则
package com.xiaoqi.config;

import org.springframework.security.config.annotation.authentication.builders.AuthenticationManagerBuilder;
import org.springframework.security.config.annotation.web.builders.HttpSecurity;
import org.springframework.security.config.annotation.web.configuration.EnableWebSecurity;
import org.springframework.security.config.annotation.web.configuration.WebSecurityConfigurerAdapter;
import org.springframework.security.crypto.bcrypt.BCryptPasswordEncoder;

@EnableWebSecurity
public class SecurityConfig extends WebSecurityConfigurerAdapter {
    @Override
    //授权
    protected void configure(HttpSecurity http) throws Exception {
        //首页所有人可以访问,但是功能页只有对应有权限的人才能访问
        //链式编程
        //请求授权的规则
        http.authorizeHttpRequests().antMatchers("/").permitAll()
                .antMatchers("/level1/**").hasRole("vip1")
                .antMatchers("/level2/**").hasRole("vip2")
                .antMatchers("/levle3/**").hasRole("vip3");

        //没有权限默认为登陆也
        http.formLogin();
    }

    //认证
    //密码编码  PasswordEncoder
    //在SpringSecuritys5中,新增了许多加密方式
    @Override
    protected void configure(AuthenticationManagerBuilder auth) throws Exception {
        //这些数据应该从数据库中读
        auth.inMemoryAuthentication().passwordEncoder(new BCryptPasswordEncoder())
                .withUser("xiaoqi").password(new BCryptPasswordEncoder().encode("123456")).roles("vip2","vip3")
                .and()
                .withUser("root").password(new BCryptPasswordEncoder().encode("123456")).roles("vip1","vip2","vip3");
    }
}
整合Shiro-也是安全的框架
核心三大对象:用户Subject, 管理用户SecurityManager, 连接数据Realms
Subject:即“当前操作用户”。但是,在Shiro中,Subject这一概念并不仅仅指人,也可以是第三方进程、后台帐户(Daemon Account)或其他类似事物。它仅仅意味着“当前跟软件交互的东西”。
SecurityManager:它是Shiro框架的核心,典型的Facade模式,Shiro通过SecurityManager来管理内部组件实例,并通过它来提供安全管理的各种服务。
Realm: Realm充当了Shiro与应用安全数据间的“桥梁”或者“连接器”。也就是说,当对用户执行认证(登录)和授权(访问控制)验证时,Shiro会从应用配置的Realm中查找用户及其权限信息。从这个意义上讲,Realm实质上是一个安全相关的DAO:它封装了数据源的连接细节,并在需要时将相关数据提供给Shiro。当配置Shiro时,你必须至少指定一个Realm,用于认证和(或)授权。配置多个Realm是可以的,但是至少需要一个。
1、导入依赖
    <dependencies>
        <!--整合shiro
        Subject:用户
        SecurityManager:管理所有用户
        Realm:连接数据
        -->
        <!--连接musql驱动-->
        <dependency>
            <groupId>mysql</groupId>
            <artifactId>mysql-connector-java</artifactId>
        </dependency>
        <dependency>
            <groupId>org.apache.shiro</groupId>
            <artifactId>shiro-spring</artifactId>
            <version>1.4.1</version>
        </dependency>
        <dependency>
            <groupId>org.springframework.boot</groupId>
            <artifactId>spring-boot-starter-web</artifactId>
        </dependency>
        <dependency>
            <groupId>org.springframework.boot</groupId>
            <artifactId>spring-boot-starter-test</artifactId>
            <scope>test</scope>
        </dependency>
        <dependency>
            <groupId>org.thymeleaf</groupId>
            <artifactId>thymeleaf-spring5</artifactId>
        </dependency>
        <!-- https://mvnrepository.com/artifact/org.mybatis.spring.boot/mybatis-spring-boot-starter -->
        <dependency>
            <groupId>org.mybatis.spring.boot</groupId>
            <artifactId>mybatis-spring-boot-starter</artifactId>
            <version>2.1.3</version>
        </dependency>
        <dependency>
            <groupId>log4j</groupId>
            <artifactId>log4j</artifactId>
            <version>1.2.17</version>
        </dependency>
        <dependency>
            <groupId>com.alibaba</groupId>
            <artifactId>druid</artifactId>
            <version>1.1.23</version>
        </dependency>
        <dependency>
            <groupId>org.projectlombok</groupId>
            <artifactId>lombok</artifactId>
        </dependency>

        <!--整合thymeleaf-->
        <!-- https://mvnrepository.com/artifact/com.github.theborakompanioni/thymeleaf-extras-shiro -->
        <dependency>
            <groupId>com.github.theborakompanioni</groupId>
            <artifactId>thymeleaf-extras-shiro</artifactId>
            <version>2.0.0</version>
        </dependency>

    </dependencies>
2、
Swagger
前后端分离
前端 -> 前端控制层、视图层
后端 -> 后端控制层、服务层、数据访问层
前后端通过API进行交互
前后端相对独立且松耦合
前后端可以部署在不同的服务器上
产生的问题
前后端集成,前端或者后端无法做到“及时协商,尽早解决”,最终导致问题集中爆发
解决方案
首先定义schema [ 计划的提纲 ],并实时跟踪最新的API,降低集成风险
Swagger
号称世界上最流行的API框架
Restful Api 文档在线自动生成器 => API 文档 与API 定义同步更新
直接运行,在线测试API
支持多种语言 (如:Java,PHP等)
SpringBoot集成Swagger
SpringBoot集成Swagger => springfox,两个jar包
Springfox-swagger2
swagger-springmvc
1、导入相关依赖
 <!-- https://mvnrepository.com/artifact/io.springfox/springfox-swagger-ui -->
        <dependency>
            <groupId>io.springfox</groupId>
            <artifactId>springfox-swagger-ui</artifactId>
            <version>2.10.0</version>
        </dependency>
        <!-- https://mvnrepository.com/artifact/io.springfox/springfox-swagger2 -->
        <dependency>
            <groupId>io.springfox</groupId>
            <artifactId>springfox-swagger2</artifactId>
            <version>2.9.2</version>
        </dependency>
如果上面依赖启动失败,将springboot降至2.5.5
或最新版的springboot,直接导入一个springfox-boot-starter
2、配置swagger==>config
加了configuration就相当于加了compent组件,springbootl默认会创建这个对象
@Configuration
@EnableSwagger2  //开启Swagger2
public class SwaggerConfig {
}

3,配置swagger
1、Swagger实例Bean是Docket,所以通过配置Docket实例来配置Swaggger
    @Bean
    public Docket docket(){
        return new Docket(DocumentationType.SWAGGER_2)//配置了Swaggerbean实例
                .apiInfo(apiInfo());//重新配置了默认的文档信息
    }
2.创建一个apiinfo 配置基本信息
//配置Swagger信息=apiInfo
    public ApiInfo apiInfo(){

        Contact contact = new Contact("小七","xiaoqistudy.blog.csdn.net","123");//作者信息
        return new ApiInfo("Api Documentation",
                "Api Documentation", "1.0",
                "xiaoqistudy.blog.csdn.nets", contact,
                "Apache 2.0", "http://www.apache.org/licenses/LICENSE-2.0", new ArrayList());

    }
3、配置扫描接口
构建Docket时通过select()方法配置怎么扫描接口。
相较于传统的Postman或Curl方式测试接口,使用swagger简直就是傻瓜式操作,不需要额外说明文档(写得好本身就是文档)而且更不容易出错,只需要录入数据然后点击Execute,如果再配合自动化框架,可以说基本就不需要人为操作了。
Swagger是个优秀的工具,现在国内已经有很多的中小型互联网公司都在使用它,相较于传统的要先出Word接口文档再测试的方式,显然这样也更符合现在的快速迭代开发行情。当然了,提醒下大家在正式环境要记得关闭Swagger,一来出于安全考虑来也可以节省运行时内存。
正式发布时,注意关了swagger.,会占资源
任务,异步任务,定时任务,邮件
异步任务
package com.example.xiaoqi.service;

import org.springframework.scheduling.annotation.Async;
import org.springframework.stereotype.Service;

@Service
public class AsynService {
    //告诉Spring这是一个异步的方法
    @Async
    public void hello(){
        try {
            Thread.sleep(3000);
        } catch (InterruptedException e) {
            e.printStackTrace();
        }
        System.out.println("数据正在处理");
    }
}
package com.example.xiaoqi;

import org.springframework.boot.SpringApplication;
import org.springframework.boot.autoconfigure.SpringBootApplication;
import org.springframework.scheduling.annotation.EnableAsync;

//开启异步功能
@EnableAsync
@SpringBootApplication
public class SpringBoot09Application {

    public static void main(String[] args) {
        SpringApplication.run(SpringBoot09Application.class, args);
    }

}
package com.example.xiaoqi.Controller;

import com.example.xiaoqi.service.AsynService;
import org.springframework.beans.factory.annotation.Autowired;
import org.springframework.web.bind.annotation.RequestMapping;
import org.springframework.web.bind.annotation.RestController;

@RestController
public class AsynController {

    @Autowired
    AsynService asynService;
    @RequestMapping("/hello")
    public String hello(){
        asynService.hello();//如果不加异步的功能,这里没停3秒,才会返回ok,客户体验就很差,如果加了异步功能,就马上返回OK,但是这一步还是持续在处理
        return "ok";
    }
}
邮件任务
1、添加依赖
   <dependency>
            <groupId>org.springframework.boot</groupId>
            <artifactId>spring-boot-starter-mail</artifactId>
        </dependency>
2、设备邮箱
spring.mail.username=719189161@qq.com
spring.mail.password=xxxxxxxxxx
spring.mail.host=smtp.qq.com

spring.mail.properties.mail.smtp.ssl.enable=true
3、test
import javax.mail.internet.MimeMessage;

@SpringBootTest
class SpringBoot09ApplicationTests {
    @Autowired
    JavaMailSenderImpl mailSender;


    //简单的邮件
    @Test
    void contextLoads() {
        SimpleMailMessage mailMessage = new SimpleMailMessage();
        mailMessage.setSubject("12");
        mailMessage.setText("11");
        mailMessage.setTo("719189161@qq.com");
        mailMessage.setFrom("719189161@qq.com");
        mailSender.send(mailMessage);
    }

}
 //复杂的邮件
    @Test
    void contextLoads2() throws MessagingException {
        //一个复杂的邮件
        MimeMessage mimeMessage = mailSender.createMimeMessage();
        //组装
        //正文
        MimeMessageHelper messageHelper = new MimeMessageHelper(mimeMessage,true);
        messageHelper.setSubject("12");
        //true 支持html
        messageHelper.setText("<p>123</p>",true);
        //附件
        messageHelper.addAttachment("1.jpg",new File("D:\\java\\SpringBoot\\SpringBoot-09\\src\\main\\resources\\images\\1.jpg"));
        messageHelper.setTo("719189161@qq.com");
        messageHelper.setFrom("719189161@qq.com");
        mailSender.send(mimeMessage);
    }
定时任务
项目开发中经常需要执行一些定时任务,比如需要在每天凌晨的时候,分析一次前一天的日志信息,Spring为我们提供了异步执行任务调度的方式,提供了两个接口。
TaskExecutor接口 任务执行
TaskScheduler接口 任务调度
两个注解
@EnableScheduling//开启定时功能的注解
@Scheduled//什么时候执行
1、在启动类加@EnableScheduling
2、在service加一个类
package com.cjj.swaggerdemo.service;

import org.springframework.scheduling.annotation.Scheduled;
import org.springframework.stereotype.Service;

@Service
public class ScheduleService {
    //在一个特定的时间执行这个方法
    //cron表达式:秒 分 时 日 月 周几 年
    //30 0/5 10,18 * *? 每隔5分钟,在10点和18点执行
    @Scheduled(cron = "0 14 23 * *  ?") //每天的23:14执行
    public void hello() {
        System.out.println("hello,你被执行了");
    }
}
springboot集成redis
1\导入依赖
2、配置连接
3、测试
关于对象的保存需要序列化,不然保存到报错
序列化(Serialization)本质上是将对象的状态信息转换为可存储或传输的格式的过程,常见的格式包括:
1、字节流(二进制格式)
Java原生序列化
Protobuf、Avro等跨语言二进制协议
2、文本格式
JSON(最常用)
XML
YAML
分布式Dubbo+Zooker
什么是分布式系统?
在《分布式系统原理与范型》一书中有如下定义:“分布式系统是若干独立计算机的集合,这些计算机对于用户来说就像单个相关系统”;
分布式系统是由一组通过网络进行通信、为了完成共同的任务而协调工作的计算机节点组成的系统。分布式系统的出现是为了用廉价的、普通的机器完成单个计算机无法完成的计算、存储任务。其目的是利用更多的机器,处理更多的数据。
RPC
RPC两个核心模块:通讯,序列化。
Dubbo
Apache Dubbo |ˈdʌbəʊ| 是一款高性能、轻量级的开源Java RPC框架,它提供了三大核心能力:面向接口的远程方法调用,智能容错和负载均衡,以及服务自动注册和发现。
1、服务提供者(Provider):暴露服务的服务提供方,服务提供者在启动时,向注册中心注册自己提供的服务。
2、服务消费者(Consumer):调用远程服务的服务消费方,服务消费者在启动时,向注册中心订阅自己所需的服务,服务消费者,从提供者地址列表中,基于软负载均衡算法,选一台提供者进行调用,如果调用失败,再选另一台调用。
3、注册中心(Registry):注册中心返回服务提供者地址列表给消费者,如果有变更,注册中心将基于长连接推送变更数据给消费者
4、监控中心(Monitor):服务消费者和提供者,在内存中累计调用次数和调用时间,定时每分钟发送一次统计数据到监控中心
注册中心,dubbo建议我们使用zookeeper
dubbo-admin:是一个监控管理后台,查看我们注册了哪些服务,哪些服务被消费了


 浙公网安备 33010602011771号