1-Django - 视图
before
Django2.2 + Python3.6.8
请求的request对象常用属性
首先,路由和前端访问:
# get请求
# http://127.0.0.1:8000/books/?a=1&b=2
# path('books/', views.books),
视图:
from django.shortcuts import render, HttpResponse

def books(request):
    print(request)  # <WSGIRequest: GET '/books/?a=1&b=2'>
    print(request.method)  # 请求类型: GET
    print(request.POST)   # 为空:<QueryDict: {}>
    print(request.GET)	# <QueryDict: {'a': ['1'], 'b': ['2']}>
    print(request.path)  # 当前请求的url: /books/
    print(request.get_full_path())  # 当前请求的url,带参数: /books/?a=1&b=2
    print(request.META)  # 所有请求头信息
    return HttpResponse("BOOKS")
常用响应方法
在视图函数中,常用的响应方法有以下三个:
from django.shortcuts import render, HttpResponse, redirect

def books(request):

    # return HttpResponse('OK')
    # return render(request, 'books.html')

    return redirect('/home/')   # 必须是路径:可以是相互路径(内部网站)和绝对路径(外部网站)
其中:
- render:响应页面,默认响应状态码为200。
- HttpResponse:仅能响应字符串,默认响应状态码为200。
- redirect:Django的redirect是临时重定向,默认响应状态码为302,且路径前的
/必须带上。- 301:永久重定向
- 302:临时重定向
render和redirect的区别
以登录(login)成功跳转到主页(index)为例。
- 跳转使用render的话,浏览器的url栏的url不会随之改变,比如登录成功后,跳转到index页面后,浏览器的url栏的url还是登录的url。
- 除了1中的问题,更严重的是,登录成功,使用render跳转,如果index页面需要模板数据,那么这些数据将不会渲染!!原因是在登录的视图函数中render直接返回index页面,并没有处理模板数据,而redirect则走了index视图函数,而在index视图函数中有处理模板数据的逻辑。
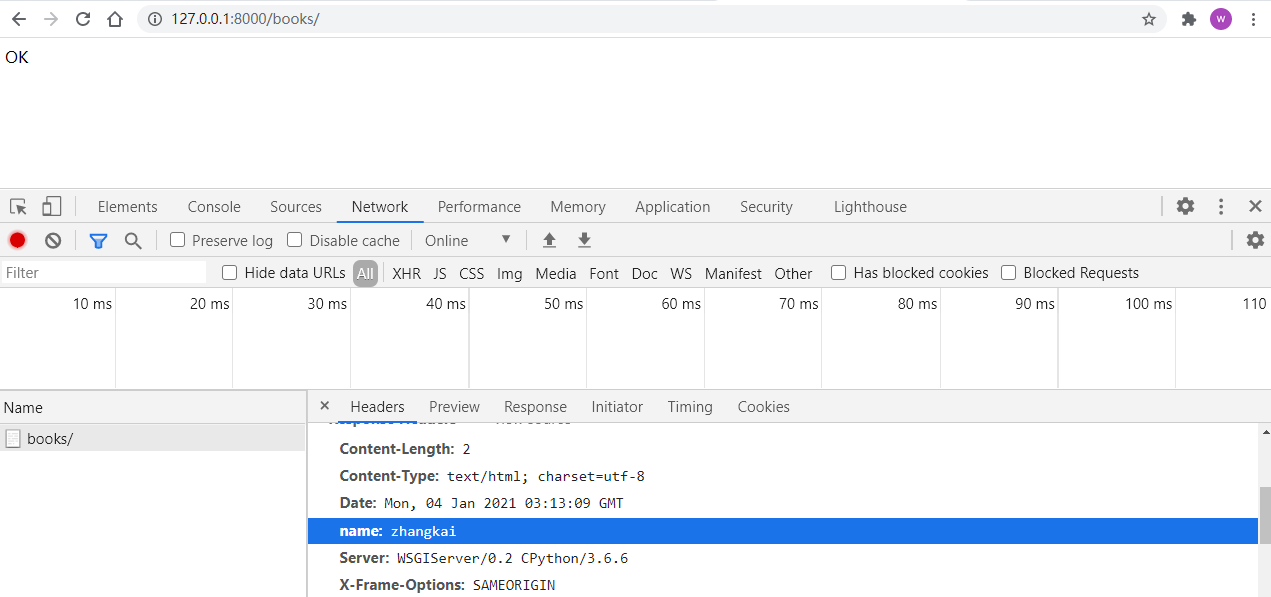
设置响应头的键值对和状态码
视图函数在返回时,可以自定义一些键值对,方便后续前端获取使用。
# http://127.0.0.1:8000/books/
# urls.py
from django.contrib import admin
from django.urls import path, re_path
from app01 import views
urlpatterns = [
    path('admin/', admin.site.urls),
    path('books/', views.books),
]

# views.py
from django.shortcuts import render, HttpResponse, redirect

def books(request):

    # render 设置键值对
    # r = render(request, 'books.html')
    # r['name'] = 'zhangkai'
    # return r

    # redirect 设置键值对

    # r = redirect('/home/')
    # r['name'] = 'zhangkai'
    # return r

    # HttpResponse 设置键值对
    hp = HttpResponse('OK')
    hp['name'] = 'zhangkai'

    # 有些特殊场景,也可以自定义响应状态码
    hp.status_code = 404
    return hp
CBV和FBV
FBV(Function base views):基于函数的视图。
CBC(Class base views):基于类的的视图:
- 可以使用面向对象的技术,提高了代码的复用性。
- 可以用不同的函数来处理不同的请求类型,而不用如FBV中,使用if判断来处理,提高了代码的可读性。
FBV的基本写法
# http://127.0.0.1:8000/books/

# urls.py
from django.contrib import admin
from django.urls import path, re_path
from app01 import views

urlpatterns = [
    path('admin/', admin.site.urls),
    path('books/', views.books),
]

# views.py
from django.shortcuts import render, HttpResponse, redirect


def inner(func):
    def wrapper(*args, **kwargs):
        print("方法执行之前,要做的逻辑")
        ret = func(*args, **kwargs)
        print("方法执行之后,要做的逻辑")
        return ret
    return wrapper

@inner   # 如果在FBV中要用到装饰器,就这么用
def books(request):
    return HttpResponse('OK')
CBV的基本写法
# http://127.0.0.1:8000/books/

# urls.py
from django.contrib import admin
from django.urls import path, re_path
from app01 import views

urlpatterns = [
    path('admin/', admin.site.urls),
    path('books/', views.Books.as_view()),  # 必须这么写
]

# views.py
from django.shortcuts import render, HttpResponse, redirect
from django.views import View  # 必须导入

class Books(View):   # 必须继承
    def get(self, request):   # get请求,必须传参 request
        return HttpResponse("OK")
CBV模式的url传参
CBV模式下的url传参跟之前路由篇中一样,无名分组按位置传参,有名分组按关键字传参。
# http://127.0.0.1:8000/books/2019/7/

# urls.py
from django.contrib import admin
from django.urls import path, re_path  # 别忘了使用 re_path
from app01 import views

urlpatterns = [
    path('admin/', admin.site.urls),
    # 无名分组
    # re_path('books/(\d+)/', views.Books.as_view()),
    # re_path('books/(\d+)/(\d+)', views.Books.as_view()),

    # 有名分组
    # re_path('books/(?P<year>\d+)/', views.Books.as_view()),
    re_path('books/(?P<year>\d+)/(?P<month>\d+)/', views.Books.as_view()),
]

# views.py
from django.shortcuts import render, HttpResponse, redirect
from django.views import View  # 必须导入

class Books(View):   # 必须继承

    def get(self, request, year, month):
        print(year, month)
        return HttpResponse("OK")
重写父类的dispatch方法,用于扩展:
from django.shortcuts import render, HttpResponse, redirect
from django.views import View  # 必须导入

class Books(View):   # 必须继承

    def dispatch(self, request, *args, **kwargs):
        print("方法执行之前,要做的逻辑")
        ret = super(Books, self).dispatch(request, *args, **kwargs)
        print("方法执行之后,要做的逻辑")
        return ret
dispatch方法相当于装饰器,在请求方法前后执行。当然,你也可以自己实现装饰器来完成扩展,但在CBV中,为某个请求方法加装装饰器,需要特殊的方法。我们来看两种在CBV中如何加装饰器,且加装饰器的几种方法。
方法1:
from django.shortcuts import render, HttpResponse, redirect
from django.views import View  # 必须导入
from django.utils.decorators import method_decorator   # Django提供的专门用来在CBV中实现装饰器的方法

def inner(func):
    def wrapper(*args, **kwargs):
        print("方法执行之前,要做的逻辑")
        ret = func(*args, **kwargs)
        print("方法执行之后,要做的逻辑")
        return ret
    return wrapper

class Books(View):   # 必须继承

    # def dispatch(self, request, *args, **kwargs):
    #     return super(Books, self).dispatch(request, *args, **kwargs)

    # @inner    # 在CBV中,装饰方法,不推荐这种直接装饰的手法
    # def get(self, request, year, month):
    #     print(year, month)
    #     return HttpResponse("OK")

    @method_decorator(inner)   # 推荐Django实现的method_decorator方法来使用自定义的装饰器
    def get(self, request, year, month):
        print(year, month)
        return HttpResponse("OK")
方法2:
from django.shortcuts import render, HttpResponse, redirect
from django.views import View  # 必须导入
from django.utils.decorators import method_decorator   # Django提供的专门用来在CBV中实现装饰器的方法

def inner(func):
    def wrapper(*args, **kwargs):
        print("方法执行之前,要做的逻辑")
        ret = func(*args, **kwargs)
        print("方法执行之后,要做的逻辑")
        return ret
    return wrapper

class Books(View):   # 必须继承

	@method_decorator(inner)   # 直接加在dispatch上
    def dispatch(self, request, *args, **kwargs):
        return super(Books, self).dispatch(request, *args, **kwargs)

    def get(self, request, year, month):
        print(year, month)
        return HttpResponse("OK")
方法3:
from django.shortcuts import render, HttpResponse, redirect
from django.views import View  # 必须导入
from django.utils.decorators import method_decorator   # Django提供的专门用来在CBV中实现装饰器的方法

def inner(func):
    def wrapper(*args, **kwargs):
        print("方法执行之前,要做的逻辑")
        ret = func(*args, **kwargs)
        print("方法执行之后,要做的逻辑")
        return ret
    return wrapper


@method_decorator(inner, name='get')   # 直接加在类上,且要指定作用的请求方法,且只能作用于一个方法
# @method_decorator(inner, name='post')   # 如果作用多个方法,就这么"摞"着写
class Books(View):   # 必须继承

    def dispatch(self, request, *args, **kwargs):
        return super(Books, self).dispatch(request, *args, **kwargs)

    def get(self, request, year, month):
        print(year, month)
        return HttpResponse("OK")
小结:
- 方法1和方法2用的多,方法3用的少。
- 方法2直接加在dispatch上,会作用于所有的请求方法上,而方法1则按需添加装饰器。
基于CBV模式实现的增删改查
下面的示例使用Ajax和django cbv模式实现了增删改查。
models.py:
from django.db import models


class Book(models.Model):
    """ 书籍表 """
    title = models.CharField(max_length=32)
    price = models.DecimalField(max_digits=8, decimal_places=2)  # 999999.99

    def __str__(self):
        return self.title
urls.py:
from django.contrib import admin
from django.urls import path
from app01 import views


urlpatterns = [
    path('admin/', admin.site.urls),
    path('index/', views.index),
    path('book/', views.Books.as_view()),
]
views.py:
import json
import decimal
from datetime import date, datetime
from django.shortcuts import render, HttpResponse
from django.http import JsonResponse, QueryDict
from django.views import View
from app01.models import Book


def index(request):
    return render(request, 'index.html')


class CustomJsonEncoder(json.JSONEncoder):
    def default(self, field):
        if isinstance(field, date):
            return field.strftime('%Y-%m-%d')
        elif isinstance(field, datetime):
            return field.strftime('%Y-%m-%d %H:%M:%S')
        elif isinstance(field, decimal.Decimal):
            return float(field)
        # 如果有更多json无法序列化的类型,就继续elif手动处理
        else:  # 其他json能序列化的就调用父类的default方法就完了
            return json.JSONEncoder.default(self, field)


class Books(View):

    def get(self, request):
        """ 查 """
        books = Book.objects.values('title', 'price', 'pk')
        data_list = json.dumps(list(books), cls=CustomJsonEncoder)
        return HttpResponse(data_list, content_type="application/json")

    def post(self, request):
        """ 增 """
        title = request.POST.get("title")
        price = request.POST.get("price")
        obj = Book.objects.create(title=title, price=price)
        return JsonResponse({"status": True, 'title': title, 'price': price, 'pk': obj.pk})

    def put(self, request):
        """ 改 """
        data = QueryDict(request.body)
        pk = data.get("pk")
        title = data.get("title")
        price = data.get("price")
        print(222, pk, title, price)
        Book.objects.filter(pk=pk).update(title=title, price=price)
        return JsonResponse({"status": True, 'title': title, 'price': price})

    def delete(self, request):
        """ 删 """
        data = QueryDict(request.body)
        pk = data.get("pk")
        print(1111, pk)
        Book.objects.filter(pk=pk).delete()
        return JsonResponse({"status": True, "pk": pk})
index.html:
<!DOCTYPE html>
<html lang="en">
<head>
<meta charset="UTF-8">
<title>cbv</title>
<!-- 最新版本的 Bootstrap 核心 CSS 文件 -->
<link rel="stylesheet" href="https://stackpath.bootstrapcdn.com/bootstrap/3.4.1/css/bootstrap.min.css"
integrity="sha384-HSMxcRTRxnN+Bdg0JdbxYKrThecOKuH5zCYotlSAcp1+c8xmyTe9GYg1l9a69psu" crossorigin="anonymous">
</head>
<body>
<div class="container">
<div class="row">
<div class="col-md-8 col-lg-offset-2">
<div>
<button class="btn btn-default" data-toggle="modal" data-target="#myModal" id="add">新增</button>
</div>
<table class="table table-hover">
<thead>
<tr>
<th>序号</th>
<th>书籍名称</th>
<th>书籍价格</th>
<th>操作</th>
</tr>
</thead>
<tbody id="content"></tbody>
</table>
</div>
</div>
</div>
<!-- Modal -->
<div class="modal fade" id="myModal" tabindex="-1" role="dialog" aria-labelledby="myModalLabel">
<div class="modal-dialog" role="document">
<div class="modal-content">
<div class="modal-header">
<button type="button" class="close" data-dismiss="modal" aria-label="Close"><span aria-hidden="true">×</span>
</button>
<h4 class="modal-title" id="myModalLabel">新增/编辑模态框</h4>
</div>
<div class="modal-body">
<form action="">
<input type="text" class="form-control" placeholder="书籍名称" id="title">
<br>
<input type="text" class="form-control" placeholder="书籍价格" id="price">
<input type="text" hidden id="pk">
</form>
</div>
<div class="modal-footer">
<button type="button" class="btn btn-default" data-dismiss="modal" id="close">Close</button>
<button type="button" class="btn btn-primary" data-dismiss="modal" id="save">Save changes</button>
</div>
</div>
</div>
</div>
{% csrf_token %}
<script src="http://libs.baidu.com/jquery/2.0.0/jquery.min.js"></script>
<!-- 最新的 Bootstrap 核心 JavaScript 文件 -->
<script src="https://stackpath.bootstrapcdn.com/bootstrap/3.4.1/js/bootstrap.min.js"
integrity="sha384-aJ21OjlMXNL5UyIl/XNwTMqvzeRMZH2w8c5cRVpzpU8Y5bApTppSuUkhZXN0VxHd"
crossorigin="anonymous"></script>
<script>
// 展示书籍列表
function show() {
let data = send('get');
// console.log(111, data);
$.each(data, function (index, item) {
$("#content").append(
`<tr>
<td>${index + 1}</td>
<td>${item['title']}</td>
<td>${item['price']}</td>
<td>
<button class="btn btn-info btn-sm edit" data-toggle="modal" data-target="#myModal" value="${item['pk']}">编辑</button>
<button class="btn btn-sm btn-danger del" value="${item['pk']}">删除</button>
</td>
</tr>`
);
})
}
show();
function send(methodType, data = {}) {
let result = null;
$.ajax({
async: false, // 将异步改为同步,否则别的函数拿不到返回值
url: "/book/",
type: methodType,
headers: {"X-CSRFToken": $("[name='csrfmiddlewaretoken']").val()},
data: data,
success: function (data) {
// console.log(data, typeof data)
result = data;
}
});
return result;
}
// 添加书籍
$("#add").click(function () {
$("#title").val("");
$("#price").val("");
$("#myModalLabel").text("新增");
// 无论currentTr属性值存在不或者不存在,都给删除,防止点击编辑按钮却不保存而是点击close的情况,导致这个属性也被添加了
$("#save").removeData("currentTr");
});
// 编辑
$("#content").on("click", '.edit', function () {
$("#myModalLabel").text("编辑");
// 将当前行的内容放到input中
var pk = $(this).attr('value');
var title = $(this).parent().parent().find('td').eq(1).text();
var price = $(this).parent().parent().find('td').eq(2).text();
$("#pk").val(pk);
$("#title").val(title);
$("#price").val(price);
// 由于新增和编辑按钮共用modal框,所以,通过加属性的方式做区分
var $currentTr = $(this).parent().parent();
$("#save").data("currentTr", $currentTr);
});
// 保存功能,包括新增和编辑
$("#save").on("click", function () {
let $currentTr = $(this).data("currentTr");
let $pk = $("#pk");
let $title = $("#title");
let $price = $("#price");
if ($currentTr != undefined) { // 表示是编辑操作
let data = send('put', {"title": $title.val(), "price": $price.val(), "pk": $pk.val()});
$currentTr.find('td').eq(0).text(data['pk']);
$currentTr.find('td').eq(1).text(data['title']);
$currentTr.find('td').eq(2).text(data['price']);
} else { // 表示是新增操作
let data = send('post', {"title": $title.val(), "price": $price.val()});
let num = $("#content tr").length + 1;
$("#content").append(`
<tr>
<td>${num}</td>
<td>${data['title']}</td>
<td>${data['price']}</td>
<td>
<button class="btn btn-info btn-sm edit" data-toggle="modal" data-target="#myModal" value="${data['pk']}">编辑</button>
<button class="btn btn-sm btn-danger del" value="${data['pk']}">删除</button>
</td>
</tr>`);
}
// 每次新增后都要清空input框内容
$title.val("");
$price.val("");
// 清空 $(this).data(currentTr)
$(this).removeData("currentTr");
});
// 删除功能,点击删除按钮,删除当前行,也要用到事件委派
$("#content").on("click", '.del', function () {
let pk = $(this).attr('value');
console.log(pk);
let data = send('delete', {"pk": pk});
console.log(555, data);
$(this).parent().parent().nextAll().each(function () {
let currentNum = $(this).find("td").eq(0).text();
$(this).find("td").eq(0).text(currentNum - 1);
});
$(this).parent().parent().remove();
})
</script>
</body>
</html>
浏览器访问http://127.0.0.1:8000/index/即可实现增删改查。
that's all

 浙公网安备 33010602011771号