1-Docker - 部署Django项目
about
本篇主要为了练习Django在docker环境的基本部署,熟悉相关部署流程。
宿主的一些环境要提前配置好:
- Python环境,https://www.cnblogs.com/Neeo/articles/12293143.html
- django环境,
pip3 install django==1.11.1
- django环境,
- docker环境,https://www.cnblogs.com/Neeo/articles/11945963.html
- docker-compose,https://www.cnblogs.com/Neeo/articles/12721710.html
[root@r ~]# python3 -V
Python 3.6.8
[root@r ~]# pip3 -V
pip 9.0.3 from /usr/lib/python3.6/site-packages (python 3.6)
[root@r ~]# python3 -m django --version
1.11.1
[root@r ~]# docker --version
Docker version 18.06.3-ce, build d7080c1
[root@r ~]# docker-compose -v
docker-compose version 1.18.0, build 8dd22a9
创建Django项目
创建/opt/DjangoDemo目录,并且后续的配置工作都在此目录上展开。
创建Django项目
现在,我们在/opt/DjangoDemo目录下创建一个Django项目AT,并且执行数据库迁移命令。
[root@r ~]# mkdir /opt/DjangoDemo && cd /opt/DjangoDemo
[root@r DjangoDemo]# django-admin startproject AT
[root@r DjangoDemo]# ls
AT
[root@r DjangoDemo]# cd AT/
[root@r AT]# python3 manage.py makemigrations
No changes detected
[root@r AT]# python3 manage.py migrate
Operations to perform:
  Apply all migrations: admin, auth, contenttypes, sessions
Running migrations:
  Applying contenttypes.0001_initial... OK
  Applying auth.0001_initial... OK
  Applying admin.0001_initial... OK
  Applying admin.0002_logentry_remove_auto_add... OK
  Applying contenttypes.0002_remove_content_type_name... OK
  Applying auth.0002_alter_permission_name_max_length... OK
  Applying auth.0003_alter_user_email_max_length... OK
  Applying auth.0004_alter_user_username_opts... OK
  Applying auth.0005_alter_user_last_login_null... OK
  Applying auth.0006_require_contenttypes_0002... OK
  Applying auth.0007_alter_validators_add_error_messages... OK
  Applying auth.0008_alter_user_username_max_length... OK
  Applying sessions.0001_initial... OK
创建requirements.txt文件
requirements.txt文件不用说了吧!我们项目的依赖包都管理在该文件中。
在项目的根目录创建该文件,并填写一个django的版本。
[root@r AT]# echo 'django==1.11.1' >> requirements.txt
修改settings中的ALLOWED_HOSTS
修改ALLOWED_HOSTS以支持远程访问。
ALLOWED_HOSTS = ["www.neeo.cc", "127.0.0.1"]
www.neeo.cc是我的服务器的域名;127.0.0.1是容器中的ip。
使用Dockerfile来构建镜像文件
首先要拉取一个Python3.6的镜像:
[root@r AT]# docker pull python:3.6-alpine
3.6-alpine: Pulling from library/python
cbdbe7a5bc2a: Pull complete
26ebcd19a4e3: Pull complete
ebb7c97b2c7d: Download complete
c30b8a8127ec: Download complete
a82086273aba: Download complete
3.6-alpine: Pulling from library/python
cbdbe7a5bc2a: Pull complete
26ebcd19a4e3: Pull complete
ebb7c97b2c7d: Pull complete
c30b8a8127ec: Pull complete
a82086273aba: Pull complete
Digest: sha256:5592efbc8cd685cb40d1ab5821438522b393480da18d11863717ceea4582c89d
Status: Downloaded newer image for python:3.6-alpine
[root@r AT]# docker images | grep python
python                 3.6-alpine          92a6cc6f3ecc        35 hours ago        92.8MB
[root@r AT]# vim dockerfile编辑Dockerfile文件:
# 基于本地仓库 python:3.6-alpine 镜像
FROM python:3.6-alpine

# 设置 python 环境变量
ENV PYTHONUNBUFFERED 1

# 创建 code 文件夹并将其设置为工作目录
RUN mkdir /code
WORKDIR /code
# 更新 pip
RUN pip install pip -U
# 将 requirements.txt 复制到容器的 code 目录
ADD requirements.txt /code/
# 安装库
RUN pip install -r requirements.txt
# 将当前目录复制到容器的 code 目录, 点 表示当前目录中的所有文件复制到容器的code目录。
ADD . /code/
此时Django项目目录文件结构如下:
[root@r AT]# pwd
/opt/DjangoDemo/AT
[root@r AT]# ls
AT  db.sqlite3  dockerfile  manage.py  requirements.txt
编辑docker-compose
在项目根目录编辑[root@r AT]# vim docker-compose.yaml
version: "3.3"

services:
  at:
    restart: always
    build: .  # 点表示当前目录
    command: "python3 manage.py runserver 0.0.0.0:8000"
    volumes:
      - .:/code
    ports:
      - "8823:8000"
command是启动django服务监听(容器环境)本地8000端口,然后下面的ports是将容器的8000端口映射到宿主机的8823端口。
此时Django项目目录文件结构如下:
[root@r AT]# ls
AT  db.sqlite3  docker-compose.yaml  dockerfile  manage.py  requirements.txt
测试
使用docker-compose命令来启动容器服务:
[root@r AT]# docker-compose up
Creating network "at_default" with the default driver
Building at
Step 1/8 : FROM python:3.6-alpine
 ---> 92a6cc6f3ecc
Step 2/8 : ENV PYTHONUNBUFFERED 1
 ---> Running in f9d6711cc31c
Removing intermediate container f9d6711cc31c
 ---> 5c46570a82d9
Step 3/8 : RUN mkdir /code
 ---> Running in 57fc971ecfe5
Removing intermediate container 57fc971ecfe5
 ---> 9743aab02b3f
Step 4/8 : WORKDIR /code
 ---> Running in fe629f84a1c2
Removing intermediate container fe629f84a1c2
 ---> 7e910fdc2da3
Step 5/8 : RUN pip install pip -U
 ---> Running in 0d022709942c
Requirement already up-to-date: pip in /usr/local/lib/python3.6/site-packages (20.1)
Removing intermediate container 0d022709942c
 ---> ad31936ddeac
Step 6/8 : ADD requirements.txt /code/
 ---> f8fb28bc5fc4
Step 7/8 : RUN pip install -r requirements.txt
 ---> Running in 6e8dfeb7a01a
Collecting django==1.11.1
  Downloading Django-1.11.1-py2.py3-none-any.whl (6.9 MB)
Collecting pytz
  Downloading pytz-2020.1-py2.py3-none-any.whl (510 kB)
Installing collected packages: pytz, django
Successfully installed django-1.11.1 pytz-2020.1
Removing intermediate container 6e8dfeb7a01a
 ---> 5200a0425ea6
Step 8/8 : ADD . /code/
 ---> e4f426c3cee9

Successfully built e4f426c3cee9
Successfully tagged at_at:latest
WARNING: Image for service at was built because it did not already exist. To rebuild this image you must use `docker-compose build` or `docker-compose up --build`.
Creating at_at_1 ... done
Attaching to at_at_1
at_1  | Performing system checks...
at_1  |
at_1  | System check identified no issues (0 silenced).
at_1  | May 01, 2020 - 05:35:06
at_1  | Django version 1.11.1, using settings 'AT.settings'
at_1  | Starting development server at http://0.0.0.0:8000/
at_1  | Quit the server with CONTROL-C.
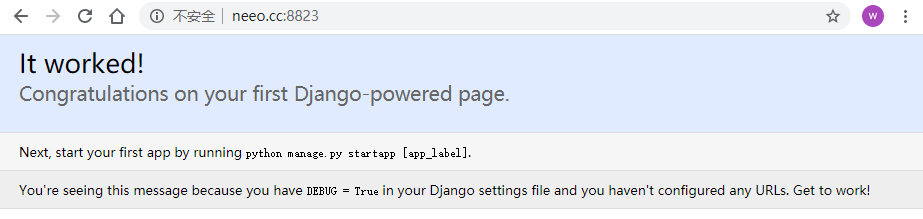
此时你可以浏览器访问了:
补充一些其他命令:
# 后台启动并且查看log文件
[root@r AT]# docker-compose up -d && docker-compose logs -ft --tail=20 at
see also:

 浙公网安备 33010602011771号