1-Selenium - webdriver的环境配置
about
环境: win10 +
想要Python通过selenium操作浏览器搞些事情,就必须有两个前提条件:
- 下载selenium模块
- 安装selenium的浏览器驱动 webdriver
selenium模块下载
pip install selenium
pip install -i https://pypi.doubanio.com/simple/ selenium
pip install -i https://pypi.doubanio.com/simple/ selenium==3.141.0
浏览器驱下载
浏览器驱动的安装时新手阶段遇到较多问题之一,因为可选择的浏览器较多,我们先来聊聊各种场景的浏览器:
- 网页浏览器,也就是我们现在经常用到的浏览器,打开浏览器有个可视化的界面供我们操作,常见的有:
- Firefox
- Safari
- IE/edge
- Opera
- 无头浏览器(Headless Browser),无头,这里是说无界面的,这种浏览器的运行是不可见的,selenium中常用的无头浏览器有:
- PhantomJS无头浏览器
- Google无头浏览器
- Firefox无头浏览器
关于无头浏览器:无头浏览器指的是没有图形用户界面的浏览器。无头浏览器在类似于流行网络浏览器的环境中提供对网页的自动控制,但是通过命令行界面或使用网络通信来执行。 它们对于测试网页特别有用,因为它们能够像浏览器一样呈现和理解超文本标记语言,包括页面布局、颜色、字体选择以及JavaScript和AJAX的执行等样式元素,这些元素在使用其他测试方法时通常是不可用的。
无头浏览器常用于:
- Web应用程序中的测试自动化。
- 拍摄网页截图
- 对JavaScript库运行自动化测试
- 收集网站数据
- 自动化网页交互
使用无头浏览器的优势:
- 对于UI自动化测试,少了真实浏览器加载css,js以及渲染页面的工作。无头测试要比真实浏览器快的多。
- 可以在无界面的服务器或CI上运行测试,减少了外界的干扰,使自动化测试更稳定。
- 在一台机器上可以模拟运行多个无头浏览器,方便进行并发测试。
关于PhantomJS无头浏览器:PhantomJS是一个可以用JavaScript编写脚本的无头web浏览器。它在Windows、macOS、Linux和FreeBSD上运行。使用QtWebKit作为后端,它为各种web标准提供了快速的本地支持:DOM处理、CSS选择器、JSON、Canvas和SVG。
另外,说一个比较悲痛的消息:PhantomJS暂停维护(可能的原因是内部问题和外部压力(Google和Firefox无头带来的压力)),所以,我们现在使用PhantomJS的话,你会看到提示:
UserWarning: Selenium support for PhantomJS has been deprecated, please use headless versions of Chrome or Firefox instead
  warnings.warn('Selenium support for PhantomJS has been deprecated, please use headless '
闲话少叙,先来看具体怎么安装和使用!
网页浏览器
相对于无头浏览器来说,网页浏览器有以下优势:
- 配置相对简单
- 执行过程可视化,便于调试
- 模拟真实的用户操作
Chrome
Chrome的驱动下载地址:
- https://registry.npmmirror.com/binary.html?path=chromedriver/
- http://chromedriver.storage.googleapis.com/index.html
这里以淘宝镜像为例。
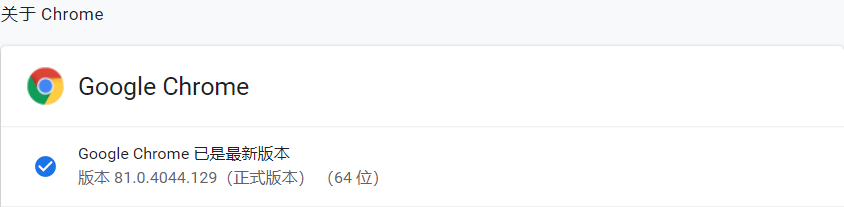
- 查看你的Chrome浏览器的版本。打开你的Chrome浏览器的
设置▶帮助▶关于Google Chrome(G),这里我的Chrome的版本是81.0.4044.129
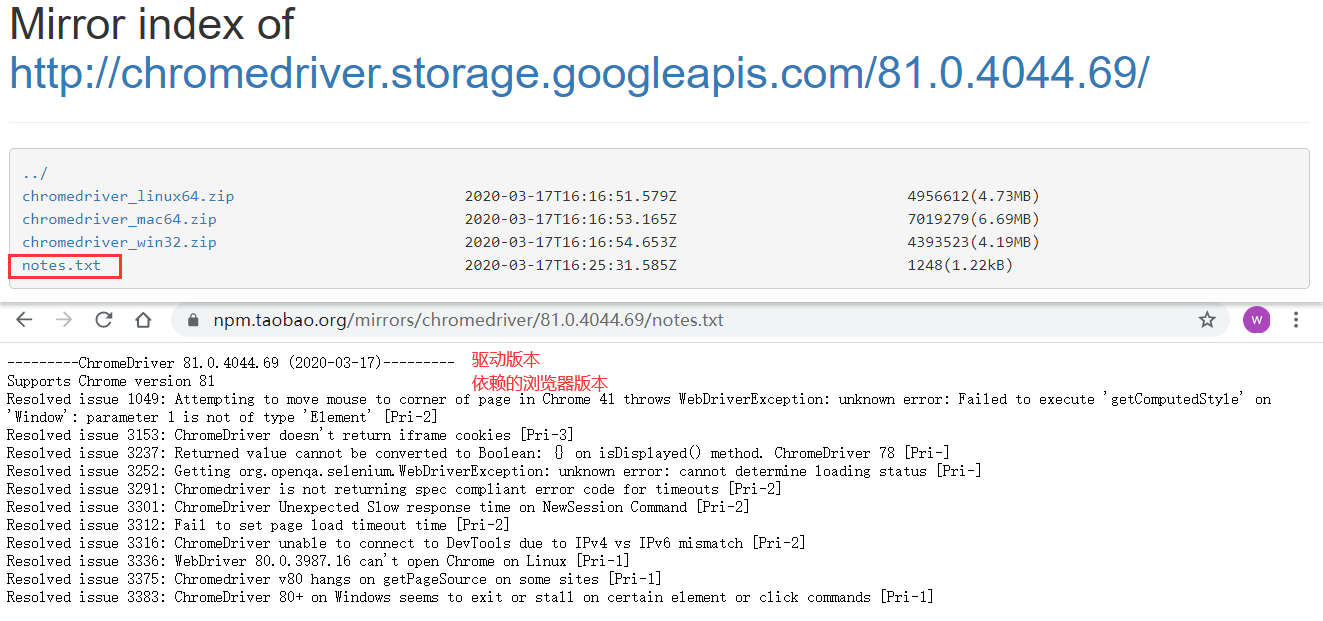
2. 打开淘宝镜像链接:https://registry.npmmirror.com/binary.html?path=chromedriver/,如下图,可以看到,有两个81版本的驱动,我们选择一个最贴近浏览器版本的驱动版本81.0.4044.69

- 那我们选择的对吗?现在点击
81.0.4044.69/这个驱动下载链接中,查看notes.txt文件。可以看到,notes.txt文件中说了三件事,浏览器驱动的版本、依赖浏览器的版本、该版本的驱动解决了哪些问题。通过依赖的浏览器驱动版本我们可以知道,这个就是我们想要的那个驱动。
- 回到之前的驱动下载页面,根据系统选择不同的安装包,这里我选择
chromedriver_win32.zip。点击链接立即下载到本地。

- 压缩包内就一个
chromedriver.exe可执行文件,将该文件移动到Python的安装目录中的Scripts目录(因为该目录已经添加到了系统Path中,你移动到别的目录也行,只要将目录添加到系统的Path中)

- 可以尝试测试一下了:
from selenium import webdriver

def foo():
    """
    如果报如下错误:
    selenium.common.exceptions.WebDriverException: Message: 'chromedriver' executable needs to be in PATH. Please see https://sites.google.com/a/chromium.org/chromedriver/home

    原因是在执行时,没有在path中找到驱动,这里的解决办法是实例化driver对象时,添加executable_path参数,引用驱动的绝对路径
    """

    # driver = webdriver.Chrome(executable_path="C:\Python36\Scripts\chromedriver.exe") # 解决如上报错
    driver = webdriver.Chrome()
    driver.implicitly_wait(time_to_wait=10)
    driver.get('https://www.baidu.com')
    print(driver.title)  # 百度一下,你就知道
    driver.quit()


if __name__ == '__main__':
    foo()
效果就是打开一个浏览器,然后代码获取了百度主页的title,然后关闭浏览器。
Firefox
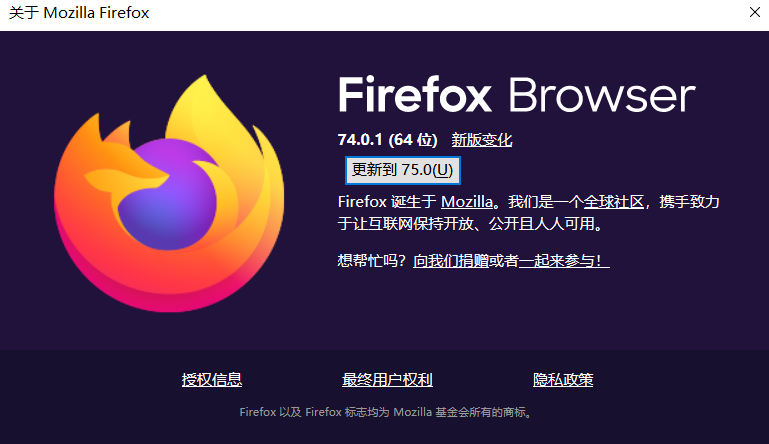
- 还是要先查看Firefox的浏览器版本,
设置▶帮助▶关于 Firefox,可以看我的Firefox版本是74。
- 打开Firefox的驱动下载地址:https://github.com/mozilla/geckodriver/releases,在最新的
v0.26.0版本的描述中,推荐Firefox的版本≥60,而我们的Firefox版本正符合;下拉根据系统选择不同的压缩包,这里我选择geckodriver-v0.26.0-win64.zip。

- 下载到本地是一个
geckodriver.exe可执行文件,同样的,你将该文件移动到Python安装目录中的Scripts目录(跟Google的驱动放一起,不会放的,参考Google驱动的第5步)。

- 测试:
from selenium import webdriver

def foo():
    """
    如果报如下错误:
    selenium.common.exceptions.WebDriverException: Message: 'geckodriver' executable needs to be in PATH.
    原因是在执行时,没有在path中找到驱动,这里的解决办法是实例化driver对象时,添加executable_path参数,引用驱动的绝对路径
    """

    # driver = webdriver.Firefox(executable_path="C:\Python36\Scripts\geckodriver.exe") # 解决如上报错
    driver = webdriver.Firefox() # 解决如上报错
    driver.implicitly_wait(time_to_wait=10)
    driver.get('https://www.baidu.com')
    print(driver.title)  # 百度一下,你就知道
    driver.quit()


if __name__ == '__main__':
    foo()
这里在再补充一个错误,我之前的Firefox的版本是最新版,但我本机运行有问题,所以在使用selenium操作的时候,报了这个错误:
selenium.common.exceptions.TimeoutException: Message: connection refused
经过查询是我的Firefox浏览器有问题,我就降级装了个74版本的。但这只是个例。
Safari
首先保证你的Python和selenium模块安装完成:
# 使用brew命令安装python3.7
brew install python3
# 安装selenium模块
pip3 install selenium==3.141.0
来看如何配置Safari。
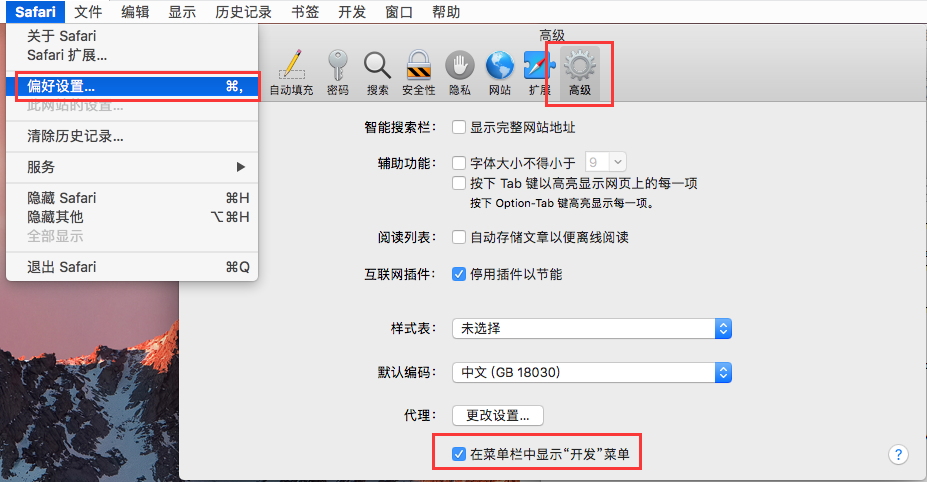
从macOS El Capitan和Sierra上的Safari 10开始,每个版本的浏览器都包含WebDriver支持。要启用支持:
Enable the Developer menu from Safari preferences   # 从Safari首选项中启用“开发人员”菜单
Check the Allow Remote Automation option from with the Develop menu   # 从“开发”菜单中选中“允许远程自动化”选项
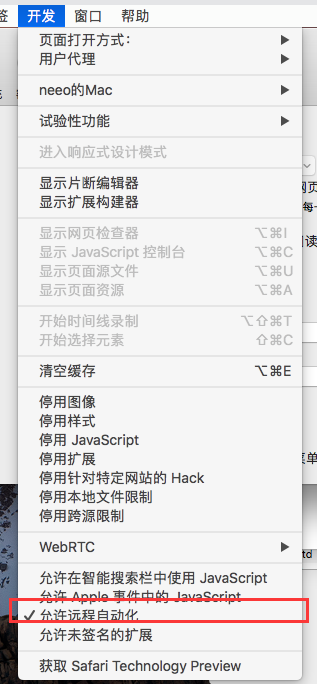
然后,在首次启动之前,终端输入:
/usr/bin/safaridriver -p 1337
然后按照提示输入密码,使webdriver获得授权。
现在可以执行测试了:
from selenium import webdriver

def foo():

    driver = webdriver.Safari()
    driver.implicitly_wait(time_to_wait=10)
    driver.get('https://www.baidu.com')
    print(driver.title)  # 百度一下,你就知道
    driver.quit()


if __name__ == '__main__':
    foo()
如下报错是提示你没有勾选
selenium.common.exceptions.SessionNotCreatedException: Message: Could not create a session: You must enable the 'Allow Remote Automation' option in Safari's Develop menu to control Safari via WebDriver.
意思是:必须在Safari的“开发”菜单中启用“允许远程自动化”选项,才能通过WebDriver控制Safari。如果你之前设置了,这里以不会报错了。
IE
必要的配置
- 在
设置▶缩放中,将比例调整为100%。 - 在
设置▶Internet 选项▶安全选项,如下图,将四个选项都勾选启用保护模式。
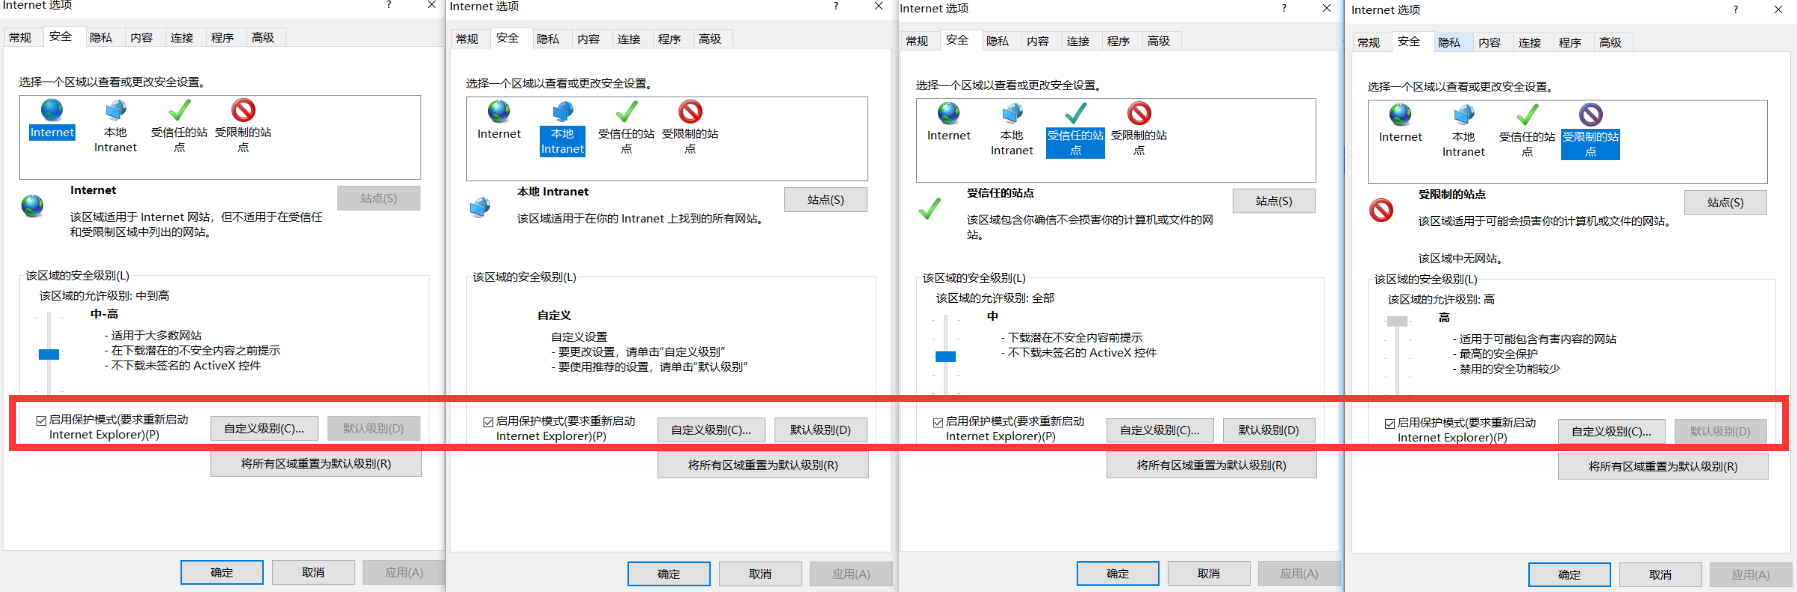
3. 针对IE10和更高的版本,必须在IE选项设置中的高级页中,取消增强保护模式。
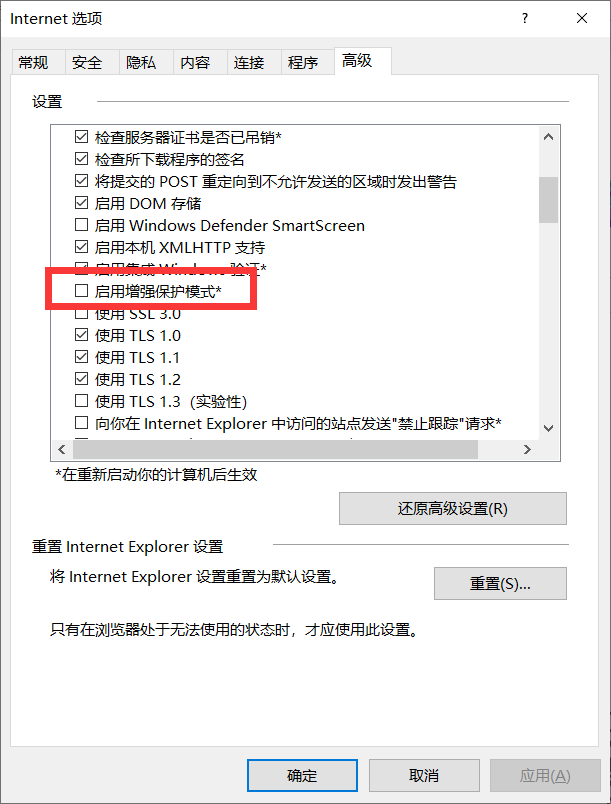
重启IE浏览器。
webdriver驱动安装
- 由于IE的webdriver驱动依赖selenium模块的版本,所以,我们先来查看selenium模块的版本,这里我的selenium模块的版本是
Version: 3.141.0:
C:\Users\Anthony>pip36 show selenium
WARNING: pip is being invoked by an old script wrapper. This will fail in a future version of pip.
Please see https://github.com/pypa/pip/issues/5599 for advice on fixing the underlying issue.
To avoid this problem you can invoke Python with '-m pip' instead of running pip directly.
Name: selenium
Version: 3.141.0
Summary: Python bindings for Selenium
Home-page: https://github.com/SeleniumHQ/selenium/
Author: UNKNOWN
Author-email: UNKNOWN
License: Apache 2.0
Location: c:\python36\lib\site-packages
Requires: urllib3
Required-by: Appium-Python-Client
- 下载IE浏览器的webdriver驱动,访问http://selenium-release.storage.googleapis.com/index.html定位到跟selenium版本一致的链接并且进入该链接内。

- 这里一定要选择跟你的selenium版本一致的压缩包;另外,我的系统是64位的,但这里我选择32位的压缩包,原因是据不可靠消息,32位相对于64位性能更好!

- 将
IEDriverServer.exe可执行文件拷贝到Python的安装目录中的Scripts目录内。

- 现在,可以测试了。
from selenium import webdriver

def foo():
    """
    如果报如下错误:
    selenium.common.exceptions.WebDriverException: Message: 'IEDriverServer.exe' executable needs to be in PATH. Please download from http://selenium-release.storage.googleapis.com/index.html and read up at https://github.com/SeleniumHQ/selenium/wiki/InternetExplorerDriver
    原因是在执行时,没有在 path中找到驱动,这里的解决办法是实例化driver对象时,添加executable_path参数,引用驱动的绝对路径
    """

    # driver = webdriver.Ie(executable_path="C:\Python36\Scripts\IEDriverServer.exe") # 解决如上报错
    driver = webdriver.Ie() # 解决如上报错
    # driver = webdriver.Firefox()
    driver.implicitly_wait(time_to_wait=10)
    driver.get('https://www.baidu.com')
    print(driver.title)  # 百度一下,你就知道
    driver.quit()

if __name__ == '__main__':
    foo()
终极配置
由于每次谷歌浏览器升级后,都要手动的下载对应版本的驱动,然后把之前的驱动替换掉,这个操作好麻烦。关键是,我在2023/8/21号使用selenium时,发现我的谷歌浏览器升级到了版本 116.0.5845.96(正式版本) (64 位)这个版本,但此时selenium对应的驱动还没来得及更新到116版本,还在114版本.......麻爪了.....
但幸好我找到了一个解决办法,就是使用Selenium提供的webdriver_manager库,可以帮助自动下载和更新Chrome浏览器的驱动程序chromedriver.exe。可以按照以下步骤操作:
pip install webdriver_manager
然后使用中,这样用:
from selenium import webdriver
from selenium.webdriver.chrome.options import Options
from selenium.webdriver.common.keys import Keys
from selenium.webdriver.common.by import By
from selenium.webdriver.chrome.service import Service
from selenium.common.exceptions import WebDriverException, NoSuchElementException, ElementNotInteractableException
from config import settings
from webdriver_manager.chrome import ChromeDriverManager

class Op(object):
    chromedriver_path = os.path.join(settings.BASE_DIR, 'config', 'chromedriver.exe')

    def __init__(self, base_url, username, password, is_headless=1):
        self.is_headless = is_headless
        self.base_url = base_url
        self.username = username
        self.password = password
        if self.is_headless:
            chrome_options = Options()
            chrome_options.add_argument('--headless')
            chrome_options.add_argument('--disable-gpu')
            self.driver = webdriver.Chrome(
                options=chrome_options,
                # service=Service(self.chromedriver_path)
                service=Service(executable_path=ChromeDriverManager().install())  # 就改成这样就行了

            )
        else:
            self.driver = webdriver.Chrome(service=Service(executable_path=ChromeDriverManager().install()))
        self.driver.implicitly_wait(time_to_wait=10)
        # self.driver.maximize_window()
参考:https://blog.csdn.net/lisheng386/article/details/131150369
无头浏览器
欢迎斧正,that's all
see also:
2019 Selenium Chrome版本与chromedriver兼容版本对照表 | selenium之 chromedriver与chrome版本映射表(更新至v2.43) | chromedriver与chrome各版本对应及下载地址

 浙公网安备 33010602011771号