
SpringBoot与检索
检索
我们的应用经常需要添加检索功能,开源的ElasticSearch是目前全文搜索引擎的首选。它可以快速的存储、搜索和分析海量数据。SpringBoot通过整合SpringData ElasticSearch为我们提供了非常便捷的检索功能支持
ElasticSearch是一个分布式搜索服务,提供Restful API,底层基于Lucene,采用多shard(分片)的方式保证数据安全,并且提供自动resharding的功能
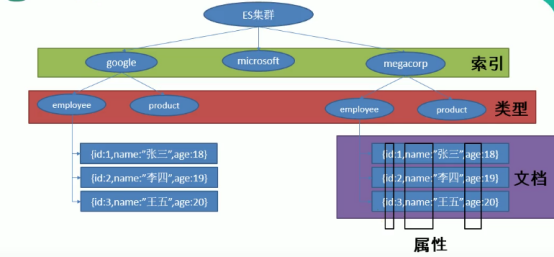
ElasticSearch中索引、类型、文档、属性的关系:
使用ElasticSearch
添加文档
使用PUT请求,给url为http://172.17.119.176:9200/megacorp/employee/1添加一条json数据

路径 /megacorp/employee/1 包含了三部分的信息:
- megacorp:索引名称
- employee:类型名称
- 1:特定雇员的ID
检索文档
使用GET请求,发送 http://172.17.119.176:9200/megacorp/employee/1即可检索出相关信息

轻量搜索
使用GET请求,发送http://172.17.119.176:9200/megacorp/employee/_search 即可检索出全部信息
高亮搜索
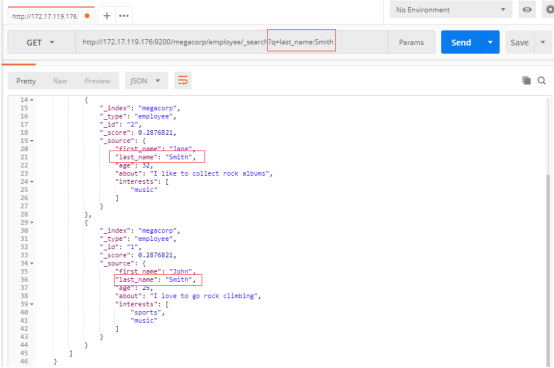
通过特定的参数去搜索,例如查询出last_name为Smith的员工
使用GET请求:http://172.17.119.176:9200/megacorp/employee/_search?q=last_name:Smith
使用查询表达式搜索
通过POST请求,在请求体里面使用表达式搜索
url: http://172.17.119.176:9200/megacorp/employee/_search

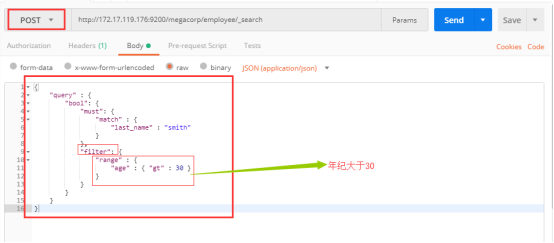
复杂搜索
使用filter查询年纪大于30的姓氏为Smith的员工
使用POST请求,url: http://172.17.119.176:9200/megacorp/employee/_search
全文搜索
搜索喜欢攀岩的雇员:
使用POST请求,url: http://172.17.119.176:9200/megacorp/employee/_search

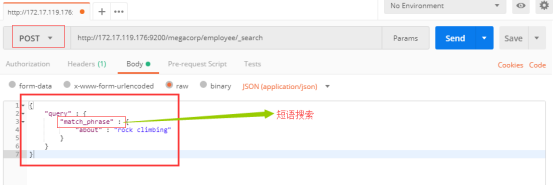
短语搜索
上面搜索的是单个单词的,现在搜索含有某个短语的,只需要把match变成match_phrase
使用POST请求,url: http://172.17.119.176:9200/megacorp/employee/_search
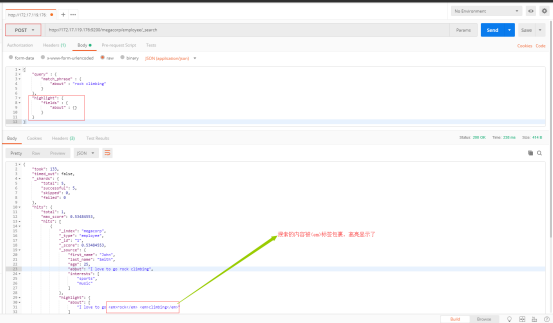
高亮搜索
有的时候希望将搜索出的内容高亮显示,可以使用高亮搜索,只需要加上highlight参数
使用POST请求, url: http://172.17.119.176:9200/megacorp/employee/_search
SpringBoot整合Elasticsearch
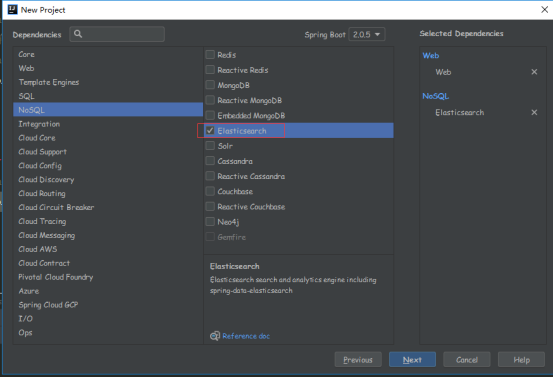
创建项目,选中Elasticsearch组件
SpringBoot默认支持两种方式跟ES进行交互
1、Jest(默认不生效)
(1) 需要导入jest的工具包(JestClient)
2、SpringData ElasticSearch
(1) ElasticSearchTemplate操作es
(2) 编写一个ElasticsearchRepository的子接口操作es
使用Jest操作es
首先注掉SpringData
<!--<dependency>-->
    <!--<groupId>org.springframework.boot</groupId>-->
    <!--<artifactId>spring-boot-starter-data-elasticsearch</artifactId>-->
<!--</dependency>-->
引入Jest的相关依赖
可以去Maven Repository找到相关依赖
版本根据es相关版本选择,例如这里选择5版本的Jest
导入依赖:
<!-- 导入jest -->
<dependency>
    <groupId>io.searchbox</groupId>
    <artifactId>jest</artifactId>
    <version>5.3.4</version>
</dependency>
配置Jest
如果es在别的机器上,要配置uri
spring:
  elasticsearch:
    jest:
      uris: http://172.17.119.176:9200
使用
首先准备一个javaBean,并标识主键


public class Article {
    @JestId    // 标识主键
    private Integer id;
    private String author;
    private String title;
    private String content;


    public Integer getId() {
        return id;
    }

    public void setId(Integer id) {
        this.id = id;
    }

    public String getAuthor() {
        return author;
    }

    public void setAuthor(String author) {
        this.author = author;
    }

    public String getTitle() {
        return title;
    }

    public void setTitle(String title) {
        this.title = title;
    }

    public String getContent() {
        return content;
    }

    public void setContent(String content) {
        this.content = content;
    }
}
索引(添加)一个文档
@Autowired
JestClient jestClient;

@Test
public void contextLoads() throws IOException {
    Article article = new Article(1, "zahngsan", "好消息", "Hello World");

    // 构建一个索引功能
    Index build = new Index.Builder(article).index("jinxin")        // 指定索引
                                            .type("news")           // 指定类型
                                            .build();               // 开始构建
    // 执行
    jestClient.execute(build);
}
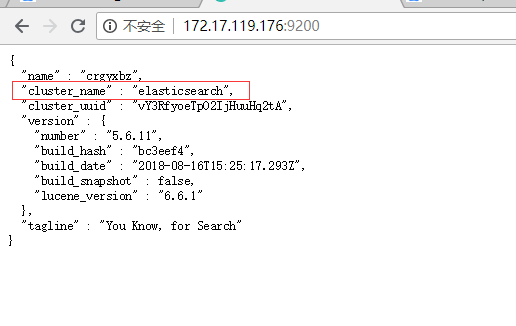
索引完成后再浏览器通过 /索引/类型/id 的形式搜索,
即http://172.17.119.176:9200/jinxin/news/1,可以看到索引的信息,证明索引成功!

搜索
@Autowired
JestClient jestClient;

@Test
public void search() throws IOException {
    String json = "{\n" +
            "    \"query\" : {\n" +
            "        \"match\" : {\n" +
            "            \"content\" : \"Hello\"\n" +
            "        }\n" +
            "    }\n" +
            "}";

    // 构建搜索
    Search search = new Search.Builder(json).addIndex("jinxin")         // 添加索引
                                            .addType("news")            // 添加类型
                                            .build();                   // 构建

    // 执行
    SearchResult result = jestClient.execute(search);
    // 打印结果
    System.out.println(result.getJsonString());
}
使用SpringData Elasticsearch
导入依赖
<dependency>
    <groupId>org.springframework.boot</groupId>
    <artifactId>spring-boot-starter-data-elasticsearch</artifactId>
</dependency>
配置
在application.yaml中配置节点
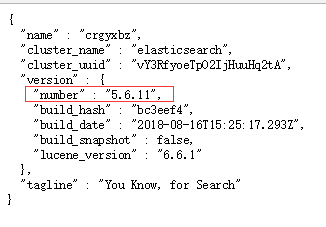
其中cluseter-name由9200端口返回的数据指定
cluseter-nodes填写主机IP + 9300端口即可
spring:
  elasticsearch:
    jest:
      uris: http://172.17.119.176:9200
  data:
    elasticsearch:
      cluster-name: elasticsearch
      cluster-nodes: 172.17.119.176:9300
使用
SpringData提供了两种方式去操作es,一种是使用ElasticsearchTemplate操作,一个使用ElasticsearchRepository的子接口操作es
实现ElasticsearchRepository
首先创建一个JavaBean,并指定索引跟类型
@Document(indexName = "jinxin", type = "books")   // 指定索引跟类型
public class Book {
    private Integer id;
    private String bookName;
    private String author;

    public Integer getId() {
        return id;
    }

    public void setId(Integer id) {
        this.id = id;
    }

    public String getBookName() {
        return bookName;
    }

    public void setBookName(String bookName) {
        this.bookName = bookName;
    }

    public String getAuthor() {
        return author;
    }

    public void setAuthor(String author) {
        this.author = author;
    }

    @Override
    public String toString() {
        return "Book{" +
                "id=" + id +
                ", bookName='" + bookName + '\'' +
                ", author='" + author + '\'' +
                '}';
    }
}
然后定义一个接口继承ElasticsearchRepository,里面要填写两个泛型,一个是JavaBean,一个是主键的类型
public interface BookRepository extends ElasticsearchRepository<Book, Integer> {
}
之后就可以测试使用了
@Autowired
BookRepository bookRepository;

@Test
public void dataes(){
    Book book = new Book();
    book.setId(1);
    book.setBookName("java");
    book.setAuthor("jojo");
    bookRepository.index(book);
}

 浙公网安备 33010602011771号