
风袖小程序
风袖小程序
01走进web全栈工程师
初始化
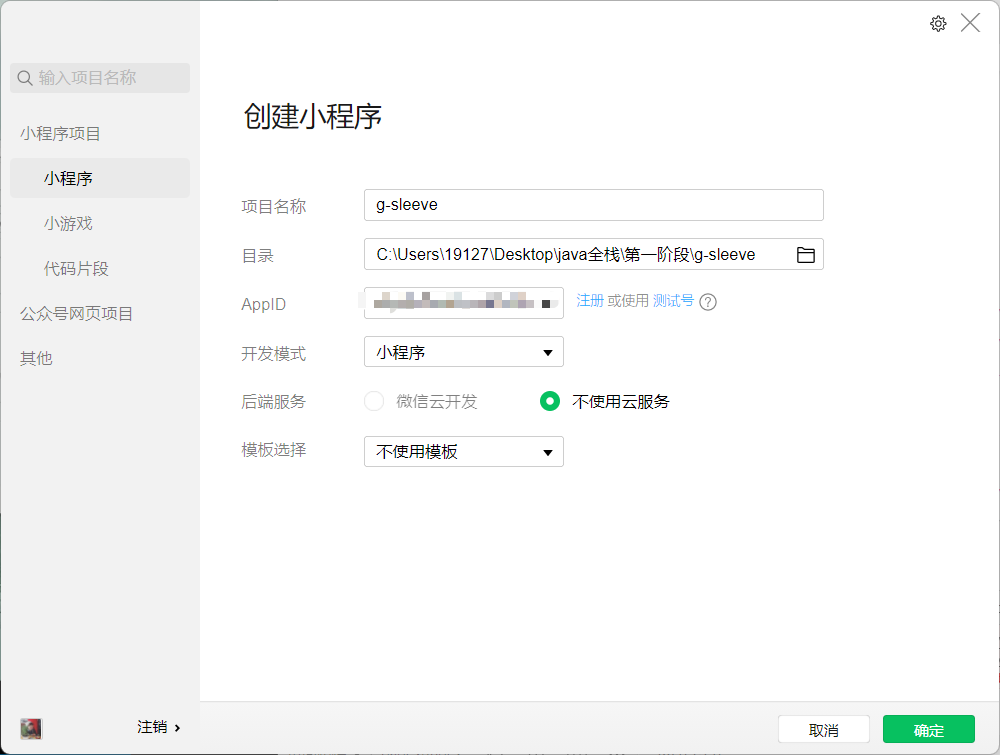
新建小程序
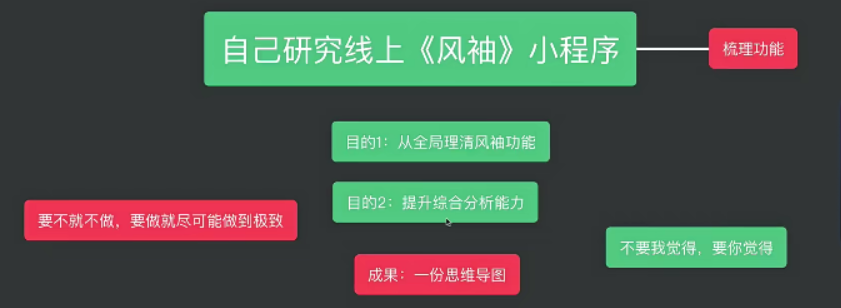
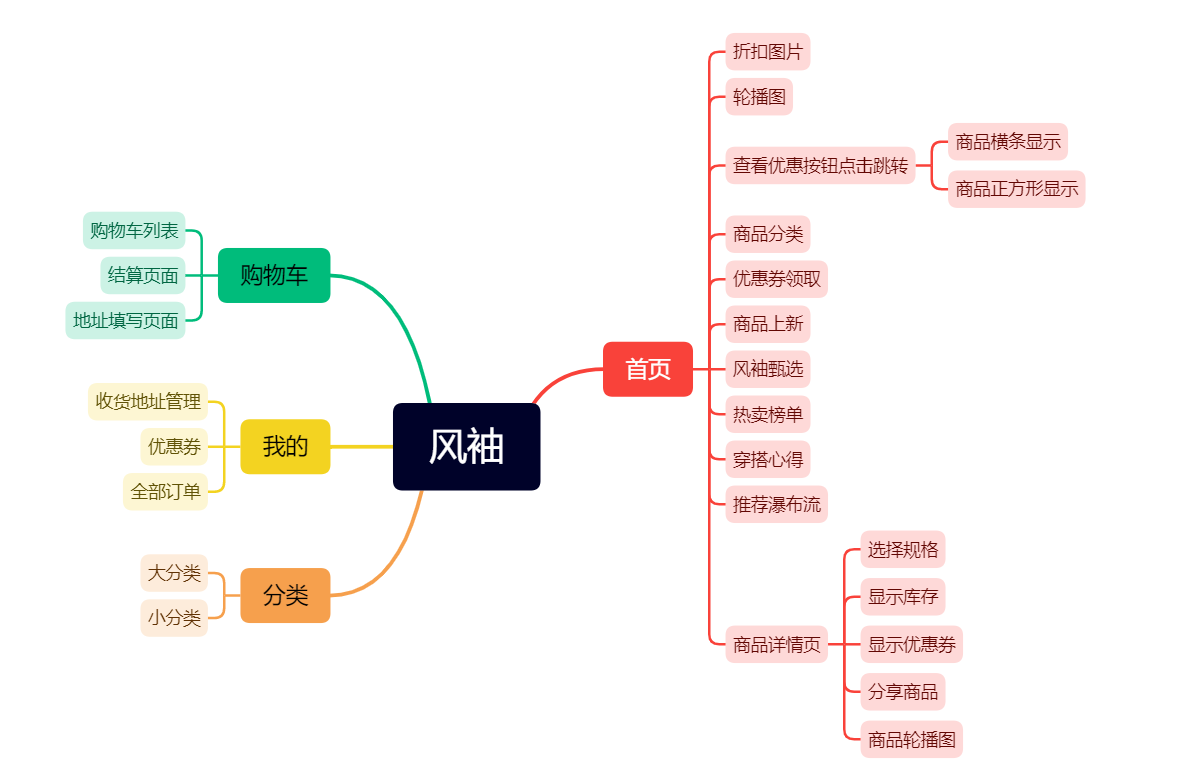
第一阶段第一次作业(风袖细节)
sku
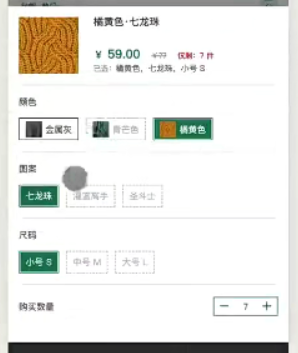
可视规格
进一步初始化
新建home文件夹后,新建page home,自动生成四个文件
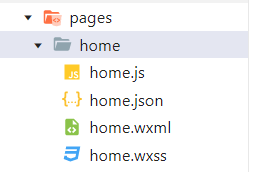
当删除一个页面的时候,需要删掉app.json里面相应的页面:
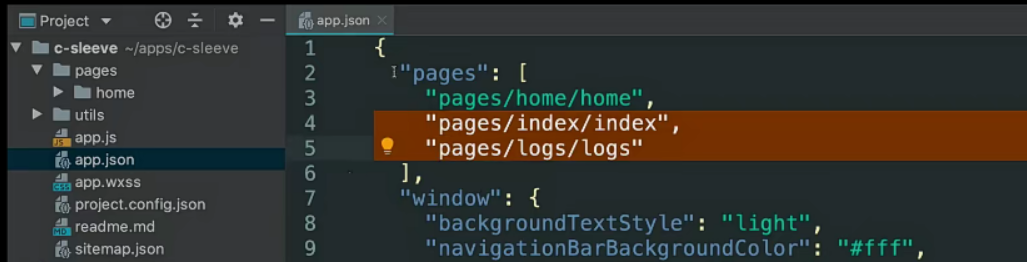
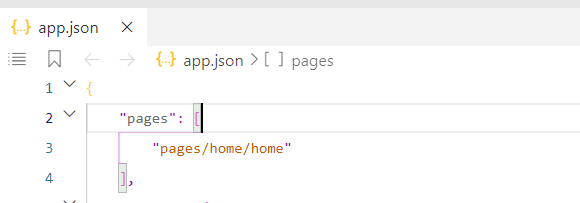
调整home为首页:
在普通编译模式下:

1.在这里将app.json里面的pages这一项中home移到最前面
WebStrom配置小程序
注意默认情况下,webstorm不支持wxml和wxss的文件类型,当然也不会有语法高亮!所以需要手动去配置。
.js文件和.json文件不需要配置,我们只需要配置.wxml和.wxss:
.wxml->html
.wxss->css
1、选择file->settings
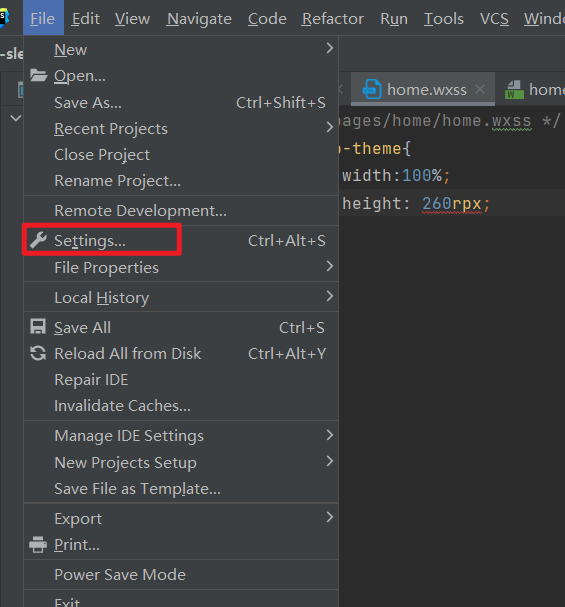
Editor->File type
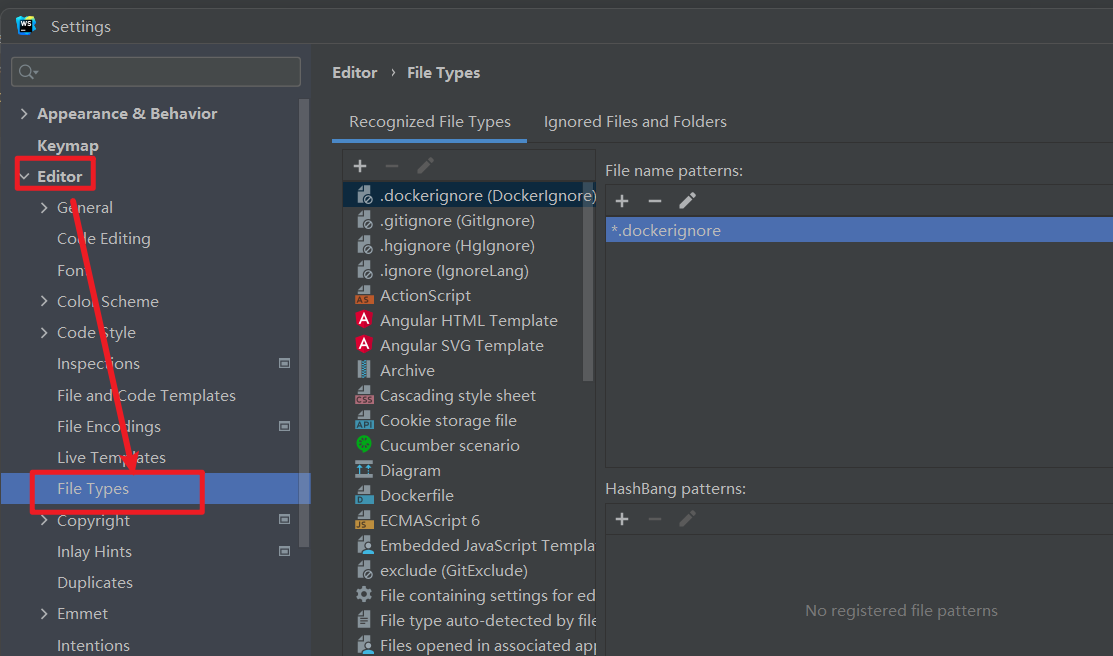
2、配置CSS
识别的文件类型列表中,选择css文件,点击’+’,输入 *.wxss,确定。
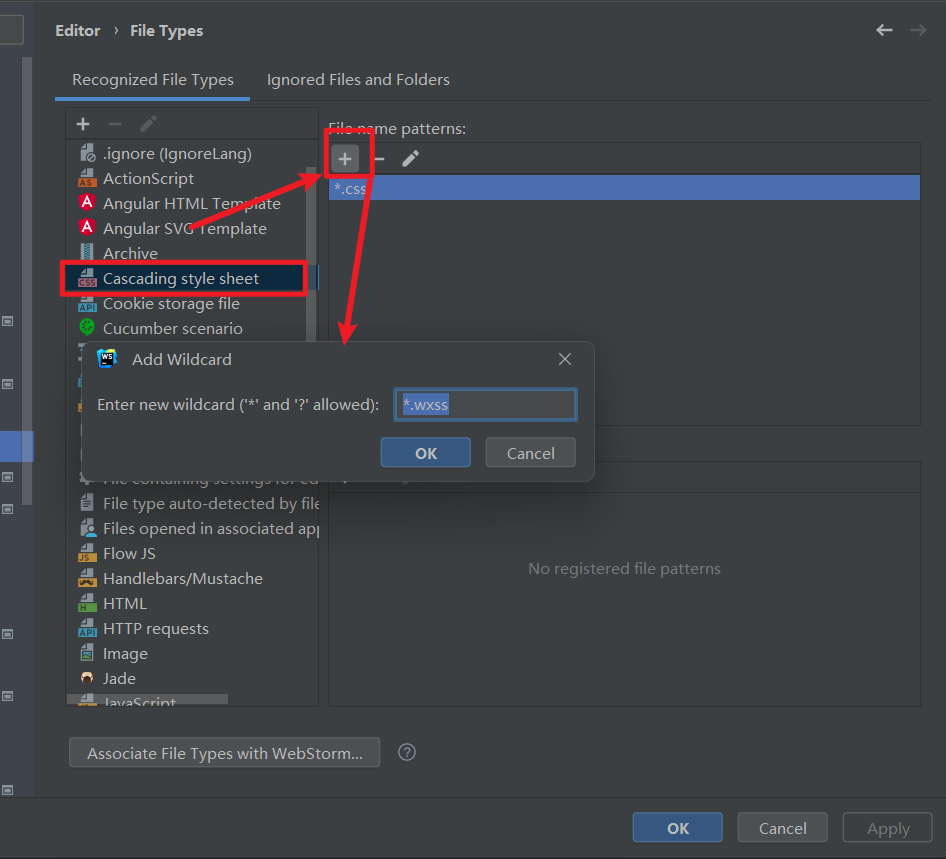
3、配置html
识别的文件类型列表选择HTML文件,点击’+’,输入*.wxml,确认。
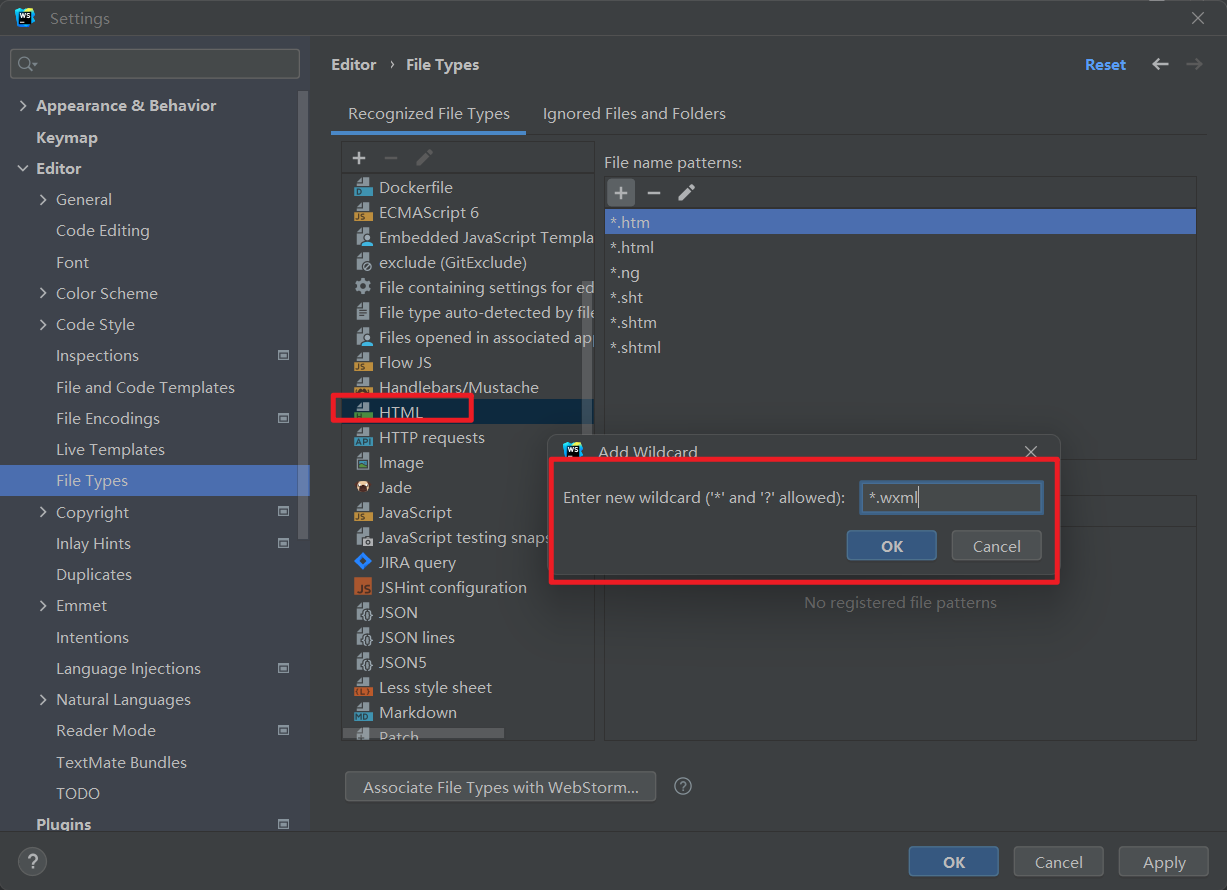
4、代码提示插件
在Plugin中点Markplace,输入框中搜索Wxapp(或者Wxapp Support)插件,点击install,安装小程序插件,确认配置。
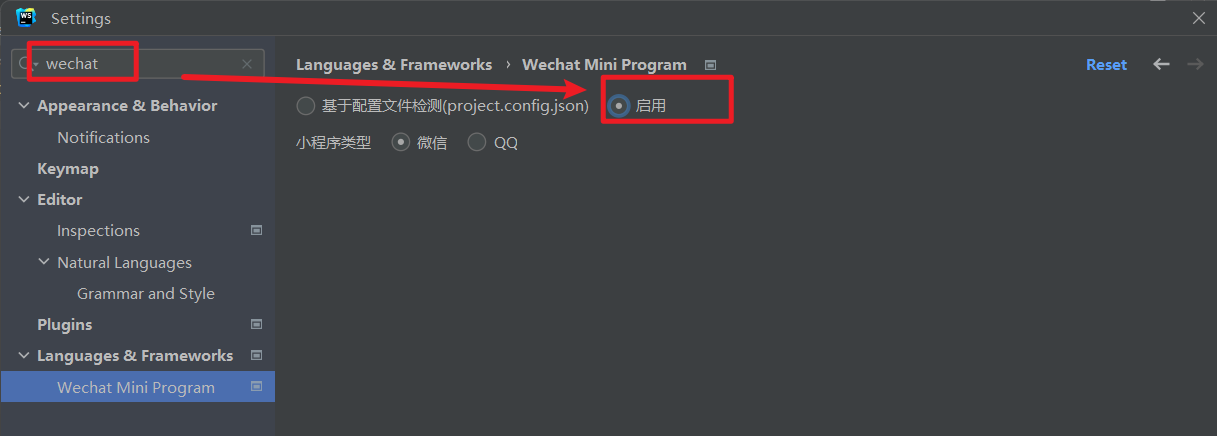
安装wechat插件
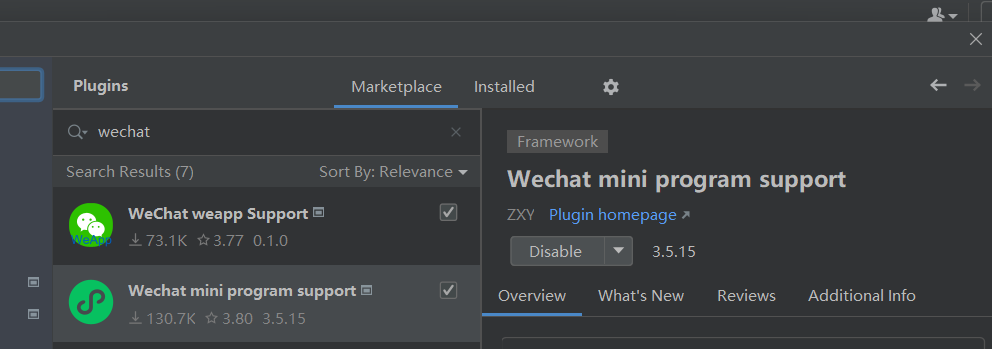
然后setting里面搜索wechat之后选择启用
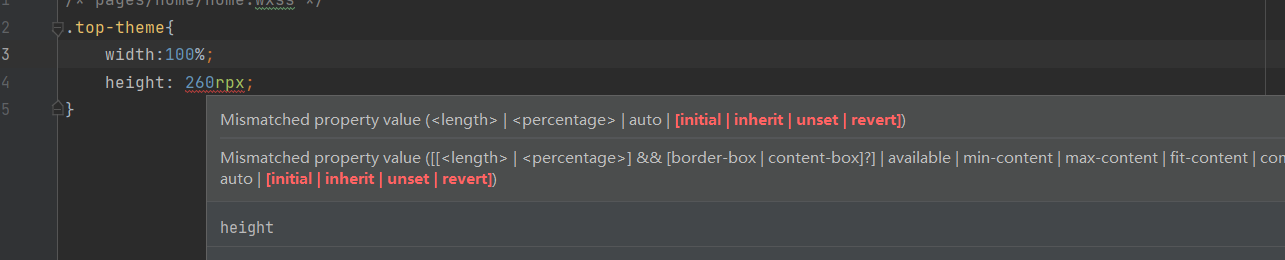
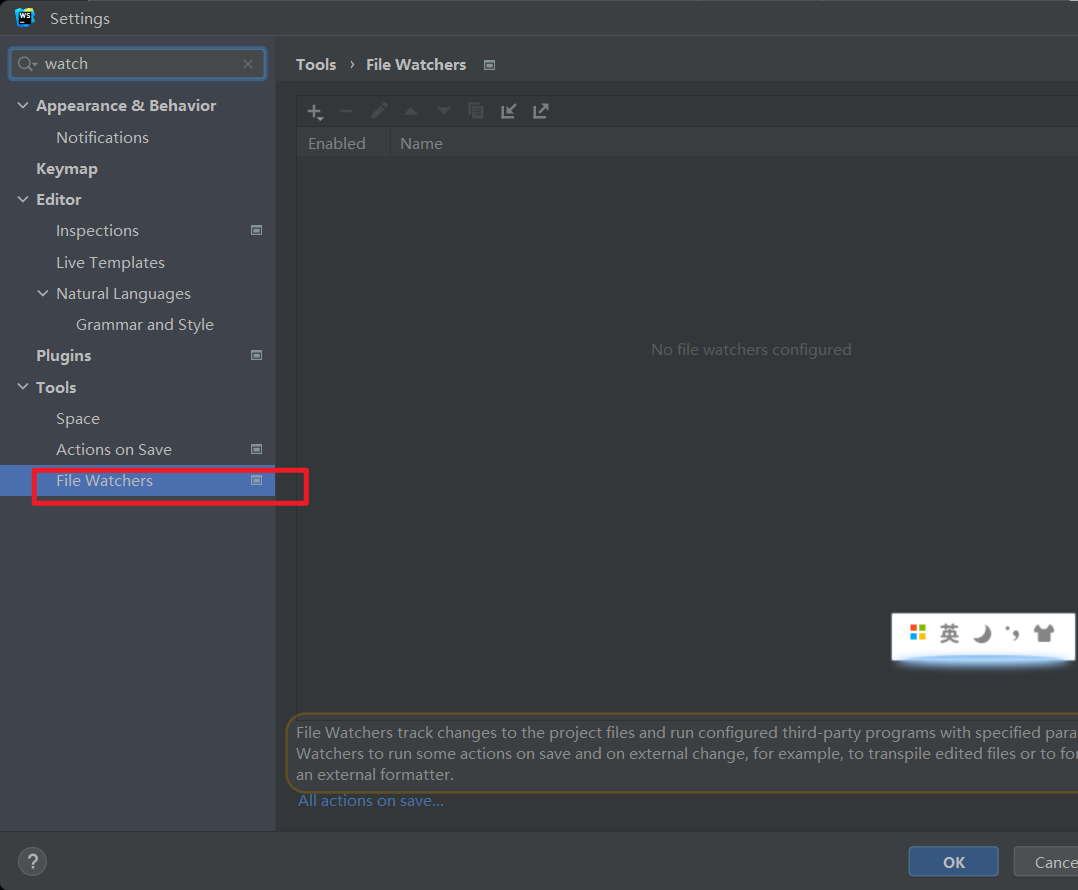
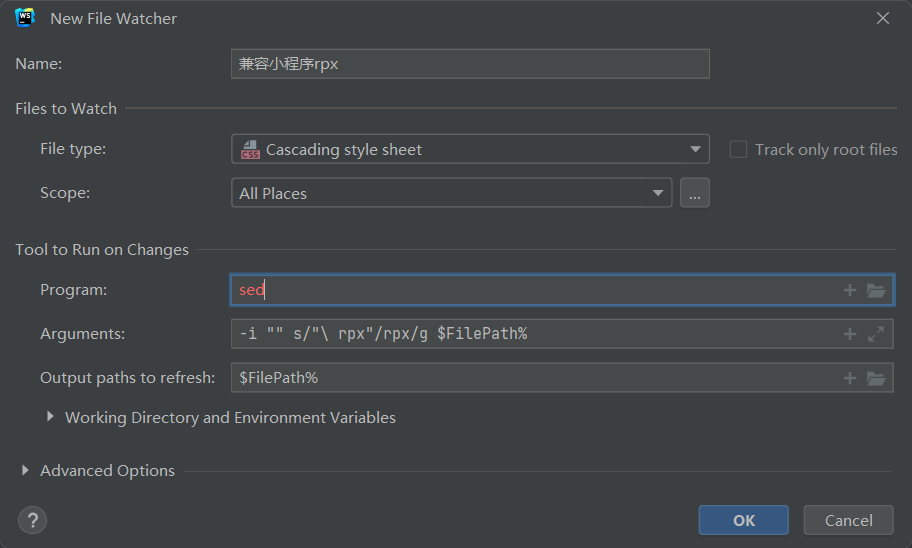
rpx(responsive pixel) 是微信小程序为了适配不同屏幕分辨率推出的一种尺寸单位。因为是国内的自定义单位,所以 WebStorm 无法识别,进而导致两个问题:
IDE 会报【Mismatched property value 】错误并标红
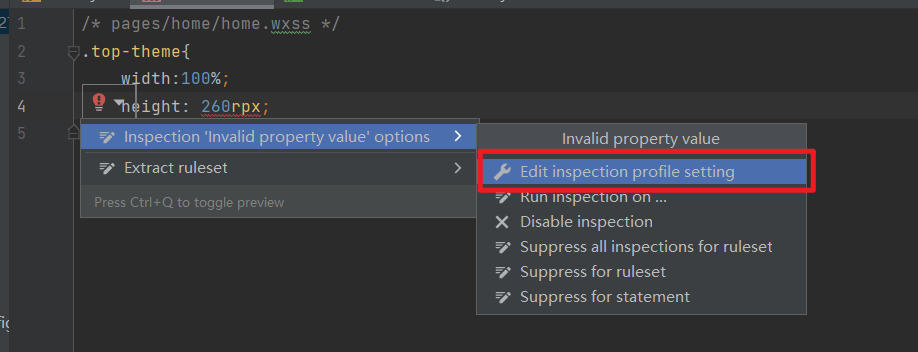
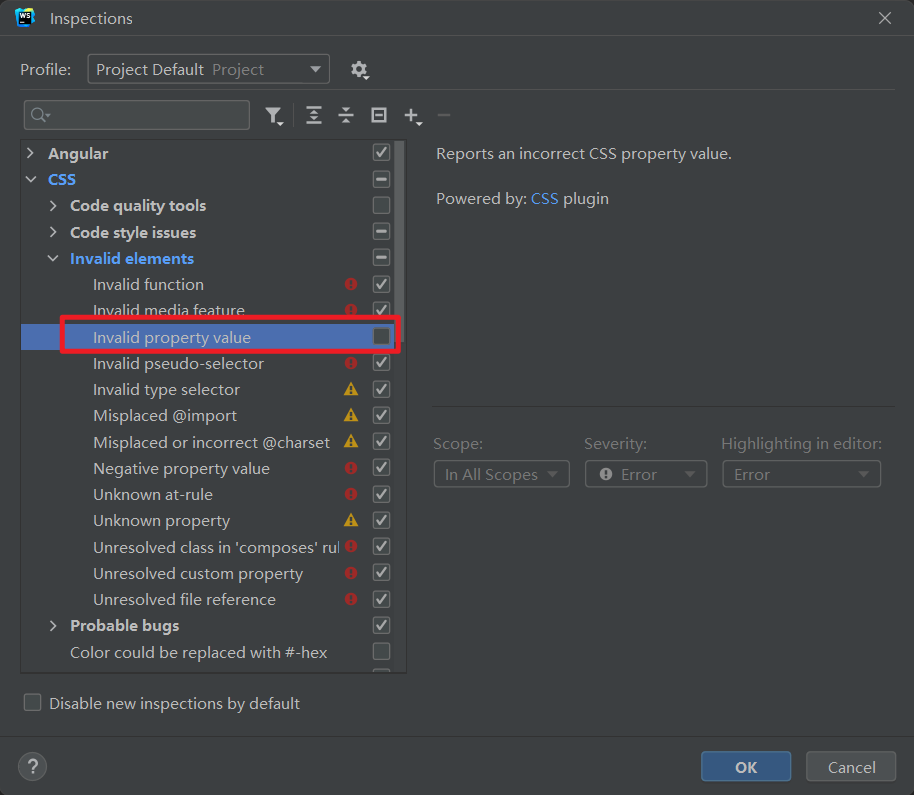
解决:
编辑提示标红,取消对钩
格式化代码键: ctrl + alt + L
增加兼容类型: -i "" s/"\ rpx"/rpx/g $FilePath%
调用服务端api获取数据
    onLoad(options) {
        wx.request({
            url:'http://localhost:53000/themes/by/names?names=t-1',
            method:'GET',
            data:{
                names:'t-1'
            },
            /*header:{
                appkey:''
            }*/
        })
    },
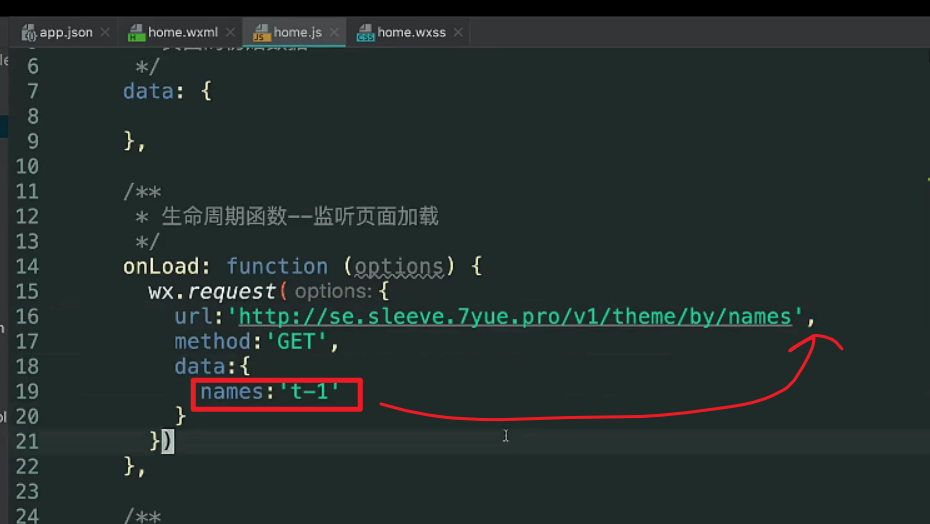
如果method是get,那么这里data里面的option会附加到url后面
这里相当于:url:'http://se.sleeve.7yue.pro/v1/theme/by/names?names=t-1',
如果method是post,这里会被当做post body的一部分,并不会去拼接
这里没有appkey,所以搭建本地服务器
首先要有node环境---自行百度
安装json-server
npm i json-server -g
在WXSHOP目录下运行命令行
json-server --watch --port 53000 all.json
浏览器:http://localhost:53000/themes
PS: themes指的的是all.json里面的key
这里可以抽取url前面的共同部分到一个文件夹里面,新建config文件夹,里面新建config.js
const config = {
    // appkey:''
    apiBaseUrl: 'http://localhost:53000/'
};

export {
    config
}
小程序开发前必备配置
打开微信小程序开发者工具,点击设置->项目设置:
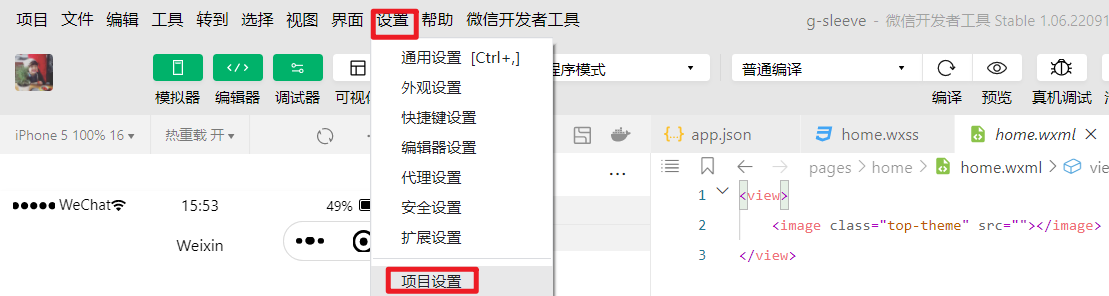
老师的视频中的配置:
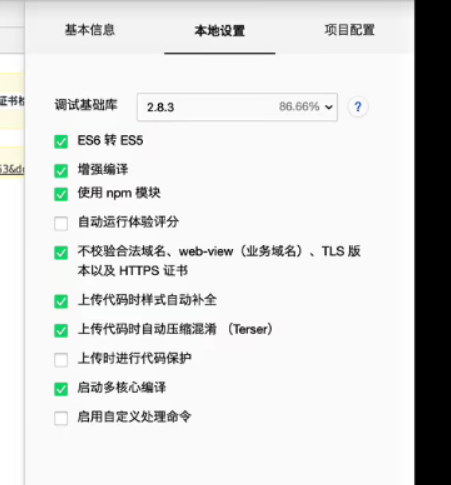
现在许多选项已经没有了,所以这里我只勾选了不校验合法域名
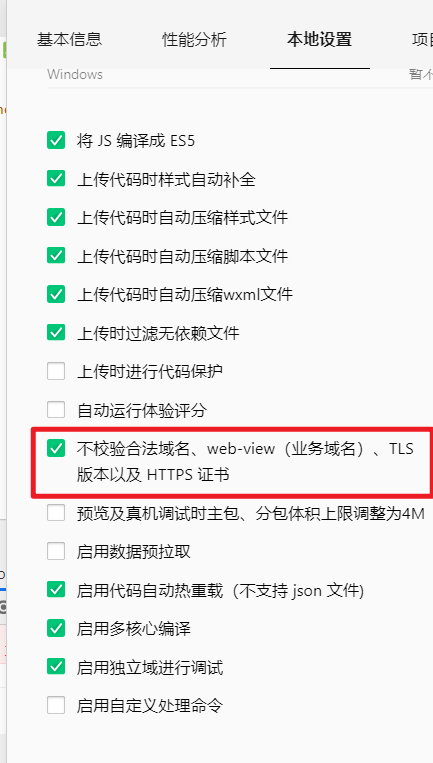
配置文件与第一次调用服务端API
在home.js首部加上
import {config} from "../../config/config"
然后引用这个变量
onLoad(options) {
    wx.request({
        url:`${config.apiBaseUrl}themes/`,
        // url:'http://localhost:53000/themes/?name=t-1',
        method:'GET',
        data:{
            name:'t-1'
        }
        // ,header{
        //     appkey:config.appkey
        // }
    })
},
模板字符串:
模板字符串``
字符串中可以出现换行符
可以使用 ${xxx} 形式输出变量
优点
在模板字符串中,空格、缩进、换行都会被保留,可以识别html代码
模板字符串完全支持“运算”式的表达式,可以在${}里完成一些计算
1. 模板字符串
需要拼接字符串的时候尽量改成使用模板字符串:
// 例子 2-1
// bad
const foo = 'this is a' + example;

// good
const foo = `this is a ${example}`;
2. 标签模板
可以借助标签模板优化书写方式:
在onload里面写:
,success(res) {
    // console.log(res)
    this.setData({
        topTheme:res.data[0]
    })
}
这里res并不是指我们获取到的这个数据,这里res.data才是下方的这个数据
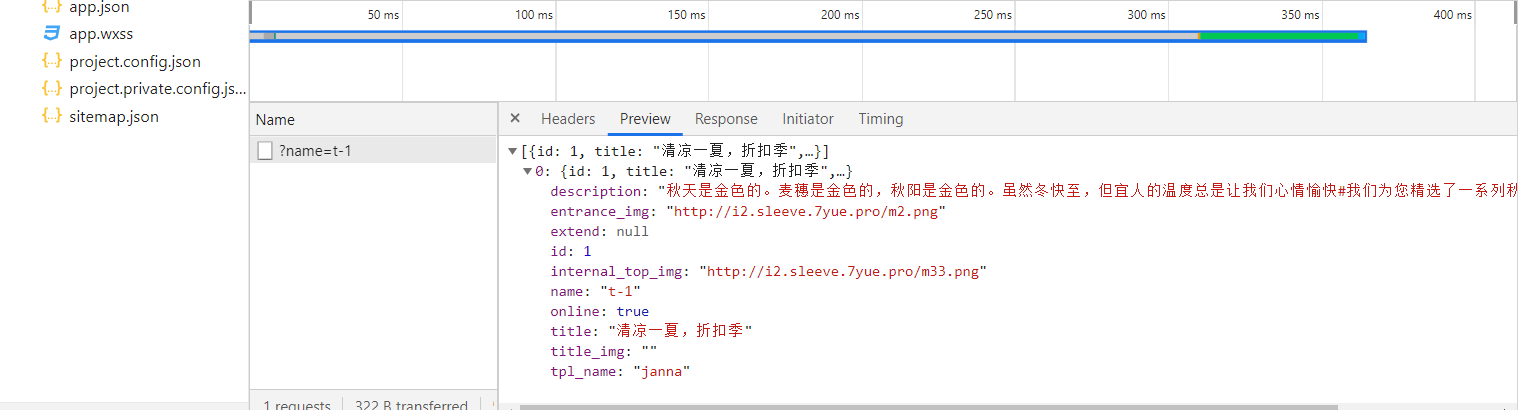
res是这个

在wxml中写:
<view>
    <image class="top-theme" src="{{topTheme.entrance_img}}"></image>
</view>
但是这里并不能正确显示,解决方法:
1:在wx.request外面写一个let that = this ,在里面调用 that.setData
  onLoad(options) {
        let that = this
        wx.request({

            url:`${config.apiBaseUrl}themes/`,
            // url:'http://localhost:53000/themes/names?names=t-1',
            method:'GET',
            data:{
                name:'t-1'
            }
            // ,header{
            //     appkey:config.appkey
            // }
            ,success(res) {
                // console.log(res)
                that.setData({

                    topTheme:res.data[0]
                })
            }
        })
    },
2.使用箭头函数success:res=> ,这里可以让this 的指代不发生变化
  onLoad(options) {
        wx.request({
            url:`${config.apiBaseUrl}themes/`,
            // url:'http://localhost:53000/themes/names?names=t-1',
            method:'GET',
            data:{
                name:'t-1'
            }
            // ,header{
            //     appkey:config.appkey
            // }
            ,success:res=> {
                // console.log(res)
                this.setData({

                    topTheme:res.data[0]
                })
            }
        })
    },
业务对象的重要性
将js中的方法抽象为model,根据我们的业务对象可以将theme作为一个业务对象抽取出来,这里因为可能主页也有theme,主页的其他位置也有theme,所以我们给其起名字为getHomeLocationA。
// 业务对象  单品 theme banner spu sku address user
import {config} from "../config/config";

export class Theme {
    static getHomeLocationA(callback)  {
        wx.request({
            url: `${config.apiBaseUrl}themes/`,
            // url:'http://localhost:53000/themes/names?names=t-1',
            method: 'GET',
            data: {
                name: 't-1'
            }
            // ,header{
            //     appkey:config.appkey
            // }
            ,
            success: res => {
                // console.log(res)
                //直接将res返回到home.wxml中
                callback(res.data)

                // this.setData({
                //     topTheme: res.data[0]
                // })
            }
        })
    }
}
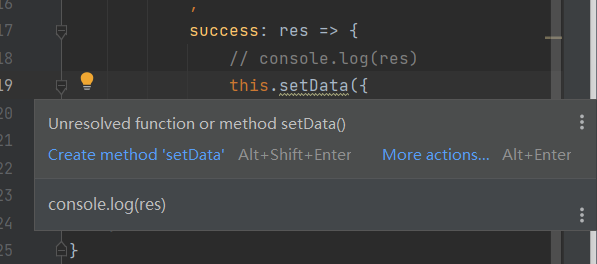
只有在页面里面才可以this.setData在模型里面是不可以的
这里因为在model里面的方法,没法传给页面使用,所以这里使用callback
其实回调函数(没有调用也会执行)就是一个参数,把这个参数传到另一个函数里面,也就是主函数里面,当主函数里面的事情干完再回头去执行当做参数传进去的回调函数,回头去调用,这就是回调的概念
举一个别人举过的例子:约会结束后你送你女朋友回家,离别时,你肯定会说:“到家了给我发条信息,我很担心你。” 对不,然后你女朋友回家以后还真给你发了条信息。小伙子,你有戏了。其实这就是一个回调的过程。你留了个参数函数(要求女朋友给你发条信息)给你女朋友,然后你女朋友回家,回家的动作是主函数。她必须先回到家以后,主函数执行完了,再执行传进去的函数,然后你就收到一条信息了。
接下来我们用代码更清晰的理解一下回调的概念:
<script>
    //定义主函数,回调函数作为参数
    function A(callback) {
        callback();
        console.log('我是主函数');
    }

    //定义回调函数
    function B() {
        setTimeout("console.log('我是回调函数')",2000);//即使此时时间设置为0,也会先输出主函数
    }

    //调用主函数,将B传进去
    A(B);
</script>
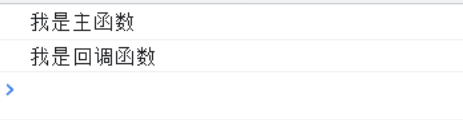
从以上代码可以看出,我们先执行的回调函数callback(),但是输出的时候却是后输出回调函数里面的内容,由此可以证实上面的说法,要等到主函数里面的事情干完再回头去执行回调函数。
这里定义好了theme这个类,使用的时候需要将其导出,这里导出也有很快捷的类
export class Theme {
这里导出的时候这里最好在最后写一个export,这样可以统一的导出
export {
    Theme
}
在home.js里面改写:
onLoad(options) {
    Theme.getHomeLocationA(data=>{
        this.setData({
            topTheme:data[0]
        })
    })
},
封装HTTP请求
这里我们写的request是调用wx的request方法,主要有三个参数url,data,method这里给一个默认的参数GET
class Http{
    static request(url,data,method='GET'){
        // wx.request
    }
}
然后调用wx.request把一些参数提前赋值
static request({url,data,callback,method='GET'}){
        // wx.request
        wx.request({
            url:`${config.apiBaseUrl}${url}`,
            data,
            method,
            // header:{
            //     appkey:config.appkey
            // }
            success(res) {
                callback(res.data)
            }
        })
    }
然后在theme里面调用
static getHomeLocationA(callback)  {
        Http.request({
            url:'themes/',
            data: {
                name: 't-1'
            },
            callback:data=>{
                callback(data)
            }
        })
    }
使用async await
处理异步之间的调用主要是有三种形式:
callback
promise
async await
安装linui
npm install lin-ui
新建utils文件夹中util.js文件
const promisic = function (func) {
    return function (params = {}) {
        return new Promise((resolve, reject) => {
            const args = Object.assign(params, {
                success: (res) => {
                    resolve(res);
                },
                fail: (error) => {
                    reject(error);
                }
            });
            func(args);
        });
    };
};

//代理模式
export {
    promisic
}
这里使用了async await就可以删掉http里面的callback参数,因为只要使用了这两个就相当于是同步
http中:
    static async request({url,data,method='GET'}){
        // wx.request
       return await promisic(wx.request) ({
            url:`${config.apiBaseUrl}${url}`,
            data,
            method,
            // header:{
            //     appkey:config.appkey
            // }

        })
    }
因为http里面的request是async的,所以我们在theme里面request前面加上await
theme:
    static async getHomeLocationA(callback)  {
       const data =  await Http.request({
            url:'themes/',
            data: {
                name: 't-1'
            }
        })
    }
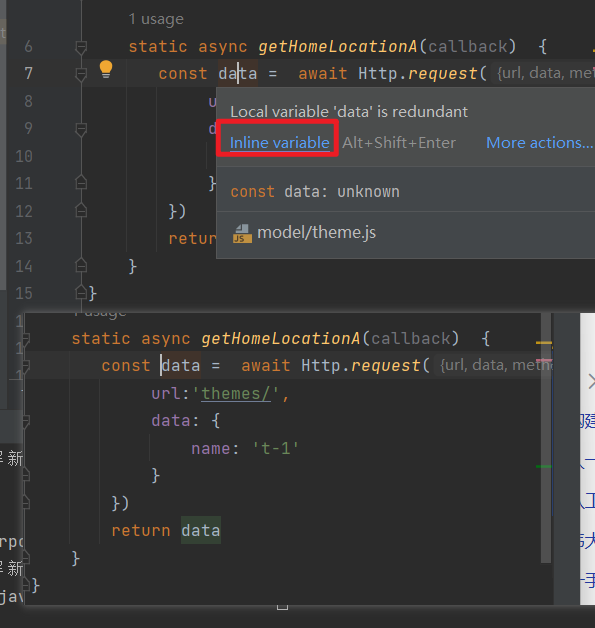
一个函数前面加上async代表他到最后一定会返回一个promise
这里webstorm可以自动优化:
    static async getHomeLocationA(callback)  {
        return await Http.request({
            url: 'themes/',
            data: {
                name: 't-1'
            }
        })
    }
这里home.js的onload函数就可以直接得到结果,不需要使用回调函数了
    onLoad:async function(options) {
        const data = await Theme.getHomeLocationA()
        this.setData({
            topTheme:data.data[0]
        })
    },
这里需要修改data[0]为data.data[0],现在的层级结构是这样
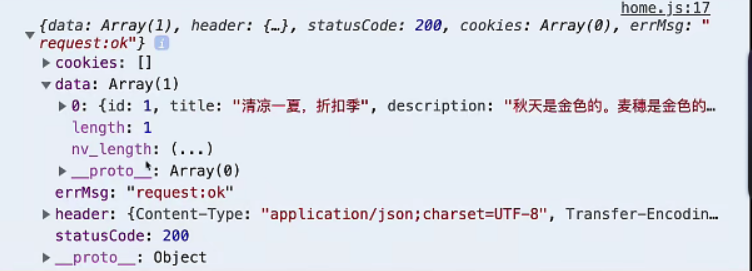
我们最好在封装的时候就把这个data给封装进去,在http中修改返回的数据就是res.data,之后调用的时候只需要写res.data就可以了
static async request({url,data,method='GET'}){
        // wx.request
     const res = await promisic(wx.request) ({
            url:`${config.apiBaseUrl}${url}`,
            data,
            method,
            // header:{
            //     appkey:config.appkey
            // }

        })
        return res.data
    }
将不支持promise的api转换为支持promise的api
这里只能传入这个函数wx.request,这里后面不能跟(),如果跟了代表你已经调用了这个函数了
promisic(wx.request)
promisic返回的依然是一个函数,再在这个后面加(),传递原来wx.request中的参数。
promisic(wx.request)({
    url:'',
    data:data,
})
参照类似的格式,我们可以将上面的函数改写:在await之后加上promise(wx.request)()第二个括号中跟着原来的参数
static async request({url,data,callback,method='GET'}){
    // wx.request
    await promisic(wx.request) ({
        url:`${config.apiBaseUrl}${url}`,
        data,
        method,
        // header:{
        //     appkey:config.appkey
        // }
    })
}
获取banner教程
获取banner数据
用轮播图显示
这里我们新建model banner 和theme类似:
static LocationB = 'b-1';
static async getHomeLocationB(){
    return await Http.request({
        url: 'banner/',
        data: {
            name: `${Banner.LocationB}`,
        }
    })
}
这里因为onload里面的业务逻辑太多了,所以我们将其简化一下
	data: {
    	themeA:null,
        bannerB:null
	},
    async onLoad() {
        this.initAllData()

    },

    async initAllData(){
            const themeA = await Theme.getHomeLocationA()
            const bannerB = await Banner.getHomeLocationB()
            this.setData({
                themeA:themeA[0],
                bannerB:bannerB[0]
            })
    },
banner轮播图实现与插槽的基本概念
主要是使用swiper组件
<view>
    <image class="top-theme" src="{{themeA.entrance_img}}">123</image>
    <swiper class="swiper"
            indicator-dots
            indicator-active-color="#157658"
            autoplay
            circular>
        <block wx:for="{{bannerB.items}}">
            <swiper-item>
                <image class="swiper" src="{{item.img}}"></image>
            </swiper-item>
        </block>
    </swiper>
</view>
要用swiper,除了slot里面的插槽需要应用class,总体的swiper也需要给他一个高和宽
设置指示点的属性indicator-dots="{{true}},但也可以直接写这个属性,默认就会将其设置为true
设置指示点的颜色:indicator-active-color="#157658"
设置自动播放:autoplay
到最后一张之后继续循环滚动: circular
npm的semver语法规则
输入命令安装lin-ui
npm install lin-ui
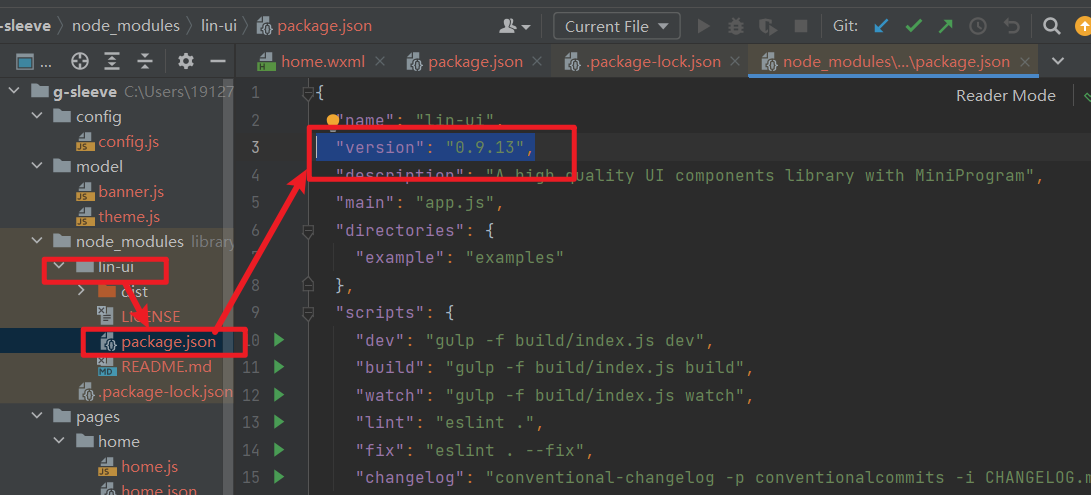
到package.json里面查看版本号
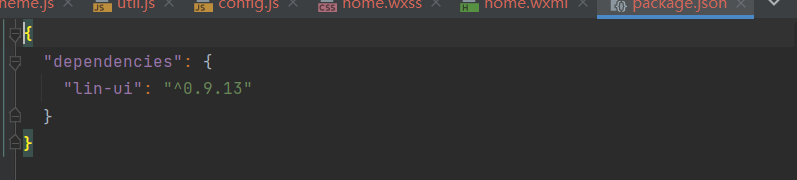
版本格式:主版本号.次版本号.修订号,版本号递增规则如下:
- 主版本号(major):当你做了不兼容的 API 修改
- 次版本号(minor):当你做了向下兼容的功能性新增,可以理解为 Feature 版本
- 修订号(patch):当你做了向下兼容的问题修正,可以理解为 Bug fix 版本
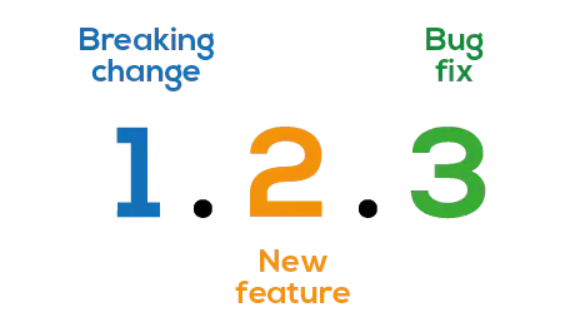
在 npm 的依赖的规则中,还有 ~、>、<、=、>=、<=、-、||、x、X、* 等符号。
当执行 npm install xxx -S 来安装三方包时,npm 会首先安装包的最新版本,然后将包名及版本号写入到 package.json 文件中。被安装的依赖的版本号前会默认加上 ^ 符号。
^:表示同一主版本号中,不小于指定版本号的版本号
`^2.2.1` 对应主版本号为 2,不小于 `2.2.1` 的版本号,比如 `2.2.1`、`2.2.2`、`2.3.0`,主版本号固定
// 当该依赖有最新版本时(eg:2.3.3),npm install 会安装最新的依赖
~:表示同一主版本号和次版本号中,不小于指定版本号的版本号
`~2.2.1` 对应主版本号为 2,次版本号为 2,不小于 `2.2.1` 的版本号,比如 `2.2.1、2.2.2`,主版本号和次版本号固定
>、<、=、>=、<=、-:用来指定一个版本号范围
`>2.1`
`1.0.0 - 1.2.0`
// 注意使用 `-` 的时候,必须两边都有空格。
||:表示或
`^2 <2.2 ||> 2.3`
x、X、*:表示通配符
`*` 对应所有版本号
`3.x` 对应所有主版本号为 3 的版本号
也可用latest,表示永远下载最新版本

Lin-ui真正的版本是在node_modules里面lin-ui文件中的package.json文件夹下面的version中看到
之后点击工具->构建npm
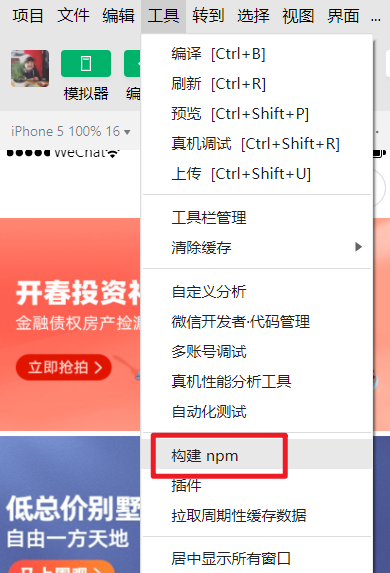
小程序在打包上传的时候是会忽略node_module的
重点是使用这个文件夹下面的lin-ui
这里如果需要更新最新版本的lin-ui的话,只需要将lin-ui文件夹删除以及node_modules删除,重新执行npm i就可以重新下载最新版本
lin-ui grid组件构建六宫格
组件间关系
定义和使用组件间关系
有时需要实现这样的组件:
<custom-ul>
  <custom-li> item 1 </custom-li>
  <custom-li> item 2 </custom-li>
</custom-ul>
这个例子中, custom-ul 和 custom-li 都是自定义组件,它们有相互间的关系,相互间的通信往往比较复杂。此时在组件定义时加入 relations 定义段,可以解决这样的问题。示例:
// path/to/custom-ul.js
Component({
  relations: {
    './custom-li': {
      type: 'child', // 关联的目标节点应为子节点
      linked: function(target) {
        // 每次有 custom-li 被插入时执行,target是该节点实例对象,触发在该节点 attached 生命周期之后
      },
      linkChanged: function(target) {
        // 每次有 custom-li 被移动后执行,target是该节点实例对象,触发在该节点 moved 生命周期之后
      },
      unlinked: function(target) {
        // 每次有 custom-li 被移除时执行,target是该节点实例对象,触发在该节点 detached 生命周期之后
      }
    }
  },
  methods: {
    _getAllLi: function(){
      // 使用 getRelationNodes 可以获得 nodes 数组,包含所有已关联的custom-li,且是有序的
      var nodes = this.getRelationNodes('path/to/custom-li')
    }
  },
  ready: function(){
    this._getAllLi()
  }
})
// path/to/custom-li.js
Component({
  relations: {
    './custom-ul': {
      type: 'parent', // 关联的目标节点应为父节点
      linked: function(target) {
        // 每次被插入到 custom-ul 时执行,target是 custom-ul 节点实例对象,触发在 attached 生命周期之后
      },
      linkChanged: function(target) {
        // 每次被移动后执行,target是 custom-ul 节点实例对象,触发在 moved 生命周期之后
      },
      unlinked: function(target) {
        // 每次被移除时执行,target是 custom-ul 节点实例对象,触发在 detached 生命周期之后
      }
    }
  }
})
注意:必须在两个组件定义中都加入 relations 定义,否则不会生效。
关联一类组件
有时,需要关联的是一类组件,如:
<custom-form>
  <view>
    input
    <custom-input></custom-input>
  </view>
  <custom-submit> submit </custom-submit>
</custom-form>
custom-form 组件想要关联 custom-input 和 custom-submit 两个组件。此时,如果这两个组件都有同一个behavior:
// path/to/custom-form-controls.js
module.exports = Behavior({
  // ...
})
// path/to/custom-input.js
var customFormControls = require('./custom-form-controls')
Component({
  behaviors: [customFormControls],
  relations: {
    './custom-form': {
      type: 'ancestor', // 关联的目标节点应为祖先节点
    }
  }
})
// path/to/custom-submit.js
var customFormControls = require('./custom-form-controls')
Component({
  behaviors: [customFormControls],
  relations: {
    './custom-form': {
      type: 'ancestor', // 关联的目标节点应为祖先节点
    }
  }
})
则在 relations 关系定义中,可使用这个 behavior 来代替组件路径作为关联的目标节点:
// path/to/custom-form.js
var customFormControls = require('./custom-form-controls')
Component({
  relations: {
    'customFormControls': {
      type: 'descendant', // 关联的目标节点应为子孙节点
      target: customFormControls
    }
  }
})
relations 定义段
relations 定义段包含目标组件路径及其对应选项,可包含的选项见下表。
| 选项 | 类型 | 是否必填 | 描述 |
|---|---|---|---|
| type | String | 是 | 目标组件的相对关系,可选的值为 parent 、 child 、 ancestor 、 descendant |
| linked | Function | 否 | 关系生命周期函数,当关系被建立在页面节点树中时触发,触发时机在组件 attached 生命周期之后 |
| linkChanged | Function | 否 | 关系生命周期函数,当关系在页面节点树中发生改变时触发,触发时机在组件 moved 生命周期之后 |
| unlinked | Function | 否 | 关系生命周期函数,当关系脱离页面节点树时触发,触发时机在组件 detached 生命周期之后 |
| target | String | 否 | 如果这一项被设置,则它表示关联的目标节点所应具有的behavior,所有拥有这一 behavior 的组件节点都会被关联 |
在这里可以使用
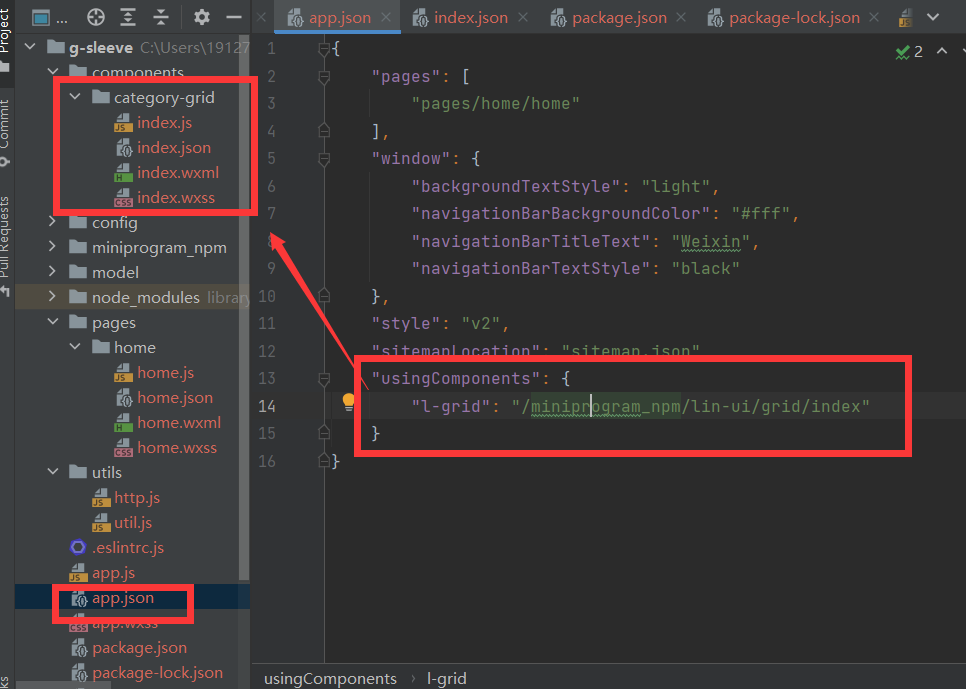
一个插槽只能插入一个元素,如果你有多个元素需要先用view将其包裹起来
我们在页面中接收到数据,需要将其发送到自定义组件中,这里我们需要在index.js中定义property,在这里grid是一个数组,以下的两种写法都可以:
如果初始值就是一个空数组
properties: {
    grid:Array
},
或者如果想给他一个初始值:
grid:{
    type:Array,
        value:[]
}
图片在小程序里面一定要设置它的高和宽,因为它并不会自适应
.img{
    width: 60rpx;
    height: 60rpx;
}
lin-ui中grid生效是需要有key和slot的,这里我们在wx:for里面有一个默认的index
<block wx:for="{{grid}}">
    <l-grid-item key="{{index}}" slot="{{index}}">
        <view class="grid-item">
            <image class="img" src="{{item.img}}"></image>
            <text class="text">{{item.title}}</text>
        </view>
    </l-grid-item>
</block>
在组件上不可以使用class,要使用组件外部类
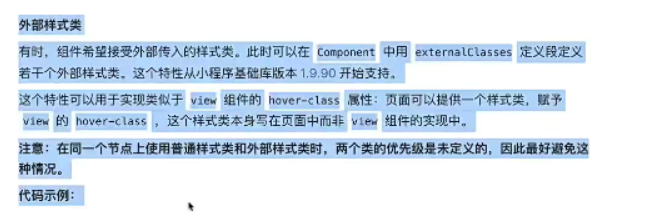
设置居中:
.container{
    width: 100%;
    height: 320rpx;
    display: flex;
    flex-direction: row;
    align-items: center;
    justify-content: center;
}
不设置高度,这里grid组件是可以自动的设置高度的
.grid-item{
    width: 200rpx;
    display: flex;
    flex-direction: column;
    align-items: center;
}
如果只是看的话,高度和宽度都可以不去设置,但是如果是为了点击的话,需要设置宽度,否则就是这个图标和文字区域的大小有效
这里lin-UI默认一行三个,但是如果想要改变一行的数量,这里需要设置属性row-num
如果没有明确理由,不要固定宽高
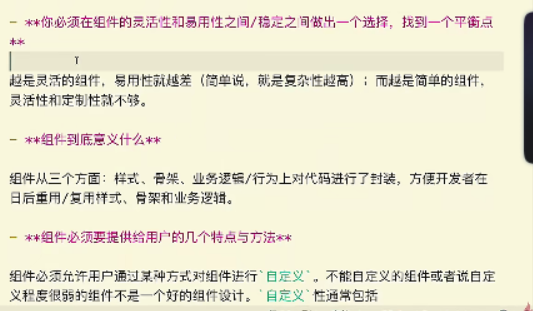
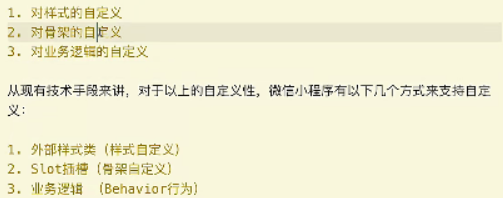
02 lin-ui组件库的引入与编程原则
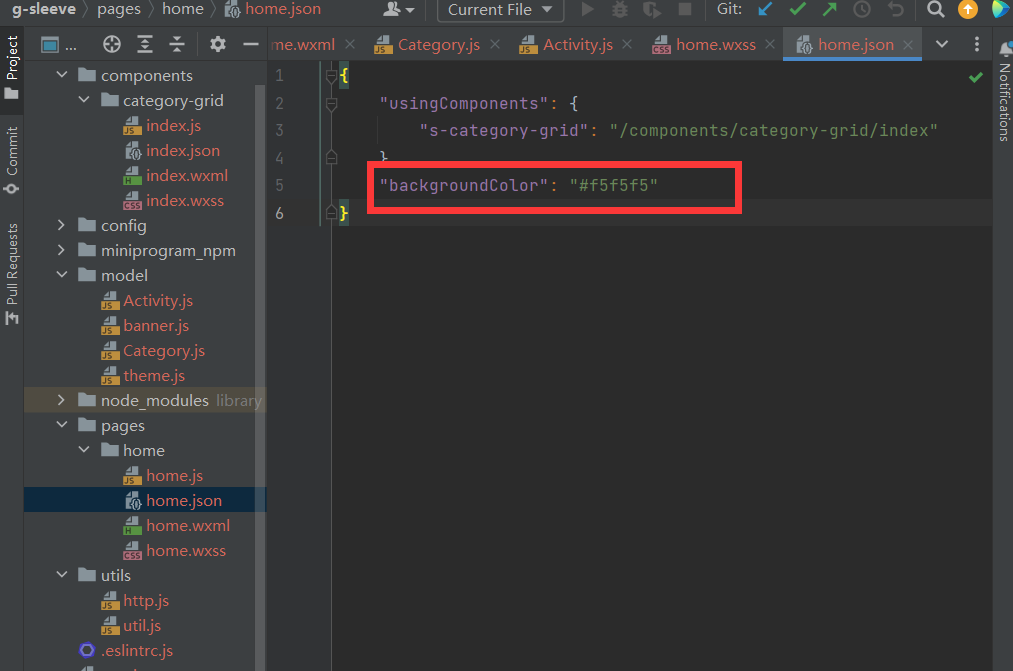
背景颜色如何设置
这里的这个背景颜色指的是小程序窗口下拉刷新的颜色
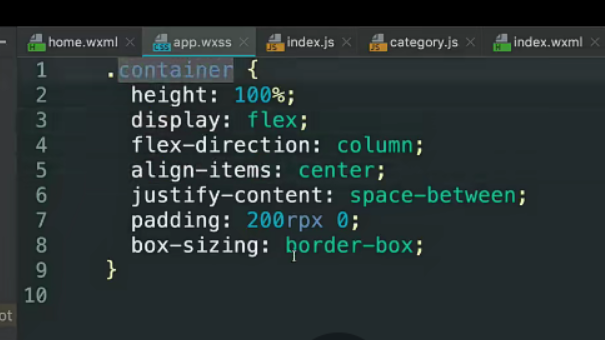
小程序默认自带的container样式类:我们需要删除
小程序图片自带一个向上的间距,需要将这个图片的类设置为 display: flex;
.top-theme{
    width: 100%;
    height: 400rpx;
    display: flex;
}

 浙公网安备 33010602011771号