springmvc小结(下)
1.@ModelAttribute
1.给共享的数据设置model数据设置,贴在形参上,也可以贴在方法上,设置一个model的key值
2.当controller方法返回一个对象的时候,,缺省值会把当前请求的url作为逻辑视图名称,共享返回对象
2.多个对象的传递
  //自定义属性注解,用于请求参数转移到对应的对象参数中去
     //把一dog.开头的参数封装到dog中
     @InitBinder("dog")
     public void initBing(WebDataBinder binder){
           binder.setFieldDefaultPrefix("dog.");
     }

     @InitBinder("cat")
     public void initBing1(WebDataBinder binder){
           binder.setFieldDefaultPrefix("cat.");
     }

     @RequestMapping("/testmany")
     public String test(Cat cat,Dog dog){

           System.out.println(cat);
           System.out.println(dog);
           return null;
     }
   <form method="post" action="model/testmany">
      catName:<input type="text" name="cat.name"><br/>
      catAge:<input type="text" name="cat.age"><br/>
      DogName:<input type="text" name="dog.name"><br/>
      DogAge:<input type="text" name="dog.age"><br/>
      <input type="submit" value="submit">
   </form>
处理不同的数据可以传递到不同的pojo实现类中。
3.处理json
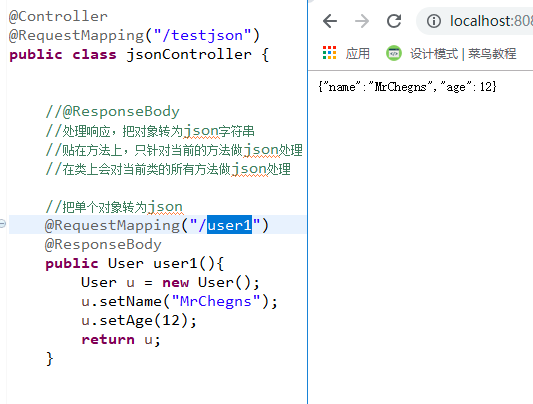
①.单个对象
     //@ResponseBody
     //处理响应,把对象转为json字符串
     //贴在方法上,只针对当前的方法做json处理
     //在类上会对当前类的所有方法做json处理

     //把单个对象转为json
     @RequestMapping("/user1")
     @ResponseBody
     public User user1(){
           User u = new User();
           u.setName("MrChegns");
           u.setAge(12);
           return u;
     }
②.多个对象
     //多个对象

     @RequestMapping("/user2")
     @ResponseBody
     public List<User> user2(){

           List<User> users = new ArrayList<>();
           User u1 = new User("MrChengs",12);
           User u2 = new User("MrChengs",13);

           users.add(u1);
           users.add(u2);

           return users;
     }

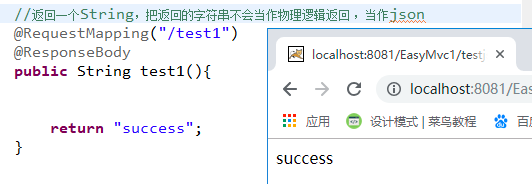
注意://返回一个String,把返回的字符串不会当作物理逻辑返回 ,当作json
     @RequestMapping(value="/test1",produces=MediaType.APPLICATION_JSON_VALUE)
     @ResponseBody
     public String test1(){
           return "success“;
     }
4.日期处理
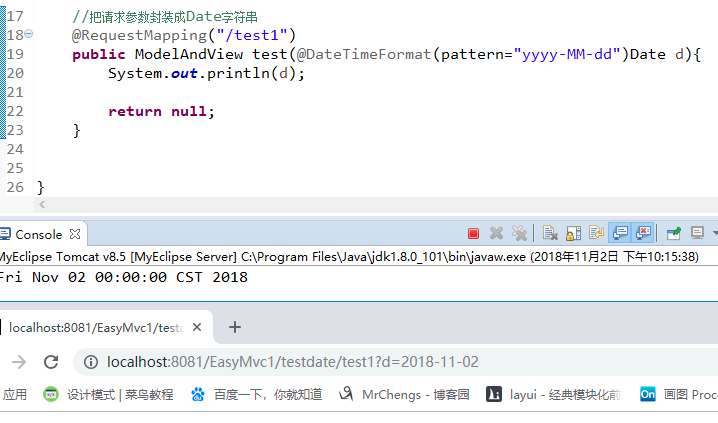
//把请求参数封装成Date字符串
     //前台向后台传数据
     @RequestMapping("/test1")
     public ModelAndView  test(@DateTimeFormat(pattern="yyyy-MM-dd")Date d){
           System.out.println(d);
           return null;
     }
time时的Date类型:
    @InitBinder
     public void initBind(WebDataBinder binder){
           SimpleDateFormat sdf = new SimpleDateFormat();
           sdf.applyPattern("yyyy-MM-dd");
           binder.registerCustomEditor(java.util.Date.class, new  CustomDateEditor(sdf, true));
     }
     @RequestMapping("/test2")
     public ModelAndView dates(User u){
           System.out.println(u);
           return null;
     }

配置全局可以使用
新建类:
这个类需要加入到spring容器
@ControllerAdvice
public class DateformateConfig {
     @InitBinder
     public void initBind(WebDataBinder binder){
           SimpleDateFormat sdf = new SimpleDateFormat();
           sdf.applyPattern("yyyy-MM-dd");
           binder.registerCustomEditor(java.util.Date.class, new  CustomDateEditor(sdf, true));
     }
}
@RequestMapping("/test2")
     public ModelAndView dates(User u){
           System.out.println(u);
           return null;
     }
得到结果不变
jsp页面处理:

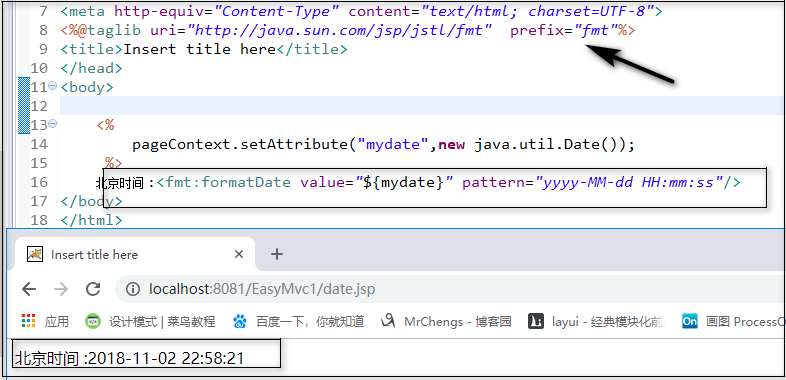
后台向前台
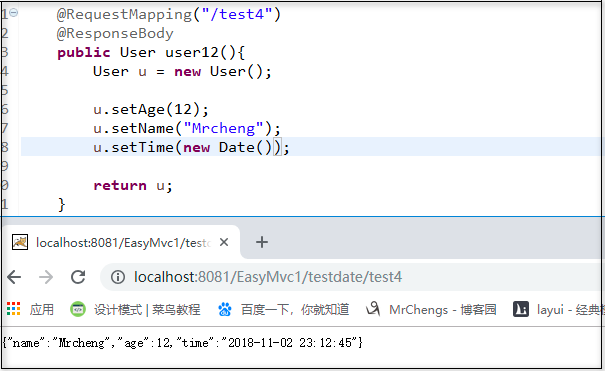
public class User {
     private String name;
     private int age;
     //东八区
     @JsonFormat(pattern="yyyy-MM-dd  HH:mm:ss",timezone="GMT+8")
     private Date time;
     ....
}
@RequestMapping("/test4")
     @ResponseBody
     public User user12(){
           User u = new User();
           u.setAge(12);
           u.setName("Mrcheng");
           u.setTime(new Date());
           return u;
     }
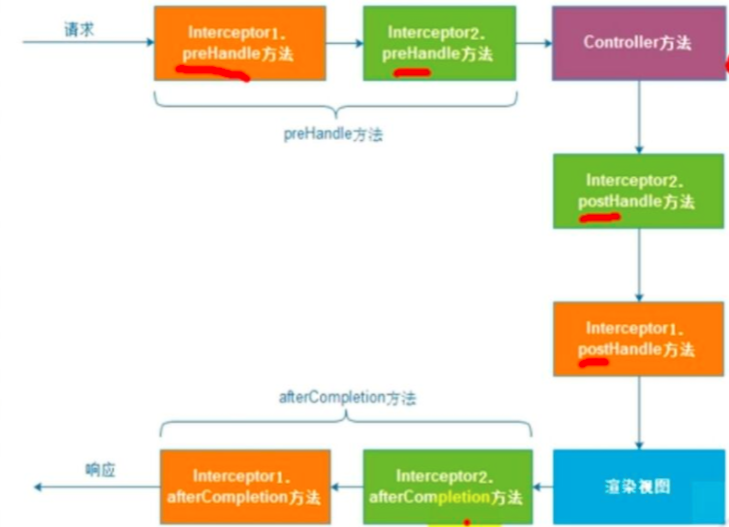
5.拦截器
配置
<!-- 拦截器 -->
<mvc:interceptors>
     <mvc:interceptor>
           <!-- 对那些资源及进行拦截 -->
           <mvc:mapping path="/**"/>
           <!-- 派出不需要被拦截的 -->
           <mvc:exclude-mapping path="login"/>
           <bean  class="com.MrChengs.interceptor.LoginCheckInterceptor" />
     </mvc:interceptor>
</mvc:interceptors>
实现类登陆拦截
public class LoginCheckInterceptor implements  HandlerInterceptor{
     //登陆判断
     @Override
     public boolean preHandle(HttpServletRequest request,  HttpServletResponse response, Object handler)
                throws Exception {

                if(request.getSession() == null){
                     response.sendRedirect(request.getContextPath()+ "/login.jsp");
                     return false;
                }
           return true;
     }
     @Override
     public void postHandle(HttpServletRequest request,  HttpServletResponse response, Object handler,
                ModelAndView modelAndView) throws Exception {
     }
     @Override
     public void afterCompletion(HttpServletRequest request,  HttpServletResponse response, Object handler, Exception ex)
                throws Exception {
     }
}
6.异常处理:
①.全局:
springmvc.xml
value的值也是根据逻辑视图的转换来的
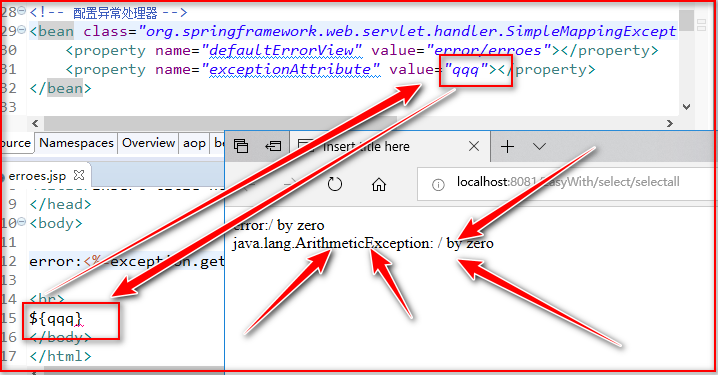
<!-- 配置异常处理器 -->
<bean  class="org.springframework.web.servlet.handler.SimpleMappingExceptionResolver">
    //设置错误的默认视图
     <property name="defaultErrorView"  value="error/erroes"></property>
</bean>
错误的提示页面:
<%@ page language="java" contentType="text/html; charset=UTF-8"
    pageEncoding="UTF-8" isErrorPage="true"%>
<!DOCTYPE html PUBLIC "-//W3C//DTD HTML 4.01 Transitional//EN"  "http://www.w3.org/TR/html4/loose.dtd">
<html>
<head>
<meta http-equiv="Content-Type" content="text/html;  charset=UTF-8">
<title>Insert title here</title>
</head>
<body>
error:<%=exception.getMessage() %>
</body>
</html>

错误页面获取异常信息的变量名称
<property name="exceptionAttribute" value="qqq"></property>
根据不同类型的异常配置不同的异常
<!-- 根据不同的异常类型,跳转到不同的页面 -->
     <property name="exceptionMappings">

     </property>
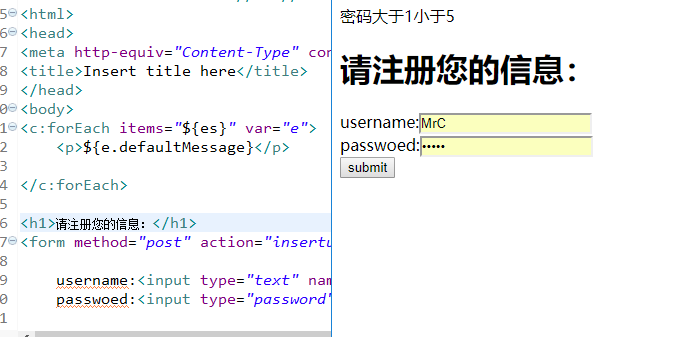
7.数据校验
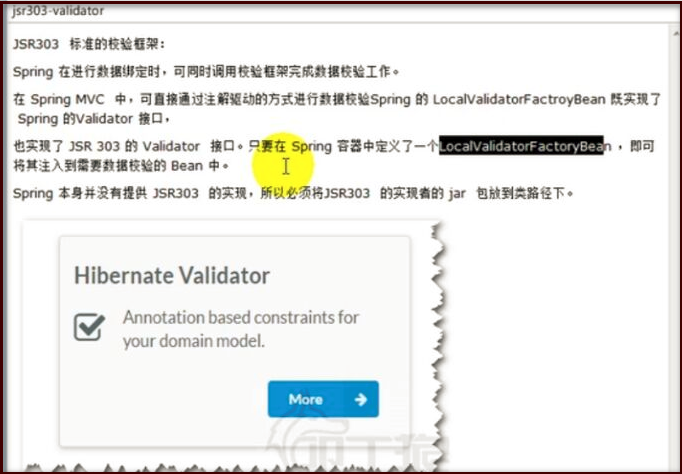
springmvc.xml中
<!-- 数据校验 -->
<bean  class="org.springframework.validation.beanvalidation.LocalValidatorFactoryBean"></bean>
pojo中
public class User {
     private int id;

     @NotNull(message="username 不可以为空")
     private String username;

     @Size(max=5,min=1,message="密码大于1小于5")
     private String password;
...
}
controller类上
BindingResult 必须在 @Valid之后
@RequestMapping("/insertuser")
     public String Users(@Valid User user,BindingResult  bindingResult,Model model) throws Exception{

           List<ObjectError> es = bindingResult.getAllErrors();
           if(es.size() > 0){
                model.addAttribute("es", es);
                return "/insert";
           }

           System.out.println("hellouser");
           System.out.println(user);
           UserMapper um = (UserMapper)  getContext().getBean("userMapper");
           um.addUser(user);

           return "redirect:/select/selectall";
     }
jsp页面上
<c:forEach items="${es}" var="e">
     <p>${e.defaultMessage}</p>
</c:forEach>
更多的可以从参考网上的更多教程.......
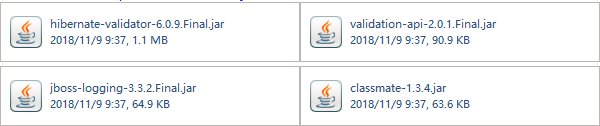
8.文件上传

1.apache版本
id是固定的
springmvc.xml
<!-- 文件上传解析器 -->
<bean id="multipartResolver"  class="org.springframework.web.multipart.commons.CommonsMultipartResolver">
     <property name="maxUploadSize" value="1048000"></property>
</bean>
jsp页面
<form action="upload" method="post"  enctype="multipart/form-data">
     name:<input type="text" name="username">
     file:<input type="file" name="pic" >
     <input type="submit" value="submit">
</form>
controller
@Controller
public class FileUpLoad {

     @Autowired
     private ServletContext servletContext;

     @RequestMapping("/upload")
     public ModelAndView upload(User user,MultipartFile pic)  throws IOException{
           System.out.println(user);
           String fileName = pic.getOriginalFilename();
           System.out.println(fileName);
           String dir = servletContext.getRealPath("/photo");
           Files.copy(pic.getInputStream(),Paths.get(dir,  fileName));
           return null;
     }
}
两个同名pic位置
基本上总结到此结束了.....

 浙公网安备 33010602011771号