微信公众号H5消息推送功能
背景
近期公司要把某部分业务增加一个微信公众号H5端(业务处理流程以及发消息给指定用户),方便用户使用。由于前段时间刚好项目经理辞职跑路,于是,上面要求我来搭建前后台,以及环境部署,因此记录一下。
开发前准备
首先说说微信开发相关的一些注意点。做过微信开发的应该都知道,由于微信一些限制,所以我们不得不一步步跟着微信官方文档来开发。贴上微信公众号开发帮助文档
公众号申请
-
公众号种类有
订阅号和服务号,每种对应有不同的接口,有一定的限制,所以申请公众号前要注意。不懂的可以看看订阅号与服务号的区别对比这篇文章 -
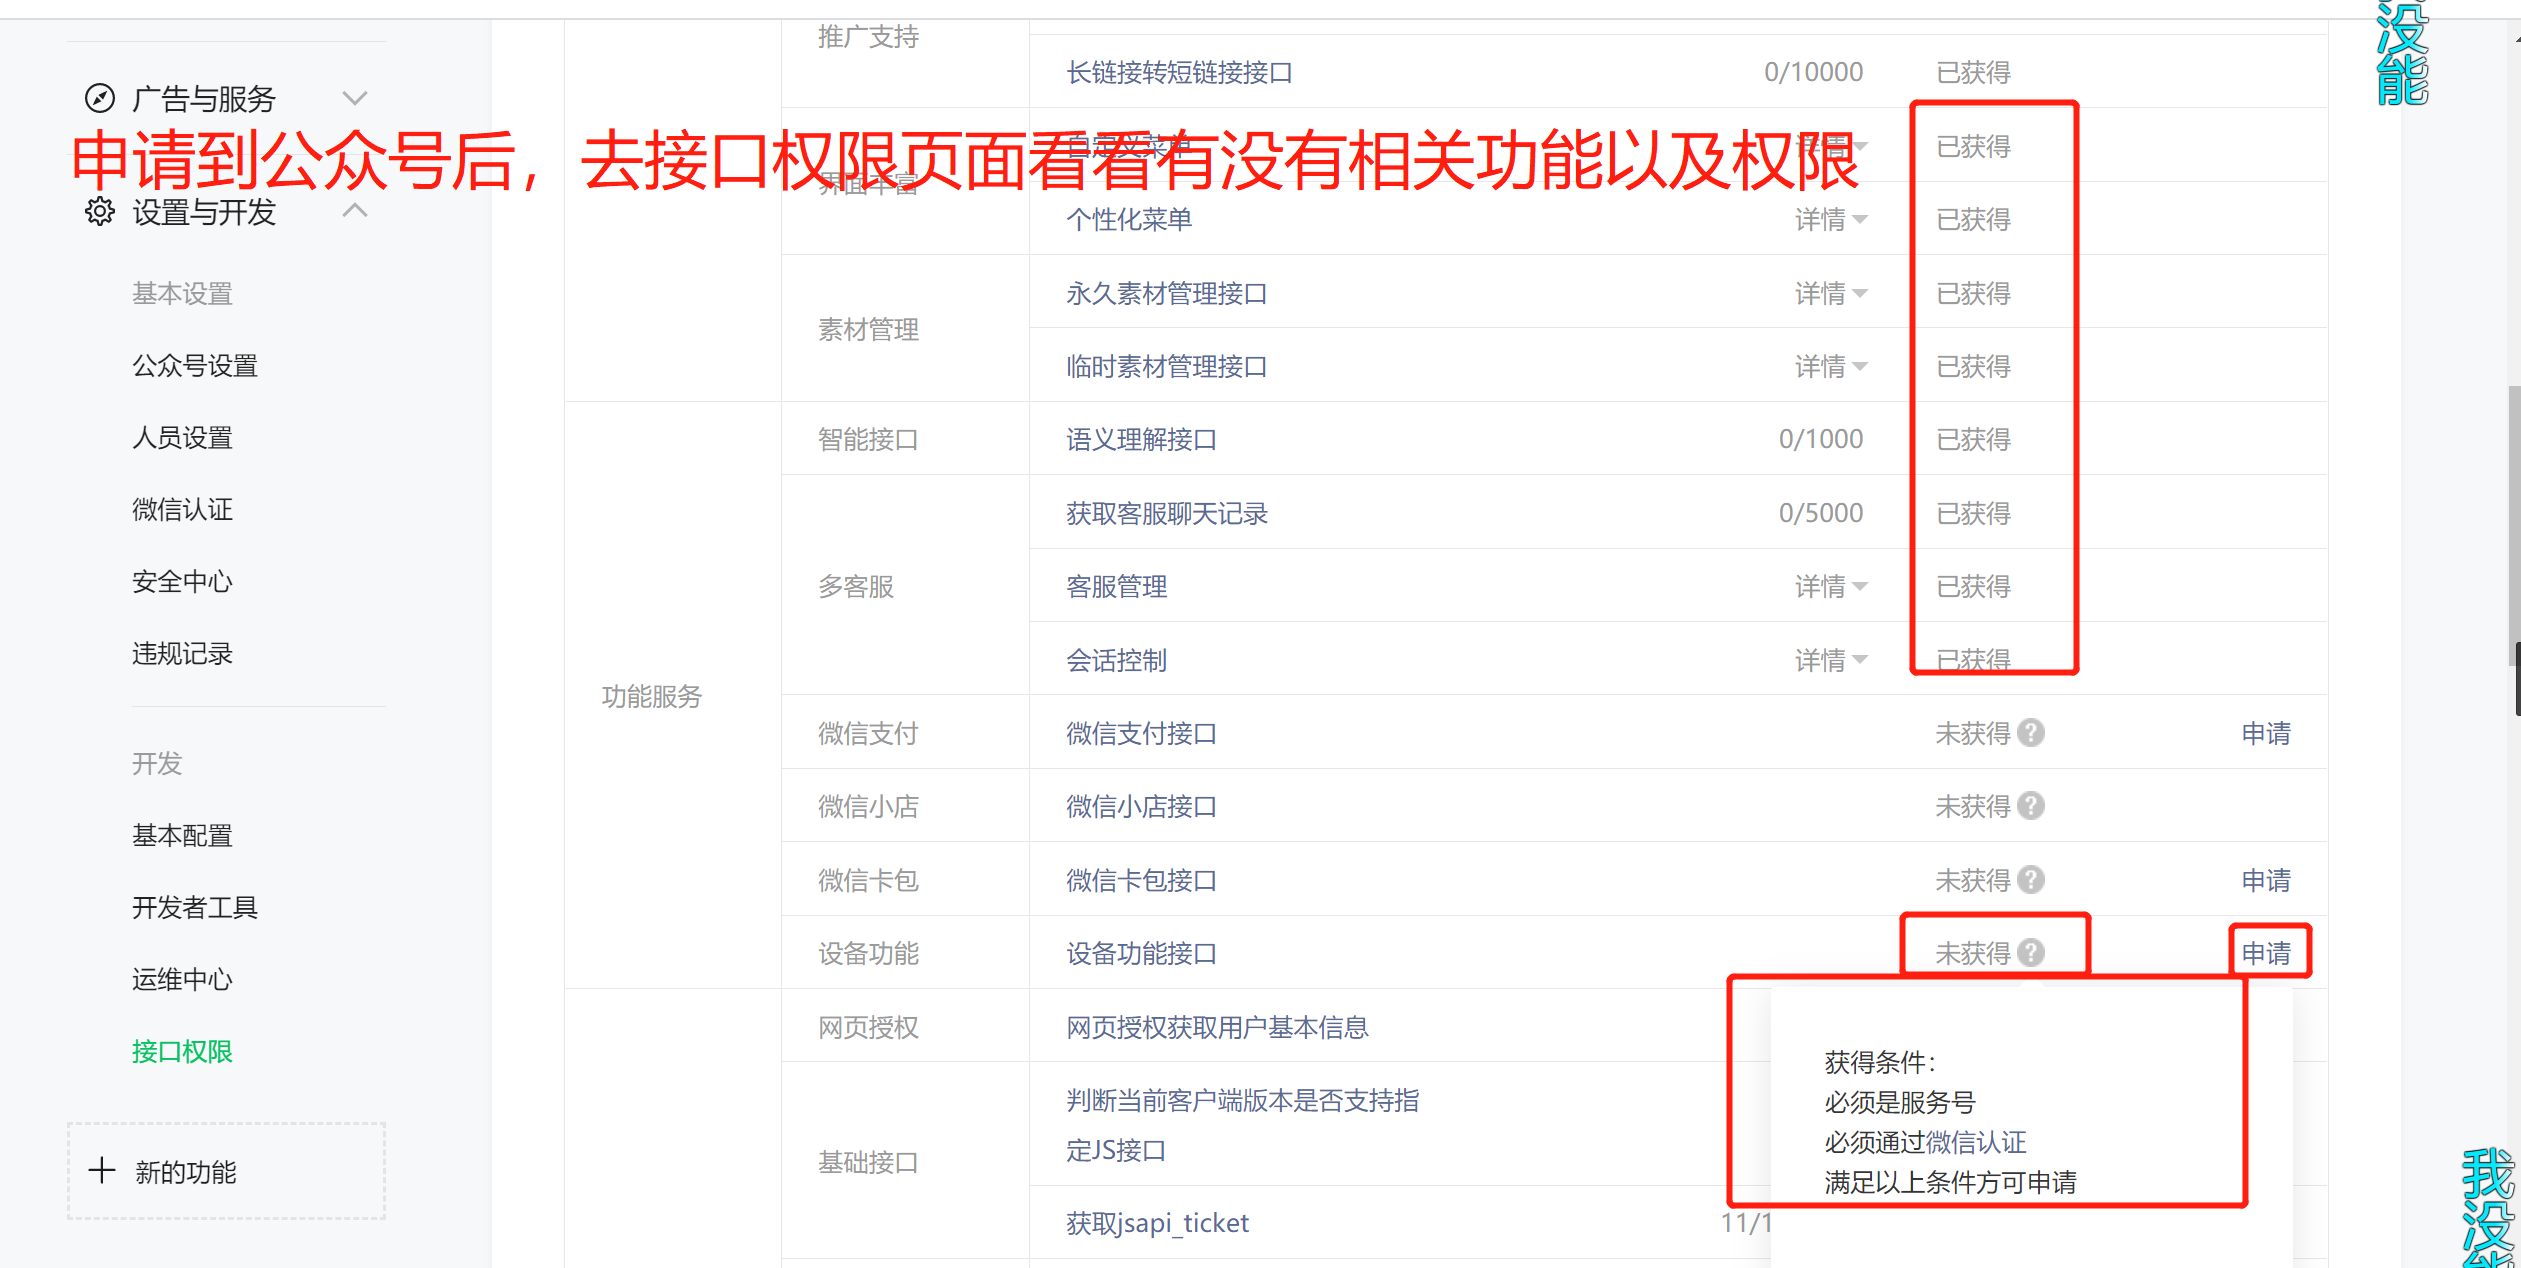
公众号申请下来后,可在公众号管理后台的接口权限页面查看已经获取或者没有获得的接口。
-
公众号申请到后,拿到
AppID 和 AppSecret,后面开发要经常用到,注意保存。AppID固定不变的。AppSecret可重置,不过不建议经常重置,因为会造成其它获取Access_Token失败,影响业务。
前端搭建
!> 由于之前用uniapp做过四五个微信小程序,更久之前也用过element-ui做web应用,而且uniapp的页面文件遵循 Vue 单文件组件 (SFC) 规范,所以这次公众号的前端H5页面也使用uniapp来快速搭建
uni-app 是一个使用 Vue.js 开发所有前端应用的框架,开发者编写一套代码,可发布到iOS、Android、Web(响应式)、以及各种小程序(微信/支付宝/百度/头条/QQ/钉钉/淘宝)、快应用等多个平台。uniapp官网
搭建方式一(推荐):官方教程
搭建方式二:直接采用的方法是复制一份之前的uniapp项目来改,把核心的保留,不要的去掉,然后再在这基础上加自己的东西。
前端开发(基于uniapp)注意事项
-
开发工具:uniapp官网推荐使用HBuilderX工具,因为HBuilderX内置相关环境,开箱即用,无需配置nodejs,对uniapp比较友好。
-
打包:因为我们是微信H5端,所以前端打包时,选择
发行->网站-H5手机版(仅适用于uni-app)(H),然后弹出如下图

-
IP白名单配置:打包完成后,发布到正式环境,发现下图报错。
.1icoxpn6wq00.jpg)
解决办法:
.5doucervxcc0.jpg)
- 网页授权拿取code,然后换取openid:
授权方式一:用户没有感知的
snsapi_base方式
授权方式二:需要用户点击确认的
snsapi_userinfo方式
授权URL(get请求): https://open.weixin.qq.com/connect/oauth2/authorize?appid=APPID&redirect_uri=REDIRECT_URI&response_type=code&scope=SCOPE&state=STATE#wechat_redirect ,注意替换对应的参数,以及参数顺序不能乱
回调url中获取code,拿到code后就很容易拿到
openid了,我这里使用正则表达式匹配
var reg = new RegExp("\\b" + "code" + "=([^&]*)");
var r = location.href.match(reg);
var code = decodeURIComponent(r[1])
!> 其它的一些步骤请看这里官网授权完整教程。我就不过多介绍了
- 注意1:如果测试时,发现在postman获取code失败,请在微信上打开,或者使用官方的微信开发者工具进行请求。
- 注意2:code只能用一次,失效后只能重新请求,请求不限制次数
- 获取access_token:
-
access_token是公众号的全局唯一接口调用凭据,公众号调用各接口时都需使用access_token -
access_token过期时间是7200s(两个小时),注意保存和刷新token -
重复获取token将导致上次获取的token失效
-
请求
access_token地址(get请求,注意替换对应参数):https://api.weixin.qq.com/cgi-bin/token?grant_type=client_credential&appid=APPID&secret=APPSECRET
- 自定义js配置文件和引入:
!> 后端有常量类,枚举类,有工具类等,前端其实也可以定义类似的配置文件。
- 自定义一个
constant.js文件
//项目一些配置
module.exports = {
	"key1":"value1",
	"key2":"value2",
	......
}
- 在需要的vue页面中的script标签中使用
import constants from '../../common/constant.js'或者在js代码要用到的地方直接使用以下代码引入
var constant = require("../../common/constant.js")
- 读取配置文件内容(取值):
constant.key1
后端搭建
-
项目技术选型 :
Spring Boot,MyBatis-Plus,Maven,Swagger,Hutool,MySQL,Redis -
项目包结构 :
delivery
├── generate -- 代码生成器
├── redis -- redis相关
├── result -- 返回结果封装
├── admin -- swagger文档配置
├── testcontroller -- 测试类(可忽略)
├── wechat_message -- 发消息模块
└── wechat_push -- 绑定解绑模块
小小项目的小小截图

后端开发注意事项
-
redis和swagger:在我博客其它文章有写过,这里不再写,感兴趣的可以搜搜看 -
创建项目:不是用idea生成的项目,而是在spring官网快速生成后导入idea的,看个人喜欢。
-
代码生成器:
- 增加生成器依赖
<dependency>
   <groupId>com.baomidou</groupId>
   <artifactId>mybatis-plus-generator</artifactId>
   <version>3.3.1</version>
</dependency>
- 生成器配置类
public class MysqlGenerator {

    private ResourceBundle resource;

    private final static String URL = "url";
    private final static String DRIVER_NAME = "driverName";
    private final static String SCHEMA_NAME = "schemaName";
    private final static String USERNAME = "username";
    private final static String PASSWORD = "password";
    private final static String PARENT_PACKAGE_NAME = "parentPackageName";
    private final static String MAPPER_FILE_PATH = "mapperFilePath";
    private final static String AUTHOR = "author";

    public MysqlGenerator(String properties) {
        this.resource = ResourceBundle.getBundle(properties);
    }

    public static void main(String[] args) {
        MysqlGenerator codeGenerator = new MysqlGenerator("properties/codeCenerator");
        codeGenerator.generateCode();
    }

    /**
     * <p>
     * 读取控制台内容
     * </p>
     */
    private static String scanner(String tip) {
        Scanner scanner = new Scanner(System.in);
        System.out.println("请输入" + tip + ":");
        if (scanner.hasNext()) {
            String ipt = scanner.next();
            if (StringUtils.isNoneBlank(ipt)) {
                return ipt;
            }
        }
        throw new MybatisPlusException("请输入正确的" + tip + "!");
    }

    /**
     * 开始生成代码
     */
    public void generateCode() {
        boolean fileOverride = Boolean.parseBoolean(scanner("是否覆盖已有文件,true/false"));
        String moduleName = scanner("【模块名】(小写),不需要则输入`null`");
        boolean isLombok = Boolean.parseBoolean(scanner("【实体】是否为lombok模型,true/false"));
        boolean isSwagger = Boolean.parseBoolean(scanner("【实体】是否开启swagger2模式,true/false"));
        String[] include = scanner("【表名】,多个英文逗号分割").split(",");
        boolean isController = Boolean.parseBoolean(scanner("是否生成controller层,true/false"));

        // 代码生成器
        AutoGenerator mpg = new AutoGenerator();

        // 全局配置
        GlobalConfig gc = new GlobalConfig();
        String projectPath = System.getProperty("user.dir");
        gc.setOutputDir(projectPath + "/src/main/java");
        if (resource.containsKey(AUTHOR)) {
            gc.setAuthor(resource.getString(AUTHOR));
        }
        gc.setFileOverride(fileOverride);
        gc.setOpen(false);
        gc.setSwagger2(isSwagger); //实体属性 Swagger2 注解
        gc.setIdType(IdType.ASSIGN_UUID);//默认指定生成的主键的ID类型
        mpg.setGlobalConfig(gc);

        // 数据源配置
        mpg.setDataSource(readJDBC());

        // 包配置
        PackageConfig pc = new PackageConfig();
        pc.setParent(resource.getString(PARENT_PACKAGE_NAME));
        if (!"null".equals(moduleName)) {
            pc.setModuleName(moduleName);
        }
        mpg.setPackageInfo(pc);

        // 自定义配置
        InjectionConfig cfg = new InjectionConfig() {
            @Override
            public void initMap() {
                // to do nothing
            }
        };
        String mapperFilePath = resource.getString(MAPPER_FILE_PATH);
        // 如果模板引擎是 freemarker
        String templatePath = "/templates/mapper.xml.ftl";
        // 自定义输出配置
        List<FileOutConfig> focList = new ArrayList<>();
        // 自定义配置会被优先输出
        focList.add(new FileOutConfig(templatePath) {
            @Override
            public String outputFile(TableInfo tableInfo) {
                // 自定义输出文件名 , 如果你 Entity 设置了前后缀、此处注意 xml 的名称会跟着发生变化!!
                String fileName;
                if (pc.getModuleName() != null) {
                    fileName = projectPath + mapperFilePath + pc.getModuleName()
                            + "/" + tableInfo.getEntityName() + "Mapper" + StringPool.DOT_XML;
                } else {
                    fileName = projectPath + mapperFilePath + "/" + tableInfo.getEntityName() + "Mapper" + StringPool.DOT_XML;

                }
                return fileName;
            }
        });
        cfg.setFileOutConfigList(focList);

        //模板生成自定义参数 injectionConfig
        Map<String, Object> injectionConfig = new HashMap<>();
        //schema不为空
        if (resource.containsKey(SCHEMA_NAME)) {
            injectionConfig.put("schema", resource.getString(SCHEMA_NAME));
        }
        cfg.setMap(injectionConfig);

        mpg.setCfg(cfg);
        // 配置模板
        TemplateConfig templateConfig = new TemplateConfig();
        templateConfig.setXml(null);
        if (!isController) {
            templateConfig.setController("");
        }
        //自定义entity实体模板
        templateConfig.setEntity("templates/entity");
        mpg.setTemplate(templateConfig);

        //tableFillList 表填充字段
//        List<TableFill> fileList = new ArrayList<TableFill>() {{
//            add(new TableFill("create_time", FieldFill.INSERT));
//            add(new TableFill("update_time", FieldFill.INSERT_UPDATE));
//            add(new TableFill("create_by", FieldFill.INSERT));
//            add(new TableFill("update_by", FieldFill.INSERT_UPDATE));
//        }};
        // 策略配置
        StrategyConfig strategy = new StrategyConfig();
        strategy.setEntityLombokModel(isLombok);
        strategy.setNaming(NamingStrategy.underline_to_camel);
        strategy.setColumnNaming(NamingStrategy.underline_to_camel);
        strategy.setRestControllerStyle(true);
        strategy.setInclude(include);
        strategy.setEntityTableFieldAnnotationEnable(true);
        strategy.setTablePrefix(pc.getModuleName() + "_");
//        strategy.setTableFillList(fileList);
        //父类为数据库记录添加,create_by", "create_time", "update_by", "update_time
//        strategy.setSuperEntityClass("com.chinaweal.youfool.framework.springboot.mybatis.plus.SuperEntity");
//        strategy.setSuperEntityColumns("create_by", "create_time", "update_by", "update_time");

        mpg.setStrategy(strategy);
        mpg.setTemplateEngine(new FreemarkerTemplateEngine());
        mpg.execute();
    }

    /**
     * 读取数据库连接信息
     */
    private DataSourceConfig readJDBC() {
        DataSourceConfig dsc = new DataSourceConfig();

        dsc.setUrl(resource.getString(URL));
        if (resource.containsKey(SCHEMA_NAME)) {
            dsc.setSchemaName(resource.getString(SCHEMA_NAME));
        }
        dsc.setDriverName(resource.getString(DRIVER_NAME));
        dsc.setUsername(resource.getString(USERNAME));
        dsc.setPassword(resource.getString(PASSWORD));
        return dsc;
    }
}
- 数据库配置文件
在resources下新建properties文件夹,再新建codeCenerator.properties,编写数据库相关配置

运行
MysqlGenerator类的main方法,根据提示完成代码生成
- 返回结果统一封装:
@Data
public class Result<T> implements Serializable {

    private static final long serialVersionUID = 1L;

    @ApiModelProperty(value = "成功标志")
    private boolean success;

    @ApiModelProperty(value = "消息")
    private String message;

    @ApiModelProperty(value = "返回代码")
    private Integer code;

    @ApiModelProperty(value = "时间戳")
    private long timestamp = System.currentTimeMillis();

    @ApiModelProperty(value = "结果对象")
    private T result;
}
- SpringBoot多环境配置(开发和生产环境):
-
在
resources根目录下新建三个配置文件,分别是application.yml,application-dev.yml,application-prod.yml。 -
在总配置文件下加入下面配置,指定为dev开发环境。
# 指定运行环境
spring:
  profiles:
    active: dev
- 在pom.xml中配置maven打包时,使用哪个默认配置文件,如果想用dev配置来打包项目,推荐使用命令
mvn package -Pdev指定-P参数
<!-- 多环境配置方案 -->
	<profiles>
		<profile>
			<id>prod</id>
			<properties>
				<profileActive>prod</profileActive>
			</properties>
			<activation>
				<!-- 默认情况下使用prod开发配置 如 打包时不包含 -p 参数-->
				<activeByDefault>true</activeByDefault>
			</activation>
		</profile>

	</profiles>
- Spring Boot移除tomcat:因为本项目要部署到
tomcat下的webapps目录下,所以我们要把tomcat移除
步骤1:启动类继承
SpringBootServletInitializer
步骤2:并且重写对servlet的初始化方法
@Override
	protected SpringApplicationBuilder configure(SpringApplicationBuilder application){
		return application.sources(DeliveryApplication.class);//你的项目启动类名
	}
项目部署
-
项目部署到服务器后,发现代码中
new Date()获取到的时间不对,导致发给用户模板消息上的当时时间也显示不准确,tomcat日志时间也不对,后面通过date -s "年-月-日 时:分:秒"来修改Linux时间,然后再用clock -w命令来同步bios时间解决问题。 -
数据库中存的时间也和当时时间不对,判断为MySql数据库连接的时区问题,原来用的是
serverTimezone=GMT%2B8,后面尝试过serverTimezone=UTC和serverTimezone=Asia/Shanghai和EDT都不行,最终使用serverTimezone=America/New_York成功解决
问题总结
客服消息和模板消息
- 刚刚一开始是使用客服消息接口,后面发现一个问题,就是客服接口需要用户和公众号在48小时内有过互动(发消息,点击菜单等互动)才能保持发消息成功,不然会报错,导致消息发送失败。

-
模板消息要申请对应的模板,微信官方审核时间为7-15个天,也可以使用模板库中别人做好的模板。
-
模板消息中,
first字段的color属性设置成了红色也没有变红,微信社区中有很多人也遇到同样的问题,好像是官方的问题。keyword字段就可以通过color属性来改变颜色(注意不要用#ff0000,要用大写的#FF0000才能变红)

在微信网页调用相机扫一扫
业务背景:在处理业务时候,用户会调起相机,识别条形码中的包含的单号,然后通过单号作为入参,再调用接口查询和单号关联的数据。
-
由于是微信H5网页,所以不能用uniapp封装好的
uni.scanCode(OBJECT),该方法只适合在小程序中使用,所以只能引入wxsdk来实现。 -
引入微信sdk
npm install jweixin-module --save
- 使用微信sdk
var wx = require('jweixin-module')
- 通过config接口注入权限验证配置
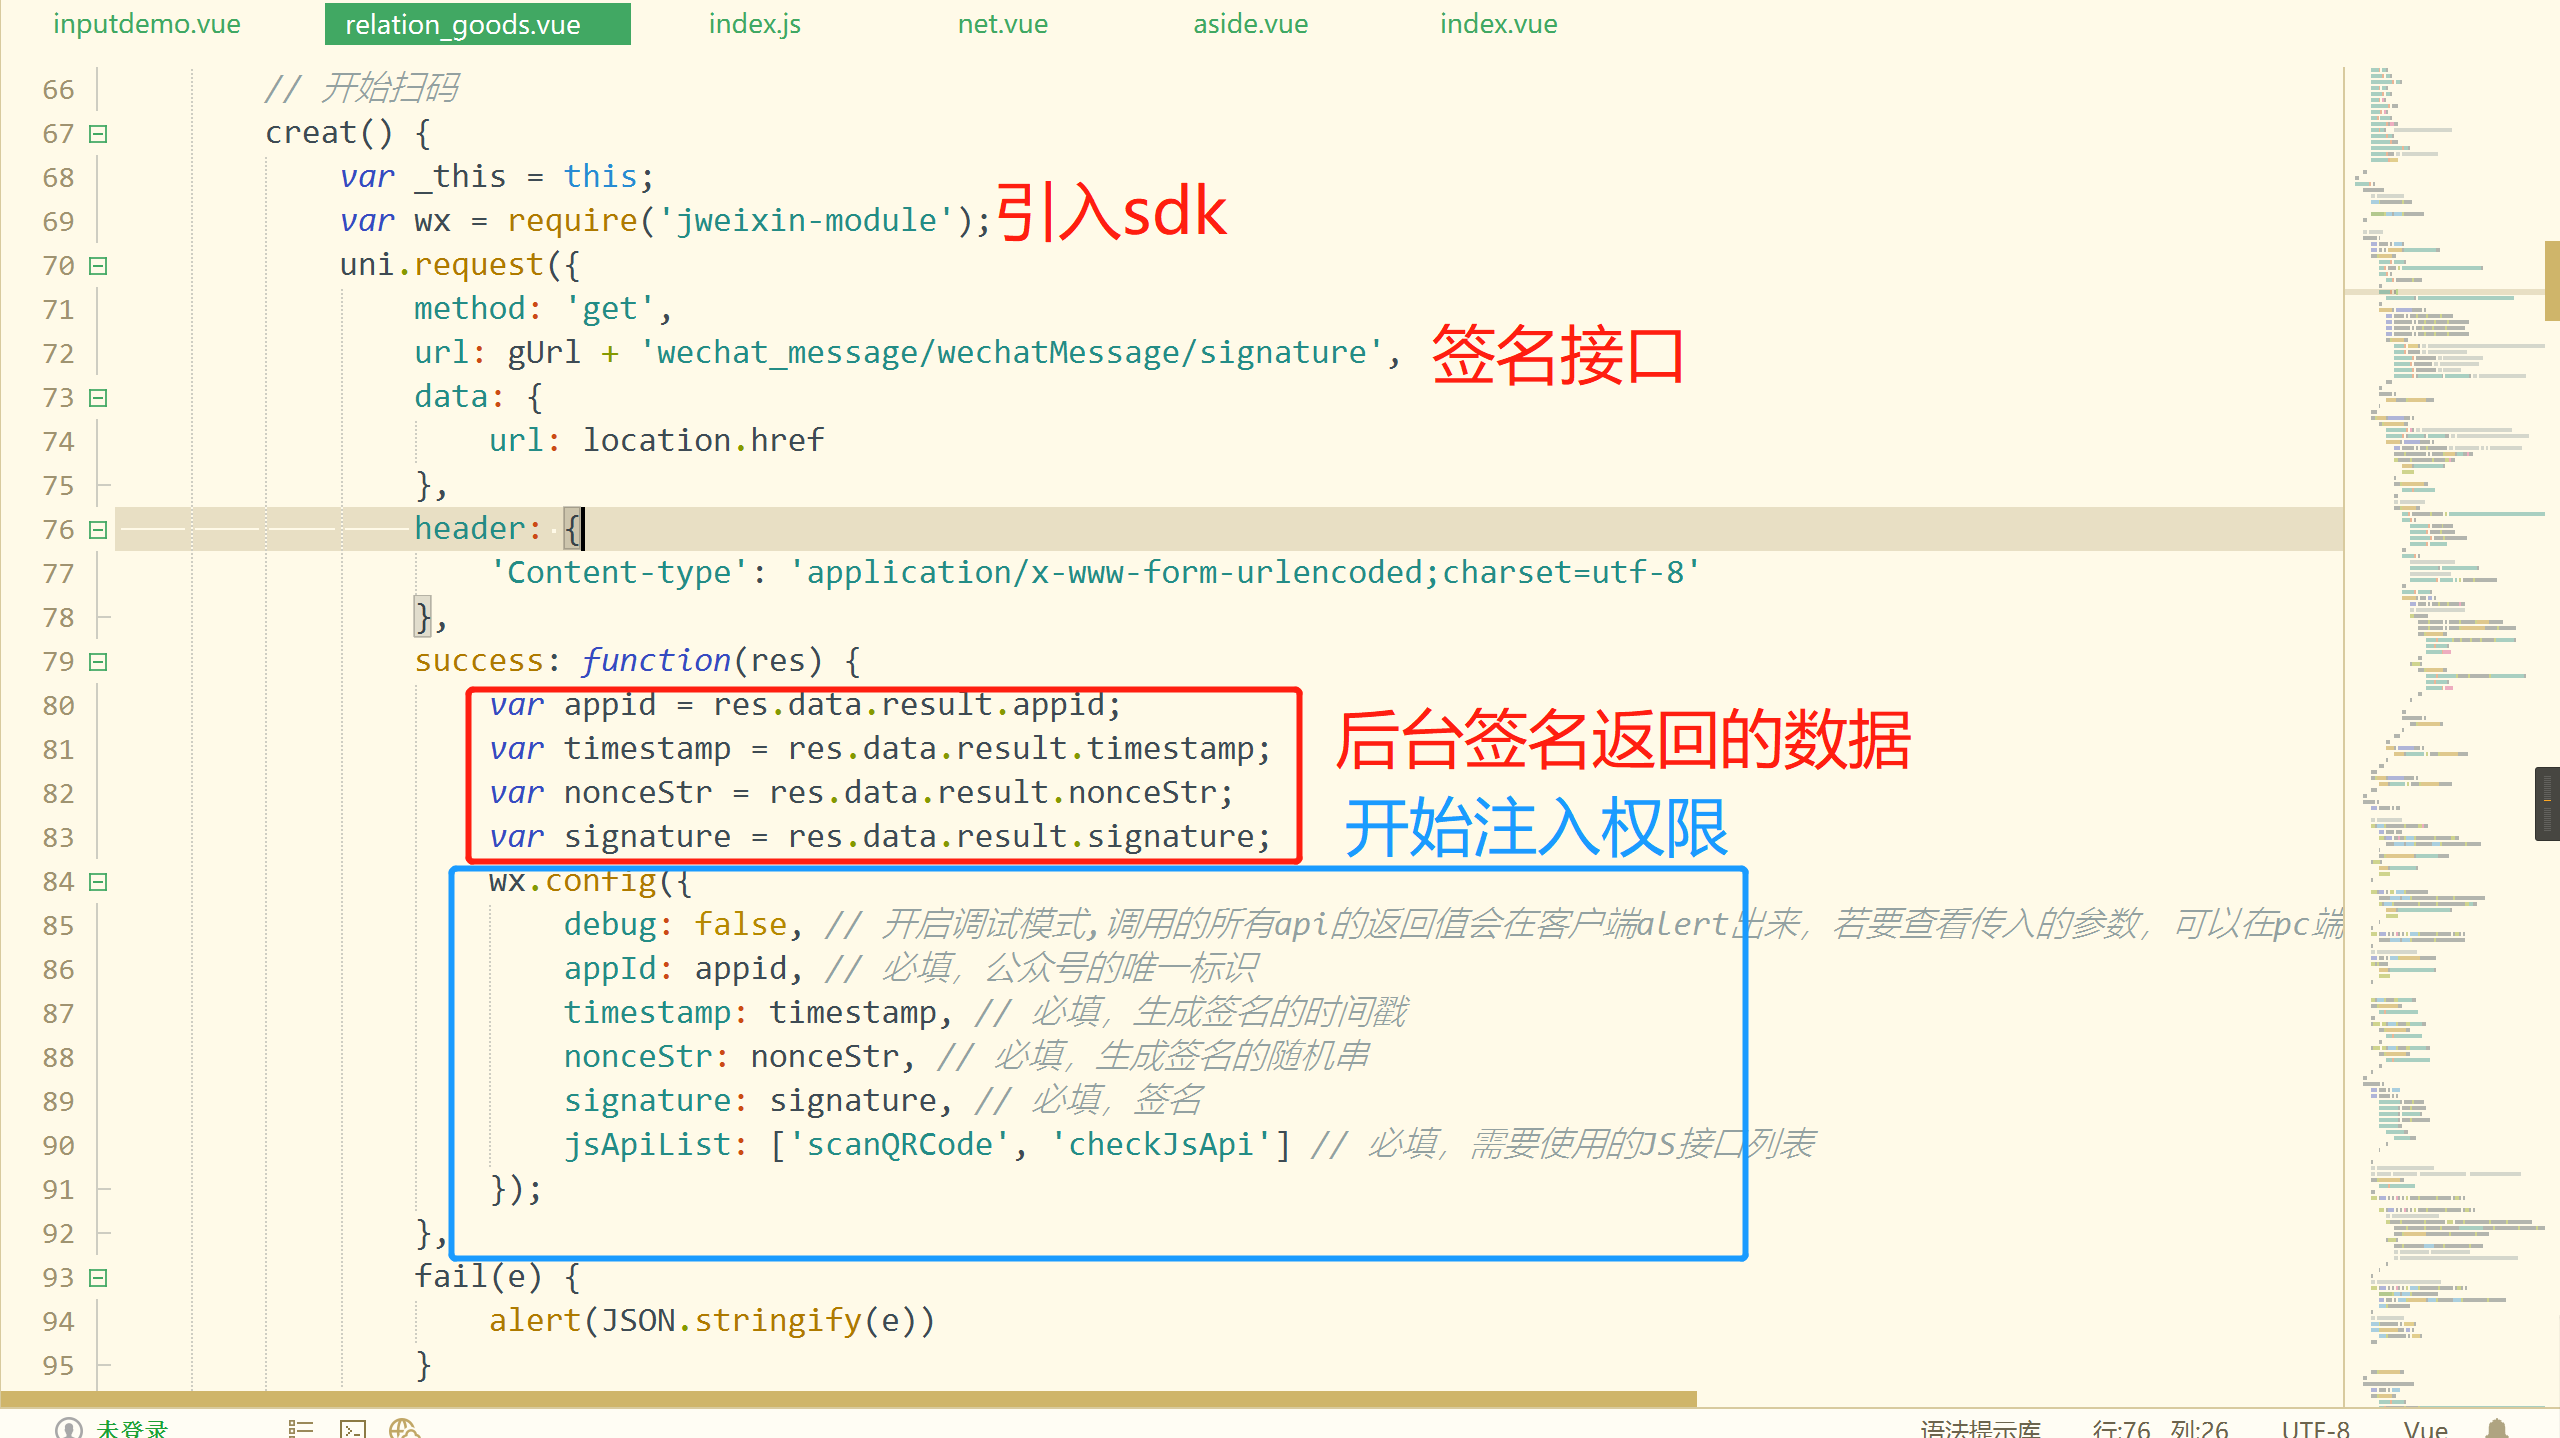
!> 记得调用后台签名接口的时候,前端要通过location.href获取当前页的URL并传给后台(后台进行去#号)签名
- 后台签名接口注意事项(避坑)
可以先看下官网的签名算法教程

-
注意签名参数按照字段名的ASCII 码从小到大排序
-
所有参数名均为小写字符
-
URL不用进行转义,但是要去掉URL的hash模式后面的#号
- 开始扫码并返回结果

- 如果报错,可通过wx.error()这个回调方法打印调试
wx.error(function(res) {
    alert('错误:' + JSON.stringify(res));
});
Bug: 同一个页面授权多次获取到相同的code
-
不知什么情况引起获取到相同的code。微信官方也没有相关教程或者说明
-
本项目的授权,只是为了获取openid来绑定对应当前登录的供应商(不是用的微信登录,是用的我们自己的登录。绑定后就给对应openid的用户发模板消息进来业务提醒)
-
尝试过网友提供的加参数
&connect_redirect=1方法1,和state参数用随机数方法2,以及第一次请求到code后刷新页面方法3都没有解决。后面自己琢磨出下面的解决方案
!> 解决方法:
和redis缓存思路类似,第一次进来页面,先判断浏览器内存中有没有openid,如果没有(第一次进行绑定或者解绑),则请求授权生成code,如果有,则不请求授权。

 浙公网安备 33010602011771号