windows基于Fiddler搭建代理服务器实现网络共享
背景:虽然学校同时提供了windows及linux操作系统的网络登录客户端,但是由于学校网络账号只允许在一台设备上登录。因此如果需要在linux上安装插件或者是其他需要网络的场景,就会导致本地windows机器的账号被强制下线,非常麻烦。
思路:在windows机器上安装Fiddler4,将windows机器作为一台代理服务器以供linux服务器连接网络,实现网络共享。
安装Fiddler4
随便在网上找一个Fiddler4的安装包即可,软件本身并不大,或者到官方网站下载也可以
设置
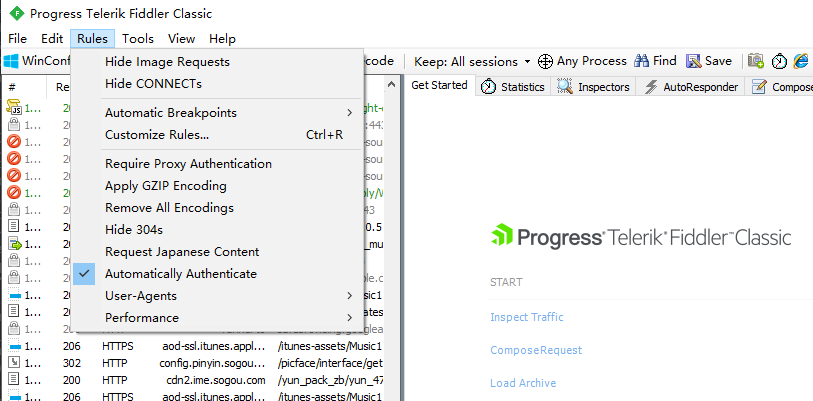
安装后打开,首先选择顶部菜单栏勾选 Rules->Automatically Authenticate;
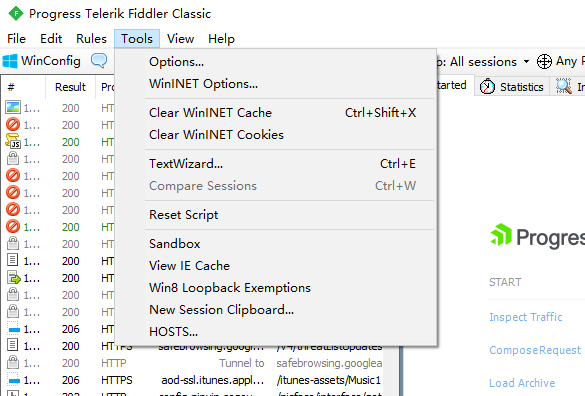
之后打开 Tools -> Options
找到Connections,输入代理端口8888,此处随意选择一个不冲突的端口即可,还需要勾选 Allow remote computers to connect

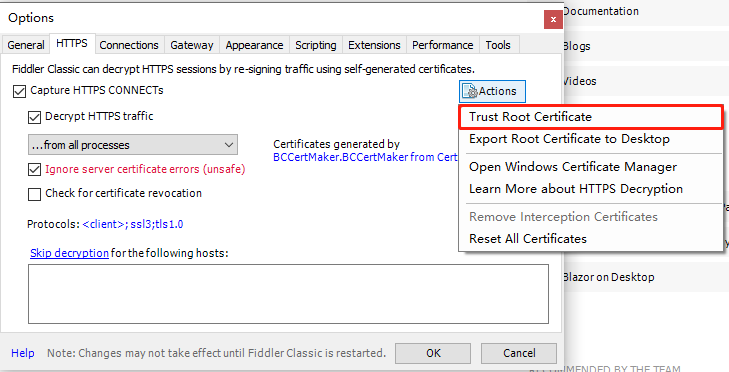
由于网络访问不仅仅有http,还有https协议的,因此需要配置一下证书。打开HTTPS页面,按照下图进行勾选。

之后点击Actions->Trust Root Certificate,之后点击 Yes 与 OK 即可。
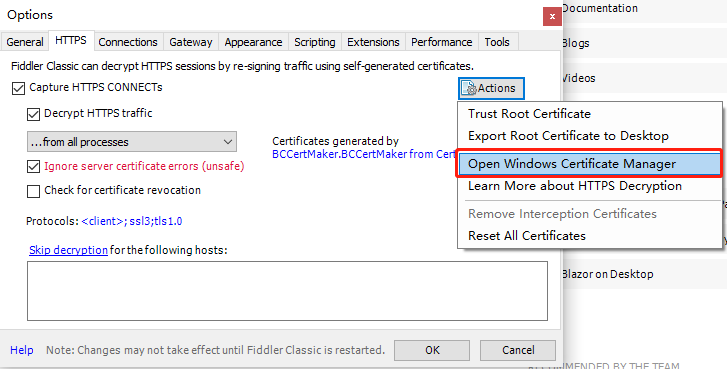
之后点击 Open Windows Certificate Manager,打开windows证书管理页面。
打开 受信任的根证书颁发机构->证书,找到以下的Fiddler证书。
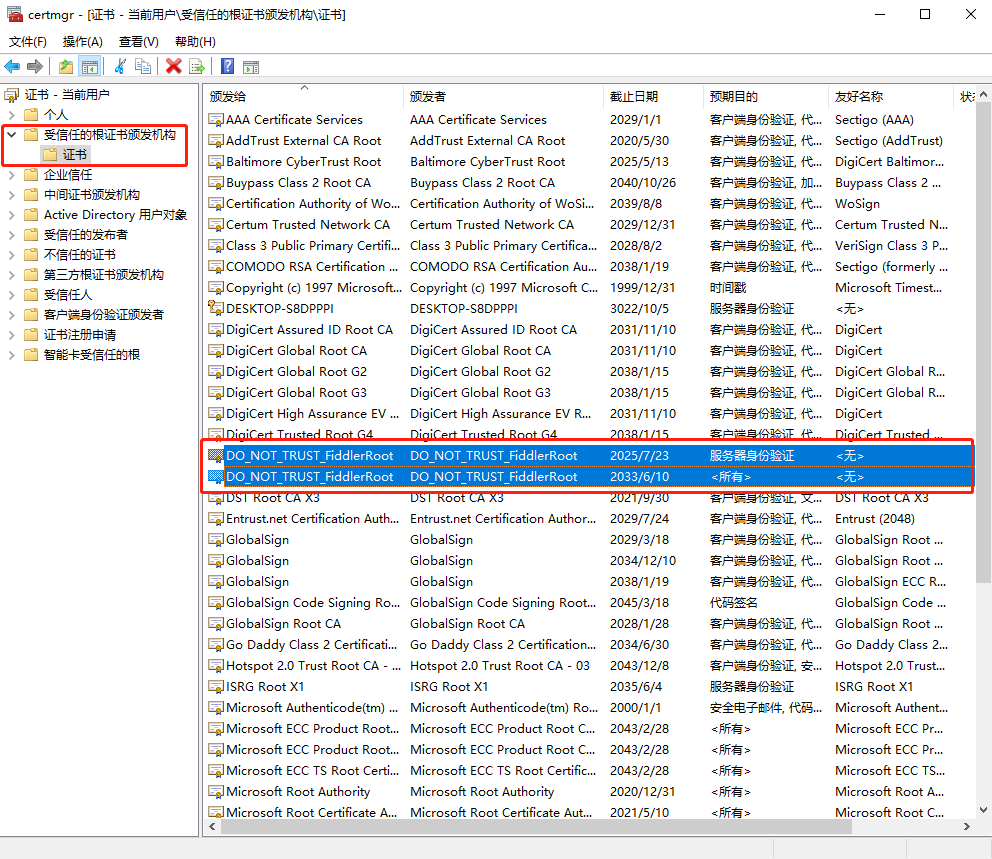
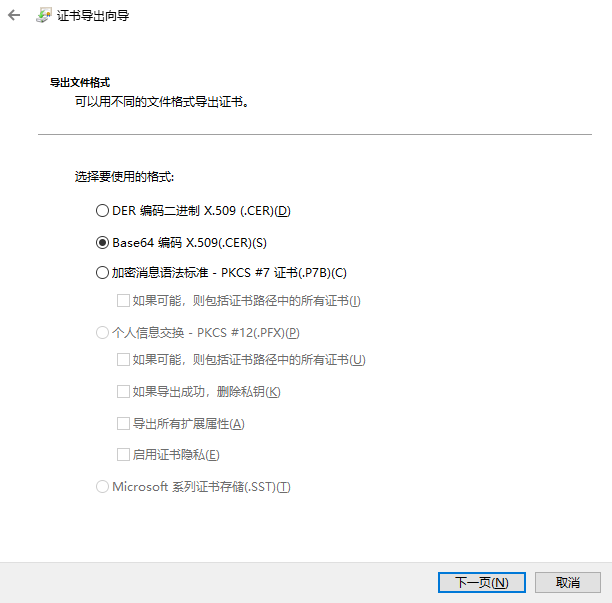
对于每个证书点击右键 -> 所有任务 -> 导出,文件格式选择Base64 编码,保存后文件默认后缀是.cer。由于需要将证书导入linux服务器中,因此需要将后缀改为.crt
服务器操作
将以上导出的Fiddler证书发送到服务器上,由于我的linux服务器是ubuntu,因此以下操作适合ubuntu系统。对于Centos以及其他操作系统,可以自行查找证书更新的操作。
将证书移到 usr/local/share/ca-certificates/下,之后执行update-ca-certificates更新证书
root@ubuntu:/home/nfs# mv /home/wen***/share/fiddler* /usr/local/share/ca-certificates/
root@ubuntu:/home/nfs# ls /usr/local/share/ca-certificates/
fiddler1.crt  fiddler2.crt
root@ubuntu:/home/nfs# update-ca-certificates
Updating certificates in /etc/ssl/certs...
rehash: warning: skipping ca-certificates.crt,it does not contain exactly one certificate or CRL
rehash: warning: skipping FiddlerRoot.pem,it does not contain exactly one certificate or CRL
2 added, 0 removed; done.
Running hooks in /etc/ca-certificates/update.d...
done.
服务器配置
到此windows代理服务已搭建完毕,linux服务器也配置了证书。在linux服务器上使用代理的方式非常简单,只需要将windows主机对应ip及先前设置好的端口配置到http_proxy及https_proxy即可。
root@ubuntu:/home/nfs# export http_proxy="192.168.45.166:8888"
root@ubuntu:/home/nfs# export https_proxy="192.168.45.166:8888"
root@ubuntu:/home/nfs# export no_proxy="localhost,127.0.0.1"
root@ubuntu:/home/nfs# curl baidu.com
<html>
<meta http-equiv="refresh" content="0;url=http://www.baidu.com/">
</html>
root@ubuntu:/home/nfs#
但这种直接在命令行export的方式是临时的,在下次重新打开Terminal后就失效了,因此可以将这段配置写入/etc/profile中。
此外需要注意的是apt使用时,需要单独为其配置代理
root@ubuntu:/home/nfs# cat /etc/apt/apt.conf.d/proxy.conf
Acquire::http::Proxy "http://192.168.45.166:8888";
Acquire::https::Proxy "http://192.168.45.166:8888";
附
如果发现http正常链接,但https的SSL认证失败,请注意自己的系统时间是否正确,SSL 证书的有效性是基于系统时间的。如果你的系统时间不准确,可能导致证书验证失败。请确保你的系统时间和时区设置正确,可以使用 date 命令来检查和调整系统时间。
附
对于已安装Conda的环境,Conda会修改ssl认证证书的路径,因此不能通过以上更新系统证书的方式来进行认证。
首先通过curl命令可以查看证书位置在/root/anaconda3/ssl/cacert.pem:
root@4l4sl8fnepq6v-0:# curl -v https://www.baidu.com
* Rebuilt URL to: https://www.baidu.com/
* Uses proxy env variable no_proxy == 'localhost,127.0.0.1'
* Uses proxy env variable https_proxy == '192.168.45.166:8888'
*   Trying 192.168.45.166...
* TCP_NODELAY set
* Connected to 192.168.45.166 (192.168.45.166) port 8888 (#0)
* allocate connect buffer!
* Establish HTTP proxy tunnel to www.baidu.com:443
> CONNECT www.baidu.com:443 HTTP/1.1
> Host: www.baidu.com:443
> User-Agent: curl/7.61.0
> Proxy-Connection: Keep-Alive
>
< HTTP/1.1 200 Connection established
<
* Proxy replied 200 to CONNECT request
* CONNECT phase completed!
* ALPN, offering http/1.1
* Cipher selection: ALL:!EXPORT:!EXPORT40:!EXPORT56:!aNULL:!LOW:!RC4:@STRENGTH
* successfully set certificate verify locations:
*   CAfile: /root/anaconda3/ssl/cacert.pem	#可以看到证书的具体路径
  CApath: none
* TLSv1.2 (OUT), TLS header, Certificate Status (22):
* TLSv1.2 (OUT), TLS handshake, Client hello (1):
* CONNECT phase completed!
* CONNECT phase completed!
* TLSv1.2 (IN), TLS handshake, Server hello (2):
* TLSv1.2 (IN), TLS handshake, Certificate (11):
* TLSv1.2 (OUT), TLS alert, Server hello (2):
* SSL certificate problem: unable to get local issuer certificate
* Closing connection 0
curl: (60) SSL certificate problem: unable to get local issuer certificate
之后需要将前面的证书手动添加到该CAFile中
cat fiddler1.crt >> /root/anaconda3/ssl/cacert.pem
cat fiddler2.crt >> /root/anaconda3/ssl/cacert.pem
附
由于conda,python都有自己的证书机制,因此pip安装时可以直接把前面的conda证书拿过来用,pip install之前执行export REQUESTS_CA_BUNDLE=/root/anaconda3/ssl/cacert.pem即可

 浙公网安备 33010602011771号