【uni app】vant weapp的引入和部分详细调用(表单输入框、验证码、弹出层搭配选择器、地图)
本次小程序的开发使用uni app+vant weapp,vant weapp如何引用和部分组件使用方法如下
引入
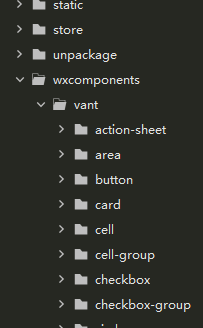
在github(https://github.com/youzan/vant-weapp)下载dist文件,在项目目录下创建wxcomponents/vant,把dist文件复制进来
在pages.json中,如果很多个页面都会引用某组件,就在globalstyle中引入
"globalStyle": {
		"navigationBarTextStyle": "black",
		"navigationBarTitleText": "uni-app",
		"navigationBarBackgroundColor": "#F8F8F8",
		"backgroundColor": "#F8F8F8",
		"usingComponents": {
			"van-button": "/wxcomponents/vant/button/index",
			"van-icon": "/wxcomponents/vant/icon/index",
			"van-cell": "/wxcomponents/vant/cell/index"
                 }
}
单页引用,在对应页的style中
        {
			"path": "pages/home/home",
			"style": {
				"navigationBarTitleText": "首页",
                                "usingComponents": {
                                           "van-button": "/wxcomponents/vant/button/index",
                                           "van-icon": "/wxcomponents/vant/icon/index"
                                 }
                        }
        }
表单
UI界面如下
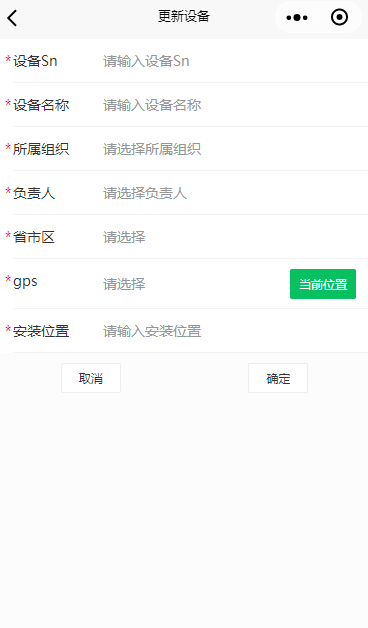
输入框van-filed
注意:van-field并没有直接实现双向绑定,需要在input事件上重新赋值
//模板中
<van-field :value="updateParam.deviceSn" required label="设备Sn" placeholder="请输入设备Sn" @input="getDeviceSn" />
//js中
methods:{
    getDeviceSn(e) {
        this.updateParam.deviceSn = e.detail
    },
}
精简写法如下
<van-field :value="updateParam.deviceSn" clearable required label="设备Sn" placeholder="请输入设备Sn" @input="updateParam.deviceSn=$event.detail" />
登录验证码
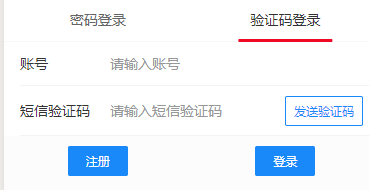
点击后

template
					<van-field :value="param.username" clearable label="账号" placeholder="请输入账号" @input="inputUsername" />
					<van-field :value="param.code" center clearable type="number" label="短信验证码" placeholder="请输入短信验证码" use-button-slot
					 @input="inputCode">
						<van-button slot="button" plain size="small" :disabled="tip!=='发送验证码'" type="info" @click="sendCode">{{tip}}</van-button>
					</van-field>
在data中定义两个变量
				timer: null,
				tip: '发送验证码'
methods
			sendCode() {
				let time = 10
				this.tip = time + 's后重试'
				this.timer = setInterval(() => {
					if (time === 1) {
						this.tip = '发送验证码'
						clearInterval(this.timer)
						this.timer = null
					} else {
						time--
						this.tip = time + 's'
					}
				}, 1000)
			},
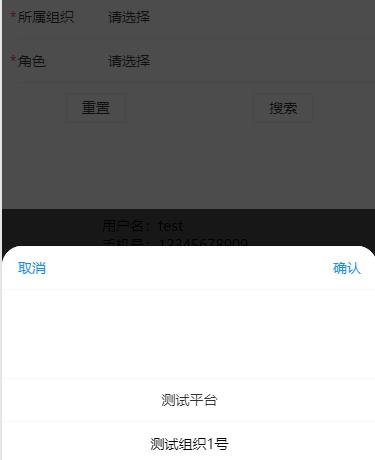
弹出层+选择器
弹出层van-popop和选择器van-picker配合使用,实现效果如下
代码
// template
<van-field :value="orgName" readonly required label="所属组织" placeholder="请选择所属组织" @click.native="popupFlag=true" />
<van-popup :show="popupFlag" @close="popupFlag=false" round position="bottom">
    <van-picker :columns="orgList" show-toolbar @cancel="popupFlag" @confirm="chooseOrg" value-key="name" />
</van-popup>

// methods
chooseOrg(e) {
    this.updateParam.orgId = e.detail.value.id
    this.orgName = e.detail.value.name
    this.popupFlag = fasle
    this.getMemberList(this.updateParam.orgId)
},
在vant-weapp中,简单选择器的实现需要定义三个变量,1个方法:
- 变量1:数组,即在选择器中遍历的数组
- 变量2:flag,控制弹出层的显示和隐藏
- 变量3:van-field中的value,即你选中项的文字说明
- 方法1:当你点击确认时,把选中项的id放入表单,文字说明改成你选中项的名字
用vant weapp选择器优点:
- 我们可以控制弹出层的方向
- 样式层面上的铺垫和圆角弹出层
- vant有日期事件选择器
- 跨移动端平台
缺点:
- 当你一个表单有多个选择器的时候,那其中的变量就需要定义很多
- 很多工作是重复比如打开弹出层关闭弹出层
对比uni或小程序原生picker选择器,只要一个变量和一个方法,但是用了样式又不统一了
因此需要自己基于vant-weapp封装一个选择器,封装组件请查看另一篇笔记
省市区picker van-area
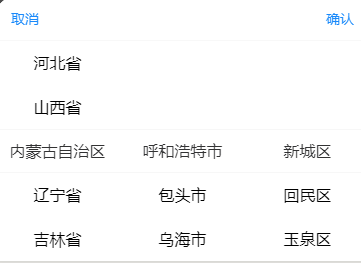
该选择器最重要的是引入area.js,在https://github.com/youzan/vant/blob/dev/src/area/demo/area.js下载文件
		<van-popup :show="areaFlag" @close="closeAreaPopup" round position="bottom">
			<van-area :area-list="areaList" @cancel="closeAreaPopup" @confirm="chooseArea" />
		</van-popup>
			showAreaPopup() {
				this.areaFlag = true
			},
			closeAreaPopup() {
				this.areaFlag = false
			},
			chooseArea(e) {
				this.updateParam.areaCode = e.detail.values[2].code
				this.areaName = e.detail.values[0].name + ',' + e.detail.values[1].name + ',' + e.detail.values[2].name
				this.closeAreaPopup()
			},
地图
获取当前位置
			getGps() {
				let self = this
				uni.getLocation({
					type: 'wgs84',
					success: function(res) {
						self.gps = res.longitude + ',' + res.latitude
						self.updateParam.gpsLng = res.longitude
						self.updateParam.gpsLat = res.latitude
					}
				});
			},
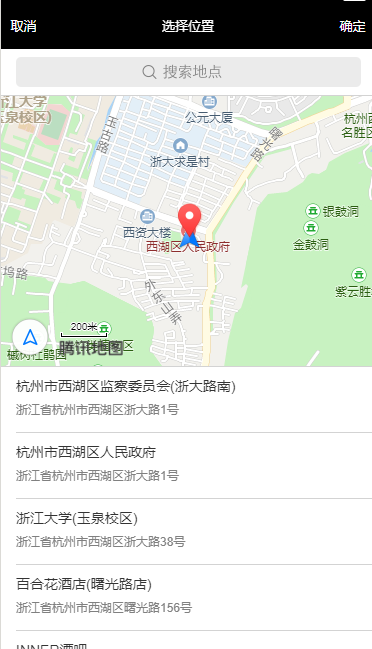
选择位置,代码和效果如下
			showMapPopup() {
				let self = this
				uni.chooseLocation({
				    success: function (res) {
						self.gps = res.longitude + ',' + res.latitude
						self.updateParam.gpsLng = res.longitude
						self.updateParam.gpsLat = res.latitude
						self.updateParam.addressDetail = res.name
				    }
				});
			},

 浙公网安备 33010602011771号