
day3 链表的设计|虚拟头节点
今天有些状态不佳,总结就随便写写了(
虚拟头节点在链表题中是一个很好的方法,能够帮助我们简化判断逻辑。
通常虚拟头节点的使用是定义一个虚拟头节点,然后把head挂在dummyhead后面,使用cur指向dummyhead,然后对cur->next进行循环判断
设计链表
class MyLinkedList {
public:
    struct node {
        int val;
        node* next;
        node(int _val) {
            val = _val;
            next = nullptr;
        }
    };
    private:
    node* dummyhead;
    int sz;
    public:
    MyLinkedList() {
        dummyhead = new node(-1);
        sz = 0;
    }
    ~MyLinkedList() {
        //delete dummyhead;
        node* cur = dummyhead;
        while(cur->next&&cur->next->next) {
            node* del = cur->next;
            node* ne = del->next;
            delete del;
            cur = ne;
        }
    }
    int get(int index) {
        if(index < 0 || index >= sz) {
            return -1;
        }
        node* cur = dummyhead->next;
        while(cur->next && index) {
            cur = cur->next;
            index--;
        }
        if(index == 0) {
            return cur->val;
        }
        else {
            return -1;
        }
    }

    void addAtHead(int val) {
        node* tmp = new node(val);
        tmp->next = dummyhead->next;
        dummyhead->next = tmp;
        ++sz;
    }

    void addAtTail(int val) {
        node* cur = dummyhead;
        while(cur->next) {
            cur = cur->next;
        }
        node* tmp = new node(val);
        cur->next = tmp;
        sz++;
    }

    void addAtIndex(int index, int val) {
        if(index < 0 || index > sz) return;
        int tmp = index;
        node* cur = dummyhead;
        while(tmp--) {
            cur = cur->next;
        }
        node* nnode = new node(val);
        nnode->next = cur->next;
        cur->next = nnode;
        sz++;
    }

    void deleteAtIndex(int index) {
        if(index < 0 || index >= sz) return;
        node* cur = dummyhead;
        while(index && cur->next) {
            --index;
            cur = cur->next;
        }
        node* del = cur->next;
        cur->next = cur->next->next;
        delete del;
        --sz;
    }
};
翻转链表 迭代的方式还比较好写,两个指针,一个cur,一个pre,依次往后交换即可。
/**
 * Definition for singly-linked list.
 * struct ListNode {
 *     int val;
 *     ListNode *next;
 *     ListNode() : val(0), next(nullptr) {}
 *     ListNode(int x) : val(x), next(nullptr) {}
 *     ListNode(int x, ListNode *next) : val(x), next(next) {}
 * };
 */
class Solution {
public:
    ListNode* reverseList(ListNode* head) {
        ListNode* pre = nullptr;
        ListNode* cur = head;
        while(cur) {
            ListNode* tmp = cur->next;
            cur->next = pre;
            pre = cur;
            cur = tmp;
        }
        return pre;
    }
};
递归版本看了国外大神的讲解。
国外版的leetcode有位大神给出了很好理解的方式:
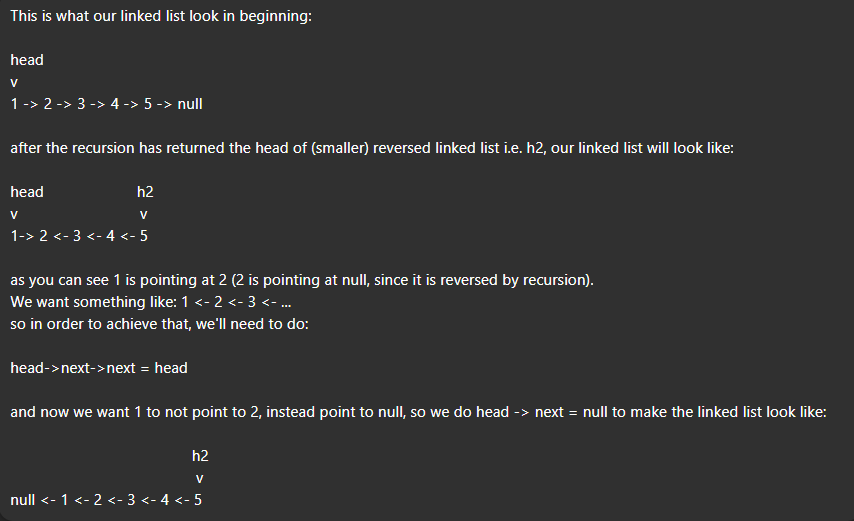
https://leetcode.com/problems/reverse-linked-list/solutions/3211778/using-2-methods-iterative-recursive-beats-97-91/
链接在上面,整理一下思路就是,我们想要的是1->2->3->4,那么如果这个函数已经实现好了,我们可以先把1后面的部分翻转,也就是得到了个p* 指向了 4->3->2的4,我们想要的是4->3->2->1,那么接下来就是要把2指向1,把1指向空就结束了,怎么实现呢?2在哪?head->next,指向1,2的next指向1也就是head->next->next = head;(2->next = 1)
于是我们看最后的代码实现:
class Solution {
public:
    ListNode* reverseList(ListNode* head) {
        if(head == nullptr || head->next == nullptr) {
            return head;
        }
        auto tmp = reverseList(head->next);
        head->next->next = head;
        head->next = nullptr;
        return tmp;
    }
};
最后移除链表比较简单,直接看代码吧(
/**
 * Definition for singly-linked list.
 * struct ListNode {
 *     int val;
 *     ListNode *next;
 *     ListNode() : val(0), next(nullptr) {}
 *     ListNode(int x) : val(x), next(nullptr) {}
 *     ListNode(int x, ListNode *next) : val(x), next(next) {}
 * };
 */
class Solution {
public:
    ListNode* removeElements(ListNode* head, int val) {
        ListNode* dummyhead = new ListNode(-1);
        dummyhead->next = head;
        ListNode* cur = dummyhead;
        while(cur->next) {
            if(cur->next->val == val) {
                ListNode* del = cur->next;
                cur->next = cur->next->next;
                delete del;
            }
            else {
                cur = cur->next;
            }
        }
        return dummyhead->next;
    }
};

 浙公网安备 33010602011771号