
FreeRadius+GoogleAuthenticator实现linux动态口令认证
简介
在运维管理中,服务器的密码管理十分重要。服务器数量少的时候还好说,可以定时来改密码。一旦数量多了,再来改密码就不现实了。
前提
我们假定运维访问服务器是这样的:
- 创建一个普通用户用于登录服务器,给出基础权限,能进行简单的日常操作。但不能修改系统层面的东西。这个权限不能做太多的事。
- 切换到root用户时,不能使用root密码来进行认证切换。不然密码泄露,服务器最高权限就算是没了。这里可以使用动态口令的方式来进行认证切换。
原理
原理图如下:
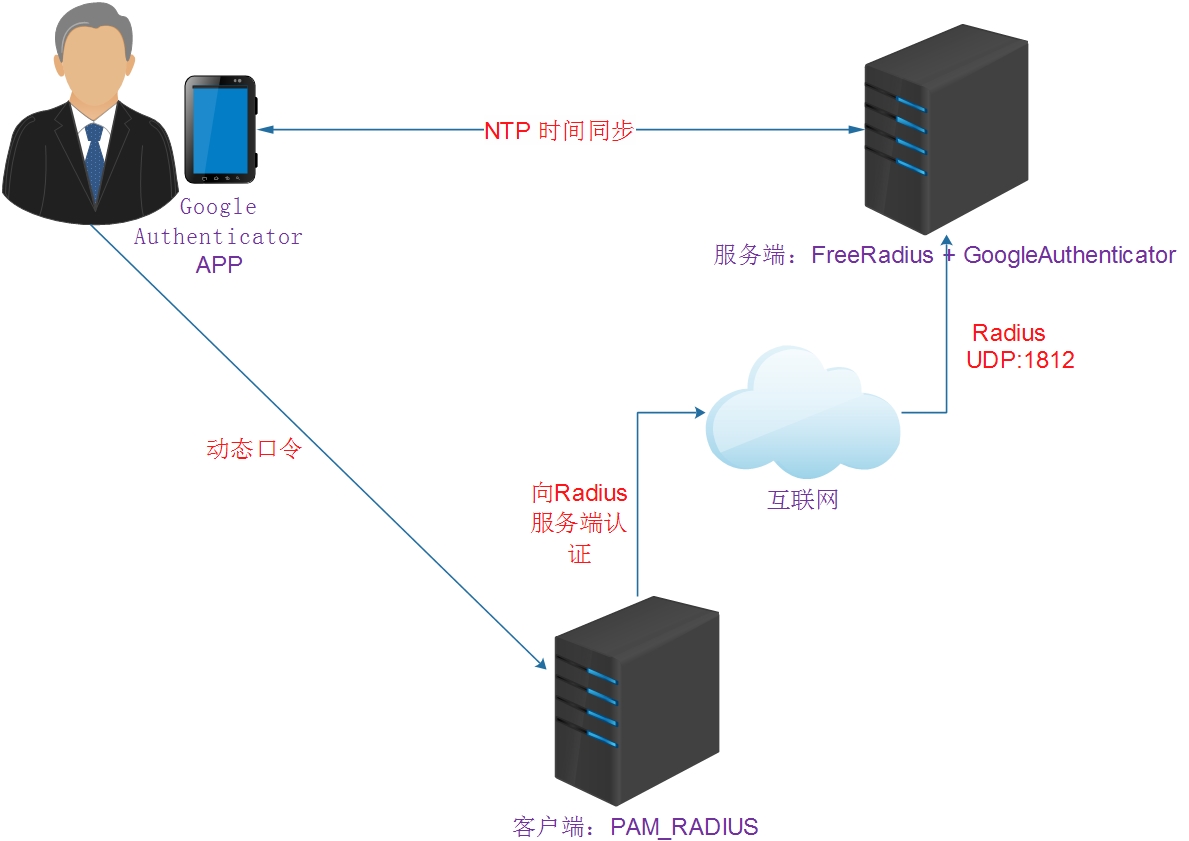
这里通过FreeRadius+GoogleAuthenticator实现linux动态口令认证,其原理是:
- 通过开源的GoogleAuthenticator来实现动态口令
- 服务器通过FreeRadius进行认证
- FreeRadius使用PAM+GoogleAuthenticator来进行认证
这样说可能有点不清楚,我这里再整理下整个流程。流程是这样的:
- 用户使用普通用户登录业务服务器A 进行操作
- 用户需要提权,切换到root,需要输入动态口令来进行切换
- 输入动态口令
- 业务服务器A 就向动态口令认证服务器B 的FreeRadius进行认证
- 认证服务器B的FreeRadius收到认证请求后,开始认证
- FreeRadius会向GoogleAuthenticator来进行动态口令的校验,然后将结果返回给业务服务器。
- 业务服务器成功切换到root用户
安装部署
服务端
系统:CentOS 7.2
NTP安装
由于Google Authenticator依赖于时间,所以你的服务器时间必须总是正确的。这里通过ntp服务自动同步网络时间。
yum install ntp -y
systemctl enable ntpd
systemctl start ntpd
Google Authenticator Pam安装配置
安装
git clone https://github.com/google/google-authenticator-libpam.git
cd google-authenticator-libpam/
./bootstrap.sh
./configure
make
make install
ln -s /usr/local/lib/security/pam_google_authenticator.so /usr/lib64/security/pam_google_authenticator.so
如果出現:
configure: error: Unable to find the PAM library or the PAM header files
請安裝此套件後,重新執行./configure:
# yum install pam-devel
配置pam
/etc/pam.d/sshd
#添加下面一行
auth    required        pam_google_authenticator.so
#注释下面一行
#auth       substack     password-auth
配置ssh
/etc/ssh/sshd_config
# Change to no to disable s/key passwords
ChallengeResponseAuthentication yes
#ChallengeResponseAuthentication no
重启sshd
systemctl restart sshd.service
为用户启用google-authenticator
输入命令:google-authenticator

1)屏幕提示Do you want authentication tokens to be time-based (y/n) ,回答y选用基于时间的token

2)屏幕提示二维码,拿出手机打开google authenticator软件(没有请自行下载),点击+后选择“条形码扫描"添加认证条目。


---

注意:将屏幕显示的secret key, verification code 和 recovery codes 保存在安全的地方,供密码恢复使用。

---


3)Do you want me to update your "/home/sammy/.google_authenticator" file (y/n) y

4)Do you want to disallow multiple uses of the same authentication token? This restricts you to one login about every 30s, but it increases your chances to notice or even prevent man-in-the-middle attacks (y/n) y

4)By default, tokens are good for 30 seconds. In order to compensate for possible time-skew between the client and the server, we allow an extra token before and after the current time. If you experience problems with poor time synchronization, you can increase the window from its default size of +-1min (window size of 3) to about +-4min (window size of 17 acceptable tokens). Do you want to do so? (y/n) n

5)If the computer that you are logging into isn‘t hardened against brute-force login attempts, you can enable rate-limiting for the authentication module. By default, this limits attackers to no more than 3 login attempts every 30s. Do you want to enable rate-limiting (y/n) y
新建ssh连接(不要关闭当前的防止无法访问)测试配置是否成功。
FreeRadius 安装配置
安装
yum install freeradius freeradius-utils -y
配置
/etc/raddb/radusd.conf
user = radiusd
group = radiusd
#改成
user = root
group = root
/etc/raddb/users
#取消下面2行注释
DEFAULT         Group == "disabled", Auth-Type := Reject
                Reply-Message = "Your account has been disabled."

#添加一行
DEFAULT        Auth-Type := PAM
/etc/raddb/sites-enabled/default
authenticate {
...
        #  Pluggable Authentication Modules
#       pam
...
}

#取消pam行前面的注释
freeradius启用pam模块
ln -s /etc/raddb/mods-available/pam /etc/raddb/mods-enabled/pam
/etc/raddb/clients.conf
#在最后添加一段认证类型
client macolee_sudo {
        ipaddr = 0.0.0.0
        netmask = 0
        secret = macolee_sudo
        require_message_authenticator = no
}
/etc/pam.d/radiusd
#%PAM-1.0
#注释掉下面一行
#auth       include	password-auth
#添加下面一行。secret是google Authenticator认证的配置文件,user是切换为root的时候需要认证
auth       required     pam_google_authenticator.so secret=/etc/raddb/gauth user=root
account    required	pam_nologin.so
account    include	password-auth
password   include	password-auth
session    include	password-auth
启动freeradius
systemctl enable radiusd
systemctl start radiusd
打开防火墙限制,开通FreeRadius的1812端口
/etc/sysconfig/iptables
-A INPUT -s 10.1.2.97 -p udp -m udp --dport 1812 -j ACCEPT
客户端
pam_radius安装配置
安装
#添加epel yum源
yum install https://dl.fedoraproject.org/pub/epel/epel-release-latest-7.noarch.rpm -y
#安装
yum install pam_radius -y
配置
...

# server[:port]	shared_secret      timeout (s)
# 127.0.0.1	secret             1
# other-server    other-secret       3

#添加认证服务器地址 认证类型
10.214.60.37:1812  macolee_sudo       10
修改sudo的pam配置
#%PAM-1.0
#添加下面一行
auth       required      pam_radius_auth.so
#注释下面一行
#auth       include      system-auth
account    include      system-auth
password   include      system-auth
session    optional     pam_keyinit.so revoke
session    required     pam_limits.so
验证
前提
客户端服务器上的用户名,在radius服务端也必须存在。比如客户端要切换为root的普通用户是test1,那么radius服务端也必须有test1这个普通用户
客户端和服务端添加用户
#添加用户
useradd test1
#给用户sudo权限
命令:visudo
#添加
macolee  ALL=(ALL) /bin/su - root
测试登录
> 1. 以test1用户登录客户端服务器
> 2. 输入名sudo su - root
> 3. 输入手机app上google验证器上的验证码
> 4. 能成功切换,表示配置成功


 浙公网安备 33010602011771号