

第1章 HBase简介
1.1 HBase定义
HBase是一种分布式、可扩展、支持海量数据存储的NoSQL数据库。
1.2 HBase数据模型
逻辑上,HBase的数据模型同关系型数据库很类似,数据存储在一张表中,有行有列。但从HBase的底层物理存储结构(K-V)来看,HBase更像是一个multi-dimensional map。
1.2.1 HBase逻辑结构
1.2.2 HBase物理存储结构

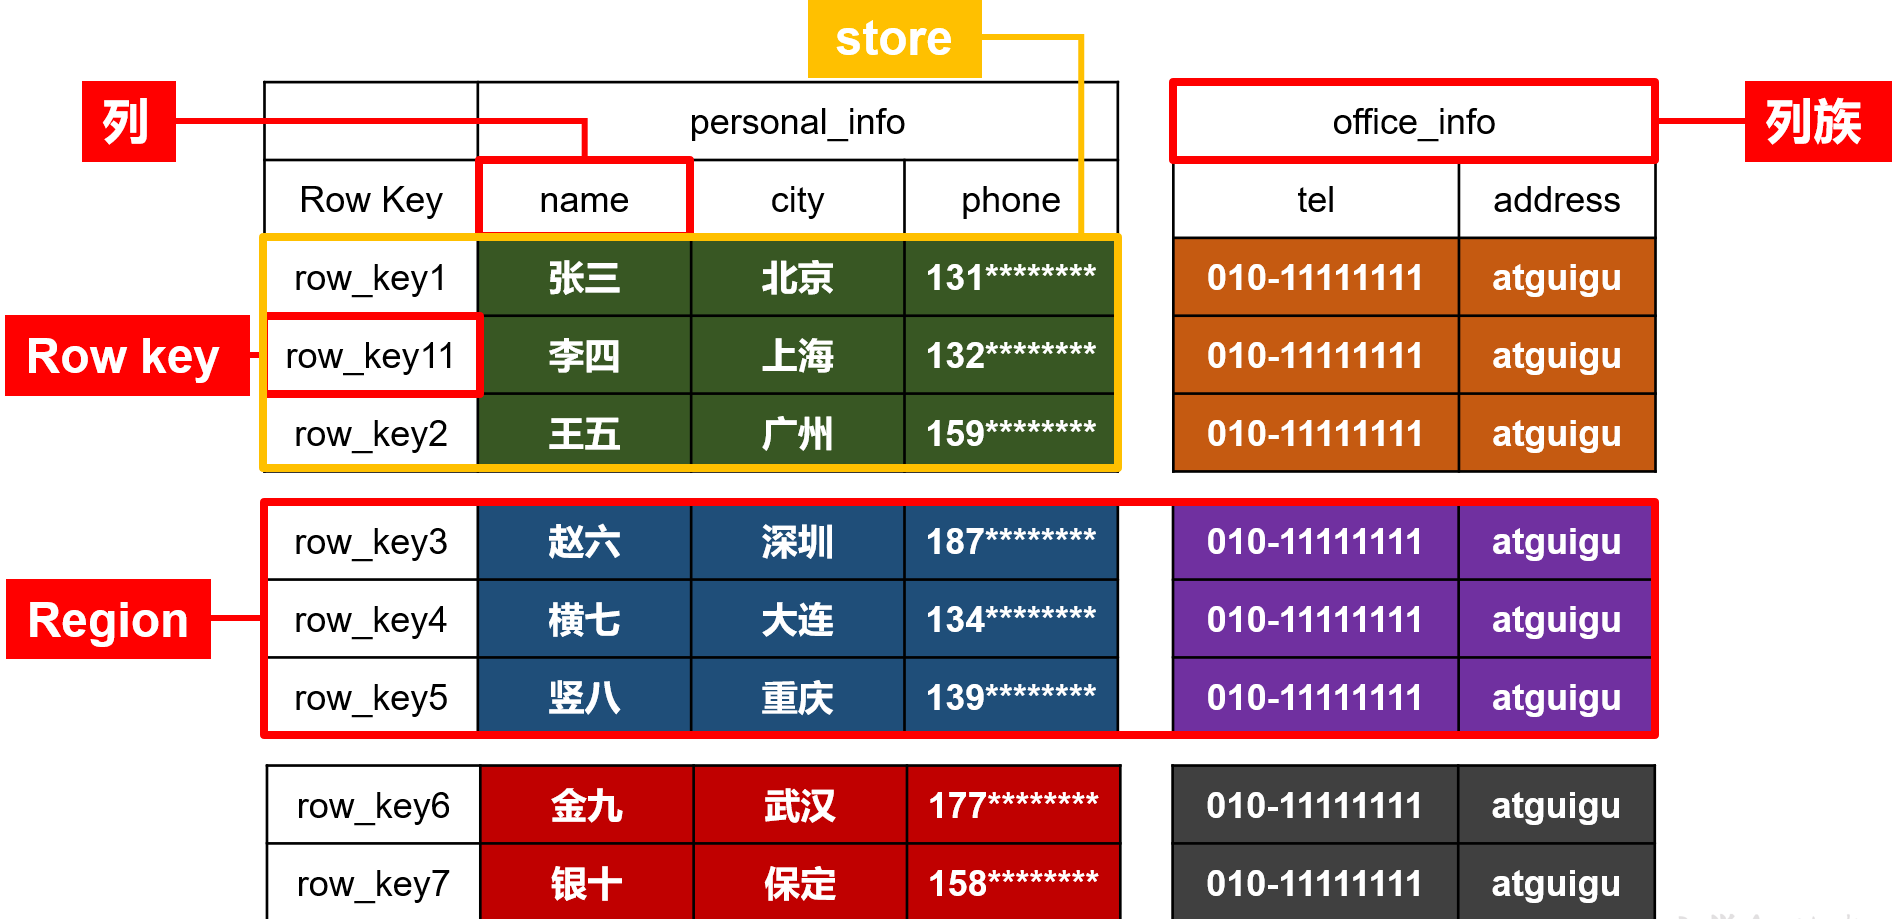
1.2.3 数据模型
1)Name Space
命名空间,类似于关系型数据库的DataBase概念,每个命名空间下有多个表。HBase有两个自带的命名空间,分别是“hbase”和“default”,“hbase”中存放的是HBase内置的表,“default”表是用户默认使用的命名空间。
2)Region
类似于关系型数据库的表概念。不同的是,HBase定义表时只需要声明列族即可,不需要声明具体的列。这意味着,往HBase写入数据时,字段可以动态、按需指定。因此,和关系型数据库相比,HBase能够轻松应对字段变更的场景。
3)Row
HBase表中的每行数据都由一个RowKey和多个Column(列)组成,数据是按照RowKey的字典顺序存储的,并且查询数据时只能根据RowKey进行检索,所以RowKey的设计十分重要。
4)Column
HBase中的每个列都由Column Family(列族)和Column Qualifier(列限定符)进行限定,例如info:name,info:age。建表时,只需指明列族,而列限定符无需预先定义。
5)Time Stamp
用于标识数据的不同版本(version),每条数据写入时,如果不指定时间戳,系统会自动为其加上该字段,其值为写入HBase的时间。
6)Cell
由{rowkey, column Family:column Qualifier, time Stamp} 唯一确定的单元,cell中的数据是没有类型的,全部是字节码形式存储。
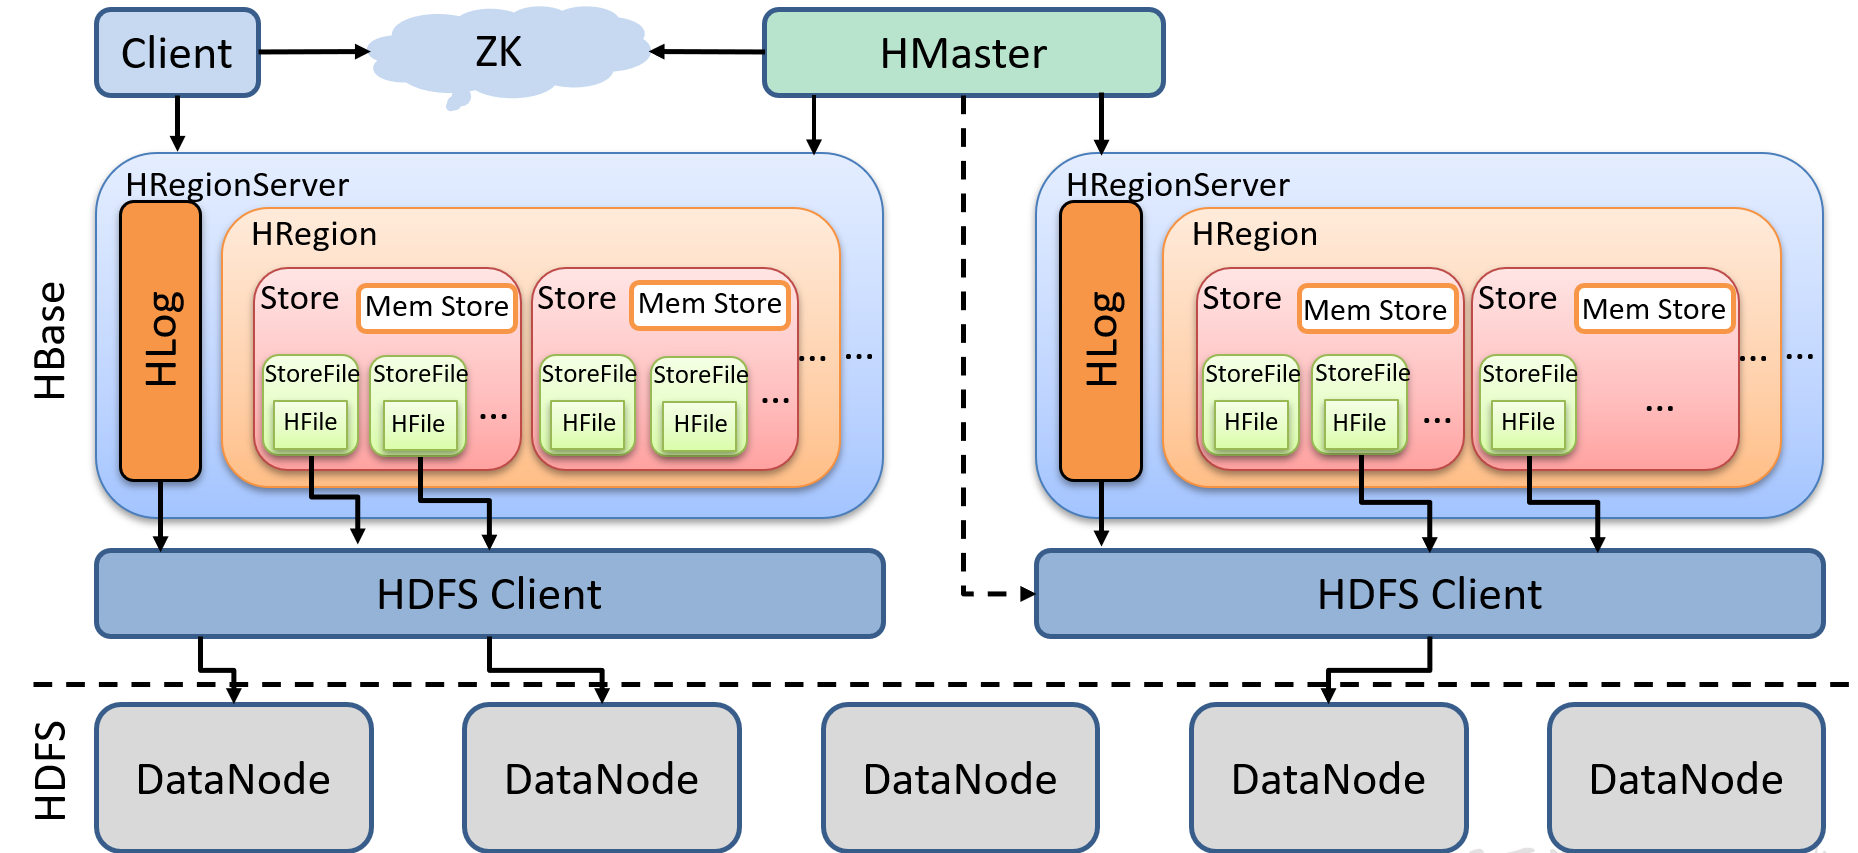
1.3 HBase基本架构
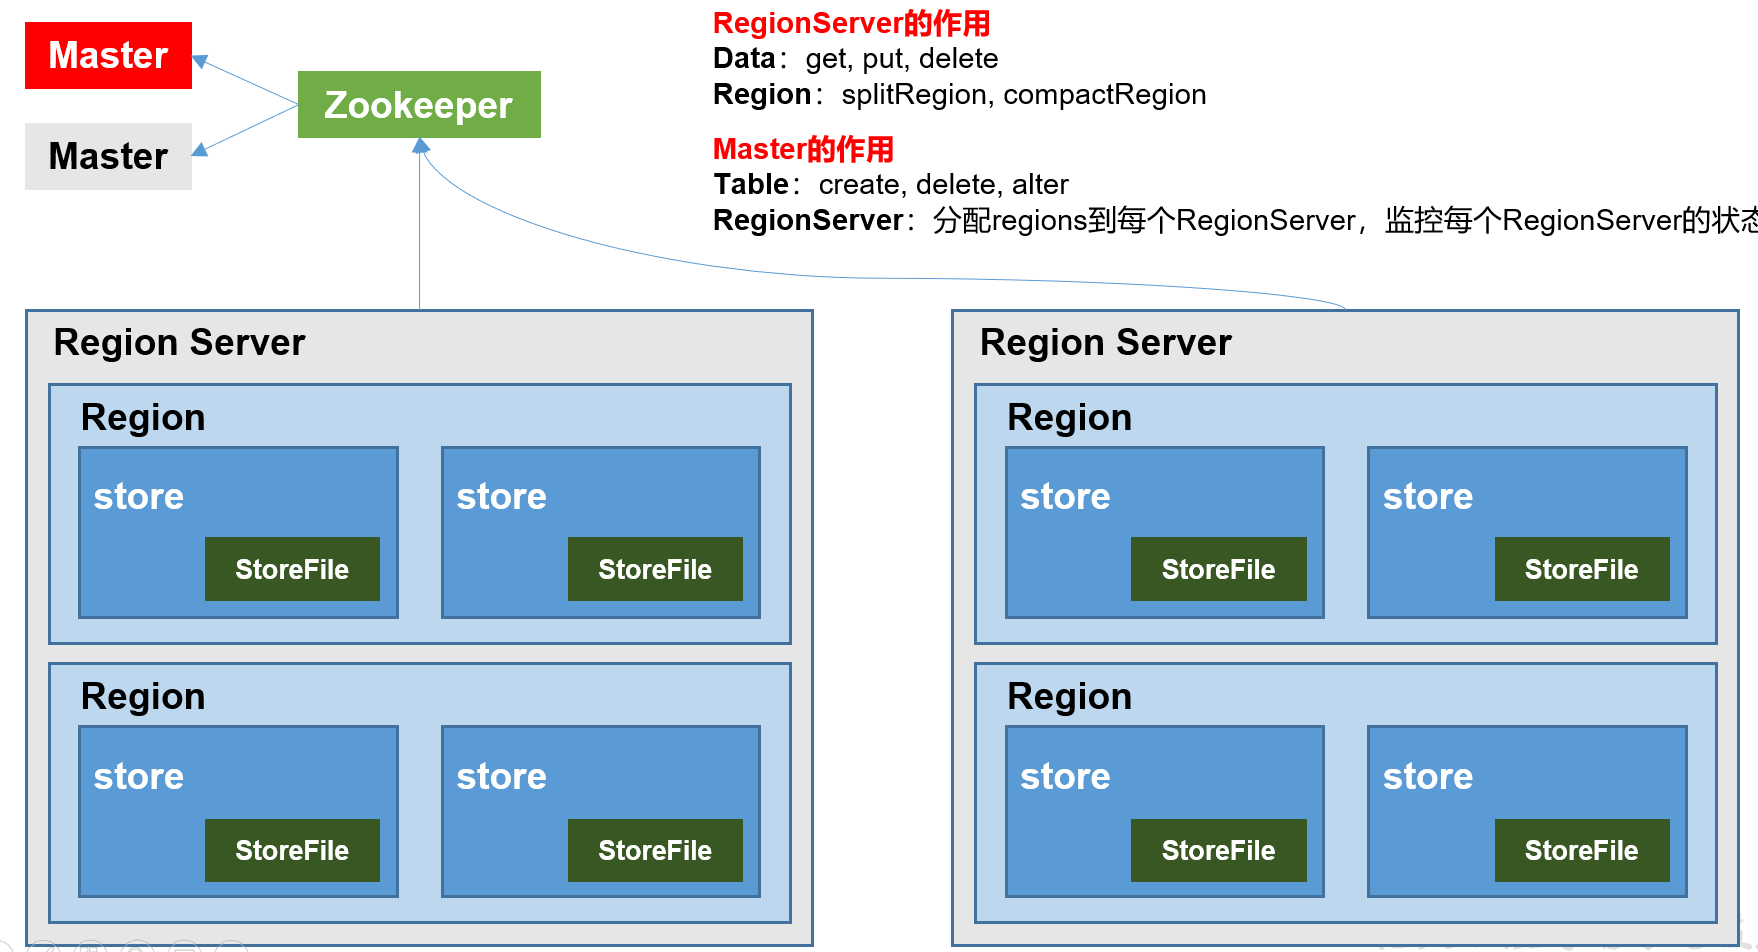
架构角色:
1)Region Server,Region Server为 Region的管理者,其实现类为HRegionServer,主要作用如下:
对于数据的操作:get, put, delete;
对于Region的操作:splitRegion、compactRegion。
2)Master,Master是所有Region Server的管理者,其实现类为HMaster,主要作用如下:
对于表的操作:create, delete, alter
对于RegionServer的操作:分配regions到每个RegionServer,监控每个RegionServer的状态,负载均衡和故障转移。
3)Zookeeper
HBase通过Zookeeper来做Master的高可用、RegionServer的监控、元数据的入口以及集群配置的维护等工作。
4)HDFS
HDFS为HBase提供最终的底层数据存储服务,同时为HBase提供高可用的支持。
第2章 HBase快速入门
2.1 HBase安装部署
2.1.1 Zookeeper正常部署
首先保证Zookeeper集群的正常部署并启动
2.1.2 Hadoop正常部署
Hadoop集群的正常部署并启动
2.1.3 HBase的解压
1)资料下载:https://pan.baidu.com/s/118tpLqK50S7ZXZFQk8y8Gg 提取码:zpex
2)上传hbase-2.0.5-bin.tar.gz至/opt/software/,并解压HBase到/opt/module/,完成后重命名
tar -zxvf /opt/software/hbase-2.0.5-bin.tar.gz -C /opt/module/
mv /opt/module/hbase-2.0.5 /opt/module/hbase
3)配置环境变量
sudo vim /etc/profile.d/my_env.sh
#HBASE_HOME
export HBASE_HOME=/opt/module/hbase
export PATH=$PATH:$HBASE_HOME/bin
source /etc/profile.d/my_env.sh
2.1.4 HBase的配置文件
1)hbase-env.sh修改内容:
vim /opt/module/hbase/conf/hbase-env.sh
#找到第125行,将hbase自带的zookeeper禁用
export HBASE_MANAGES_ZK=false
2)hbase-site.xml修改内容:
vim /opt/module/hbase/conf/hbase-site.xml
    <property>
        <name>hbase.rootdir</name>
        <value>hdfs://hadoop102:9820/HBase</value>
    </property>
    <property>
        <name>hbase.unsafe.stream.capability.enforce</name>
        <value>false</value>
    </property>
    <property>
        <name>hbase.cluster.distributed</name>
        <value>true</value>
    </property>
    <property>
        <name>hbase.zookeeper.quorum</name>
        <value>hadoop102,hadoop103,hadoop104</value>
    </property>
3)regionservers:
vim /opt/module/hbase/conf/regionservers
hadoop102
hadoop103
hadoop104
2.1.5 HBase发送至其他机器(环境变量记得source一下)
xsync /opt/module/hbase/
sudo /home/atguigu/bin/xsync /etc/profile.d/my_env.sh
2.1.6 HBase服务的启动
启动方式一(单个节点单个启动/停止):
hbase-daemon.sh start master
hbase-daemon.sh start regionserver
提示:如果集群之间的节点时间不同步,会导致regionserver无法启动,抛出ClockOutOfSyncException异常。
修复提示:
a、同步时间服务:查看博客 https://www.cnblogs.com/LzMingYueShanPao/p/14631592.html
b、属性:hbase.master.maxclockskew设置更大的值
<property>
        <name>hbase.master.maxclockskew</name>
        <value>180000</value>
        <description>Time difference of regionserver from master</description>
</property>
对应的停止服务:
hbase-daemon.sh stop regionserver
hbase-daemon.sh stop master
启动方式二(一键启动/停止):
start-hbase.sh
对应的停止服务:
stop-hbase.sh
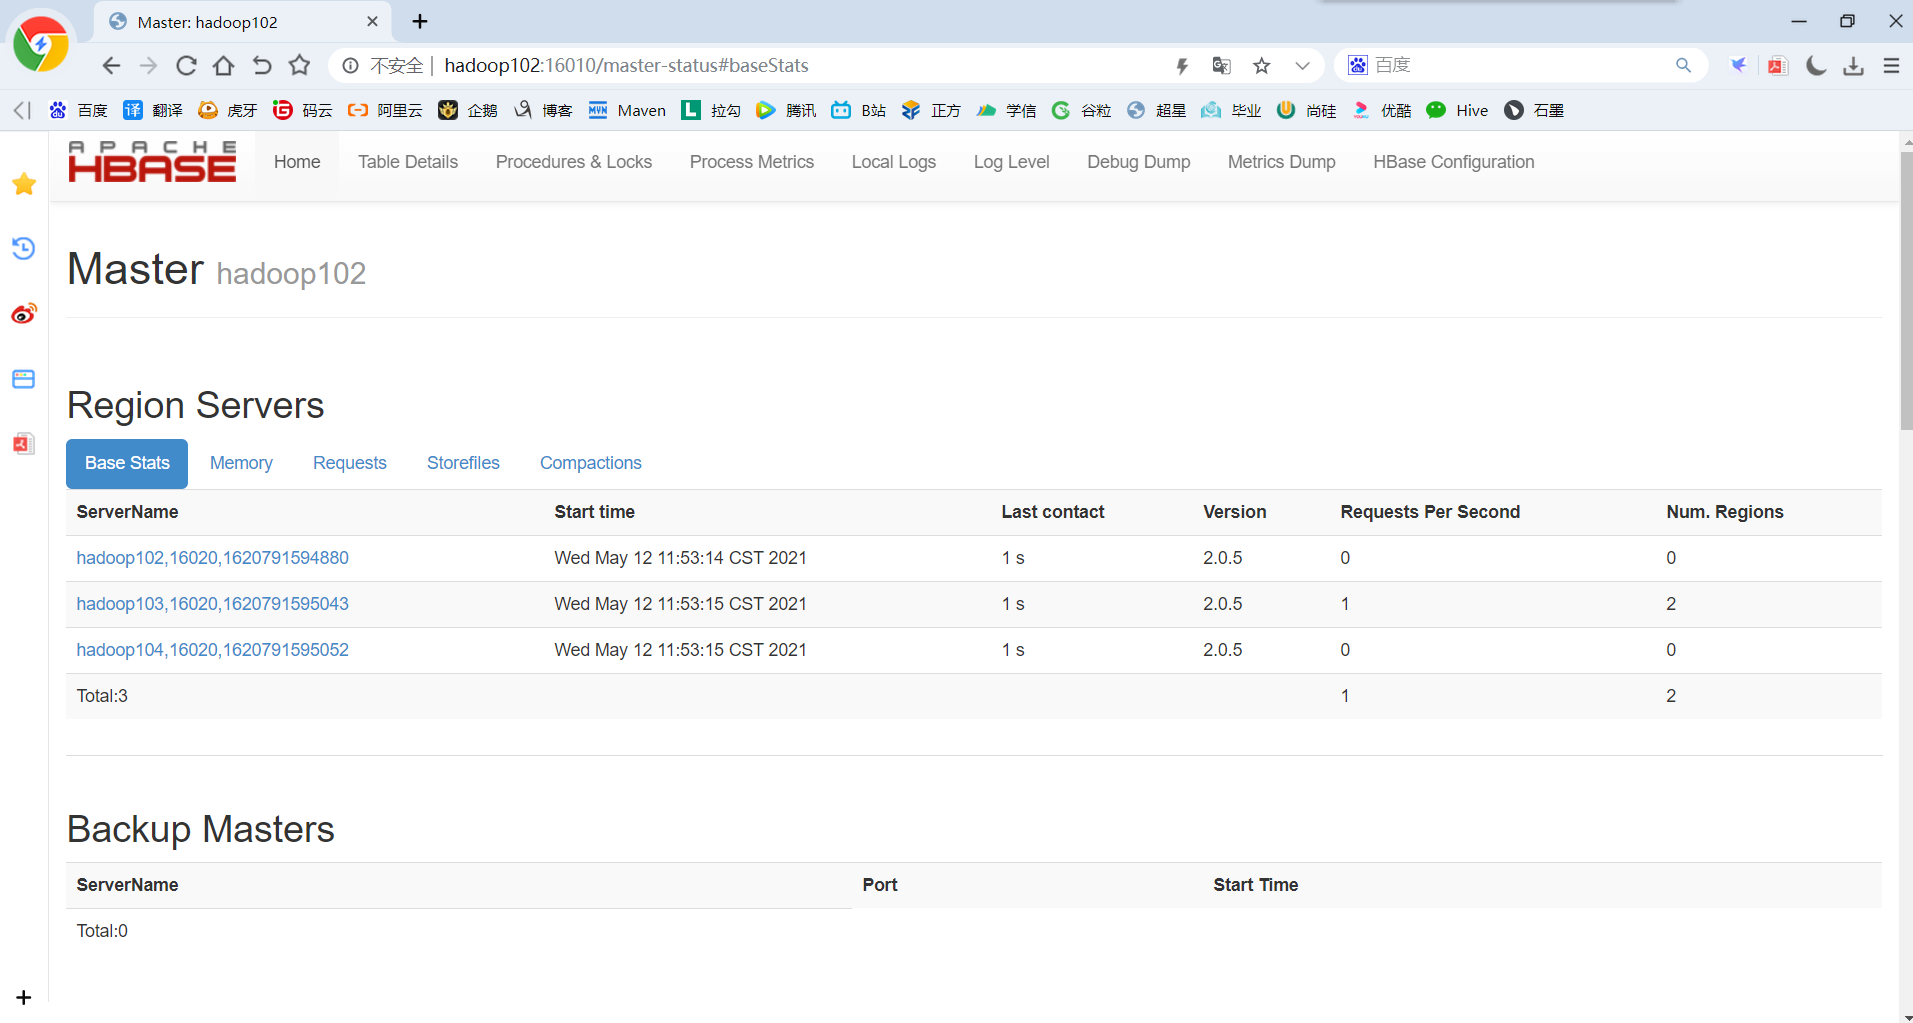
2.1.7 查看HBase页面
启动成功后,可以通过“host:port”的方式来访问HBase管理页面,例如:http://hadoop102:16010
2.2 HBase Shell操作
2.2.1 基础操作
1)进入HBase客户端命令行
hbase shell
2)查看帮助命令
help
2.2.2 DDL
Group name: ddl
  Commands: alter, alter_async, alter_status, create, describe, disable, disable_all, drop, drop_all, enable, enable_all,
  exists, get_table, is_disabled, is_enabled, list, list_regions, locate_region, show_filters
Group name: namespace
  Commands: alter_namespace, create_namespace, describe_namespace, drop_namespace, list_namespace, list_namespace_tables
1)创建所有的命名空间
create_namespace 'bigdata'
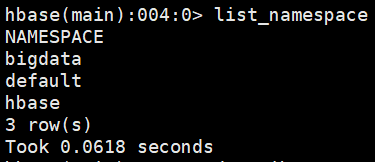
2)查看所有的命名空间
list_namespace
3)查看命名空间详情
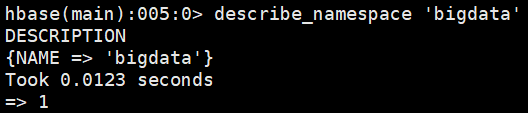
4)删除命名空间(命名空间下没有表才可以删除)
drop_namespace 'bigdata'
5)创建表
//在默认’default’命名空间下创建表
create 'student','stu_info'

//在指定命名空间下创建表
create 'bigdata:student','stu_info','stu_info2'
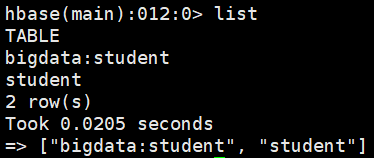
6)查看所有的表
list
7)查看表的详情
hbase(main):013:0> describe 'student'
Table student is ENABLED
student
COLUMN FAMILIES DESCRIPTION
{NAME => 'stu_info', VERSIONS => '1', EVICT_BLOCKS_ON_CLOSE => 'false', NEW_VERSION_BEHAVIOR => 'false', KEEP_DELETED_CELLS => 'FALSE', CACHE_DATA_ON_WRITE => 'false', DAT
A_BLOCK_ENCODING => 'NONE', TTL => 'FOREVER', MIN_VERSIONS => '0', REPLICATION_SCOPE => '0', BLOOMFILTER => 'ROW', CACHE_INDEX_ON_WRITE => 'false', IN_MEMORY => 'false', C
ACHE_BLOOMS_ON_WRITE => 'false', PREFETCH_BLOCKS_ON_OPEN => 'false', COMPRESSION => 'NONE', BLOCKCACHE => 'true', BLOCKSIZE => '65536'}
1 row(s)
Took 0.1211 seconds
hbase(main):014:0> describe 'bigdata:student'
Table bigdata:student is ENABLED
bigdata:student
COLUMN FAMILIES DESCRIPTION
{NAME => 'stu_info', VERSIONS => '1', EVICT_BLOCKS_ON_CLOSE => 'false', NEW_VERSION_BEHAVIOR => 'false', KEEP_DELETED_CELLS => 'FALSE', CACHE_DATA_ON_WRITE => 'false', DAT
A_BLOCK_ENCODING => 'NONE', TTL => 'FOREVER', MIN_VERSIONS => '0', REPLICATION_SCOPE => '0', BLOOMFILTER => 'ROW', CACHE_INDEX_ON_WRITE => 'false', IN_MEMORY => 'false', C
ACHE_BLOOMS_ON_WRITE => 'false', PREFETCH_BLOCKS_ON_OPEN => 'false', COMPRESSION => 'NONE', BLOCKCACHE => 'true', BLOCKSIZE => '65536'}
{NAME => 'stu_info2', VERSIONS => '1', EVICT_BLOCKS_ON_CLOSE => 'false', NEW_VERSION_BEHAVIOR => 'false', KEEP_DELETED_CELLS => 'FALSE', CACHE_DATA_ON_WRITE => 'false', DA
TA_BLOCK_ENCODING => 'NONE', TTL => 'FOREVER', MIN_VERSIONS => '0', REPLICATION_SCOPE => '0', BLOOMFILTER => 'ROW', CACHE_INDEX_ON_WRITE => 'false', IN_MEMORY => 'false',
CACHE_BLOOMS_ON_WRITE => 'false', PREFETCH_BLOCKS_ON_OPEN => 'false', COMPRESSION => 'NONE', BLOCKCACHE => 'true', BLOCKSIZE => '65536'}
2 row(s)
Took 0.0271 seconds
8)修改表
(1)删除列族信息
alter 'bigdata:student','delete'=>'stu_info2'
(2)修改版本信息
alter 'bigdata:student',{NAME=>'stu_info',VERSIONS=>2}

9)删除表
disable 'student'
drop 'student'
提示:如果直接drop表,会报错:ERROR: Table student is enabled. Disable it first.
2.2.3 DML
Group name: dml
  Commands: append, count, delete, deleteall, get, get_counter, get_splits, incr, put, scan, truncate, truncate_preserve
1)插入数据到表
put 'bigdata:student','1001','stu_info:sex','female'
put 'bigdata:student','1001','stu_info:age','19'
put 'bigdata:student','1002','stu_info:name','zhuge'
put 'bigdata:student','1002','stu_info:sex','male'
put 'bigdata:student','1002','stu_info:age','28'
2)Scan方式查看数据
(1)扫描全表
scan 'bigdata:student'

(2)限定开始位置扫描全表
scan 'bigdata:student',{STARTROW=>'1001'}

(3)限定开始和结束位置扫描全表
scan 'bigdata:student',{STARTROW=>'1001',STOPROW=>'1001'}

(4)扫描全表数据(包含被标记删除或者应该被覆盖的数据)
scan 'bigdata:student',{ROW=>true,VERSIONS=>2}
3)Get方式查看数据
(1)指定RowKey查询
get 'bigdata:student','1001'

(2)指定RowKey+列族查询
get 'bigdata:student','1001','stu_info'

(3)指定RowKey+列族+列名查询
get 'bigdata:student','1001','stu_info:age'

(4)指定获取数据版本查询
get 'bigdata:student','1002',{COLUMN=>'stu_info',VERSIONS=>1}

get 'bigdata:student','1002',{COLUMN=>'stu_info:age',VERSIONS=>1}

get 'bigdata:student','1002',{COLUMN=>['stu_info:age','stu_info:name'],VERSIONS=>1}

4)统计表数据行数
count 'bigdata:student'

5)更新数据(实际上还是Put)
put 'bigdata:student','1001','stu_info:age','16'
put 'bigdata:student','1001','stu_info:sex','male'
6)删除数据
(1)指定RowKey+列族+列名删除
deleteall 'bigdata:student','1001','stu_info:age'
(2)指定RowKey+列族删除(无法删除)
deleteall 'bigdata:student','1001','stu_info'

(3)指定RowKey删除
deleteall 'bigdata:student','1001'

注意:使用的是deleteall命令而不是delete命令
7)清空表数据
truncate 'bigdata:student'
第3章 HBase进阶
3.1 架构原理
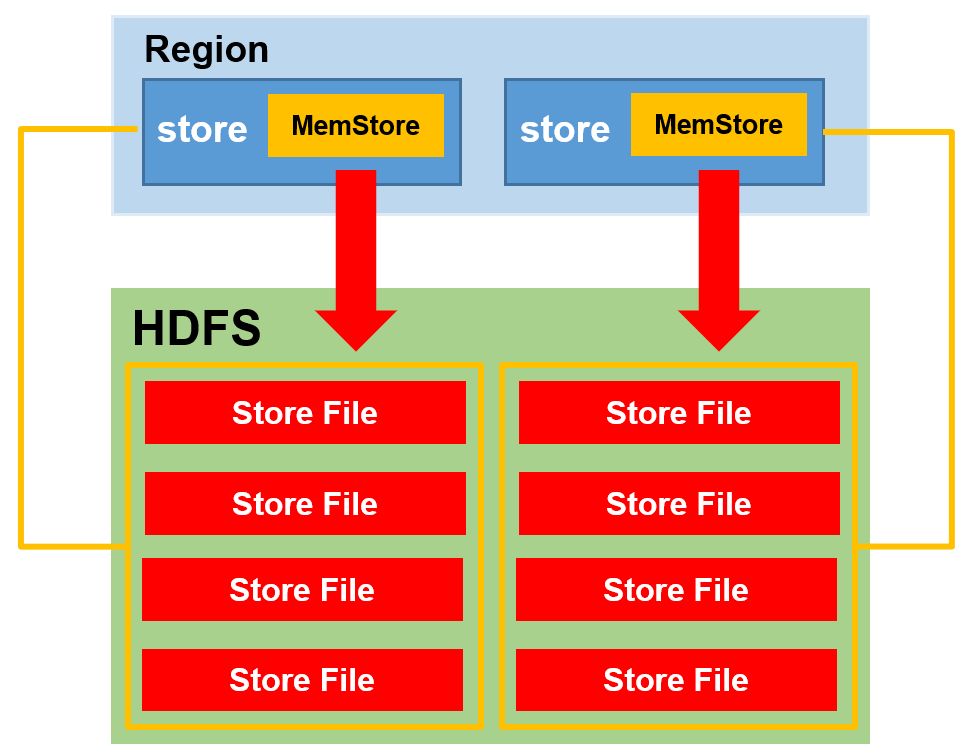
1)StoreFile
保存实际数据的物理文件,StoreFile以HFile的形式存储在HDFS上。每个Store会有一个或多个StoreFile(HFile),数据在每个StoreFile中都是有序的。
2)MemStore
写缓存,由于HFile中的数据要求是有序的,所以数据是先存储在MemStore中,排好序后,等到达刷写时机才会刷新写到HFile,每次刷写都会形成一个新的HFile。
3)WAL
由于数据要经MemStore排序后才能刷新写到HFile,但把数据保存在内存中会有很高的概率导致数据丢失,为了解决这个问题,数据会先写在一个叫做Write-Ahead logfile(HLog)的文件中,然后再写入MemStore中。所以在系统出现故障的时候,数据可以通过这个日志文件重建。
3.2 写流程
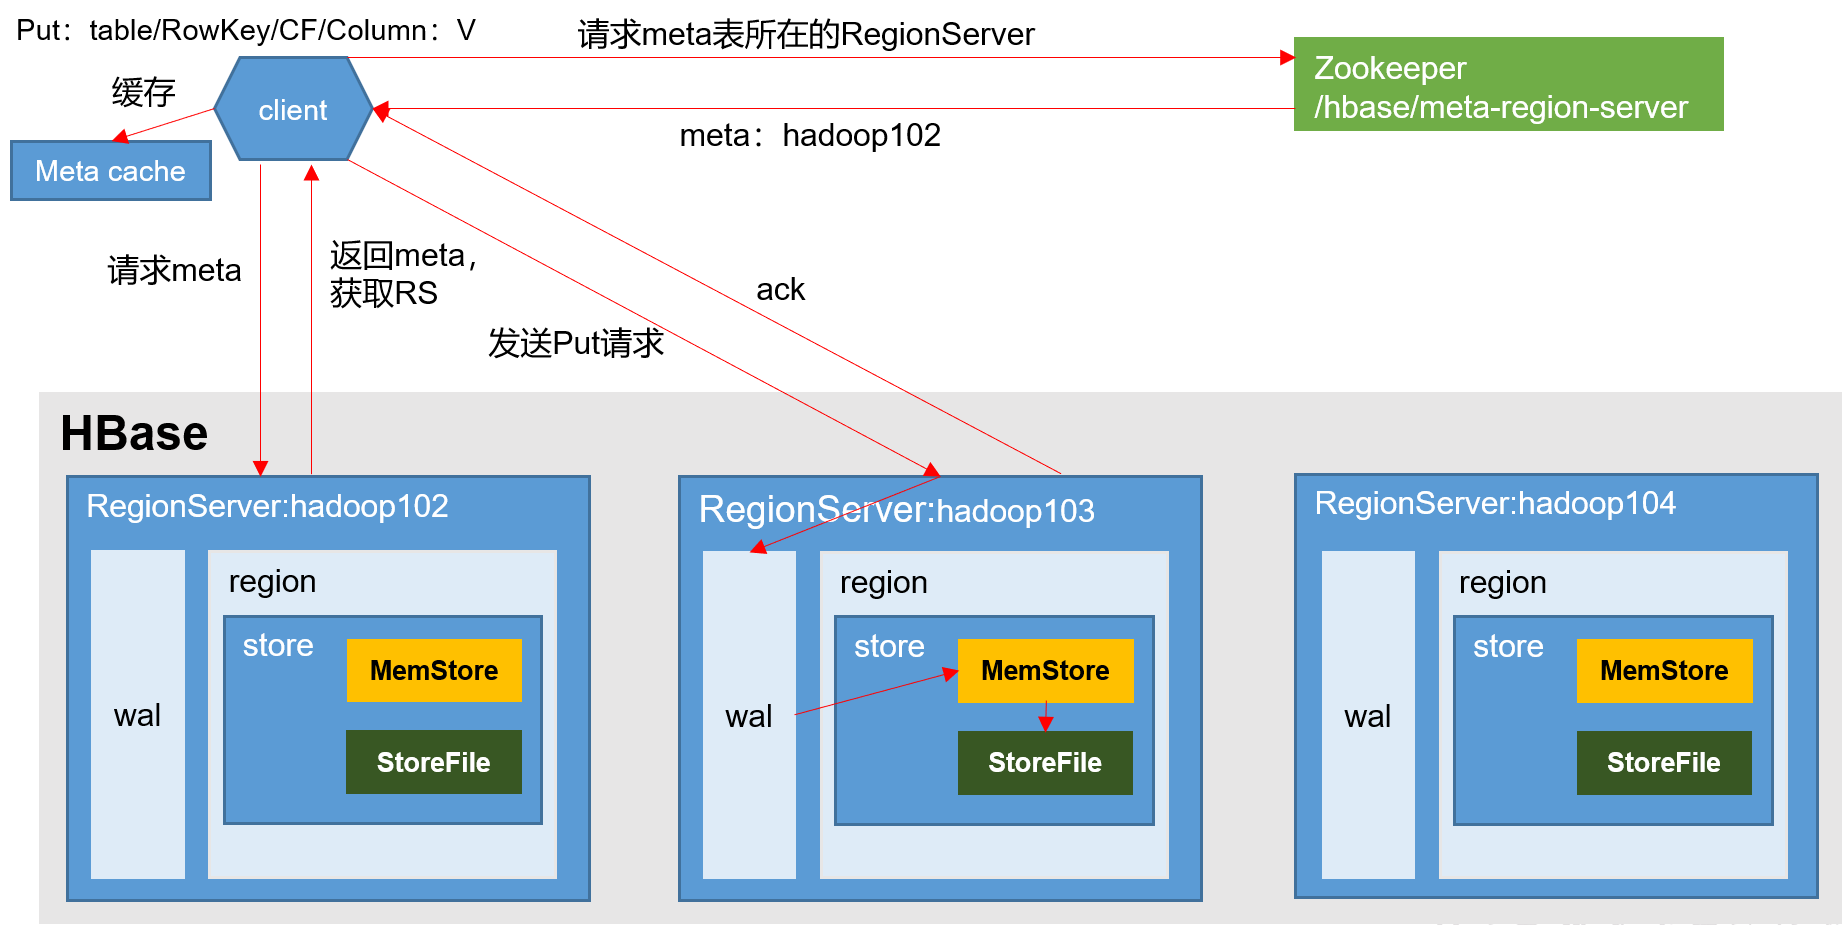
写流程:
1)Client先访问Zookeeper,获取hbase:meta表位于哪个RegionServer。
2)访问对应的RegionServer,获取hbase:meta表,根据读请求的namespace:table/rowkey,查询出目标数据位于哪个RegionServer中的哪个Region中。并将该table的region信息以及meta表的位置信息缓存在客户端的meta cache,方便下次访问。
3)与目标RegionServer进行通讯;
4)将数据顺序写入(追加)到WAL(HLog日志文件);
5)将数据写入对应的MemStore,数据会在MemStore进行排序;
6)向客户端发送ack;
7)等达到MemStore的刷写时机后,将数据刷写到HFile。
3.3 MemStore Flush
3.3.1 触发条件
实际工作中,创建表的时候列簇的个数一般为1个,最多不超过两个(原因: 避免在flush的时候产生大量的小文件),hbase在flush的时候是flush整个region而不是单个memstore
1)region中某个memstore的数据量达到128M的时候,region会flush
2)region中所有的memstore的总数据量达到512M的时候,region会flush
3)regionserver中所有的region,每个region中的所有memstore的总数据量达到 java_heap * 40% * 95% 时,会触发flush,在flush之前会将regionserver中所有的region按照memstore占用的空间大小进行排序,优先flush占用空间多的region
4)如果处于写高峰期的时候,此时第三个触发条件可以适当延迟,等到regionserver中所有的region,每个region中的所有的memstore的总数据量达到 java_heap * 40% 时,会阻塞client写入,优先flush。在flush之前会将regionserver中所有的region按照memstore占用的空间大小进行排序,优先flush占用空间多的region,每次flush完一个region就会判断当前regionserver中所有的region,每个region中的所有的memstore的总数据量<=java_heap * 40% * 95%,如果满足条件则会停止flush允许client继续写入
5)region距离上一次flush如果达到1小时,此时触发region flush
6)regionserver的预写日志的文件数达到32的时候,会触发region flush
7)手动flush: flush '表名'
3.4 读流程
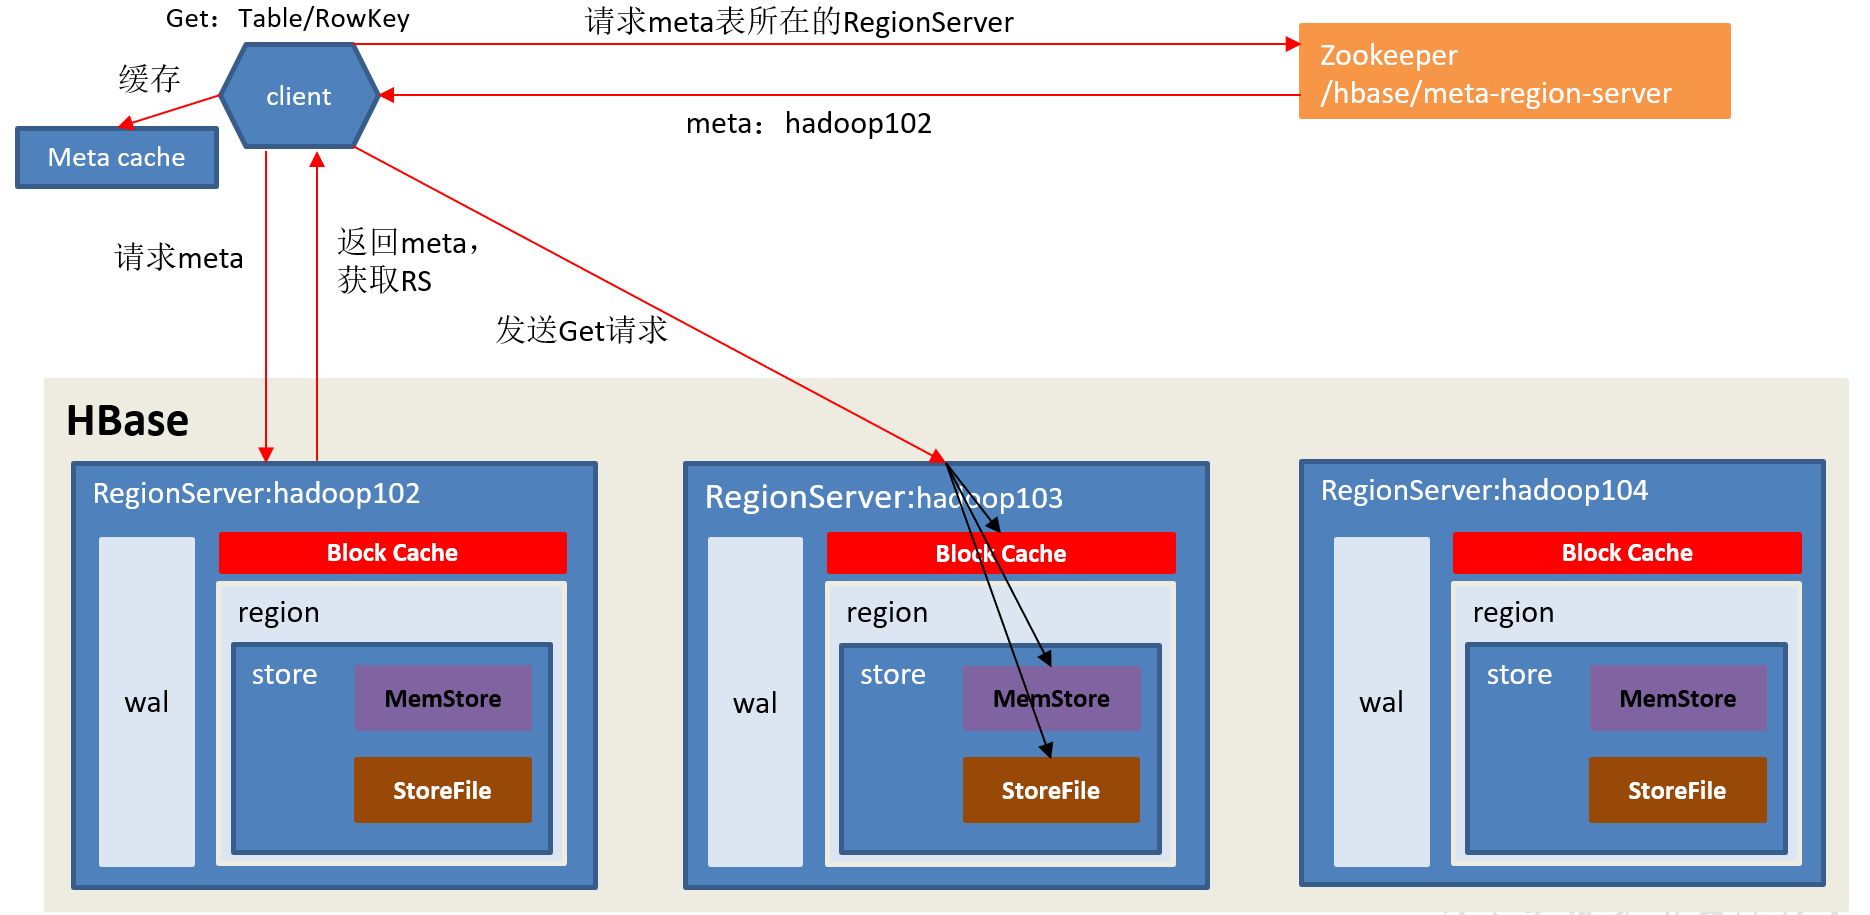
读流程:
1)Client先访问Zookeeper,获取hbase:meta表位于哪个RegionServer。
2)访问对应的RegionServer,获取hbase:meta表,根据读请求的namespace:table/rowkey,查询出目标数据位于哪个RegionServer中的哪个Region中。并将该table的region信息以及meta表的位置信息缓存在客户端的meta cache,方便下次访问。
3)与目标RegionServer进行通讯;
4)分别在BlockCache(读缓存),MemStore中查询目标数据,如果BlockCache中未查到相应数据则扫描对应的HFile文件,HFile中扫描到的数据块(默认64K)写入BlockCache,并将查到的所有数据进行合并。此处所有数据是指同一条数据的不同版本(timestamp)或者不同的类型(Put/Delete)。
5)将合并后的最终结果返回给客户端。
3.5 StoreFile Compaction
由于memstore每次刷写都会生成一个新的HFile,且同一个字段的不同版本(timestamp)和不同类型(Put/Delete)有可能会分布在不同的HFile中,因此查询时需要遍历所有的HFile。为了减少HFile的个数,以及清理掉过期和删除的数据,会进行StoreFile Compaction。
Compaction分为两种,分别是Minor Compaction和Major Compaction。
(1)Minor Compaction会将临近的若干个较小的HFile合并成一个较大的HFile,但不会清理过期和删除的数据。
(2)Major Compaction会将一个Store下的所有的HFile合并成一个大HFile,并且会清理掉过期和删除的数据。

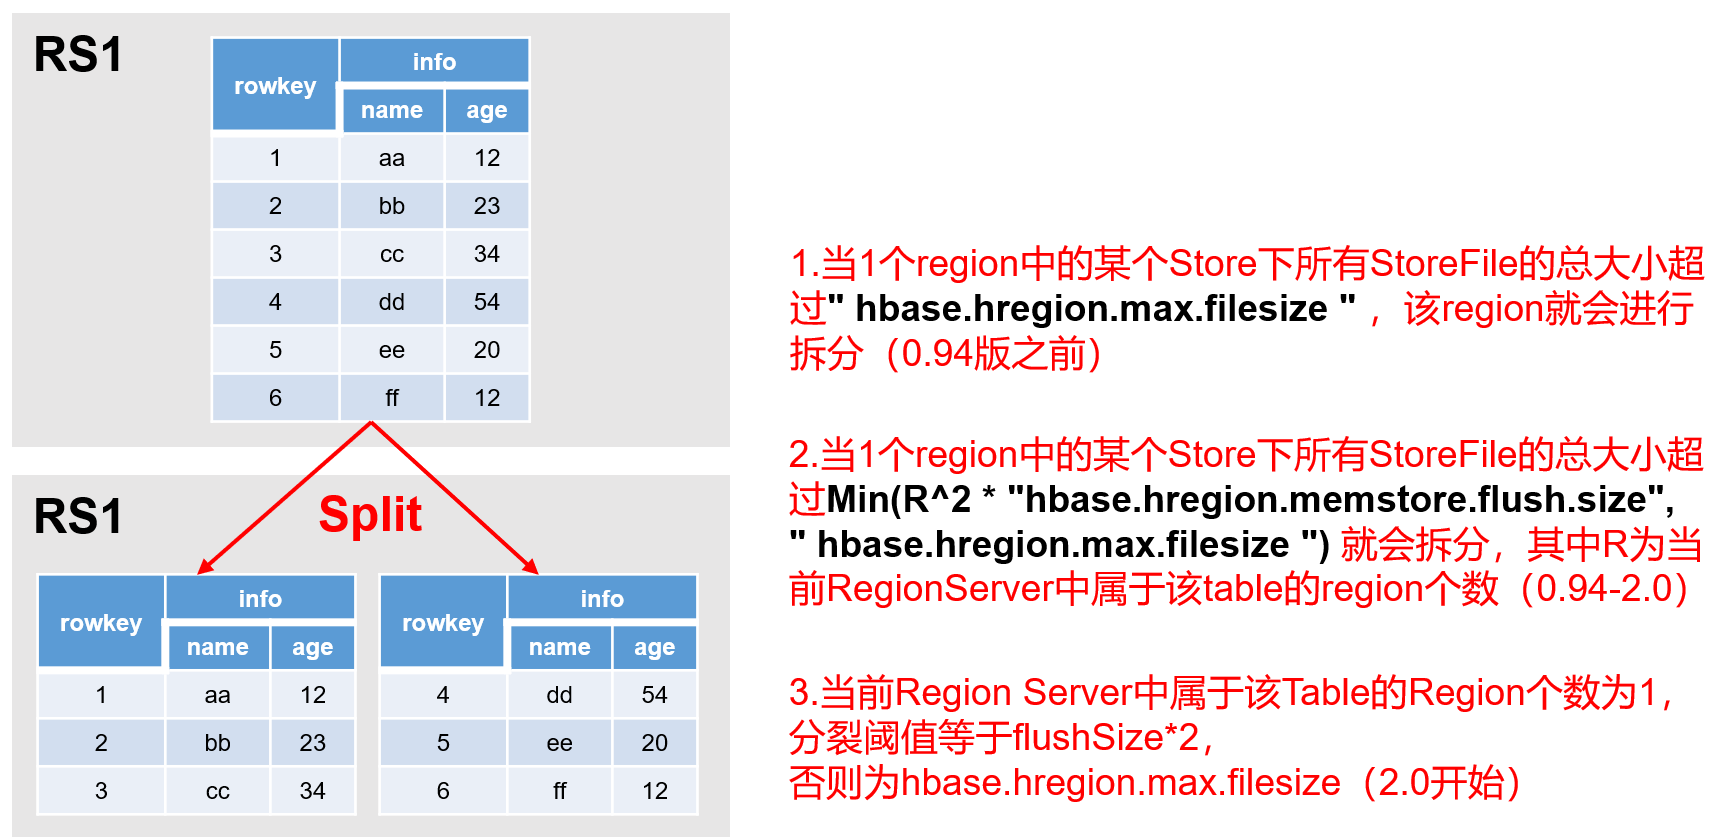
3.6 Region Split
默认情况下,每个Table起初只有一个Region,随着数据的不断写入,Region会自动进行拆分。刚拆分时,两个子Region都位于当前的Region Server,但处于负载均衡的考虑,HMaster有可能会将某个Region转移给其他的Region Server。
Region Split时机:
1)0.94版本之前:使用的是ConstantSizeRegionSplitPolicy策略。
当1个region中的某个Store下所有StoreFile的总大小超过hbase.hregion.max.filesize,该Region就会进行拆分。
2)0.94版本-2.0版本:使用的是IncreasingToUpperBoundRegionSplitPolicy。
当1个Region中的某个Store下所有StoreFile的总大小超过Min(2*R^3 * "hbase.hregion.memstore.flush.size",hbase.hregion.max.filesize"),该Region就会进行拆分,其中R为当前Region Server中属于该Table的Region个数。
3)2.0版本:使用的是SteppingSplitPolicy。
当前RegionServer中属于该Table的Region个数为1,分裂阈值等于flushSize*2,否则为hbase.hregion.max.filesize。
第4章 HBase API
1)在IDEA中创建Maven工程并添加如下依赖:
    <dependencies>
        <dependency>
            <groupId>org.apache.hbase</groupId>
            <artifactId>hbase-client</artifactId>
            <version>2.0.5</version>
        </dependency>
        <dependency>
            <groupId>org.apache.hbase</groupId>
            <artifactId>hbase-server</artifactId>
            <version>2.0.5</version>
        </dependency>
        <dependency>
            <groupId>junit</groupId>
            <artifactId>junit</artifactId>
            <version>4.12</version>
        </dependency>
    </dependencies>
2)新建com.yuange.hbase.TestHBase类
package com.yuange.hbase;

import org.apache.hadoop.conf.Configuration;
import org.apache.hadoop.hbase.HBaseConfiguration;
import org.apache.hadoop.hbase.client.Admin;
import org.apache.hadoop.hbase.client.Connection;
import org.apache.hadoop.hbase.client.ConnectionFactory;
import org.junit.After;
import org.junit.Before;

import java.io.IOException;

public class TestHBase {

    private Connection connection;
    private Admin admin;

    @Before
    public void init() throws IOException {
        Configuration conf = HBaseConfiguration.create();
        conf.set("hbase.zookeeper.quorum","hadoop102:2181,hadoop103:2181,hadoop104:2181");
        connection = ConnectionFactory.createConnection(conf);
        admin = connection.getAdmin();
    }

    @After
    public void after() throws IOException {
        admin.close();
        connection.close();
    }

}
4.1 DDL
4.1.1 创建命名空间
    /*
    * 创建名称空间
    * */
    @Test
    public void createNameSpace() throws IOException {
        admin.createNamespace(NamespaceDescriptor.create("bigdata2").build());
    }
4.1.2 查看命名空间
    /*
    * 查看名称空间
    * */
    @Test
    public void listNameSpace() throws IOException {
        NamespaceDescriptor[] namespaceDescriptors = admin.listNamespaceDescriptors();
        for (NamespaceDescriptor namespaceDescriptor : namespaceDescriptors) {
            System.out.println(namespaceDescriptor.getName());
        }
    }
4.1.3 删除命名空间
    /*
    * 删除名称空间
    * */
    @Test
    public void dropNameSpace() throws IOException {
        //获取名称空间下的所有表
        TableName[] bigdata = admin.listTableNamesByNamespace("bigdata2");
        for (TableName bigdatum : bigdata) {
            //禁用表
            admin.disableTable(bigdatum);
            //删除表
            admin.deleteTable(bigdatum);
        }
        //删除名称空间
        admin.deleteNamespace("bigdata2");
    }
4.1.4 判断表是否存在
    /*
    * 判断表是否存在
    * */
    @Test
    public void tableExists() throws IOException {
        boolean b = admin.tableExists(TableName.valueOf("bigdata:person"));
     system.out.println(b);
    }
4.1.5 创建表
    /*
    * 创建表
    * */
    @Test
    public void createTable() throws IOException {
        //描述列族
        ColumnFamilyDescriptor p1 = ColumnFamilyDescriptorBuilder.newBuilder("p1".getBytes()).setMaxVersions(3).build();
        ColumnFamilyDescriptor p2 = ColumnFamilyDescriptorBuilder.newBuilder("p2".getBytes()).setMaxVersions(3).build();
        //创建表构造器并添加列族
        TableDescriptor build = TableDescriptorBuilder.newBuilder(TableName.valueOf("bigdata2:person"))
                .setColumnFamily(p1)
                .setColumnFamily(p2)
                .build();
        //执行创建操作
        admin.createTable(build);
    }
4.1.6 创建表时进行预分区
    /*
     * 创建表时进行预分区
     * */
    @Test
    public void createTableAndPartition() throws IOException {
        //描述列族
        ColumnFamilyDescriptor p1 = ColumnFamilyDescriptorBuilder.newBuilder("p1".getBytes()).setMaxVersions(3).build();
        ColumnFamilyDescriptor p2 = ColumnFamilyDescriptorBuilder.newBuilder("p2".getBytes()).setMaxVersions(3).build();
        //创建表构造器并添加列族
        TableDescriptor build = TableDescriptorBuilder.newBuilder(TableName.valueOf("bigdata2:person2"))
                .setColumnFamily(p1)
                .setColumnFamily(p2)
                .build();
        //执行创建操作
        admin.createTable(build,"1".getBytes(),"3".getBytes(),4);
    }

4.1.7 修改表
    /*
    * 修改表
    * */
    @Test
    public void alterTable() throws IOException {
        //描述列族
        ColumnFamilyDescriptor p1 = ColumnFamilyDescriptorBuilder.newBuilder("p1".getBytes()).setMaxVersions(5).build();
        //如果不把p2添加进描述表中则p2列限定符会被删除
        //ColumnFamilyDescriptor p2 = ColumnFamilyDescriptorBuilder.newBuilder("p2".getBytes()).setMaxVersions(3).build();
        //描述表
        TableDescriptor build = TableDescriptorBuilder.newBuilder(TableName.valueOf("bigdata2:person"))
                .setColumnFamily(p1)
                //.setColumnFamily(p2)
                .build();
        //执行
        admin.modifyTable(build);
    }
4.1.8 查看表
    /*
    * 查看表
    * */
    @Test
    public void listTable() throws IOException {
        TableName[] tableNames = admin.listTableNames();
        for (TableName tableName : tableNames) {
            System.out.println("表所在的命名空间:"+tableName.getNamespaceAsString());
            System.out.println("表所在的命名空间:表名:"+tableName.getNameAsString());
            System.out.println("表名:"+tableName.getQualifierAsString());
        }
    }
4.2 DML
4.2.1 插入数据
    /*
    * 添加数据
    * */
    @Test
    public void putData() throws IOException {
        //获取table对象
        Table table = connection.getTable(TableName.valueOf("bigdata2:person"));
        //row key(唯一标识)
        Put put = new Put("1001".getBytes());
        //family(列族)、qualifier(字段名)、value(字段值)
        put.addColumn("p1".getBytes(),"pname".getBytes(),"张三".getBytes());
        put.addColumn("p1".getBytes(),"page".getBytes(), Bytes.toBytes(20));
        put.addColumn("p1".getBytes(),"address".getBytes(),"广西".getBytes());
        //put.addColumn("p2".getBytes(),"pname".getBytes(),"李四".getBytes());
        //put.addColumn("p2".getBytes(),"page".getBytes(),Bytes.toBytes(18));
        table.put(put);
        table.close();
    }
4.2.2 批量添加
    /*
    * 批量添加
    * */
    @Test
    public void batchPutData() throws IOException {
        Table table = connection.getTable(TableName.valueOf("bigdata2:person"));

        ArrayList<Put> puts = new ArrayList<Put>();
        Put put = null;

        for (int i = 0; i < 10; i++) {
            //byte [] row
            put = new Put("1002".getBytes());
            //byte [] family, byte [] qualifier, byte [] value
            put.addColumn("p1".getBytes(),"pname".getBytes(),("zhangsan"+i).getBytes());
            put.addColumn("p1".getBytes(),"page".getBytes(),Bytes.toBytes(10+i));
            put.addColumn("p1".getBytes(),"address".getBytes(),("圣魂村"+i).getBytes());
            puts.add(put);
        }
        table.put(puts);
        table.close();
    }
4.2.3 根据RowKey查询数据
  /*
    * 根据rowkey查询数据
    * 1、查询整行数据: get '命名空间名称:表名',rowkey
    * 2、查询某个列的数据: get '命名空间名称:表名',rowkey,'列簇名:列限定符名称'
    * 3、查看某个列簇的数据: get '命名空间名称:表名',rowkey,'列簇名'
    * 4、查看某个时间戳的数据: get '命名空间名称:表名',rowkey,{COLUMN=>'列簇名:列限定符名称',TIMESTAMP=>时间戳}
    * 5、查看多个版本的数据: get '命名空间名称:表名',rowkey,{COLUMN=>'列簇名:列限定符名称',VERSIONS=>版本数}
    * */
    @Test
    public void get() throws IOException {
        Table table = connection.getTable(TableName.valueOf("bigdata2:person"));
        //1、查询整行数据: get '命名空间名称:表名',rowkey
        //Get get = new Get("1001".getBytes());
        //2、查询某个列的数据: get '命名空间名称:表名',rowkey,'列簇名:列限定符名称'
        //Get get = new Get("1001".getBytes());
        //get.addColumn("p1".getBytes(), "pname".getBytes());
        //3、查看某个列簇的数据: get '命名空间名称:表名',rowkey,'列簇名'
        //Get get = new Get("1001".getBytes());
        //get.addFamily("p1".getBytes());
        //4、查看某个时间戳的数据: get '命名空间名称:表名',rowkey,{COLUMN=>'列簇名:列限定符名称',TIMESTAMP=>时间戳}
        Get get = new Get("1003".getBytes());
        get.addColumn("p3".getBytes(),"pname".getBytes());
        //get.setTimestamp(1620898044350L);
        //5、查询多个版本的数据
        get.readVersions(6);
        //执行查询
        Result result = table.get(get);
        //结果
        List<Cell> cells = result.listCells();
        for (Cell cell : cells) {
            //获取rowkey
            String rowkey = new String(cell.getRowArray(), cell.getRowOffset(), cell.getRowLength());
            //获取列簇
            String family = new String(cell.getFamilyArray(), cell.getFamilyOffset(), cell.getFamilyLength());
            //获取列限定符
            String qualifier = new String(cell.getQualifierArray(), cell.getQualifierOffset(), cell.getQualifierLength());
            //获取值
            if(qualifier.equals("page") ){
                int value = Bytes.toInt(cell.getValueArray(), cell.getValueOffset(), cell.getValueLength());
                System.out.println("rowkey="+rowkey+",family="+family+",qualifier="+qualifier+",value="+value);
            }else{
                String value = new String(cell.getValueArray(), cell.getValueOffset(), cell.getValueLength());
                System.out.println("rowkey="+rowkey+",family="+family+",qualifier="+qualifier+",value="+value);
            }
        }
        table.close();
    }
4.2.4 扫描数据
  /**
     * 扫描数据
     *                 1、查询整表数据: scan '命名空间名称:表名'
     *                 2、查询查询某个列的数据: scan '命名空间名称:表名',{COLUMNS=>'列簇名:列限定符名称'}
     *                 3、查看某个列簇的数据: scan '命名空间名称:表名',{COLUMNS=>'列簇名'}
     *                 4、查看多个版本的数据:scan '命名空间名称:表名',{COLUMNS=>'列簇名',VERSIONS=>版本数}
     *                 5、查看指定rowkey范围段的数据: scan '命名空间名称:表名',{STARTKEY=>起始rowkey,STOPKEY=>结束rowkey} [查询结果不包含stopkey]
     * @throws Exception
     */
    @Test
    public void scan() throws Exception{
        //获取表对象
        Table table = connection.getTable(TableName.valueOf("bigdata2:person"));
        //封装数据
        //1、查询整表
        Scan scan = new Scan();
        //2、查询查询某个列的数据: scan '命名空间名称:表名',{COLUMNS=>'列簇名:列限定符名称'}
        //scan.addColumn("f1".getBytes(),"name".getBytes());
        //3、查看某个列簇的数据: scan '命名空间名称:表名',{COLUMNS=>'列簇名'}
        scan.addFamily("p3".getBytes());
        //4、查看多个版本的数据:scan '命名空间名称:表名',{COLUMNS=>'列簇名',VERSIONS=>版本数}
        scan.readVersions(3);
        //5、查看指定rowkey范围段的数据: scan '命名空间名称:表名',{STARTKEY=>起始rowkey,STOPKEY=>结束rowkey} [查询结果不包含stopkey]
        scan.withStartRow("1001".getBytes(),false);
        scan.withStopRow("1004".getBytes(),true);
        //查询
        ResultScanner scanner = table.getScanner(scan);
        //结果展示
        Iterator<Result> it = scanner.iterator();
        while (it.hasNext()){
            Result row = it.next();
            List<Cell> cells = row.listCells();
            for(Cell cell:cells){
                //获取rowkey
                String rowkey = new String(CellUtil.cloneRow(cell));
                //获取列簇
                String family = new String(CellUtil.cloneFamily(cell));
                //获取列限定符
                String qualifier = new String(CellUtil.cloneQualifier(cell));
                //获取值
                if(family.equals("p3") && qualifier.equals("page") ){
                    int value = Bytes.toInt(CellUtil.cloneValue(cell));
                    System.out.println("rowkey="+rowkey+",family="+family+",qualifier="+qualifier+",value="+value);
                }else{
                    String value = new String(CellUtil.cloneValue(cell));
                    System.out.println("rowkey="+rowkey+",family="+family+",qualifier="+qualifier+",value="+value);
                }
            }
        }
        //关闭
        table.close();
    }
4.2.5 删除数据
    /**
     * 删除数据
     * @throws Exception
     */
    @Test
    public void delete() throws Exception{
        //获取表对象
        Table table = connection.getTable(TableName.valueOf("bigdata2:person"));
        //封装数据
        //删除整行
        Delete delete = new Delete("1001".getBytes());
        //删除单个Cell
        delete.addColumn("p1".getBytes(),"pname".getBytes());
        //删除列簇
        delete.addFamily("p1".getBytes());
        //删除
        table.delete(delete);
        //关闭
        table.close();
    }
4.2.6 清空数据
    /**
     * 清空表
     * @throws Exception
     */
    @Test
    public void truncate() throws Exception{
        if(admin.tableExists(TableName.valueOf("bigdata2:person"))){
            //禁用表
            admin.disableTable(TableName.valueOf("bigdata2:person"));
            //清空表
            admin.truncateTable(TableName.valueOf("bigdata2:person"),false);
        }
    }
第5章 HBase优化
5.1 预分区
每一个region维护着StartRow与EndRow,如果加入的数据符合某个Region维护的RowKey范围,则该数据交给这个Region维护。那么依照这个原则,我们可以将数据所要投放的分区提前大致的规划好,以提高HBase性能。
1)手动设定预分区
create 'bigdata2:person4','p4',SPLITS=>['100','200','300','500']

2)生成16进制序列预分区
create 'bigdata2:person3', 'p3', {NUMREGIONS => 15, SPLITALGO => 'HexStringSplit'}
3)按照文件中设置的规则预分区,创建splits.txt文件内容如下:
vim /opt/module/hbase/splits.txt
aaa
bbb
ccc
ddd
eee
然后执行:
create 'bigdata2:person5','p5',SPLITS_FILE=>'/opt/module/hbase/splits.txt'

4)使用JavaAPI创建预分区
//自定义算法,产生一系列hash散列值存储在二维数组中
byte[][] splitKeys = 某个散列值函数
//创建HbaseAdmin实例
HBaseAdmin hAdmin = new HBaseAdmin(HbaseConfiguration.create());
//创建HTableDescriptor实例
HTableDescriptor tableDesc = new HTableDescriptor(tableName);
//通过HTableDescriptor实例和散列值二维数组创建带有预分区的Hbase表
hAdmin.createTable(tableDesc, splitKeys);
  @Test
    public void createTableAndPartition() throws IOException {
        //描述列族
        ColumnFamilyDescriptor p1 = ColumnFamilyDescriptorBuilder.newBuilder("p1".getBytes()).setMaxVersions(3).build();
        ColumnFamilyDescriptor p2 = ColumnFamilyDescriptorBuilder.newBuilder("p2".getBytes()).setMaxVersions(3).build();
        //创建表构造器并添加列族
        TableDescriptor build = TableDescriptorBuilder.newBuilder(TableName.valueOf("bigdata2:person2"))
                .setColumnFamily(p1)
                .setColumnFamily(p2)
                .build();
        //执行创建操作
        admin.createTable(build,"1".getBytes(),"3".getBytes(),4);
    }
5.2 RowKey设计
Rowkey设计原则:
1、 长度原则: rowkey的长度不能太长,一般保持在16字节以下
2、 唯一性原则: 数据写入的时候两条数据的rowkey不能相同
3、 Hash原则: 保证数据分散存储
热点问题解决方案:
一条数据的唯一标识就是RowKey,那么这条数据存储于哪个分区,取决于RowKey处于哪个一个预分区的区间内,设计RowKey的主要目的 ,就是让数据均匀的分布于所有的region中,在一定程度上防止数据倾斜。接下来我们就谈一谈RowKey常用的设计方案。
1)生成随机数、hash、散列值,比如:
原本rowKey为1001的,SHA1后变成:dd01903921ea24941c26a48f2cec24e0bb0e8cc7
原本rowKey为3001的,SHA1后变成:49042c54de64a1e9bf0b33e00245660ef92dc7bd
原本rowKey为5001的,SHA1后变成:7b61dec07e02c188790670af43e717f0f46e8913
在做此操作之前,一般我们会选择从数据集中抽取样本,来决定什么样的rowKey来Hash后作为每个分区的临界值。
2)字符串反转
20170524000001转成10000042507102
20170524000002转成20000042507102
这样也可以在一定程度上散列逐步put进来的数据。
3)字符串拼接
20170524000001_a12e
20170524000001_93i7
5.3 内存优化
HBase操作过程中需要大量的内存开销,毕竟Table是可以缓存在内存中的,一般会分配整个可用内存的70%给HBase的Java堆。但是不建议分配非常大的堆内存,因为GC过程持续太久会导致RegionServer处于长期不可用状态,一般16~48G内存就可以了,如果因为框架占用内存过高导致系统内存不足,框架一样会被系统服务拖死。
5.4 基础优化
1)允许在HDFS的文件中追加内容,hdfs-site.xml、hbase-site.xml
属性:dfs.support.append
解释:开启HDFS追加同步,可以优秀的配合HBase的数据同步和持久化。默认值为true。
2)优化DataNode允许的最大文件打开数,hdfs-site.xml
属性:dfs.datanode.max.transfer.threads
解释:HBase一般都会同一时间操作大量的文件,根据集群的数量和规模以及数据动作,设置为4096或者更高。默认值:4096
3)优化延迟高的数据操作的等待时间,hdfs-site.xml
属性:dfs.image.transfer.timeout
解释:如果对于某一次数据操作来讲,延迟非常高,socket需要等待更长的时间,建议把该值设置为更大的值(默认60000毫秒),以确保socket不会被timeout掉。
4)优化数据的写入效率,mapred-site.xml
属性:mapreduce.map.output.compress、mapreduce.map.output.compress.codec
解释:开启这两个数据可以大大提高文件的写入效率,减少写入时间。第一个属性值修改为true,第二个属性值修改为:org.apache.hadoop.io.compress.GzipCodec或者其他压缩方式。
5)设置RPC监听数量,hbase-site.xml
属性:hbase.regionserver.handler.count
解释:默认值为30,用于指定RPC监听的数量,可以根据客户端的请求数进行调整,读写请求较多时,增加此值。
6)优化HStore文件大小,hbase-site.xml
属性:hbase.hregion.max.filesize
解释:默认值10737418240(10GB),如果需要运行HBase的MR任务,可以减小此值,因为一个region对应一个map任务,如果单个region过大,会导致map任务执行时间过长。该值的意思就是,如果HFile的大小达到这个数值,则这个region会被切分为两个Hfile。
7)优化HBase客户端缓存,hbase-site.xml
属性:hbase.client.write.buffer
解释:用于指定HBase客户端缓存,增大该值可以减少RPC调用次数,但是会消耗更多内存,反之亦然。一般我们需要设定一定的缓存大小,以达到减少RPC次数的目的。
8)指定scan.next扫描HBase所获取的行数,hbase-site.xml
属性:hbase.client.scanner.caching
解释:用于指定scan.next方法获取的默认行数,值越大,消耗内存越大。
9)flush、compact、split机制
当MemStore达到阈值,将Memstore中的数据Flush进Storefile;compact机制则是把flush出来的小文件合并成大的Storefile文件。split则是当Region达到阈值,会把过大的Region一分为二。
属性:
hbase.hregion.memstore.flush.size:134217728
hbase.regionserver.global.memstore.size.lower.limit 0.95
hbase.regionserver.global.memstore.size 0.4
第6章 整合Phoenix
6.1 Phoenix简介
6.1.1 Phoenix定义
Phoenix是HBase的开源SQL皮肤。可以使用标准JDBC API代替HBase客户端API来创建表,插入数据和查询HBase数据。
6.1.2 Phoenix特点
1)容易集成:如Spark,Hive,Pig,Flume和Map Reduce;
2)操作简单:DML命令以及通过DDL命令创建和操作表和版本化增量更改;
3)支持HBase二级索引创建。
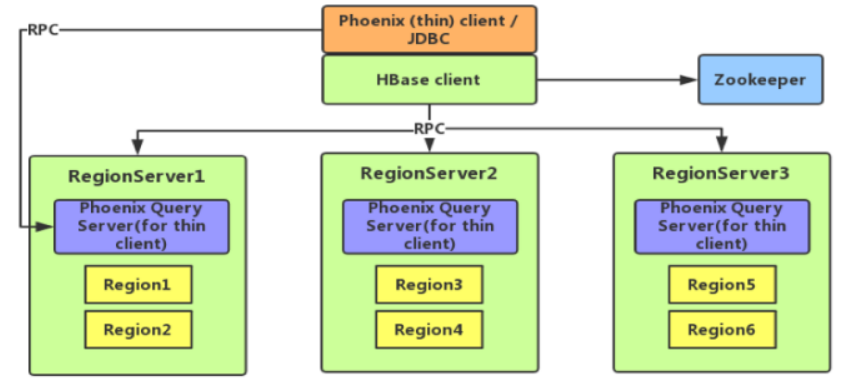
6.1.3 Phoenix架构
6.2 Phoenix快速入门
6.2.1 安装
1)官网地址:http://phoenix.apache.org/
2)Phoenix部署
(1)上传并解压tar包,然后重命名
tar -zxvf /opt/software/apache-phoenix-5.0.0-HBase-2.0-bin.tar.gz -C /opt/module
mv /opt/module/apache-phoenix-5.0.0-HBase-2.0-bin /opt/module/phoenix
(2)配置环境变量
sudo vim /etc/profile.d/my_env.sh
#PHOENIX_HOME
export PHOENIX_HOME=/opt/module/phoenix
export PATH=$PATH:$PHOENIX_HOME/bin
source /etc/profile.d/my_env.sh
(3)复制server包并拷贝到各个节点的hbase/lib
cp /opt/module/phoenix/phoenix-5.0.0-HBase-2.0-server.jar /opt/module/hbase/lib/
xsync /opt/module/hbase/lib/phoenix-5.0.0-HBase-2.0-server.jar
(4)重启HBase
stop-hbase.sh
start-hbase.sh
(5)连接Phoenix
sqlline.py
6.2.2 Phoenix Shell操作
1)表的操作
(1)显示所有表
!table 或 !tables
(2)创建表,直接指定单个列作为RowKey
CREATE TABLE IF NOT EXISTS student(
id VARCHAR primary key,
name VARCHAR
)COLUMN_ENCODED_BYTES = 0;
在phoenix中,表名等会自动转换为大写,若要小写,使用双引号,如"us_population"。
COLUMN_ENCODED_BYTES = 0 表示禁用列映射,即不让 Phoenix 对 column family(列族) 进行编码
(3)创建表指定多个列的联合作为RowKey
CREATE TABLE IF NOT EXISTS population (
State CHAR(2) NOT NULL,
City VARCHAR NOT NULL,
Population BIGINT
CONSTRAINT my_pk PRIMARY KEY (state, city)
)COLUMN_ENCODED_BYTES = 0;
(4)插入数据
upsert into student values('1001','zhangsan');
(5)查询记录
select * from student;
select * from student where id='1001';
(6)删除记录
delete from student where id='1001';
(7)删除表
drop table student;
(8)退出命令行
!quit
2)表的映射
(1)表的关系
默认情况下,直接在HBase中创建的表,通过Phoenix是查看不到的。如果要在Phoenix中操作直接在HBase中创建的表,则需要在Phoenix中进行表的映射。映射方式有两种:视图映射和表映射。
(2)命令行中创建表test,HBase 中test的表结构如下,两个列族info1、info2
|
Rowkey |
info1 |
info2 |
|
id |
name |
address |
(3)启动HBase Shell
hbase shell
(4)创建HBase表test
create 'test','info1','info2'
3)视图映射
(1)Phoenix创建的视图是只读的,所以只能用来做查询,无法通过视图对源数据进行修改等操作。在phoenix中创建关联test表的视图
create view "test"(
id varchar primary key,
"info1"."name" varchar,
"info2"."address" varchar
)COLUMN_ENCODED_BYTES = 0;
(2)查询视图
select * from "test";
(3)删除视图(hbase上的表不会被删除)
drop view "test";
4)表映射,使用Apache Phoenix创建对HBase的表映射,有两种方法:
a.HBase中不存在表时,可以直接使用create table指令创建需要的表,系统将会自动在Phoenix和HBase中创建person_infomation的表,并会根据指令内的参数对表结构进行初始化。
b.当HBase中已经存在表时,可以以类似创建视图的方式创建关联表,只需要将create view改为create table即可。(当删除该表时,hbase上的表也会被删除)
create table "test"(
id varchar primary key,
"info1"."name" varchar,
"info2"."address" varchar
) column_encoded_bytes=0;
5)命名空间表映射,Phoenix默认不能映射命名空间的表,如果需要映射则修改hbase的hbase-site.xml与phoenix中的hbase-site.xml
(1) 修改/opt/module/hbase/conf/hbase-site.xml与/opt/module/phoenix/bin/hbase-site.xml的配置文件
<property>
        <name>phoenix.schema.isNamespaceMappingEnabled</name>
        <value>true</value>
</property>
<property>
        <name>phoenix.schema.mapSystemTablesToNamespace</name>
        <value>true</value>
</property>
(2) 分发/opt/module/hbase/conf/hbase-site.xml
xsync /opt/module/hbase/conf/hbase-site.xml
(3) 创建schema(注意: schema的名称必须与命名空间的名称一致)
create schema "big"
(4)使用schema
use "big"
(5) 建立映射
create table "big"."person"(
id varchar primary key,
"base_info"."name" varchar,
"base_info"."age" varchar
)COLUMN_ENCODED_BYTES=0;
6.2.3 Phoenix JDBC操作
1)启动queryServer服务
queryserver.py
2)创建项目并导入依赖
<dependencies>
<dependency>
       <groupId>org.apache.phoenix</groupId>
       <artifactId>phoenix-queryserver-client</artifactId>
       <version>5.0.0-HBase-2.0</version>
    </dependency>
    <dependency>
       <groupId>org.apache.httpcomponents</groupId>
       <artifactId>httpclient</artifactId>
       <version>4.5.6</version>
       <scope>provided</scope>
   </dependency>
   <dependency>
       <groupId>com.google.protobuf</groupId>
       <artifactId>protobuf-java</artifactId>
       <version>3.5.1</version>
   </dependency>
   <dependency>
       <groupId>io.grpc</groupId>
       <artifactId>grpc-netty</artifactId>
       <version>1.10.0</version>
   </dependency>
<dependency>
        <groupId>junit</groupId>
        <artifactId>junit</artifactId>
        <version>4.12</version>
    </dependency>
</dependencies>
3)编写代码
package com.yuange.phoenix;

import org.apache.phoenix.queryserver.client.ThinClientUtil;
import org.junit.After;
import org.junit.Before;
import org.junit.Test;
import java.sql.*;

public class TestPhoenix {

    private Connection connection;
    private PreparedStatement preparedStatement;

    @Before
    public void init() throws Exception {
        Class.forName("org.apache.phoenix.queryserver.client.Driver");
        String url = ThinClientUtil.getConnectionUrl("hadoop102",8765);
        connection = DriverManager.getConnection(url);
        connection.setAutoCommit(true);
    }

    @After
    public void after() throws SQLException {
        if (connection!=null){
            connection.close();
        }
    }

    /**
     * 创建表
     * */
    @Test
    public void createTable() throws SQLException {
        //预编译
        preparedStatement = connection.prepareStatement("create table student(" +
                "id varchar primary key," +
                "name varchar," +
                "age varchar)COLUMN_ENCODED_BYTES=0");
        //执行
        preparedStatement.execute();
    }

    /**
     * 插入数据
     * */
    @Test
    public void upsert() throws SQLException {
        preparedStatement = connection.prepareStatement("upsert into student values(?,?,?)");
        //设置参数
        preparedStatement.setString(1,"1001");
        preparedStatement.setString(2,"张三");
        preparedStatement.setString(3,"19");
        preparedStatement.execute();
    }

    /**
     * 批量插入
     * */
    @Test
    public void upsertBatch() throws SQLException {
        preparedStatement = connection.prepareStatement("upsert into student values(?,?,?)");
        for (int i = 0; i < 1200; i++) {
            preparedStatement.setString(1,"200"+i);
            preparedStatement.setString(2,"王昭君"+i);
            preparedStatement.setString(3,""+(i+20));
            if (i%500==0){
                //提交批量数据
                preparedStatement.executeBatch();
                //清空批次数据
                preparedStatement.clearBatch();
            }
            //将剩余的SQL语句执行完
            preparedStatement.executeBatch();
        }
    }

    /**
     * 查询数据
     * */
    @Test
    public void select() throws SQLException {
        preparedStatement = connection.prepareStatement("select * from student where id > ?");
        preparedStatement.setString(1,"2000");
        ResultSet resultSet = preparedStatement.executeQuery();
        while (resultSet.next()){
            String id = resultSet.getString("id");
            String name = resultSet.getString("name");
            String age = resultSet.getString("age");
            System.out.println("id="+id+",name="+name+",age="+age);
        }
    }

    /**
     * 删除数据
     * */
    @Test
    public void delete() throws SQLException {
        preparedStatement = connection.prepareStatement("delete from student where id > ?");
        preparedStatement.setString(1,"2000");
        int i = preparedStatement.executeUpdate();
        System.out.println("删除了"+i+"条数据");
    }

    /**
     * 删除表
     * */
    @Test
    public void dropTable() throws SQLException {
        preparedStatement  = connection.prepareStatement("drop table student");
        preparedStatement.execute();
    }
}
6.3 Phoenix二级索引
6.3.1 HBase协处理器(扩展)
案例需求:编写协处理器,实现在往A表插入数据的同时让HBase自身(协处理器)向B表中插入一条数据。
实现步骤:
1)在hbase的shell窗口创建A表和B表
create 'A','f1'
create 'B','f1'
2)创建一个maven项目,并引入以下依赖。
<dependencies>
    <dependency>
        <groupId>org.apache.hbase</groupId>
        <artifactId>hbase-client</artifactId>
        <version>2.0.5</version>
        <scope>provided</scope>
</dependency>

    <dependency>
        <groupId>org.apache.hbase</groupId>
        <artifactId>hbase-server</artifactId>
        <version>2.0.5</version>
        <scope>provided</scope>
    </dependency>
</dependencies>
<build>
    <plugins>
        <plugin>
            <artifactId>maven-compiler-plugin</artifactId>
            <version>2.3.2</version>
            <configuration>
                <source>1.8</source>
                <target>1.8</target>
            </configuration>
        </plugin>
        <plugin>
            <artifactId>maven-assembly-plugin</artifactId>
            <configuration>
                <descriptorRefs>
                    <descriptorRef>jar-with-dependencies</descriptorRef>
                </descriptorRefs>
            </configuration>
            <executions>
                <execution>
                    <id>make-assembly</id>
                    <phase>package</phase>
                    <goals>
                        <goal>single</goal>
                    </goals>
                </execution>
            </executions>
        </plugin>
    </plugins>
</build>
3)定义MyCoprocessor类并实现RegionObserver和RegionCoprocessor接口
package com.yuange.phoenix;

import org.apache.hadoop.conf.Configuration;
import org.apache.hadoop.hbase.HBaseConfiguration;
import org.apache.hadoop.hbase.TableName;
import org.apache.hadoop.hbase.client.*;
import org.apache.hadoop.hbase.coprocessor.ObserverContext;
import org.apache.hadoop.hbase.coprocessor.RegionCoprocessor;
import org.apache.hadoop.hbase.coprocessor.RegionCoprocessorEnvironment;
import org.apache.hadoop.hbase.coprocessor.RegionObserver;
import org.apache.hadoop.hbase.wal.WALEdit;
import java.io.IOException;
import java.util.Optional;

public class MyCoprocessor implements RegionObserver, RegionCoprocessor {


    @Override
    public Optional<RegionObserver> getRegionObserver() {
        return Optional.of(this);
    }

    @Override
    public void postPut(ObserverContext<RegionCoprocessorEnvironment> c, Put put, WALEdit edit, Durability durability) throws IOException {
        Configuration conf = HBaseConfiguration.create();
        conf.set("hbase.zookeeper.quorum","hadoop102:2181,hadoop103:2181,hadoop104:2181");
        //获取连接
        Connection connection = ConnectionFactory.createConnection(conf);
        //获取表对象
        Table table = connection.getTable(TableName.valueOf("B"));
        //插入数据
        table.put(put);
        //关闭资源
        table.close();
        connection.close();
    }
}
4)通过重启的方式加载协处理器
(1)打包放入HBase的lib目录下
(2)分发jar包并重启HBase
(3)建表时指定注册协处理器即可
/*
     * MyCoprocessor
     * */
    @Test
    public void createTableMyCoprocessor() throws IOException {
        //描述列族
        ColumnFamilyDescriptor p1 = ColumnFamilyDescriptorBuilder.newBuilder("f1".getBytes()).build();
        //创建表构造器并添加列族
        TableDescriptor build = TableDescriptorBuilder.newBuilder(TableName.valueOf("C"))
                .setColumnFamily(p1)
                //指定协处理器
                .setCoprocessor("com.yuange.phoenix.MyCoprocessor")
                .build();
        //执行创建操作
        admin.createTable(build);
    }

    /*
     * 添加数据
     * */
    @Test
    public void putDataMyCoprocessor() throws IOException {
        //获取table对象
        Table table = connection.getTable(TableName.valueOf("A"));
        //row key(唯一标识)
        Put put = new Put("1001".getBytes());
        //family(列族)、qualifier(字段名)、value(字段值)
        put.addColumn("f1".getBytes(),"pname".getBytes(),"张三".getBytes());
        put.addColumn("f1".getBytes(),"page".getBytes(), Bytes.toBytes(20));
        put.addColumn("f1".getBytes(),"address".getBytes(),"广西".getBytes());
        table.put(put);
        table.close();
    }

    /*
     * 根据rowkey查询数据
     * 查看某个列簇的数据: get '命名空间名称:表名',rowkey,'列簇名'
     * */
    @Test
    public void getMyCoprocessor() throws IOException {
        Table table = connection.getTable(TableName.valueOf("B"));
        //查看某个列簇的数据: get '命名空间名称:表名',rowkey,'列簇名'
        Get get = new Get("1001".getBytes());
        get.addFamily("f1".getBytes());
        //执行查询
        Result result = table.get(get);
        //结果
        List<Cell> cells = result.listCells();
        for (Cell cell : cells) {
            //获取rowkey
            String rowkey = new String(cell.getRowArray(), cell.getRowOffset(), cell.getRowLength());
            //获取列簇
            String family = new String(cell.getFamilyArray(), cell.getFamilyOffset(), cell.getFamilyLength());
            //获取列限定符
            String qualifier = new String(cell.getQualifierArray(), cell.getQualifierOffset(), cell.getQualifierLength());
            //获取值
            if(qualifier.equals("page") ){
                int value = Bytes.toInt(cell.getValueArray(), cell.getValueOffset(), cell.getValueLength());
                System.out.println("rowkey="+rowkey+",family="+family+",qualifier="+qualifier+",value="+value);
            }else{
                String value = new String(cell.getValueArray(), cell.getValueOffset(), cell.getValueLength());
                System.out.println("rowkey="+rowkey+",family="+family+",qualifier="+qualifier+",value="+value);
            }
        }
        table.close();
    }
5)通过不重启的方式动态加载协处理器:
(1) 给hbase-site.xml中添加配置,防止协处理器异常导致集群停机
vim /opt/module/hbase/conf/hbase-site.xml
<property>
  <name>hbase.coprocessor.abortonerror</name>
  <value>false</value>
</property>
xsync /opt/module/hbase/conf/hbase-site.xml
(2) 打成jar包并修改jar包名称为c1.jar然后至上传hdfs,比如存放路径为 hdfs://hadoop102:9820/c1.jar
![]()
(3) 在hbase的shell窗口禁用表:
disable 'A'
(4) 加载协处理器:alter '表名', METHOD => 'table_att', 'Coprocessor'=>'jar所处HDFS路径| 协处理器所在的全类名|优先级|参数'
alter 'A',METHOD=>'table_att','Coprocessor'=>'hdfs://hadoop102:8020/c1.jar|com.yuange.phoenix.MyCoprocessor|134|'
(5) 启动表:
enable 'A'
(6) 向A表插入数据,观察B表是否同步有数据插入
put 'A','1001','f1:name','zhangsan'
scan 'B'

6.3.2 二级索引配置文件
1)添加如下配置到HBase的HRegionserver节点的hbase-site.xml
vim /opt/module/hbase/conf/hbase-site.xml
<!-- phoenix regionserver 配置参数-->
    <property>
        <name>hbase.regionserver.wal.codec</name>
        <value>org.apache.hadoop.hbase.regionserver.wal.IndexedWALEditCodec</value>
    </property>

    <property>
        <name>hbase.region.server.rpc.scheduler.factory.class</name>
        <value>org.apache.hadoop.hbase.ipc.PhoenixRpcSchedulerFactory</value>
        <description>Factory to create the Phoenix RPC Scheduler that uses separate queues for index and metadata updates</description>
    </property>

    <property>
        <name>hbase.rpc.controllerfactory.class</name>
        <value>org.apache.hadoop.hbase.ipc.controller.ServerRpcControllerFactory</value>
        <description>Factory to create the Phoenix RPC Scheduler that uses separate queues for index and metadata updates</description>
    </property>
2)分发配置
xsync /opt/module/hbase/conf/hbase-site.xml
3)重启HBase
stop-hbase.sh
start-hbase.sh
6.3.3 全局二级索引
Global Index是默认的索引格式,创建全局索引时,会在HBase中建立一张新表。也就是说索引数据和数据表是存放在不同的表中的,因此全局索引适用于多读少写的业务场景。写数据的时候会消耗大量开销,因为索引表也要更新,而索引表是分布在不同的数据节点上的,跨节点的数据传输带来了较大的性能消耗。在读数据的时候Phoenix会选择索引表来降低查询消耗的时间。
1)启动sqlline.py
sqlline.py
2)创建表
create table teacher(
id varchar primary key,
name varchar,
age varchar
)COLUMN_ENCODED_BYTES=0;
3)添加数据
upsert into teacher values('1001','zhangsan','29');
upsert into teacher values('1001','lisi','25');
upsert into teacher values('1001','wangwu','22');
4)创建单个字段的全局索引(如果想查询的字段不是索引字段的话索引表不会被使用,也就是说不会带来查询速度的提升)
CREATE INDEX teacher_index ON teacher(name);

5)查看查询计划
explain select name from teacher where name='zhangsan';

6)创建携带其他字段的全局索引
CREATE INDEX teacher2_index ON teacher (name) INCLUDE (age);

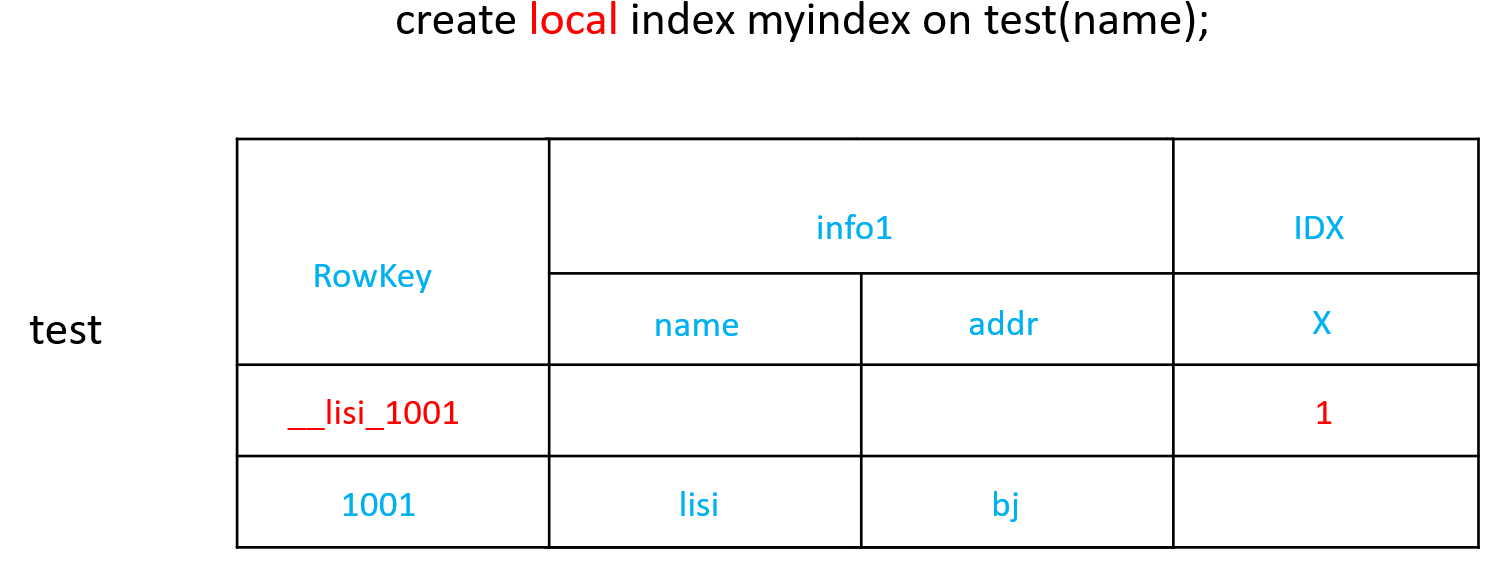
6.3.4 本地二级索引
Local Index适用于写操作频繁的场景。索引数据和数据表的数据是存放在同一张表中(且是同一个Region),避免了在写操作的时候往不同服务器的索引表中写索引带来的额外开销。查询的字段不是索引字段索引表也会被使用,这会带来查询速度的提升。
CREATE LOCAL INDEX teacher_local_index ON teacher(name);
第7章 与Hive的集成
7.1 HBase与Hive的对比
1.Hive
(1) 数据仓库
Hive的本质其实就相当于将HDFS中已经存储的文件在Mysql中做了一个双射关系,以方便使用HQL去管理查询。
(2) 用于数据分析、清洗
Hive适用于离线的数据分析和清洗,延迟较高。
(3) 基于HDFS、MapReduce
Hive存储的数据依旧在DataNode上,编写的HQL语句终将是转换为MapReduce代码执行。
2.HBase
(1) 数据库
是一种面向列族存储的非关系型数据库。
(2) 用于存储结构化和非结构化的数据
适用于单表非关系型数据的存储,不适合做关联查询,类似JOIN等操作。
(3) 基于HDFS
数据持久化存储的体现形式是HFile,存放于DataNode中,被ResionServer以region的形式进行管理。
(4) 延迟较低,接入在线业务使用
面对大量的企业数据,HBase可以直线单表大量数据的存储,同时提供了高效的数据访问速度。
7.2 HBase与Hive集成使用
在hive-site.xml中修改zookeeper的属性,如下:
vim /opt/module/hive/conf/hive-site.xml
<property>
        <name>hive.zookeeper.quorum</name>
        <value>hadoop102,hadoop103,hadoop104</value>
    </property>

    <property>
        <name>hive.zookeeper.client.port</name>
        <value>2181</value>
    </property>
1.案例一
目标:建立Hive表,关联HBase表,插入数据到Hive表的同时能够影响HBase表。
分步实现:
1)在Hive中创建表同时关联HBase(提示:完成之后,可以分别进入Hive和HBase查看,都生成了对应的表)
CREATE TABLE hive_hbase_emp_table(
empno int,
ename string,
job string,
mgr int,
hiredate string,
sal double,
comm double,
deptno int)
STORED BY 'org.apache.hadoop.hive.hbase.HBaseStorageHandler'
WITH SERDEPROPERTIES ("hbase.columns.mapping" = ":key,info:ename,info:job,info:mgr,info:hiredate,info:sal,info:comm,info:deptno")
TBLPROPERTIES ("hbase.table.name" = "hbase_emp_table");
2)在Hive中创建临时中间表,用于load文件中的数据(提示:不能将数据直接load进Hive所关联HBase的那张表中)
CREATE TABLE emp(
empno int,
ename string,
job string,
mgr int,
hiredate string,
sal double,
comm double,
deptno int)
row format delimited fields terminated by '\t';
3)向Hive中间表中load数据
load data local inpath '/home/admin/softwares/data/emp.txt' into table emp;
4)通过insert命令将中间表中的数据导入到Hive关联Hbase的那张表中
insert into table hive_hbase_emp_table select * from emp;
5)查看Hive以及关联的HBase表中是否已经成功的同步插入了数据
select * from hive_hbase_emp_table;
scan 'hbase_emp_table'
2.案例二
目标:在HBase中已经存储了某一张表hbase_emp_table,然后在Hive中创建一个外部表来关联HBase中的hbase_emp_table这张表,使之可以借助Hive来分析HBase这张表中的数据。
注:该案例2紧跟案例1的脚步,所以完成此案例前,请先完成案例1。
分步实现:
1)在Hive中创建外部表
CREATE EXTERNAL TABLE relevance_hbase_emp(
empno int,
ename string,
job string,
mgr int,
hiredate string,
sal double,
comm double,
deptno int)
STORED BY
'org.apache.hadoop.hive.hbase.HBaseStorageHandler'
WITH SERDEPROPERTIES ("hbase.columns.mapping" =
":key,info:ename,info:job,info:mgr,info:hiredate,info:sal,info:comm,info:deptno")
TBLPROPERTIES ("hbase.table.name" = "hbase_emp_table");
2)关联后就可以使用Hive函数进行一些分析操作了
select * from relevance_hbase_emp;

 浙公网安备 33010602011771号