第1章 Flume概述
1.1 Flume定义
Flume是Cloudera提供的一个高可用的,高可靠的,分布式的海量日志采集、聚合和传输的系统。Flume基于流式架构,灵活简单。
Flume最主要的作用:实时读取服务器本地磁盘的数据,将数据写入到HDFS。

1.2 Flume基础架构
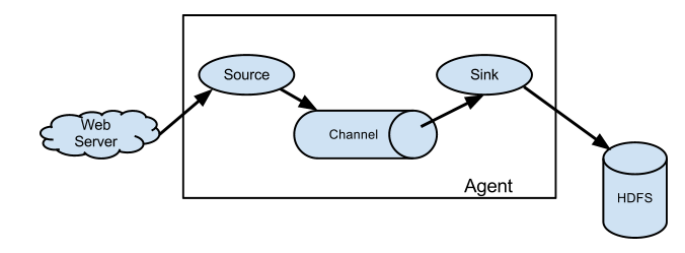
Flume组成架构如下图所示:
1.2.1 Agent
Agent是一个JVM进程,它以事件的形式将数据从源头送至目的。
Agent主要有3个部分组成,Source、Channel、Sink。
1.2.2 Source
Source是负责接收数据到Flume Agent的组件。Source组件可以处理各种类型、各种格式的日志数据,包括avro、thrift、exec、jms、spooling directory、netcat、sequence generator、syslog、http、legacy。
1.2.3 Sink
Sink不断地轮询Channel中的事件且批量地移除它们,并将这些事件批量写入到存储或索引系统、或者被发送到另一个Flume Agent。
Sink组件目的地包括hdfs、logger、avro、thrift、ipc、file、HBase、solr、自定义。
1.2.4 Channel
Channel是位于Source和Sink之间的缓冲区。因此,Channel允许Source和Sink运作在不同的速率上。Channel是线程安全的,可以同时处理几个Source的写入操作和几个Sink的读取操作。
Flume自带两种Channel:Memory Channel和File Channel。
Memory Channel是内存中的队列。Memory Channel在不需要关心数据丢失的情景下适用。如果需要关心数据丢失,那么Memory Channel就不应该使用,因为程序死亡、机器宕机或者重启都会导致数据丢失。
File Channel将所有事件写到磁盘。因此在程序关闭或机器宕机的情况下不会丢失数据。
1.2.5 Event
传输单元,Flume数据传输的基本单元,以Event的形式将数据从源头送至目的地。Event由Header和Body两部分组成,Header用来存放该event的一些属性,为K-V结构,Body用来存放该条数据,形式为字节数组。

第2章 Flume入门
2.1 Flume安装部署
2.1.1 安装地址
(1)Flume官网地址:http://flume.apache.org/
(2)文档查看地址:http://flume.apache.org/FlumeUserGuide.html
(3)下载地址:http://archive.apache.org/dist/flume/
2.1.2 安装部署
(1)将apache-flume-1.9.0-bin.tar.gz上传到linux的/opt/software目录下
(2)解压apache-flume-1.9.0-bin.tar.gz到/opt/module/目录下
tar -zxvf /opt/software/apache-flume-1.9.0-bin.tar.gz -C /opt/module/
(3)修改apache-flume-1.9.0-bin的名称为flume
mv /opt/module/apache-flume-1.9.0-bin /opt/module/flume
(4)将lib文件夹下的guava-11.0.2.jar删除以兼容Hadoop 3.1.3
rm /opt/module/flume/lib/guava-11.0.2.jar
2.2 Flume入门案例
2.2.1 监控端口数据官方案例
1)案例需求:
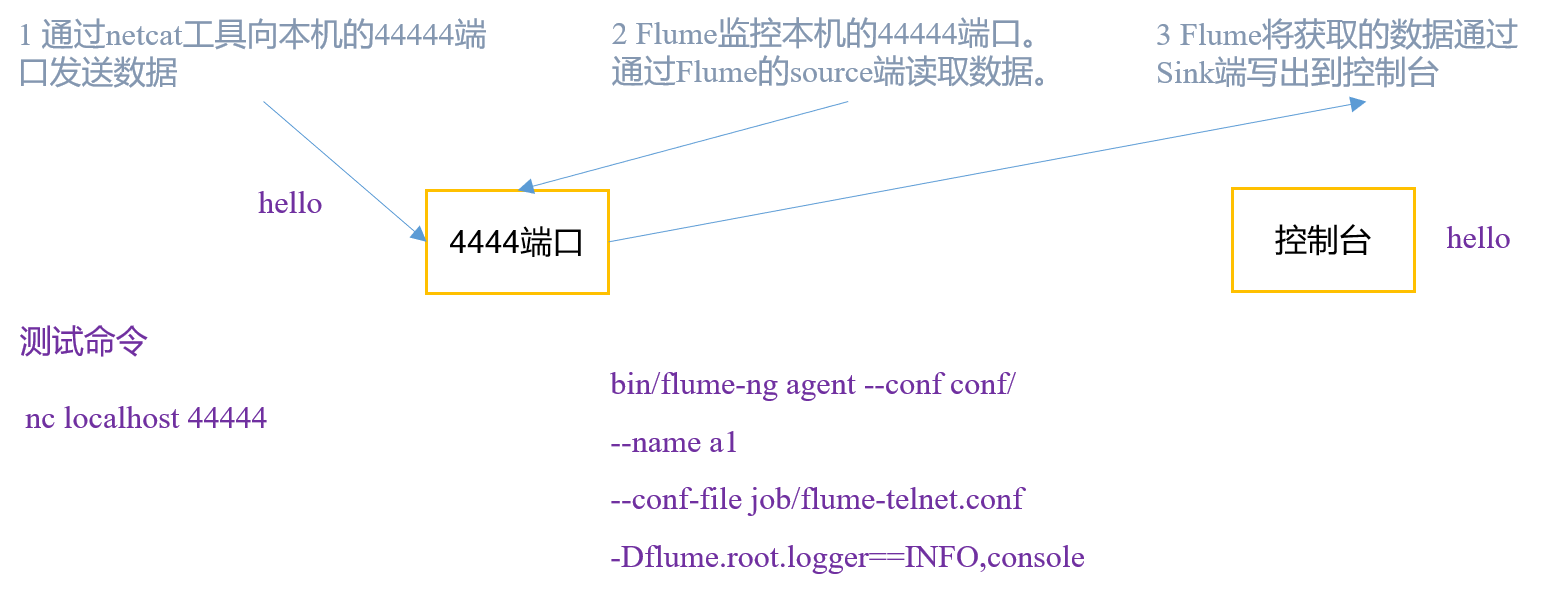
使用Flume监听一个端口,收集该端口数据,并打印到控制台。
2)需求分析:
3)实现步骤:
(1)安装netcat工具
sudo yum install -y nc
(2)判断44444端口是否被占用
sudo netstat -anp | grep 44444
(3)创建Flume Agent配置文件flume-netcat-logger.conf,在flume目录下创建job文件夹并进入job文件夹。

在job文件夹下创建Flume Agent配置文件flume-netcat-logger.conf。
vim flume-netcat-logger.conf

在flume-netcat-logger.conf文件中添加如下内容:
# Name the components on this agent
a1.sources = r1
a1.sinks = k1
a1.channels = c1

# Describe/configure the source
a1.sources.r1.type = netcat
a1.sources.r1.bind = hadoop102
a1.sources.r1.port = 44444

# Describe the sink
a1.sinks.k1.type = logger

# Use a channel which buffers events in memory
a1.channels.c1.type = memory
a1.channels.c1.capacity = 1000
a1.channels.c1.transactionCapacity = 100

# Bind the source and sink to the channel
a1.sources.r1.channels = c1
a1.sinks.k1.channel = c1
注:配置文件来源于官方手册http://flume.apache.org/FlumeUserGuide.html
(4)先开启flume监听端口
第一种写法:
bin/flume-ng agent --conf conf/ --name a1 --conf-file job/flume-netcat-logger.conf -Dflume.root.logger=INFO,console
第二种写法:
bin/flume-ng agent -c conf/ -n a1 -f job/flume-netcat-logger.conf -Dflume.root.logger=INFO,console
参数说明:
--conf/-c:表示配置文件存储在conf/目录
--name/-n:表示给agent起名为a1
--conf-file/-f:flume本次启动读取的配置文件是在job文件夹下的flume-telnet.conf文件。
-Dflume.root.logger=INFO,console :-D表示flume运行时动态修改flume.root.logger参数属性值,并将控制台日志打印级别设置为INFO级别。日志级别包括:log、info、warn、error。
(5)使用netcat工具向本机的44444端口发送内容
nc hadoop102 44444

(6)在Flume监听页面观察接收数据情况
![]()
2.2.2 实时监控单个追加文件
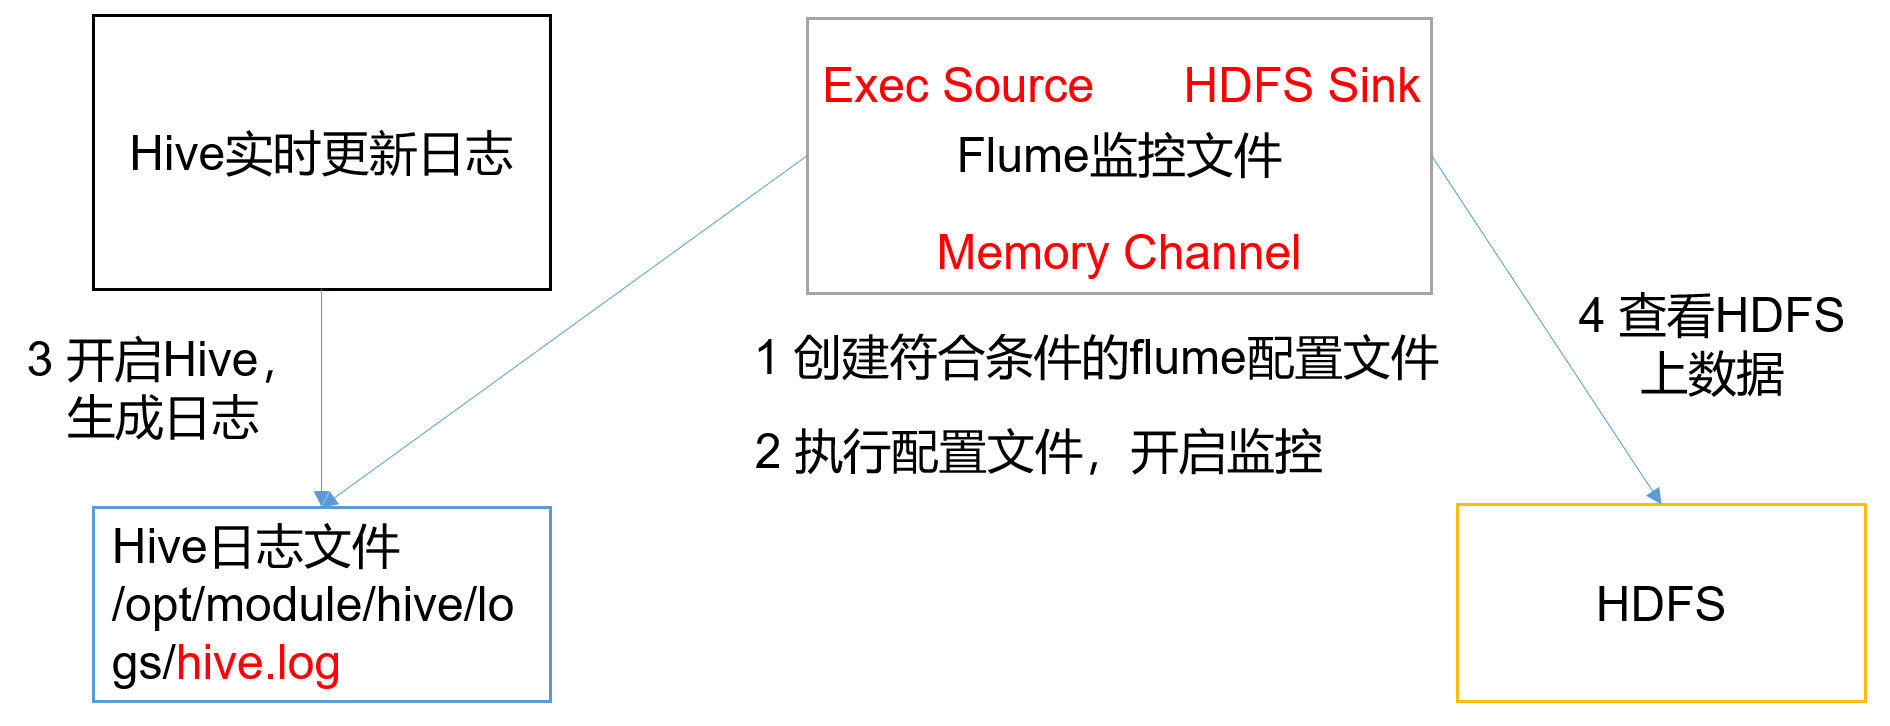
1)案例需求:实时监控Hive日志,并上传到HDFS中
2)需求分析:
3)实现步骤:
(1)Flume要想将数据输出到HDFS,依赖Hadoop相关jar包,检查/etc/profile.d/my_env.sh文件,确认Hadoop和Java环境变量配置正确
#JAVA_HOME
export JAVA_HOME=/opt/module/jdk1.8.0_212
export PATH=$PATH:$JAVA_HOME/bin

##HADOOP_HOME
export HADOOP_HOME=/opt/module/hadoop-3.1.3
export PATH=$PATH:$HADOOP_HOME/bin
export PATH=$PATH:$HADOOP_HOME/sbin

##ZOOKEEPER_HOME
export ZOOKEEPER_HOME=/opt/module/zookeeper
export PATH=$PATH:$ZOOKEEPER_HOME/bin

#HIVE_HOME
export HIVE_HOME=/opt/module/hive
export PATH=$PATH:$HIVE_HOME/bin

(2)创建flume-file-hdfs.conf文件
vim flume-file-hdfs.conf
注:要想读取Linux系统中的文件,就得按照Linux命令的规则执行命令。由于Hive日志在Linux系统中所以读取文件的类型选择:exec即execute执行的意思。表示执行Linux命令来读取文件。
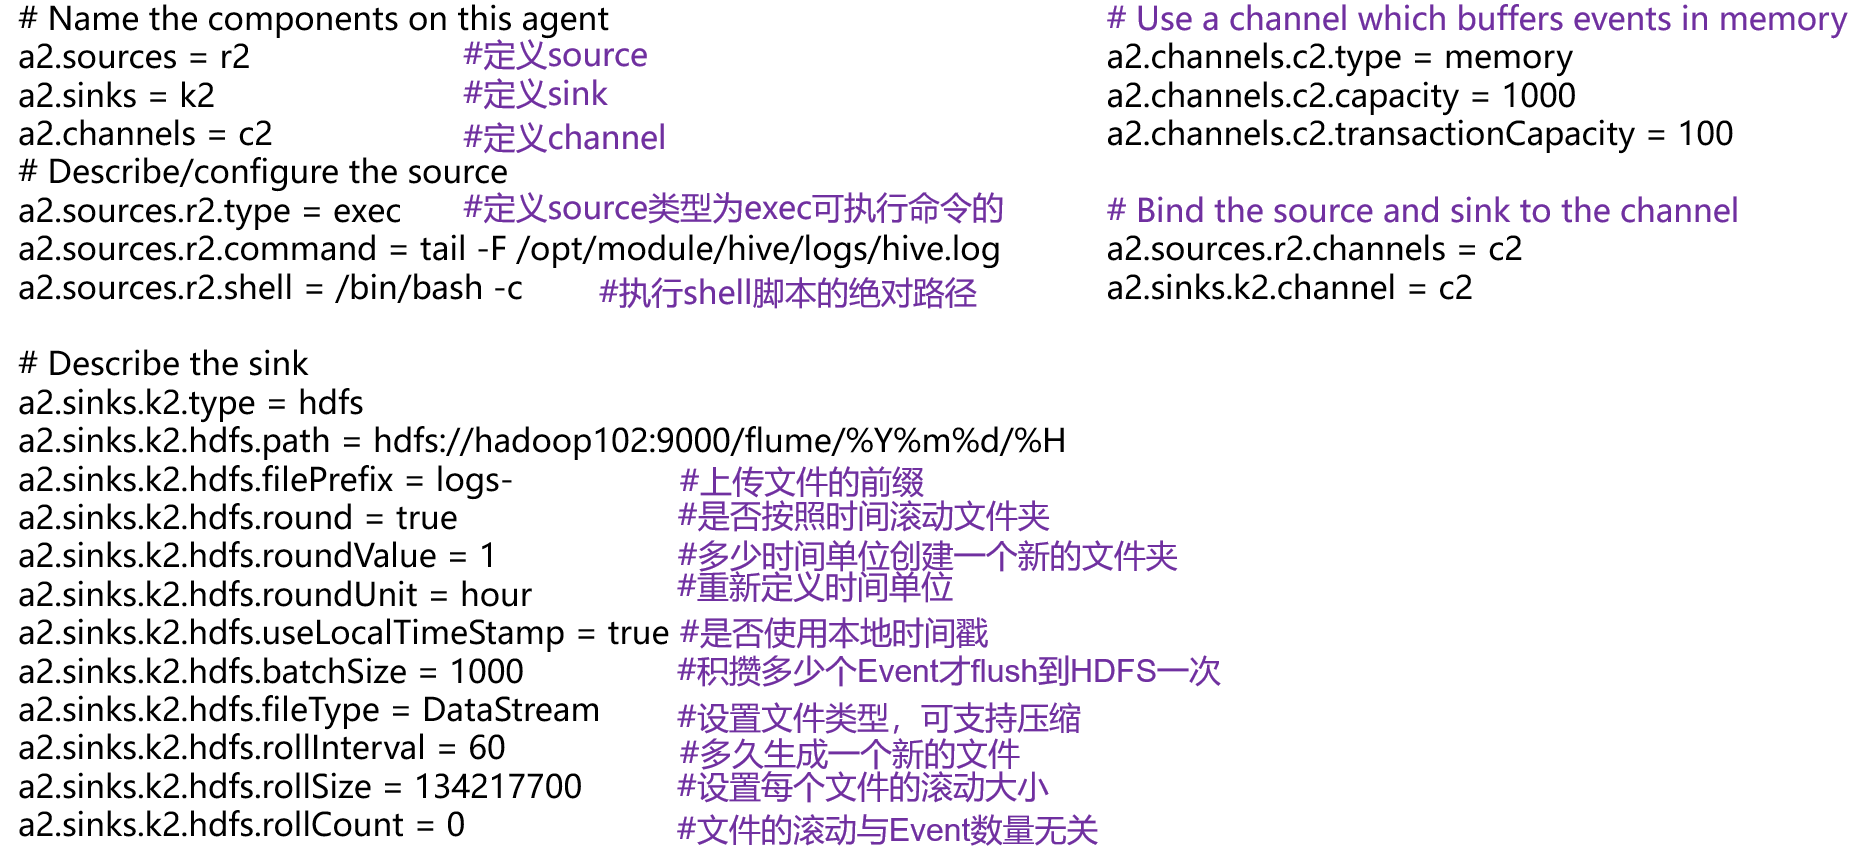
添加如下内容:
# Name the components on this agent
a2.sources = r2
a2.sinks = k2
a2.channels = c2

# Describe/configure the source
a2.sources.r2.type = exec
a2.sources.r2.command = tail -F /opt/module/hive/logs/hive.log

# Describe the sink
a2.sinks.k2.type = hdfs
a2.sinks.k2.hdfs.path = hdfs://hadoop102:9820/flume/%Y%m%d/%H
#上传文件的前缀
a2.sinks.k2.hdfs.filePrefix = logs-
#是否按照时间滚动文件夹
a2.sinks.k2.hdfs.round = true
#多少时间单位创建一个新的文件夹
a2.sinks.k2.hdfs.roundValue = 1
#重新定义时间单位
a2.sinks.k2.hdfs.roundUnit = hour
#是否使用本地时间戳
a2.sinks.k2.hdfs.useLocalTimeStamp = true
#积攒多少个Event才flush到HDFS一次
a2.sinks.k2.hdfs.batchSize = 100
#设置文件类型,可支持压缩
a2.sinks.k2.hdfs.fileType = DataStream
#多久生成一个新的文件
a2.sinks.k2.hdfs.rollInterval = 60
#设置每个文件的滚动大小
a2.sinks.k2.hdfs.rollSize = 134217700
#文件的滚动与Event数量无关
a2.sinks.k2.hdfs.rollCount = 0

# Use a channel which buffers events in memory
a2.channels.c2.type = memory
a2.channels.c2.capacity = 1000
a2.channels.c2.transactionCapacity = 100

# Bind the source and sink to the channel
a2.sources.r2.channels = c2
a2.sinks.k2.channel = c2
对于所有与时间相关的转义序列,Event Header中必须存在以 “timestamp”的key(除非hdfs.useLocalTimeStamp设置为true,此方法会使用TimestampInterceptor自动添加timestamp)。
a3.sinks.k3.hdfs.useLocalTimeStamp = true
(3)运行Flume
bin/flume-ng agent --conf conf/ --name a2 --conf-file job/flume-file-hdfs.conf -Dflume.root.logger=INFO,console
(4)开启Hadoop和Hive并操作Hive产生日志(对Hadooop与Hive不清楚的可以查看我的历史博客,这里就不详细介绍了)
mycluster.sh start
hiveservices.sh start
(5)在HDFS上查看文件。
2.2.3 实时监控目录下多个新文件
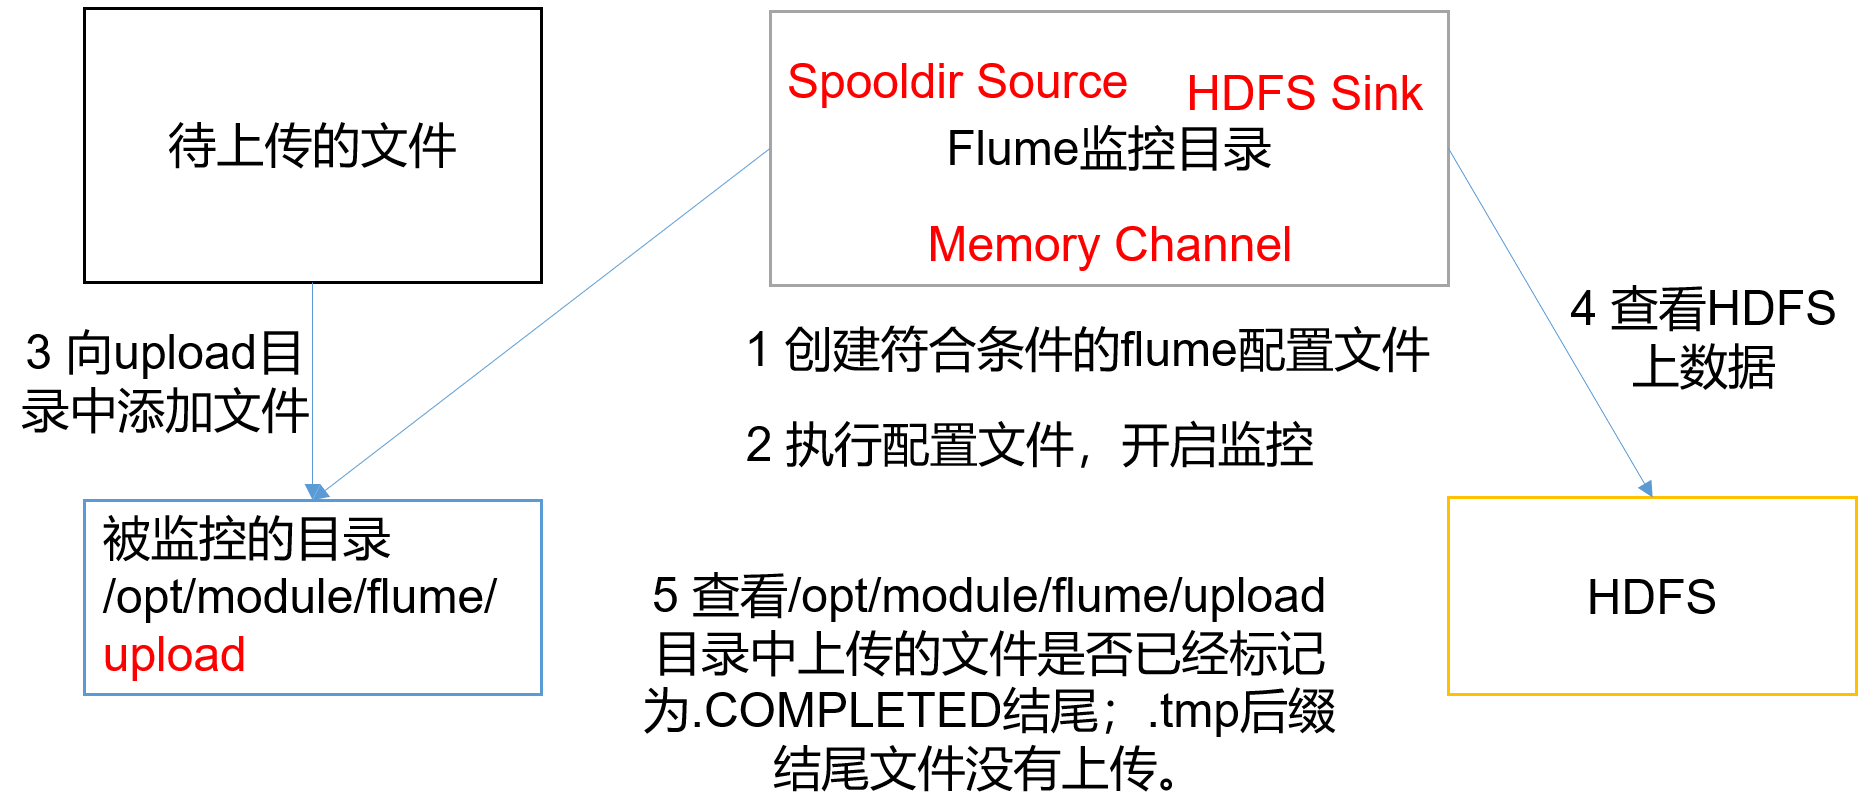
1)案例需求:使用Flume监听整个目录的文件,并上传至HDFS
2)需求分析:
3)实现步骤:
(1)创建配置文件flume-dir-hdfs.conf,添加如下内容
vim flume-dir-hdfs.conf
a3.sources = r3
a3.sinks = k3
a3.channels = c3

# Describe/configure the source
a3.sources.r3.type = spooldir
a3.sources.r3.spoolDir = /opt/module/flume/upload
a3.sources.r3.fileSuffix = .COMPLETED
a3.sources.r3.fileHeader = true
#忽略所有以.tmp结尾的文件,不上传
a3.sources.r3.ignorePattern = ([^ ]*\.tmp)

# Describe the sink
a3.sinks.k3.type = hdfs
a3.sinks.k3.hdfs.path = hdfs://hadoop102:9820/flume/upload/%Y%m%d/%H
#上传文件的前缀
a3.sinks.k3.hdfs.filePrefix = upload-
#是否按照时间滚动文件夹
a3.sinks.k3.hdfs.round = true
#多少时间单位创建一个新的文件夹
a3.sinks.k3.hdfs.roundValue = 1
#重新定义时间单位
a3.sinks.k3.hdfs.roundUnit = hour
#是否使用本地时间戳
a3.sinks.k3.hdfs.useLocalTimeStamp = true
#积攒多少个Event才flush到HDFS一次
a3.sinks.k3.hdfs.batchSize = 100
#设置文件类型,可支持压缩
a3.sinks.k3.hdfs.fileType = DataStream
#多久生成一个新的文件
a3.sinks.k3.hdfs.rollInterval = 60
#设置每个文件的滚动大小大概是128M
a3.sinks.k3.hdfs.rollSize = 134217700
#文件的滚动与Event数量无关
a3.sinks.k3.hdfs.rollCount = 0

# Use a channel which buffers events in memory
a3.channels.c3.type = memory
a3.channels.c3.capacity = 1000
a3.channels.c3.transactionCapacity = 100

# Bind the source and sink to the channel
a3.sources.r3.channels = c3
a3.sinks.k3.channel = c3
(2)启动监控文件夹命令
bin/flume-ng agent --conf conf/ --name a3 --conf-file job/flume-dir-hdfs.conf
说明:在使用Spooling Directory Source时,不要在监控目录中创建并持续修改文件;上传完成的文件会以.COMPLETED结尾;被监控文件夹每500毫秒扫描一次文件变动。
(3)在/opt/module/flume目录下创建upload文件夹,向upload文件夹中添加文件
mkdir upload
cd upload
touch atguigu.txt
touch atguigu.tmp
touch atguigu.log
(4)查看HDFS上的数据
2.2.4 实时监控目录下的多个追加文件
Exec source适用于监控一个实时追加的文件,不能实现断点续传;Spooldir Source适合用于同步新文件,但不适合对实时追加日志的文件进行监听并同步;而Taildir Source适合用于监听多个实时追加的文件,并且能够实现断点续传。
1)案例需求:使用Flume监听整个目录的实时追加文件,并上传至HDFS
2)需求分析:

3)实现步骤:
(1)创建配置文件flume-taildir-hdfs.conf
vim flume-taildir-hdfs.conf
a3.sources = r3
a3.sinks = k3
a3.channels = c3

# Describe/configure the source
a3.sources.r3.type = TAILDIR
a3.sources.r3.positionFile = /opt/module/flume/tail_dir.json
a3.sources.r3.filegroups = f1 f2
a3.sources.r3.filegroups.f1 = /opt/module/flume/files/.*file.*
a3.sources.r3.filegroups.f2 = /opt/module/flume/files2/.*log.*

# Describe the sink
a3.sinks.k3.type = hdfs
a3.sinks.k3.hdfs.path = hdfs://hadoop102:9820/flume/upload2/%Y%m%d/%H
#上传文件的前缀
a3.sinks.k3.hdfs.filePrefix = upload-
#是否按照时间滚动文件夹
a3.sinks.k3.hdfs.round = true
#多少时间单位创建一个新的文件夹
a3.sinks.k3.hdfs.roundValue = 1
#重新定义时间单位
a3.sinks.k3.hdfs.roundUnit = hour
#是否使用本地时间戳
a3.sinks.k3.hdfs.useLocalTimeStamp = true
#积攒多少个Event才flush到HDFS一次
a3.sinks.k3.hdfs.batchSize = 100
#设置文件类型,可支持压缩
a3.sinks.k3.hdfs.fileType = DataStream
#多久生成一个新的文件
a3.sinks.k3.hdfs.rollInterval = 60
#设置每个文件的滚动大小大概是128M
a3.sinks.k3.hdfs.rollSize = 134217700
#文件的滚动与Event数量无关
a3.sinks.k3.hdfs.rollCount = 0

# Use a channel which buffers events in memory
a3.channels.c3.type = memory
a3.channels.c3.capacity = 1000
a3.channels.c3.transactionCapacity = 100

# Bind the source and sink to the channel
a3.sources.r3.channels = c3
a3.sinks.k3.channel = c3
(2)创建files文件夹和files2文件夹

(3)启动监控文件夹命令
bin/flume-ng agent --conf conf/ --name a3 --conf-file job/flume-taildir-hdfs.conf
(4)向files文件夹中追加内容
echo hello >> file1.txt
echo atguigu >> file2.txt
ll >> file.txt
(5)查看HDFS上的数据

Taildir说明:
Taildir Source维护了一个json格式的position File,其会定期的往position File中更新每个文件读取到的最新的位置,因此能够实现断点续传。
Position File的格式如下:
{"inode":2496272,"pos":12,"file":"/opt/module/flume/files/file1.txt"}
{"inode":2496275,"pos":12,"file":"/opt/module/flume/files/file2.txt"}
注:Linux中储存文件元数据的区域就叫做inode,每个inode都有一个号码,操作系统用inode号码来识别不同的文件,Unix/Linux系统内部不使用文件名,而使用inode号码来识别文件。
第3章 Flume进阶
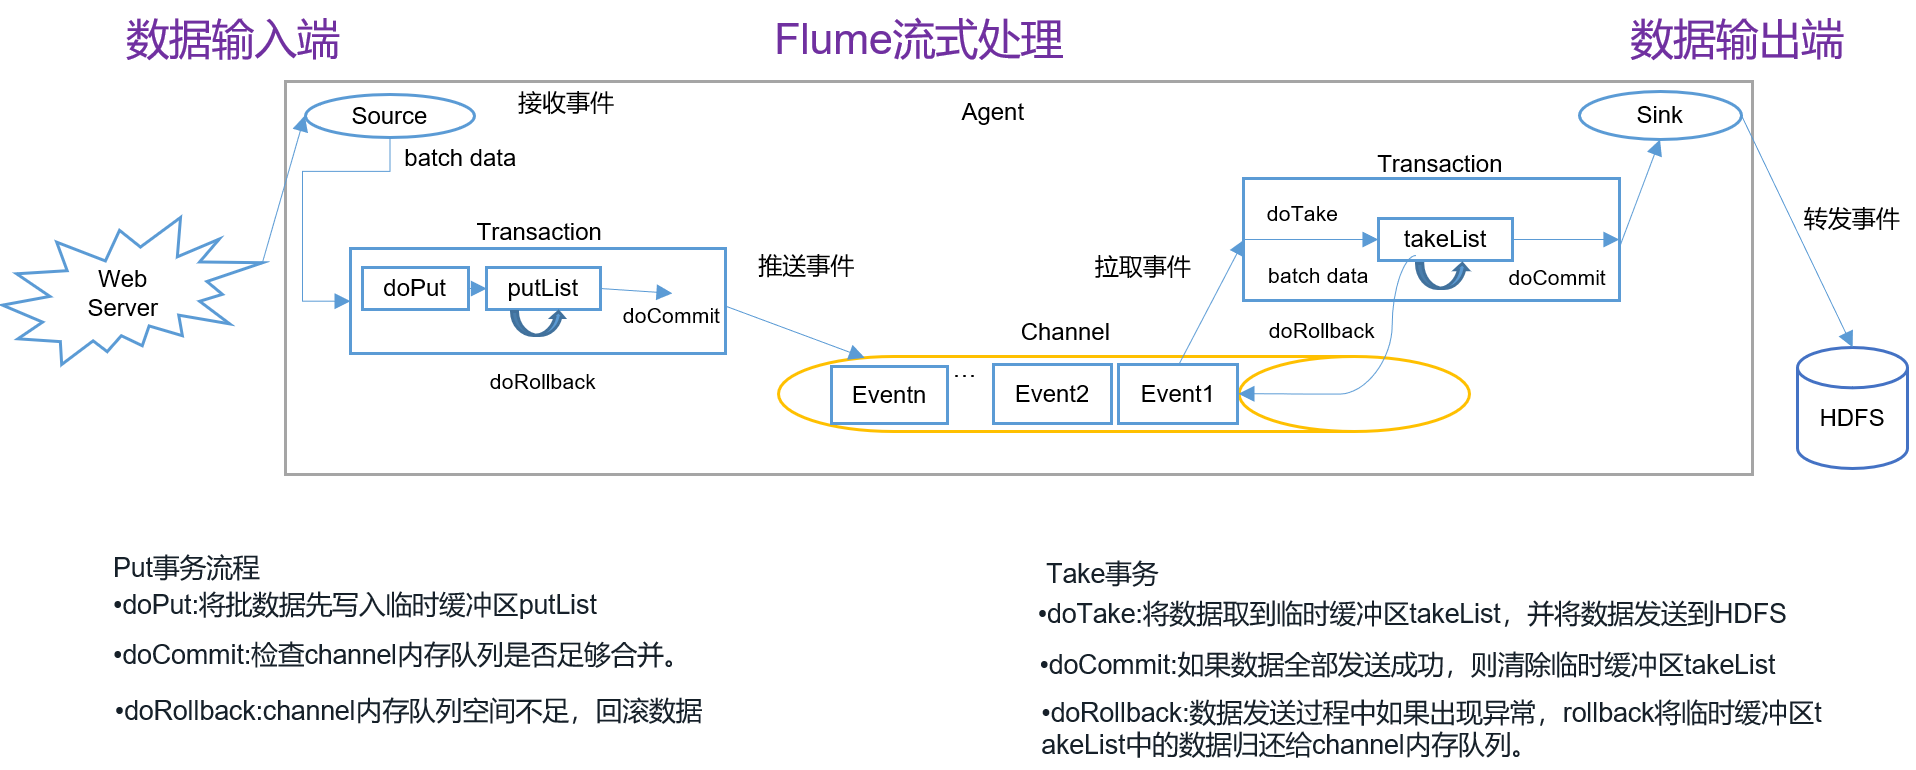
3.1 Flume事务
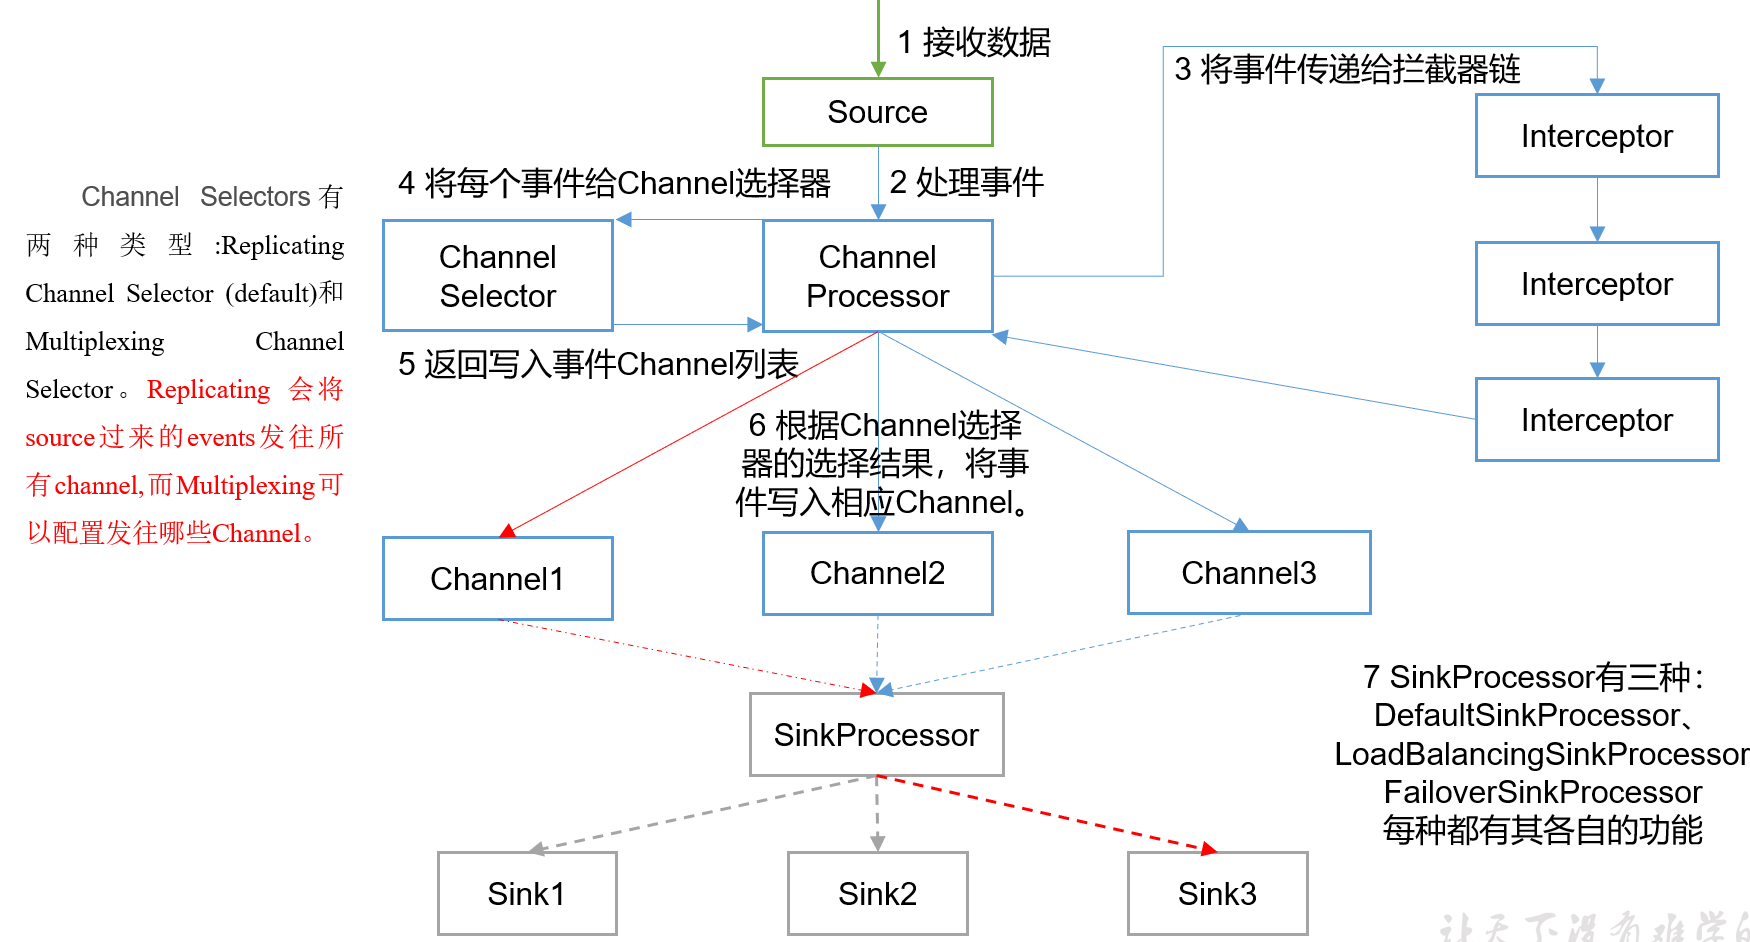
3.2 Flume Agent内部原理
重要组件:
1)ChannelSelector
ChannelSelector的作用就是选出Event将要被发往哪个Channel。其共有两种类型,分别是Replicating(复制)和Multiplexing(多路复用)。
ReplicatingSelector会将同一个Event发往所有的Channel,Multiplexing会根据相应的原则,将不同的Event发往不同的Channel。
2)SinkProcessor
SinkProcessor共有三种类型,分别是DefaultSinkProcessor、LoadBalancingSinkProcessor和FailoverSinkProcessor
DefaultSinkProcessor对应的是单个的Sink,LoadBalancingSinkProcessor和FailoverSinkProcessor对应的是Sink Group,LoadBalancingSinkProcessor可以实现负载均衡的功能,FailoverSinkProcessor可以错误恢复的功能。
3.3 Flume拓扑结构
3.3.1 简单串联

图 Flume Agent连接
这种模式是将多个flume顺序连接起来了,从最初的source开始到最终sink传送的目的存储系统。此模式不建议桥接过多的flume数量, flume数量过多不仅会影响传输速率,而且一旦传输过程中某个节点flume宕机,会影响整个传输系统。
3.3.2 复制和多路复用
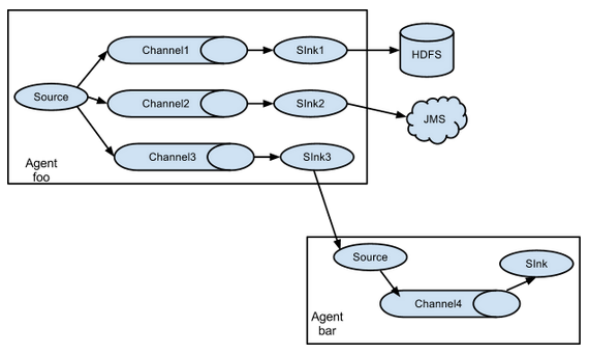
图 单source,多channel、sink
Flume支持将事件流向一个或者多个目的地。这种模式可以将相同数据复制到多个channel中,或者将不同数据分发到不同的channel中,sink可以选择传送到不同的目的地。
3.3.3 负载均衡和故障转移

图 Flume负载均衡或故障转移
Flume支持使用将多个sink逻辑上分到一个sink组,sink组配合不同的SinkProcessor可以实现负载均衡和错误恢复的功能。
3.3.4 聚合

图 Flume Agent聚合
这种模式是我们最常见的,也非常实用,日常web应用通常分布在上百个服务器,大者甚至上千个、上万个服务器。产生的日志,处理起来也非常麻烦。用flume的这种组合方式能很好的解决这一问题,每台服务器部署一个flume采集日志,传送到一个集中收集日志的flume,再由此flume上传到hdfs、hive、hbase等,进行日志分析。
3.4 Flume企业开发案例
3.4.1 复制和多路复用
1)案例需求
使用Flume-1监控文件变动,Flume-1将变动内容传递给Flume-2,Flume-2负责存储到HDFS。同时Flume-1将变动内容传递给Flume-3,Flume-3负责输出到Local FileSystem。
2)需求分析:
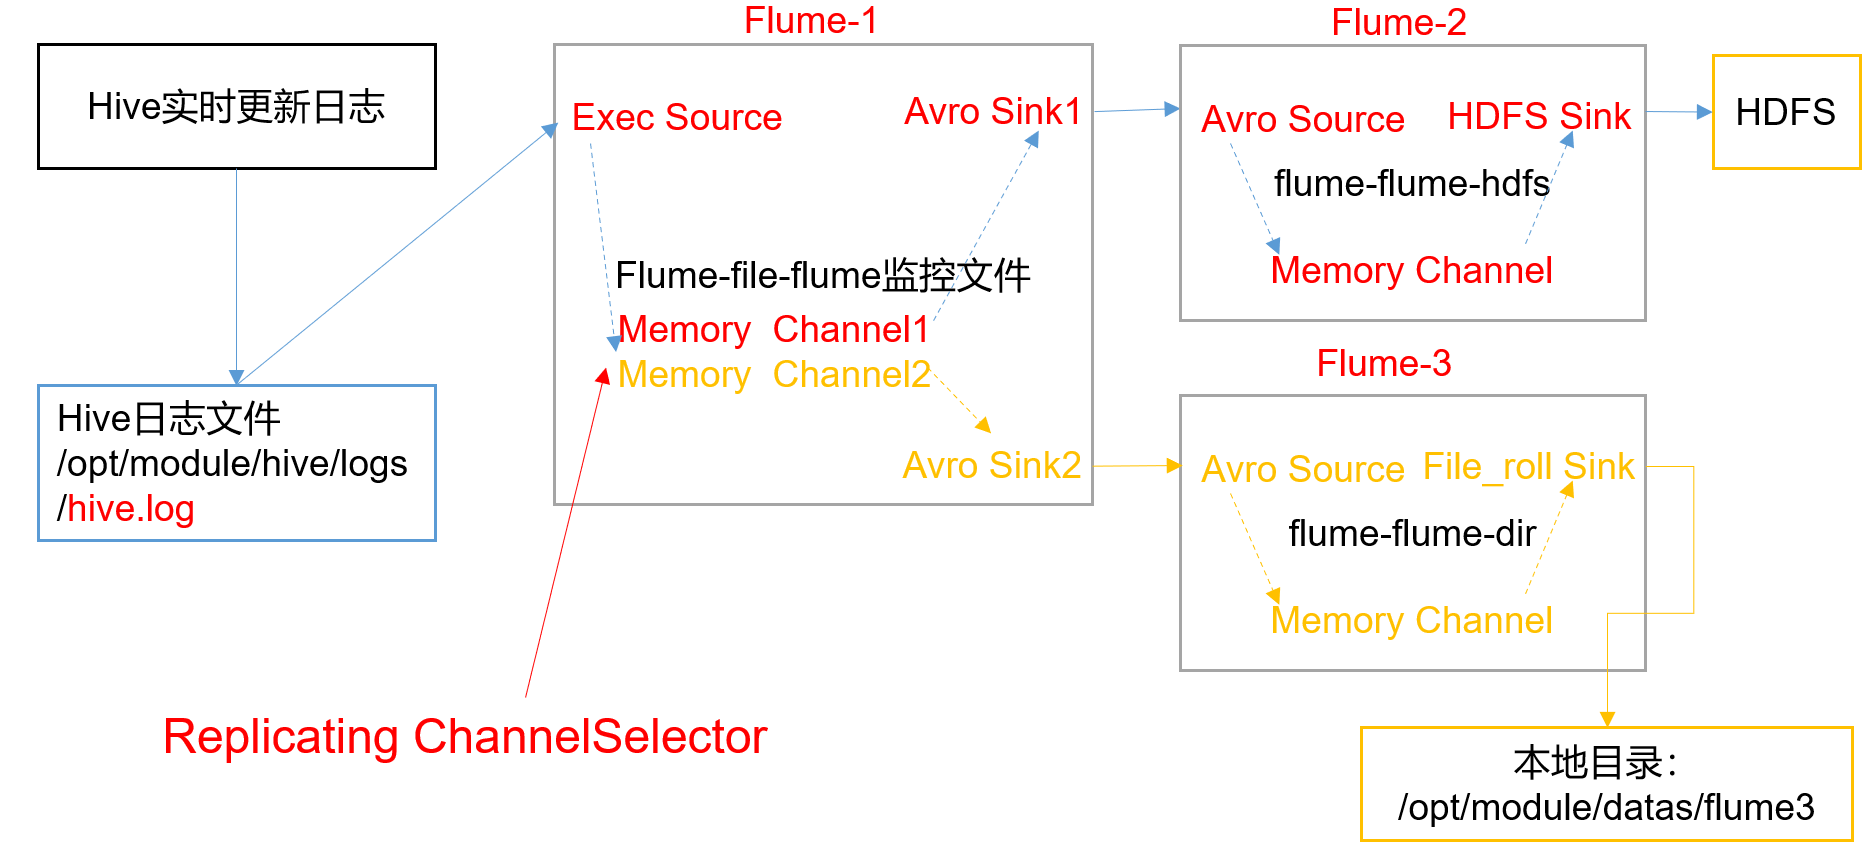
3)实现步骤:
(1)准备工作
在/opt/module/flume/job目录下创建group1文件夹
mkdir group1
在/opt/module/datas/目录下创建flume3文件夹
mkdir flume3
(2)在/opt/module/flume/job/group1目录下创建flume-file-flume.conf
配置1个接收日志文件的source和两个channel、两个sink,分别输送给flume-flume-hdfs和flume-flume-dir。
vim flume-file-flume.conf
# Name the components on this agent
a1.sources = r1
a1.sinks = k1 k2
a1.channels = c1 c2
# 将数据流复制给所有channel
a1.sources.r1.selector.type = replicating

# Describe/configure the source
a1.sources.r1.type = exec
a1.sources.r1.command = tail -F /opt/module/hive/logs/hive.log
a1.sources.r1.shell = /bin/bash -c

# Describe the sink
# sink端的avro是一个数据发送者
a1.sinks.k1.type = avro
a1.sinks.k1.hostname = hadoop102
a1.sinks.k1.port = 4141

a1.sinks.k2.type = avro
a1.sinks.k2.hostname = hadoop102
a1.sinks.k2.port = 4142

# Describe the channel
a1.channels.c1.type = memory
a1.channels.c1.capacity = 1000
a1.channels.c1.transactionCapacity = 100

a1.channels.c2.type = memory
a1.channels.c2.capacity = 1000
a1.channels.c2.transactionCapacity = 100

# Bind the source and sink to the channel
a1.sources.r1.channels = c1 c2
a1.sinks.k1.channel = c1
a1.sinks.k2.channel = c2
(3)创建flume-flume-hdfs.conf
配置上级Flume输出的Source,输出是到HDFS的Sink。
vim flume-flume-hdfs.conf
# Name the components on this agent
a2.sources = r1
a2.sinks = k1
a2.channels = c1

# Describe/configure the source
# source端的avro是一个数据接收服务
a2.sources.r1.type = avro
a2.sources.r1.bind = hadoop102
a2.sources.r1.port = 4141

# Describe the sink
a2.sinks.k1.type = hdfs
a2.sinks.k1.hdfs.path = hdfs://hadoop102:9820/flume2/%Y%m%d/%H
#上传文件的前缀
a2.sinks.k1.hdfs.filePrefix = flume2-
#是否按照时间滚动文件夹
a2.sinks.k1.hdfs.round = true
#多少时间单位创建一个新的文件夹
a2.sinks.k1.hdfs.roundValue = 1
#重新定义时间单位
a2.sinks.k1.hdfs.roundUnit = hour
#是否使用本地时间戳
a2.sinks.k1.hdfs.useLocalTimeStamp = true
#积攒多少个Event才flush到HDFS一次
a2.sinks.k1.hdfs.batchSize = 100
#设置文件类型,可支持压缩
a2.sinks.k1.hdfs.fileType = DataStream
#多久生成一个新的文件
a2.sinks.k1.hdfs.rollInterval = 600
#设置每个文件的滚动大小大概是128M
a2.sinks.k1.hdfs.rollSize = 134217700
#文件的滚动与Event数量无关
a2.sinks.k1.hdfs.rollCount = 0

# Describe the channel
a2.channels.c1.type = memory
a2.channels.c1.capacity = 1000
a2.channels.c1.transactionCapacity = 100

# Bind the source and sink to the channel
a2.sources.r1.channels = c1
a2.sinks.k1.channel = c1
(4)创建flume-flume-dir.conf
配置上级Flume输出的Source,输出是到本地目录的Sink。
vim flume-flume-dir.conf
# Name the components on this agent
a3.sources = r1
a3.sinks = k1
a3.channels = c2

# Describe/configure the source
a3.sources.r1.type = avro
a3.sources.r1.bind = hadoop102
a3.sources.r1.port = 4142

# Describe the sink
a3.sinks.k1.type = file_roll
a3.sinks.k1.sink.directory = /opt/module/datas/flume3

# Describe the channel
a3.channels.c2.type = memory
a3.channels.c2.capacity = 1000
a3.channels.c2.transactionCapacity = 100

# Bind the source and sink to the channel
a3.sources.r1.channels = c2
a3.sinks.k1.channel = c2
提示:输出的本地目录必须是已经存在的目录,如果该目录不存在,并不会创建新的目录。
(5)执行配置文件
分别启动对应的flume进程:flume-flume-dir,flume-flume-hdfs,flume-file-flume。
bin/flume-ng agent --conf conf/ --name a3 --conf-file job/group1/flume-flume-dir.conf -Dflume.root.logger=INFO,console

bin/flume-ng agent --conf conf/ --name a2 --conf-file job/group1/flume-flume-hdfs.conf -Dflume.root.logger=INFO,console

bin/flume-ng agent --conf conf/ --name a1 --conf-file job/group1/flume-file-flume.conf -Dflume.root.logger=INFO,console
(6)启动Hadoop和Hive
mycluster.sh start
hiveservices.sh start
(7)检查HDFS上数据

(8)检查/opt/module/datas/flume3目录中数据

3.4.2 负载均衡和故障转移
1)案例需求
使用Flume1监控一个端口,其sink组中的sink分别对接Flume2和Flume3,采用FailoverSinkProcessor,实现故障转移的功能。
2)需求分析
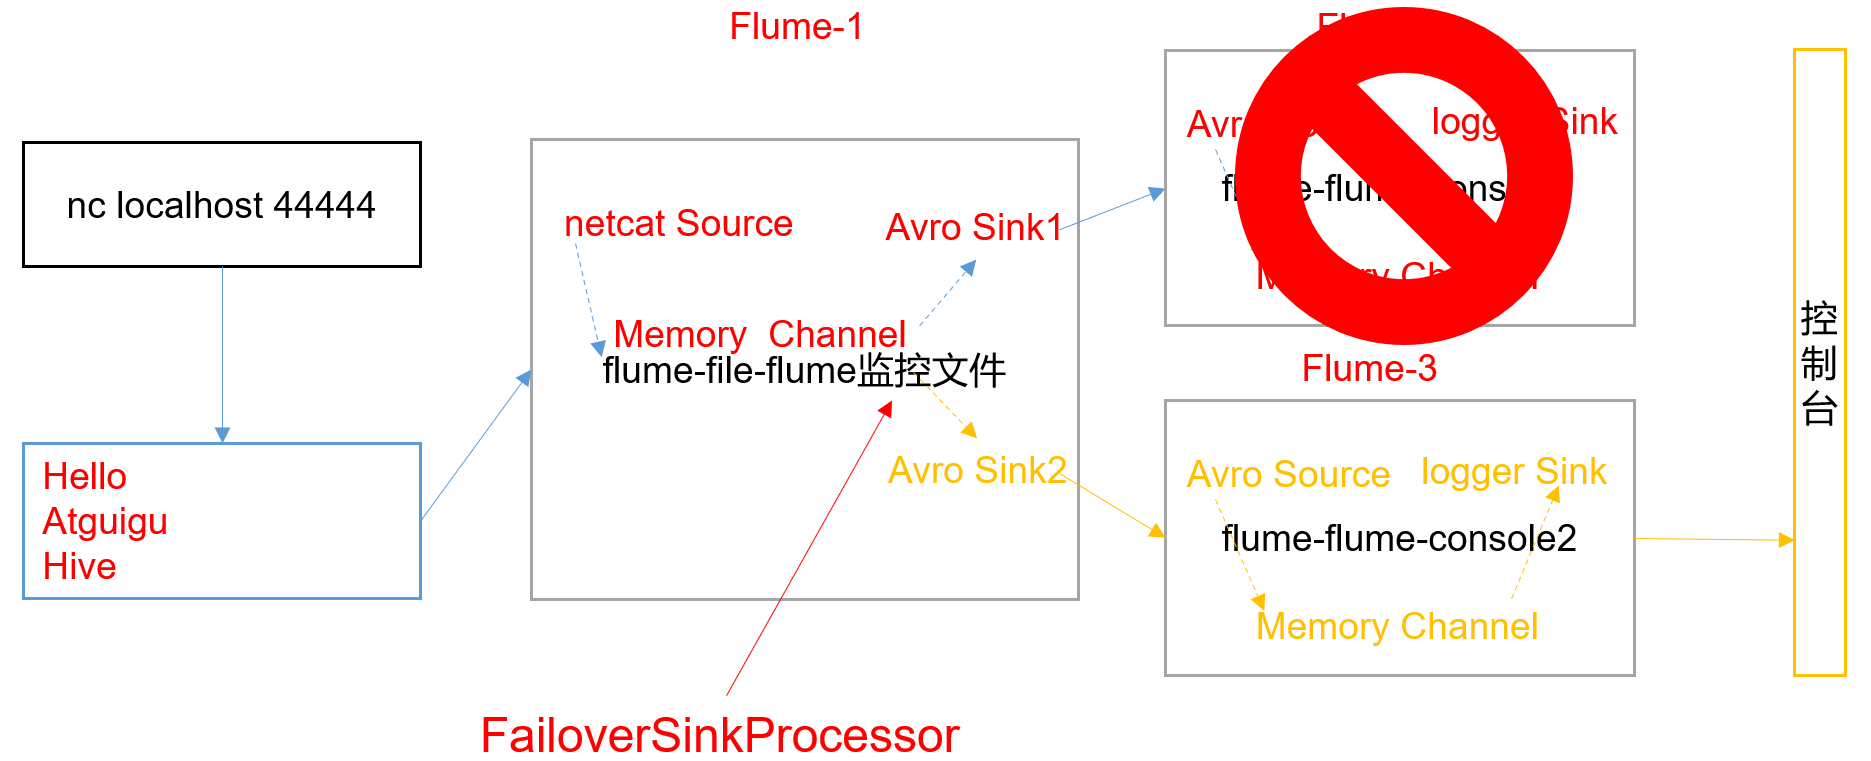
3)实现步骤
(1)准备工作,在/opt/module/flume/job目录下创建group2文件夹
mkdir group2
(2)在/opt/module/flume/job/group2目录下创建flume-netcat-flume.conf
配置1个netcat source和1个channel、1个sink group(2个sink),分别输送给flume-flume-console1和flume-flume-console2。
vim flume-netcat-flume.conf
# Name the components on this agent
a1.sources = r1
a1.channels = c1
a1.sinkgroups = g1
a1.sinks = k1 k2

# Describe/configure the source
a1.sources.r1.type = netcat
a1.sources.r1.bind = hadoop102
a1.sources.r1.port = 44444

a1.sinkgroups.g1.processor.type = failover
a1.sinkgroups.g1.processor.priority.k1 = 5
a1.sinkgroups.g1.processor.priority.k2 = 10
a1.sinkgroups.g1.processor.maxpenalty = 10000

# Describe the sink
a1.sinks.k1.type = avro
a1.sinks.k1.hostname = hadoop102
a1.sinks.k1.port = 4141

a1.sinks.k2.type = avro
a1.sinks.k2.hostname = hadoop102
a1.sinks.k2.port = 4142

# Describe the channel
a1.channels.c1.type = memory
a1.channels.c1.capacity = 1000
a1.channels.c1.transactionCapacity = 100

# Bind the source and sink to the channel
a1.sources.r1.channels = c1
a1.sinkgroups.g1.sinks = k1 k2
a1.sinks.k1.channel = c1
a1.sinks.k2.channel = c1
(3)创建flume-flume-console1.conf
配置上级Flume输出的Source,输出是到本地控制台。
vim flume-flume-console1.conf
# Name the components on this agent
a2.sources = r1
a2.sinks = k1
a2.channels = c1

# Describe/configure the source
a2.sources.r1.type = avro
a2.sources.r1.bind = hadoop102
a2.sources.r1.port = 4141

# Describe the sink
a2.sinks.k1.type = logger

# Describe the channel
a2.channels.c1.type = memory
a2.channels.c1.capacity = 1000
a2.channels.c1.transactionCapacity = 100

# Bind the source and sink to the channel
a2.sources.r1.channels = c1
a2.sinks.k1.channel = c1
(4)创建flume-flume-console2.conf
配置上级Flume输出的Source,输出是到本地控制台。
vim flume-flume-console2.conf
# Name the components on this agent
a3.sources = r1
a3.sinks = k1
a3.channels = c2

# Describe/configure the source
a3.sources.r1.type = avro
a3.sources.r1.bind = hadoop102
a3.sources.r1.port = 4142

# Describe the sink
a3.sinks.k1.type = logger

# Describe the channel
a3.channels.c2.type = memory
a3.channels.c2.capacity = 1000
a3.channels.c2.transactionCapacity = 100

# Bind the source and sink to the channel
a3.sources.r1.channels = c2
a3.sinks.k1.channel = c2
(5)执行配置文件,分别开启对应配置文件:flume-flume-console2,flume-flume-console1,flume-netcat-flume。
bin/flume-ng agent --conf conf/ --name a3 --conf-file job/group2/flume-flume-console2.conf -Dflume.root.logger=INFO,console

bin/flume-ng agent --conf conf/ --name a2 --conf-file job/group2/flume-flume-console1.conf -Dflume.root.logger=INFO,console

bin/flume-ng agent --conf conf/ --name a1 --conf-file job/group2/flume-netcat-flume.conf -Dflume.root.logger=INFO,console
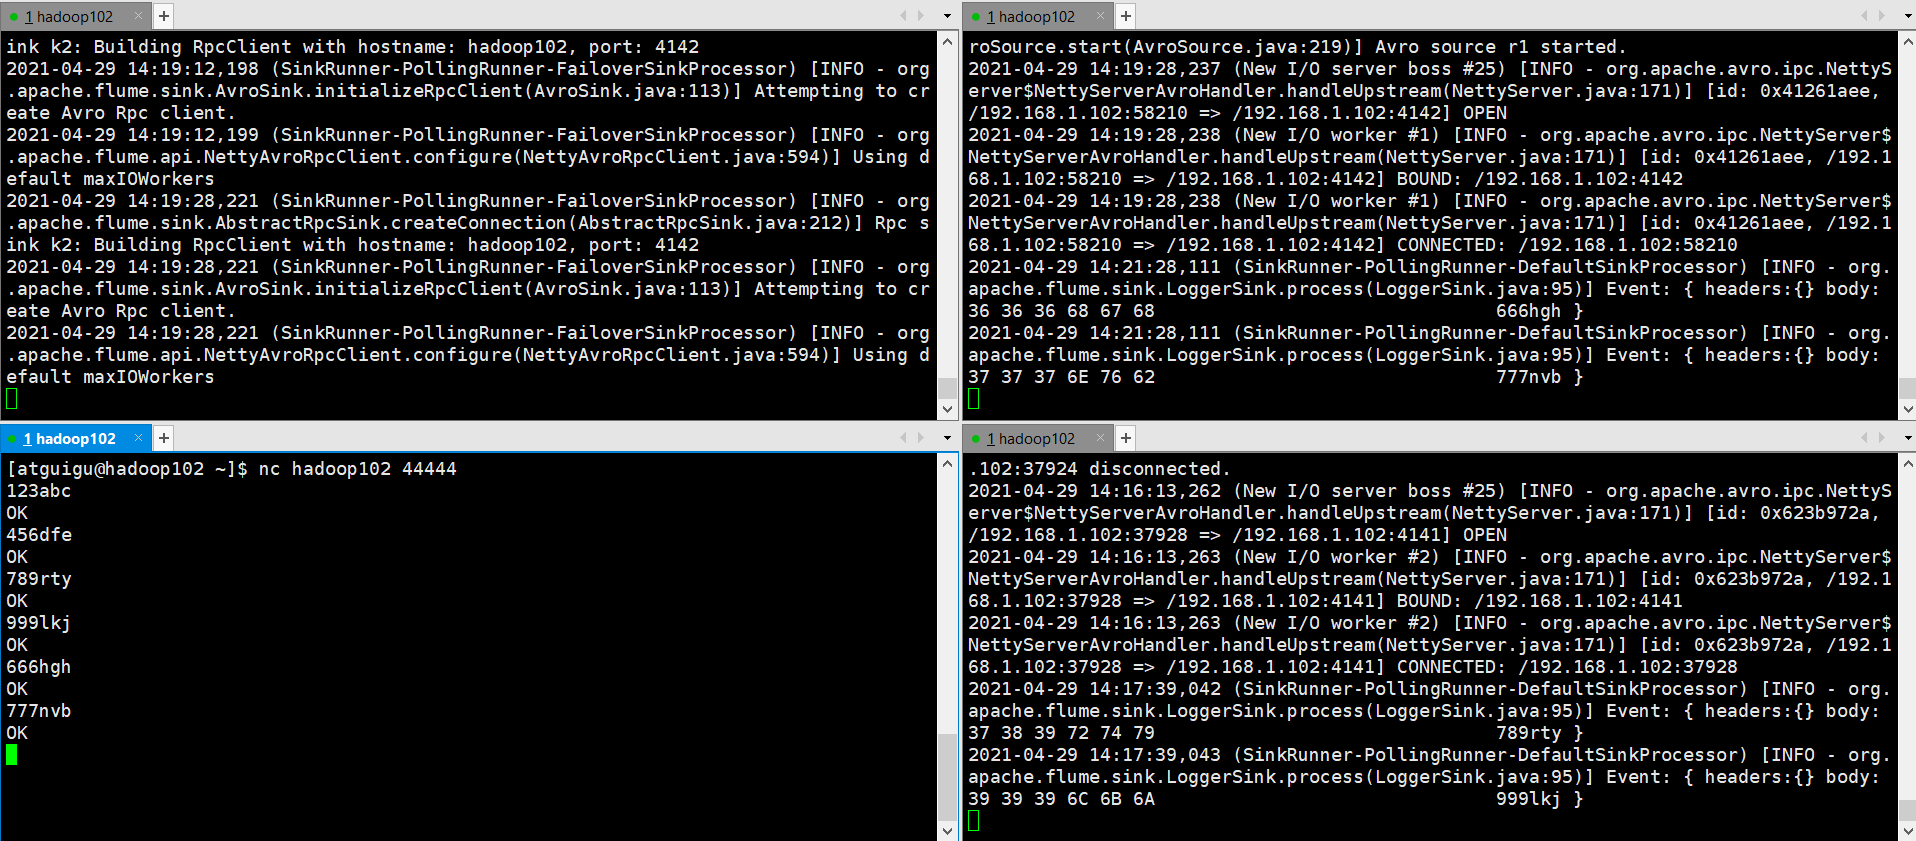
(6)使用netcat工具向本机的44444端口发送内容
nc hadoop102 44444
(7)查看Flume2及Flume3的控制台打印日志
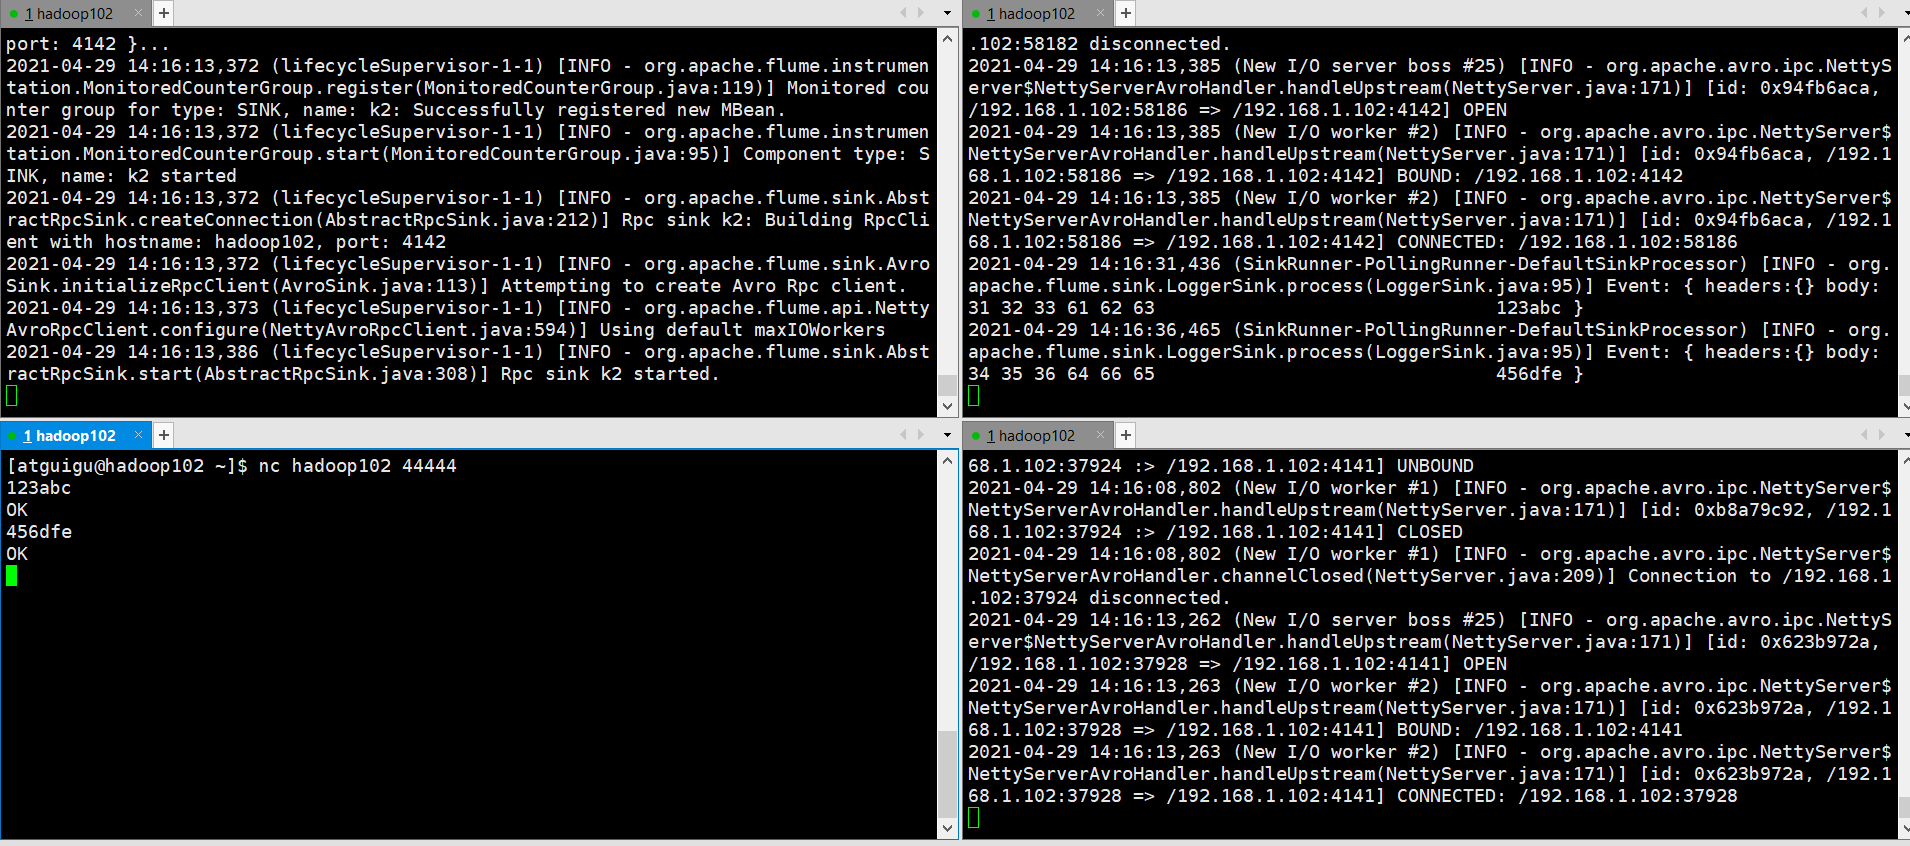
(8)将Flume2 kill,观察Flume3的控制台打印情况。
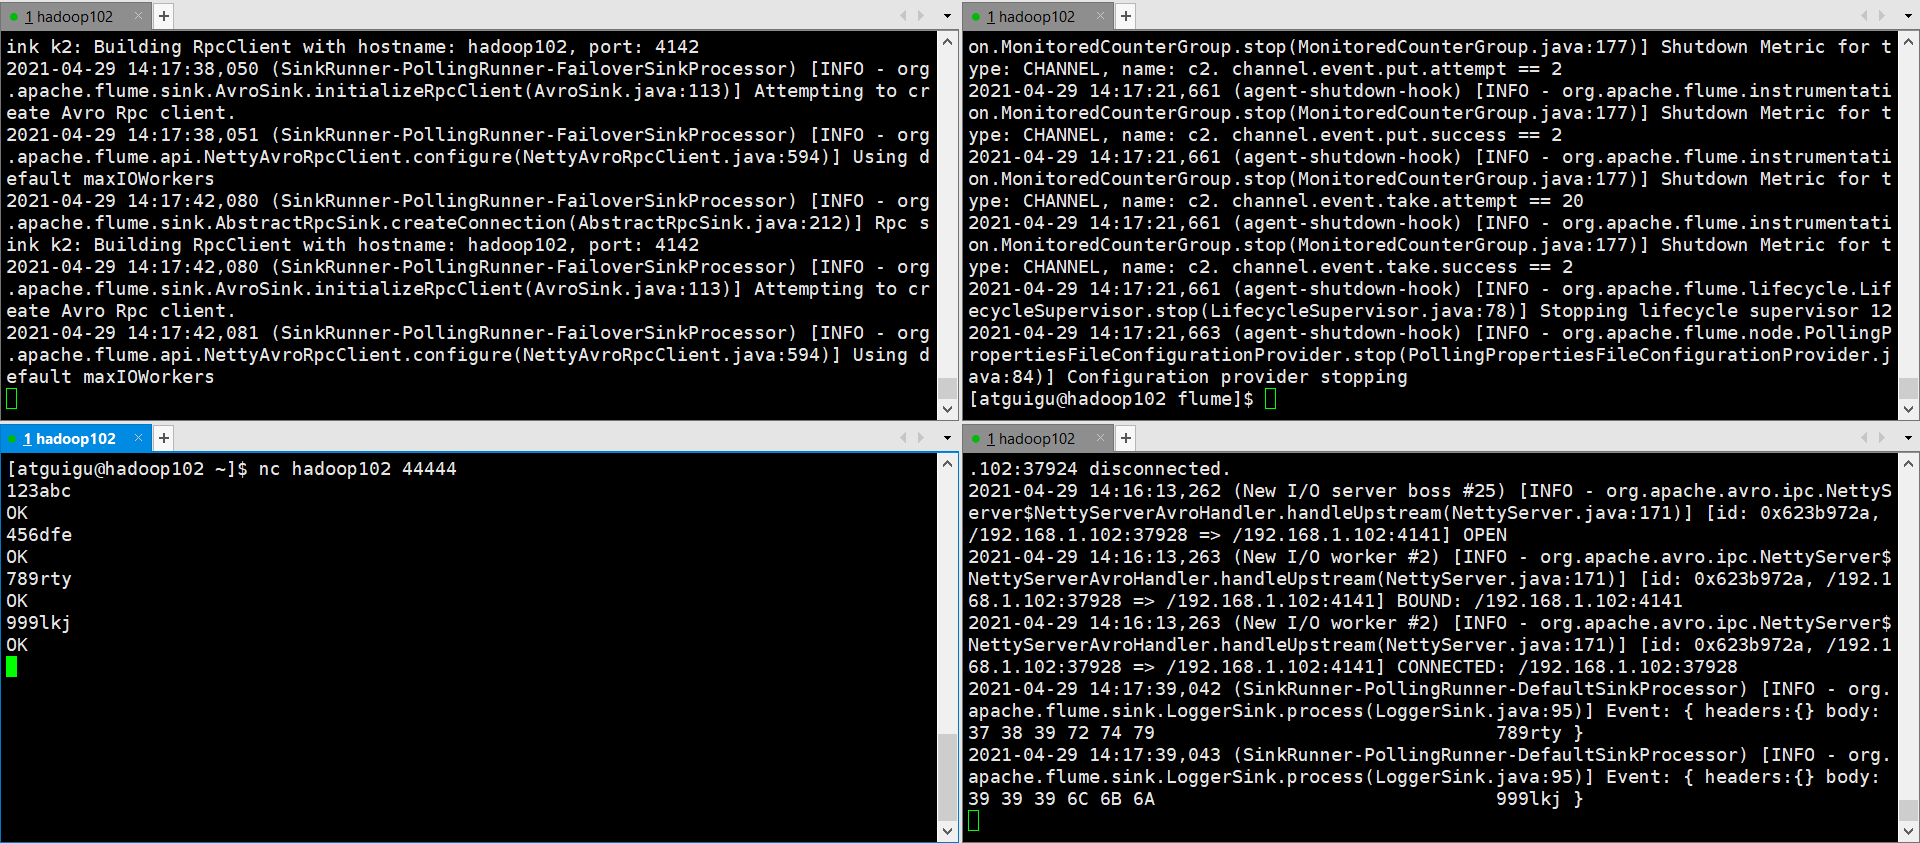
注:使用jps -ml查看Flume进程。

(9)将Flume2 恢复,观察Flume2的控制台打印情况。

3.4.3 聚合
1)案例需求:
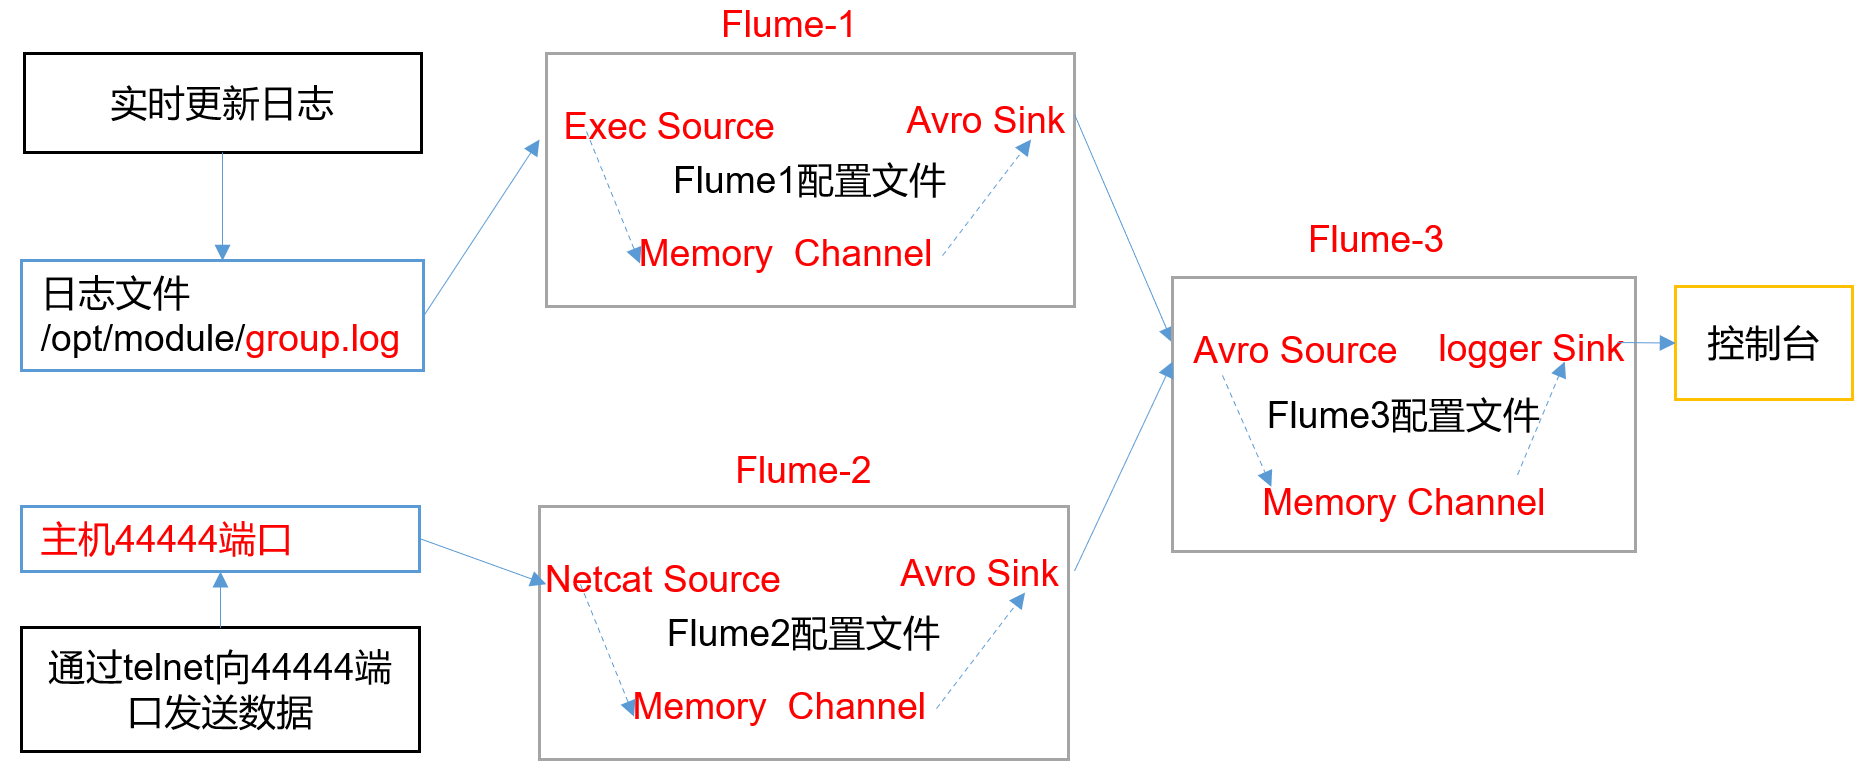
hadoop102上的Flume-1监控文件/opt/module/group.log,hadoop103上的Flume-2监控某一个端口的数据流,
Flume-1与Flume-2将数据发送给hadoop104上的Flume-3,Flume-3将最终数据打印到控制台。
2)需求分析
3)实现步骤:
(1)准备工作,分发flume,然后在hadoop102的/opt/module/flume/job目录下创建一个group3文件夹,完成后分发,最后在/opt/module/目录下创建group.log
xsync flume

(2)在hadoop102的/opt/module/flume/job/group3目录下创建flume1-logger-flume.conf
配置Source用于监控hive.log文件,配置Sink输出数据到下一级Flume。
vim flume1-logger-flume.conf
# Name the components on this agent
a1.sources = r1
a1.sinks = k1
a1.channels = c1

# Describe/configure the source
a1.sources.r1.type = exec
a1.sources.r1.command = tail -F /opt/module/group.log
a1.sources.r1.shell = /bin/bash -c

# Describe the sink
a1.sinks.k1.type = avro
a1.sinks.k1.hostname = hadoop104
a1.sinks.k1.port = 4141

# Describe the channel
a1.channels.c1.type = memory
a1.channels.c1.capacity = 1000
a1.channels.c1.transactionCapacity = 100

# Bind the source and sink to the channel
a1.sources.r1.channels = c1
a1.sinks.k1.channel = c1
(3)在hadoop103的/opt/module/flume/job/group3目录下创建flume2-netcat-flume.conf
配置Source监控端口44444数据流,配置Sink数据到下一级Flume:
vim flume2-netcat-flume.conf
# Name the components on this agent
a2.sources = r1
a2.sinks = k1
a2.channels = c1

# Describe/configure the source
a2.sources.r1.type = netcat
a2.sources.r1.bind = hadoop103
a2.sources.r1.port = 44444

# Describe the sink
a2.sinks.k1.type = avro
a2.sinks.k1.hostname = hadoop104
a2.sinks.k1.port = 4141

# Use a channel which buffers events in memory
a2.channels.c1.type = memory
a2.channels.c1.capacity = 1000
a2.channels.c1.transactionCapacity = 100

# Bind the source and sink to the channel
a2.sources.r1.channels = c1
a2.sinks.k1.channel = c1
(4)在hadoop104的/opt/module/flume/job/group3目录下创建flume3-flume-logger.conf
配置source用于接收flume1与flume2发送过来的数据流,最终合并后sink到控制台。
vim flume3-flume-logger.conf
# Name the components on this agent
a3.sources = r1
a3.sinks = k1
a3.channels = c1

# Describe/configure the source
a3.sources.r1.type = avro
a3.sources.r1.bind = hadoop104
a3.sources.r1.port = 4141

# Describe the sink
# Describe the sink
a3.sinks.k1.type = logger

# Describe the channel
a3.channels.c1.type = memory
a3.channels.c1.capacity = 1000
a3.channels.c1.transactionCapacity = 100

# Bind the source and sink to the channel
a3.sources.r1.channels = c1
a3.sinks.k1.channel = c1
(5)执行配置文件,分别开启对应配置文件:flume3-flume-logger.conf,flume2-netcat-flume.conf,flume1-logger-flume.conf。
#hadoop102上执行
bin/flume-ng agent --conf conf/ --name a1 --conf-file job/group3/flume1-logger-flume.conf -Dflume.root.logger=INFO,console
hadoop103上执行
bin/flume-ng agent --conf conf/ --name a2 --conf-file job/group3/flume2-netcat-flume.conf -Dflume.root.logger=INFO,console
hadoop104上执行
bin/flume-ng agent --conf conf/ --name a3 --conf-file job/group3/flume3-flume-logger.conf -Dflume.root.logger=INFO,console
(6)在hadoop102上向/opt/module目录下的group.log追加内容
echo 'hello' > group.log
(7)在hadoop103上向44444端口发送数据
nc hadoop103 44444

(8)检查hadoop104上数据

3.5 自定义Interceptor
1)案例需求
使用Flume采集服务器本地日志,需要按照日志类型的不同,将不同种类的日志发往不同的分析系统。
2)需求分析
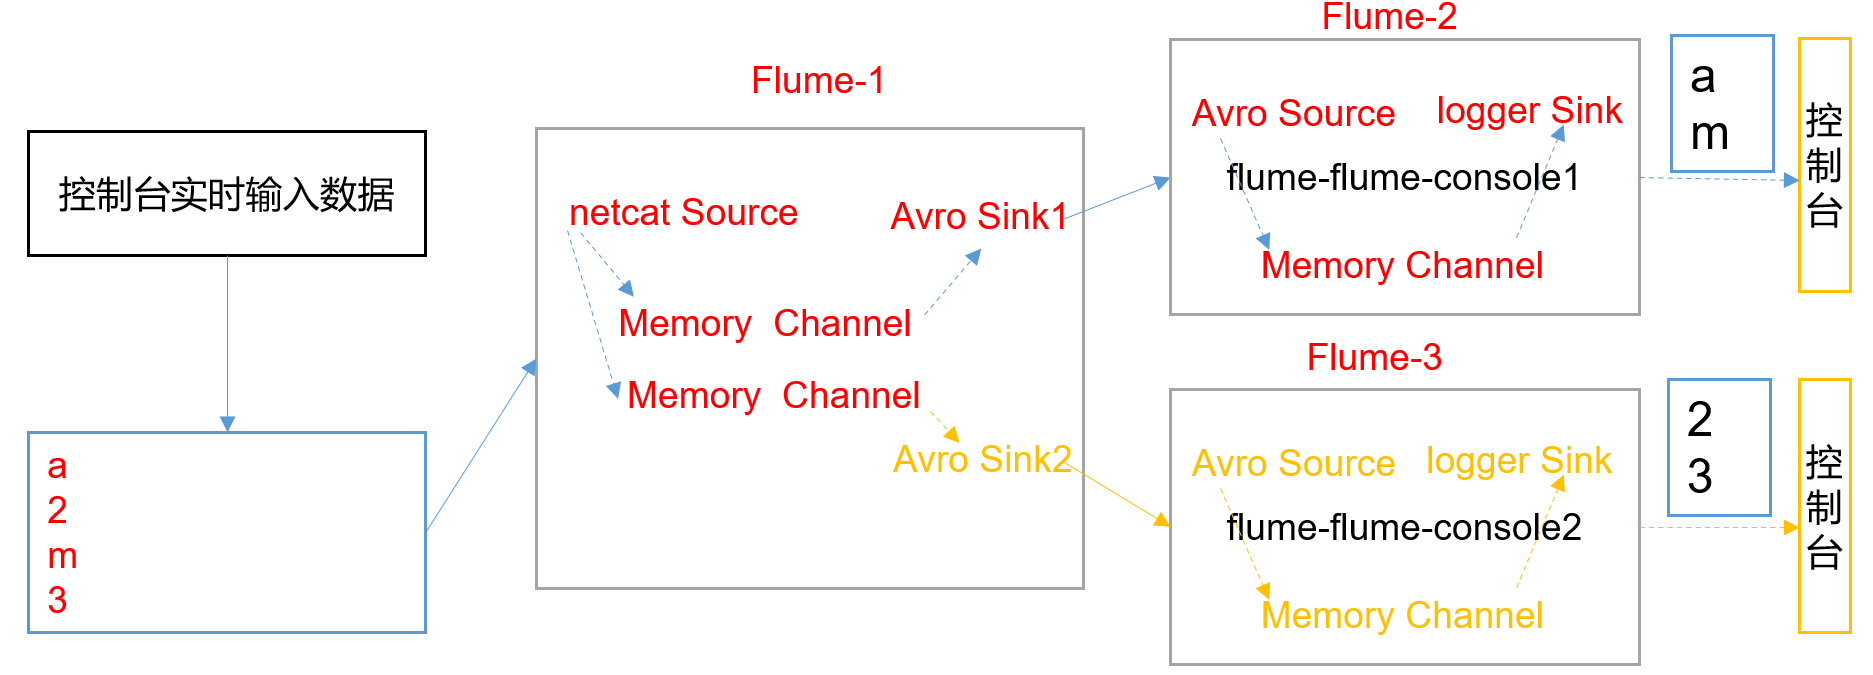
在实际的开发中,一台服务器产生的日志类型可能有很多种,不同类型的日志可能需要发送到不同的分析系统。此时会用到Flume拓扑结构中的Multiplexing结构,Multiplexing的原理是,根据event中Header的某个key的值,将不同的event发送到不同的Channel中,所以我们需要自定义一个Interceptor,为不同类型的event的Header中的key赋予不同的值。
在该案例中,我们以端口数据模拟日志,以数字(单个)和字母(单个)模拟不同类型的日志,我们需要自定义interceptor区分数字和字母,将其分别发往不同的分析系统(Channel)。
3)实现步骤
(1)创建一个maven项目,并引入以下依赖。
<dependency>
    <groupId>org.apache.flume</groupId>
    <artifactId>flume-ng-core</artifactId>
    <version>1.9.0</version>
</dependency>
(2)定义CustomInterceptor类并实现Interceptor接口。
package com.atguigu.flume.interceptor;

import org.apache.flume.Context;
import org.apache.flume.Event;
import org.apache.flume.interceptor.Interceptor;
import java.util.List;

public class CustomInterceptor implements Interceptor {
    public void initialize() {
    }

    public Event intercept(Event event) {
        byte[] body = event.getBody();
        if (body[0] < 'z' && body[0] > 'a') {
            event.getHeaders().put("type", "letter");
        } else if (body[0] > '0' && body[0] < '9') {
            event.getHeaders().put("type", "number");
        }
        return event;
    }

    public List<Event> intercept(List<Event> events) {
        for (Event event : events) {
            intercept(event);
        }
        return events;
    }

    public void close() {
    }

    public static class Builder implements Interceptor.Builder{
        public Interceptor build() {
            return new CustomInterceptor();
        }

        public void configure(Context context) {
        }
    }
}
(3)编辑flume配置文件,为hadoop102上的Flume配置1个netcat source,1个sink group(2个avro sink),并配置相应的ChannelSelector和interceptor。
在/opt/module/flume/job目录下创建group4文件夹

进入该文件夹创建flume-netcat-flume.conf文件
vim flume-netcat-flume.conf
# Name the components on this agent
a1.sources = r1
a1.sinks = k1 k2
a1.channels = c1 c2

# Describe/configure the source
a1.sources.r1.type = netcat
a1.sources.r1.bind = hadoop102
a1.sources.r1.port = 44444
a1.sources.r1.interceptors = i1
a1.sources.r1.interceptors.i1.type = com.atguigu.flume.interceptor.CustomInterceptor$Builder
a1.sources.r1.selector.type = multiplexing
a1.sources.r1.selector.header = type
a1.sources.r1.selector.mapping.letter = c1
a1.sources.r1.selector.mapping.number = c2

# Describe the sink
a1.sinks.k1.type = avro
a1.sinks.k1.hostname = hadoop103
a1.sinks.k1.port = 4141

a1.sinks.k2.type=avro
a1.sinks.k2.hostname = hadoop104
a1.sinks.k2.port = 4242

# Use a channel which buffers events in memory
a1.channels.c1.type = memory
a1.channels.c1.capacity = 1000
a1.channels.c1.transactionCapacity = 100

# Use a channel which buffers events in memory
a1.channels.c2.type = memory
a1.channels.c2.capacity = 1000
a1.channels.c2.transactionCapacity = 100


# Bind the source and sink to the channel
a1.sources.r1.channels = c1 c2
a1.sinks.k1.channel = c1
a1.sinks.k2.channel = c2
hadoop103上的Flume配置一个avro source和一个logger sink,在/opt/module/flume/job目录下创建group4文件夹,创建flume-flume-logger.conf文件
vim flume-flume-logger.conf
a1.sources = r1
a1.sinks = k1
a1.channels = c1

a1.sources.r1.type = avro
a1.sources.r1.bind = hadoop103
a1.sources.r1.port = 4141

a1.sinks.k1.type = logger

a1.channels.c1.type = memory
a1.channels.c1.capacity = 1000
a1.channels.c1.transactionCapacity = 100

a1.sinks.k1.channel = c1
a1.sources.r1.channels = c1
为hadoop104上的Flume配置一个avro source和一个logger sink,在/opt/module/flume/job目录下创建group4文件夹,创建flume-flume-logger.conf文件
vim flume-flume-logger.conf
a1.sources = r1
a1.sinks = k1
a1.channels = c1

a1.sources.r1.type = avro
a1.sources.r1.bind = hadoop104
a1.sources.r1.port = 4242

a1.sinks.k1.type = logger

a1.channels.c1.type = memory
a1.channels.c1.capacity = 1000
a1.channels.c1.transactionCapacity = 100

a1.sinks.k1.channel = c1
a1.sources.r1.channels = c1
(4)使用maven将项目打成jar后上传至/opt/module/flume/lib目录

(5)分别在hadoop103,hadoop104,hadoop102上启动flume进程,注意先后顺序。
#在hadoop103的/opt/module/flume/目录下执行
bin/flume-ng agent --conf conf/ --name a1 --conf-file job/group4/flume-flume-logger.conf -Dflume.root.logger=INFO,console
#在hadoop104的/opt/module/flume/目录下执行
bin/flume-ng agent --conf conf/ --name a1 --conf-file job/group4/flume-flume-logger.conf -Dflume.root.logger=INFO,console
#在hadoop102的/opt/module/flume/目录下执行
bin/flume-ng agent --conf conf/ --name a1 --conf-file job/group4/flume-netcat-flume.conf -Dflume.root.logger=INFO,console
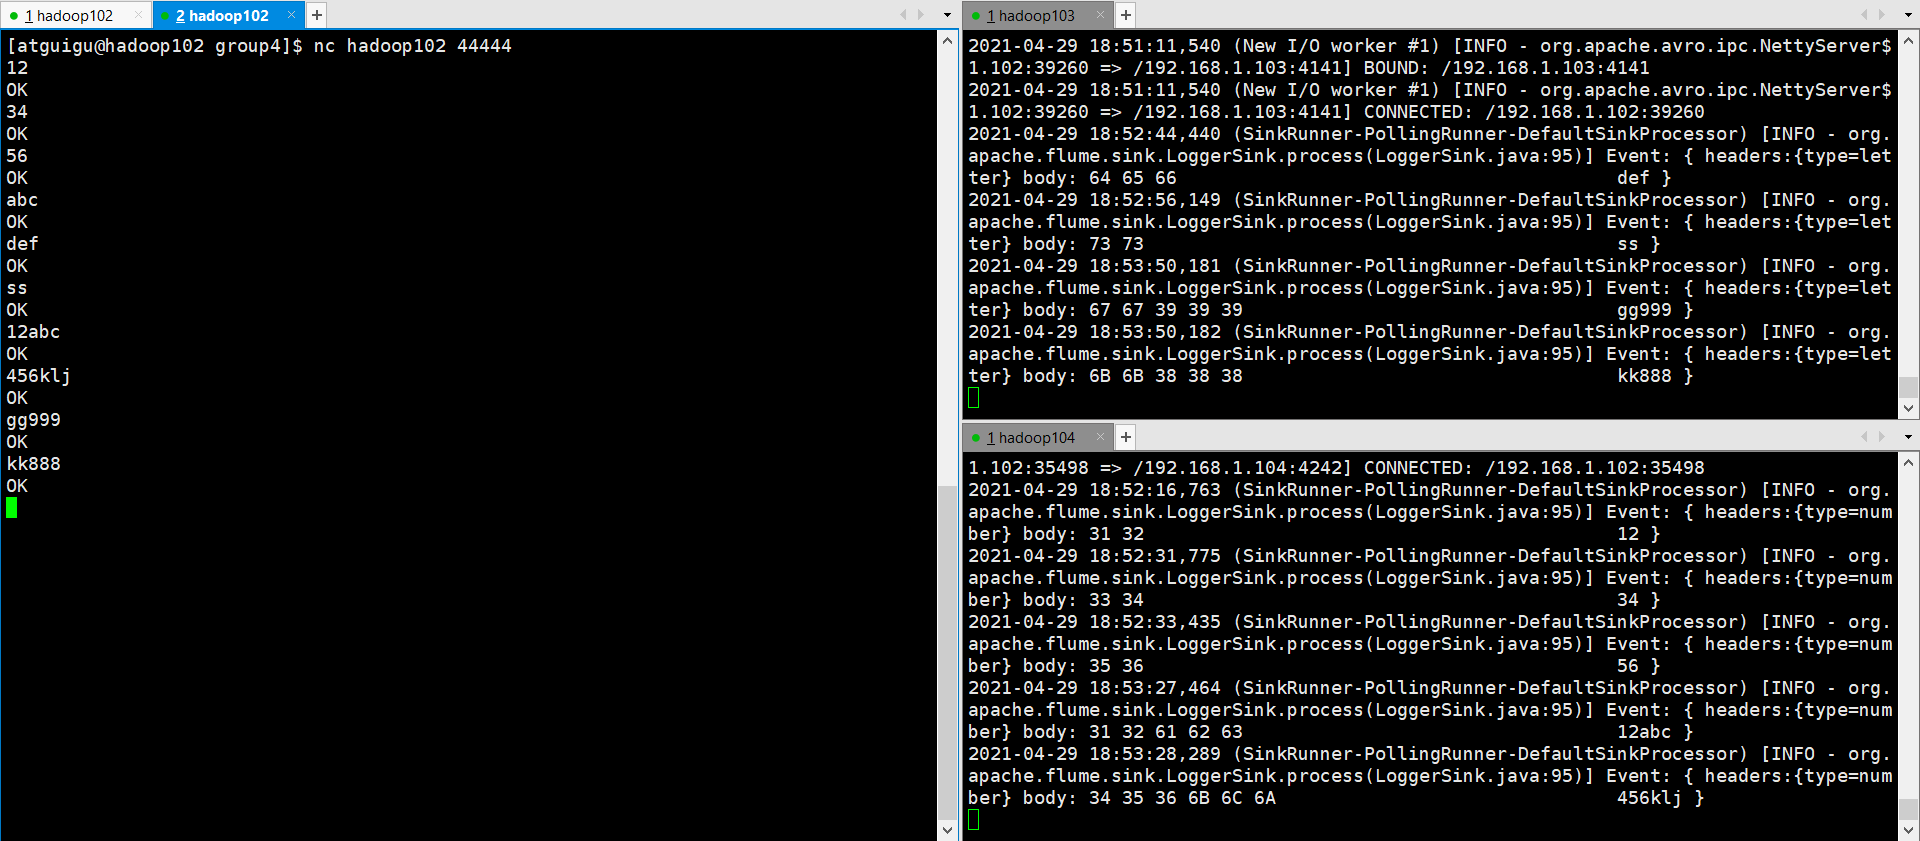
(6)在hadoop102使用netcat向localhost:44444发送字母和数字。
(7)观察hadoop103和hadoop104打印的日志。
3.6 自定义Source
1)介绍
Source是负责接收数据到Flume Agent的组件。Source组件可以处理各种类型、各种格式的日志数据,包括avro、thrift、exec、jms、spooling directory、netcat、sequence generator、syslog、http、legacy。官方提供的source类型已经很多,但是有时候并不能满足实际开发当中的需求,此时我们就需要根据实际需求自定义某些source。
官方也提供了自定义source的接口:https://flume.apache.org/FlumeDeveloperGuide.html#source
根据官方说明自定义MySource需要继承AbstractSource类并实现Configurable和PollableSource接口。
实现相应方法:
getBackOffSleepIncrement()//暂不用
getMaxBackOffSleepInterval()//暂不用
configure(Context context)//初始化context(读取配置文件内容)
process()//获取数据封装成event并写入channel,这个方法将被循环调用。
使用场景:读取MySQL数据或者其他文件系统。
2)需求
使用flume接收数据,并给每条数据添加前缀,输出到控制台。前缀可从flume配置文件中配置。
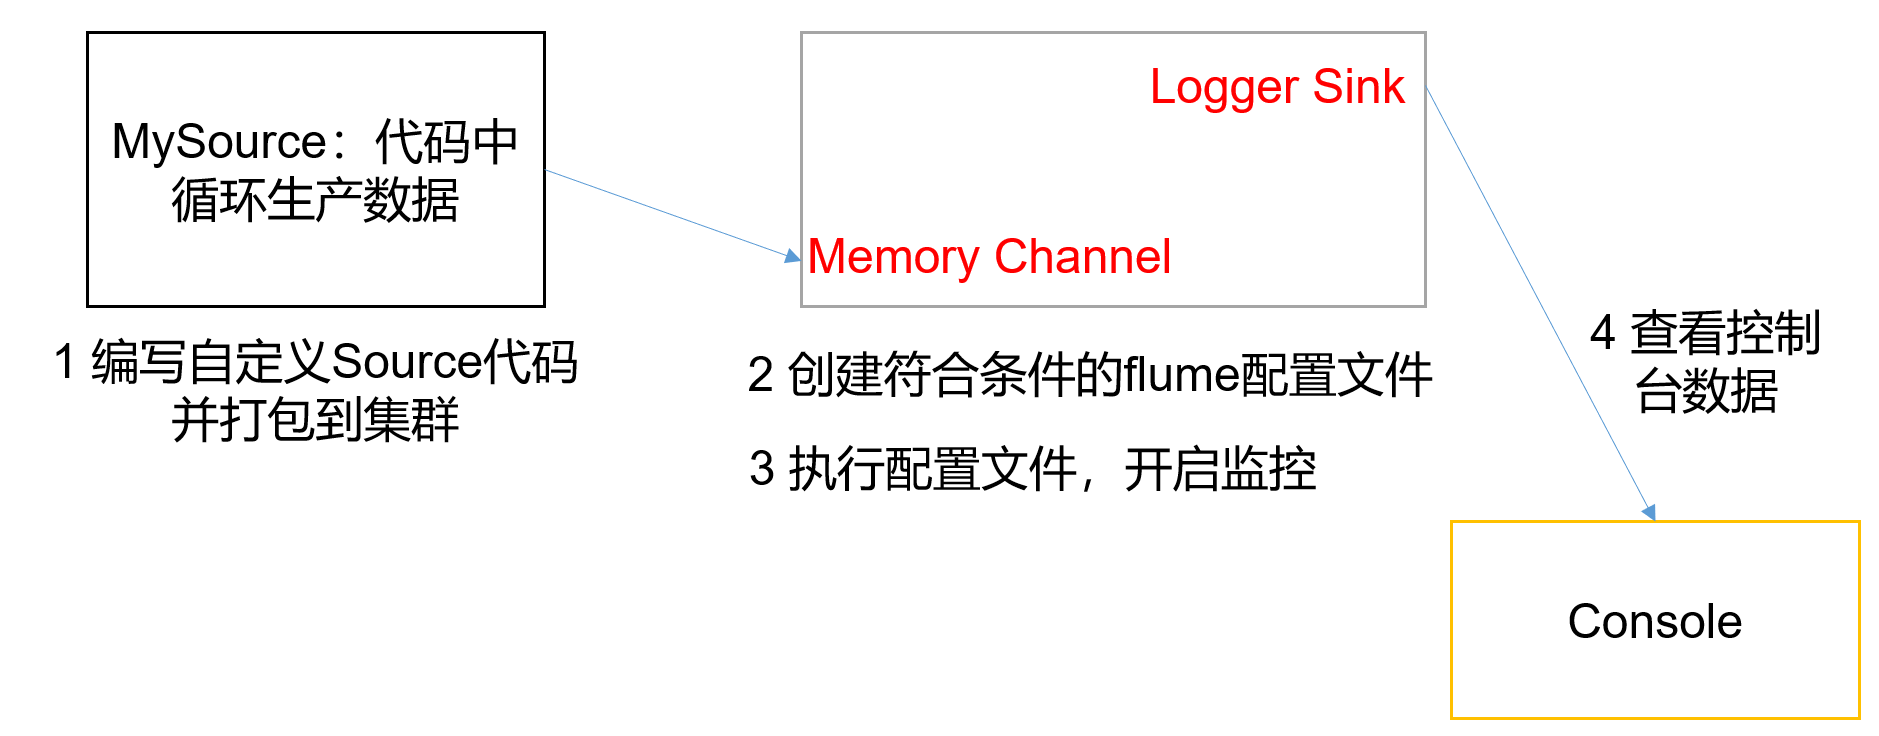
3)分析
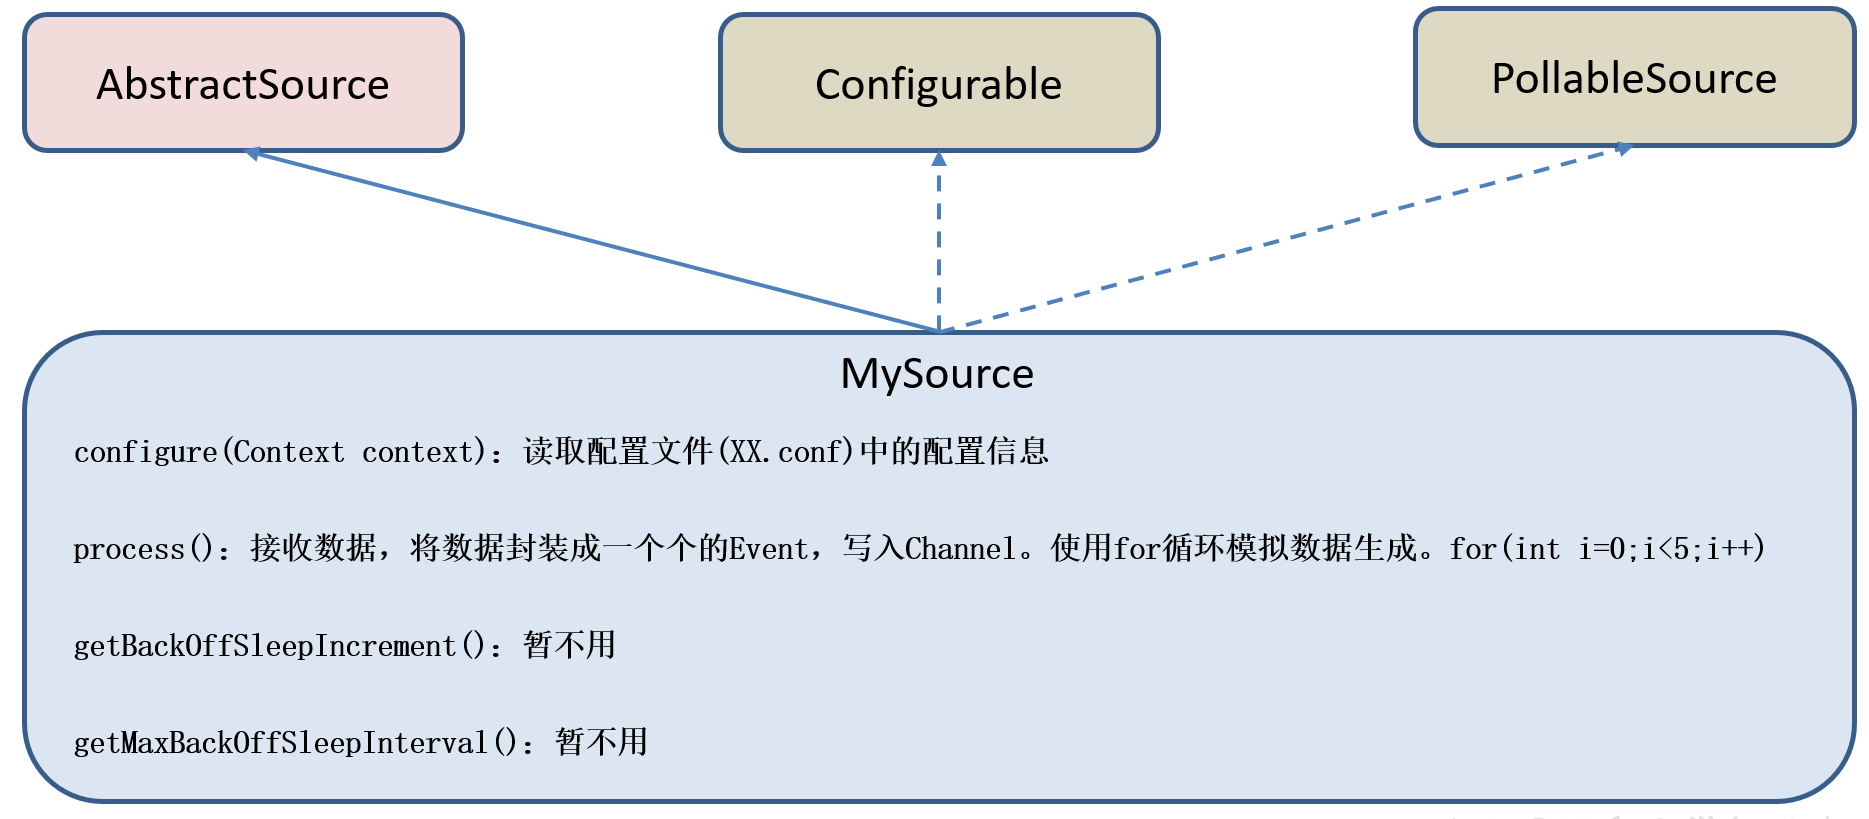
4)编码
(1)编写代码
package com.atguigu.flume.interceptor;

import org.apache.flume.Context;
import org.apache.flume.EventDeliveryException;
import org.apache.flume.PollableSource;
import org.apache.flume.conf.Configurable;
import org.apache.flume.event.SimpleEvent;
import org.apache.flume.source.AbstractSource;

import java.util.HashMap;

public class MySource extends AbstractSource implements Configurable, PollableSource {
    //定义配置文件将来要读取的字段
    private Long delay;
    private String field;

    @Override
    public Status process() throws EventDeliveryException {
        try {
            //创建事件头信息
            HashMap<String, String> hearderMap = new HashMap<String, String>();
            //创建事件
            SimpleEvent event = new SimpleEvent();
            //循环封装事件

            for (int i = 0; i < 5; i++) {
                //给事件设置头信息
                event.setHeaders(hearderMap);
                //给事件设置内容
                event.setBody((field + i).getBytes());
                //将事件写入channel
                getChannelProcessor().processEvent(event);
                Thread.sleep(delay);
            }
        } catch (Exception e) {
            e.printStackTrace();
            return Status.BACKOFF;
        }
        return Status.READY;
    }

    public long getBackOffSleepIncrement() {
        return 0;
    }

    public long getMaxBackOffSleepInterval() {
        return 0;
    }

    //初始化配置信息
    @Override
    public void configure(Context context) {
        delay = context.getLong("delay");
        field = context.getString("field","Hello!");
    }
}
5)测试
(1)打包,将写好的代码打包,并放到flume的lib目录(/opt/module/flume)下。
(2)配置文件,在hadoop102的/opt/module/flume/job目录下新建group5目录,然后在该目录下新建 flume-fiel-logger.conf
mkdir group5
cd group5/
vim flume-fiel-logger.conf
# Name the components on this agent
a1.sources = r1
a1.sinks = k1
a1.channels = c1

# Describe/configure the source
a1.sources.r1.type = com.atguigu.flume.interceptor.MySource
a1.sources.r1.delay = 1000
#a1.sources.r1.field = atguigu

# Describe the sink
a1.sinks.k1.type = logger

# Use a channel which buffers events in memory
a1.channels.c1.type = memory
a1.channels.c1.capacity = 1000
a1.channels.c1.transactionCapacity = 100

# Bind the source and sink to the channel
a1.sources.r1.channels = c1
a1.sinks.k1.channel = c1
(3)开启任务
bin/flume-ng agent --conf conf/ --name a1 --conf-file job/group5/flume-fiel-logger.conf -Dflume.root.logger=INFO,console

(4)结果展示

3.7 自定义Sink
1)介绍
Sink不断地轮询Channel中的事件且批量地移除它们,并将这些事件批量写入到存储或索引系统、或者被发送到另一个Flume Agent。
Sink是完全事务性的。在从Channel批量删除数据之前,每个Sink用Channel启动一个事务。批量事件一旦成功写出到存储系统或下一个Flume Agent,Sink就利用Channel提交事务。事务一旦被提交,该Channel从自己的内部缓冲区删除事件。
Sink组件目的地包括hdfs、logger、avro、thrift、ipc、file、null、HBase、solr、自定义。官方提供的Sink类型已经很多,但是有时候并不能满足实际开发当中的需求,此时我们就需要根据实际需求自定义某些Sink。
官方也提供了自定义sink的接口:https://flume.apache.org/FlumeDeveloperGuide.html#sink
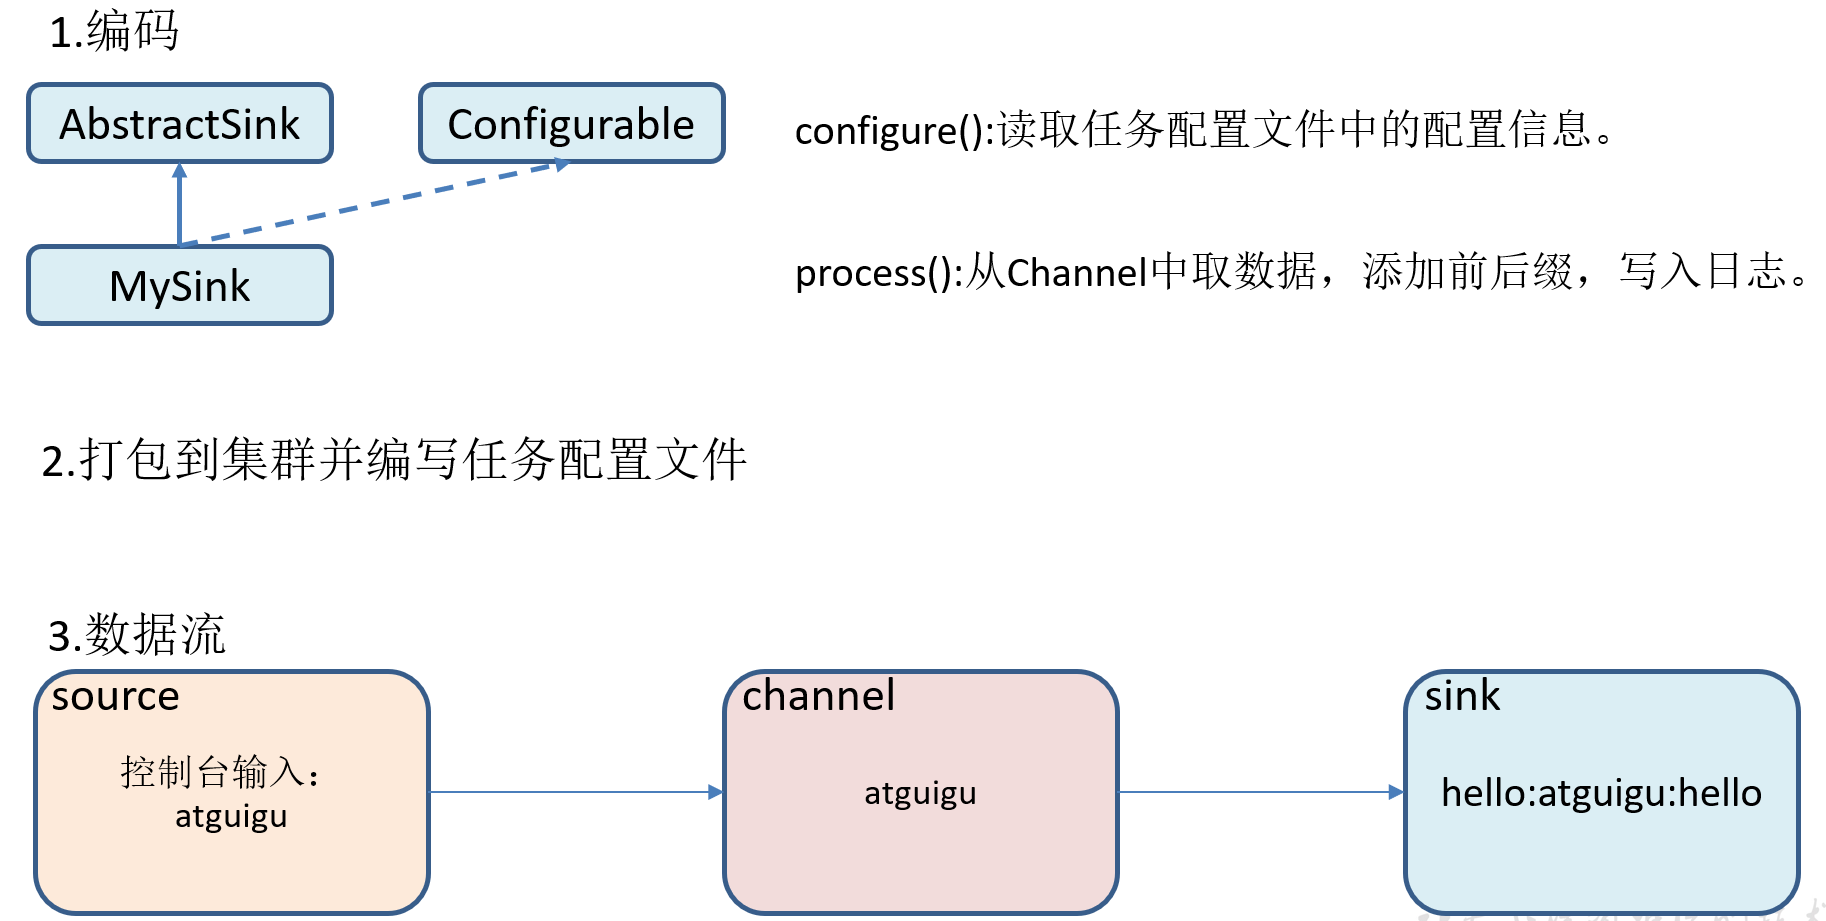
根据官方说明自定义MySink需要继承AbstractSink类并实现Configurable接口。
实现相应方法:
configure(Context context)//初始化context(读取配置文件内容)
process()//从Channel读取获取数据(event),这个方法将被循环调用。
使用场景:读取Channel数据写入MySQL或者其他文件系统。
2)需求
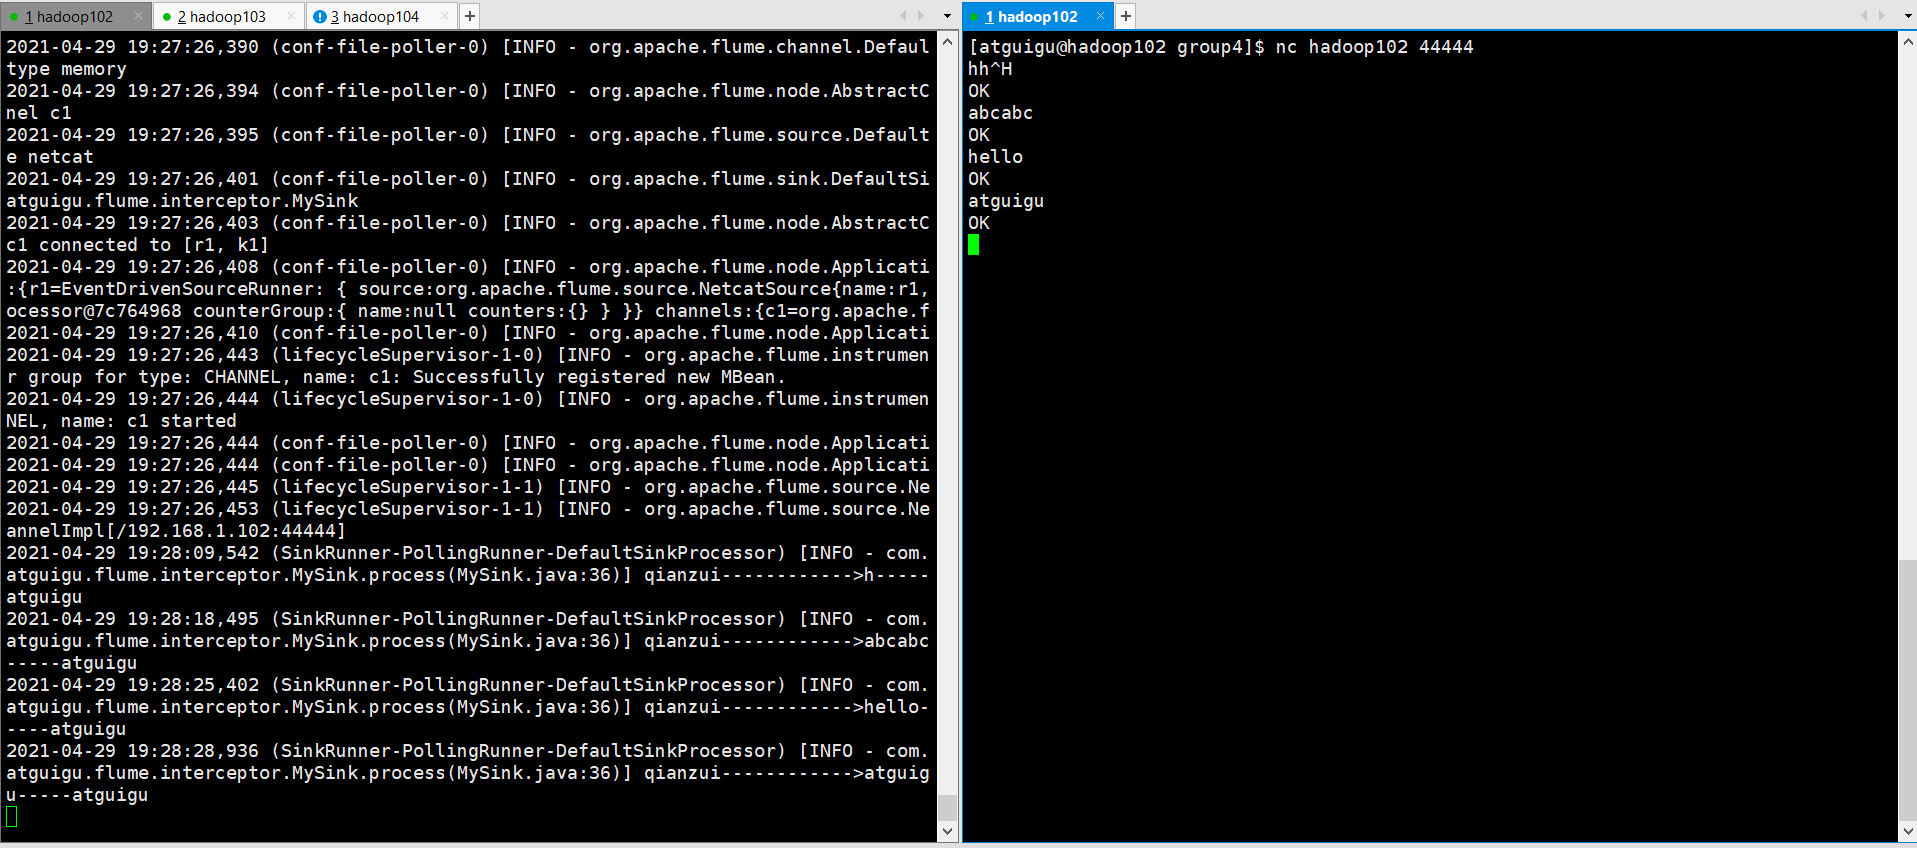
使用flume接收数据,并在Sink端给每条数据添加前缀和后缀,输出到控制台。前后缀可在flume任务配置文件中配置。
流程分析:
3)编码
package com.atguigu.flume.interceptor;

import org.apache.flume.*;
import org.apache.flume.conf.Configurable;
import org.apache.flume.sink.AbstractSink;
import org.slf4j.Logger;
import org.slf4j.LoggerFactory;

public class MySink extends AbstractSink implements Configurable {
    //创建Logger对象
    private static final Logger LOG = LoggerFactory.getLogger(AbstractSink.class);
    private String prefix;
    private String suffix;

    @Override
    public Status process() throws EventDeliveryException {
        //声明返回值状态信息
        Status status;
        //获取当前Sink绑定的Channel
        Channel ch = getChannel();
        //获取事务
        Transaction txn = ch.getTransaction();
        //声明事件
        Event event;
        //开启事务
        txn.begin();
        //读取Channel中的事件,直到读取到事件结束循环
        while (true) {
            event = ch.take();
            if (event != null) {
                break;
            }
        }
        try {
            //处理事件(打印)
            LOG.info(prefix + new String(event.getBody()) + suffix);
            //事务提交
            txn.commit();
            status = Status.READY;
        } catch (Exception e) {
            //遇到异常,事务回滚
            txn.rollback();
            status = Status.BACKOFF;
        } finally {
            //关闭事务
            txn.close();
        }
        return status;
    }

    @Override
    public void configure(Context context) {
        //读取配置文件内容,有默认值
        prefix = context.getString("prefix", "qianzui------------>");
        //读取配置文件内容,无默认值
        suffix = context.getString("suffix","<----------------houzui");
    }
}
4)测试
(1)打包,将写好的代码打包,并放到flume的lib目录(/opt/module/flume)下。
(2)配置文件,在hadoop102的/opt/module/flume/job目录下新建group6目录,然后在该目录下新建 flume-netcat-logger.conf
mkdir group6
cd group6/
vim flume-fiel-logger.conf
# Name the components on this agent
a1.sources = r1
a1.sinks = k1
a1.channels = c1

# Describe/configure the source
a1.sources.r1.type = netcat
a1.sources.r1.bind = hadoop102
a1.sources.r1.port = 44444

# Describe the sink
a1.sinks.k1.type = com.atguigu.flume.interceptor.MySink
#a1.sinks.k1.prefix = atguigu-----
a1.sinks.k1.suffix = -----atguigu

# Use a channel which buffers events in memory
a1.channels.c1.type = memory
a1.channels.c1.capacity = 1000
a1.channels.c1.transactionCapacity = 100

# Bind the source and sink to the channel
a1.sources.r1.channels = c1
a1.sinks.k1.channel = c1
(3)开启任务
bin/flume-ng agent --conf conf/ --name a1 --conf-file job/group6/flume-fiel-logger.conf -Dflume.root.logger=INFO,console
(4)结果展示
3.8 Flume数据流监控
3.8.1 Ganglia的安装与部署
Ganglia由gmond、gmetad和gweb三部分组成。
gmond(Ganglia Monitoring Daemon)是一种轻量级服务,安装在每台需要收集指标数据的节点主机上。使用gmond,你可以很容易收集很多系统指标数据,如CPU、内存、磁盘、网络和活跃进程的数据等。
gmetad(Ganglia Meta Daemon)整合所有信息,并将其以RRD格式存储至磁盘的服务。
gweb(Ganglia Web)Ganglia可视化工具,gweb是一种利用浏览器显示gmetad所存储数据的PHP前端。在Web界面中以图表方式展现集群的运行状态下收集的多种不同指标数据。
1)三台机器安装epel源
sudo yum install -y epel-release
2) 在hadoop102安装web,meta和monitor
sudo yum -y install ganglia-gmetad ganglia-web ganglia-gmond
3) 在103、104安装monitor
sudo yum -y install ganglia-gmond
4)在hadoop102上修改配置文件/etc/httpd/conf.d/ganglia.conf
sudo vim /etc/httpd/conf.d/ganglia.conf
Alias /ganglia /usr/share/ganglia

<Location /ganglia>
  #Require local
  Require ip 192.168.1.9
  Require all granted
  # Require ip 10.1.2.3
  # Require host example.org
</Location>
其中的Require ip 192.168.1.9 地址是根据windows上的VMnet8ip地址为依据的,各位可以输入 ipconfig 自行查看自己的ip

5)在hadoop102上修改配置文件/etc/ganglia/gmetad.conf
sudo vim /etc/ganglia/gmetad.conf

将该条内容修改为:
data_source "hadoop102" hadoop102
6)在hadoop102上修改有颜色内容的配置文件/etc/ganglia/gmond.conf,并将修改后的文件同步到103,104。
sudo vim /etc/ganglia/gmond.conf
cluster {
  name = "hadoop102"
  owner = "unspecified"
  latlong = "unspecified"
  url = "unspecified"
}
udp_send_channel {
  #bind_hostname = yes # Highly recommended, soon to be default.
                       # This option tells gmond to use a source address
                       # that resolves to the machine's hostname.  Without
                       # this, the metrics may appear to come from any
                       # interface and the DNS names associated with
                       # those IPs will be used to create the RRDs.
  # mcast_join = 239.2.11.71
  host = hadoop102
  port = 8649
  ttl = 1
}
udp_recv_channel {
  # mcast_join = 239.2.11.71
  port = 8649
  bind = 0.0.0.0
  retry_bind = true
  # Size of the UDP buffer. If you are handling lots of metrics you really
  # should bump it up to e.g. 10MB or even higher.
  # buffer = 10485760
}
7)在hadoop102上修改配置文件/etc/selinux/config
sudo vim /etc/selinux/config
# This file controls the state of SELinux on the system.
# SELINUX= can take one of these three values:
#     enforcing - SELinux security policy is enforced.
#     permissive - SELinux prints warnings instead of enforcing.
#     disabled - No SELinux policy is loaded.
SELINUX=disabled
# SELINUXTYPE= can take one of these two values:
#     targeted - Targeted processes are protected,
#     mls - Multi Level Security protection.
SELINUXTYPE=targeted
尖叫提示:selinux本次生效关闭必须重启,如果此时不想重启,可以临时生效之:
sudo setenforce 0
8)hadoop102启动ganglia三个后台,hadoop103,hadoop104启动gmond
#hadoop102上启动
sudo systemctl start httpd
sudo systemctl start gmetad
sudo systemctl start gmond
#hadoop103上启动
sudo systemctl start gmond
#hadoop104上启动
sudo systemctl start gmond
9)打开网页浏览ganglia页面:http://hadoop102/ganglia
尖叫提示:如果完成以上操作依然出现权限不足错误,请修改/var/lib/ganglia目录的权限:
sudo chmod -R 777 /var/lib/ganglia
3.8.2 操作Flume测试监控
1)在hadoop102上启动Flume任务
bin/flume-ng agent --conf conf/ --name a1 --conf-file job/group6/flume-fiel-logger.conf -Dflume.root.logger=INFO,console -Dflume.monitoring.type=ganglia -Dflume.monitoring.hosts=hadoop102:8649
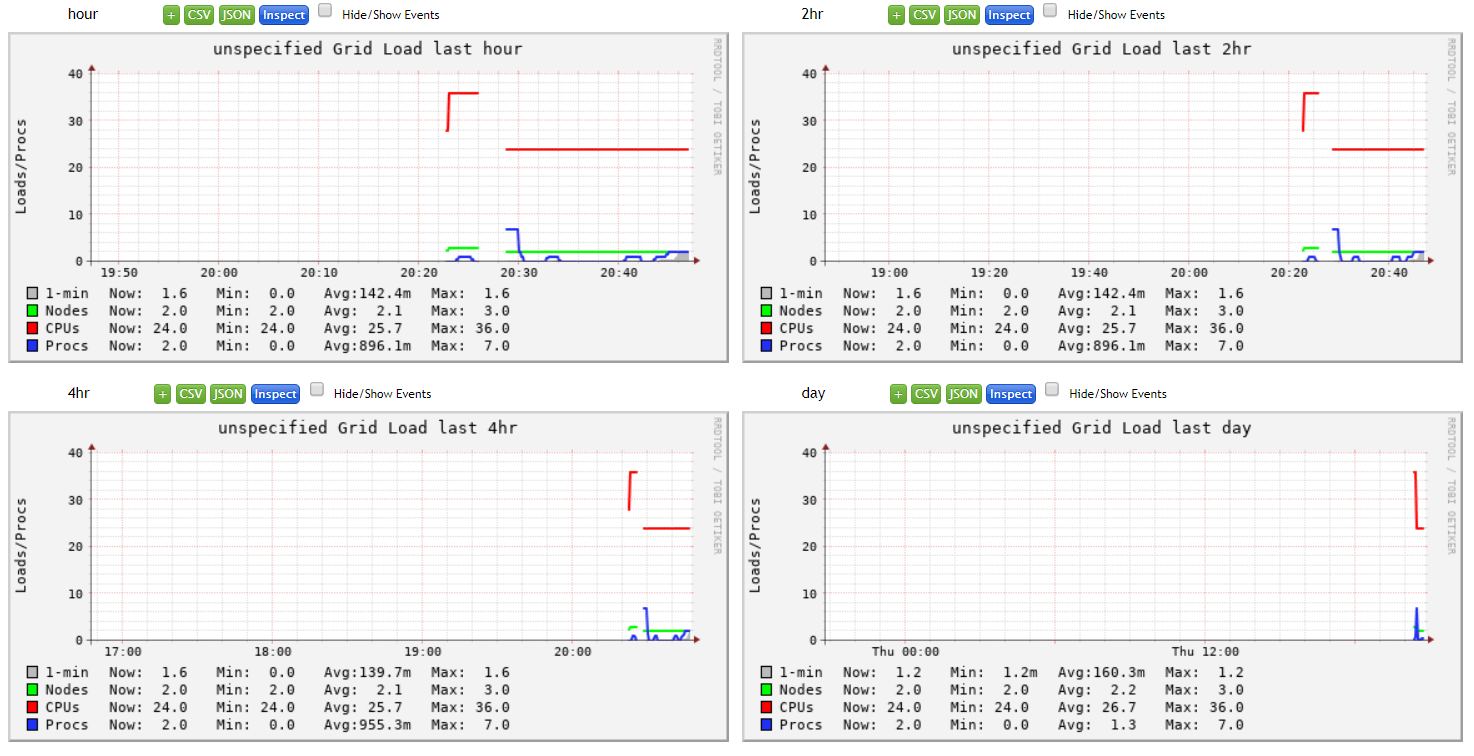
2)发送数据观察ganglia监测图
nc localhost 44444
样式如图:

|
字段(图表名称) |
字段含义 |
|
EventPutAttemptCount |
source尝试写入channel的事件总数量 |
|
EventPutSuccessCount |
成功写入channel且提交的事件总数量 |
|
EventTakeAttemptCount |
sink尝试从channel拉取事件的总数量。 |
|
EventTakeSuccessCount |
sink成功读取的事件的总数量 |
|
StartTime |
channel启动的时间(毫秒) |
|
StopTime |
channel停止的时间(毫秒) |
|
ChannelSize |
目前channel中事件的总数量 |
|
ChannelFillPercentage |
channel占用百分比 |
|
ChannelCapacity |
channel的容量 |
第4章 企业真实面试题(重点)
4.1 你是如何实现Flume数据传输的监控的
使用第三方框架Ganglia实时监控Flume。
4.2 Flume的Source,Sink,Channel的作用?你们Source是什么类型?
1)作用
(1)Source组件是专门用来收集数据的,可以处理各种类型、各种格式的日志数据,包括avro、thrift、exec、jms、spooling directory、netcat、sequence generator、syslog、http、legacy
(2)Channel组件对采集到的数据进行缓存,可以存放在Memory或File中。
(3)Sink组件是用于把数据发送到目的地的组件,目的地包括Hdfs、Logger、avro、thrift、ipc、file、Hbase、solr、自定义。
2)我公司采用的Source类型为:
(1)监控后台日志:taildir,avro
(2)监控后台产生日志的端口:netcat exec spooldir
4.3 Flume的Channel Selectors

Channel Selectors,可以让不同的项目日志通过不同的Channel到不同的Sink中去,官方文档上Channel Selectors有两种类型:Replicating Channel Selector(default)和 Multiplexing Channel Selector
这两种Selector的区别是:Replicating会将source过来的events发往所有channel,而Multiplexing可以选择该发往哪些Channel
4.4 Flume参数调优
1)Source
增加Source个(使用Tair Dir Source时可增加FileGroups个数)可以增大Source的读取数据的能力。例如:当某一个目录产生的文件过多时需要将这个文件目录拆分成多个文件目录,同时配置好多个Source 以保证Source有足够的能力获取到新产生的数据。
batchSize参数决定Source一次批量运输到Channel的event条数,适当调大这个参数可以提高Source搬运Event到Channel时的性能。
2)Channel
type 选择memory时Channel的性能最好,但是如果Flume进程意外挂掉可能会丢失数据。type选择file时Channel的容错性更好,但是性能上会比memory channel差。
使用file Channel时dataDirs配置多个不同盘下的目录可以提高性能。
Capacity 参数决定Channel可容纳最大的event条数。transactionCapacity 参数决定每次Source往channel里面写的最大event条数和每次Sink从channel里面读的最大event条数。
transactionCapacity需要大于Source和Sink的batchSize参数。
3)Sink
增加Sink的个数可以增加Sink消费event的能力。Sink也不是越多越好够用就行,过多的Sink会占用系统资源,造成系统资源不必要的浪费。
batchSize参数决定Sink一次批量从Channel读取的event条数,适当调大这个参数可以提高Sink从Channel搬出event的性能。
4.5 Flume的事务机制
Flume的事务机制(类似数据库的事务机制):Flume使用两个独立的事务分别负责从Soucrce到Channel,以及从Channel到Sink的事件传递。比如spooling directory source 为文件的每一行创建一个事件,一旦事务中所有的事件全部传递到Channel且提交成功,那么Soucrce就将该文件标记为完成。同理,事务以类似的方式处理从Channel到Sink的传递过程,如果因为某种原因使得事件无法记录,那么事务将会回滚。且所有的事件都会保持到Channel中,等待重新传递。
4.6 Flume采集数据会丢失吗?
根据Flume的架构原理,Flume是不可能丢失数据的,其内部有完善的事务机制,Source到Channel是事务性的,Channel到Sink是事务性的,因此这两个环节不会出现数据的丢失,唯一可能丢失数据的情况是Channel采用memoryChannel,agent宕机导致数据丢失,或者Channel存储数据已满,导致Source不再写入,未写入的数据丢失。
Flume不会丢失数据,但是有可能造成数据的重复,例如数据已经成功由Sink发出,但是没有接收到响应,Sink会再次发送数据,此时可能会导致数据的重复。


 浙公网安备 33010602011771号