linux文件系统初探--Day2(3)
大致搞清楚mount过程在内核中是怎样一个过程之后,今天来看看day2的super.c中都干了啥。
samplefs_fill_super
samplefs_fill_super在挂载时作为samplefs_mount->mount_nodev中的回调函数被调用,接下来看一下 mount_nodev:
mount_nodev
struct dentry *mount_nodev(struct file_system_type *fs_type,
	int flags, void *data,
	int (*fill_super)(struct super_block *, void *, int))
{
	int error;
	struct super_block *s = sget(fs_type, NULL, set_anon_super, flags, NULL);

	if (IS_ERR(s))
		return ERR_CAST(s);

	error = fill_super(s, data, flags & SB_SILENT ? 1 : 0);
	if (error) {
		deactivate_locked_super(s);
		return ERR_PTR(error);
	}
	s->s_flags |= SB_ACTIVE;
	return dget(s->s_root);
}
可见mount_nodev的逻辑如下:
- 根据fs_type创建一个super_block;
- 调用fill_super填充这个super_block;
- 返回super_block的root dentry。
所以fill_super的功能顾名思义,就是fill mount_nodev 创建的super_block:
static int samplefs_fill_super(struct super_block *sb, void *data, int silent)
{
	struct inode *inode;
	struct samplefs_sb_info *sfs_sb;

        /* 设置超级块中的部分成员 */
	sb->s_maxbytes = MAX_LFS_FILESIZE; /* NB: may be too large for mem */
	sb->s_blocksize = PAGE_CACHE_SIZE;
	sb->s_blocksize_bits = PAGE_CACHE_SHIFT;
	sb->s_magic = SAMPLEFS_MAGIC;
	sb->s_op = &samplefs_super_ops;
	sb->s_time_gran = 1; /* 1 nanosecond time granularity */

/* Eventually replace iget with:
	inode = samplefs_get_inode(sb, S_IFDIR | 0755, 0); */

        // 这里原来是iget,新内核中,iget被iget_locked代替
        // 根据super_block和inode ino找到相应的inode,如果找不到就新建一个。
        // 这个inode是特定文件系统的root inode
	inode = iget_locked(sb, SAMPLEFS_ROOT_I);

	if (!inode)
		return -ENOMEM;
        unlock_new_inode(inode);

        // 将内存中的super_block的s_fs_info设为samplefs_sb_info
	sb->s_fs_info = kzalloc(sizeof(struct samplefs_sb_info), GFP_KERNEL);
	sfs_sb = SFS_SB(sb);
	if (!sfs_sb) {
		iput(inode);
		return -ENOMEM;
	}

        // 根据root inode创建root dentry
	sb->s_root = d_make_root(inode);
	if (!sb->s_root) {
		iput(inode);
		kfree(sfs_sb);
		return -ENOMEM;
	}

        // 设置 negative language support,这是samplefs_sb_info自带的成员。
	/* below not needed for many fs - but an example of per fs sb data */
	sfs_sb->local_nls = load_nls_default();

        // samplefs 挂载时的多个选项,这部分在接下来详细讨论。
	samplefs_parse_mount_options(data, sfs_sb);

	/* FS-FILLIN your filesystem specific mount logic/checks here */

	return 0;
}
samplefs_parse_mount_options
这个函数主要是解析mount命令的options,options由mount系统调用(用户态)传给ksys_mount,在ksys_mount中将参数从用户态转换为内核态。解析得到的数据都存放在samplefs_sb_info中。
static void
samplefs_parse_mount_options(char *options, struct samplefs_sb_info *sfs_sb)
{
	char *value;
	char *data;
	int size;

	if (!options)
		return;

	while ((data = strsep(&options, ",")) != NULL) {
		if (!*data)
			continue;
		if ((value = strchr(data, '=')) != NULL)
			*value++ = '\0';

                // 这里strnicmp改为strncasecmp,一样的功能。
		if (strncasecmp(data, "rsize", 5) == 0) {
			if (value && *value) {
				size = simple_strtoul(value, &value, 0);
				if (size > 0)
					sfs_sb->rsize = size;
			}
		} else if (strncasecmp(data, "wsize", 5) == 0) {
			if (value && *value) {
				size = simple_strtoul(value, &value, 0);
				if (size > 0)
					sfs_sb->wsize = size;
			}
		} /* else unknown mount option */
	}
}
samplefs_put_super负责将super_block的私有信息(s_fs_info)从内存移除,我们看代码也确实是做了这样的操作。
现在,我们的samplefs可以执行mount过程了。

小结
其实day2的代码还是容易搞懂的,day2最难弄清楚的其实是mount的具体过程。
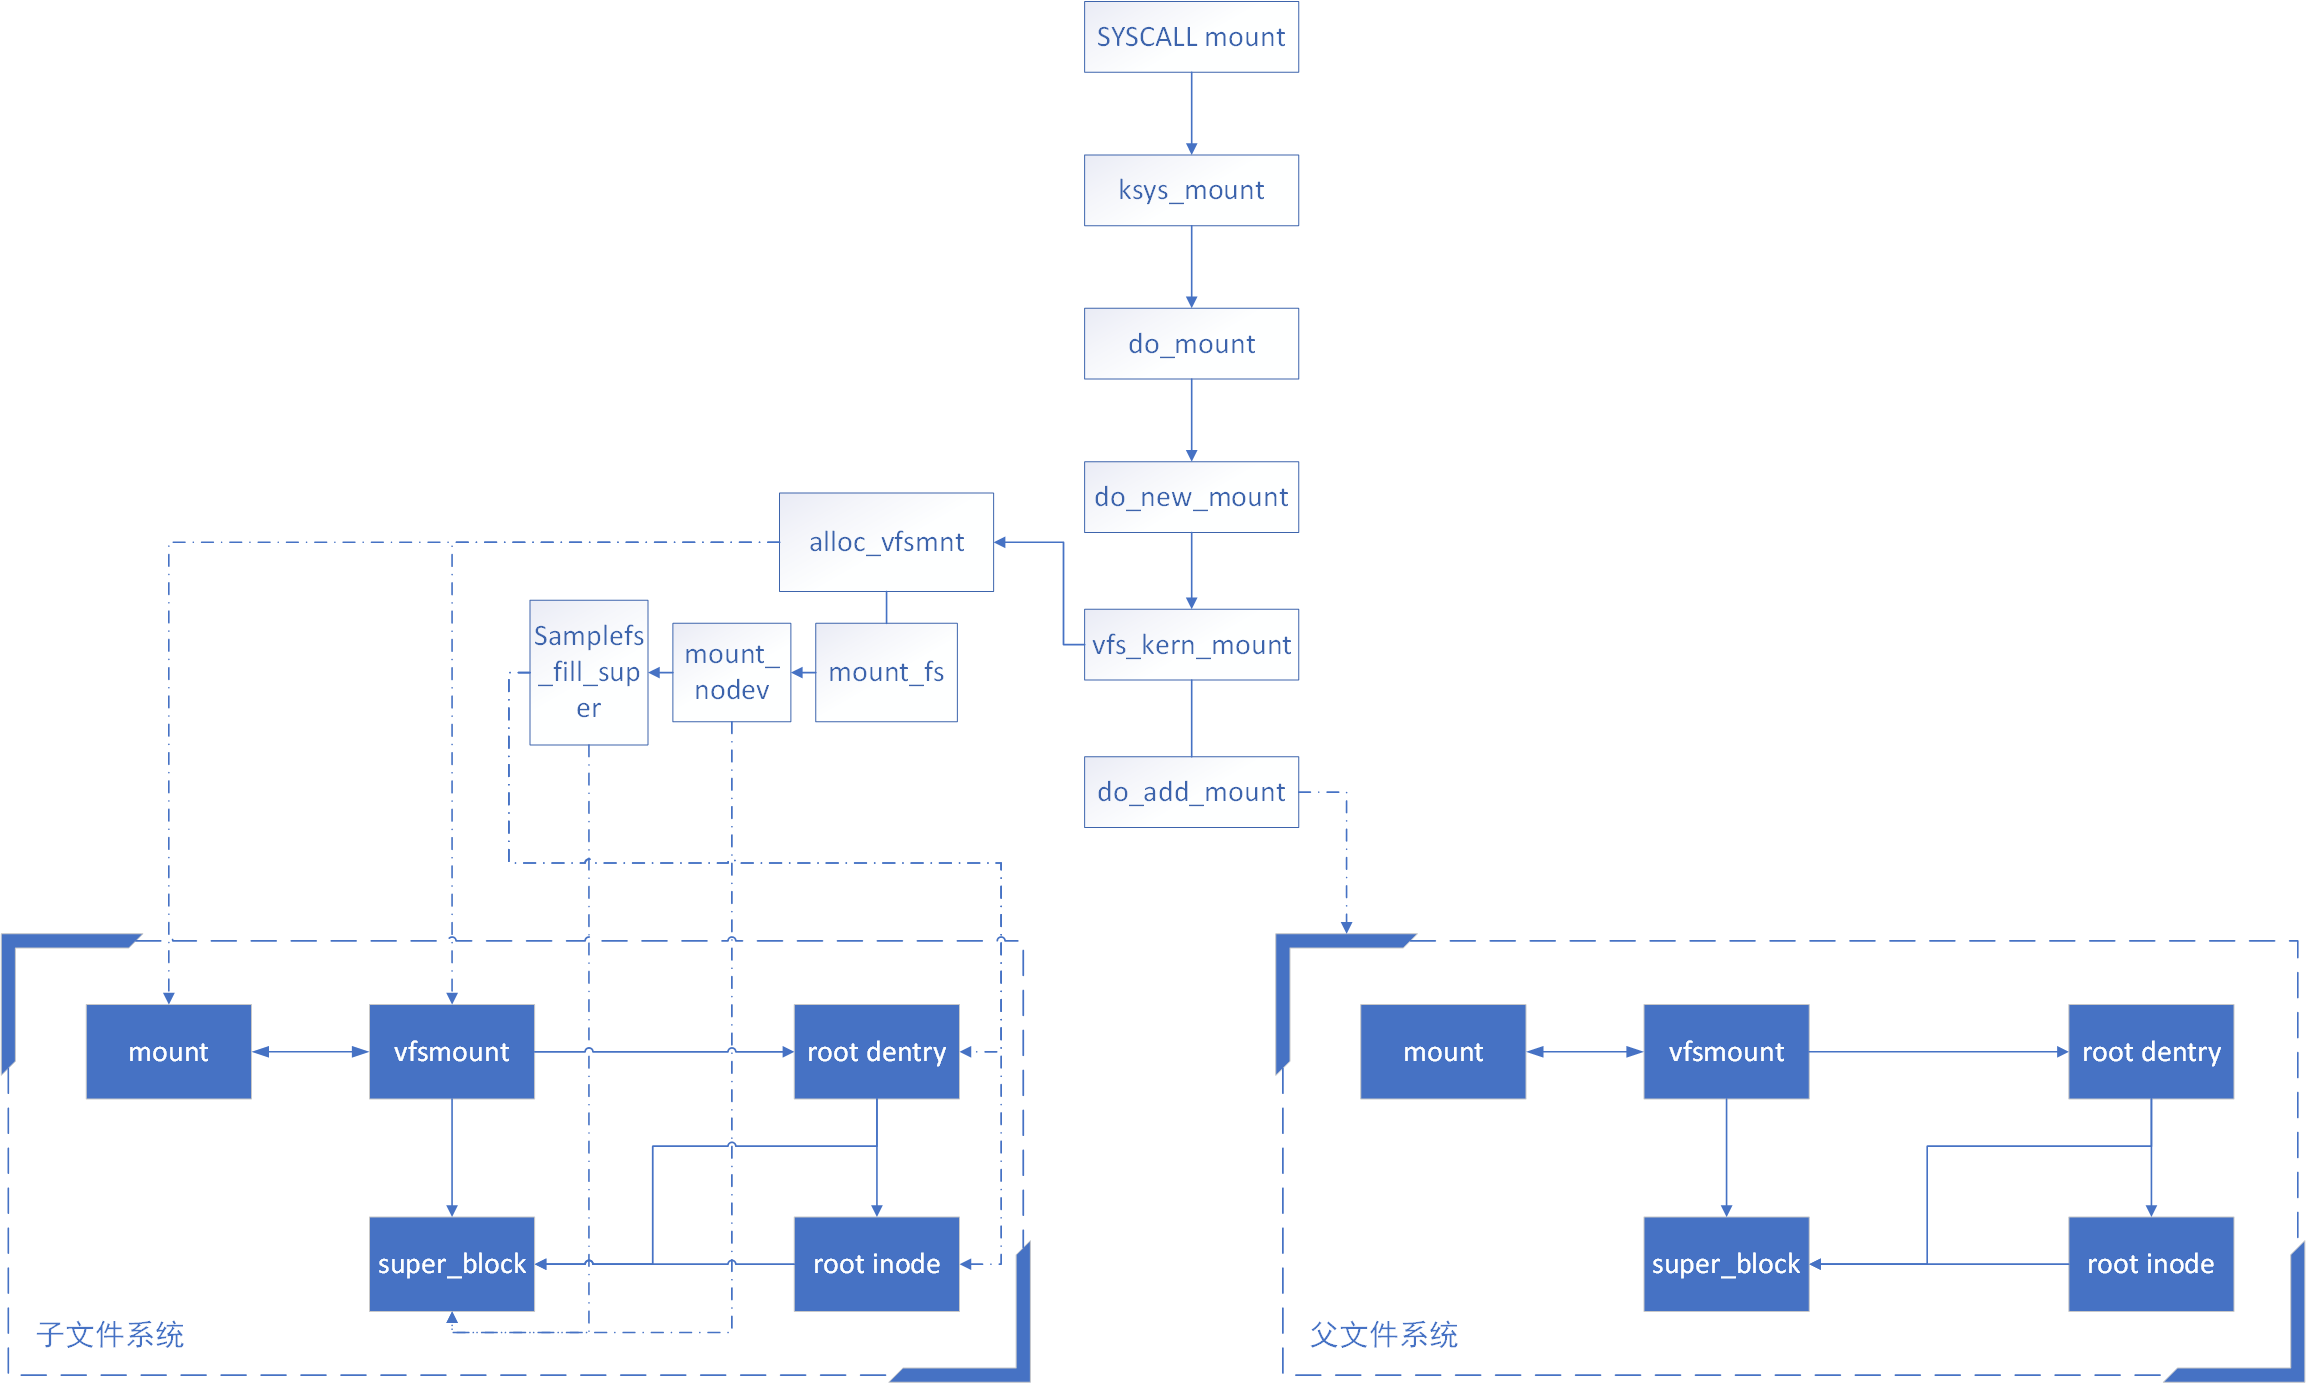
上图部分借鉴了这里
vfs_kern_mount负责完成mount过程中文件系统各种结构(mount、vfsmount、super_block、inode以及dentry)的创建与填写,do_add_mount负责将文件系统以及其root_dentry指向正确的父文件系统中dentry的位置。

 浙公网安备 33010602011771号