

springboot+easyui+jpa实现动态权限角色的后台管理系统(一)
最近因为多次需要使用easyui的后台管理系统,所以自己写了一个easyui后台管理系统的模版,可修改权限增加角色
(这里先放创建数据库和加载菜单,配置拦截器的方法和遇到的问题)
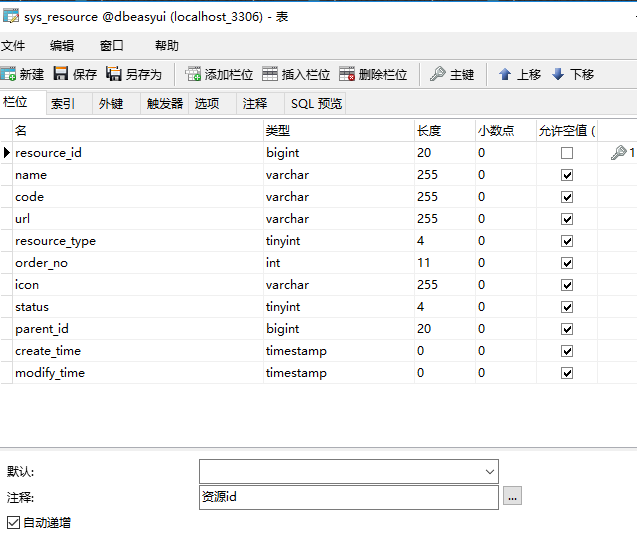
1.先创建数据库(我是在本地创建的数据库)
资源表:存放菜单资源
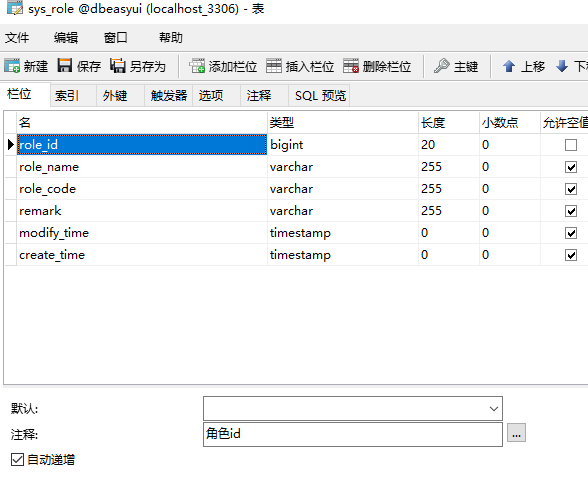
角色表:存放角色数据
角色和资源的中间表:关联角色表和资源表

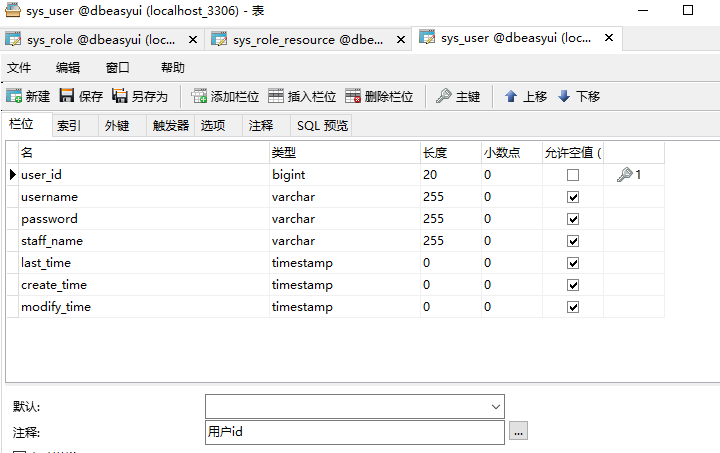
用户表:存放用户数据
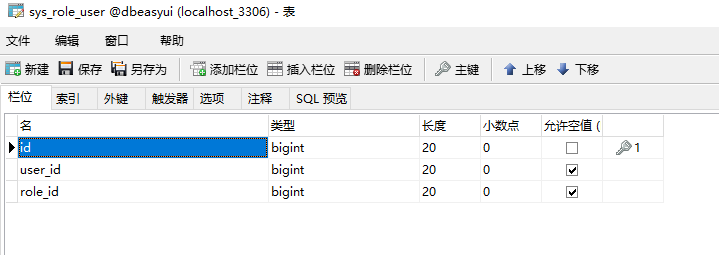
角色和用户中间表:关联角色和用户
2.创建完数据库和数据表后在项目中创建相应的实体类,控制层,服务层和数据访问层
3.写前端的login.ftl和index.ftl
login.ftl就不放了,放上index.ftl,在加载页面的时候调用js打开一级菜单,在一级菜单打开的时候获取二级菜单
<!DOCTYPE html>
<html lang="en">
<head>
    <meta charset="utf-8"/>
    <title>ace Admin</title>
    <meta name="description" content=""/>
    <meta name="viewport" content="width=device-width, initial-scale=1.0"/>
    <#include "inc/inc.ftl"/>
</head>
<body>
<div id="test"></div>
<div class="easyui-layout" data-options="fit:true">
    <div data-options="region:'north'" class="head_body" style="overflow:hidden;">
        <div>
            <div class="head_left"></div>
            <div class="head_right">
                <div class="huanying">
                    欢迎 <span>${Session.userInfo.username}</span> 登陆 | 现在是<span id="show_date"></span>
                </div>
                <div class="anniu">
                    <div class="bb">
                        <a href="javascript:logout();" class="logout"></a>
                        <a id="open_change_password" class="changePwd" href="javascript:editPassword();"></a>
                    </div>
                    <div class="bs">
                        <a class="styleswitch a1" style="CURSOR: pointer" title="黑灰色" rel="black"></a>
                        <a class="styleswitch a2" style="CURSOR: pointer" title="天蓝色" rel="default"></a>
                        <a class="styleswitch a3" style="CURSOR: pointer" title="灰色" rel="bootstrap"></a>
                        <a class="styleswitch a4" style="CURSOR: pointer" title="浅灰色" rel="gray"></a>
                        <a class="styleswitch a5" style="CURSOR: pointer" title="白色" rel="metro"></a>
                    </div>
                </div>
            </div>
        </div>
    </div>

    <div data-options="region:'west',split:true,title:'导航菜单'" style="width:188px;">
        <div class="easyui-accordion" id="main-accordion" data-options="fit:true,border:false">
        </div>
    </div>

    <div id="mainPanel" data-options="region:'center'">
        <div id="index_tabs" class="easyui-tabs" data-options="fit:true,border:false,tabHeight:30"
             style="height:600px;">
            <div title="Home">
                <div style="padding:10px 0 10px 10px">
                    <h2>系统介绍</h2>
                    <div class="light-info">

                    </div>
                </div>
            </div>
        </div>
    </div>
</div>

<div id="dlg" class="easyui-dialog" style="width:450px;height:auto;padding:10px 20px" buttons="#dlg-buttons"
     data-options="closed:true,modal:true">
    <form id="fm" method="post" enctype="multipart/form-data">
        <input type="hidden" id="userId" name="userId"/>
        <table class="grid">
            <tr>
                <td>密码:</td>
                <td>
                    <input type="text" name="password" class="easyui-passwordbox" iconWidth="28"
                           data-options="required:true,validType:['length[0,20]']"/>
                </td>
            </tr>
        </table>
    </form>
</div>
<div id="dlg-buttons">
    <a href="javascript:void(0)" class="easyui-linkbutton c8" data-options="iconCls:'icon-ok'"
       onclick="javascript:saveUser();" style="width:90px;">保存</a>
    <a href="javascript:void(0)" class="easyui-linkbutton c2" data-options="iconCls:'icon-cancel'"
       onclick="javascript:$('#dlg').dialog('close');" style="width:90px;">取消</a>
</div>
</body>
</html>

<script type="text/javascript">
    $(document).ready(function () {
//         设置tab高度,浏览器当前窗口可视区域高度 -头部高度
//         $("#index_tabs").height($(window).height()-$("#navbar").height());
        //显示系统时间
        var myDate = new Date();
        var week = ['日', '一', '二', '三', '四', '五', '六'];
        var month = myDate.getMonth() + 1;
        var weekDay = " 星期" + week[myDate.getDay()];
        var showDate = myDate.getFullYear() + "年" + month + "月" + myDate.getDate() + "日" + weekDay;
        $("#show_date").text(showDate);
        loadFirstMenu();
//        loadSecondMenu();
//        $('#main-accordion').accordion('getSelected').panel('collapse');//默认全部关闭

    });

    function loadFirstMenu() {
        $.ajax({
            url: '${request.contextPath}/resource/first_menu?userId=' +${Session.userInfo.userId},
            type: 'get',
            success: function (data) {
                for (var i in data) {//不使用过滤
                    var mc = $('#main-accordion').accordion('add', {
                        title: data[i].name,
                        content: $.formatString('<ul id=\'{0}\' class="easyui-tree menu_tree" style="padding:10px;"></ul>', "tree" + data[i].resourceId)
                    });
                    $('#' + "tree" + data[i].resourceId).tree({
                        url: '${request.contextPath}/resource/second_menu?resourceId=' + data[i].resourceId + '&userId=' +${Session.userInfo.userId},
                        method: 'get',
                        parentField: 'parentId',
                        onSelect: function (node) {
                            var start = node.path.indexOf("http");
                            var path = '${request.contextPath}' + node.path;
                            if (start == 0) {
                                var path = node.path;
                            }
                            addTab(node.text, path, node.iconCls);
                        }
                    });
                }
            }
        });
    }

    //初始化TABS组件
    $('#index_tabs').tabs({
        fit: true,
        border: false,
        tabHeight: 30,
        tools: [{
            iconCls: 'icon-reload',
            handler: function () {
                var currTab = $('#index_tabs').tabs('getSelected');
                var index = $('#index_tabs').tabs('getTabIndex', currTab);
                if (index != 0) {
                    var updateUrl = $(currTab.panel('options').content).attr('src');
                    $('#index_tabs').tabs('update', {
                        tab: currTab,
                        options: {
                            content: refreshTab(updateUrl)
                        }
                    });
                }
            }
        }, {
            iconCls: 'icon-clear',
            handler: function () {
                $.messager.confirm('提示', '确定要全部关闭选项卡?', function (r) {
                    if (r) {
                        var tabTitle = new Array();
                        var tabs = $('#index_tabs').tabs("tabs");
                        var tCount = tabs.length;
                        if (tCount > 0) {
                            for (var i = 0; i < tCount; i++) {
                                tabTitle.push(tabs[i].panel('options').title);
                            }
                            for (var i = 0; i < tabTitle.length; i++) {
                                if (tabTitle[i] != '首页') {
                                    $('#index_tabs').tabs("close", tabTitle[i]);
                                }
                            }
                        }
                    }
                });
            }
        }]
    });

    function editPassword() {
        $('#dlg').dialog('open').dialog('setTitle', '修改');
        $('#userId').val(${Session.userInfo.userId});
    }

    function saveUser() {
        $('#fm').form('submit', {
            url: "${request.contextPath}/sys/user_save",
            success: function (result) {
                var result = eval('(' + result + ')');
                if (result.code == 0) {
                    $.messager.show({
                        title: '提示',
                        msg: result.message
                    });
                    $('#dlg').dialog('close');
                }
            }
        });
    }
</script>
4.将获取一级菜单和二级菜单的http请求发送到对应controller层
package com.lk.modeleasyui.controller;

import com.lk.modeleasyui.beans.MenuDTO;
import com.lk.modeleasyui.domain.SysResource;
import com.lk.modeleasyui.service.SysResourceService;
import org.springframework.beans.factory.annotation.Autowired;
import org.springframework.web.bind.annotation.GetMapping;
import org.springframework.web.bind.annotation.RequestMapping;
import org.springframework.web.bind.annotation.RestController;

import java.util.List;

/**
 * @Author: Lukizzz
 * @Date: 2018/9/11 11:39
 * @Description:
 */
@RestController
@RequestMapping(value = "/resource")
public class SysResourceController {

    @Autowired
    private SysResourceService sysResourceService;

    @GetMapping(value = "/first_menu")
    public List<SysResource> getFirstMenu(Long userId) throws Exception {
        return sysResourceService.getFirstMenu(userId);
    }

    @GetMapping(value = "/second_menu")
    public List<MenuDTO> getSecondMenu(Long resourceId) throws Exception {
        return sysResourceService.getSecondMenu(resourceId);
    }

}
注意使用restController的注解 不然前端无法接收到json
5.service:
package com.lk.modeleasyui.service;

import com.lk.modeleasyui.beans.MenuDTO;
import com.lk.modeleasyui.beans.TreeBean;
import com.lk.modeleasyui.dao.SysResourceDAO;
import com.lk.modeleasyui.dao.SysRoleResourceDAO;
import com.lk.modeleasyui.dao.SysRoleUserDAO;
import com.lk.modeleasyui.domain.SysResource;
import com.lk.modeleasyui.domain.SysRoleResource;
import com.lk.modeleasyui.domain.SysRoleUser;
import org.springframework.beans.factory.annotation.Autowired;
import org.springframework.stereotype.Service;

import java.util.ArrayList;
import java.util.List;

/**
 * @Author: Lukizzz
 * @Date: 2018/9/11 11:51
 * @Description:
 */
@Service
public class SysResourceService {
    @Autowired
    private SysResourceDAO sysResourceDAO;
    @Autowired
    private SysRoleUserDAO sysRoleUserDAO;
    @Autowired
    private SysRoleResourceDAO sysRoleResourceDAO;

    public List<SysResource> getFirstMenu(Long userId) {
        List<SysRoleUser> list = sysRoleUserDAO.findAllByUserId(userId);
        List<Long> roleIds = new ArrayList<>();
        for (SysRoleUser sysRoleUser :list){
            roleIds.add(sysRoleUser.getRoleId());
        }
        List<SysRoleResource> resourceIds = sysRoleResourceDAO.findAllByRoleIdIn(roleIds);
        List<SysResource> sysResources = new ArrayList<>();
        for (SysRoleResource sysRoleResource:resourceIds){
            SysResource sysResource = new SysResource();
            sysResource.setResourceId(sysRoleResource.getResourceId());
            sysResources.add(sysResource);
        }
        return sysResourceDAO.findAllByResourceIds(sysResources);
    }

    public List<MenuDTO> getSecondMenu(Long resourceId) {
        List<SysResource> list = sysResourceDAO.findAllBylist(resourceId);
        List<MenuDTO> menus = new ArrayList<>();
        for(SysResource resource : list){
            MenuDTO menu = new MenuDTO();
            menu.setText(resource.getName());
            menu.setPath(resource.getUrl());
            menu.setIconCls(resource.getIcon());
            menus.add(menu);
        }
        return menus;
    }
}
这里创建了两个类:MenuDTO TreeBean
MenuDTO:
public class MenuDTO extends TreeBean {
    private String path;

    public String getPath() {
        return path;
    }

    public void setPath(String path) {
        this.path = path;
    }
}
TreeBean:
@Data
public class TreeBean {

    private String id;
    private String text;
    private String state = "open";
    private boolean checked = false;
    private Object attributes;
    private String parentId;
    private String iconCls;

}
在测试过程中,如果没有登录直接打开index的页面会出现乱码,原因是没有登录的话session获取不到userInfo,因此我设置了一个拦截器,创建一个LoginInterceptor类和一个工具类WebAppConfig
LoginInterceptor:
public class LoginInterceptor extends HandlerInterceptorAdapter {
    @Override
    public boolean preHandle(HttpServletRequest request, HttpServletResponse response, Object handler) throws Exception {
        HttpSession session = request.getSession();
        if (session.getAttribute("userInfo") == null) {
            response.sendRedirect(request.getContextPath() + "/login");
            return false;
        }
        return super.preHandle(request, response, handler);
    }
}
如果session获取的userInfo为空的话就重定向到登陆界面
WebAppConfig:
@Configuration
public class WebAppConfig implements WebMvcConfigurer {


    @Override
    public void addInterceptors(InterceptorRegistry registry) {
        String[] excludes = new String[]{"/static/**"};
        registry.addInterceptor(new LoginInterceptor()).excludePathPatterns("/login").excludePathPatterns("/do_login").excludePathPatterns(excludes);
        WebMvcConfigurer.super.addInterceptors(registry);
    }

    @Override
    public void addResourceHandlers(ResourceHandlerRegistry registry) {
        registry.addResourceHandler("/static/**").addResourceLocations("classpath:/static/");
        WebMvcConfigurer.super.addResourceHandlers(registry);
    }

}
在配置拦截器的时候遇到几个小问题:
1.WebMvcConfigurerAdapter过时:
在网络上的大部分配置拦截器的教程都是继承WebMvcConfigurerAdapter,课时现在版本的WebMvcConfigurerAdapter已经被spring认为过时,我找了很久找到了它的替代品,也是官方推荐我们去使用的,实现 WebMvcConfigurer,具体的代码可见上面的WebAppConfig.
2.拦截器是配置成功了,但是登陆界面的静态资源也被拦截了
这个问题的解决方法WebAppConfig代码里也已经有了,首先String[] excluds定义加载的静态资源的路径,excludePathPatterns("/login")这个"/login"代表着这个路径不被拦截,所以我们在下面的代码中加入excludePathPatterns("excluds"),跳过拦截
在创建登陆的时候还遇到个小问题
    @RequestMapping(value = "/index")
    public String index() {
        return "index";
    }

    @RequestMapping(value = "/")
    public String toIndex() {
        return "index";
    }
本意是想跳转到index页面
但是一直出现报错,错误的大概意思是包名和视图名重复了,修改多次index的名字后无果后来发现是freemarker的依赖没有添加
放上效果图:

其他的问题和过程写在下一篇的随笔里

 浙公网安备 33010602011771号