
Feign与SpringCloud LoadBalancer实现负载均衡源码分析
SpringCloud LoadBalancer
众所周知,SpringCloud体系中负载均衡的组件有SpringCloud LoadBalancer和Ribbon,Ribbon也在逐渐的被替代掉,因为SpringCloud LoadBalancer性能更高,支持响应式
下面通过hard-coded体现一下SpringCloud的负载均衡
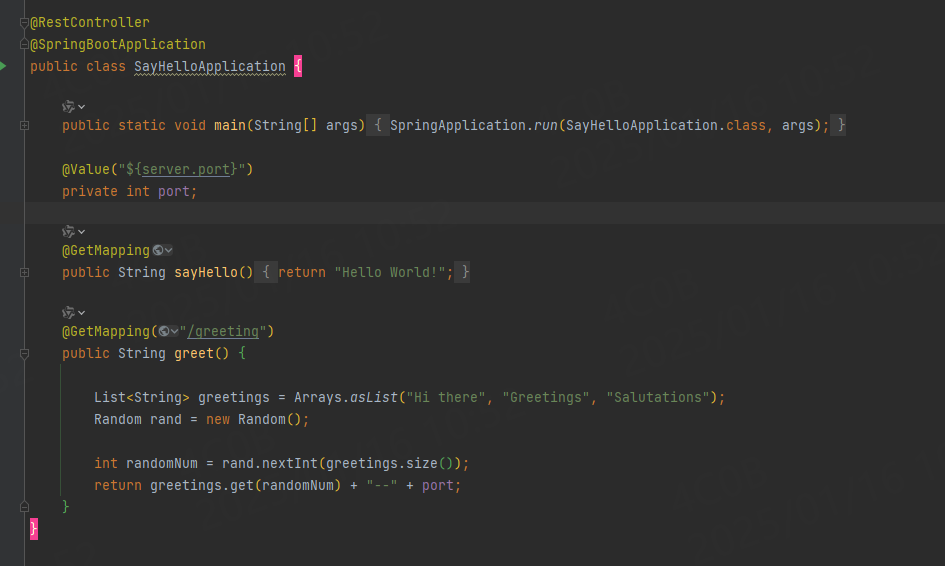
首先有一个【say-hello】服务,提供"/","/greeting"接口,同时为了后续观测方便,将此服务的端口号也返回
我们的调用方【user】服务,使用webflux,下面为主要依赖
<dependencies>
        <dependency>
            <groupId>org.springframework.boot</groupId>
            <artifactId>spring-boot-starter-webflux</artifactId>
        </dependency>
        <dependency>
            <groupId>org.springframework.cloud</groupId>
            <artifactId>spring-cloud-starter-loadbalancer</artifactId>
        </dependency>
        <dependency>
            <groupId>org.springframework.boot</groupId>
            <artifactId>spring-boot-starter-test</artifactId>
            <scope>test</scope>
        </dependency>
    </dependencies>
<dependencyManagement>
        <dependencies>
            <dependency>
                <groupId>org.springframework.cloud</groupId>
                <artifactId>spring-cloud-dependencies</artifactId>
                <version>2023.0.0</version>
                <type>pom</type>
                <scope>import</scope>
            </dependency>
        </dependencies>
    </dependencyManagement>
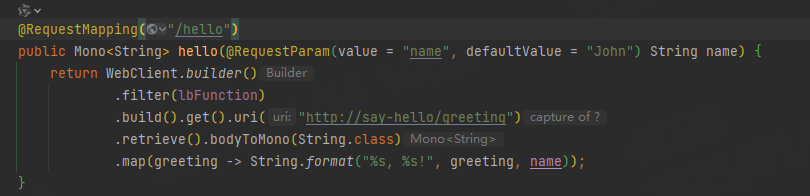
想要实现负载均衡,首先需要WebClient发起请求并且添加ReactorLoadBalancerExchangeFilterFunction过滤器,在使用的地方注入ReactorLoadBalancerExchangeFilterFunction即可,
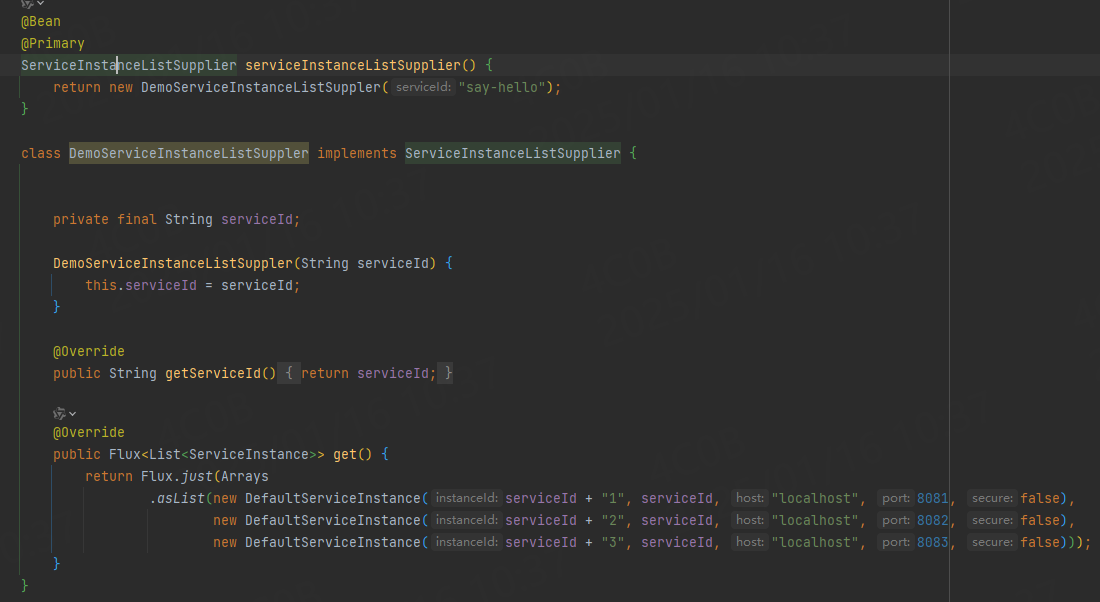
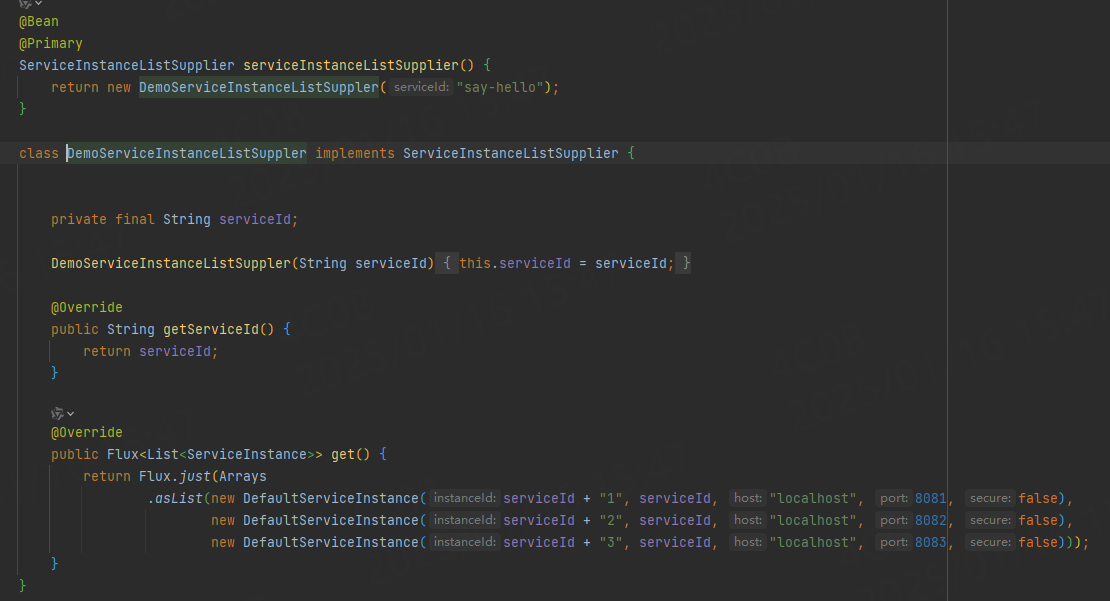
另外还需要提供ServiceInstanceListSupplier,并且注入为bean,稍后再分析原理,,这里serverId为say-hello,我们将服务实例写成固定的单个节点,8081,8082,8082
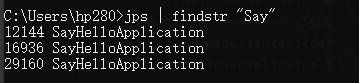
现在启动say-hello服务的8081,8082,8083服务来体现负载均衡
调整user服务的日志等级为debug
logging:
  level:
    root: debug
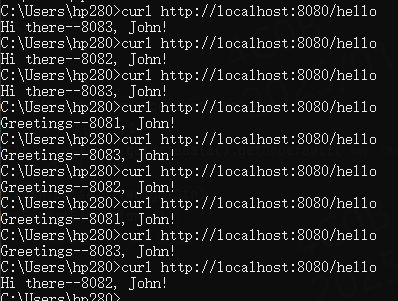
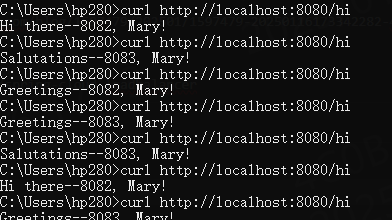
访问user服务的/hello接口
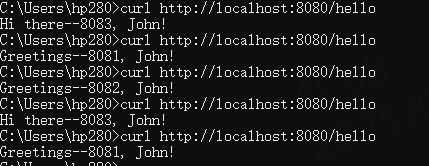
可以明显的发现当前的负载策略是依次轮询,并且每次起始的实例并非8081
实现原理也很简单,主要在WebClient调用的时候会首先执行ExchangeFilterFunction的filter方法,ExchangeFilterFunction的andThan可以实现无限套娃,相当于过滤器的链式调用,有点绕
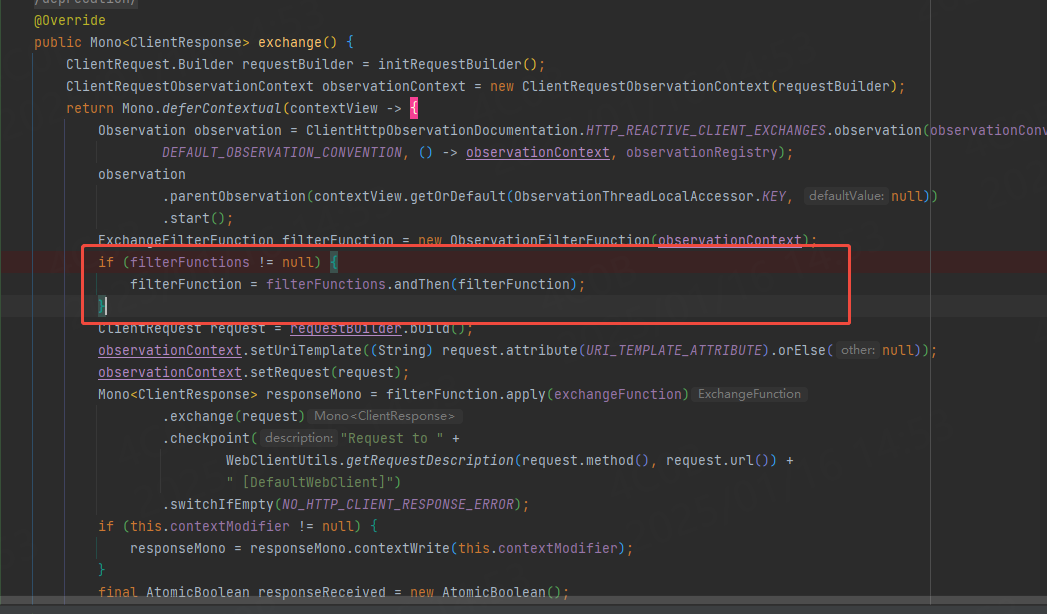
filterFunctions为自己传入的filter,andThan其实相当于next,我们在/hello接口中传入的filter为ReactorLoadBalancerExchangeFilterFunction,其中负载均衡主要在这里面进行开展,也可以传入自定义的过滤器
LoadBalancerLifecycle将获取当前NamedContextFactory,并且它确保负载均衡器可以在整个生命周期正常工作,也可以做一些额外的工作,
比如可以记录日志
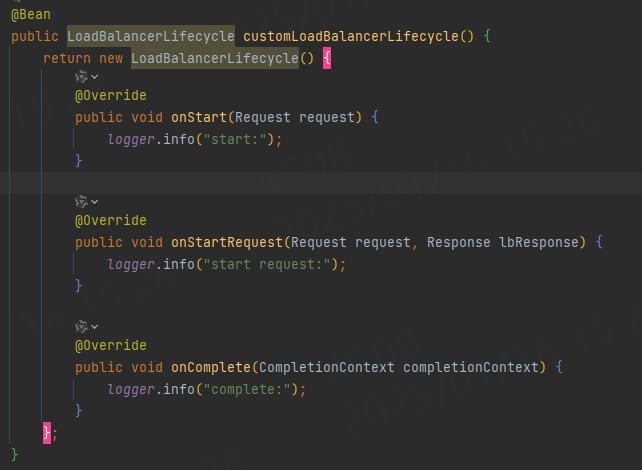
也可以使用MicrometerStatsLoadBalancerLifecycle记录一些指标信息
接着调用LoadBalancerLifecycle的start方法
下面会调用主要逻辑choose方法
在LoadBalancerClientConfiguration,如果我们没有定义的话会默认使用RoundRobinLoadBalancer,采用依次轮询的策略,
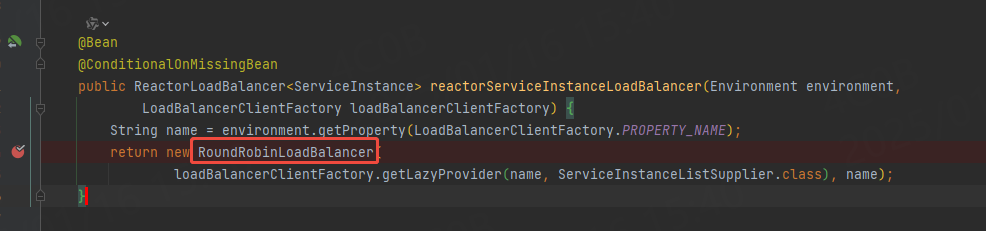
而像其他的ReactorLoadBalancer都需要ServiceInstanceListSupplier来提供实例的一些信息,像在这个demo中我们使用固定值
根据这些扩展接口,我们很容易的来集成其他的注册发现框架,比如nacos通过DiscoveryClientServiceInstanceListSupplier
获取完ServiceInstance,我们来看RoundRobinLoadBalancer的轮询算法实现
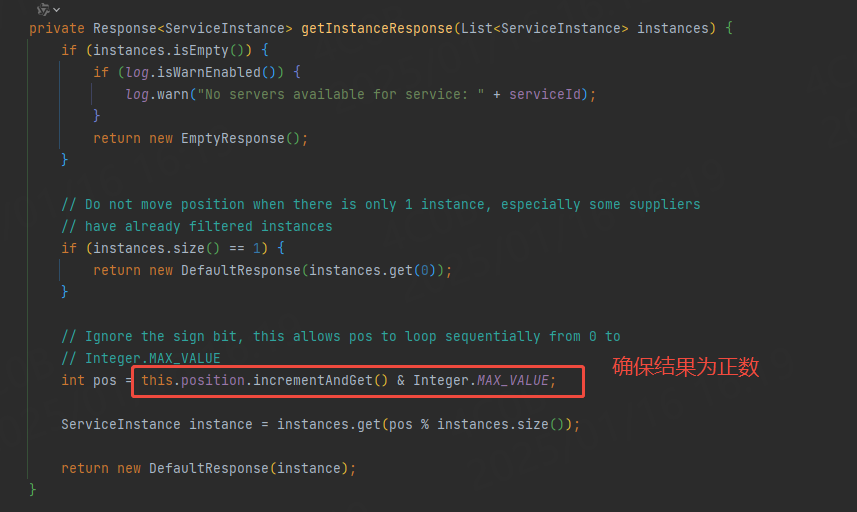
其中position为初始化时产生的[0,999]的随机数,每次调用都会进行+1并且与Integer.MAX_VALUE进行与运算,如果是正整数,因为Integer.MAX_VALUE是2^32 -1 。0111 1111 1111 1111 1111 1111 1111 1111,当执行Integer.MAX_VALUE + 1时
会导致最高位(符号位)发生变化,从而产生溢出,加1后的结果为 1000 0000 0000 0000 0000 0000 0000 0000,表示的是最小的负数,即Integer.MIN_VALUE,次数再和Integer.MAX_VALUE进行与运算,所以pos的取值范围为[0, Integer.MAX_VALUE]
当连续的整数对相同的数取余时,余数也是连续的,所以就实现了依次轮询的策略,
nacos中的实现方式为Math.abs(index.getAndIncrement() % items.size()
SpringCloud LoadBalancer里面内置了RandomLoadBalancer随机算法,实现应该是最简单的,直接使用随机数ThreadLocalRandom.current()
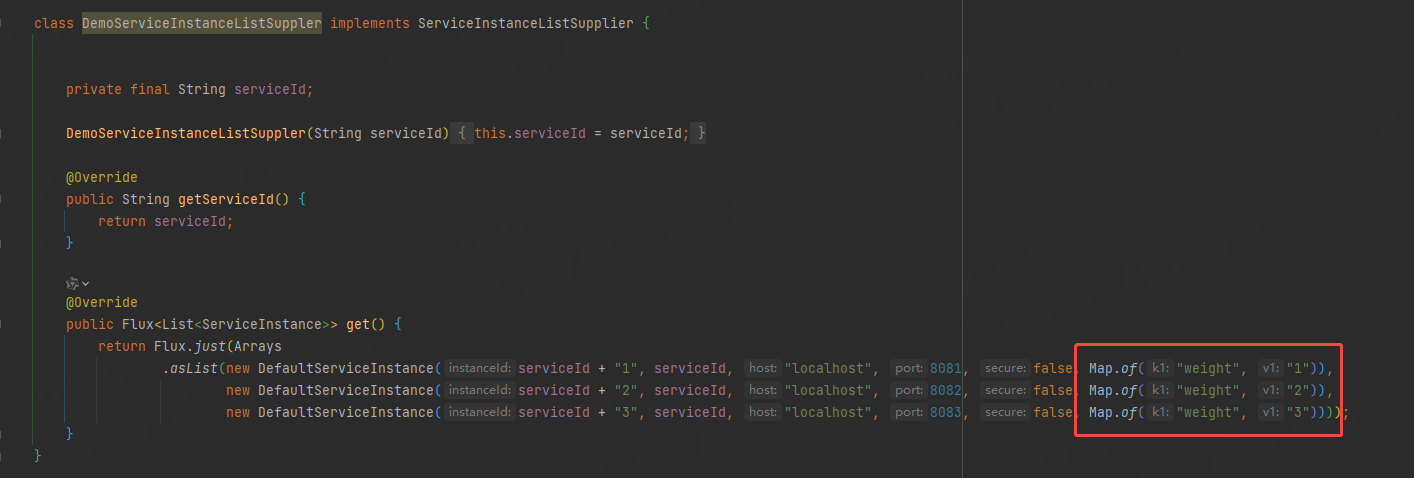
当然,我们也可以自己实现负载均衡的策略,比如下面是按照权重来实现,
修改DemoServiceInstanceListSuppler中的DefaultServiceInstance,在metadata添加额外参数weight,instance1权重为1,instance2权重为2,instance3权重为3
在当前NamedContext添加ReactorLoadBalancer bean
@Bean
    public ReactorLoadBalancer<ServiceInstance> reactorServiceInstanceLoadBalancer(
            ServiceInstanceListSupplier serviceInstanceListSupplier) {
        return new ReactorServiceInstanceLoadBalancer() {
            @Override
            public Mono<Response<ServiceInstance>> choose(Request request) {
                return serviceInstanceListSupplier.get(request).next().map(instances -> {
                    return getInstanceResponse(instances);
                });
            }

            private Response<ServiceInstance> getInstanceResponse(List<ServiceInstance> instances) {
                if (instances.size() == 1) {
                    return new DefaultResponse(instances.get(0));
                }
                int totalWeight = instances.stream()
                        .mapToInt(this::getWeight)
                        .sum();

                Random random = new Random();
                int r = random.nextInt(totalWeight);

                for (ServiceInstance instance : instances) {
                    int weight = getWeight(instance);
                    if (r < weight) {
                        return new DefaultResponse(instance);
                    }
                    r -= weight;
                }
                return new EmptyResponse();
            };

            private int getWeight(ServiceInstance instance) {
                // 从元数据中获取权重,默认权重为 1
                String weightStr = instance.getMetadata().getOrDefault("weight", "1");
                try {
                    return Integer.parseInt(weightStr);
                } catch (NumberFormatException e) {
                    return 1; // 如果解析失败,默认权重为 1
                }
            }
        };
    }
重启项目,可以看到节点大概是按照我们预设的权重来的,instance1 8081端口的几率还是很小的
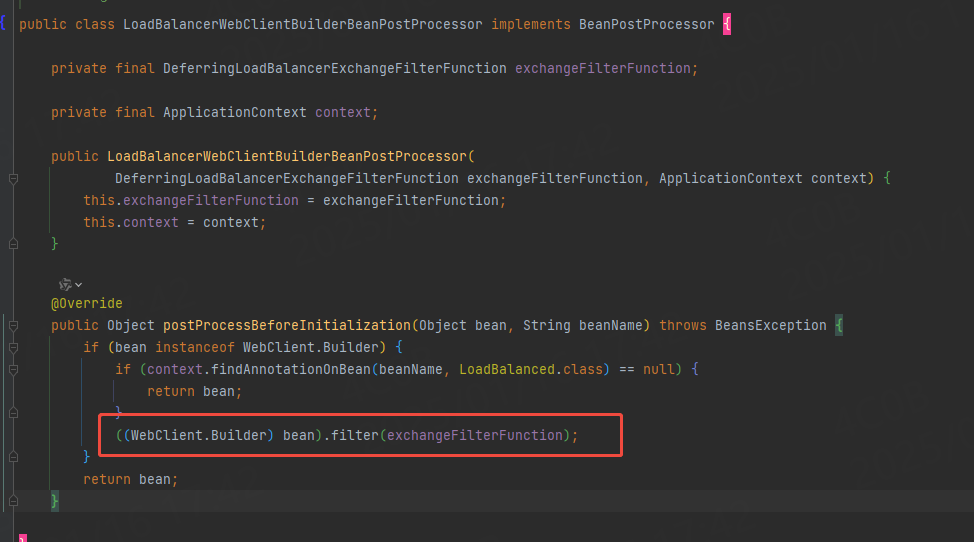
除了上面手动往WebClient里面添加Filter的方法之外,我们更多的是使用自动配置的方式,以减少程序的复杂性,
新添加bean,并且添加注解@LoadBalancerClient,name为say-hello,
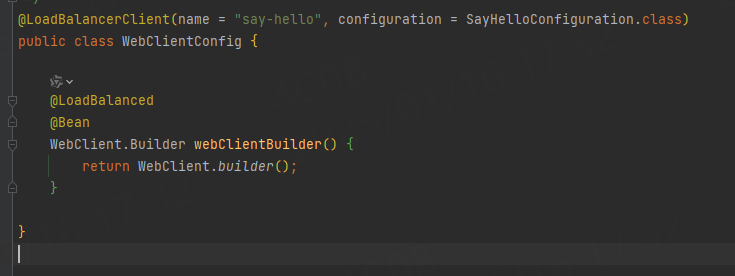
新建接口/hi

其中@LoadBalancerClient会通过LoadBalancerClientConfigurationRegistrar注入为NamedContextFactory.Specification,如果添加了@LoadBalanced注解将在BeanPostProcessor的时候将会添加ExchangeFilterFunction
feign中负载均衡的实现
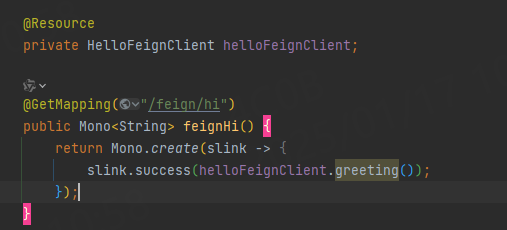
使用注解@EnableFeignClients开启客户端feign,自定义feignclient的name为say-hello,不能填写url,因为填写url后续不会走负载均衡,并且name为后续使用的service-id,因为【say-hello】服务直接返回字符串reponseType为text/plain,,所以这里先使用StringDecoder,正常项目使用SpringDecoder或者自己定义序列化方式,

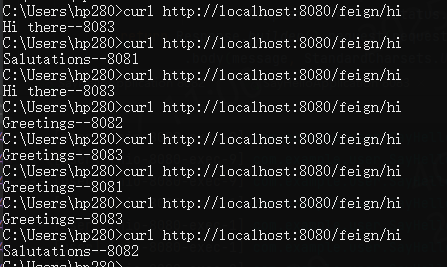
【user】新增接口/feign/hi,将访问【say-hello】的greeting接口,负载均衡策略还是使用上一步的权重
访问发现确实使用了负载均衡策略
下面将分析具体的实现逻辑,
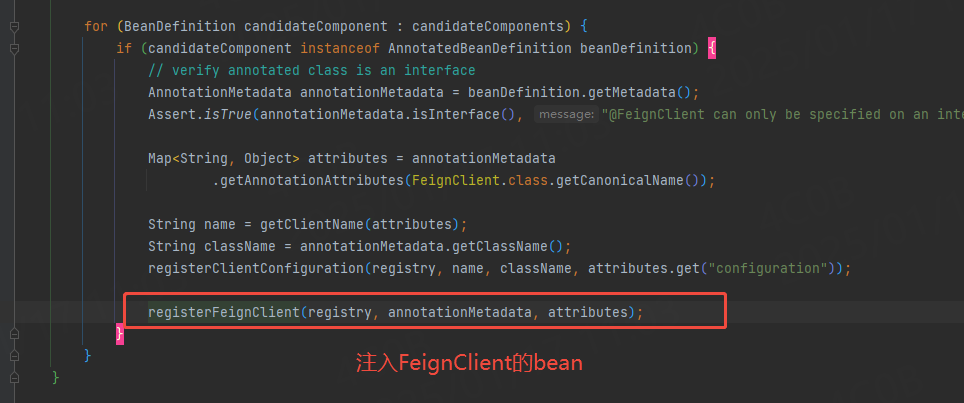
首先在@EnableFeignClients中会借助FeignClientsRegistrar扫描FeignClient注解的接口,
接着在FeignClientFactoryBean会借助Feign.Builder构造client的属性,最后直接返回生成的代理对象。Builder有个属性是client,最终在调用代理方法的时候会执行client.execute()方法,具体的就不再赘述了,

想要使用负载的client,需要借助spring的自动注入属性,导入以下依赖,或者自己定义也行
<dependency>
            <groupId>org.springframework.cloud</groupId>
            <artifactId>spring-cloud-starter-loadbalancer</artifactId>
        </dependency>

负载主要在FeignBlockingLoadBalancerClient的execute方法实现,与feign其他流程无关,所以达到了最大化的解耦,
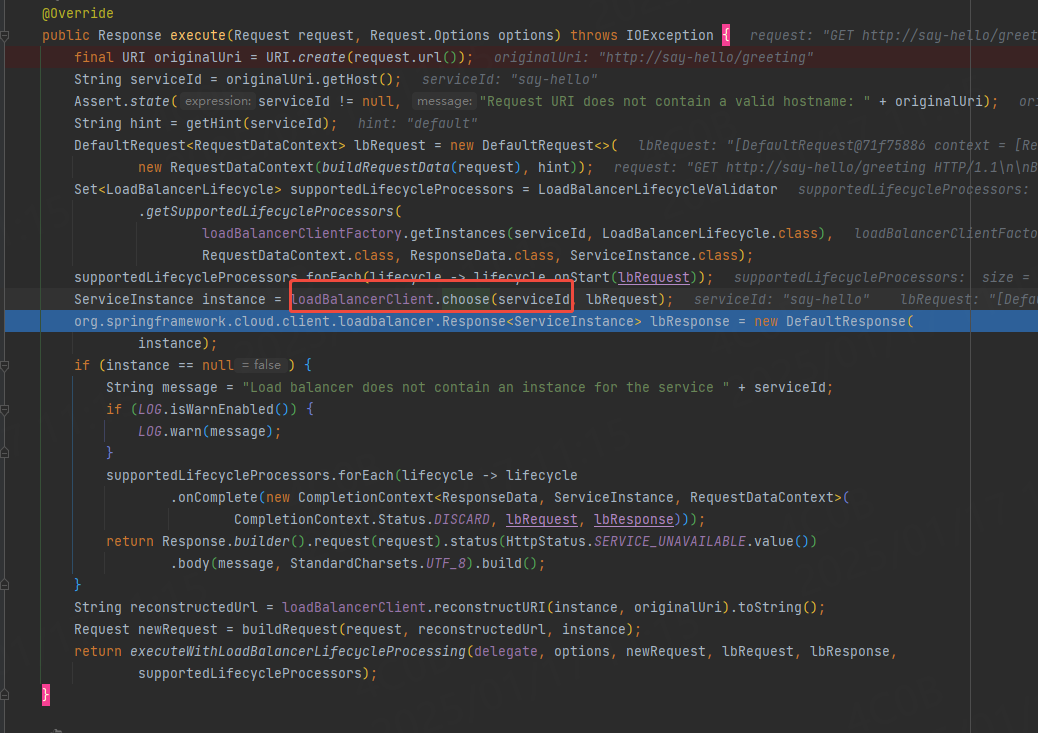
execute的主要逻辑不难发现和ReactorLoadBalancerExchangeFilterFunction#filter的差不多,最终都会调用ReactiveLoadBalancer#choose选择某一个实例节点来发起请求

 浙公网安备 33010602011771号