malware analysis、Sandbox Principles、Design && Implementation
catalog
0. 引言
1. sandbox introduction
2. Sandboxie
3. seccomp(short for secure computing mode): API级沙箱
4. 利用do_syscall_trace一次性对所有系统调用进行Hook监控
5. cuckoo
6. Detux
7. remnux
8. Noriben Malware Analysis Sandbox
9. Limon Sandbox for Analyzing Linux Malwares
10. 基于docker的malware analysis
11. Joe Sandbox Desktop
12. Zero Wine: Malware Behavior Analysis
0. 引言
0x1:what is malware
1. code that is malicious
2. viruses、worms、keyloggers、backdoors、rootkits
0x2: malware behaviour
1. disrupt computer operation
2. ddos/cc attack
3. stealing sensitive information
4. gain access to computer systems
5. spy on computer users
0x3: Types of malware analysis
1. static analysis: analysis without executing the malware
    1) determine file type
    2) determine file size
    3) HASH
        3.1) SSDEEP: comparison of fuzzy hash with previously submitted samples to determine similar variants
        3.2) MD5
        3.3) SHA1
    4) Strings(可疑字符串)
        4.1) Unicode
        4.2) ASCII
    5) determines packers using YARA rules
    6) File Obfuscations(packers, cryptors)
    7) Submission to multi AV Scanning engines
        7.1) VirusTotal api
    8) ELF characteristics
        8.1)  display program header structures
    9) symbols
        9.1) static symbols
        9.2) dynamic symbols
    10) sections
    11) Disassembly

2. dynamic analysis: analysis by executing the malware
    1) File system activity
    2) process activity
    3) network activity
        3.1) DNS summary
        3.2) TCP conversations
        3.3) packet captures
        3.4) event trace dump
    4) system call tracing

3. memory analysis: analysis of RAM(main memory)after executing the malware
    1) list running process
        1.1) process listing with process arguments
        1.2) thread associated with each process
    2) list network connections
        2.1) display process running with RAW sockets
    3) list shared libraries
    4) kernel modules
        4.1) module list
        4.2) SYSFS
    5) detect hooking(user and kernel mode)
        5.1) checks netfilter hooks
        5.2) check for PLT/GOT hooks
        5.3) keyoard notifier hooks
        5.4) TTY Hooks
        5.5) check for userland api hooks
    6) code or binary injection
    7) rootkit detection
        7.3) system call table modification
        7.4) check for modified file operation structures
        7.5) checks hooked network operation function structures
    8) detect hidden artifacts
Relevant Link:
file:///D:/学习资料/sandbox/paper/eu-15-KA-Automating-Linux-Malware-Analysis-Using-Limon-Sandbox-wp.pdf
file:///D:/学习资料/sandbox/paper/eu-15-KA-Automating-Linux-Malware-Analysis-Using-Limon-Sandbox.pdf
1. sandbox introduction
在计算机安全领域,沙盒(sandbox 沙箱)是一种安全机制,为运行中的程序提供的隔离环境。通常是作为一些来源不可信、具破坏力或无法判定程序意图的程序提供实验之用
沙盒通常严格控制其中的程序所能访问的资源,比如,沙盒可以提供用后即回收的磁盘及内存空间。在沙盒中,网络访问、对真实系统的访问、对输入设备的读取通常被禁止或是严格限制。从这个角度来说,沙盒属于虚拟化的一种,沙盒中的所有改动对操作系统不会造成任何损失。通常,这种技术被计算机技术人员广泛用于测试可能带毒的程序或是其他的恶意代码
有时沙盒也叫沙箱,英文sandbox。在计算机领域指一种虚拟技术,且多用于计算机安全技术。其原理是通过重定向技术,把程序生成和修改的文件定向到自身文件夹中。当某个程序试图发挥作用时,安全软件可以先让它在沙盒中运行,如果含有恶意行为,则禁止程序的进一步运行,而这不会对系统造成任何危害
0x1: sandbox具体实现形式
沙盒将软件运行于一个受限的系统环境中,控制程序可使用的资源(如文件描述符、内存、磁盘空间等),以下是一些沙盒的具体实现
1. chroot
chroot是在unix系统的一个操作,针对正在运作的软件进程和它的子进程,改变它外显的根目录。一个运行在这个环境下,经由chroot设置根目录的程序,它不能够对这个指定根目录之外的文件进行访问动作,不能读取,也不能更改它的内容,由chroot创造出的那个根目录,叫做"chroot监狱"(chroot jail / chroot prison)

2. Sandboxie
Sandboxie是一个沙盒计算机程序用于将浏览器限制在一个虚拟沙箱中运行,由Ronen Tzur开发,可以在32位及64位的、基于Windows NT的系统上运行(如Windows XP、Windows 7等)。它创造了一个类似沙盒的独立作业环境,在其内部运行的程序并不能对硬盘产生永久性的影响。其为一个独立的虚拟环境,可用以测试不受信任的应用程序或上网行为

3. 软件监狱(Jail)
限制网络访问、受限的文件系统命名空间。软件监狱最常用于虚拟主机上(例如VM)

4. LSM MAC访问控制
基于规则的执行,通过系统安全机制,按照一系列预设规则给用户及程序分配一定的访问权限,完全控制程序的启动、代码注入及网络访问。也可控制程序对于文件、注册表的访问。在这样的环境中,病毒木马感染系统的几率将会减小。Linux中,安全增强式Linux和AppArmor正使用了这种策略

5. 虚拟机
模拟一个完整的宿主系统,可以如运行于真实硬件一般运行虚拟的操作系统(客户系统)。客户系统只能通过模拟器访问宿主的资源,因此可算作一种沙盒

6. 主机本地沙盒
通过创建一个模拟真实桌面的环境,研究人员就能够观察恶意软件是如何感染一台主机的。若干恶意软件分析服务使用了沙盒技术,例如Docker技术就是一种典型的用户态沙盒,在Docker容器中的操作被严格进行配置和限制

7. 安全计算模式(seccomp)
Linux内核内置的一个沙盒。启用后,seccomp仅允许write()、read()、exit()和sigreturn()这几个系统调用。

8. KERNEL级Sandbox
一种类似于影子系统的,比带有宿主的虚拟机更深层的系统内核级技术。它可以接管病毒调用接口或函数的行为。并会在确认病毒行为后实行回滚机制,让系统复原
0x2: sandbox技术思想
1. 将对数据的修改、对系统的操作重定向到一个受保护的虚拟区域
2. ROLLBACK(回滚),当发生策略规定范围之外的操作事件时,及时对异常状态进行回滚
3. 策略限制,例如defensewall、SELINUX、AppArmor、Smack
Relevant Link:
http://zh.wikipedia.org/wiki/Chroot
http://zh.wikipedia.org/wiki/Sandboxie
http://lifehacker.com/sandboxie-tests-apps-without-risking-your-system-now-s-514339469
http://sandboxie.com/index.php?AllVersions
http://baike.baidu.com/view/7373858.htm
http://zh.wikipedia.org/wiki/%E6%B2%99%E7%9B%92_(%E9%9B%BB%E8%85%A6%E5%AE%89%E5%85%A8)
2. Sandboxie

Relevant Link:
http://www.sandboxie.com/index.php?HowItWorks
http://www.cnblogs.com/SunboyL/p/SandBox.html
3. seccomp(short for secure computing mode): API级沙箱
seccomp (short for secure computing mode) is a computer security facility that provides an application sandboxing mechanism in the Linux kernel; it was merged into the Linux kernel mainline in kernel version 2.6.12, which was released on March 8, 2005.seccomp allows a process to make a one-way transition into a "secure" state where it cannot make any system calls except exit(), sigreturn(), read() and write() to already-open file descriptors. Should it attempt any other system calls, the kernel will terminate the process with SIGKILL. In this sense, it does not virtualize the system's resources but isolates the process from them entirely.
#include <sys/prctl.h>
int prctl(int option, unsigned long arg2, unsigned long arg3, unsigned long arg4, unsigned long arg5);

option = PR_SET_SECCOMP (since Linux 2.6.23)
Set the secure computing (seccomp) mode for the calling thread, to limit the available system calls.  The more recent seccomp(2) system call provides a superset of the functionality of PR_SET_SECCOMP.
seccomp mode is enabled via the prctl(2) system call using the PR_SET_SECCOMP argument, or (since Linux kernel 3.17) via the seccomp(2) system call.
0x1: seccomp-bpf
seccomp-bpf is an extension to seccomp that allows filtering of system calls using a configurable policy implemented using Berkeley Packet Filter rules. It is used by OpenSSH and vsftpd as well as the Google Chrome/Chromium web browsers on Chrome OS and Linux.
从本质上讲,seccomp filters相当于PHP中的"safe mode",通过提前限制进程可以使用系统API范围,来达到Jail限制沙箱的目的
0x2: Uses
1. As of Chrome version 20, seccomp-bpf is used to sandbox Adobe Flash Player
2. As of Chrome version 23, seccomp-bpf is used to sandbox the renderers
3. Vsftpd uses seccomp-bpf sandboxing as of version 3.0.0
4. OpenSSH has supported seccomp-bpf since version 6.0
5. LXD, which is a "hypervisor" for containers
6. Firefox and FirefoxOS use seccomp-bpf to sandbox the child processes and certain plugins
0x3: Detecting seccomp features at runtime
#include <stdio.h>
#include <stdlib.h>
#include <errno.h>
#include <string.h>
#include <sys/prctl.h>
#include <linux/seccomp.h>

int main(void)
{
        int ret;

        ret = prctl(PR_GET_SECCOMP, 0, 0, 0, 0);
        if (ret < 0) {
                switch (errno) {
                case ENOSYS:
                        printf("seccomp not available: pre-2.6.23\n");
                        return 0;
                case EINVAL:
                        printf("seccomp not available: not built in\n");
                        return 0;
                default:
                        fprintf(stderr, "unknown PR_GET_SECCOMP error: %s\n",
                                strerror(errno));
                        return 1;
                }
        }
        printf("seccomp available\n");

        ret = prctl(PR_SET_SECCOMP, SECCOMP_MODE_FILTER, NULL, 0, 0);
        if (ret < 0) {
                switch (errno) {
                case EINVAL:
                        printf("seccomp filter not available\n");
                        return 0;

                case EFAULT:
                        printf("seccomp filter available\n");
                        return 0;

                default:
                        fprintf(stderr, "unknown PR_SET_SECCOMP error: %s\n",
                                strerror(errno));
                        return 1;
                }
        }
        printf("PR_SET_SECCOMP unexpectedly succeeded?!\n");
        return 1;
}
0x4: Code Example Use
seccomp是操作系统通过API方式(Glibc/System call)提供的一种API调用访问控制能力,在程序开发中需要调用seccomp相关的API将这种控制能力"引入进来",可以理解为程序在编译阶段就给自己施加对应的限制,这样即使发生了溢出攻击,被Exploit的程序也会由于API沙箱的限制而无法执行太多危险操作
example.c
/*
 * seccomp example with syscall reporting
 *
 * Use of this source code is governed by a BSD-style license that can be
 * found in the LICENSE file.
 */
#define _GNU_SOURCE 1
#include <stdio.h>
#include <stddef.h>
#include <stdlib.h>
#include <unistd.h>

#include "config.h"
#include "seccomp-bpf.h"

static int install_syscall_filter(void)
{
    struct sock_filter filter[] =
    {
        VALIDATE_ARCHITECTURE,        /* Validate architecture. */
        EXAMINE_SYSCALL,        /* Grab the system call number. */
        ALLOW_SYSCALL(rt_sigreturn),    /* List allowed syscalls. */
#ifdef __NR_sigreturn
        ALLOW_SYSCALL(sigreturn),
#endif
        ALLOW_SYSCALL(exit_group),
        ALLOW_SYSCALL(exit),
        ALLOW_SYSCALL(read),
        ALLOW_SYSCALL(write),
        KILL_PROCESS,
    };

    struct sock_fprog prog =
    {
        .len = (unsigned short)(sizeof(filter)/sizeof(filter[0])),
        .filter = filter,
    };

    if (prctl(PR_SET_NO_NEW_PRIVS, 1, 0, 0, 0))
    {
        perror("prctl(NO_NEW_PRIVS)");
        goto failed;
    }
    if (prctl(PR_SET_SECCOMP, SECCOMP_MODE_FILTER, &prog))
    {
        perror("prctl(SECCOMP)");
        goto failed;
    }
    return 0;

failed:
    if (errno == EINVAL)
    {
        fprintf(stderr, "SECCOMP_FILTER is not available. :(\n");
    }

    return 1;
}

int main(int argc, char *argv[])
{
    char buf[1024];

    if (install_syscall_filter())
    {
        return 1;
    }

    printf("Type stuff here: ");
    fflush(NULL);
    buf[0] = '\0';
    fgets(buf, sizeof(buf), stdin);
    printf("You typed: %s", buf);

    printf("And now we fork, which should do quite the opposite ...\n");
    fflush(NULL);
    sleep(1);

    fork();
    printf("You should not see this because I'm dead.\n");

    return 0;
}
//gcc -Wall   -c -o example.o example.c
seccomp-bpf.h
/*
 * seccomp example for x86 (32-bit and 64-bit) with BPF macros
 *
 * Copyright (c) 2012 The Chromium OS Authors <chromium-os-dev@chromium.org>
 * Authors:
 *  Will Drewry <wad@chromium.org>
 *  Kees Cook <keescook@chromium.org>
 *
 * Use of this source code is governed by a BSD-style license that can be
 * found in the LICENSE file.
 */
#ifndef _SECCOMP_BPF_H_
#define _SECCOMP_BPF_H_

#define _GNU_SOURCE 1
#include <stdio.h>
#include <stddef.h>
#include <stdlib.h>
#include <errno.h>
#include <signal.h>
#include <string.h>
#include <unistd.h>

#include <sys/prctl.h>
#ifndef PR_SET_NO_NEW_PRIVS
# define PR_SET_NO_NEW_PRIVS 38
#endif

#include <linux/unistd.h>
#include <linux/audit.h>
#include <linux/filter.h>
#ifdef HAVE_LINUX_SECCOMP_H
# include <linux/seccomp.h>
#endif
#ifndef SECCOMP_MODE_FILTER
# define SECCOMP_MODE_FILTER    2 /* uses user-supplied filter. */
# define SECCOMP_RET_KILL    0x00000000U /* kill the task immediately */
# define SECCOMP_RET_TRAP    0x00030000U /* disallow and force a SIGSYS */
# define SECCOMP_RET_ALLOW    0x7fff0000U /* allow */
struct seccomp_data {
    int nr;
    __u32 arch;
    __u64 instruction_pointer;
    __u64 args[6];
};
#endif
#ifndef SYS_SECCOMP
# define SYS_SECCOMP 1
#endif

#define syscall_nr (offsetof(struct seccomp_data, nr))
#define arch_nr (offsetof(struct seccomp_data, arch))

#if defined(__i386__)
# define REG_SYSCALL    REG_EAX
# define ARCH_NR    AUDIT_ARCH_I386
#elif defined(__x86_64__)
# define REG_SYSCALL    REG_RAX
# define ARCH_NR    AUDIT_ARCH_X86_64
#else
# warning "Platform does not support seccomp filter yet"
# define REG_SYSCALL    0
# define ARCH_NR    0
#endif

#define VALIDATE_ARCHITECTURE \
    BPF_STMT(BPF_LD+BPF_W+BPF_ABS, arch_nr), \
    BPF_JUMP(BPF_JMP+BPF_JEQ+BPF_K, ARCH_NR, 1, 0), \
    BPF_STMT(BPF_RET+BPF_K, SECCOMP_RET_KILL)

#define EXAMINE_SYSCALL \
    BPF_STMT(BPF_LD+BPF_W+BPF_ABS, syscall_nr)

#define ALLOW_SYSCALL(name) \
    BPF_JUMP(BPF_JMP+BPF_JEQ+BPF_K, __NR_##name, 0, 1), \
    BPF_STMT(BPF_RET+BPF_K, SECCOMP_RET_ALLOW)

#define KILL_PROCESS \
    BPF_STMT(BPF_RET+BPF_K, SECCOMP_RET_KILL)

#endif /* _SECCOMP_BPF_H_ */

Relevant Link:
http://outflux.net/teach-seccomp/
http://man7.org/linux/man-pages/man2/prctl.2.html
http://en.wikipedia.org/wiki/Seccomp
https://blog.jtlebi.fr/2014/05/29/introduction-to-seccomp-bpf-linux-syscall-filter/#comment-135514
http://outflux.net/teach-seccomp/autodetect.html
4. 利用do_syscall_trace一次性对所有系统调用进行Hook监控
Relevant Link:
http://blog.aliyun.com/948
5. cuckoo
Cuckoo Sandbox is a malware analysis system. It simply means that you can throw any suspicious file at it and in a matter of seconds Cuckoo will provide you back some detailed results outlining what such file did when executed inside an isolated environment.
Cuckoo Sandbox is a free software that automated the task of analyzing any malicious file under Windows, OS X, Linux, and Android.
0x1: What is Cuckoo
Cuckoo is an open source automated malware analysis system.
It’s used to automatically run and analyze files and collect comprehensive analysis results that outline what the malware does while running inside an isolated Windows operating system.
It can retrieve the following type of results:
1. Traces of win32 API calls performed by all processes spawned by the malware.
2. Files being created, deleted and downloaded by the malware during its execution.
3. Memory dumps of the malware processes(和Volatility配合)
4. Network traffic trace in PCAP format.
5. Screenshots of Windows desktop taken during the execution of the malware.
6. Full memory dumps of the machines.
0x2: Use Cases
Cuckoo is designed to be used both as a standalone application as well as to be integrated in larger frameworks, thanks to its extremely modular design.
1. Generic Windows executables
2. DLL files
3. PDF documents
4. Microsoft Office documents
5. URLs and HTML files
6. PHP scripts
7. CPL files
8. Visual Basic (VB) scripts
9. ZIP files
10. Java JAR
11. Python files
12. Almost anything else
Cuckoo Sandbox consists of a central management software which handles sample execution and analysis.
Each analysis is launched in a fresh and isolated virtual machine. Cuckoo’s infrastructure is composed by an Host machine (the management software) and a number of Guest machines (virtual machines for analysis).
The Host runs the core component of the sandbox that manages the whole analysis process, while the Guests are the isolated environments where the malware samples get actually safely executed and analyzed

the recommended setup is GNU/Linux (Ubuntu preferably) as host and Windows XP Service Pack 3 as guest
0x3: Preparing the Host
1. Requirements
sudo apt-get install python python-pip python-dev libffi-dev libssl-dev
sudo apt-get install mongodb

sudo pip install -r requirements.txt
alembic==0.8.0
beautifulsoup4==4.4.1
cffi==1.2.1
chardet==2.3.0
cryptography==1.0
Django==1.8.4
dpkt==1.8.6.2
ecdsa==0.13
elasticsearch==2.2.0
enum34==1.0.4
Flask==0.10.1
HTTPReplay==0.1.11
idna==2.0
ipaddress==1.0.14
itsdangerous==0.24
Jinja2==2.8
jsbeautifier==1.5.10
Mako==1.0.1
MarkupSafe==0.23
ndg-httpsclient==0.4.0
oletools==0.42
http://pefile.googlecode.com/files/pefile-1.2.10-139.tar.gz#egg=pefile
pyasn1==0.1.8
pycparser==2.14
pymongo==3.0.3
pyOpenSSL==0.15.1
python-dateutil==2.4.2
python-editor==0.3
python-magic==0.4.6
requests==2.7.0
six==1.9.0
SQLAlchemy==1.0.8
tlslite-ng==0.6.0-alpha3
wakeonlan==0.2.2
Werkzeug==0.10.4
2. Virtualization Software
sudo apt-get install virtualbox
//If you want to have a latest version of VirtualBox
add to /etc/apt/sources.list
deb http://download.virtualbox.org/virtualbox/debian vivid contrib
deb http://download.virtualbox.org/virtualbox/debian utopic contrib
deb http://download.virtualbox.org/virtualbox/debian trusty contrib
deb http://download.virtualbox.org/virtualbox/debian saucy contrib
deb http://download.virtualbox.org/virtualbox/debian raring contrib
deb http://download.virtualbox.org/virtualbox/debian quantal contrib
deb http://download.virtualbox.org/virtualbox/debian precise contrib
deb http://download.virtualbox.org/virtualbox/debian lucid contrib non-free
//use add-apt-repository to add to your /etc/apt/sources.list
sudo apt-add-repository "deb http://download.virtualbox.org/virtualbox/debian vivid contrib"
//Add secure key:
wget -q https://www.virtualbox.org/download/oracle_vbox.asc -O- | sudo apt-key add -
//Install VirtualBox
sudo apt-get update
sudo apt-get install virtualbox-5.0
3. Installing Tcpdump
In order to dump the network activity performed by the malware during execution, you’ll need a network sniffer properly configured to capture the traffic and dump it to a file.
By default Cuckoo adopts tcpdump
4. Installing Volatility
Volatility is an optional tool to do forensic analysis on memory dumps. In combination with Cuckoo, it can automatically provide additional visibility into deep modifications in the operating system as well as detect the presence of rootkit technology that escaped the monitoring domain of Cuckoo’s analyzer.
5. Configuration
Cuckoo relies on six main configuration files:
1. cuckoo.conf: for configuring general behavior and analysis options.
    1) machinery in [cuckoo]: this defines which Machinery module you want Cuckoo to use to interact with your analysis machines. The value must be the name of the module without extension, cuckoo采用模块化的方式定义Guest沙箱,而virtualbox是官方推荐的一种
    2) ip and port in [resultserver]: defines the local IP address and port that Cuckoo is going to use to bind the result server on. Make sure this matches the network configuration of your analysis machines, or they won’t be able to return the collected results
    3) connection in [database]: defines how to connect to the internal database. You can use any DBMS supported by SQLAlchemy using a valid Database Urls syntax.

2. auxiliary.conf: for enabling and configuring auxiliary modules.
3. <machinery>.conf: for defining the options for your virtualization software(the file has the same name of the machinery module you choose in cuckoo.conf).
4. memory.conf: Volatility configuration. The Volatility tool offers a large set of plugins for memory dump analysis.
5. processing.conf: for enabling and configuring processing modules.
6. reporting.conf: for enabling or disabling report formats.
0x4: Preparing the Guest
For analysis purposes recommended to use Windows XP Service Pack 3
1. Requirements
In order to make Cuckoo run properly in your virtualized Windows system, you will have to install some required software and libraries.
1. Python is a strict requirement for the Cuckoo guest component (analyzer) in order to run properly.
2. Some Python libraries are optional and provide some additional features to Cuckoo guest component. They include:
    1) Python Image Library: it’s used for taking screenshots of the Windows desktop during the analysis.
3. Additional Software
Depending on what kind of files you want to analyze and what kind of sandboxed Windows environment you want to run the malware samples in, you might want to install additional software such as
    1) browsers
    2) PDF readers
    3) office suites etc.
Remember to disable the “auto update” or “check for updates” feature of any additional software.
2. Network Configuration
保证沙箱虚拟机的互联网连接通畅是十分重要,因为对于大多数恶意程序而言,联网上线之后才能进行下一步的释放、驻留、攻击动作
1. Windows Settings
One of the most important things to do is disabling Windows Firewall and the Automatic Updates.

2. Virtual Networking
In order to make it work properly you’ll have to configure your machine’s network so that the Host and the Guest can communicate. Testing the network access by pinging a guest is a good practice, to make sure the virtual network was set up correctly. Use only static IP addresses for your guest, as today Cuckoo doesn’t support DHCP and using it will break your setup
The recommended setup is using a Host-Only networking layout with proper forwarding and filtering configuration done with iptables on the Host.
For example, using VirtualBox, you can enable Internet access to the virtual machines using the following iptables rules (assuming that eth0 is your outgoing interface, vboxnet0 is your virtual interface and 192.168.56.0/24 is your subnet address):

iptables -A FORWARD -o eth0 -i vboxnet0 -s 192.168.56.0/24 -m conntrack --ctstate NEW -j ACCEPT
iptables -A FORWARD -m conntrack --ctstate ESTABLISHED,RELATED -j ACCEPT
iptables -A POSTROUTING -t nat -j MASQUERADE

And adding IP forwarding:
sysctl -w net.ipv4.ip_forward=1
3. Installing the Agent
In the agent/ directory you will find and agent.py file, just copy it to the Guest operating system, This will launch the XMLRPC server which will be listening for connections.
4. Saving the Virtual Machine
save the virtual machine to a snapshot state.
Before doing this make sure you rebooted it softly and that it’s currently running, with Cuckoo’s agent running and with Windows fully booted
0x5: Usage
https://github.com/LittleHann/cuckoo-linux
https://downloads.cuckoosandbox.org/docs/usage/index.html
https://downloads.cuckoosandbox.org/docs/
https://github.com/cuckoosandbox/cuckoo
file:///D:/%E5%AD%A6%E4%B9%A0%E8%B5%84%E6%96%99/%E8%9C%9C%E7%BD%90/paper/US-13-Bremer-Mo-Malware-Mo-Problems-Cuckoo-Sandbox-WP.pdf

//1. 安装mysql
sudo apt-get install mysql-server mysql-client
//2. 创建保存cuckoo结果收集信息的数据库
mysql -uroot -p111
create database cuckoo;

//修改配置文件中mysql帐号密码
vim conf/cuckoo.conf
connection = mysql://root:111@localhost/cuckoo
Relevant Link:
https://github.com/cuckoobox/cuckoo
http://docs.cuckoosandbox.org/en/latest/
https://www.cuckoosandbox.org
https://www.cuckoosandbox.org/blog.html
https://media.blackhat.com/us-13/US-13-Bremer-Mo-Malware-Mo-Problems-Cuckoo-Sandbox-WP.pdf
https://downloads.cuckoosandbox.org/docs/introduction/what.html
https://www.virtualbox.org/wiki/Linux_Downloads
https://www.virtualbox.org/wiki/Technical_documentation
https://www.virtualbox.org/manual/ch01.html#idp46457699650320
http://www.howopensource.com/2013/04/install-virtualbox-ubuntu-ppa/
https://www.howtoforge.com/virtualbox_ubuntu
https://downloads.cuckoosandbox.org/docs/installation/guest/index.html
https://blog.malwarebytes.org/intelligence/2014/04/automating-malware-analysis-with-cuckoo-sandbox/
6. Detux
Detux is is an open Linux Sandbox platform. It aims at executing various ELF binaries and capture the network traffic generated by it.
The sandbox plans to support x86, x64, MIPS and ARM.
Post execution of the binary, a report with following information may be generated:
1. Network connections made by the binary
2. FileType of the binary
3. Strings in the binary
4. DNS and URLs requested
Relevant Link:
http://detux.org/
http://honeynet.org.in/projects/detux-the-linux-malware-analyzer/
7. remnux
remnux是一个恶意样本分析的分发套件(内含很多分析工具),它有两种形式,AVO、docker
0x1: Available Application Images
1. Google’s V8 JavaScript engine for JavaScript deobfuscation: remnux/v8
2. Thug low-interaction honeyclient: remnux/thug
3. Viper binary analysis and management framework: remnux/viper
4. Rekall memory forensic framework: remnux/rekall
5. JSDetox JavaScript analysis tool for deobfuscation: remnux/jsdetox
6. Radare2 reverse-engineering framework and disassembler: remnux/radare2
7. Pescanner static malware analysis tool for Windows PE files: remnux/pescanner
8. The Volatility Framework for memory forensics: remnux/volatility
9. MASTIFF static analysis framework for suspicious files: remnux/mastiff
10. Maltrieve for retrieving malware samples: remnux/maltrieve
docker run -i -t --name mytest remnux/thug /bin/bash
Relevant Link:
https://github.com/REMnux/docker
https://remnux.org/docs/containers/malware-analysis/
https://remnux.org/docs/containers/malware-analysis/
https://remnux.org/docs/distro/get/
https://remnux.org/docs/containers/run-apps/
https://remnux.org/docs/containers/create-docker-images/
8. Noriben Malware Analysis Sandbox(windows PE analyser)
Noriben is a Python-based script that works in conjunction with Sysinternals Procmon to automatically collect, analyze, and report on runtime indicators of malware. In a nutshell, it allows you to run your malware, hit a keypress, and get a simple text report of the sample's activities.
Noriben allows you to not only run malware similar to a sandbox, but to also log system-wide events while you manually run malware in ways particular to making it run. For example, it can listen as you run malware that requires varying command line options. Or, watch the system as you step through malware in a debugger.
Noriben only requires Sysinternals procmon.exe (or procmon64.exe) to operate. It requires no pre-filtering (though it would greatly help) as it contains numerous white list items to reduce unwanted noise from system activity.
python Noriben.py -t 120 --output output --cmd ./malware/xorddos

Relevant Link:
https://github.com/Rurik/Noriben
http://www.ghettoforensics.com/2013/04/noriben-your-personal-portable-malware.html
9. Limon Sandbox for Analyzing Linux Malwares
0x1: Tools Used By limon
Limon relies on below tools to perform static, dynamic, memory analysis
1. YARA-python
YARA is a tool aimed at (but not limited to) helping malware researchers to identify and classify malware samples. With YARA you can create descriptions of malware families (or whatever you want to describe) based on textual or binary patterns. Each description, a.k.a rule, consists of a set of strings and a boolean expression which determine its logic.
rule silent_banker : banker
{
    meta:
        description = "This is just an example"
        thread_level = 3
        in_the_wild = true
    strings:
        $a = {6A 40 68 00 30 00 00 6A 14 8D 91}
        $b = {8D 4D B0 2B C1 83 C0 27 99 6A 4E 59 F7 F9}
        $c = "UVODFRYSIHLNWPEJXQZAKCBGMT"
    condition:
        $a or $b or $c
}
apt-get install yara
silent_banker.rule
rule silent_banker : banker
{
    meta:
        description = "This is just an example"
        thread_level = 3
        in_the_wild = true
    strings:
        $a = {6A 40 68 00 30 00 00 6A 14 8D 91}
        $b = {8D 4D B0 2B C1 83 C0 27 99 6A 4E 59 F7 F9}
        $c = "littlehann"
    condition:
        $a or $b or $c
}

2. VirusTotal Public api
3. ssdeep
4. string utility(linux command)
5. ldd(linux command)
6. readelf(linux command)
7. Inetsim
INetSim is a software suite for simulating common internet services in a lab environment, e.g. for analyzing the network behaviour of unknown malware samples.
Currently, modules for the simulation of the following services are included with the INetSim distribution:
1. HTTP / HTTPS:
    1) supports methods GET, HEAD, POST and OPTIONS with HTTP/1.0 and HTTP/1.1
    2) "real mode"
        2.1) Delivers existing files from a webroot directory
    3) "fake mode"
        3.1) Delivers configured fake files based on the file extension in the HTTP request (e.g. .html or .exe) or static paths
        3.2) Requests for checkip.dyndns.org are answered with client's IP address
2. SMTP / SMTPS
    1) received e-mails are stored in mbox format
    2) supports ESMTP and flexible configuration of service extensions
    3) supports authentication methods PLAIN, LOGIN, ANONYMOUS, CRAM-MD5 and CRAM-SHA1
    4) arbitrary authentication data is accepted and logged in plain text
3. POP3 / POP3S
    1) dynamic creation of mailbox content from supplied mbox files
    2) supports APOP and flexible configuration of service capabilities
    3) supports authentication methods PLAIN, LOGIN, ANONYMOUS, CRAM-MD5 and CRAM-SHA1
    4) arbitrary authentication data is accepted and logged in plain text
4. DNS
    1) forward and reverse lookup with default and static configuration
5. FTP / FTPS
    1) download and upload
    2) builds a virtual filesystem based on an existing directory stucture which allows for creation and deletion of arbitrary files
6. TFTP
    1) download and upload
    2) flexible configuration of service options
    3) builds a virtual filesystem based on an existing directory structure which allows for creation of arbitrary files
7. IRC
    1) basic command set
8. NTP
9. Ident
10. Finger
11. Syslog
12. "Small servers":
    1) Daytime,
    2) Time,
    3) Echo,
    4) Chargen,
    5) Discard and
    6) Quotd
    7) Dummy
install
//Before installing INetSim, please make sure your system meets all necessary requirements.
apt-get install libperl5*

//There were two Perl libraries which were not in Portage that needed to be installed from source. The first was IPC::Sharable
wget http://search.cpan.org/CPAN/authors/id/M/MS/MSOUTH/IPC-Shareable-0.61.tar.gz
tar zxvf IPC-Shareable-0.61.tar.gz
cd IPC-Shareable-0.61
perl Makefile.PL
make
make test
make install

//The next required Perl library, Perlipq, took a little longer. This is a library used to interface with the packet queueing on the system for redirection.
wget http://search.cpan.org/CPAN/authors/id/J/JM/JMORRIS/perlipq-1.25.tar.gz
tar zxvf perlipq-1.25.tar.gz
cd perlipq-1.25
perl Makefile.PL

groupadd inetsim
wget http://www.inetsim.org/downloads/inetsim-1.2.5.tar.gz
tar -zvxf inetsim-1.2.5.tar.gz
cd inetsim-1.2.5
./setup.sh
//Configuration
vim conf/inetsim.conf
8. tcpdump
9. volatility memory forensics framework
The Volatility Framework is a completely open collection of tools, implemented in Python under the GNU General Public License, for the extraction of digital artifacts from volatile memory (RAM) samples.
The extraction techniques are performed completely independent of the system being investigated but offer visibilty into the runtime state of the system. The framework is intended to introduce people to the techniques and complexities associated with extracting digital artifacts from volatile memory samples and provide a platform for further work into this exciting area of research.
Volatility supports investigations of the following memory images:
Windows:
* 32-bit Windows XP Service Pack 2 and 3
* 32-bit Windows 2003 Server Service Pack 0, 1, 2
* 32-bit Windows Vista Service Pack 0, 1, 2
* 32-bit Windows 2008 Server Service Pack 1, 2 (there is no SP0)
* 32-bit Windows 7 Service Pack 0, 1
* 32-bit Windows 8, 8.1, and 8.1 Update 1
* 32-bit Windows 10 (initial support)
* 64-bit Windows XP Service Pack 1 and 2 (there is no SP0)
* 64-bit Windows 2003 Server Service Pack 1 and 2 (there is no SP0)
* 64-bit Windows Vista Service Pack 0, 1, 2
* 64-bit Windows 2008 Server Service Pack 1 and 2 (there is no SP0)
* 64-bit Windows 2008 R2 Server Service Pack 0 and 1
* 64-bit Windows 7 Service Pack 0 and 1
* 64-bit Windows 8, 8.1, and 8.1 Update 1
* 64-bit Windows Server 2012 and 2012 R2
* 64-bit Windows 10 (initial support)

Linux:
* 32-bit Linux kernels 2.6.11 to 4.2.3
* 64-bit Linux kernels 2.6.11 to 4.2.3
* OpenSuSE, Ubuntu, Debian, CentOS, Fedora, Mandriva, etc

Mac OSX:
* 32-bit 10.5.x Leopard (the only 64-bit 10.5 is Server, which isn't supported)
* 32-bit 10.6.x Snow Leopard
* 64-bit 10.6.x Snow Leopard
* 32-bit 10.7.x Lion
* 64-bit 10.7.x Lion
* 64-bit 10.8.x Mountain Lion (there is no 32-bit version)
* 64-bit 10.9.x Mavericks (there is no 32-bit version)
* 64-bit 10.10.x Yosemite (there is no 32-bit version)
* 64-bit 10.11.x El Capitan (there is no 32-bit version)
Volatility does not provide memory sample acquisition capabilities. For acquisition, there are both free and commercial solutions available.
Volatility supports a variety of sample file formats and the ability to convert between these formats:
Raw linear sample (dd)
Hibernation file (from Windows 7 and earlier)
Crash dump file
VirtualBox ELF64 core dump
VMware saved state and snapshot files
EWF format (E01)
LiME (Linux Memory Extractor) format
Mach-O file format
QEMU virtual machine dumps
Firewire
HPAK (FDPro)
install && usage
//install requirements
pip install distorm3
wget https://pypi.python.org/packages/source/d/distorm3/distorm3-3.3.1.zip#md5=0732bcaa53591ff1c264b2d15c282586
unzip distorm3-3.3.1.zip
cd distorm3-3.3.0
python setup.py install

git clone https://github.com/volatilityfoundation/volatility.git
cd volatility
python vol.py --info
//This is a list of publicly available memory samples for testing purposes.
python vol.py [plugin] -f [image] --profile=[profile]
python vol.py pslist -f ./samples/zeus.vmem --profile=WinXPSP2x86
python vol.py connections -f ./samples/zeus.vmem --profile=WinXPSP2x86
python vol.py dlllist -f ./samples/zeus.vmem --profile=WinXPSP2x86
10. strace(linux commad)
11. sysdig
apt-get install sysdig
//查看可用的凿子列表
sysdig -cl | less
CPU Usage:CPU使用量
Errors:错误
I/O
Logs:日志
Misc:混杂
Net:网络
Performance:性能
Security:安全
System State:系统状态
监控实例
监控文件I/O
sysdig -p "%user.name %proc.name %fd.name" "evt.type=write and fd.name contains /home/" -z -w writetrace.scap.gz
sysdig -r writetrace.scap.gz

监控网络I/O
检查由特定IP地址,特定进程(如apache2)提供的数据(ASCII编码格式)
# sysdig -s 4096 -A -c echo_fds fd.cip=192.168.0.100 -r /mnt/sysdig/debian.scap.gz proc.name=apache2
0x2: Supported File Types
1. ELF
2. Perl
3. Python script
4. shell script
5. bash script
6. php script
7. loadable kernel module(LKM)
0x3: installation && usage

git clone https://github.com/monnappa22/Limon pip install magic wget https://pypi.python.org/packages/source/p/python-magic/python-magic-0.4.11.tar.gz#md5=3c1cdcb8fc0ec4ea5a0cf2230c929c76 tar -zvxf python-magic-0.4.11.tar.gz cd python-magic-0.4.11 python setup.py install wget https://pypi.python.org/packages/source/y/yara/yara-1.7.7.tar.gz tar -zvzf yara-1.7.7.tar.gz cd yara-1.7.7 python setup.py install wget https://pypi.python.org/packages/source/p/psutil/psutil-4.0.0.tar.gz tar -zvzf psutil-4.0.0.tar.gz cd psutil-4.0.0 python setup.py install apt-get install ssdeep //原项目中使用了python-magic5中的新方法,ubuntu上默认使用的是0.4.x,因此需要进行API重写 vim statan.py def filetype(self): if os.path.exists(self.file): #m = magic.open(magic.MAGIC_NONE) #m.load() ftype = magic.from_file(self.file, mime=True) return ftype else: print "No such file or directory:", self.file sys.exit() //配置YARA规则 https://github.com/endgameinc/binarypig https://github.com/Yara-Rules/rules/tree/master/malware mkdir /root/yara_rules git clone https://github.com/endgameinc/binarypig.git cd binarypig cp ./yara_rules/* /root/yara_rules/ cat > /root/yara_rules/capabilities.yara https://malwarecookbook.googlecode.com/svn/trunk/3/5/capabilities.yara //禁用virusTotal检测 ''' print "Virustotal:\n" + "\t" f.write("Virustotal:\n" + "\t") f.write("\n") avresults = static.virustotal(virustotal_key) if avresults !=None: avvendors = avresults.keys() avvendors.sort() for avvendor in avvendors: print "\t " + avvendor + " ==> " + avresults[avvendor] f.write("\t " + avvendor + " ==> " + avresults[avvendor]) f.write("\n") print dash_lines f.write(dash_lines) f.write("\n") ''' //安装vmware sudo apt-get install build-essential linux-headers-`uname -r` wget https://download3.vmware.com/software/player/file/VMware-Player-12.1.0-3272444.x86_64.bundle?HashKey=0a1f7f18c468357fcb8c7f0b85b23b21¶ms=%7B%22sourcefilesize%22%3A%22132.42+MB%22%2C%22dlgcode%22%3A%22PLAYER-1210%22%2C%22languagecode%22%3A%22en%22%2C%22source%22%3A%22DOWNLOADS%22%2C%22downloadtype%22%3A%22manual%22%2C%22eula%22%3A%22N%22%2C%22downloaduuid%22%3A%22f8a24090-3bcf-4d2c-9eb8-856da95b2f73%22%2C%22purchased%22%3A%22N%22%2C%22dlgtype%22%3A%22Product+Binaries%22%2C%22productversion%22%3A%2212.1.0%22%2C%22productfamily%22%3A%22VMware+Workstation+Player%22%7D&AuthKey=1458874182_b108948b99eab9c2e6854ef02b2ade2d chmod +x VMware-Player-12.1.0-3272444.x86_64.bundle sudo ./VMware-Player-12.1.0-3272444.x86_64.bundle python limon.py -h python limon.py /root/Limon/samples/xorddos -t 40 -x -M -E -C -i

Relevant Link:
https://www.blackhat.com/eu-15/briefings.html#automating-linux-malware-analysis-using-limon-sandbox
https://www.blackhat.com/docs/eu-15/materials/eu-15-KA-Automating-Linux-Malware-Analysis-Using-Limon-Sandbox-wp.pdf
https://www.blackhat.com/docs/eu-15/materials/eu-15-KA-Automating-Linux-Malware-Analysis-Using-Limon-Sandbox.pdf
http://yara.readthedocs.org/en/v3.4.0/index.html
http://yara.readthedocs.org/en/v3.4.0/yarapython.html
https://www.virustotal.com/en/documentation/public-api/
http://www.inetsim.org/
http://secshoggoth.blogspot.com/2009/02/inetsim-installation.html
https://github.com/volatilityfoundation/volatility/wiki/Volatility%20Usage#using-volatility
https://github.com/volatilityfoundation/volatility/wiki/Volatility-Usage
https://github.com/volatilityfoundation/volatility
https://github.com/volatilityfoundation/volatility/wiki/Memory-Samples
https://github.com/volatilityfoundation/volatility/wiki/Memory-Samples
https://linux.cn/article-4341-1.html
https://github.com/draios/sysdig
http://www.sysdig.org/
http://malware-unplugged.blogspot.com/2015/11/setting-up-limon-sandbox-for-analyzing.html
http://malware-unplugged.blogspot.com/2015/11/limon-sandbox-for-analyzing-linux.html
https://github.com/monnappa22/Limon
10. 基于docker的malware analysis
0x1: 分析模块
1. 静态分析
docker pull ubuntu
//映射docket和宿主机的样本共享目录
//1. 交互shell
sudo docker run --rm -it -v /root/Limon/samples:/home/malware/samples ubuntu bash
//2. 设置宿主机和容器共享目录(只读),运行指令后立即退出
sudo docker run --rm -v /root/Limon/samples/:/home/malware/samples:ro ubuntu /home/malware/samples/xorddos
//3. 降权运行docker
chmod u+w /etc/sudoers
littlehann ALL=(ALL) ALL
chmod u-w /etc/sudoers
//每个docker malware分析容器运行估计时间(延时)
cat  > /root/Limon/samples/run.sh
#!/bin/bash
/home/malware/samples/xorddos
sleep 120

//运行
su littlehann
/*
1. 声明--rm=true,在容器运行结束后自动回收资源(包括卷)
2. 声明:ro,即指定volume为只读卷,在容器中无法修改宿主机共享的目录、文件
3. 声明--mac-address=,为新启动容器指定网卡MAC地址
*/
sudo docker run --rm=true -v /root/Limon/samples/:/home/malware/samples:ro ubuntu /home/malware/samples/run.sh

//查看日志文件
sudo docker logs 29f7517873609d3850d226428779c5526ebc5b64bb7065b9959f83297c1c4570
2. 网络行为监控
1. DNS Queries
    1) Type
    2) Query
    3) Response
2. IPs Connected
    1) Protocol
    2) IP Address:Port
3. URLs Accessed
4. TCP Raw Streams
DNS Query、IPs Connected、URLs Accessed、TCP Raw Streams
"""
# -*- coding: utf-8 -*-
# Author: zhenghan <zhenghan.zh@alibaba-inc.com>
# Date: 2016/3/26 9:53
@version: undo
@license: Apache Licence
@site: http://littlehann.cnblogs.com/
@software: PyCharm Community Edition
@file: sniffdocekr.py
"""

#coding:utf-8
from scapy.all import *
from datetime import datetime
import time
import datetime
import sys
import re

############# MODIFY THIS PART IF NECESSARY ###############
interface = 'docker0'
#filter_bpf = 'port 53'
filter_bpf = ''

queryType = {
    1 : 'A',
    2 : 'NS',
    5 : 'CNAME',
    #6 : 'SOA',
    #11 : 'WKS',
    12 : 'PTR',
    #13 : 'HINFO',
    15 : 'MX',
    28 : 'AAAA',
    #252 : 'AXFR',
    #255 : 'ANY'
}

httpMethod = {
    'GET',
    'HEAD',
    'POST',
    'PUT',
    'DELETE',
    'OPTIONS',
    'CONNECT',
    'TRACE'
}

# ------ SELECT/FILTER MSGS
def select_traffic(pkt):
    pkt_time = pkt.sprintf('%sent.time%')
# ------ SELECT/FILTER DNS MSGS
    try:
        if pkt.haslayer(DNS):
            #only record valid dns query/respon
            if pkt[DNSQR].qtype in queryType:
                qtype = queryType[pkt[DNSQR].qtype]
                qname = pkt[DNSQR].qname
                if DNSQR in pkt and pkt.dport == 53: #query
                    print "DNS Queries Request: " +  str(qtype) + " " + str(qname) # responses
                elif DNSRR in pkt and pkt.sport == 53 or pkt.ancount > 0 and isinstance(pkt.an, DNSRR):
                    a_count = int(pkt[DNS].ancount) + int(pkt[DNS].nscount) + int(pkt[DNS].arcount)
                    a_count += 4
                    while a_count > 4:
                        rrname = pkt[0][a_count].rrname
                        type = queryType[pkt[0][a_count].type]
                        rdata = pkt[0][a_count].rdata
                        print "DNS Queries Response: rrname=" + rrname + " type=" +  type + " rdata=" + rdata
                        a_count -= 1
            else:
                pass
        elif  pkt.haslayer(TCP):
            if pkt.haslayer(Raw):
                if (pkt[Raw].load[0:3] in httpMethod or pkt[Raw].load[0:4] in httpMethod ): #URLs Accessed
                    requestLoad = str(pkt[Raw].load).split("\r\n")
                    uri,host = '',''
                    for requestItem in requestLoad:
                        mURI = re.match(r'GET\s+(.*)\s+HTTP/\d\.\d', requestItem)
                        mHost = re.match(r'Host:\s*((\w+\.)+\w+(\.){0,1})', requestItem, re.M|re.I)
                        if mURI:
                            uri = mURI.groups()[0]
                        if mHost:
                            host = mHost.groups()[0]
                            break
                    print 'URLs Accessed: '+ host + uri
                elif len(pkt[Raw].load) > 1:
                    sIP = pkt[IP].src
                    sPort = str(pkt[TCP].sport)
                    dIP = pkt[IP].dst
                    dPort = str(pkt[TCP].sport)
                    print sIP + ":" + sPort + " -> " + dIP + ":" + dPort + ' TCP Raw Streams(ascii): ' + str(pkt[Raw].load)
                    print sIP + ":" + sPort + " -> " + dIP + ":" + dPort + ' TCP Raw Streams(hex): ' + str(pkt[Raw].load).encode("hex")
            if ('SAckOK', '') in pkt[TCP].options: #IPs Connected
                sIP = pkt[IP].src
                sPort = str(pkt[TCP].sport)
                dIP = pkt[IP].dst
                dPort = str(pkt[TCP].sport)
                print "IPs Connected: " + sIP + ":" + sPort + " -> " + dIP + ":" + dPort
    except Exception,e:
        print 'error', e
# ------ START SNIFFER
sniff(iface=interface, filter=filter_bpf, store=0,  prn=select_traffic)
3. 自动启动docker(运行恶意样本)
启动了sniffer之后(监控docker网卡),就可以开始启动docker sandbox,在docker隔离环境下运行恶意样本了
# start one Docker container for malware analyse
mac = randomMAC()
newContainerName = file_md5sum + "_" + filter_file_name
cli = Client()
try:
    isRuning = cli.inspect_container(newContainerName)
except Exception,e:
    isRuning = []
if isRuning == []:
    container = cli.create_container(
        image='ubuntu', # ubuntu
        detach=True, # -d=true
        name=newContainerName, # container name
        volumes=[container_malware_path], # container volume
        host_config=cli.create_host_config(binds=[
            host_malware_path + ":" + container_malware_path + ":ro"
        ]),
        mac_address=mac, # --mac-address=92:d0:c6:0a:29:33
        command=container_malware_path + docker_malware_script_name # /home/malware/samples/run.sh
    )
    print container.get('Id')
    response = cli.start(container=container.get('Id'))
else:
    print newContainerName + " is running"
    sys.exit(0)
0x2: 遇到的问题
1. 恶意样本文件的保存,因为很多恶意程序在进程启动后,会删除原始磁盘文件
    1) 一个可行的解决方法是对保存样本的目录、文件设置只读权限: find /root/Limon/samples/ -iname "*" -print0 | xargs -I {} -0 chattr +i {}
    2) 或者将volume卷设置为只读

2. 如果需要详细的程序动态行为信息,在需要进行syshook(在sandbox、或者宿主机中)
3. 值得注意的是,docker为每个运行中的容器都指定了虚拟网桥,scapy可以分别sniffer容器对应的虚拟网桥,从而实现并发分析大量样本的目的,但是在实践中,发现没有办法拿到容器对应的宿主机virtual bridge的名字,转而只能继续监听docker中继网桥。在启动容器的时候手工指定一个MAC地址,然后在sniffer中添加对MAC的过滤器,实现流量的捕获
4. cli = Client()执行报错,docker api和docker server版本不一致,修改即可
vim /usr/local/lib/python2.7/dist-packages/docker/constants.py
#DEFAULT_DOCKER_API_VERSION = '1.22'
DEFAULT_DOCKER_API_VERSION = '1.18'
Relevant Link:
http://www.secdev.org/projects/scapy/
https://github.com/secdev/scapy/
http://www.secdev.org/projects/scapy/demo.html
http://stackoverflow.com/questions/24792462/python-scapy-dns-sniffer-and-parser
http://www.cnblogs.com/lonenysky/p/5014548.html
http://itgeekchronicles.co.uk/2014/05/12/scapy-iterating-over-dns-responses/
https://thepacketgeek.com/scapy-p-09-scapy-and-dns/
http://www.secdev.org/projects/scapy/doc/usage.html
http://docker-py.readthedocs.org/en/latest/volumes/
https://pypi.python.org/pypi/docker-py/0.3.1
http://docs.saltstack.cn/ref/modules/all/salt.modules.dockerio.html
http://www.xiaomastack.com/2015/04/17/docker-py/
11. Joe Sandbox Desktop
Joe Sandbox Desktop's architecture is modular. It consists of at least one controller machine running Linux and multiple connected analysis machines (with Windows or Android installed) hosted by virtualization products such as VMware or VirtualBox. Users or a submission script sends files and URLs for analysis via the Joe Sandbox Desktop Web Interface to the controller's server. The Joe Sandbox Desktop server stores the submission in a local file database and forwards them to the connected analysis machines, where the submission is then executed.
Joe Sandbox Desktop's configurable and efficient dynamic and static analysis engine monitors any activities during the binary program execution and reports behavior data instantly to the controller.
Evaluating results, statistics, activities and code functions are compiled into a detailed and well structured report.
0x1: Key Features
1. comprehensive reports
Joe Sandbox Desktop generates very detailed analysis reports about
    1) system
    2) network
    3) browser
    4) tampering/code manipulation behavior.
The report includes evaluations and additional data about strings, domains and file structures. Matching generic signatures highlight suspicious and malicious key behavior. Classification and threat scores help to detect sophisticated cyber-attacks quickly. A context based search enables to quickly navigate.

2. all files on all platforms
Joe Sandbox Desktop enables analysis of all executable files (including malicious documents) on Windows XP, Windows Vista, Windows W7, Windows W7 x64, W8 and W10

3. hundreds of generic and open behavior signatures
Joe Sandbox Desktop uses a growing set of over 686+ generic Behavior Signatures to detect and classify malicious behavior activities such as
    1) Exploiting
    2) Shellcode (for malicious documents)
    3) Persistence
    4) Boot Survival
    5) Spreading
    6) Data Spying
    7) Leakage
    8) C&C Communication.
Behavior Signatures are extendable and customizable and optionally are shared within a community.

4. virtual and physical analysis systems
Joe Sandbox Desktop enables to use a mix of virtual and physical analysis machines for analysis. Physical machines are very helpful in order to deal with evasive malware which may not run on virtual systems.

5. yara
Joe Sandbox Desktop allows to use Yara Rules for advanced malware detection. Joe Sandbox Desktop forwards all samples, downloaded files, resources as well as memory dumps to Yara. In addition Joe Sandbox Desktop features a nice web based Yara Rule editor.

6. Yara Rule Generation
Joe Sandbox Desktop creates various Yara rules based on static, dynamic and hybrid behavior data. The generated Yara rules allow to identify specific malware, malware families and malware variants. Yara Rule Generator uses sophisticated data rating and clustering algorithms.

7. Analyses Hidden Payloads
Joe Sandbox Desktop's Hybrid Code Analysis (HCA) engine identifies code functions based on dynamic memory dumps. HCA enables in-depth analysis of malware by understanding hidden payloads, malicious functionality not seen during runtime analysis. HCA results are highly annotated and connected to dynamic behavior information. Through an advanced algorithm, HCA identifies hidden API calls and hidden strings within codes.

8. Execution Graphs
Joe Sandbox Desktop generates highly condensed control flow graphs, so called Execution Graphs. Execution Graphs enable to detect evasions against malware analysis systems. Furthermore Execution Graphs allow to rate the behavior by looking at API chains, execution coverage and loops.
//值得注意的是,动态sandbox vm执行虽然对代码隐藏技术检测效果很好,却受制于输入参数的影响,静态CFG(代码控制流图)分析可以从静态宏观的角度获取整个代码的流程逻辑全貌

9. SSL Proxy
Joe Sandbox Desktop enables to inspect HTTPS traffic. Similiar to a next generation firewall Joe Sandbox Desktop installs a MITM SSL Proxy which intercepts and analyzes any SSL traffic. This allows to inspect malicious HTTPS C&C traffic which is often used in APTs.

10. Extensive supplementary Analysis Data
In addition to analysis reports in HTML, XML and JSON formats, Joe Sandbox Desktop captures and generates supplementary data. This includes created files, unpacked PE files, memory dumps, PCAP of the captured network traffic, screenshots, shellcode and strings.

11. Automated User Behavior
Through predefined and configurable Cookbooks - special scripts submitted as second input - Joe Sandbox Desktop allows for performing advanced use cases on the analysis machine. Cookbook scripts describe an analysis procedure and allow any possible user behavior to be automated. Browsing a URL with IE, Firefox or Chrome, logging into an email account, or running a file with special arguments are just a few examples of the existing Cookbooks included.

12. Simplified Management and Control
Joe Sandbox Desktop includes an intuitive web interface with features such as file and URL uploads, cookbook editor, user management and bulk upload/download and mail/syslog notifications.
0x2: Cookbooks
While Hybrid Code Analysis and behavior signatures detect evasive threats, Cookbooks enable to easily influence and change the malware's behavior automatically. With Cookbooks security professionals can change the environment, simulate operating system events or modify the operating system behavior. Cookbooks also enable to completely customize the analysis procedure including malware startup, analysis duration and analysis chaining on multiple systems. The Cookbook technology makes Joe Sandbox the most flexible and customizable malware analysis system in the industry.
0x3: Hybrid Code Analysis
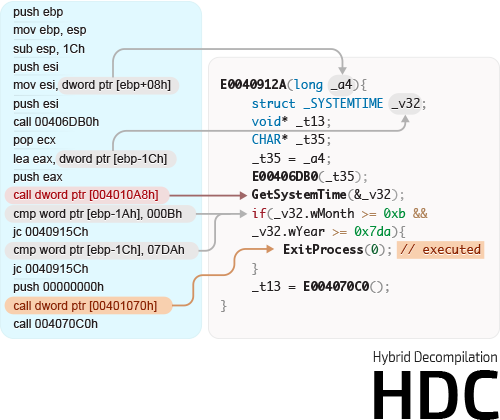
Hybrid Code Analysis (HCA) combines dynamic and static program analysis while retaining the main benefits of both techniques: context awareness, resilience against code obfuscation such as packing and self-modifying code on the one hand, and code analysis completion on the other hand. It enables to understand evasions against malware analysis systems including sleeps, logic bombs and system fingerprinting. Moreover, it allows discovering hidden behavior – dormant functionality which is executed only under rare conditions. Hybrid Code Analysis enables security professionals to understand the complete malware behavior, not just the installation.

0x4: Hybrid Decompilation
Hybrid Decompilation (HDC) combines static decompilation techniques with knowledge of dynamic code execution to generate high level C-code. The automatically generated C-code features high-level control structures (if, do-while loops, switch statements), function parameters and local variables, high-level types (including high-level types for APIs), and function call arguments. Compared to standard decompilation Hybrid Decompilation directly operates on memory and benefits from dynamic data such as strings, function arguments and execution marks. Due to that HDC generates easy to understand codes which enable security professionals to quickly understand key behavior of evasive threats.
0x5: Execution Graph Analysis
Execution Graph Analysis (EGA) generates highly condensed control flow graphs, so called Execution Graphs to visualize codes detected by Hybrid Code Analysis. Execution Graphs highlight the full logical behavior of the malware and include additional runtime information such as execution status, signature matches, key decisions, unpacked code and richest paths. Execution Graph Analysis detects evasions against malware analysis systems completely automated, without any human interaction. Furthermore EGA rates the behavior by looking at API chains, execution coverage and loops.

0x6: Adaptive Internet Simulation
AIS acts as a configurable firewall between the Joe Sandbox malware analysis system and the Internet. AIS is smart! It montiors network traffic and decides which packets to let through, and which ones to block.
With this unique technology AIS prevents leakage of sensitive system information, such as ids and hardware tokens. Moreover AIS provides powerful features such as user-controlled DNS answers and faking HTTP POST answers.
A Joe Sandbox Analysis using AIS provides an in depth view of the malware behavior without the risks of unlimited Internet access.

0x7: Extensive Behavior Signature Set
Joe Security has one of the most extensive generic Behavior Signature set. The set consisting of over 951+ signatures covers multiple platforms including Windows, Android and Mac OS X. Behavior Signatures enable detecting, classifying and summarizing malicious behavior, dangerous code and evasions. Joe Sandbox applies each signature to an enormous amount of captured data ranging from operating system to network, browser, memory, file, binary and screen data.

Relevant Link:
http://www.joesecurity.org/joe-sandbox-desktop#key-features
http://www.joesecurity.org/joe-sandbox-technology#cookbooks
http://joe4security.blogspot.ch/2014/07/joe-sandbox-aware-malware-certainly-not.html
http://joe4security.blogspot.ch/2014/12/new-sandbox-evasion-tricks-spot-with.html
http://joe4security.blogspot.ch/2014/11/finding-dga-in-1-minute-with-joe.html
http://joe4security.blogspot.ch/2015/09/pure-innovation-hybrid-decompilation.html
http://www.joesecurity.org/joe-sandbox-technology#hca
12. Zero Wine: Malware Behavior Analysis
0x1: Introduction
Zero wine is an open source (GPL v2) research project to dynamically analyze the behavior of malware. Zero wine just runs the malware using WINE in a safe virtual sandbox (in an isolated environment) collecting information about the APIs called by the program.
The output generated by wine (using the debug environment variable WINEDEBUG) are the API calls used by the malware (and the values used by it, of course). With this information, analyzing malware's behavior turns out to be very easy.
0x2: How does it works
Zero wine is distributed as one QEMU virtual machine image with a Debian operating system installed. The image contains software to upload and analyze malware and to generate reports based on the information gathered (this software is stored in /home/malware/zerowine).
Running the distributed virtual machine with the correct command line options (use the supplied startup shell script to run the virtual machine) provides a web based (web server is written in python) graphical interface to upload malware to be analyzed (a CGI written, also, in python).
When a new malware is uploaded, it is copied to the directory /tmp/vir/MD5_OF_THE_FILE, them, the previous created WINE environment (WINEPREFIX if you prefer) is removed and a backup system is untared (the backup system is /home/malware/backup/backup.tar.gz). After this operation, the malware is executed using the shell script malware_launcher.sh (the file is stored in the folder /home/malware/bin).
NOTE: The current system is subject to change as it doesn't allow the analysis of more than one malware at a time. In the future, every time you upload a new malware file it will be added to a queue for later analysis and a new WINEPREFIX specific to run this malware will be created.
Relevant Link:
http://zerowine.sourceforge.net/
https://sourceforge.net/projects/zerowine/
Copyright (c) 2016 LittleHann All rights reserved

 浙公网安备 33010602011771号