1.建立platter类函数,命名为CustomPalette.js
export default class CustomPalette {
constructor(create, elementFactory, palette) {
this.create = create;
this.elementFactory = elementFactory;
palette.registerProvider(this);
}
// 这个是绘制palette的核心,函数名不要变
getPaletteEntries() {
const elementFactory = this.elementFactory;
const create = this.create;
function dragEventFactory(type) {
return function (event) {
const taskShape = elementFactory.create('shape', {
type: type
});
create.start(event, taskShape);
};
}
return {
'create.cake': {
title: '我是自定义节点-小鸟', // 鼠标悬浮到节点上显示的文字
className: 'icon-custom bpmn-icon-cake', // 样式名
action: { // 操作该节点时会触发的事件,此时只注册一个拖动事件即可,否则拖动时没有效果
dragstart: dragEventFactory('bpmn:Task'),//拖拽
click:dragEventFactory('bpmn:Task')//点击
}
}
};
}
}
CustomPalette.$inject = [
'create',
'elementFactory',
'palette'
];
2.在CustomPalette.js同级,建立一个index.js文件将其导出
import CustomPalette from './CustomPalette';
export default {
__init__: ['customPalette'],
customPalette: ['type', CustomPalette],
};
3.页面中引入index.js
import customModule from './customPalette';
export default {
mounted() {
this.containerEl = document.getElementById('container');
this.bpmnModeler = new BpmnModeler({
additionalModules: [ customModule ]
});
}
4.为节点定义样式
新建一个customPalette.scss文件,在该文件同级放一张“bird.png”的图片,作为节点的背景图写入。背景图引入的话,貌似只支持.png格式,亲测:jpg报错
.bpmn-icon-cake {
background-image: url('./bird.png');
}
.icon-custom {
background-size: 65%;
background-repeat: no-repeat;
background-position: center center;
}
并且在main.js中引入,注意,一定要在main.js中全局引入,否则不生效。
import './views/module/platte/customPalette.scss'
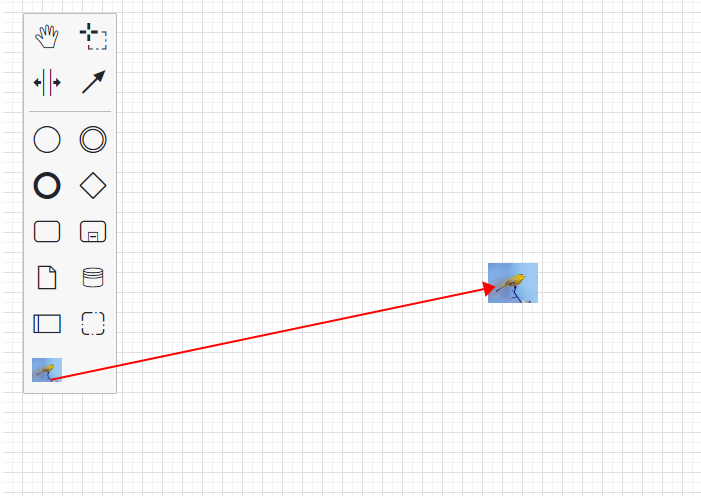
此时效果如下

此时,我们便可以在左侧工具栏中看到自定义的“草莓蛋糕”节点了,但是此时拖动该节点,右侧只会产生一个“bpmn:Task”的节点,只有一个框框。
我们希望的是,拖动后画布中也显示自定义图标,所以我们进行下一步:自定义渲染
5.画布渲染自定义节点
此时需要我们新建一个 CustomRenderer.js文件,作用:自定义 renderer。因为我们是在bpmn原有的元素“bpmn:Task”基础上进行修改,所以我们需要对将BaseRenderer进行继承。
安装diagram-js
我使用的版本如下,粘贴到package.json,运行npm i
"diagram-js-context-pad": "^1.0.2",
"diagram-js-grid-bg": "^1.0.3",
"diagram-js-minimap": "^2.1.1",
import BaseRenderer from 'diagram-js/lib/draw/BaseRenderer'; // 引入默认的renderer
const HIGH_PRIORITY = 1500; // 最高优先级
export default class CustomRenderer extends BaseRenderer {
// 继承BaseRenderer
constructor(eventBus, bpmnRenderer) {
super(eventBus, HIGH_PRIORITY);
this.bpmnRenderer = bpmnRenderer;
}
canRender(element) {
return !element.labelTarget;
}
drawShape(parentNode, element) {
const shape = this.bpmnRenderer.drawShape(parentNode, element);
return shape;
}
getShapePath(shape) {
return this.bpmnRenderer.getShapePath(shape);
}
}
CustomRenderer.$inject = ['eventBus', 'bpmnRenderer'];
此时, CustomRenderer.js文件大概结构完成了,注意:HIGH_PRIORITY变量和canRender不可以删掉,否则会有问题。重头戏是里面的drawShape函数。
6.书写drawShape函数
我们在CustomRenderer.js同级建立一个util文件,记录自定义类型节点的一些属性。
import cake from './bird.png';
// 自定义元素的类型,此时我们只需要自定义一种节点,所以数组只有一个元素
const customElements = ['bpmn:Task'];
const customConfig = {
// 自定义元素的配置
bird: {
url: bird,
attr: {x: 0, y: 0, width: 50, height: 50}
}
};
export {customElements, customConfig};
现在我们来书写CustomRenderer.js中的drawShape函数
安装tiny-svg:npm i tiny-svg
import { customElements, customConfig } from './util';
import { append as svgAppend, create as svgCreate } from 'tiny-svg';
...
drawShape(parentNode, element) {
const type = element.type; // 获取到类型
// 所有节点都会走这个函数,所以此时只限制,需要自定义的才去自定义,否则仍显示bpmn默认图标
if (customElements.includes(type)) {
const {url, attr} = customConfig['bird'];
const customIcon = svgCreate('image', {...attr, href: url});
element['width'] = attr.width;
element['height'] = attr.height;
svgAppend(parentNode, customIcon);
return customIcon;
}
const shape = this.bpmnRenderer.drawShape(parentNode, element);
return shape;
}
7.导出并使用CustomRenderer
修改之前导出CustomPalette的index.js文件
import CustomPalette from './CustomPalette';
import CustomRenderer from './CustomRenderer';
export default {
__init__: ['customPalette','customRenderer'],
customPalette: ['type', CustomPalette],
customRenderer: ['type', CustomRenderer]
};
注意:此时__init__内的属性名都不可以改,不要问为什么,因为改了报错。
步骤3中已经将该index.js引入到了页面中,此时无需再次引入
效果如下


 浙公网安备 33010602011771号