

iOS开发基础知识--碎片38
iOS开发基础知识--碎片38
iOS开发基础知识--碎片38
iOS开发基础知识--碎片38
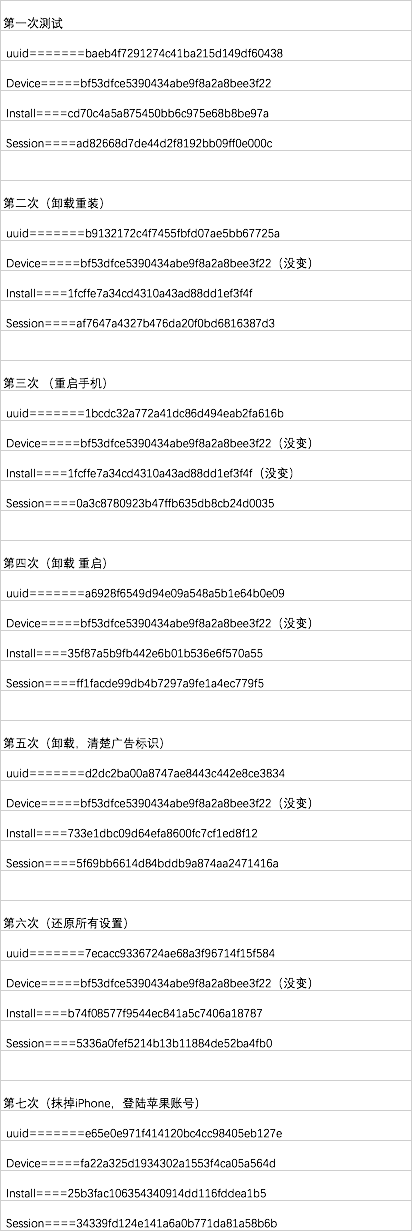
1:FCUUID获取设备标识的运用
a:作者 githun地址 https://github.com/fabiocaccamo/FCUUID
因为里面还用到作者的另外一个类UICKeyChainStore地址:https://github.com/kishikawakatsumi/UICKeyChainStore
b:在项目中添加 Security.framework
c:导入头文件 #import “FCUUID.h"

// 每次运行应用都会变

+(NSString *)uuid;

//changes each time (no persistent), but allows to keep in memory more temporary uuids

+(NSString *)uuidForKey:(id<NSCopying>)key;

// 每次运行应用都会变

+(NSString *)uuidForSession;

// 重新安装的时候会变

+(NSString *)uuidForInstallation;

// 卸载后重装会变

+(NSString *)uuidForVendor;

// 抹掉iPhone的时候才会变,适合做唯一标识

+(NSString *)uuidForDevice;
2:在图片增加一个外围的白色边框
-(UIImage*) circleImage:(UIImage*) image withParam:(CGFloat) inset {

    //UIGraphicsBeginImageContext(image.size);
    //解决失真 模糊的问题
    UIGraphicsBeginImageContextWithOptions(image.size, NO, [[UIScreen mainScreen] scale]);
    CGContextRef context =UIGraphicsGetCurrentContext();

    //圆的边框宽度为2,颜色为红色

    CGContextSetLineWidth(context,2);

    CGContextSetStrokeColorWithColor(context, [UIColor whiteColor].CGColor);

    CGRect rect = CGRectMake(inset, inset, image.size.width - inset *2.0f, image.size.height - inset *2.0f);

    CGContextAddEllipseInRect(context, rect);

    CGContextClip(context);

    //在圆区域内画出image原图

    [image drawInRect:rect];

    CGContextAddEllipseInRect(context, rect);

    CGContextStrokePath(context);

    //生成新的image

    UIImage *newimg = UIGraphicsGetImageFromCurrentImageContext();

    UIGraphicsEndImageContext();

    return newimg;

}
注意:如果使用UIGraphicsBeginImageContext(image.size);会导致图片有点失真模糊,可以采用 UIGraphicsBeginImageContextWithOptions(image.size, NO, [[UIScreen mainScreen] scale]);还有如果在视图上进行画圆,只有在视图没有其它盖住时才看得到,比如如果有个背景图片,那么它就没盖住了;
3:在普通视图控制器包一个UINavigation
#pragma mark 添加导航栏
-(void)addNavigationBar{
    //创建一个导航栏
    UINavigationBar *navigationBar=[[UINavigationBar alloc]initWithFrame:CGRectMake(0, 0, 320, 44+20)];
    //navigationBar.tintColor=[UIColor whiteColor];
    [self.view addSubview:navigationBar];
    //创建导航控件内容
    UINavigationItem *navigationItem=[[UINavigationItem alloc]initWithTitle:@"Web Chat"];

    //左侧添加登录按钮
    UIBarButtonItem *loginButton=[[UIBarButtonItem alloc]initWithTitle:@"登录" style:UIBarButtonItemStyleDone target:self action:@selector(login)];

    navigationItem.leftBarButtonItem=loginButton;

    //添加内容到导航栏
    [navigationBar pushNavigationItem:navigationItem animated:NO];
}
4:系统自带定位坐标转为城市名
    //系统自带定位
    [[MPLocationManager shareInstance] startSystemLocationWithRes:^(CLLocation *loction, NSError *error) {
        if (!error) {
            CLGeocoder *geocoder=[[CLGeocoder alloc]init];
            [geocoder reverseGeocodeLocation:loction completionHandler:^(NSArray<CLPlacemark *> * _Nullable placemarks, NSError * _Nullable error) {
                if (placemarks.count>0) {
                    CLPlacemark *placemark=[placemarks objectAtIndex:0];
                    //获取城市
                    NSString *city = placemark.locality;
                    if (!city) {
                        //四大直辖市的城市信息无法通过locality获得,只能通过获取省份的方法来获得(如果city为空,则可知为直辖市)
                        city = placemark.administrativeArea;
                    }
                    //有差异才改变
                    if(![BBUserDefault.LocationCity isEqualToString:city])
                    {
                        BBUserDefault.LocationCity=city;
                    }

                    NSLog(@"当前城市:[%@]",city);
                }
            }];
        }
        BBUserDefault.latiude=[NSString stringWithFormat:@"%f",loction.coordinate.latitude];
        BBUserDefault.longitude=[NSString stringWithFormat:@"%f",loction.coordinate.longitude];
        NSLog(@"定位信息:[%f,%f]",loction.coordinate.latitude,loction.coordinate.longitude);
    }];
注意:MPLocationManager.h类的代码如下:
#import <Foundation/Foundation.h>

typedef void(^KSystemLocationBlock)(CLLocation *loction, NSError *error);

@interface MPLocationManager : NSObject


+ (id)shareInstance;

/**
 *  启动系统定位
 *
 *  @param systemLocationBlock 系统定位成功或失败回调成功
 */
- (void)startSystemLocationWithRes:(KSystemLocationBlock)systemLocationBlock;


@end
//
//  MPLocationManager.m
//  MobileProject
//
//  Created by wujunyang on 16/1/15.
//  Copyright © 2016年 wujunyang. All rights reserved.
//

#import "MPLocationManager.h"

@interface MPLocationManager()<CLLocationManagerDelegate>
@property (nonatomic, readwrite, strong) CLLocationManager *locationManager;

@property (nonatomic, readwrite, copy) KSystemLocationBlock kSystemLocationBlock;
@end

@implementation MPLocationManager

+ (id)shareInstance{
    static id helper = nil;
    static dispatch_once_t onceToken;
    dispatch_once(&onceToken, ^{
        helper = [[MPLocationManager alloc]  init];
    });
    return helper;
}


#pragma mark - 苹果
/**
 *  苹果系统自带地图定位
 */
- (void)startSystemLocationWithRes:(KSystemLocationBlock)systemLocationBlock{
    self.kSystemLocationBlock = systemLocationBlock;

    if(!self.locationManager){
        self.locationManager =[[CLLocationManager alloc] init];
        self.locationManager.desiredAccuracy=kCLLocationAccuracyBest;
        //        self.locationManager.distanceFilter=10;
        if ([UIDevice currentDevice].systemVersion.floatValue >=8) {
            [self.locationManager requestWhenInUseAuthorization];//使用程序其间允许访问位置数据(iOS8定位需要)
        }
    }
    self.locationManager.delegate=self;
    [self.locationManager startUpdatingLocation];//开启定位
}

-(void)locationManager:(CLLocationManager *)manager didUpdateLocations:(NSArray *)locations{
    CLLocation *currLocation=[locations lastObject];
    self.locationManager.delegate = nil;
    [self.locationManager stopUpdatingLocation];

    self.kSystemLocationBlock(currLocation, nil);
}
/**
 *定位失败,回调此方法
 */
-(void)locationManager:(CLLocationManager *)manager didFailWithError:(NSError *)error{
    if ([error code]==kCLErrorDenied) {
        NSLog(@"访问被拒绝");
    }
    if ([error code]==kCLErrorLocationUnknown) {
        NSLog(@"无法获取位置信息");
    }
    self.locationManager.delegate = nil;
    [self.locationManager stopUpdatingLocation];

    self.kSystemLocationBlock(nil, error);
}
@end
5:初始化init传参的一些样例
@implementation ZOCEvent

- (instancetype)initWithTitle:(NSString *)title
                         date:(NSDate *)date
                     location:(CLLocation *)location
{
    self = [super init];
    if (self) {
        _title    = title;
        _date     = date;
        _location = location;
    }
    return self;
}

- (instancetype)initWithTitle:(NSString *)title
                         date:(NSDate *)date
{
    return [self initWithTitle:title date:date location:nil];
}

- (instancetype)initWithTitle:(NSString *)title
{
    return [self initWithTitle:title date:[NSDate date] location:nil];
}

@end
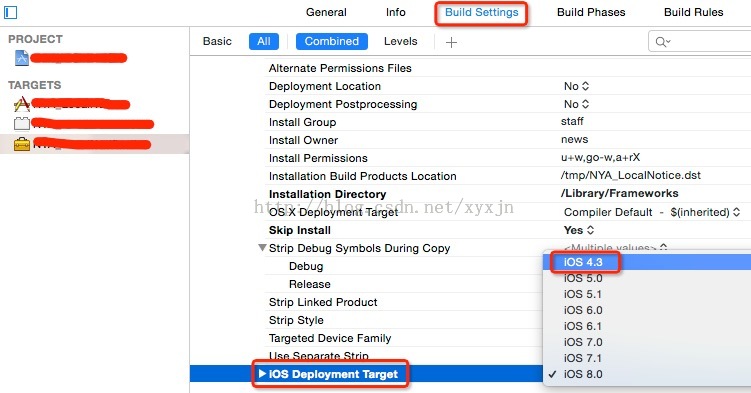
6:embedded dylibs/frameworks are only
supported on iOS 8.0 and later 错误解决
ld: warning: embedded dylibs/frameworks only run on iOS 8 or later
ld: embedded dylibs/frameworks are only supported on iOS 8.0 and later (@rpath/XXX.framework/XXX) for architecture armv7
clang: error: linker command failed with exit code 1 (use -v to see invocation)
原因:主要是因为XXX的framework支持的最低开发环境为8.0,而使用该framework的工程支持版本为8.0以下(我这里的环境为4.3)
解决方法:选择低版本的开发环境,重新编译XXX的framework
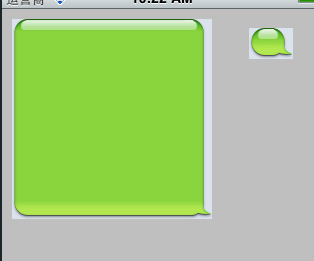
7:图片左右上下拉伸不变形stretchableImageWithLeftCapWidth
- (UIImage *)stretchableImageWithLeftCapWidth:(NSInteger)leftCapWidth topCapHeight:
(NSInteger)topCapHeight 这个函数是UIImage的一个实例函数,它的功能是创建一个内容可拉伸,而边角不拉伸的图片,需要两个参数,第一个是左边不拉伸区域的宽度,第二个参数是上面不拉伸的高度。
根据设置的宽度和高度,将接下来的一个像素进行左右扩展和上下拉伸。
注意:可拉伸的范围都是距离leftCapWidth后的1竖排像素,和距离topCapHeight后的1横排像素。
参数的意义是,如果参数指定10,5。那么,图片左边10个像素,上边5个像素。不会被拉伸,x坐标为11和一个像素会被横向复制,y坐标为6的一个像素会被纵向复制。
注意:只是对一个像素进行复制到一定宽度。而图像后面的剩余像素也不会被拉伸。
    UIImage *img=[UIImage imageNamed:@"bubbleSelf.png"];
    img=[img stretchableImageWithLeftCapWidth:15 topCapHeight:12];
    UIImageView *imgView=[[UIImageView alloc]initWithImage:img];
    [imgView setFrame:CGRectMake(10, 10, 200, 200)];
    [self. view addSubview:imgView];

 浙公网安备 33010602011771号