ssh一键安装脚本创建用户免密登录
ssh 介绍:
ssh: secure shell, protocol, 22/tcp, 安全的远程登录,实现加密通信
具体的软件实现:
OpenSSH:ssh协议的开源实现,CentOS 默认安装
dropbear:另一个ssh协议的开源项目的实现
公钥交换原理:
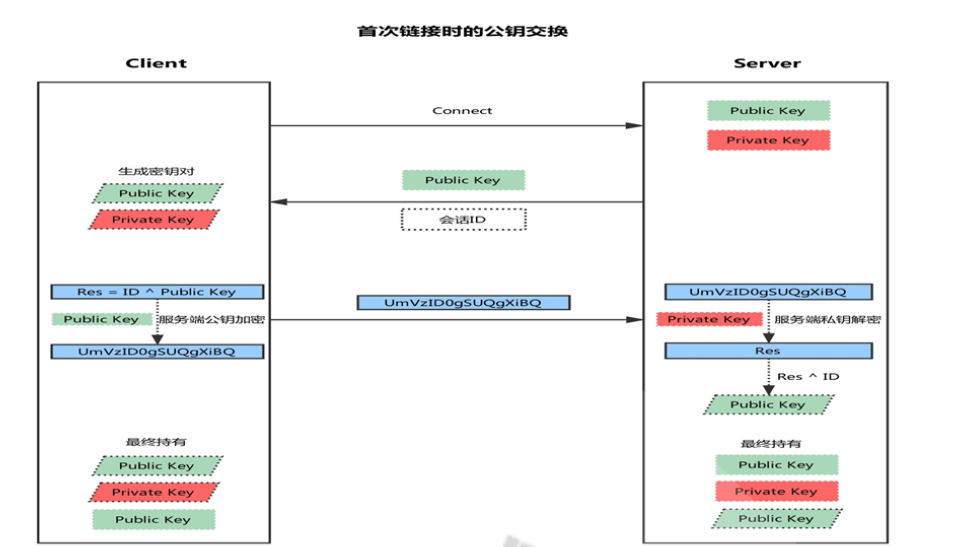
客户端发起链接请求
服务端返回自己的公钥,以及一个会话ID(这一步客户端得到服务端公钥)客户端生成密钥对
客户端用自己的公钥异或会话ID,计算出一个值Res,并用服务端的公钥加密客户端发送加密后的值到服务端,服务端用私钥解密,得到Res
服务端用解密后的值Res异或会话ID,计算出客户端的公钥(这一步服务端得到客户端公钥)
最终:双方各自持有三个秘钥,分别为自己的一对公、私钥,以及对方的公钥,之后的所有通讯都会被加密
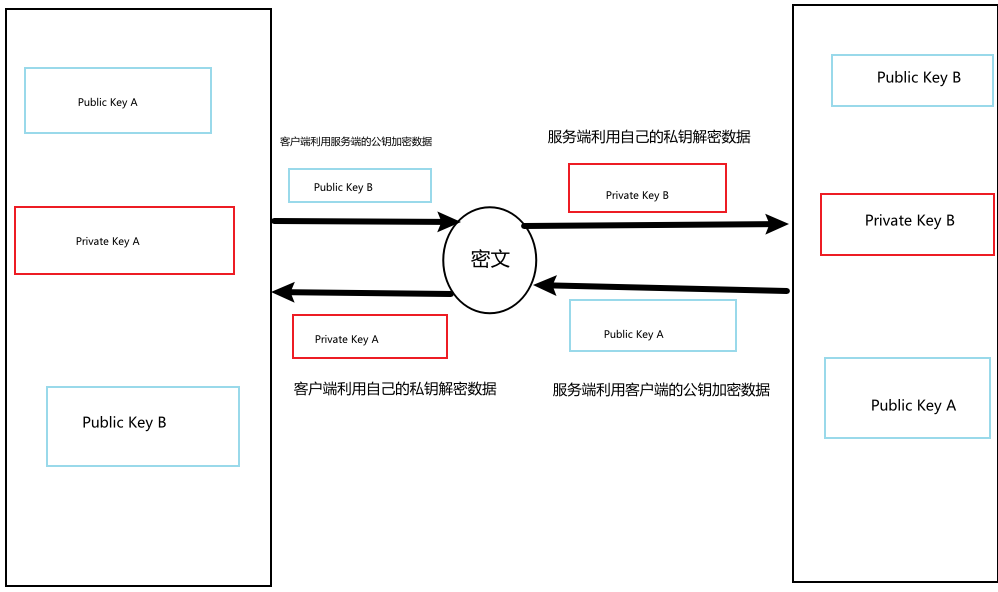
ssh加密通讯原理:
服务端配置文件:
/etc/ssh/sshd_config
1. 基础配置
| 配置项 | 说明 | 推荐值/示例 |
|---|---|---|
Port |
SSH 监听端口(可多行设置多个端口) | Port 22 或 Port 2222 |
ListenAddress |
绑定特定 IP 地址(默认 0.0.0.0 监听所有地址) |
ListenAddress 192.168.1.100 |
Protocol |
支持的 SSH 协议版本(建议禁用旧的 SSHv1) | Protocol 2 |
HostKey |
服务器密钥文件路径(通常无需修改) | /etc/ssh/ssh_host_rsa_key |
2. 安全加固配置
| 配置项 | 说明 | 推荐值/示例 |
|---|---|---|
PermitRootLogin |
是否允许 root 登录(强烈建议禁用) | PermitRootLogin no |
PasswordAuthentication |
是否允许密码认证(建议关闭,改用密钥) | PasswordAuthentication no |
PermitEmptyPasswords |
是否允许空密码(必须禁用) | PermitEmptyPasswords no |
MaxAuthTries |
最大认证尝试次数(防暴力破解) | MaxAuthTries 3 |
LoginGraceTime |
登录超时时间(秒) | LoginGraceTime 60 |
AllowUsers |
仅允许特定用户登录(白名单) | AllowUsers alice bob |
DenyUsers |
禁止特定用户登录(黑名单) | DenyUsers hacker |
3. 高级功能
| 配置项 | 说明 | 推荐值/示例 |
|---|---|---|
X11Forwarding |
是否允许 X11 图形转发(按需开启) | X11Forwarding no |
ClientAliveInterval |
客户端无响应时断开连接的时间(秒) | ClientAliveInterval 300 |
Subsystem |
定义子系统(如 SFTP) | Subsystem sftp /usr/lib/openssh/sftp-server |
Banner |
登录前显示的警告信息(路径) | Banner /etc/issue.net |
4. 日志与限制
| 配置项 | 说明 | 推荐值/示例 |
|---|---|---|
LogLevel |
日志详细程度(INFO 或 VERBOSE) |
LogLevel INFO |
MaxSessions |
单个连接允许的会话数(防滥用) | MaxSessions 10 |
TCPKeepAlive |
是否发送 TCP 保活包(防连接断开) | TCPKeepAlive yes |
典型配置示例
# 基础设置
Port 2222
Protocol 2
ListenAddress 192.168.1.100

# 安全加固
PermitRootLogin no
PasswordAuthentication no
MaxAuthTries 3
LoginGraceTime 60
AllowUsers alice bob

# 日志与功能
LogLevel INFO
X11Forwarding no
Subsystem sftp /usr/lib/openssh/sftp-server
客户端配置:
ssh-keygen -t ed25519 -C "your_email@example.com"
#按回车使用默认路径(~/.ssh/id_ed25519)
默认即可


cat ~/.ssh/id_ed25519.pub

ssh-ed25519 AAAAC3NzaC1lZDI1NTE5AAAAIJx7j... your_email@example.com
服务端配置:
root@ubuntu20:/data# cat scripts.sh
#!/bin/bash

if [ "$(id -u)" -ne 0 ];then
        echo "请使用sudo 或者root"
        exit 1
fi

read  -p "请输入用户名" username

#创建用户
if "id $username" &>/dev/null;then
       echo "用户名已存在"
else
        useradd -m -s /bin/bash  "$username" || { echo "用户创建失败"; exit 1; }
        echo "$username创建完毕!"
fi

#配置ssh目录
mkdir -p "/home/$username/.ssh"||exit1
chmod 700 "/home/$username/.ssh"
touch "/home/$username/.ssh/authorized_keys"
chmod 600 "/home/$username/.ssh/authorized_keys"
chown -R "$username.$username" "/home/$username/.ssh"


#添加公钥(检查文件是否存在)
if [ -f "/data/pub.txt" ]; then
    cat "/data/pub.txt" > "/home/$username/.ssh/authorized_keys"
else
    echo "警告: /data/pub.txt 不存在,未添加公钥"
fi


# 备份SSH配置
cp /etc/ssh/sshd_config /etc/ssh/sshd_config.bak


# 配置AllowUsers(避免重复添加)
if ! grep -q "^AllowUsers.*$username" /etc/ssh/sshd_config; then
    if grep -q "^AllowUsers" /etc/ssh/sshd_config; then
        sed -i "/^AllowUsers/ s/$/ $username/" /etc/ssh/sshd_config
    else
        echo "AllowUsers $username" >> /etc/ssh/sshd_config
    fi
fi


# 禁用密码登录
if ! grep -q "^PasswordAuthentication no" /etc/ssh/sshd_config; then
    sed -i 's/^#PasswordAuthentication yes/PasswordAuthentication no/' /etc/ssh/sshd_config
    sed -i 's/^PasswordAuthentication yes/PasswordAuthentication no/' /etc/ssh/sshd_config
    echo "已禁用密码登录,仅允许密钥认证"
fi

# 检查配置
if ! sshd -t; then
    echo "错误: SSH配置测试失败,正在恢复备份"
#备份原配置
    cp /etc/ssh/sshd_config.bak /etc/ssh/sshd_config
    exit 1
fi

systemctl restart sshd
# 获取服务器IP(更可靠的方式)
server_ip=$(hostname -I | awk '{print $1}')
[ -z "$server_ip" ] && server_ip="服务器IP"

echo "配置完成,请使用以下命令测试:"
echo "ssh $username@$server_ip"
PermitRootLogin no
PasswordAuthentication no
PubkeyAuthentication yes
AllowUsers lijun root qq ooo uub wuhui ll kk
Port 2334

 浙公网安备 33010602011771号