

周末大放送网站图片上传,水印,预览,截图
周末闲着没事,将网站中经常用到的对图片的操作做了一个总结,方便以后回顾,这里将一天的成果,贴出来,希望能帮到大家。
首先是swfupload方式的无刷新上传,关于怎么配置,按照demo 的写法,我相信只要你不是太笨,都能成功。
关于swfupload你可以去网上下,也可以点这里下载:SWFUpload_v250_beta_3_samples.rar
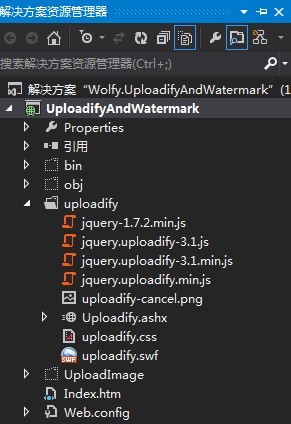
项目结构:
上传代码:
前台上传页面,你可以根据需要建html页,也可以建webform。这里用一般处理程序来对照片进行处理,加水印,修改文件名等操作。

 SWFUploadImage.aspx
SWFUploadHandler.ashx
SWFUploadImage.aspx
SWFUploadHandler.ashx
预览和截图,水印代码(这里将他们整合在一个页面了,实在不想再建页面,在配置swfupload),截图的时候,用到网上的一个jquery插件(可变层,可移动层)
CutPhoto.aspx
CutPhoto.ashx
其实对照片的操作还有生成缩略图,我想着图片上传后,就是对照片按比例缩放,这里就不再赘述了。其实在总结的时候,遇到最让人DT的就是uploadify这个上传插件,也不知道什么地方设置错了,能上传成功,但就是不能触发事件,这里也将代码贴出来,有知道的大神,一定告诉我,这代码很折腾人啊。
这可能也是我选择swfupload放弃uploadify的原因,不能触发上传成功的事件,获取不到上传成功的图片的路径。
解决方案:
代码:
 1 <!DOCTYPE html PUBLIC "-//W3C//DTD XHTML 1.0 Transitional//EN" "http://www.w3.org/TR/xhtml1/DTD/xhtml1-transitional.dtd">
 2 <html xmlns="http://www.w3.org/1999/xhtml">
 3 <head>
 4     <title></title>
 5     <meta http-equiv="Content-Type" content="text/html; charset=utf-8" />
 6     <script src="/uploadify/jquery-1.7.2.min.js" type="text/javascript"></script>
 7     <!--<script src="/uploadify/jquery.uploadify-3.1.min.js" type="text/javascript"></script>-->
 8     <script src="uploadify/jquery.uploadify.min.js"></script>
 9     <link href="/uploadify/uploadify.css" rel="stylesheet" type="text/css" />
10     <script type="text/javascript">
11         $(document).ready(function () {
12             //.uploadify()方法创建Uploadify上传组件的一个实例。
13             $('#file_upload').uploadify({
14                 'auto': false, //关闭自动上传
15                 'removeTimeout': 1, //文件队列上传完成1秒后删除
16                 'swf': '/uploadify/uploadify.swf',
17                 'uploader': '/uploadify/Uploadify.ashx',
18                 'method': 'post', //方法,post还是get提交
19                 'buttonText': '浏 览', //设置按钮文本
20                 'multi': false, //允许同时上传多张图片
21                 'uploadLimit': 10, //一次最多只允许上传10张图片
22                 'fileTypeDesc': 'Image Files', //只允许上传图像
23                 'fileTypeExts': '*.gif; *.jpg; *.png;*.dwg', //限制允许上传的图片后缀
24                 'fileSizeLimit': 2048000, //限制上传的图片不得超过2M
25                 'onComplete': complete,
26                 'onUploadSuccess': function (file, data, response) {//每次成功上传后执行的回调函数,从服务端返回数据到前端
27                     $('#' + file.id).find('.data').html('      上传完毕');
28                 },
29
30                 'onError': error
31
32
33             });
34
35         });
36         function complete(event, queueID, fileObj, response, data) {
37             alert(123);
38         };
39         function error(event, queueID, fileObj) {
40             alert("文件:" + fileObj.name + " 上传失败");
41         }
42     </script>
43 </head>
44 <body>
45     <div id="fileQueue">
46     </div>
47     <input id="file_upload" name="file_upload" type="file" />
48     <p>
49         <span style="color: Red; font-size: small;">最多一次上传<b id="aLimit">10</b>张图片</span><br />
50         <a href="javascript:$('#file_upload').uploadify('settings', 'formData', {'typeCode':document.getElementById('id_file').value});$('#file_upload').uploadify('upload','*')">上传</a> <a href="javascript:$('#file_upload').uploadify('cancel','*')">重置上传队列</a>
51     </p>
52     <input type="hidden" value="1215154" name="tmpdir" id="id_file" />
53     <div id="showImg">
54         <img src="#" alt="" id="image" />
55     </div>
56 </body>
57 </html>
一般处理程序代码:
 1 using System;
 2 using System.Collections.Generic;
 3 using System.IO;
 4 using System.Linq;
 5 using System.Web;
 6
 7
 8 namespace UploadifyAndWatermark.uploadify
 9 {
10     /// <summary>
11     /// Uploadify 的摘要说明
12     /// </summary>
13     public class Uploadify : IHttpHandler
14     {
15
16         public void ProcessRequest(HttpContext context)
17         {
18             context.Response.ContentType = "text/plain";
19             context.Response.Charset = "utf-8";
20             //接收上传的文件
21             HttpPostedFile file = context.Request.Files["Filedata"];
22
23             if (file != null)
24             {
25                 string fileName = Path.GetFileName(file.FileName);//获取上传文件的名称.
26                 string fileExt = Path.GetExtension(fileName);//得到文件的扩展名.
27
28                 //将上传的图片放到不同的文件夹下.(根据日期)
29                 string dir = "/UploadImage/" + DateTime.Now.Year + "/" + DateTime.Now.Month + "/" + DateTime.Now.Day + "/";
30                 Directory.CreateDirectory(Path.GetDirectoryName(context.Server.MapPath(dir)));//创建文件夹.
31                 //文件重命名名字 用当前时间作为新名字 保存在相应的日期文件夹下
32                 string fullDir = dir + DateTime.Now.ToString("yyyyMMddhhmmss") + fileExt;//构建完整的文件路径.
33                 //保存图片
34                 file.SaveAs(context.Server.MapPath(fullDir));
35                 //将图片的路径返回context.Resopnse.Write(fullDir);
36                 context.Response.Write("1");
37
38             }
39             else
40             {
41                 context.Response.Write("0");
42             }
43
44         }
45
46
47         public bool IsReusable
48         {
49             get
50             {
51                 return false;
52             }
53         }
54     }
55 }
这里将代码展开,方便看到的大神,知道什么原因的,不要吝啬你的一点点点点时间,拯救一下我这个为代码疯狂的小白,不胜感激!
问题:在uploadify上传成功后,为什么不触发oncompelete事件?
是否上传成功后的路径可以 context.Response.Write(路径);在oncompelete事件参数中response能获取到该路径?
Demo下载:
Wolfy.UploadifyAndWatermark.rar uploadify照片上传
Wolfy.ImageOperation.rar swfuploadify照片上传,预览,截图,水印
前言
批量下载网页上的图片需要三个步骤:
- 获取网页的URL
- 获取网页上图片的URL
- 下载图片
例子
from html.parser import HTMLParser
import urllib.request
import os,uuid,sys


#第1步:
class PageLinkParser(HTMLParser):
  def __init__(self,strict=False):
    HTMLParser.__init__(self,strict)
    self.all=[]
  def handle_starttag(self,tag,attrs):
    if tag=='a':
      for i in attrs:
        if i[0]=='href':
          if i[1] not in self.all:
            self.all.append(i[1])

def getPageLinks(url):
  doing=[url]
  done=[]
  while len(doing)>=1:
    x=doing.pop();
    done.append(x)
    print(x)
    try:
      f=urllib.request.urlopen(x)
      parser=PageLinkParser(strict=False)
      parser.feed(f.read().decode('utf-8'))
      for i in parser.all:
        if i not in done:
          #doing.insert(0,i) #在此就不遍历了。
          done.append(i)
      parser.all=[]
    except:
      continue
  return done


#第2步:
class ImgLinkParser(HTMLParser):
  def __init__(self,strict=False):
    HTMLParser.__init__(self,strict)
    self.all=[]
  def handle_starttag(self,tag,attrs):
    if tag=='img':
      for i in attrs:
        if i[0]=='src':
          if i[1] not in self.all:
            self.all.append(i[1])

def getImgLinks(url):
  parser=ImgLinkParser(strict=False)
  try:
    f=urllib.request.urlopen(url)
    parser.feed(f.read().decode('utf-8'))#解码格式,根据网页的编码格式而定。
  finally:
    return parser.all

#第3步:
def loadImg(l):
  for i in l:
    i=i.strip()
    print(i)
    try:
      f=open(os.path.join(os.getcwd(),uuid.uuid4().hex+'.jpg'),'wb') #防止文件名重复,使用UUID
      f.write(urllib.request.urlopen(i).read())
      f.close()
    except:
      print('error:',i)
      continue

#使用
if __name__=='__main__':
  for i in getPageLinks('http://www.cnblogs.com/'):
    loadImg(getImgLinks(i))
抛砖引玉
- 可以写一个函数,用于判断网页的编码格式
- 网页的遍历可以增加一些控制功能:比如只遍历同一个网站等。
- 下载功能可以使用多线程。

 浙公网安备 33010602011771号