iOS之自动布局
iOS的自动布局技术一直都是前端开发所必不可少的,它能使我们开发出来的项目更加规范美观,同时也更加灵活 ,接下来笔者就介绍一下自动布局常用的几种方式,供大家参考~~
方法一:storyboard
从一开始做iOS开发,只考虑适配4s,直接把坐标,长宽都写成固定值。
之后考虑适配5s,在界面上设定好一个组件的坐标,其他的控件的位置做一下相对计算就可以。一直没考虑自动适配,用storyboard觉得不灵活,不能复用,而且还死卡。
之后出了iPhone大屏手机,不得不重新考虑下适配问题了。用storyboard的autolayout拖了一个半成品,(主要卡在scrollview的约束上)虽然花了时间弄好了。
很多大神不愿意用storyboard,有的原因是不习惯,有的是怕和代码时候出现冲突。但在storyboard拖控件,加约束,着实方便快速。这里不多说了,今天主要着重讲后两种方法。
方法二:Masonry
Masonry,一款用代码写自动布局的三方,好用的飞起来~
Masonry约束控件的写法真的很多很随意,记录一下。
//创建一个视图

UIView * testView = [[UIView alloc] init];
testView.backgroundColor = [UIColor grayColor];
[self.view addSubview:testView];


//将testView布满self.view,能完成这个功能的代码实在太多,下面只记录了5种,举一反三,灵活使用吧。

//1.

[testView mas_makeConstraints:^(MASConstraintMaker *make) {
   make.edges.equalTo(self.view);
}];


//2.

[testView mas_makeConstraints:^(MASConstraintMaker *make) {
   make.top.and.bottom.left.right.equalTo(self.view);
}];


//3.

[testView mas_makeConstraints:^(MASConstraintMaker *make) {
   make.top.equalTo(self.view);
   make.bottom.equalTo(self.view);
   make.left.equalTo(self.view);
   make.right.equalTo(self.view);
}];


//4.

[testView mas_makeConstraints:^(MASConstraintMaker *make) {
   make.top.equalTo(self.view.mas_top);
   make.bottom.equalTo(self.view.mas_bottom);
   make.left.equalTo(self.view.mas_left);
   make.right.equalTo(self.view.mas_bottom);
}];


//5.

[testView mas_makeConstraints:^(MASConstraintMaker *make) {
   make.top.and.left.and.right.bottom.equalTo(@0);
}];


//加边距

//1.

[testView mas_makeConstraints:^(MASConstraintMaker *make) {
   make.edges.equalTo(self.view).with.insets(UIEdgeInsetsMake(10, 10, 10, 10));
}];


//2.

[testView mas_makeConstraints:^(MASConstraintMaker *make) {
   make.top.equalTo(self.view).with.offset(10);
   make.left.equalTo(self.view).with.offset(10);
   make.bottom.equalTo(self.view).with.offset(-10);

   //注意:这么写也可以
   make.right.equalTo(self.view).with.insets(UIEdgeInsetsMake(10, 10, 10, 10));
}];


//3.

[testView mas_makeConstraints:^(MASConstraintMaker *make) {
   make.top.equalTo(@10);
   make.left.equalTo(@10);
   make.bottom.equalTo(@-10);
   make.right.equalTo(@-10);
}];


//使用LayoutGuide,是从状态栏以下开始布局,如果加上导航条,就会以导航条以下开始布局。

[testView mas_makeConstraints:^(MASConstraintMaker *make) {
    UIView *topLayoutGuide = (id)self.topLayoutGuide;
    make.top.equalTo(topLayoutGuide.mas_bottom);
    UIView *bottomLayoutGuide = (id)self.bottomLayoutGuide;
    make.bottom.equalTo(bottomLayoutGuide.mas_top);
    make.left.equalTo(self.view);
    make.right.equalTo(self.view);

}];

//可以设置center,size。

[testView mas_makeConstraints:^(MASConstraintMaker *make) {
   make.center.mas_equalTo(CGPointMake(0, 50));
   make.size.mas_equalTo(CGSizeMake(200, 100));
}];

//写一个scrollView横滑约束,竖向滑动可直接参考Masonry的官方栗子。

UIView * superview = self.view;

//约束scrollView相对于父视图的约束

[self.scrollView mas_makeConstraints:^(MASConstraintMaker *make) {
   make.edges.equalTo(superview);
}];

//创建 contentView
UIView * contentView = [[UIView alloc] init];
contentView.backgroundColor = [UIColor redColor];
[self.scrollView addSubview:contentView];

//约束 contentView
[contentView mas_makeConstraints:^(MASConstraintMaker *make) {
   make.edges.equalTo(self.scrollView);
   make.height.equalTo(self.scrollView);
}];

[contentView addSubview:self.hotBookView];
[contentView addSubview:self.myBookView];

[self.hotBookView mas_makeConstraints:^(MASConstraintMaker *make) {
   make.top.equalTo(@0);
   make.left.equalTo(@0);
   make.width.equalTo(self.scrollView.mas_width);
   make.height.equalTo(self.scrollView.mas_height);
}];

[self.myBookView mas_makeConstraints:^(MASConstraintMaker *make) {
   make.left.equalTo(self.hotBookView.mas_right);
   make.top.equalTo(@0);
   make.width.equalTo(self.scrollView.mas_width);
   make.height.equalTo(self.scrollView.mas_height);
}];

[contentView mas_makeConstraints:^(MASConstraintMaker *make) {
   make.right.equalTo(self.myBookView.mas_right);
}];

//将view组成数组,也可以约束.

self.buttonViews = @[ raiseButton, lowerButton, centerButton ];
[self.buttonViews updateConstraints:^(MASConstraintMaker *make) {
    make.baseline.equalTo(self.mas_centerY).with.offset(self.offset);
}];

//将testView,greenView,blueView的高度设成一致
[testView mas_makeConstraints:^(MASConstraintMaker *make) {
   make.height.equalTo(@[greenView, blueView]);
}];
方法三:xib
xib,把每个页面分开。每个程序员做自己的模块,很好的解决冲突问题。很多公司都用这种方法开发项目,大家分工明确,而且可以拖拽控件,从而使我们的效率大大的增加。接下来是步骤~~
1.首先建立xib文件,其实很简单,就是在你建立Cocoa Touch Class的时候勾选一下 Also create XIB file的选项,很好找。

2.我们可以看到xib文件已经建好了,点击进入


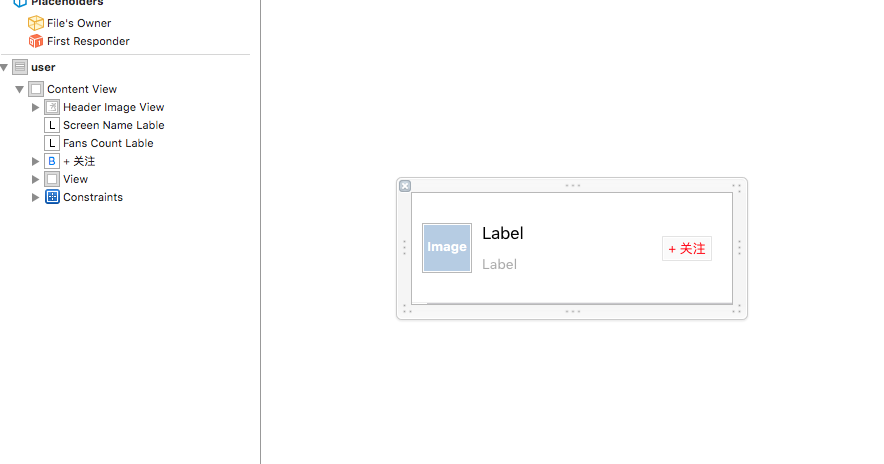
3.而这个也就相当于一个小的故事版,拖进去我们想要的控件,大致摆好位置。

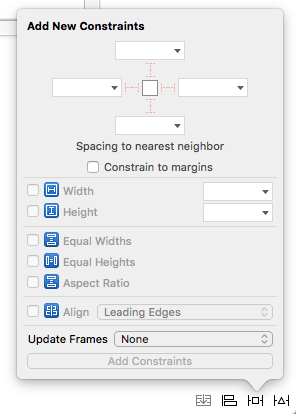
4.这个是在左下角的Pin按钮,用来适配控件距离当前View的上下左右的距离,和本身的宽高。

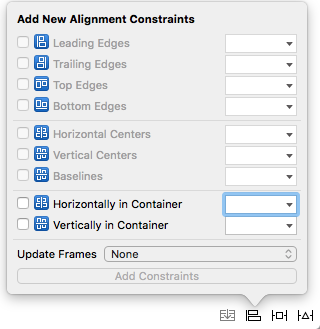
5.这是Align按钮,用来适配控件的对齐和居中

6.都设置好之后,点击最左边的按钮选择Selected View下的 Update Frames进行刷新,然后就大功告成了!

后记:
对于iOS的自动布局,选择代码还是拖拽约束,团队合作就看公司要求,自己写项目看心情就可以了。并没有什么绝对的好与坏~~


 浙公网安备 33010602011771号