iOS依赖库管理工具之CocoaPods
CocoaPods 是开发 OS X 和 iOS 应用程序的一个第三方库的依赖管理工具。利用 CocoaPods,可以定义自己的依赖关系库 (称作 pods),并且随着时间的变化,在整个开发环境中对第三方库的版本管理非常方便。
1.为什么要用CocoaPods?
在iOS项目开发过程中,我们经常会使用一些第三方库,如AFNetworking、YYKit、Masonry等,通过这些优秀的第三方库,来帮助我们更有效率的进行开发。回想一下我们导入这些第三方库的过程:
- 第一步:下载第三方库的源代码并添加到工程;
- 第二步:添加第三方库使用到的Framework;
- 第三步:处理第三方库之间或第三方库与工程之间的依赖关系以及重复添加等问题;
- 第四步:如果第三方库有更新,需要将工程中使用的第三方库删除,重新执行前面的三个步骤。
上面的四个步骤,如果我们使用CocoaPods,那么只需要配置好相应的Podfile,CocoaPods会为我们去做好这些事情。
2.安装CocoaPods
CocoaPods是用Ruby 的依赖管理 gem 进行构建的,要想使用它首先需要有Ruby的环境。OS X系统默认可以运行Ruby,因此执行以下命令即可:
$ sudo gem install cocoapods
安装完成后,执行下面的指令,如果没有报错,则说明安装成功。
$ pod setup
【说明】:如果执行上面指令的时候,长时间没有反应,这可能是因为Ruby的默认源使用cocoapods.org,国内访问这个网址有时候会有问题,可以将该源替换成淘宝的(如果淘宝的有问题,可以用https://gems.ruby-china.org/),替换方式如下:
$ gem sources --remove https://rubygems.org/
$ gem sources -a http://ruby.taobao.org/
替换完成之后,执行指令:
$ gem sources -l
如果输出结果和下图一样,则表示替换成功。

安装过程中,有可能遇到如下问题:
问题一:does not match the server certificate,详情如下:

解决方案:该问题是因为使用都 https://gems.ruby-china.org/ 源路径证书验证未通过,替换成http://gems.ruby-china.org/即可。
问题二:Unable to resolve dependencies,详情如下:

解决方案:gem版本比较低,升级即可。指令如下:
sudo gem update --system
问题三:Operation not permitted - /usr/bin/xcodeproj。
解决方案:没有权限,执行如下指令安装cocoapods:
sudo gem install -n /usr/local/bin cocoapods
问题四:怎么降低cocoapods版本?
//卸载当前版本
sudo gem uninstall cocoapods

//安装指定版本
sudo gem install -n /usr/local/bin  cocoapods -v 1.2.1
3.升级CocoaPods
CocoaPods的升级很简单,直接执行安装指令即可:
$ sudo gem install cocoapods
4.Podfile文件说明
Podfile 是一个文件,用于定义项目所需要使用的第三方库。该文件支持高度定制,详细的信息可以参考Podfile 指南。下面列出常用的语法并进行说明。
先看一个示例的Podfile文件:
source 'https://github.com/Artsy/Specs.git'
source 'https://github.com/CocoaPods/Specs.git'

platform :ios, '8.0'
inhibit_all_warnings!

target 'MVVMReactiveCocoa' do
  pod 'SDWebImage', '~> 3.7.1'
  pod 'UIActivityIndicator-for-SDWebImage'
  pod 'MBProgressHUD', '~> 0.9'
  pod 'SSKeychain', '~> 1.2.2'
  pod 'IQKeyboardManager', '~> 3.2.0.3'
  pod 'SVPullToRefresh', '~> 0.4.1'
  pod 'MKNetworkKit', '~> 0.87'
  pod 'WebViewJavascriptBridge', '~> 4.1.4'
  pod 'FormatterKit', '~> 1.8.0'
  pod 'DZNEmptyDataSet', '~> 1.5.1'
  pod 'Ono', '~> 1.2.0'
  pod 'FMDB'
  pod 'UMengSocial', '~> 4.3'
  pod 'GPUImage', '~> 0.1.7'
  pod 'Reveal-iOS-SDK', '~> 1.6.0'
  pod 'Appirater'
  pod 'SDVersion'
  pod 'YYKit'
  pod 'OcticonsIOS', :git => 'https://github.com/jacksonh/OcticonsIOS.git', :commit => '4bd3b21'
  pod 'LCFInfiniteScrollView', :git => 'https://github.com/leichunfeng/LCFInfiniteScrollView.git'

  target 'MVVMReactiveCocoaTests' do
    inherit! :search_paths
  end
end
看到上面的Podfile文件,有些语句的含义,我们也能大概理解,下面细说一下:
| 序号 | 语句 | 说明 |
| 1 | source 'URL' | 指定镜像仓库的源 |
| 2 | platform : iOS, '6.0' | 指定所支持系统和最低版本 |
| 3 | inhibit_all_warnings! | 屏蔽所有warning |
| 4 | workspace '项目空间名' | 指定项目空间名 |
| 5 | xcodeproj '工程文件名' | 指定xcodeproj工程文件名 |
| 6 | pod '库名' | 引入库,什么版本都可以(一般是最新版本) |
| 7 | pod '库名', '版本' | 引入指定版本的库 |
| 8 | pod '库名', :podspec => 'podspec文件路径' | 指定导入库的podspec文件路径 |
| 9 | pod '库名', :Git => '源码git地址' | 指定导入库的源码git地址 |
| 10 | pod '库名', :tag => 'tag名' | 指定导入库的Tag分支 |
关于引入库的版本,除了指定和不指定之外,还有如下操作:
>0.1高于0.1的任何版本;>=0.1版本0.1和任何更高版本;<0.1低于0.1的任何版本;<=0.1版本0.1和任何较低的版本;〜>0.1.2版本 0.1.2的版本到0.2 ,不包括0.2。这个基于你指定的版本号的最后一个部分。这个例子等效于>= 0.1.2并且 <0.2.0,并且始终是你指定范围内的最新版本。
【补充】:关于pod指令,除了常规的pod '库名'方式,还有下面这些带参数的方式:
1.使用本地路径。
pod 'AFNetworking', :path => '~/Documents/AFNetworking'
使用path方式,执行“pod install”,指令后,可以看到Pods下新加了一个目录:

对比一下我们常规的pod方式:
2.使用主分支的版本,也就是默认写法。
pod 'AFNetworking', :git => 'https://github.com/gowalla/AFNetworking.git'
3.不使用主分支,使用指定分支。
pod 'AFNetworking', :git => 'https://github.com/gowalla/AFNetworking.git', :branch => 'dev'
4.使用指定的commit版本。
pod 'AFNetworking', :git => 'https://github.com/gowalla/AFNetworking.git', :commit => '082f8319af'
5.使用指定tag版本
pod 'AFNetworking', :git => 'https://github.com/gowalla/AFNetworking.git', :tag => '0.7.0'
5.使用CocoaPods
5.1创建一个演示项目
为了演示使用CocoaPods的过程,在这里创建了一个MVVMDemo的演示项目,创建项目的过程这里不细说了。
5.2创建Podfile文件
在终端进入项目所在目录,然后用如下指令创建Podfile文件:
$ touch Podfile
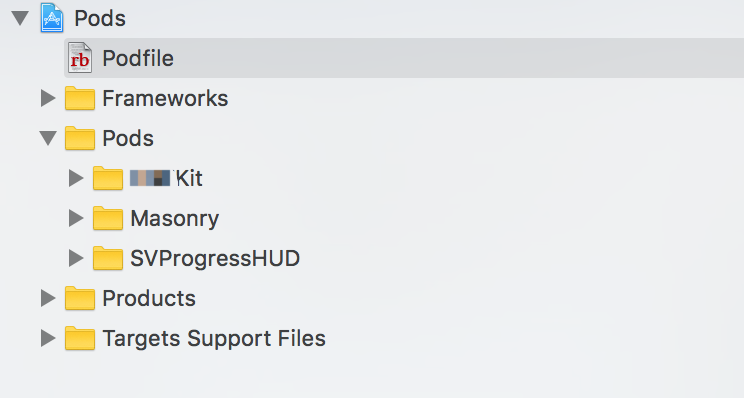
此时项目文件夹里会创建一个名为Podfile的文件,如下图所示:

5.3编辑Podfile文件
使用XCode打开Podfile文件:
$ open -a Xcode Podfile
在这里,我们需要导入AFNetworking、YYKit、Masonry库,因此在Podfile文件中输入如下内容:
source 'https://github.com/CocoaPods/Specs.git'

platform :ios, '8.0'
inhibit_all_warnings!

target 'MVVMDemo' do
  pod 'AFNetworking'
  pod 'YYKit'
  pod 'Masonry'
end
5.4执行导入命令
编写完成Podfile文件之后,保存关闭,输入如下指令导入第三方库:
$ pod install
CocoaPods就会做如下工作:下载源码、配置依赖关系、引入需要的framework等。命令的执行结果如下所示:
Updating local specs repositories

CocoaPods 1.1.0.beta.1 is available.
To update use: `gem install cocoapods --pre`
[!] This is a test version we'd love you to try.

For more information see http://blog.cocoapods.org
and the CHANGELOG for this version http://git.io/BaH8pQ.

Analyzing dependencies
Downloading dependencies
Installing AFNetworking (3.1.0)
Installing Masonry (1.0.1)
Installing YYKit (1.0.7)
Generating Pods project
Integrating client project

[!] Please close any current Xcode sessions and use `MVVMDemo.xcworkspace` for this project from now on.
Sending stats
Sending stats
Pod installation complete! There are 3 dependencies from the Podfile and 3 total
pods installed.
这说明pod install命令执行成功了。现在再看一下工程目录的变化:

从上图可以看到,多了三个文件:
- Podfile.lock:这是 CocoaPods 创建的最重要的文件之一。它记录了需要被安装的 pod 的每个已安装的版本。如果你想知道已安装的 pod 是哪个版本,可以查看这个文件。推荐将 Podfile.lock 文件加入到版本控制中,这有助于整个团队的一致性。
- MVVMDemo.xcworkspace:从上面的执行结果可以看到,红色部分的注释提示我们现在项目用MVVMDemo.xcworkspace来打开,原来的工程设置已经被更改了,如果直接打开原来的工程文件去编译就会报错,只能使用新生成的workspace来进行项目管理。
- Pods:CocoaPods会将所有的第三方库以target的方式组成一个名为Pods的工程。整个第三方库工程会生成一个名称为libPods.a的静态库给MVVMDemo项目使用。
打开MVVMDemo.xcworkspace工程,界面如下:

在项目中引用刚才添加的第三方库的头文件,执行编译操作,操作成功。
6.常见问题
问题一:旧工程项目切换到CocoaPods,执行“pod install”指令时,有可能出现如下警告信息:
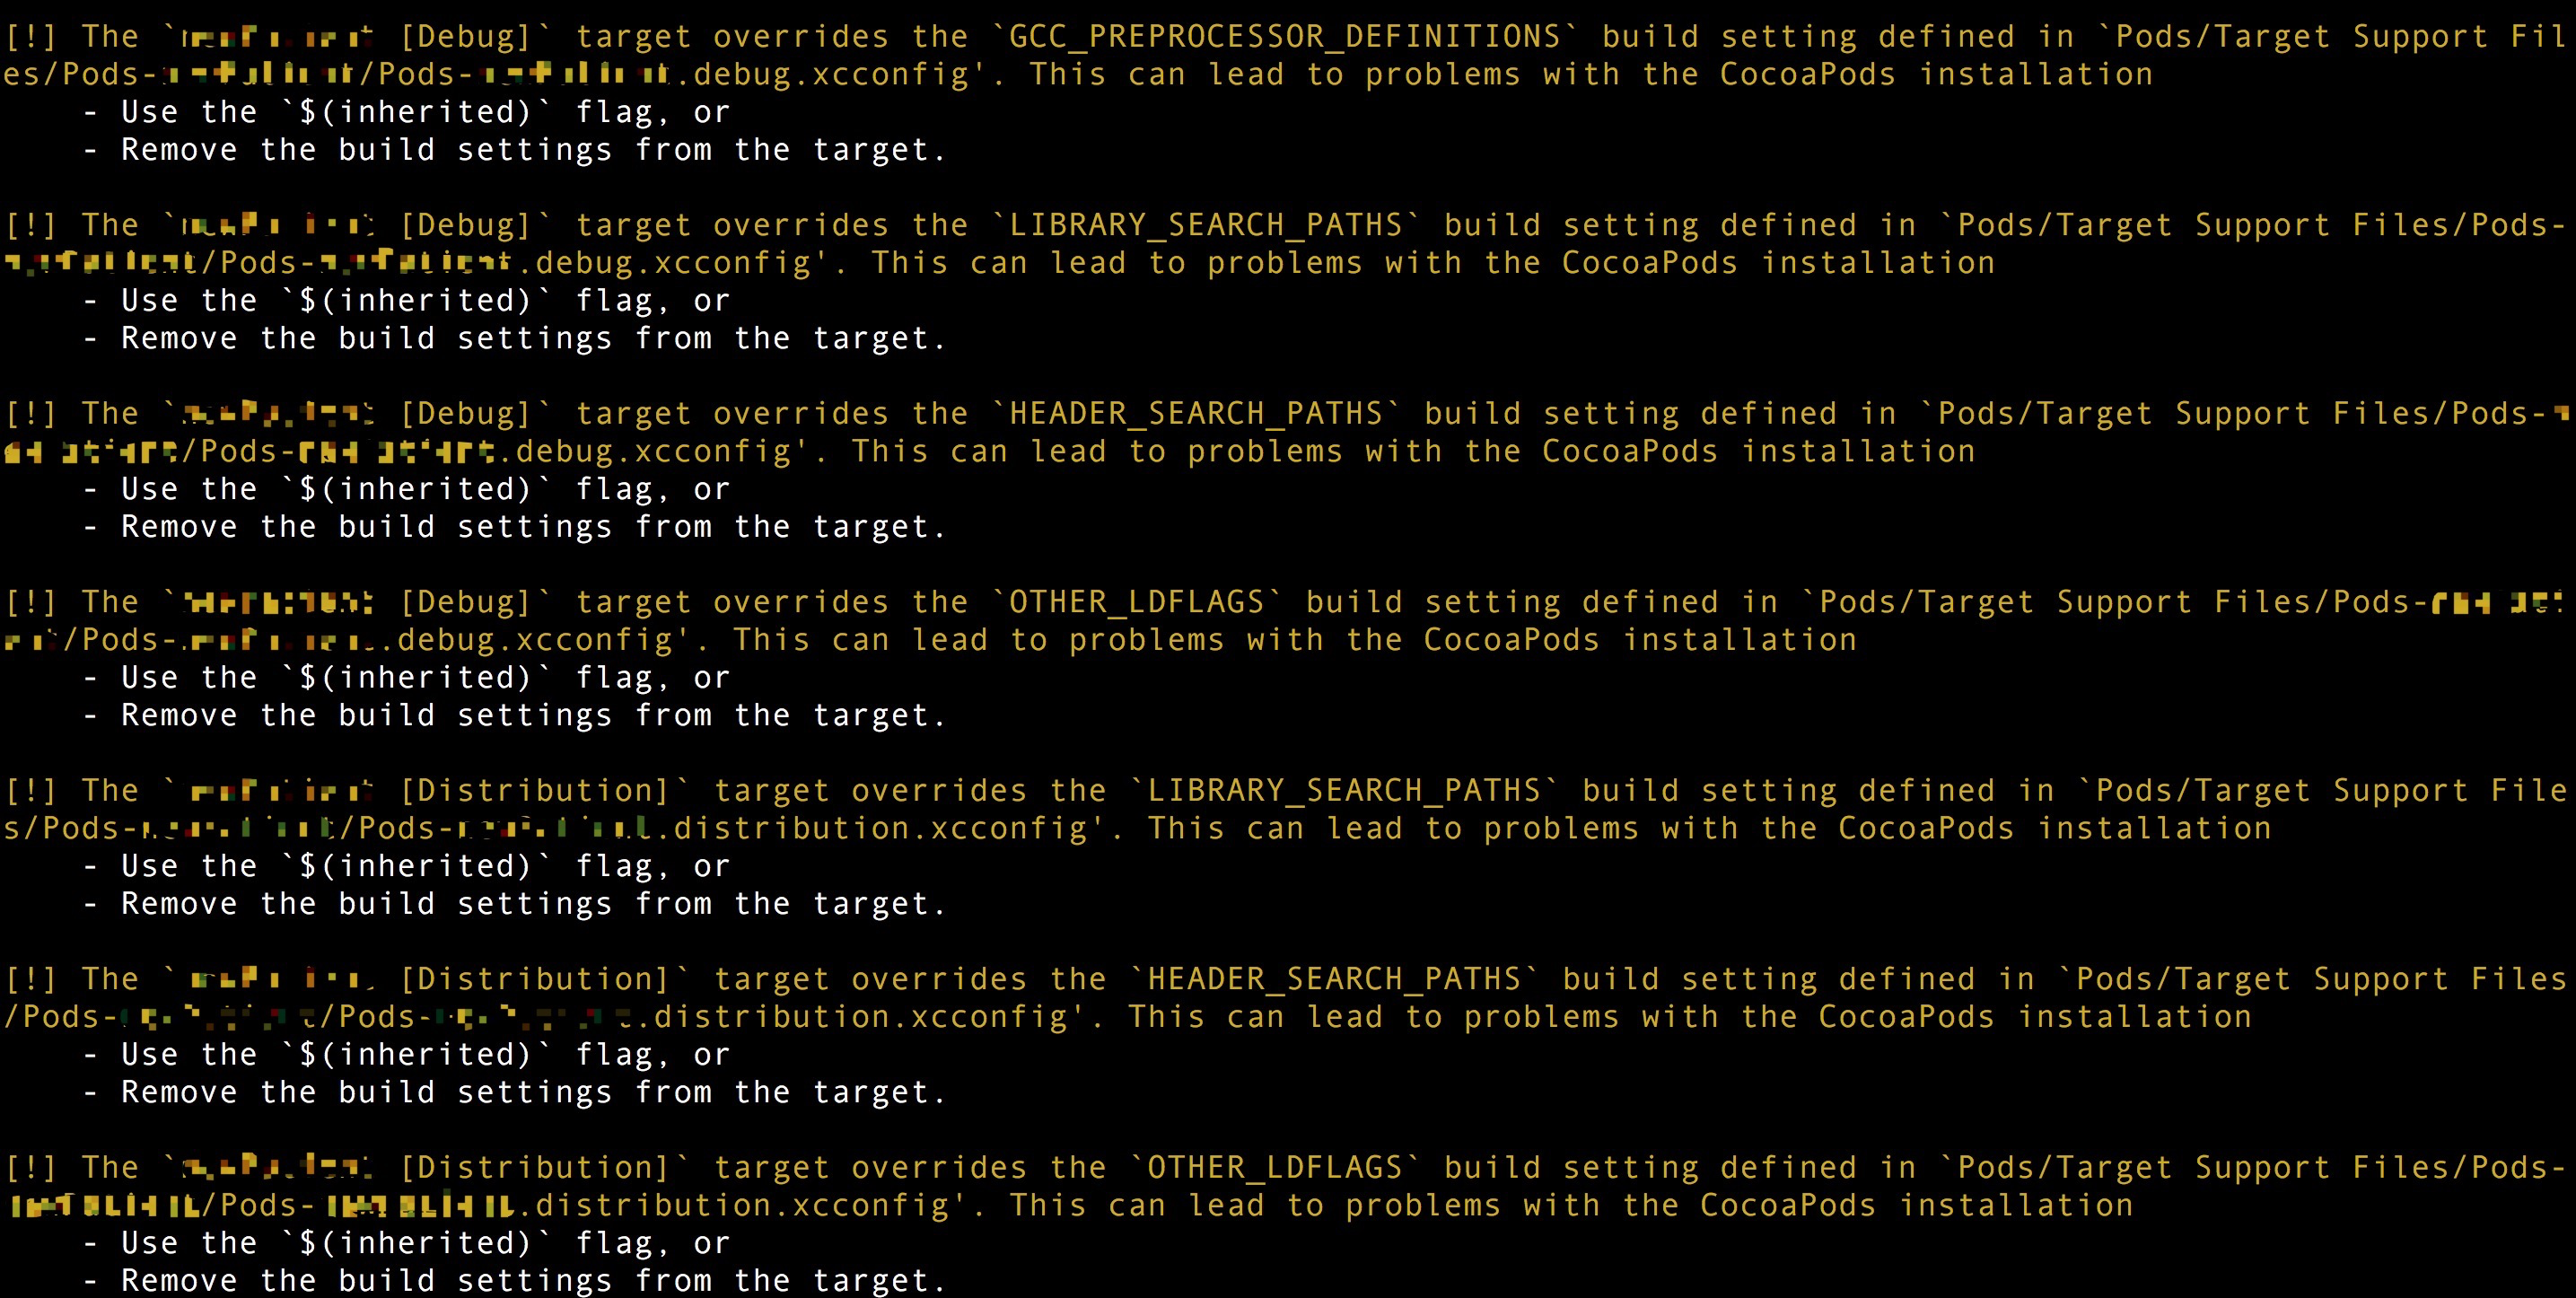
产生上面警告的原因是项目 Target 中的一些设置,CocoaPods 也做了默认的设置,如果两个设置结果不一致,就会造成问题。修改方案如下:
- 警告“...target overrides the `OTHER_LDFLAGS` build setting defined...”:点击项目文件 project.xcodeproj,右键
显示包内容,用文本编辑器打开project.pbxproj,删除OTHER_LDFLAGS的地方,保存,执行pod update指令即可消除该警告; - 警告“...target overrides the `GCC_PREPROCESSOR_DEFINITIONS` build setting defined...”:修改工程target,具体是这两项“Build Settings -> Other linker flags”和“Build Settings -> Preprocessor Macros”,在这两处添加“$(inherited)”;修改“Build Settings -> Preprocessor Macros”时,需要留意一下保留DEBUG时的日志打印(DEBUG=1);
- 警告“...target overrides the `LIBRARY_SEARCH_PATHS` build setting defined...” :修改工程target,具体是“Build Settings -> Library Search Paths”,在这里添加“$(inherited)”;
- 警告“...target overrides the `HEADER_SEARCH_PATHS` build setting defined...”:修改工程target,具体是“Build Settings -> Header Search Paths”,在这里添加“$(inherited)”;
关于$(inherited)可查看这两篇文章:
问题二:怎样在CocoaPods中使用私有库?
很简单,两个步骤:
第一步:引入source源:
source 'git@git:/Data/git/ios/GofSpecs.git'
第二步:pod私有库:
pod 'GofKit'
问题三:怎么加快pod install 或pod update指令执行时间?
执行pod install 或pod update 很多时候都卡在了Analyzing dependencies不动,这是更新本地的pod spec索引文件导致的。通过--no-repo-update标志可以不更新本地pod spec索引。当然首次install不应该添加这个标志,后续修改Podfile的时候可以适当使用,加快pod速度。
问题四:怎样输出指令详细日志?
pod install --verbose
问题五:怎样忽略某些文件或文件夹,让这些文件或文件夹不使用git管理?
在项目的根目录(跟.git文件夹所在目录同层)建立.gitignore文件,在里面声明即可。例如:
#ignore these files
GofViewMakerDemo/Pods/*
上面的.gitignore文件意思就是“GofViewMakerDemo/Pods/*”目录下的所有文件不使用git管理。
这里有一份可忽略的文件列表:


# Created by https://www.gitignore.io/api/objective-c,swift

### Objective-C ###
# Xcode
#
# gitignore contributors: remember to update         Global/Xcode.gitignore, Objective-C.gitignore & Swift.gitignore

## Build generated
build/
DerivedData/

## Various settings
*.pbxuser
!default.pbxuser
*.mode1v3
!default.mode1v3
*.mode2v3
!default.mode2v3
*.perspectivev3
!default.perspectivev3
xcuserdata/

## Other
*.moved-aside
*.xcuserstate

## Obj-C/Swift specific
*.hmap
*.ipa

# CocoaPods
#
# We recommend against adding the Pods directory to your         .gitignore. However
# you should judge for yourself, the pros and cons are     mentioned at:
# https://guides.cocoapods.org/using/using-cocoapods.html#should-i-check-the-pods-directory-into-source-control
#
# Pods/

# Carthage
#
# Add this line if you want to avoid checking in source code from Carthage dependencies.
# Carthage/Checkouts

Carthage/Build

# fastlane
#
# It is recommended to not store the screenshots in the git repo. Instead, use fastlane to re-generate the
# screenshots whenever they are needed.
# For more information about the recommended setup visit:
#     https://github.com/fastlane/fastlane/blob/master/fastlane/docs/Gitignore.md

fastlane/report.xml
fastlane/screenshots

### Objective-C Patch ###
*.xcscmblueprint

### Swift ###
# Xcode
#
# gitignore contributors: remember to update     Global/Xcode.gitignore, Objective-C.gitignore & Swift.gitignore

## Build generated
build/
DerivedData/

## Various settings
*.pbxuser
!default.pbxuser
*.mode1v3
!default.mode1v3
*.mode2v3
!default.mode2v3
*.perspectivev3
!default.perspectivev3
xcuserdata/

## Other
*.moved-aside
*.xcuserstate

## Obj-C/Swift specific
*.hmap
*.ipa

## Playgrounds
timeline.xctimeline
playground.xcworkspace

# Swift Package Manager
#
# Add this line if you want to avoid checking in source code from Swift Package Manager dependencies.
# Packages/
.build/

# CocoaPods
#
# We recommend against adding the Pods directory to your .gitignore. However
# you should judge for yourself, the pros and cons are mentioned at:
# https://guides.cocoapods.org/using/using-cocoapods.html#should-i-check-the-pods-directory-into-source-control
#
# Pods/

# Carthage
#
# Add this line if you want to avoid checking in source code from Carthage dependencies.
# Carthage/Checkouts

Carthage/Build

# fastlane
#
# It is recommended to not store the screenshots in the git repo. Instead, use fastlane to re-generate the
# screenshots whenever they are needed.
# For more information about the recommended setup visit:
#     https://github.com/fastlane/fastlane/blob/master/fastlane/docs/Gitignore.md

fastlane/report.xml
fastlane/Preview.html
fastlane/screenshots
fastlane/test_output
问题六:怎样导入swift库?
platform :ios, '8.0'
use_frameworks!
pod 'Alamofire', '~> 1.3'
关于Library 和 Framework的详细内容,可以参看这几篇文章:
这里做一个简单的介绍:
用cocoapods 导入swift 框架 到 swift项目和OC项目都必须要 use_frameworks!use_frameworks!只能在iOS 8及以上平台使用;使用 dynamic frameworks,必须要在Podfile文件中添加 use_frameworks!
不使用use_frameworks!,在执行pod update指令之后,会生成对应的.a文件(静态链接库):

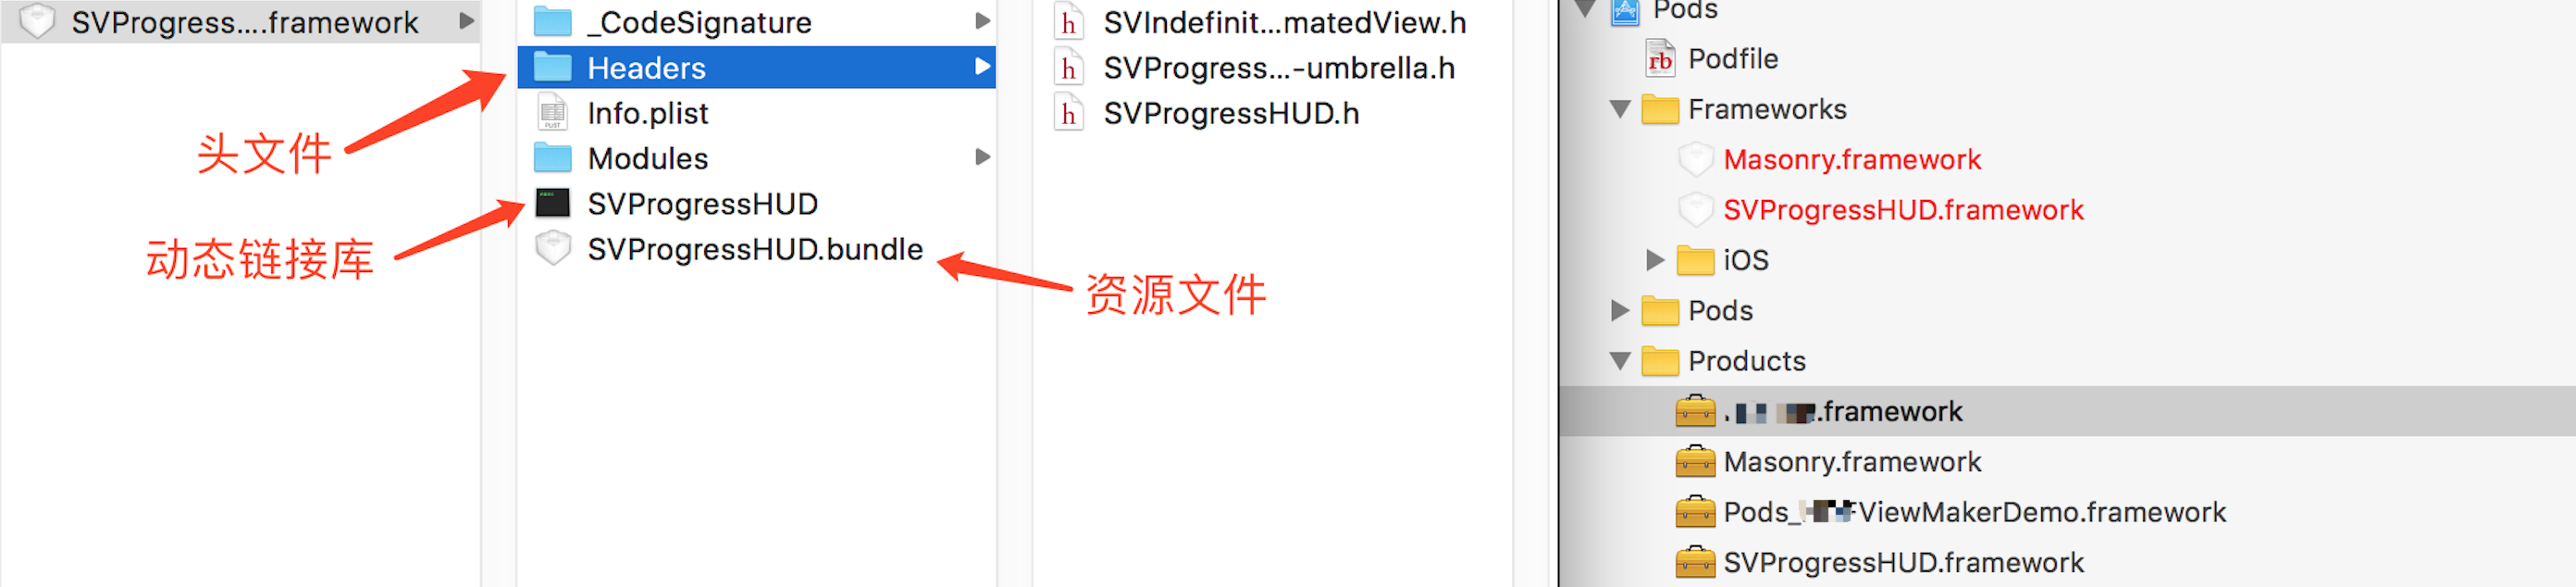
使用use_frameworks!,在执行pod update指令之后,会生成对应的.frameworks文件(动态链接库:实际内容为 Header + 动态链接库 + 资源文件):
7.参考资料

 浙公网安备 33010602011771号