
Prism的事件聚合器
书接上回,关于Prism的依赖注入容器如何使用应该都已明了,今天我们来讲一下如何使用Prism的事件聚合器。
我们分三步走:
- 第一,在MVVM项目开发中如何使用事件?
首先我们需要先知道事件是什么,事件其实就是委托的一种安全封装,从层级上来说,委托是引用类型,事件是一种成员。详解可见https://www.cnblogs.com/wangjiming/p/8300103.html(个人觉得相对友好的文)。
在WPF开发中,无论何时都离不开事件。如按下按钮后文本框更新显示welcome,最简单的就是直接在welcome事件里修改文本框文本。如果按钮与命令Binding在一起,那么事件中也会挂接命令执行方法,也就是说按下按钮事件依旧执行,只不过事件内部为命令方法。假设现在需要进行多页面开发,按下第一页按钮,第二页数据表格需同步更新,那么这里肯定就离不开事件。
在正式讲解事件聚合器之前,由于需要用实际例子演示如何通过事件在不同控件或者页面之间进行通信。关于WPF开发中的不同界面是如何实现的:https://www.cnblogs.com/weskynet/p/15967764.html
//这里模拟一个空的Login界面。2个文本框一个班接收密码,密码成功核对后提示bingo。登录成功后表格主窗口显示记录所有尝试登录的用户名称和密码及登录状态。
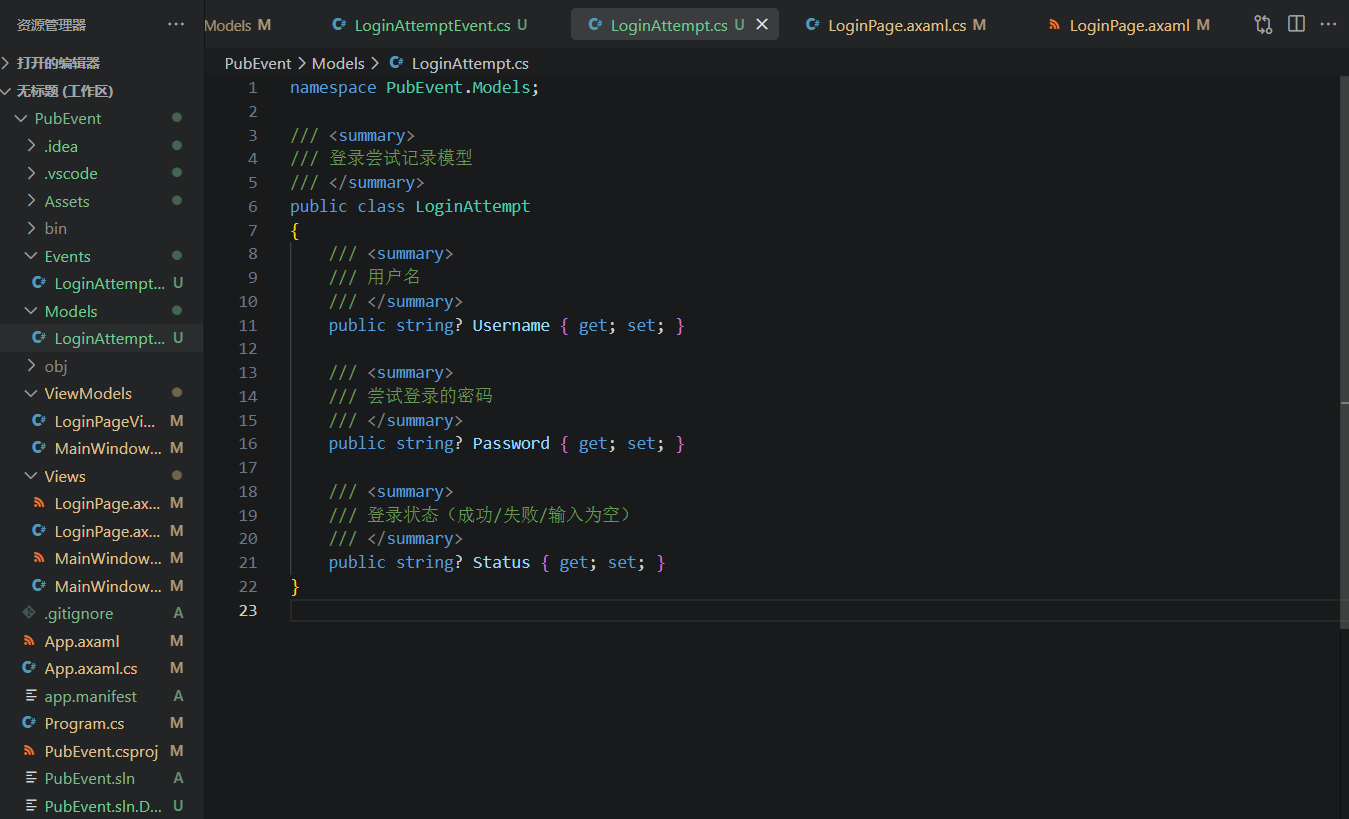
首先,先定义好登录的一些状态信息//Model/LoginAttempt.cs
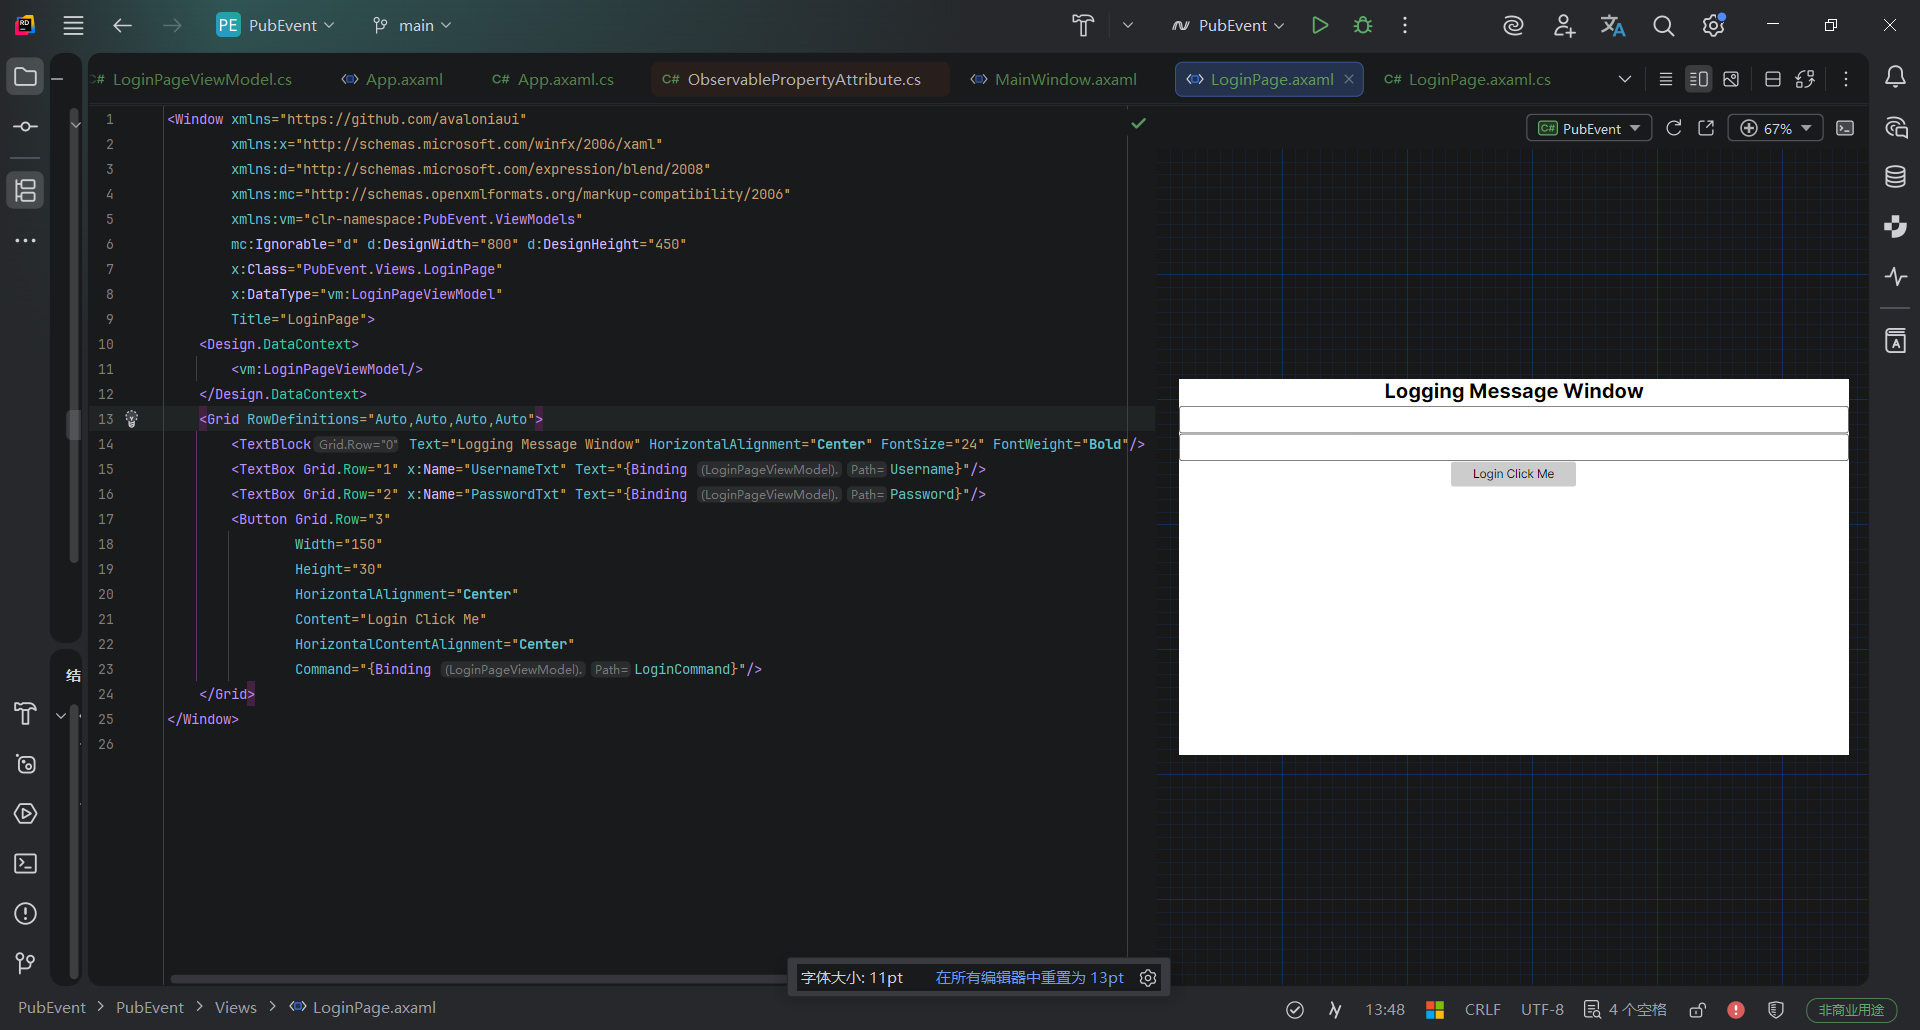
然后是定义登录页面//LoginPage.axmal
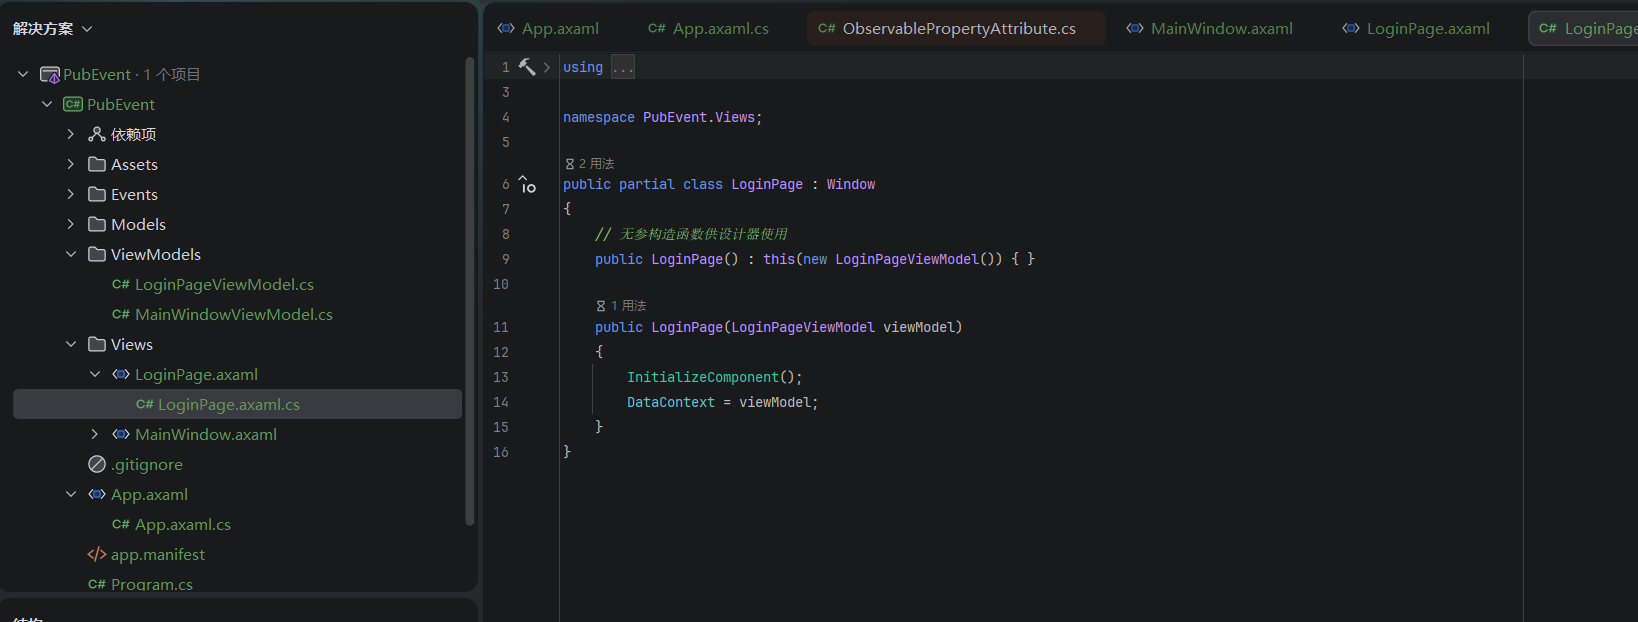
定义对应的axaml.cs//LoginPage.axmal.cs
至此,第一个界面设计完成,这个界面是需要显示在主窗口之前的,也就是在Login界面登录成功后才会进入主界面。接下来我们来写主窗口界面。
界面如图:

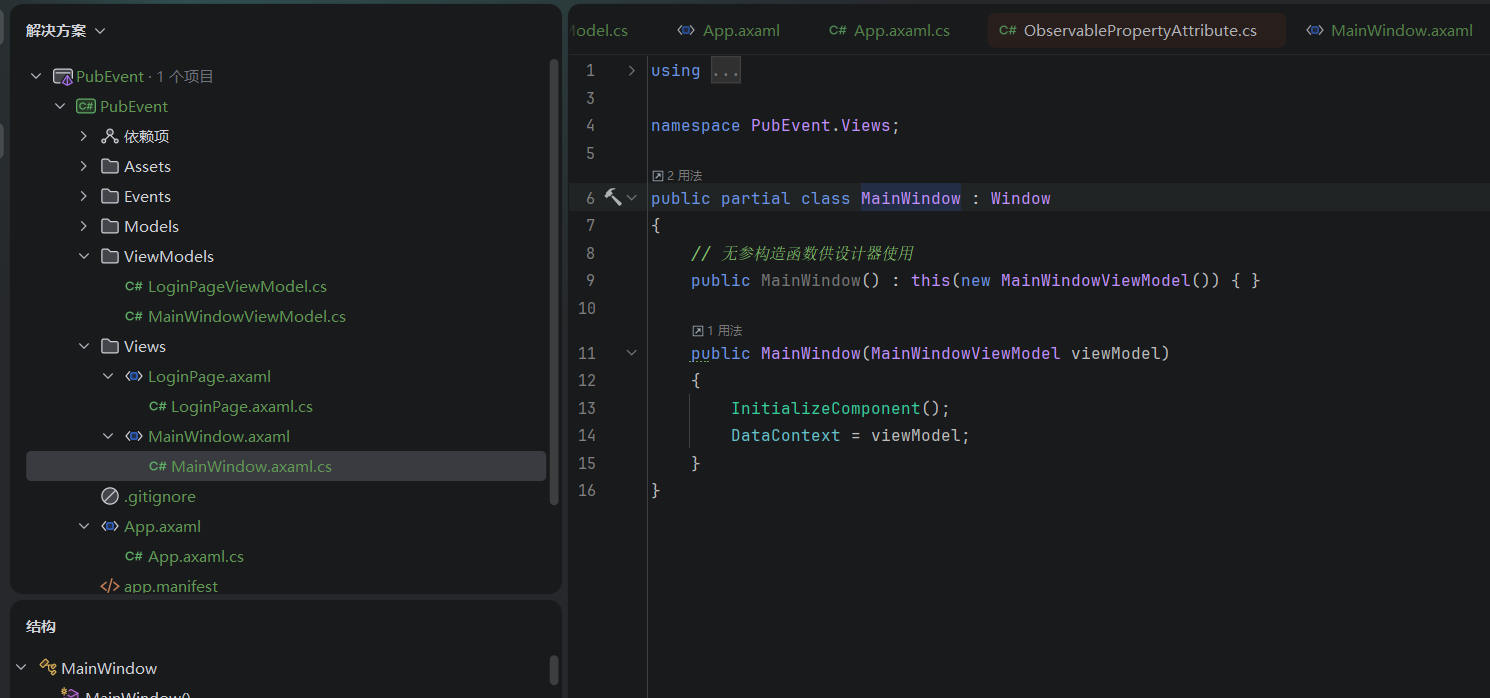
点击查看MainWindow.axmal代码
//MainWindow.axmal
<Window xmlns="https://github.com/avaloniaui"
        xmlns:x="http://schemas.microsoft.com/winfx/2006/xaml"
        xmlns:vm="using:PubEvent.ViewModels"
        xmlns:models="using:PubEvent.Models"
        xmlns:d="http://schemas.microsoft.com/expression/blend/2008"
        xmlns:mc="http://schemas.openxmlformats.org/markup-compatibility/2006"
        mc:Ignorable="d" d:DesignWidth="800" d:DesignHeight="450"
        x:Class="PubEvent.Views.MainWindow"
        x:DataType="vm:MainWindowViewModel"
        Icon="/Assets/avalonia-logo.ico"
        Title="PubEvent">

    <Design.DataContext>
        <vm:MainWindowViewModel/>
    </Design.DataContext>

    <Grid RowDefinitions="Auto,Auto,*" Margin="10">
        <TextBlock Text="登录记录"
                   FontSize="20"
                   FontWeight="Bold"
                   HorizontalAlignment="Center"
                   Margin="0,10"/>

        <!-- 调试用:显示数据数量 -->
        <TextBlock Grid.Row="1"
                   Text="{Binding LoginAttempts.Count, StringFormat='记录数量: {0}'}"
                   HorizontalAlignment="Center"
                   Foreground="Red"
                   Margin="0,5"/>

        <DataGrid Grid.Row="2"
                  x:CompileBindings="False"
                  ItemsSource="{Binding LoginAttempts}"
                  AutoGenerateColumns="True"
                  IsReadOnly="True"
                  Background="AntiqueWhite"
                  GridLinesVisibility="All"
                  BorderThickness="1"
                  BorderBrush="Gray"
                  Height="300"
                  HeadersVisibility="All">
        </DataGrid>
    </Grid>
</Window>
好的,这里View已经完成,接下来实现对应的事件以及ViewModel层
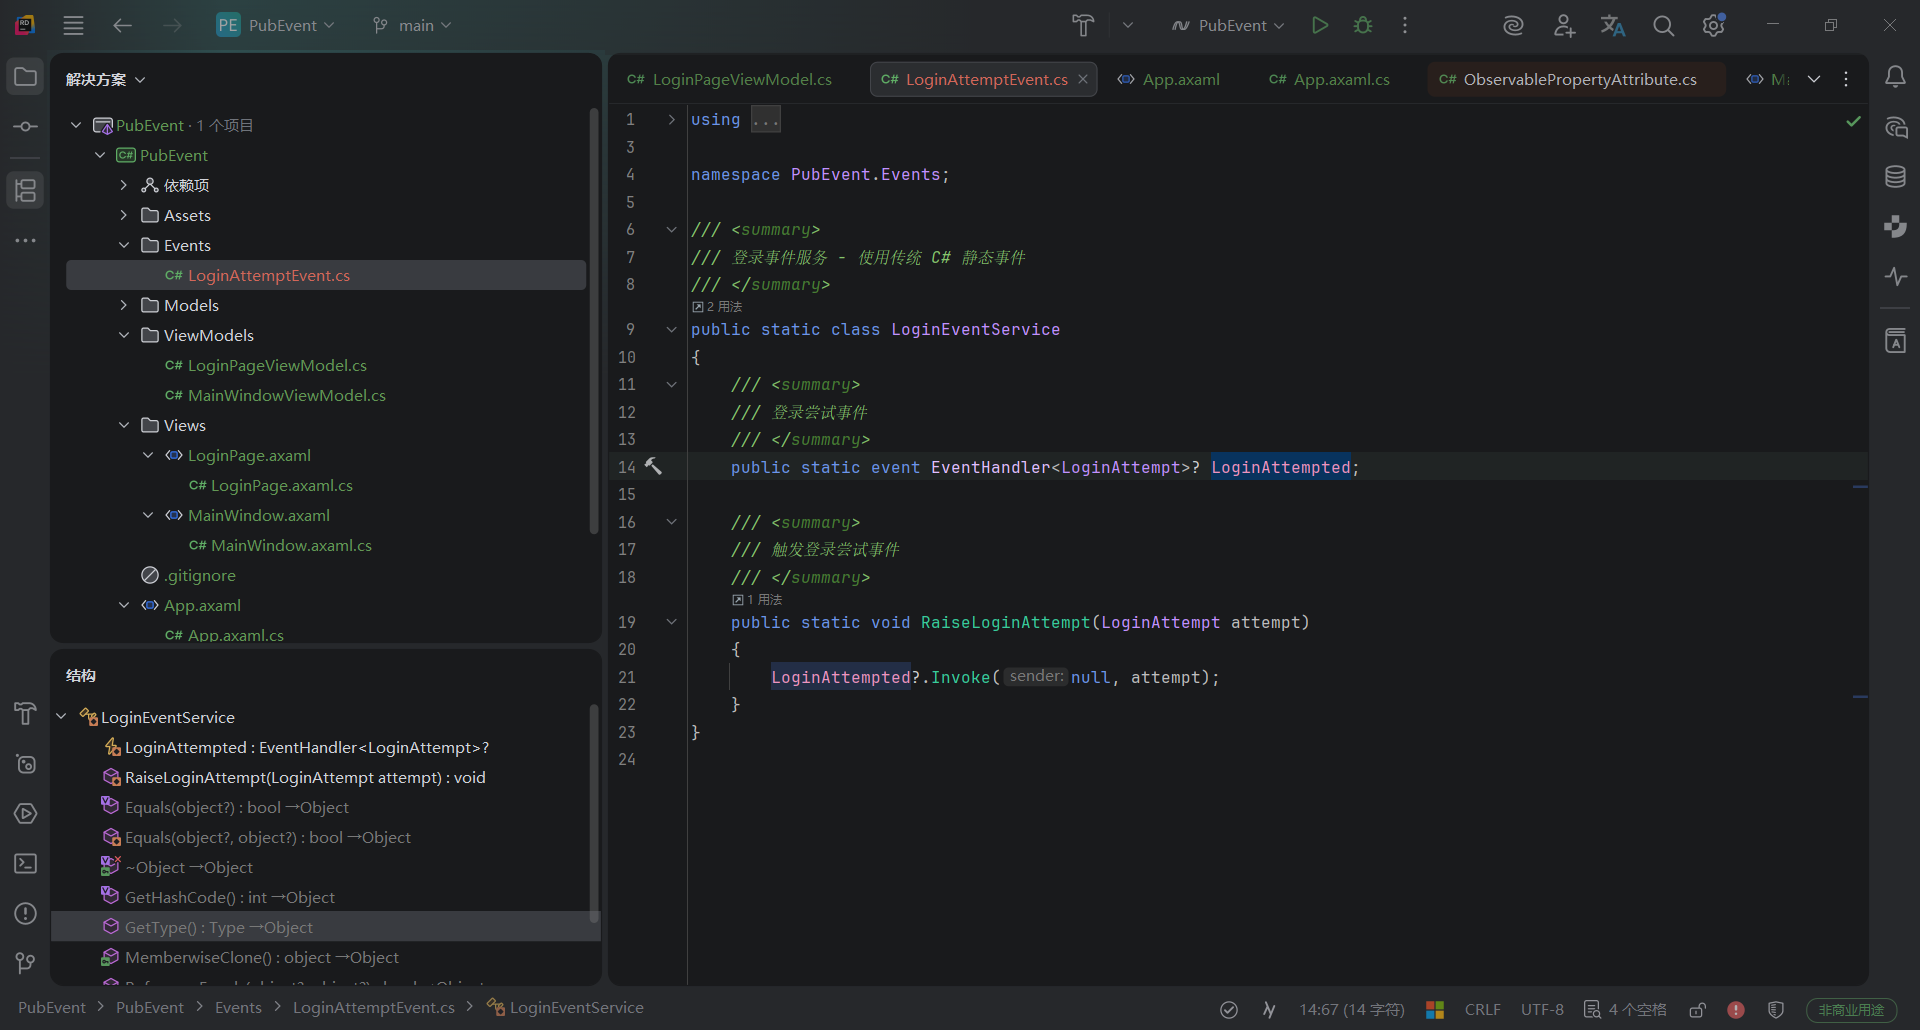
先定义好事件类,创建一个尝试登录的事件LoginAttempted。代码如图:
随后需要在LoginPageViewMode中定义好LoginPage中Button的命令(命令执行需触发事件),在MainWindowViewMode中定义好DataGrid数据来源,订阅以及执行事件方法(事件方法内更新DataGrid)。
点击查看LoginPageViewMode.cs代码
//LoginPageViewMode.cs(需要定义页面切换逻辑,带触发事件的命令,供View绑定的空构造,View绑定的两个Text。)
using System.Threading.Tasks;
using CommunityToolkit.Mvvm.ComponentModel;
using CommunityToolkit.Mvvm.Input;
using MsBox.Avalonia;
using MsBox.Avalonia.Enums;
using PubEvent.Events;
using PubEvent.Models;

namespace PubEvent.ViewModels;

public partial class LoginPageViewModel : ObservableObject
{
    [ObservableProperty]
    private string? _username;
    [ObservableProperty]
    private string? _password;

    [RelayCommand]
    private async Task Login()
    {
        if (string.IsNullOrEmpty(Username) || string.IsNullOrEmpty(Password))
        {
            // 发布登录尝试事件 - 输入为空
            PublishLoginAttempt("输入为空");

            var box = MessageBoxManager.GetMessageBoxStandard("Error", "Please enter a valid username and password", ButtonEnum.Ok);
            await box.ShowAsync();
        }
        else if (Username == "admin" && Password == "011222")
        {
            // 发布登录尝试事件 - 登录成功
            PublishLoginAttempt("登录成功");

            // 登录成功,切换到 MainWindow
            App.Current?.SwitchToMainWindow();
        }
        else
        {
            // 发布登录尝试事件 - 登录失败
            PublishLoginAttempt("登录失败");

            var box = MessageBoxManager.GetMessageBoxStandard("Error", "Please enter a right username and password", ButtonEnum.Ok);
            await box.ShowAsync();
        }
    }

    /// <summary>
    /// 发布登录尝试事件并添加到缓存
    /// </summary>
    private void PublishLoginAttempt(string status)
    {
        var attempt = new LoginAttempt
        {
            Username = Username,
            Password = Password,
            Status = status
        };

        // 添加到 App 缓存
        App.Current?.AddLoginAttempt(attempt);

        // 触发传统事件(用于 MainWindow 已创建后的实时更新)
        LoginEventService.RaiseLoginAttempt(attempt);
    }
}
点击查看MainWindowViewModel代码
//MainWindowViewModel.cs(需要定义好DataGrid数据列表,定义事件方法并订阅执行,加载LoginPage的数据缓存<必须有缓存,不然在触发事件时MainWindowViewModel还没生成,无法执行DataGrid更新>)
using System;
using System.Collections.ObjectModel;
using CommunityToolkit.Mvvm.ComponentModel;
using PubEvent.Events;
using PubEvent.Models;

namespace PubEvent.ViewModels;

public partial class MainWindowViewModel : ObservableObject
{

    /// <summary>
    /// 登录尝试记录集合
    /// </summary>
    public ObservableCollection<LoginAttempt> LoginAttempts { get; } = new();

    public MainWindowViewModel()
    {
        // 添加测试数据(验证 DataGrid 是否正常)
        LoginAttempts.Add(new LoginAttempt { Username = "测试用户", Password = "123456", Status = "测试数据" });

        // 从 App 缓存加载已有的登录记录
        if (App.Current?.CachedLoginAttempts != null)
        {
            foreach (var attempt in App.Current.CachedLoginAttempts)
            {
                LoginAttempts.Add(attempt);
            }
        }

        // 订阅传统事件(用于后续实时更新)
        LoginEventService.LoginAttempted += OnLoginAttempt;
    }

    /// <summary>
    /// 处理登录尝试事件
    /// </summary>
    private void OnLoginAttempt(object? sender, LoginAttempt attempt)
    {
        LoginAttempts.Add(attempt);
    }
}
点击查看App.axmal.cs代码
//App.axmal.cs(需要定义好初始化窗口执行LoginPage。窗口切换方法SwitchToMainWindow,缓存方法AddLoginAttempt)
using System.Collections.Generic;
using Avalonia;
using Avalonia.Controls;
using Avalonia.Markup.Xaml;
using Prism.DryIoc;
using Prism.Ioc;
using PubEvent.Models;
using PubEvent.ViewModels;
using PubEvent.Views;

namespace PubEvent;

public partial class App : PrismApplication
{
    /// <summary>
    /// 静态实例,方便从 ViewModel 中访问
    /// </summary>
    public static new App? Current => Application.Current as App;

    /// <summary>
    /// 当前的 LoginPage 窗口引用
    /// </summary>
    private Window? _loginWindow;

    /// <summary>
    /// 缓存登录尝试记录(在 MainWindow 创建之前的记录)
    /// </summary>
    public List<LoginAttempt> CachedLoginAttempts { get; } = new();

    public override void Initialize()
    {
        AvaloniaXamlLoader.Load(this);
        base.Initialize();
    }

    /// <summary>
    /// 注册类型到 DI 容器
    /// </summary>
    protected override void RegisterTypes(IContainerRegistry containerRegistry)
    {
        // 注册视图和 ViewModel
        containerRegistry.Register<LoginPage>();
        containerRegistry.Register<LoginPageViewModel>();
        containerRegistry.Register<MainWindow>();
        containerRegistry.Register<MainWindowViewModel>();
    }

    /// <summary>
    /// 创建初始窗口(LoginPage)
    /// </summary>
    protected override Window CreateShell()
    {
        _loginWindow = Container.Resolve<LoginPage>();
        return _loginWindow;
    }

    /// <summary>
    /// 添加登录尝试记录到缓存
    /// </summary>
    public void AddLoginAttempt(LoginAttempt attempt)
    {
        CachedLoginAttempts.Add(attempt);
    }

    /// <summary>
    /// 登录成功后切换到 MainWindow
    /// </summary>
    public void SwitchToMainWindow()
    {
        // 从容器解析 MainWindow
        var mainWindow = Container.Resolve<MainWindow>();
        mainWindow.Show();

        // 关闭 LoginPage
        _loginWindow?.Close();
    }
}
点击查看App.axmal代码
<prism:PrismApplication xmlns="https://github.com/avaloniaui"
             xmlns:x="http://schemas.microsoft.com/winfx/2006/xaml"
             xmlns:prism="http://prismlibrary.com/"
             x:Class="PubEvent.App"
             RequestedThemeVariant="Default">
             <!-- "Default" ThemeVariant follows system theme variant. "Dark" or "Light" are other available options. -->

    <Application.Styles>
        <FluentTheme />
        <StyleInclude Source="avares://Avalonia.Controls.DataGrid/Themes/Fluent.xaml"/>
    </Application.Styles>
</prism:PrismApplication>
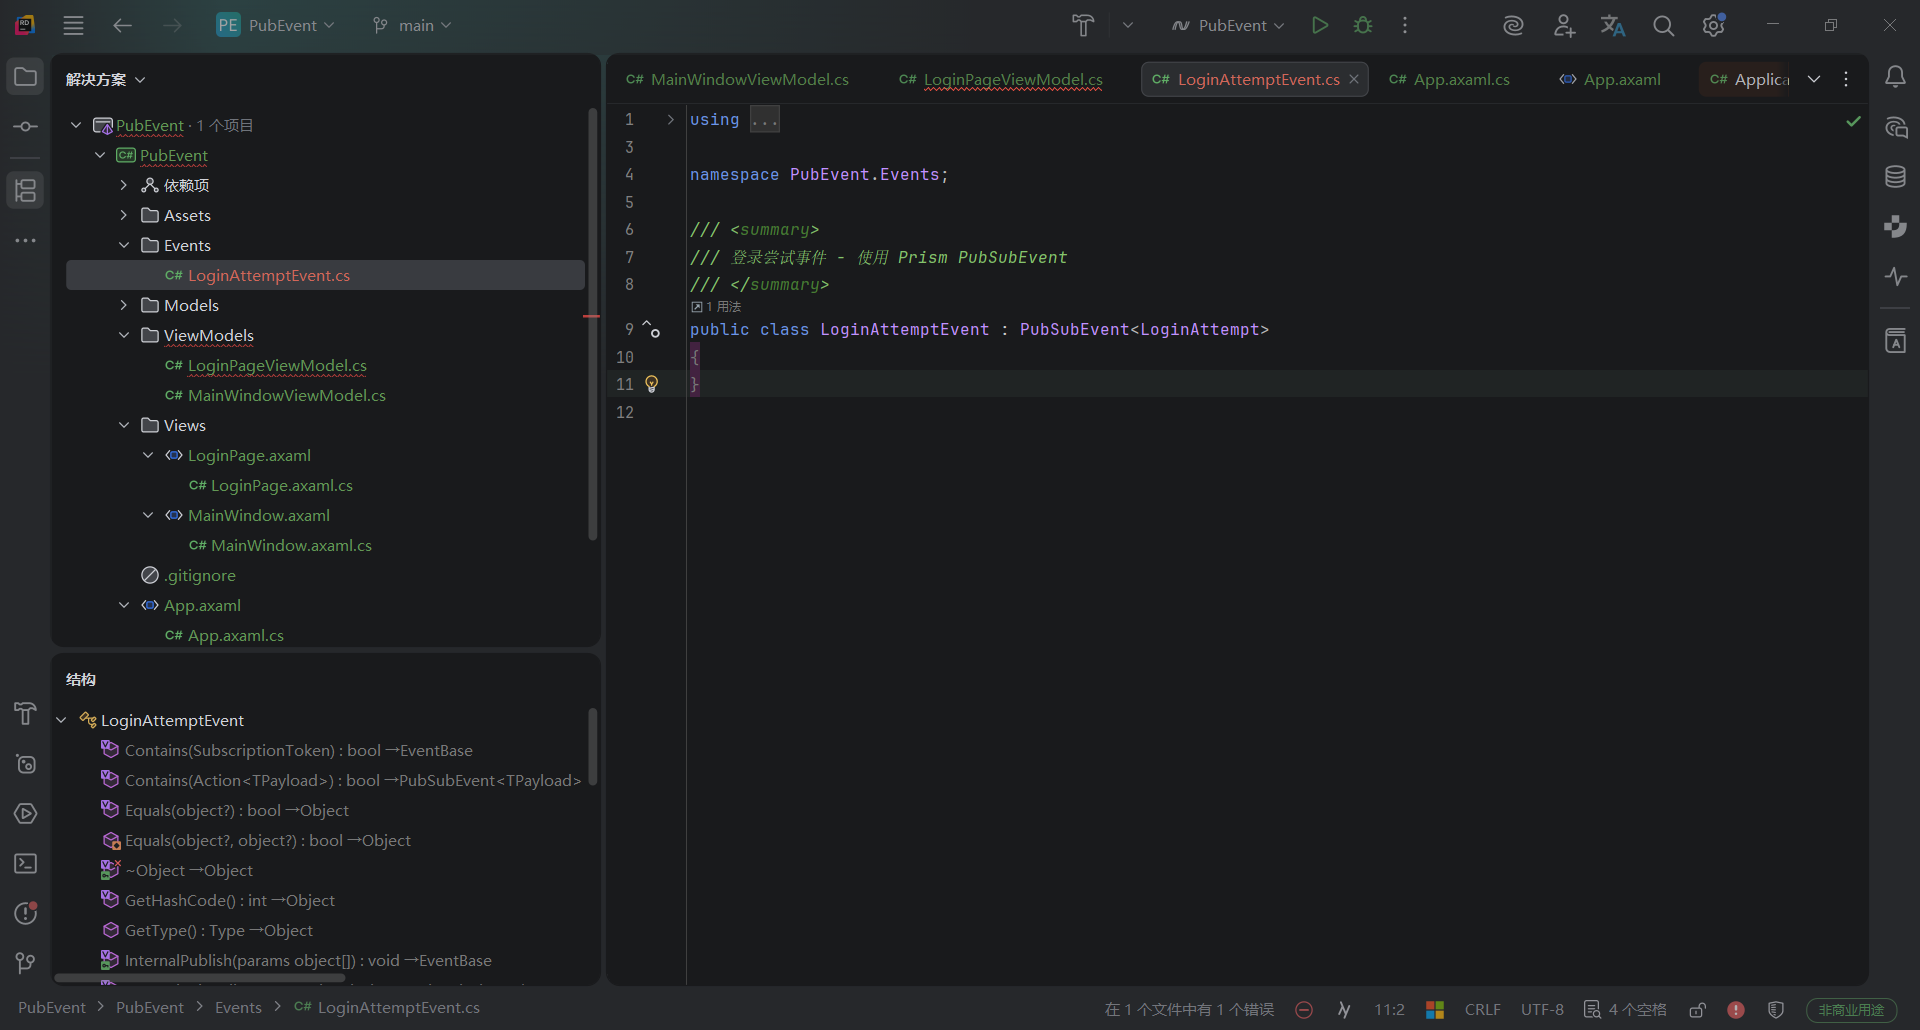
- 2、//LoginPageViewModel.cs(注入接口,实现接口类的发布)
点击查看代码
using System.Threading.Tasks;
using CommunityToolkit.Mvvm.ComponentModel;
using CommunityToolkit.Mvvm.Input;
using MsBox.Avalonia;
using MsBox.Avalonia.Enums;
using Prism.Events;
using PubEvent.Events;
using PubEvent.Models;

namespace PubEvent.ViewModels;

public partial class LoginPageViewModel : ObservableObject
{
    [ObservableProperty]
    private string? _username;
    [ObservableProperty]
    private string? _password;

    private readonly IEventAggregator? _eventAggregator;

    public LoginPageViewModel(IEventAggregator eventAggregator)
    {
        _eventAggregator = eventAggregator;
    }

    // 无参构造函数供设计器使用
    public LoginPageViewModel() : this(null!)
    {
    }

    [RelayCommand]
    private async Task Login()
    {
        if (string.IsNullOrEmpty(Username) || string.IsNullOrEmpty(Password))
        {
            // 发布登录尝试事件 - 输入为空
            PublishLoginAttempt("输入为空");

            var box = MessageBoxManager.GetMessageBoxStandard("Error", "Please enter a valid username and password", ButtonEnum.Ok);
            await box.ShowAsync();
        }
        else if (Username == "admin" && Password == "123456")
        {
            // 发布登录尝试事件 - 登录成功
            PublishLoginAttempt("登录成功");

            // 登录成功,切换到 MainWindow
            App.Current?.SwitchToMainWindow();
        }
        else
        {
            // 发布登录尝试事件 - 登录失败
            PublishLoginAttempt("登录失败");

            var box = MessageBoxManager.GetMessageBoxStandard("Error", "Please enter a right username and password", ButtonEnum.Ok);
            await box.ShowAsync();
        }
    }

    /// <summary>
    /// 发布登录尝试事件并添加到缓存
    /// </summary>
    private void PublishLoginAttempt(string status)
    {
        var attempt = new LoginAttempt
        {
            Username = Username,
            Password = Password,
            Status = status
        };

        // 添加到 App 缓存
        App.Current?.AddLoginAttempt(attempt);

        // 发布事件(用于 MainWindow 已创建后的实时更新)
        _eventAggregator?.GetEvent<LoginAttemptEvent>().Publish(attempt);
    }
}
点击查看代码
using System.Collections.ObjectModel;
using CommunityToolkit.Mvvm.ComponentModel;
using Prism.Events;
using PubEvent.Events;
using PubEvent.Models;

namespace PubEvent.ViewModels;

public partial class MainWindowViewModel : ObservableObject
{

    /// <summary>
    /// 登录尝试记录集合
    /// </summary>
    public ObservableCollection<LoginAttempt> LoginAttempts { get; } = new();

    private readonly IEventAggregator? _eventAggregator;

    public MainWindowViewModel(IEventAggregator eventAggregator)
    {
        _eventAggregator = eventAggregator;

        // 添加测试数据(验证 DataGrid 是否正常)
        LoginAttempts.Add(new LoginAttempt { Username = "测试用户", Password = "123456", Status = "测试数据" });

        // 从 App 缓存加载已有的登录记录
        if (App.Current?.CachedLoginAttempts != null)
        {
            foreach (var attempt in App.Current.CachedLoginAttempts)
            {
                LoginAttempts.Add(attempt);
            }
        }

        // 订阅登录尝试事件(用于后续实时更新)
        _eventAggregator?.GetEvent<LoginAttemptEvent>().Subscribe(OnLoginAttempt);
    }

    // 无参构造函数供设计器使用
    public MainWindowViewModel() : this(null!)
    {
    }

    /// <summary>
    /// 处理登录尝试事件
    /// </summary>
    private void OnLoginAttempt(LoginAttempt attempt)
    {
        LoginAttempts.Add(attempt);
    }
}
3、使用事件聚合器的优势在哪?为何要用?
从以上两个例子应该能很好的看出来了,使用事件聚合器能够少量的减少代码,将所有需要的事件服务都继承自PubEvent,不仅方便代码框架维护,同时它带来的解耦便利性也可以方便团队划分模块开发,还能够进行模块化的测试,对于大型应用来说这种架构是必须的。以上为我个人快速学习的简短理解,希望能够有所帮助。

 浙公网安备 33010602011771号