
11:集合框架 || 从此开始可以做力扣第一题
集合框架
一、什么是集合
概念:对象的容器,定义了对多个对象进行操作的常用方法。可实现数组的功能。
和数组的区别:
- (1)数组长度固定,集合长度不固定。
- (2)数组可以存储基本类型和引用类型,集合只能存储引用类型。如果要存储基本类型,需要用到包装类装箱。
- 位置:java.util.*
二、Collection 体系集合
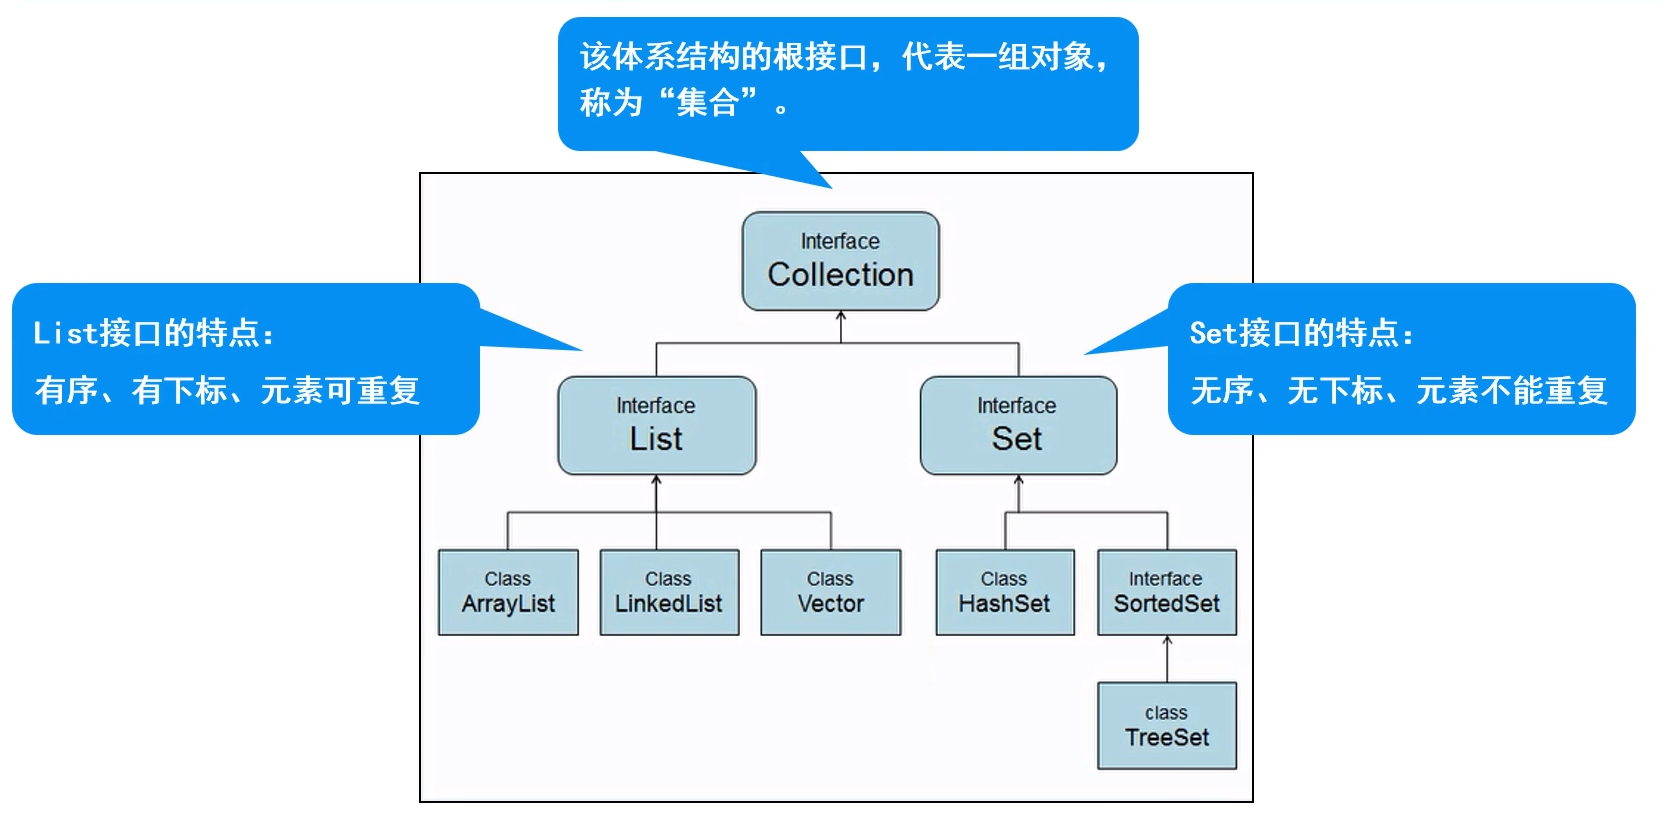
1. Collection 父接口
- 特点:代表一组任意类型的对象,无序、无下标、不能重复。
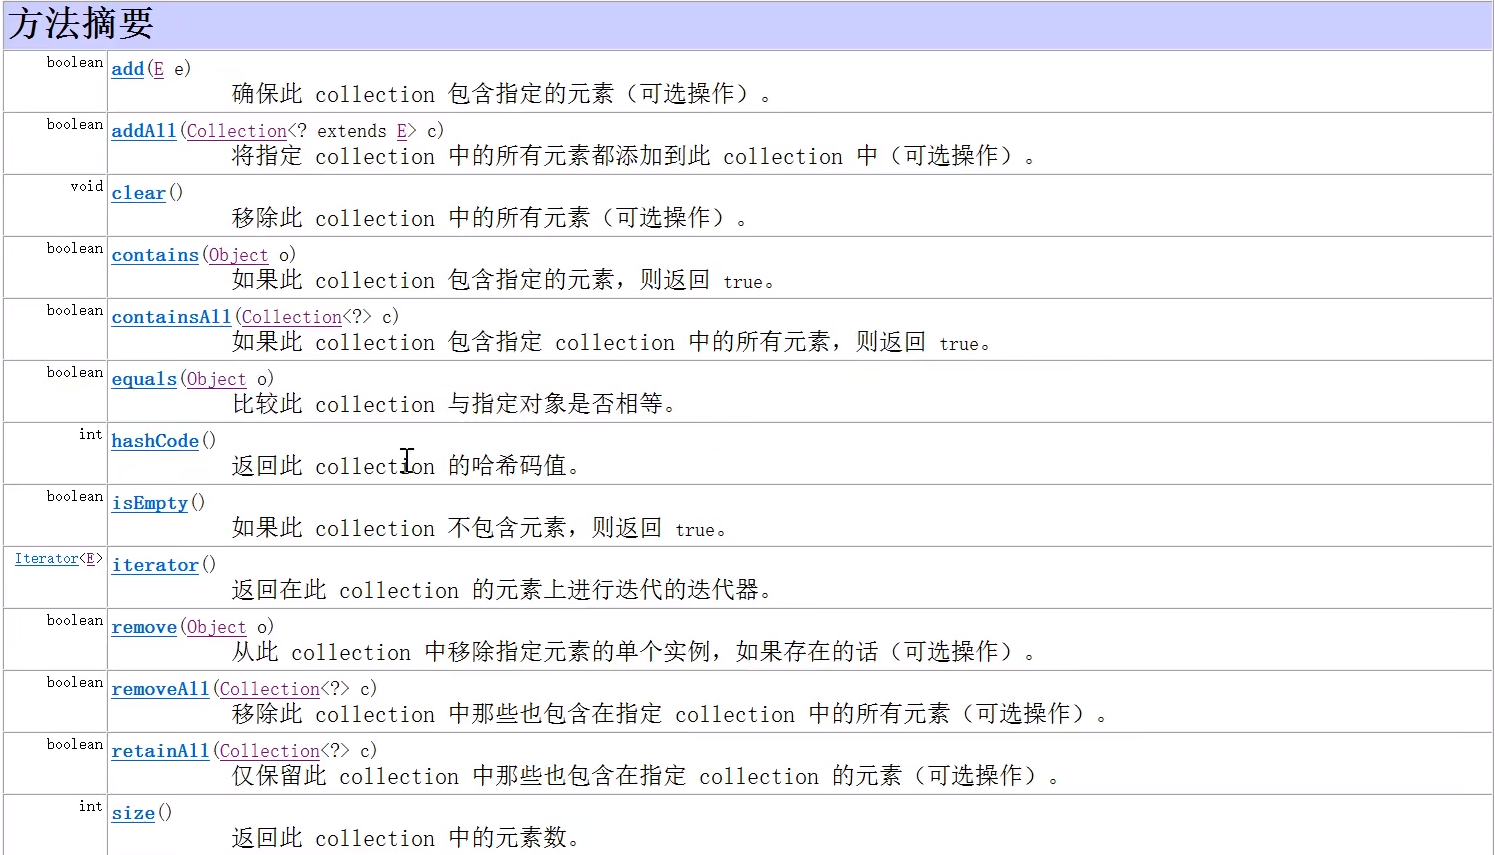
- 方法:
- boolean add(Object obj) //添加一个对象。
- boolean addAll(Collection c) //将一个集合中的所有对象添加到此集合中。
- void clear() //清空此集合中的所有对象。
- boolean contains(Object o) //检查此集合中是否包含o对象。
- boolean equals(Object o) //比较此集合是否与指定对象相等。
- boolean isEmpty() //判断此集合是否为空。
- boolean remove(Object o) //在此集合中移除o对象。
- int size() //返回此集合中的元素个数。
- Object[] toArray() //将此集合转换成数组。

-
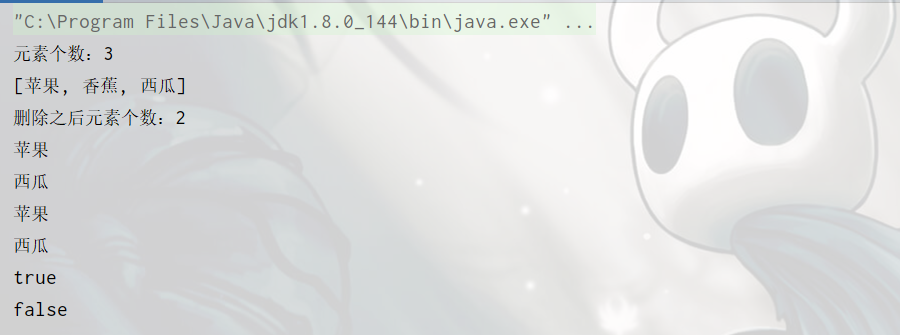
Collection接口的使用:基本方法
package xyz.qianfeng.collection.collections;

import java.util.ArrayList;
import java.util.Collection;
import java.util.Iterator;

/**
 * Collection接口的使用
 * (1)添加元素
 * (2)删除元素
 * (3)遍历元素
 * (4)判断
 */
public class Demo01 {
    public static void main(String[] args) {
        //创建接口
        Collection collection = new ArrayList();
        //1. 添加元素
        collection.add("苹果");
        collection.add("香蕉");
        collection.add("西瓜");
        System.out.println("元素个数:" + collection.size());
        System.out.println(collection);

        //2. 删除元素
        collection.remove("香蕉");
        System.out.println("删除之后元素个数:" + collection.size());

        //3. 清空元素
//        collection.clear();

        //4. 遍历元素【重点】
        //方法1 使用增强for
        for (Object object : collection) {
            System.out.println(object);
        }
        //方法2 使用迭代器(迭代器专门用来遍历集合的一种方式)
        //hasNext(); 判断有没有下一个元素
        //next(); 获取下一个元素
        //remove(); 删除当前元素
        Iterator it = collection.iterator();
        while (it.hasNext()){  //迭代器迭代过程中不允许使用Collection的删除方法。不然会报错 并发修改异常,但是可以使用迭代器自身的删除方法
            String s = (String)it.next();
            System.out.println(s);
//            collection.remove(s);//会报错
//            it.remove();//不报错
        }

        //4. 判断
        System.out.println(collection.contains("西瓜"));
        System.out.println(collection.isEmpty());
    }
}
-
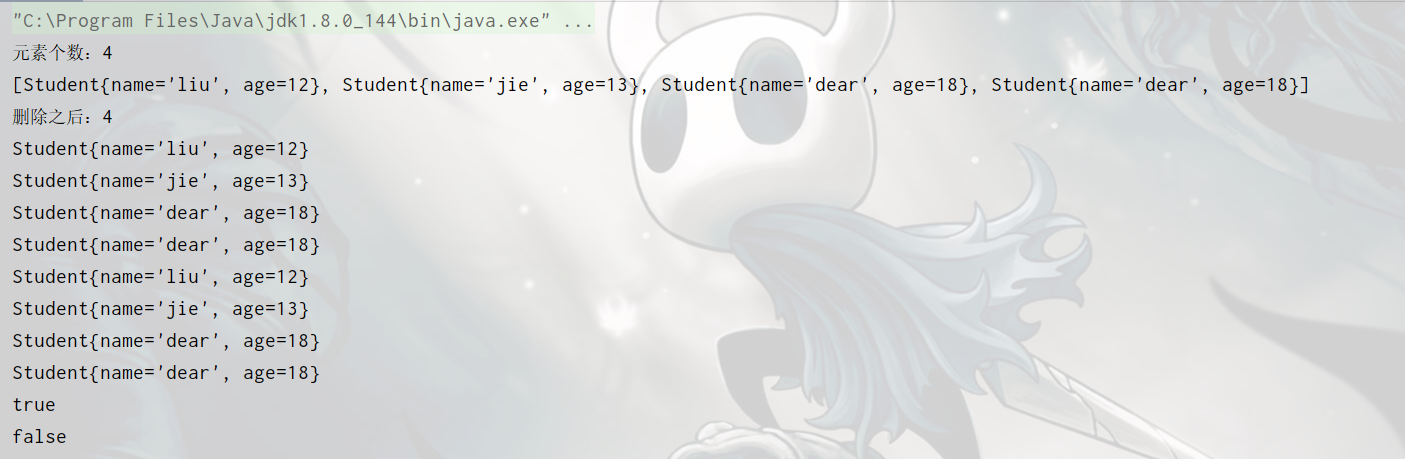
Collection接口的使用:保存学生信息
package xyz.qianfeng.collection.collections;

import java.util.ArrayList;
import java.util.Collection;
import java.util.Iterator;

/**
 * Collection的使用:保存学生信息
 */
public class Demo02 {
    public static void main(String[] args) {
        //新建Collection对象
        Collection collection = new ArrayList();
        //1. 添加学生数据
        Student s1 = new Student("liu",12);
        Student s2 = new Student("jie",13);
        Student s3 = new Student("dear",18);
        collection.add(s1);
        collection.add(s2);
        collection.add(s3);
        collection.add(s3);//可以添加重复的,是ArrayList
        System.out.println("元素个数:"+collection.size());
        System.out.println(collection.toString());
        //2. 删除
//        collection.remove(s1);
        collection.remove(new Student("dear",15));//这个对象跟原来的对象是不一样的
        System.out.println("删除之后:" + collection.size());

        //3. 清空
//        collection.clear();//虽然把集合中的元素清空了,但是这三个对象还是存在的
//        System.out.println("清空之后:" + collection.size());

        //4. 遍历
        //增强for循环
        for (Object object : collection) {
            System.out.println(object);
        }
        //迭代器
        Iterator it = collection.iterator();
        while (it.hasNext()){
            Student s = (Student) it.next();
            System.out.println(s.toString());
        }

        //5. 判断
        System.out.println(collection.contains(s1));
        System.out.println(collection.isEmpty());

    }
}
2. Collection 子接口
- List 接口
- Set 接口
三、List 集合
1. List 子接口
- 特点:有序、有下标、元素可以重复。
- 方法:
- 包含Collection的方法。
- void add(int index,Object o) //在index位置插入对象o。
- boolean addAll(int index,Collection c) //将一个集合中的元素添加到此集合中的index位置。
- Object get(int index) //返回集合中指定位置的元素。
- List subList(int fromIndex,int toIndex) //返回fromIndex和toIndex之间的集合元素。
2. List 子接口的使用
-
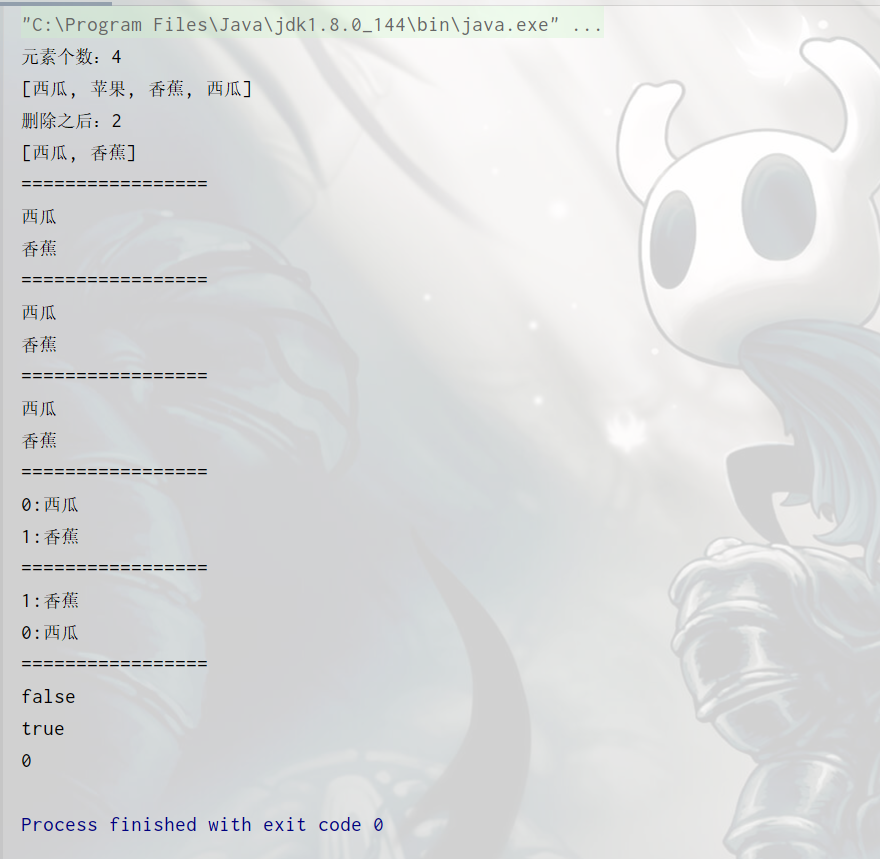
List集合使用(1)
package xyz.qianfeng.collection.list;

import java.util.ArrayList;
import java.util.Iterator;
import java.util.List;
import java.util.ListIterator;

/**
 * List子接口的使用
 */
public class Demo01 {
    public static void main(String[] args) {
        //1.先创建一个集合
        List list = new ArrayList<>();
        //1. 添加元素
        list.add("苹果");
        list.add("香蕉");
        list.add("西瓜");
        list.add(0,"西瓜");//0的意思是在第一个位置添加
        System.out.println("元素个数:" + list.size());
        System.out.println(list.toString());

        //2.删除元素
        list.remove("苹果");
        list.remove(2);
        System.out.println("删除之后:"+ list.size());
        System.out.println(list.toString());

        //3. 遍历
        //普通for
        System.out.println("=================");
        for (int i = 0; i < list.size(); i++) {
            System.out.println(list.get(i));
        }
        //增强for
        System.out.println("=================");
        for (Object object : list) {
            System.out.println(object);
        }
        //迭代器
        System.out.println("=================");
        Iterator it = list.iterator();
        while (it.hasNext()){
            System.out.println(it.next());
        }
        //列表迭代器  和迭代器的区别:
        //ListIterator可以向前或向后遍历,还可以添加、删除、修改替换元素,还可以获得下标。
        System.out.println("=================");
        ListIterator listIterator = list.listIterator();
        while (listIterator.hasNext()){//从前往后遍历
            System.out.println(listIterator.nextIndex() + ":" + listIterator.next());
        }
        System.out.println("=================");
        while (listIterator.hasPrevious()){//从后往前遍历
            System.out.println( listIterator.previousIndex() + ":" + listIterator.previous());
        }

        //4. 判断
        System.out.println("=================");
        System.out.println(list.isEmpty());
        System.out.println(list.contains("西瓜"));

        //5. 获取位置
        System.out.println(list.indexOf("西瓜"));
    }
}
-
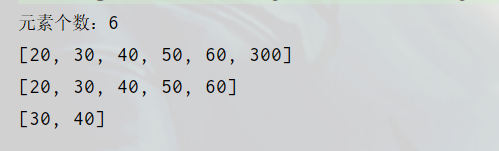
List集合使用(2)
package xyz.qianfeng.collection.list;

import java.util.ArrayList;
import java.util.List;

public class Demo02 {
    public static void main(String[] args) {
        //创建集合
        List list = new ArrayList();
        //1. 添加数字数据(jdk1.5z之后自动装箱,这里20不是int,是Integer)
        list.add(20);
        list.add(30);
        list.add(40);
        list.add(50);
        list.add(60);
        list.add(300);
        System.out.println("元素个数:" + list.size());
        System.out.println(list.toString());

        //2. 删除
//        list.remove(0);//用下标来删除
//        list.remove(20);//这样会报错,因为下标最大为4
        list.remove(new Integer(300));//这样可以删除  不是自动装箱,所以不是调用valueOf方法装箱,就不存在整数缓冲区的问题
        System.out.println(list.toString());

        //补充方法:subList:返回子集合,含头不含尾
        List subList = list.subList(1,3);
        System.out.println(subList.toString());

    }
}
3. List 实现类
- ArrayList(数组列表集合)【重点】:
- 数组结构实现,查询快(因为数组的空间是连续的)、增删慢;
- JDK1.2版本,运行效率快、线程不安全。
- Vector:现在用的不多了,和ArrayList比较像
- 数组结构实现,查询快、增删慢;
- JDK1.0版本,运行效率慢、线程安全。
- LinkedList:
- 链表结构实现,增删快,查询慢。(前一个节点指向后一个节点)
4. ArrayList 使用
package xyz.qianfeng.collection.collections;

/**
 * 学生类
 */
public class Student {
    private String name;
    private int age;

    public Student(String name, int age) {
        this.name = name;
        this.age = age;
    }

    public String getName() {
        return name;
    }

    public void setName(String name) {
        this.name = name;
    }

    public int getAge() {
        return age;
    }

    public void setAge(int age) {
        this.age = age;
    }

    @Override
    public String toString() {
        return "Student{" +
                "name='" + name + '\'' +
                ", age=" + age +
                '}';
    }

    @Override
    public boolean equals(Object obj) {
        if (this == obj){
            return true;
        }
        if (obj == null){
            return false;
        }

        if (obj instanceof Student){
            Student s = (Student) obj;
            if (this.name.equals(s.getName()) && this.age == s.getAge()){
                return true;
            }
        }
        return false;
    }
}
package xyz.qianfeng.collection.list;

import xyz.qianfeng.collection.collections.Student;

import java.util.ArrayList;
import java.util.Iterator;
import java.util.ListIterator;

/**
 * ArrayList的使用
 */
public class Demo03 {
    public static void main(String[] args) {
        //创建集合
        ArrayList arrayList = new ArrayList();
        //1.添加元素
        Student s1 = new Student("liu",12);
        Student s2 = new Student("jie",14);
        Student s3 = new Student("dear",16);
        arrayList.add(s1);
        arrayList.add(s2);
        arrayList.add(s3);
        arrayList.add(s3);
        System.out.println("元素个数:"+arrayList.size());
        System.out.println(arrayList.toString());
        //2.删除元素
//        arrayList.remove(s1);
        arrayList.remove(new Student("liu",12));//调用equals(this==obj),若要实现这个删除,就重写equals方法
        System.out.println("删除之后:" + arrayList.size());
        System.out.println(arrayList.toString());
        //3.遍历元素
        //使用迭代器
        System.out.println("=========使用迭代器==========");
        Iterator it = arrayList.iterator();
        while (it.hasNext()){
            System.out.println(it.next().toString());
        }
        //列表迭代器
        System.out.println("=========使用列表迭代器(顺序遍历)==========");
        ListIterator itlist = arrayList.listIterator();
        while (itlist.hasNext()){
            Student s = (Student) itlist.next();
            System.out.println(s.toString());
        }
        System.out.println("=========使用列表迭代器(逆序遍历)==========");
        while (itlist.hasPrevious()){
            Student s = (Student) itlist.previous();
            System.out.println(s.toString());
        }
        //4.判断
        System.out.println(arrayList.contains(new Student("jie",14)));
        System.out.println(arrayList.isEmpty());

        //5. 查找
        System.out.println(arrayList.indexOf(new Student("jie",14)));
    }

}
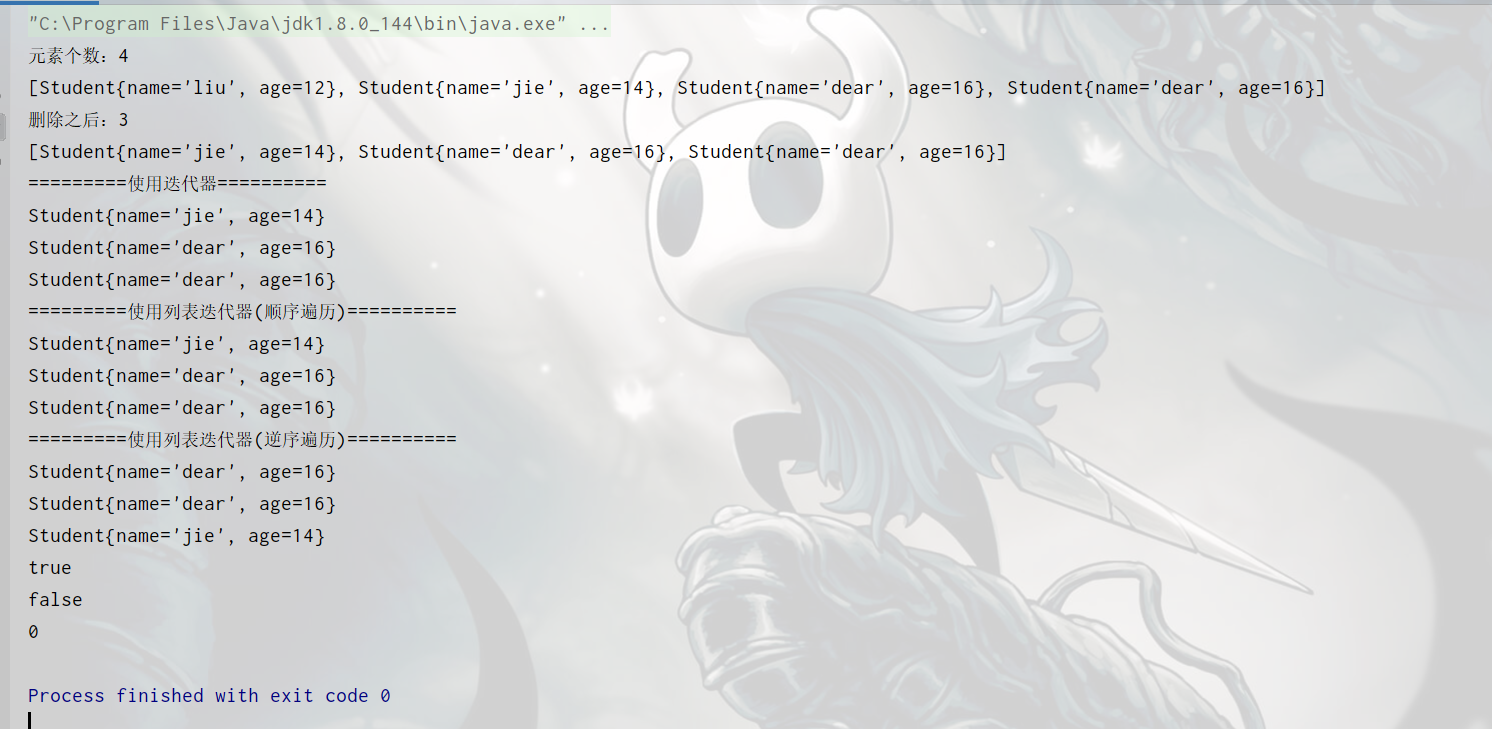
5. ArrayList 源码分析
-
默认容量大小:
- DEFAULT_CAPACITY = 10
-
存放元素的数组:
- transient Object[] elementData
- 注意:如果集合中没有添加任何元素时,数组的容量为0,任意添加一个元素,容量变为10
-
实际的元素个数:
- size
-
add()方法:
-
public boolean add(E e) {
    ensureCapacityInternal(size + 1);  // Increments modCount!!
    elementData[size++] = e;
    return true;
}
-
private void ensureCapacityInternal(int minCapacity) { if (elementData == DEFAULTCAPACITY_EMPTY_ELEMENTDATA) { minCapacity = Math.max(DEFAULT_CAPACITY, minCapacity); } ensureExplicitCapacity(minCapacity); } -
private void ensureExplicitCapacity(int minCapacity) { modCount++; // overflow-conscious code if (minCapacity - elementData.length > 0) grow(minCapacity); } -
private void grow(int minCapacity) {
    // overflow-conscious code
    int oldCapacity = elementData.length;
    int newCapacity = oldCapacity + (oldCapacity >> 1);
    if (newCapacity - minCapacity < 0)
        newCapacity = minCapacity;
    if (newCapacity - MAX_ARRAY_SIZE > 0)
        newCapacity = hugeCapacity(minCapacity);
    // minCapacity is usually close to size, so this is a win:
    elementData = Arrays.copyOf(elementData, newCapacity);
}
-
-
扩容,每次都是原来的1.5倍。
6. Vector 使用
package xyz.qianfeng.collection.list;

import java.util.Enumeration;
import java.util.Vector;

/**
 * Vector集合的使用
 */
public class Demo04 {
    public static void main(String[] args) {
        //创建集合
        Vector vector = new Vector();
        //1. 添加元素
        vector.add("草莓");
        vector.add("苹果");
        vector.add("西瓜");
        System.out.println("元素个数:" + vector.size());

        //2. 删除
//        vector.remove(0);
//        vector.remove("西瓜");
//        vector.clear();//清空

        //3. 遍历
        //使用枚举器
        Enumeration en = vector.elements();
        while (en.hasMoreElements()){
            String o = (String)en.nextElement();
            System.out.println(o);
        }

        //4. 判断
        System.out.println(vector.contains("西瓜"));
        System.out.println(vector.isEmpty());

        //补充其他方法
        System.out.println(vector.firstElement());
        System.out.println(vector.lastElement());
        System.out.println(vector.get(1));
        System.out.println(vector.elementAt(2));

    }
}
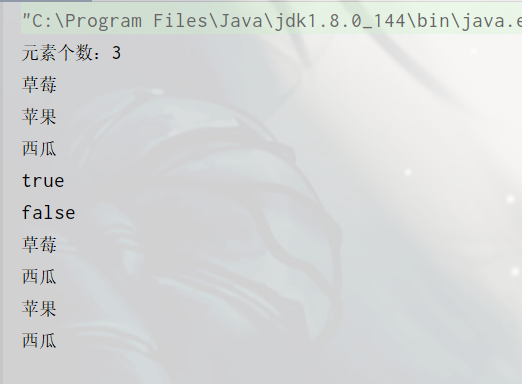
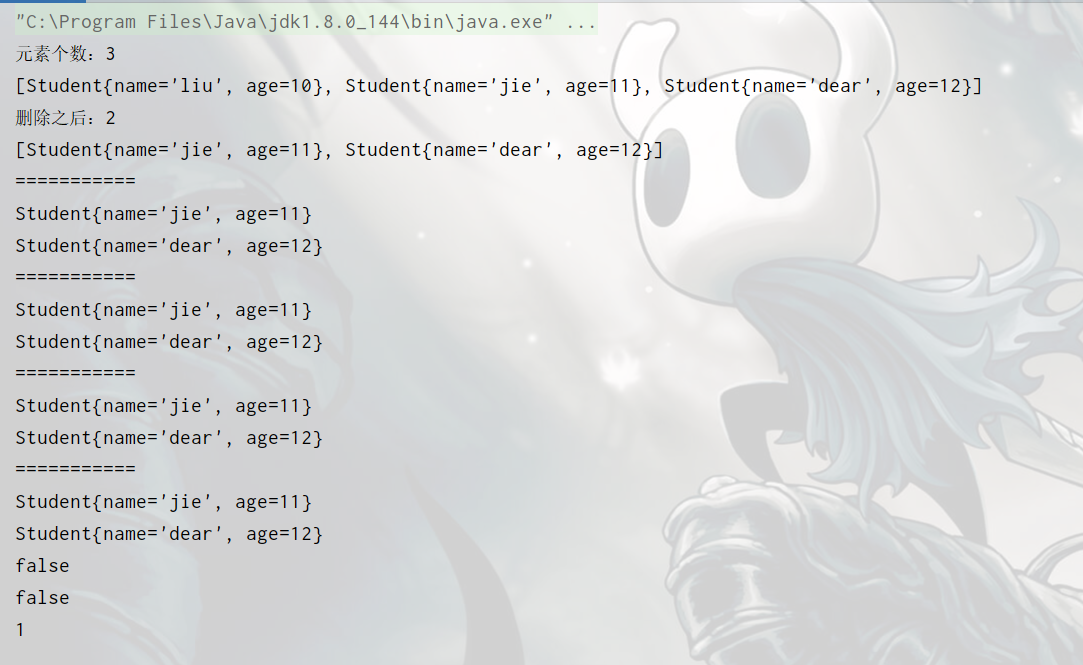
7. LinkedList 使用
存储结构:双向链表
package xyz.qianfeng.collection.list;

import xyz.qianfeng.collection.collections.Student;

import java.util.Iterator;
import java.util.LinkedList;
import java.util.ListIterator;

/**
 * LinkedList的使用
 * 双向链表
 */
public class Demo05 {
    public static void main(String[] args) {
        //创建集合
        LinkedList linkedList = new LinkedList();
        //1. 添加元素
        Student s1 = new Student("liu",10);
        Student s2 = new Student("jie",11);
        Student s3 = new Student("dear",12);
        linkedList.add(s1);
        linkedList.add(s2);
        linkedList.add(s3);
        System.out.println("元素个数:" + linkedList.size());
//        System.out.println(linkedList);默认省略了.toString
        System.out.println(linkedList.toString());

        //2. 删除
//        linkedList.remove(s1);
        linkedList.remove(new Student("liu",10));
        System.out.println("删除之后:" + linkedList.size());
        System.out.println(linkedList);

        //3. 清空
//        linkedList.clear();

        //4. 遍历
        //for遍历
        System.out.println("===========");
        for (int i = 0; i < linkedList.size(); i++) {
            System.out.println(linkedList.get(i));
        }
        //增强for
        System.out.println("===========");
        for (Object o : linkedList) {
            System.out.println(o);
        }
        //迭代器
        System.out.println("===========");
        Iterator it = linkedList.iterator();
        while (it.hasNext()){
            Student s = (Student) it.next();
            System.out.println(s.toString());
        }
        //列表迭代器
        System.out.println("===========");
        ListIterator li = linkedList.listIterator();
        while (li.hasNext()){
            Student s = (Student) li.next();
            System.out.println(s.toString());
        }

        //4. 判断
        System.out.println(linkedList.isEmpty());
        System.out.println(linkedList.contains(s1));

        //5. 获取
        System.out.println(linkedList.indexOf(s3));


    }
}
8. LinkedList 源码分析
-
size:集合大小
-
first:头结点
-
last:根节点
-
add方法:
-
public boolean add(E e) { linkLast(e); return true; } -
void linkLast(E e) { final Node<E> l = last; final Node<E> newNode = new Node<>(l, e, null); last = newNode; if (l == null) first = newNode; else l.next = newNode; size++; modCount++; } -
Node类:
private static class Node<E> {
    E item; //节点中的实际数据
    Node<E> next;//后一个节点
    Node<E> prev;//前一个节点

    Node(Node<E> prev, E element, Node<E> next) {
        this.item = element;
        this.next = next;
        this.prev = prev;
    }
}
-
9. 不同结构实现方式
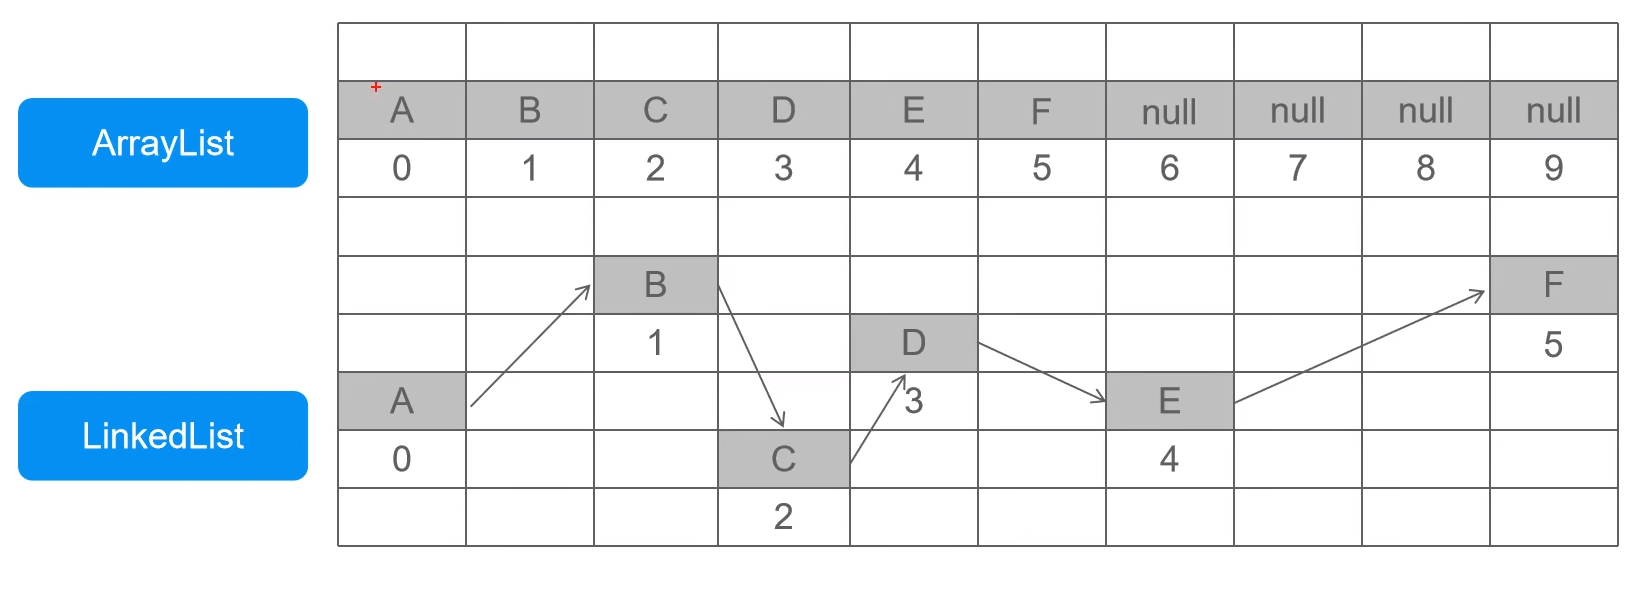
ArrayList:必须开辟连续空间,查询快,增删慢。
LinkedList:无需开辟连续的空间,查询慢,增删快。(删除的并没有被垃圾回收器回收,只是从集合中删除了)
四、泛型
Java泛型是JDK1.5中引入的一个新特性,其本质是参数化类型,把类型作为参数传递。
常见形式有泛型类、泛型接口、泛型方法。
语法:<T,...> T称为类型占位符,表示一种引用类型。
好处:
- 提高代码的重用性
- 防止类型转换异常,提高代码的安全性
1. 泛型类
package xyz.qianfeng.collection.generic;

/**
 * 泛型类 在类名的后面加<T,T>,可以写多个
 */
public class MyGeneric<T> {
    //使用泛型T
    //1. 创建变量  可以创建变量,但是不能实例化
    T t;
    //2. 作为方法的参数
    public void show(T t){
        System.out.println(t);
    }
    //3. 泛型作为方法的返回值
    public T getT(){
        return t;
    }
}
package xyz.qianfeng.collection.generic;

public class Test1 {
    public static void main(String[] args) {
        //使用泛型类创建对象
        //注意:1.泛型只能用引用类型 、
        //     2.不同泛型类型对象之间不能相互赋值
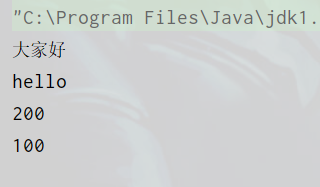
        MyGeneric<String> myGeneric = new MyGeneric<>();//JDK1.7之后<>里可以不写
        myGeneric.t = "hello";
        myGeneric.show("大家好");
        System.out.println(myGeneric.getT());

        MyGeneric<Integer> myGeneric1 = new MyGeneric<>();
        myGeneric1.t = 100;
        myGeneric1.show(200);
        System.out.println(myGeneric1.getT());

    }
}
2. 泛型接口
package xyz.qianfeng.collection.generic;

/**
 * 泛型接口
 * 语法  接口名<T>
 * 注意:不能泛型静态常量
 * @param <T>
 */
public interface MyInterface <T>{
    String name = "张三";
    T server(T t);
}
package xyz.qianfeng.collection.generic;

/**
 * 接口实现类
 */
public class MyInterfaceImpl implements MyInterface<String> {//创建实现类的时候就已经确定了泛型是什么

    @Override
    public String server(String s) {
        System.out.println(s);
        return s;
    }
}
package xyz.qianfeng.collection.generic;

/**
 * 接口实现类
 */
public class MyInterfaceImpl2<T> implements MyInterface<T> {//现在还不确定泛型是什么

    @Override
    public T server(T t) {
        System.out.println(t);
        return t;
    }
}
package xyz.qianfeng.collection.generic;

public class Test2 {
    public static void main(String[] args) {
        MyInterfaceImpl myInterface = new MyInterfaceImpl();
        myInterface.server("dearliu");
        MyInterfaceImpl2<Integer> myInterface1 = new MyInterfaceImpl2();//实例化的时候确定泛型
        myInterface1.server(123);
    }
}
3. 泛型方法
package xyz.qianfeng.collection.generic;

/**
 * 泛型方法
 * 语法:<T>放在方法返回值类型前面
 */
public class MyMethod {
    //泛型方法
    public void show(){
        System.out.println("普通方法");
    }
    public <T> T show1(T t){
        System.out.println("泛型方法" + t);
        return t;
    }
}
package xyz.qianfeng.collection.generic;

public class Test3 {
    public static void main(String[] args) {
        MyMethod myMethod = new MyMethod();
        myMethod.show1("中国加油");
        myMethod.show();
        myMethod.show1(200);
    }

}
4. 泛型集合
概念:参数化类型、类型安全集合,强制集合元素的类型必须一致。
特点:
- 编译时即可检查,而非运行时抛出异常。
- 访问时,不必类型转换(拆箱)。
- 不同泛型之间引用不能相互赋值,泛型不存在多态。
package xyz.qianfeng.collection.generic;

import xyz.qianfeng.collection.collections.Student;

import java.util.ArrayList;
import java.util.Iterator;

/**
 * 泛型集合
 */
public class Demo01 {
    public static void main(String[] args) {
        ArrayList<String> arrayList = new ArrayList<>();
//        arrayList.add(1564);会报错,只能添加字符串类型
        arrayList.add("xxx");
        for (String s : arrayList) {
            System.out.println(s);
        }

        ArrayList<Student> arrayList1 = new ArrayList<>();
        Student student1 = new Student("a",12);
        Student student2 = new Student("b",12);
        Student student3 = new Student("c",12);

        arrayList1.add(student1);
        arrayList1.add(student2);
        arrayList1.add(student3);

        Iterator<Student> it = arrayList1.iterator();
        while (it.hasNext()){
            Student s = it.next();
            System.out.println(s.toString());
        }


    }
}
五、Set 集合
1. Set 子接口
特点:
- 无序、无下标、元素不可重复。
方法:
- 全部继承自Collection中的方法,一模一样,没有提供新的方法。
2. Set 实现类
-
HashSet【重点】
- 基于HashCode实现元素不重复。
- 不是线程安全的。
- 当存入元素的哈希码相同时,会调用equals进行确认,如果结果为true,则拒绝后者存入。
- 存储结构:哈希表(数据+链表+红黑树(JDK1.8之后多了红黑树))
- 存储过程:
- 根据hashcode计算保存的位置,如果此位置为空,则直接保存,如果不为空则执行第二步。
- 再执行equals方法,如果equals方法为true,则认为是重复,否则,不重复,形成链表。
-
LinkedHashSet:
- 跟HashSet一模一样,只是有序。
-
TreeSet:
- 基于排列顺序实现元素不重复
- 存储结构为红黑树(二叉树的一种,平衡二叉树)
- 实现类SortedSet接口,对集合元素自动排序。
- 元素对象的类型必须实现Comparable接口,指定排序规则。
- 通过compareTo方法确定是否为重复元素。
红黑树:红黑树(Red Black Tree) 是一种自平衡二叉查找树,是在计算机科学中用到的一种数据结构,典型的用途是实现关联数组。
红黑树是每个结点都带有颜色属性的二叉查找树,颜色或红色或黑色。 在二叉查找树强制一般要求以外,对于任何有效的红黑树我们增加了如下的额外要求:
性质1. 结点是红色或黑色。
性质2. 根结点是黑色。
性质3. 所有叶子都是黑色。(叶子是NIL结点)
性质4. 每个红色结点的两个子结点都是黑色。(从每个叶子到根的所有路径上不能有两个连续的红色结点)
性质5. 从任一节结点其每个叶子的所有路径都包含相同数目的黑色结点。
这些约束强制了红黑树的关键性质: 从根到叶子的最长的可能路径不多于最短的可能路径的两倍长。结果是这个树大致上是平衡的。因为操作比如插入、删除和查找某个值的最坏情况时间都要求与树的高度成比例,这个在高度上的理论上限允许红黑树在最坏情况下都是高效的,而不同于普通的二叉查找树。
是性质4导致路径上不能有两个连续的红色结点确保了这个结果。最短的可能路径都是黑色结点,最长的可能路径有交替的红色和黑色结点。因为根据性质5所有最长的路径都有相同数目的黑色结点,这就表明了没有路径能多于任何其他路径的两倍长。 [3]
因为红黑树是一种特化的二叉查找树,所以红黑树上的只读操作与普通二叉查找树相同。
当我们在对红黑树进行插入和删除等操作时,对树做了修改,那么可能会违背红黑树的性质。
为了保持红黑树的性质,我们可以对相关结点做一系列的调整,通过对树进行旋转(例如左旋和右旋操作),即修改树中某些结点的颜色及指针结构,以达到对红黑树进行插入、删除结点等操作时,红黑树依然能保持它特有的性质(五点性质)。
3. Set 接口使用
package xyz.qianfeng.collection.set;

import java.util.HashSet;
import java.util.Iterator;
import java.util.Set;

/**
 * 测试 Set接口的使用
 */
public class Demo01 {
    public static void main(String[] args) {
        //创建集合
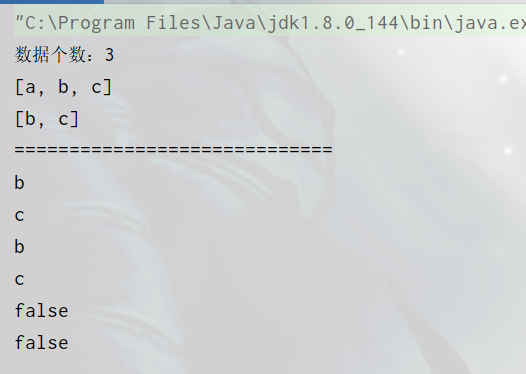
        Set<String> set = new HashSet<>();
        //1. 添加数据
        set.add("b");
        set.add("a");
        set.add("c");
        set.add("c");
        System.out.println("数据个数:" + set.size());
        System.out.println(set);

        //2. 删除
        set.remove("a");
        System.out.println(set);

        //3. 遍历
        //增强for
        System.out.println("=============================");
        for (String s : set) {
            System.out.println(s);
        }
        //迭代器
        Iterator<String> it = set.iterator();
        while (it.hasNext()){
            System.out.println(it.next());
        }
        //4. 判断
        System.out.println(set.isEmpty());
        System.out.println(set.contains("a"));
    }
}
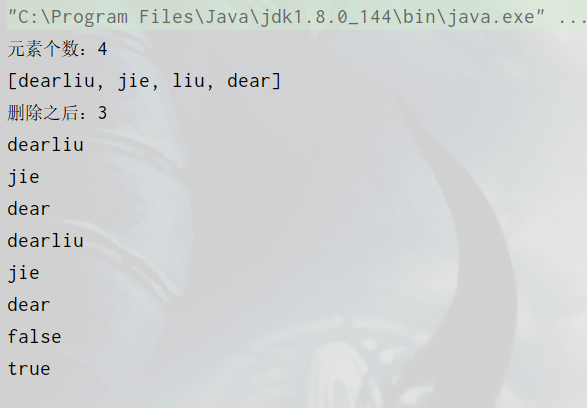
4. HashSet 使用
存储结构:哈希表(数组+链表+红黑树(JDK1.8之后多了红黑树))
package xyz.qianfeng.collection.set;

import java.util.HashSet;
import java.util.Iterator;

/**
 * HashSet集合使用
 * 存储结构:哈希表(数组+链表+红黑树(JDK1.8之后多了红黑树))
 */
public class Demo02 {
    public static void main(String[] args) {
        //新建集合
        HashSet<String> hashSet = new HashSet<>();
        //1. 添加元素
        hashSet.add("liu");
        hashSet.add("jie");
        hashSet.add("dear");
        hashSet.add("dearliu");
        hashSet.add("liu");
        System.out.println("元素个数:"+hashSet.size());
        System.out.println(hashSet.toString());
        //2. 删除
        hashSet.remove("liu");
        System.out.println("删除之后:"+ hashSet.size());
        //3. 遍历
        //增强for
        for (String s : hashSet) {
            System.out.println(s);
        }
        //迭代器
        Iterator<String> it = hashSet.iterator();
        while (it.hasNext()){
            System.out.println(it.next());
        }

        //4. 判断
        System.out.println(hashSet.isEmpty());
        System.out.println(hashSet.contains("jie"));
    }


}
5. HashSet 存储方式
存储过程:
- 根据hashcode计算保存的位置,如果此位置为空,则直接保存,如果不为空则执行第二步。
- 再执行equals方法,如果equals方法为true,则认为是重复,否则,不重复,形成链表。
package xyz.qianfeng.collection.set;

import java.util.Objects;

/**
 * 人类
 */
public class Person {
    private String name;
    private int age;

    public Person(String name, int age) {
        this.name = name;
        this.age = age;
    }

    public String getName() {
        return name;
    }

    public void setName(String name) {
        this.name = name;
    }

    public int getAge() {
        return age;
    }

    public void setAge(int age) {
        this.age = age;
    }

    @Override
    public String toString() {
        return "Person{" +
                "name='" + name + '\'' +
                ", age=" + age +
                '}';
    }

    //手动重写hashCode+equals
//    @Override
//    public int hashCode() {
//        int n1 = this.name.hashCode();
//        int n2 = this.age;
//
//        return n1+n2;
//    }
//
//    @Override
//    public boolean equals(Object obj) {
//        if (this == obj){
//            return true;
//        }
//        if (obj == null){
//            return false;
//        }
//        if (obj instanceof Person){
//            Person p = (Person) obj;
//            if (this.name.equals(p.name) && this.age == p.age){
//                return true;
//            }
//        }
//        return false;
//    }

    //快捷键重写  Alt+insert,选择equals and hashCode


    @Override
    public boolean equals(Object o) {
        if (this == o) return true;
        if (o == null || getClass() != o.getClass()) return false;
        Person person = (Person) o;
        return age == person.age && Objects.equals(name, person.name);
    }

    @Override
    public int hashCode() {
        return Objects.hash(name, age);
    }
}
package xyz.qianfeng.collection.set;

import java.util.HashSet;
import java.util.Iterator;

/**
 * HashSet集合使用
 * 存储结构:哈希表(数据+链表+红黑树(JDK1.8之后多了红黑树))
 * 存储过程;
 */
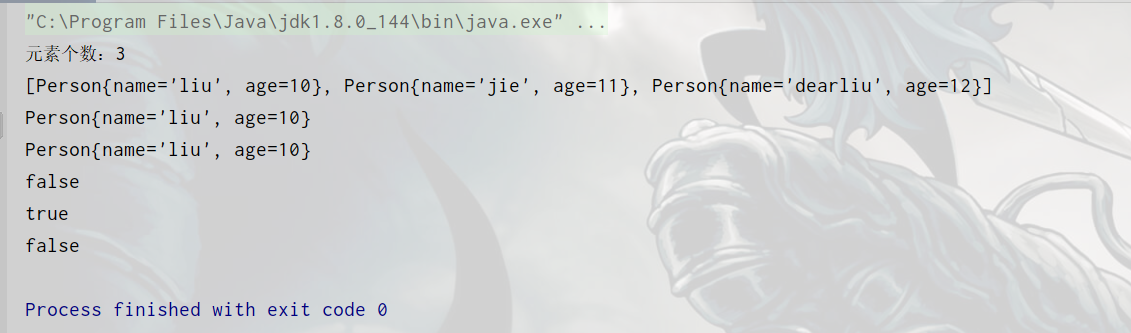
public class Demo03 {
    public static void main(String[] args) {
        //创建集合
        HashSet<Person> hashSet = new HashSet<>();
        //1. 添加数据
        Person p1 = new Person("liu", 10);
        Person p2 = new Person("jie", 11);
        Person p3 = new Person("dearliu", 12);
        Person p4 = new Person("dearliu", 12);
        hashSet.add(p1);
        hashSet.add(p2);
        hashSet.add(p3);
        hashSet.add(p3);//重复不能添加
        hashSet.add(p4);//新对象重复的可以添加
        hashSet.add(new Person("liu",10));//新对象重复的可以添加(重写hashCode方法和equals,名字相同,年龄相同就不能加进来了)

        System.out.println("元素个数:"+hashSet.size());
        System.out.println(hashSet);

        //2. 删除操作
        hashSet.remove(p3);
        hashSet.remove(new Person("jie",11));//重写hashCode和equals之后就能删掉了

        //3. 遍历
        //增强for
        for (Person person : hashSet) {
            System.out.println(person);
        }
        //迭代器
        Iterator<Person> it = hashSet.iterator();
        while (it.hasNext()){
            System.out.println(it.next());
        }

        //4. 判断
        System.out.println(hashSet.isEmpty());
        System.out.println(hashSet.contains(p1));
        System.out.println(hashSet.contains(new Person("jie",12)));
    }
}
6. HashSet 补充
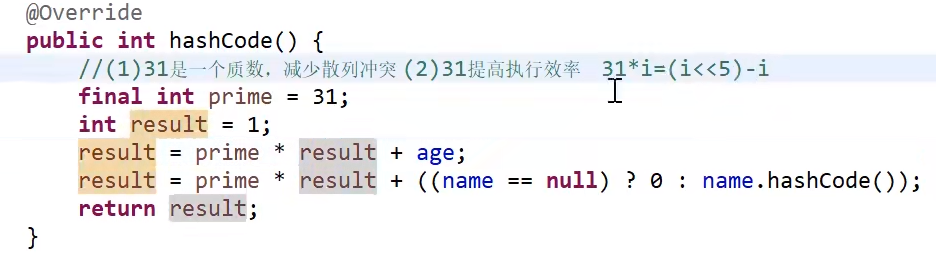
使用编译器 Alt+insert 自动生成的代码,发现会有个31。
7. TreeSet 的使用
简单例子:
package xyz.qianfeng.collection.set;

import java.util.Iterator;
import java.util.TreeSet;

/**
 * treeSet的使用
 */
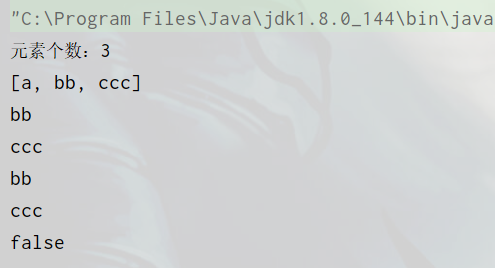
public class Demo04 {
    public static void main(String[] args) {
        //创建集合
        TreeSet<String> treeSet = new TreeSet<>();
        //1.添加元素
        treeSet.add("a");
        treeSet.add("bb");
        treeSet.add("ccc");
        treeSet.add("ccc");
        System.out.println("元素个数:"+treeSet.size());
        System.out.println(treeSet.toString());

        //2. 删除
        treeSet.remove("a");

        //3. 遍历
        //增强for
        for (String s : treeSet) {
            System.out.println(s);
        }
        //迭代器
        Iterator<String> it = treeSet.iterator();
        while (it.hasNext()){
            System.out.println(it.next());
        }

        //4. 判断
        System.out.println(treeSet.contains("a"));
    }
}
复杂例子:
package xyz.qianfeng.collection.set;

import java.util.Objects;

/**
 * 人类
 */
public class Person implements Comparable<Person> {
    private String name;
    private int age;

    public Person(String name, int age) {
        this.name = name;
        this.age = age;
    }

    public String getName() {
        return name;
    }

    public void setName(String name) {
        this.name = name;
    }

    public int getAge() {
        return age;
    }

    public void setAge(int age) {
        this.age = age;
    }

    @Override
    public String toString() {
        return "Person{" +
                "name='" + name + '\'' +
                ", age=" + age +
                '}';
    }

    //手动重写hashCode+equals
//    @Override
//    public int hashCode() {
//        int n1 = this.name.hashCode();
//        int n2 = this.age;
//
//        return n1+n2;
//    }
//
//    @Override
//    public boolean equals(Object obj) {
//        if (this == obj){
//            return true;
//        }
//        if (obj == null){
//            return false;
//        }
//        if (obj instanceof Person){
//            Person p = (Person) obj;
//            if (this.name.equals(p.name) && this.age == p.age){
//                return true;
//            }
//        }
//        return false;
//    }

    //快捷键重写  Alt+insert,选择equals and hashCode


    @Override
    public boolean equals(Object o) {
        if (this == o) return true;
        if (o == null || getClass() != o.getClass()) return false;
        Person person = (Person) o;
        return age == person.age && Objects.equals(name, person.name);
    }

    @Override
    public int hashCode() {
        return Objects.hash(name, age);
    }

    //接口方法实现重写比较方法
    @Override
    public int compareTo(Person o) {
        //先比姓名
        int n1 = this.getName().compareTo(o.getName());
        //再比年龄
        int n2 = this.age- o.getAge();
        return n1==0?n2:n1;
    }
}
package xyz.qianfeng.collection.set;

import java.util.Iterator;
import java.util.TreeSet;

/**\TreeSet保存数据
 * 要求:元素必须实现Comparable接口,comPareTo()方法的返回值为0,认为是重复的
 *
 */
public class Demo05 {
    public static void main(String[] args) {

        TreeSet<Person> treeSet = new TreeSet<>();

        Person p1 = new Person("liu", 10);
        Person p2 = new Person("jie", 11);
        Person p3 = new Person("dearliu", 12);
        Person p4 = new Person("dearliu", 12);

        //1. 添加元素
        treeSet.add(p1);//添加错误,报错,重写compareTo方法
        treeSet.add(p2);
        treeSet.add(p3);
        treeSet.add(p4);

        System.out.println(treeSet.size());
        System.out.println(treeSet.toString());

        //2. 删除
        treeSet.remove(p1);
        treeSet.remove(new Person("dearliu", 12));//这里不用重写hashCode和equals也可以,但是要重写compareTo

        //3. 遍历
        //增强for
        for (Person person : treeSet) {
            System.out.println(person);
        }
        //迭代器
        Iterator<Person> it = treeSet.iterator();
        while (it.hasNext()){
            System.out.println(it.next());
        }

        // 4. 查找
        System.out.println(treeSet.contains(new Person("dearliu", 12)));
    }
}

8. Comparator 接口
Comparator: 实现定制比较(比较器),不需要再到Person里实现接口
Comparable: 可比较的,在Person里实现接口
package xyz.qianfeng.collection.set;

import java.util.Comparator;
import java.util.TreeSet;

/**
 * Comparator接口
 */
public class Demo06 {
    public static void main(String[] args) {
        TreeSet<Person> treeSet = new TreeSet<>(new Comparator<Person>() {//匿名内部类实现
            @Override
            public int compare(Person o1, Person o2) {
                int n1 = o1.getAge()-o2.getAge();
                int n2 = o1.getName().compareTo(o2.getName());
                return n1==0?n2:n1;
            }
        });

        Person p1 = new Person("liu", 10);
        Person p2 = new Person("jie", 11);
        Person p3 = new Person("dearliu", 12);
        Person p4 = new Person("dear", 12);

        treeSet.add(p1);//添加错误,报错,重写compareTo方法
        treeSet.add(p2);
        treeSet.add(p3);
        treeSet.add(p4);

        System.out.println(treeSet.toString());

    }

}

9. TreeSet 案例
package xyz.qianfeng.collection.set;

import java.util.Comparator;
import java.util.TreeSet;

/**
 * 要求:使用TreeSet集合实现字符串按照长度进行排序
 * helloworld  zhang  lisi   wangwu   beijing  xian   nanjing
 */
public class Demo07 {
    public static void main(String[] args) {
        //创建集合,并指定比较规则
        TreeSet<String> treeSet = new TreeSet<>(new Comparator<String>() {
            @Override
            public int compare(String o1, String o2) {
                int  n1 = o1.length()-o2.length();
                int n2 = o1.compareTo(o2);
                return n1==0?n2:n1;
            }
        });
        //添加数据
        treeSet.add("helloworld");
        treeSet.add("zhang");
        treeSet.add("lisi");
        treeSet.add("xian");
        treeSet.add("wangwu");
        treeSet.add("beijing");
        treeSet.add("nanjing");
        System.out.println(treeSet);
    }
}

六、Map体系集合
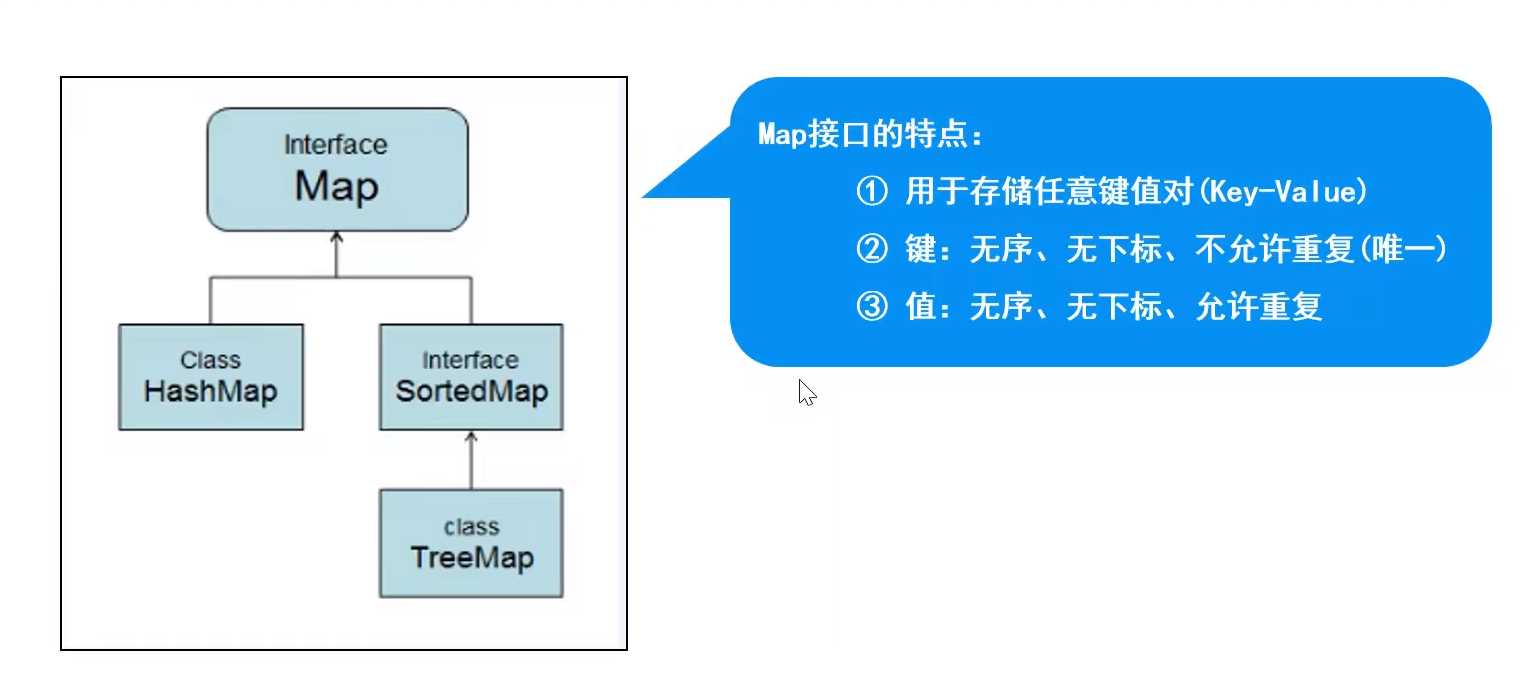
1. Map父接口
特点:
- 存储一对数据(Key—Value),无序、无下标,键不可重复,值可重复。
方法:
- V put(K key,V value) //将对象存入到集合中,关联键值。key重复则覆盖原值。
- Object get(Object key) //根据键获取对应的值。
- Set<K> //返回所有Key。
- Collection<V> values() //返回包含所有值得Collection集合。
- Set<Map.Entry<K,V>> //键值匹配的Set集合。
其他看API文档
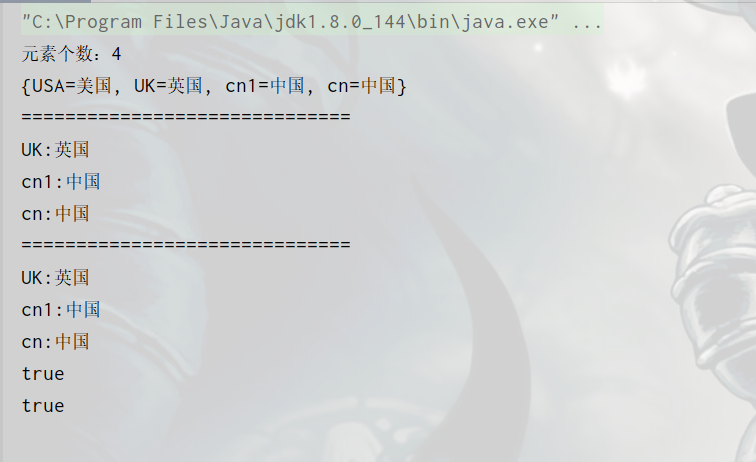
2. Map 接口使用
package xyz.qianfeng.map;

import java.util.HashMap;
import java.util.Map;
import java.util.Set;

/**
 * Map 接口的使用
 * 特点:
 * 1. 存储键值对
 * 2. 键不能重复,值可以重复
 * 3. 无序
 */
public class Demo01 {
    public static void main(String[] args) {
        //创建Map集合
        Map<String,String> map = new HashMap<>();
        //1. 添加元素
        map.put("cn","中国");
        map.put("UK","英国");
        map.put("USA","美国");
        map.put("cn","中国");//添加失败
        map.put("cn1","中国");
        System.out.println("元素个数:"+map.size());
        System.out.println(map);

        //2. 删除
        map.remove("USA");

        //3. 遍历
        //(1):keySet方法,返回值为所有的key的Set集合
//        Set<String> set = map.keySet();
//        for (String s : set) {
//            System.out.println(s+":"+map.get(s));//通过map.get(key)获取值
//        }
        //keySet简写
        System.out.println("==============================");
        for (String key: map.keySet()){
            System.out.println(key + ":" + map.get(key));
        }
        //(2):entrySet()方法  效率高于第一个方法
//        Set<Map.Entry<String,String>> entrySet = map.entrySet();//返回Set集合,里面的类型为  <Entry<>,<>>  entry里面就是键值对
//        for (Map.Entry<String, String> en : entrySet) {
//            System.out.println(en.getKey()+":"+en.getValue());
//        }
        //简写
        System.out.println("==============================");
        for (Map.Entry<String, String> en : map.entrySet()) {
            System.out.println(en.getKey()+":"+en.getValue());
        }

        //4. 判断
        System.out.println(map.containsKey("cn"));
        System.out.println(map.containsValue("英国"));
    }
}
3. Map集合的实现类
-
HashMap【重点】:
- JDK1.2版本,线程不安全,运行效率快;允许用null作为key或是value。
-
Hashtable:(基本上已经不用了)
- JDK1.0版本,线程安全,运行效率慢,不允许null作为key或者value
- Hashtable的子类Properties(用的还是比较多的):
- Hashtable的子类,要求key和value都是String。通常用于流,配置文件的读取。
-
TreeMap:
- 实现类SortedMap接口(是Map的子接口),可以对key自动排序。
七、HashMap 集合
1. HashMap的使用
JDK1.2版本,线程不安全,运行效率快;允许用null作为key或是value。
存储结构:哈希表(数组+链表+红黑树(1.8之后))
package xyz.qianfeng.map;

import java.util.Objects;

public class Student {
    private String name ;
    private int stuNo;

    public Student() {
    }

    public Student(String name, int stuNo) {
        this.name = name;
        this.stuNo = stuNo;
    }

    public String getName() {
        return name;
    }

    public void setName(String name) {
        this.name = name;
    }

    public int getStuNo() {
        return stuNo;
    }

    public void setStuNo(int stuNo) {
        this.stuNo = stuNo;
    }

    @Override
    public String toString() {
        return "Student{" +
                "name='" + name + '\'' +
                ", stuNo=" + stuNo +
                '}';
    }

    @Override
    public boolean equals(Object o) {
        if (this == o) return true;
        if (o == null || getClass() != o.getClass()) return false;
        Student student = (Student) o;
        return stuNo == student.stuNo && Objects.equals(name, student.name);
    }

    @Override
    public int hashCode() {
        return Objects.hash(name, stuNo);
    }
}
package xyz.qianfeng.map;

import java.util.HashMap;
import java.util.Map;

/**
 * HashMap集合的使用
 * 存储结构:哈希表(数组+链表+红黑树(1.8之后))
 * 使用key的hashCode和equals作为判断重复的依据
 */
public class Demo02 {
    public static void main(String[] args) {
        //创建集合K,V
        HashMap<Student,String> ha = new HashMap<>();
        //1. 添加元素
        Student student1 = new Student("liu",1);
        Student student2 = new Student("jie",2);
        Student student3 = new Student("dear",3);
        ha.put(student1,"刘");
        ha.put(student2,"杰");
        ha.put(student3,"亲爱的");
        ha.put(student3,"亲爱");//加不进来
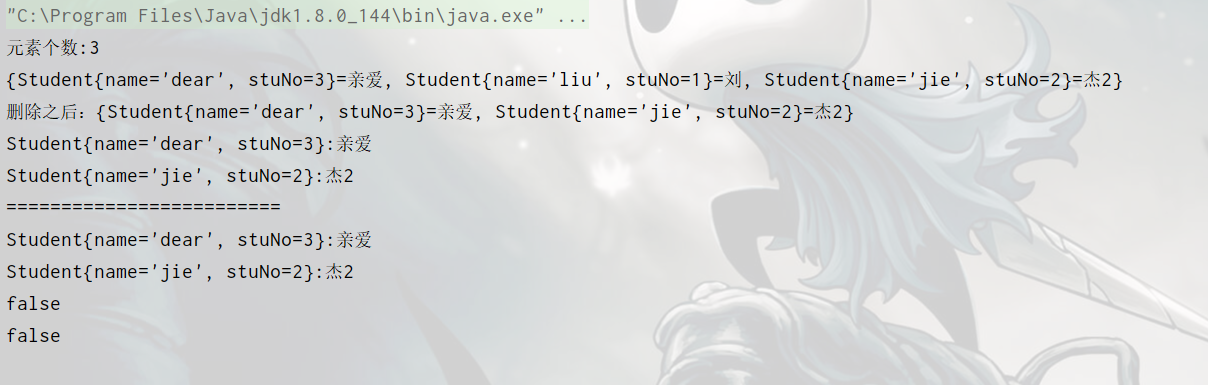
        ha.put(new Student("jie",2),"杰2");//也能加进来,要实现姓名学号一样加不进来,要重写hashCode和equals就加不进来了
        System.out.println("元素个数:"+ ha.size());
        System.out.println(ha);

        //2. 删除
        ha.remove(student1);
        System.out.println("删除之后:"+ha);
        //3. 遍历
        //keySet
        for (Student student : ha.keySet()) {
            System.out.println(student+ ":" + ha.get(student));
        }
        //entrySet
        System.out.println("=========================");
        for (Map.Entry<Student, String> en : ha.entrySet()) {
            System.out.println(en.getKey()+":"+en.getValue());
        }

        //4. 判断
        System.out.println(ha.containsKey(new Student("liu",1)));
        System.out.println(ha.containsValue("南京"));
    }
}
2. HashMap 源码分析
数组默认初始容量16:
static final int DEFAULT_INITIAL_CAPACITY = 1 << 4; // aka 16
数组最大容量 2 30 :
static final int MAXIMUM_CAPACITY = 1 << 30;
默认的树化阈值:假如现在数组容量为100,容量个数大于75%,就要扩容了:
static final float DEFAULT_LOAD_FACTOR = 0.75f;
JDK1.8之后加入红黑树,当链表的长度大于8,数组的长度大于64,就将链表调整为红黑树:
static final int TREEIFY_THRESHOLD = 8;
static final int MIN_TREEIFY_CAPACITY = 64;
当链表的长度小于6,就将树调整为链表:
static final int UNTREEIFY_THRESHOLD = 6;
键值对其实就是一个个Node:
static class Node<K,V> implements Map.Entry<K,V> {
    final int hash;
    final K key;
    V value;
    Node<K,V> next;
保存的哈希表:
transient Node<K,V>[] table;
元素的个数:
transient int size;
构造方法(给加载因子赋值0.75):
public HashMap() {
    this.loadFactor = DEFAULT_LOAD_FACTOR; // all other fields defaulted
}
put方法:
public V put(K key, V value) {
    return putVal(hash(key), key, value, false, true);
}
if ((tab = table) == null || (n = tab.length) == 0)
    n = (tab = resize()).length;
 Node<K,V>[] newTab = (Node<K,V>[])new Node[newCap];
table = newTab;
总结:
-
刚创建hashMap,没有添加元素的时候,table为null,容量为0。
-
任意添加一个元素,容量变为16,当数组中存的长度超过容量的75%,就开始扩容,,每次扩容为原来的2倍,目的是减少调整元素的个数。比如,当元素的数量超过16的0.75,即12的时候,数组的容量调整为32
-
JDK1.8 当每个链表的长度大于8,并且数组元素的个数大于等于64时,会调整为红黑树,目的是提高执行效率。
-
JDK1.8 当链表的长度小于6时,调整成链表
-
JDK1.8之前,链表是头插入,JDK1.8以后是尾插入。
3. HashMap和HashSet的区别
public HashSet() {
    map = new HashMap<>();
}
HashSet的底层用的就是HashMap。
添加元素的时候,就是用的map.put(key,PRESENT),来保存。
八、Hashtable 和 Properties
Hashtable已经不用了,Priperties详见后边IO流。
九、TreeMap集合
存储结构:红黑树
1. TreeMap的使用
package xyz.qianfeng.map;

import java.util.Objects;

public class Student implements Comparable<Student> {
    private String name ;
    private int stuNo;

    public Student() {
    }

    public Student(String name, int stuNo) {
        this.name = name;
        this.stuNo = stuNo;
    }

    public String getName() {
        return name;
    }

    public void setName(String name) {
        this.name = name;
    }

    public int getStuNo() {
        return stuNo;
    }

    public void setStuNo(int stuNo) {
        this.stuNo = stuNo;
    }

    @Override
    public String toString() {
        return "Student{" +
                "name='" + name + '\'' +
                ", stuNo=" + stuNo +
                '}';
    }

    @Override
    public boolean equals(Object o) {
        if (this == o) return true;
        if (o == null || getClass() != o.getClass()) return false;
        Student student = (Student) o;
        return stuNo == student.stuNo && Objects.equals(name, student.name);
    }

    @Override
    public int hashCode() {
        return Objects.hash(name, stuNo);
    }

    @Override
    public int compareTo(Student o) {
        int n1 = this.stuNo - o.getStuNo();
        return n1;
    }
}
2. TreeMap和TreeSet的关系
TreeSet的底层其实就是调用TreeMap
TreeSet的add方法调用的就是map.put方法
十、Collections工具类
概念:
- 集合工具类,定义了除了存取以外的集合常用方法。
方法:
- public static void reverse(List<?> list) //反转集合中元素的顺序
- public static void shuffle(List<?> list) //随机重置集合元素的顺序
- public static void sort(List<?> list) // 升序排序(元素)类型必须实现Comparable接口)
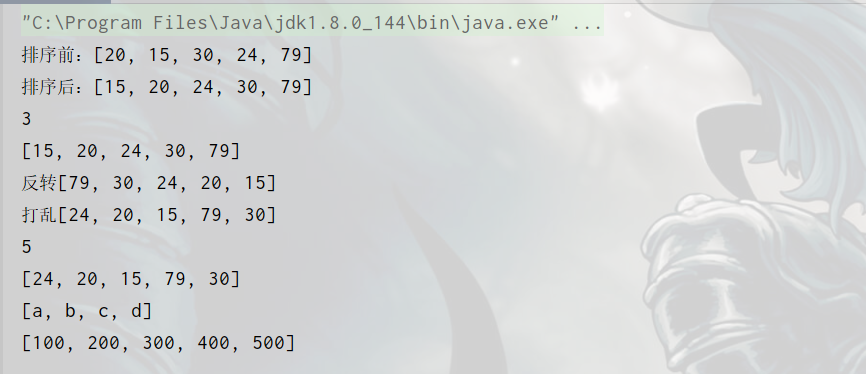
package xyz.qianfeng.collection;

import java.util.ArrayList;
import java.util.Arrays;
import java.util.Collections;
import java.util.List;

/**
 * Collections工具类的使用
 */
public class Demo01 {
    public static void main(String[] args) {
        List<Integer> list = new ArrayList<>();
        list.add(20);
        list.add(15);
        list.add(30);
        list.add(24);
        list.add(79);

        //sort排序
        System.out.println("排序前:" + list.toString());
        Collections.sort(list);//还可以自定义排序
        System.out.println("排序后:" + list.toString());

        //binarySerach 二分查找 输出下标
        int i = Collections.binarySearch(list,30);
        System.out.println(i);

        //copy 复制
        List<Integer> dest = new ArrayList<>();
//        Collections.copy(dest,list);//直接复制会报错,这个方法使用前提是两个集合大小一样。可以按照下面这样使用
        for (int i1 = 0; i1 < list.size(); i1++) {//给他长度跟原来的一样
            dest.add(0);
        }
        Collections.copy(dest,list);
        System.out.println(dest.toString());

        //反转 reverse
        Collections.reverse(list);
        System.out.println("反转"+list);

        //shuffle 打乱
        Collections.shuffle(list);
        System.out.println("打乱"+list);

        //补充 list转数组
        Integer[] arr = list.toArray(new Integer[0]);//这里给的长度如果小于list的长度,就会跟list一样长,大于list的长度,就会是给的长度
        System.out.println(arr.length);
        System.out.println(Arrays.toString(arr));
        //补充 数组转list
        String[] name = {"a","b","c","d"};
        List<String> li =  Arrays.asList(name);//这个集合是一个受限集合,不能添加和删除
        System.out.println(li);

//        int[] nums = {100,200,300,400,500};
//        List<int[]> li2 = Arrays.asList(nums);//基本类型的数组转换后 list里边是一个数组,只有一个数组
        Integer[] nums = {100,200,300,400,500};
        List<Integer> li2 = Arrays.asList(nums);
        System.out.println(li2);

    }
}
十一、集合总结
集合的概念:
- 对象的容器,和数组类似,定义了对多个对象进行操作的常用方法。
List集合:
- 有序、有下标、元素可以重复。(ArrayList、LinkedList、Vector)
Set集合:
- 无序、无下标、元素不可重复。(HashSet、TreeSet)
Map集合:
- 存储一堆数据,无序、无下标、键不可重复,值可重复。(HashMap、HashTable、TreeMap)
Collections:
- 集合工具类,定义了除了存取以外的集合常用方法。

 浙公网安备 33010602011771号