

SRE 第三次作业
磁盘存储相关术语
磁盘的分类
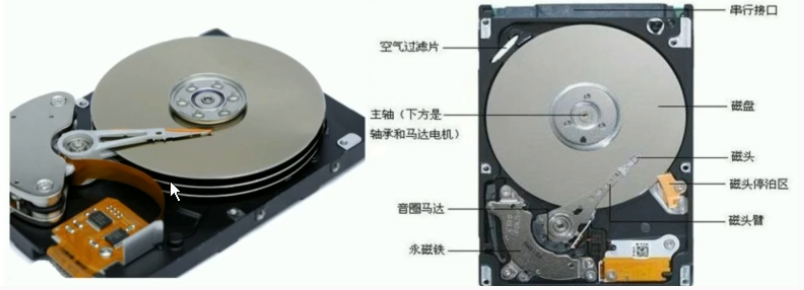
机械硬盘(HDD)
描述:传统普通硬盘,主要由:盘片,磁头,盘片转轴及控制电机,磁头控制器,数据转换器,接口,缓存等几个部分组成
特点:
- 相较于SSD,HDD在价格、容量占有绝对优势
- 相较于SSD,数据存储时间更久,因为硬盘有价,数据无价,所以目前SSD不能完全取代HDD
- 一般在Linux系统中设备命名格式为/dev/sd#,#为字母编号
固态硬盘(SSD)
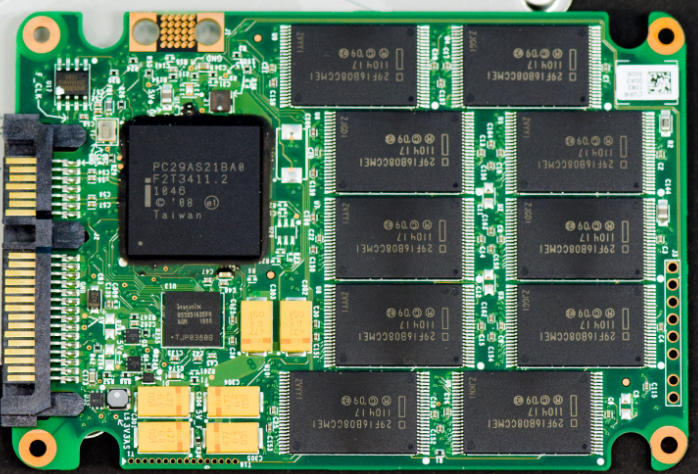
描述:固态电子存储芯片阵列而制成的硬盘,由控制单元和存储单元(FLASH芯片、DRAM芯片)组成
特点:
- 相较于HDD,由于没有机械结构,所以SSD在防震抗摔、传输速率、功耗、重量、噪音上有明显优势
- SSD传输速率性能是HDD的2倍
- 一般在Linux系统中设备命名格式为/dev/nvme0n#,#为数字编号
存储单位术语
磁头
-
工作原理是通过电流产生磁场,将数据记录在磁介质上
-
每个盘片包含两个面,每个盘面都对应地有一个读/写磁头
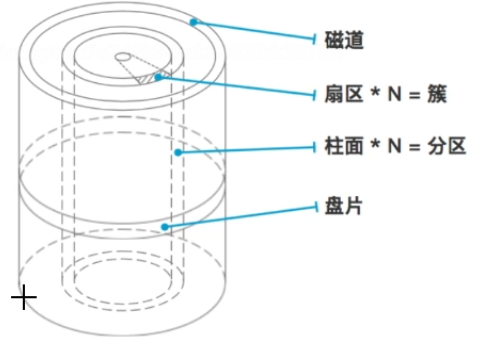
磁道
- 指硬盘或其他存储介质上用于存储数据的同心圆形区域,盘面上的每一圈就是一个磁道
扇面
- 把每个磁道按512bytes大小进行划分,这就是扇区,每个磁道上的扇区数量是不一样的
- 扇面的英文为Sector,在Linux查看文件系统相关信息时,会经常出现
- 扇区是最小的存储单位
柱面
- 磁头移动的时候,是一起移动的,如果是6个盘面,6个磁头对应的磁道是一致的,这就是柱面
单位换算
常见的存储单位有bit、B(byte)、KB、MB、GB、TB
| 单位名称 | B(byte) | KB | MB | GB | TB |
|---|---|---|---|---|---|
| 中文名称 | 字节 | 千字节 | 兆字节 | 吉字节 | 太字节 |
| 单位换算 | 1B = 8bit | 1KB = 1024B | 1MB = 1024KB | 1GB = 1024MB | 1TB = 1024GB |
注意,存储单位的换算是以1024为倍数进行的,而工作频率(Hz)与传输速率(bps)则是以1000为倍数进行换算的
磁盘分区
Linux中的分区对应Windows中就是创建盘符,分区并不是必要的,可以直接在未分区的硬盘上创建文件系统进行使用
MBR与GPT分区方式
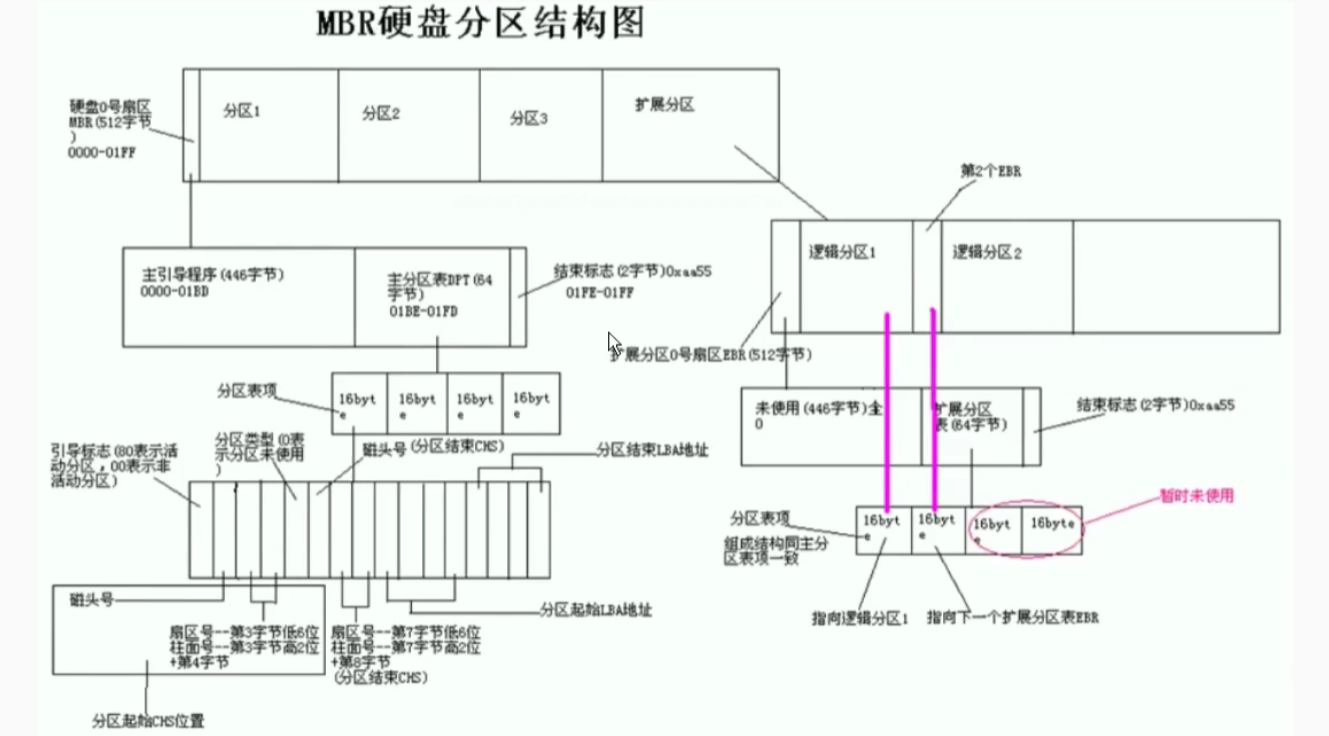
MBR
0磁道0扇区对应的存储大小为512bytes
- 446bytes:boot loader启动相关的数据
- 64bytes:分区表,其中每16bytes标识一个分区的信息,所以MBR分区最多划分出4个分区(但是实际分区数量可以超过4个,因为扩展分区内部可以继续划分多个逻辑分区)
- 2bytes:标识是否分区,如果被分区那么值为55AA
分区类型
- 主分区
- 收到分区表64bytes大小的限制,最多可以创建4个主分区
- 扩展分区
- 扩展分区为逻辑分区的容器,如果仅仅创建扩展分区而不划分逻辑分区,是无法在其上面创建文件系统的
- 逻辑分区
- 逻辑分区在划分出扩展分区以后才能进行划分,逻辑分区设备编号从5开始(比如/dev/sda5),主分区和扩展分区对应编号1到4
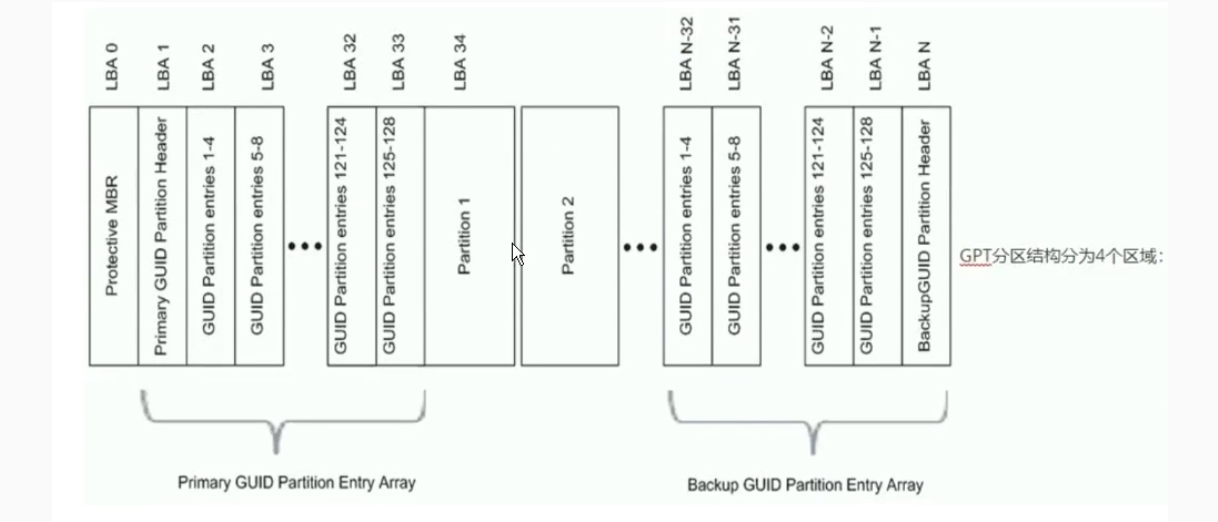
GPT
GPT支持最多划分128个分区,没有MBR的主分区、逻辑分区、扩展分区的概念,可以将分区全部都看作是主分区
GPT分区结构可以划分为4块区域:GPT头、分区表、GPT分区、备份区域
分区管理相关命令
fdisk
用途:查看分区的相关信息,进行磁盘交互式分区
案例:
root@LXH-Ubuntu:~# fdisk -l
Disk /dev/sdb: 20 GiB, 21474836480 bytes, 41943040 sectors
Disk model: VMware Virtual S
Units: sectors of 1 * 512 = 512 bytes
Sector size (logical/physical): 512 bytes / 512 bytes
I/O size (minimum/optimal): 512 bytes / 512 bytes


Disk /dev/sda: 200 GiB, 214748364800 bytes, 419430400 sectors
Disk model: VMware Virtual S
Units: sectors of 1 * 512 = 512 bytes
Sector size (logical/physical): 512 bytes / 512 bytes
I/O size (minimum/optimal): 512 bytes / 512 bytes
Disklabel type: gpt
Disk identifier: C9CDB74B-88EA-4840-9466-2CC25F3F93A4

Device       Start       End   Sectors  Size Type
/dev/sda1     2048      4095      2048    1M BIOS boot
/dev/sda2     4096   4198399   4194304    2G Linux filesystem
/dev/sda3  4198400 419428351 415229952  198G Linux filesystem


Disk /dev/mapper/ubuntu--vg-ubuntu--lv: 99 GiB, 106296246272 bytes, 207609856 sectors
Units: sectors of 1 * 512 = 512 bytes
Sector size (logical/physical): 512 bytes / 512 bytes
I/O size (minimum/optimal): 512 bytes / 512 bytes
root@LXH-Ubuntu:~#
磁盘分区案例
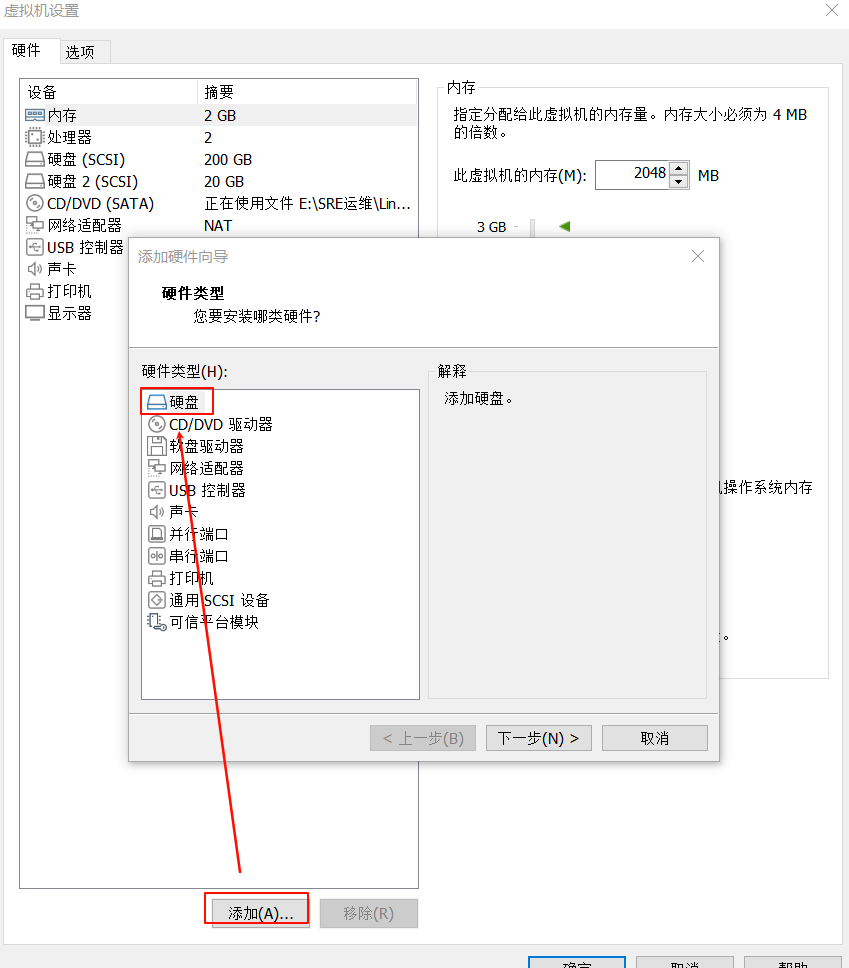
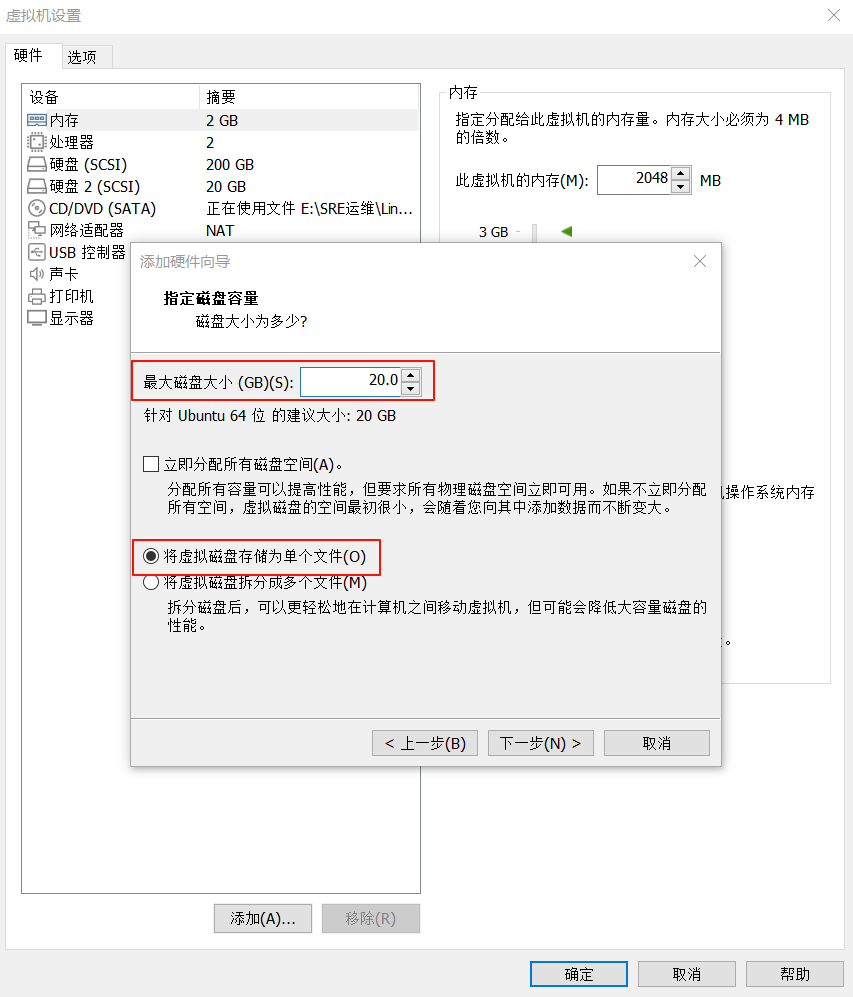
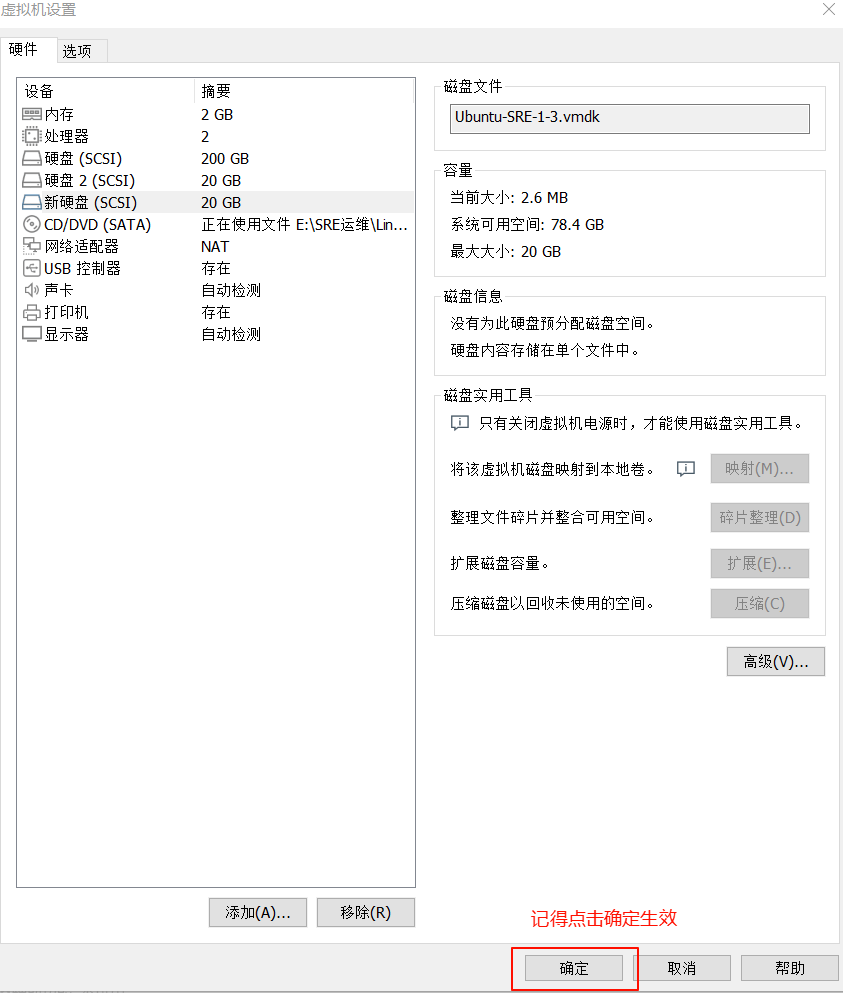
为虚拟机添加磁盘
在Vmware中为虚拟机添加新的硬盘,这里与创建虚拟机时的操作基本一致,不再过多赘述,仅仅展示图片

关于新磁盘识别的问题
在添加磁盘时,如果你的虚拟机和我一样是处于运行状态的,那么会发现系统识别不到新添加的磁盘
此时有两种方式,一种是使用命令手动触发SCSI总线 上设备的重新扫描,从而不重启就能识别到磁盘,另一种方式就是重启虚拟机(可以使用命令shutdown -r now),推荐使用第二种重启系统的方式,因为第一种方式基本只在Vmware中去使用,生产环境中不会使用这种方式
使用fdisk命令创建分区
在没有创建分区之前,使用fdisk命令查看新增磁盘
root@LXH-Ubuntu:~# fdisk -l /dev/sdc
Disk /dev/sdc: 20 GiB, 21474836480 bytes, 41943040 sectors
Disk model: VMware Virtual S
Units: sectors of 1 * 512 = 512 bytes
Sector size (logical/physical): 512 bytes / 512 bytes
I/O size (minimum/optimal): 512 bytes / 512 bytes
root@LXH-Ubuntu:~#
使用fdisk工具,创建3个MBR的主分区,各个分区大小均为3G
root@LXH-Ubuntu:~# fdisk /dev/sdc

Welcome to fdisk (util-linux 2.39.3).
Changes will remain in memory only, until you decide to write them.
Be careful before using the write command.

Device does not contain a recognized partition table.
Created a new DOS (MBR) disklabel with disk identifier 0x5cc14a1f.

Command (m for help): p							# 查看分区信息
Disk /dev/sdc: 20 GiB, 21474836480 bytes, 41943040 sectors
Disk model: VMware Virtual S
Units: sectors of 1 * 512 = 512 bytes
Sector size (logical/physical): 512 bytes / 512 bytes
I/O size (minimum/optimal): 512 bytes / 512 bytes
Disklabel type: dos
Disk identifier: 0x5cc14a1f

Command (m for help): n							# 创建分区
Partition type
   p   primary (0 primary, 0 extended, 4 free)
   e   extended (container for logical partitions)
Select (default p): p							# 分区类型为主分区
Partition number (1-4, default 1):
First sector (2048-41943039, default 2048):
Last sector, +/-sectors or +/-size{K,M,G,T,P} (2048-41943039, default 41943039): +3G	# 分区大小为3G

Created a new partition 1 of type 'Linux' and of size 3 GiB.

Command (m for help): p							# 查看分区信息,出现刚刚划分的3G的主分区信息
Disk /dev/sdc: 20 GiB, 21474836480 bytes, 41943040 sectors
Disk model: VMware Virtual S
Units: sectors of 1 * 512 = 512 bytes
Sector size (logical/physical): 512 bytes / 512 bytes
I/O size (minimum/optimal): 512 bytes / 512 bytes
Disklabel type: dos
Disk identifier: 0x5cc14a1f

Device     Boot Start     End Sectors Size Id Type
/dev/sdc1        2048 6293503 6291456   3G 83 Linux

Command (m for help): n							# 再次划分分区
Partition type
   p   primary (1 primary, 0 extended, 3 free)
   e   extended (container for logical partitions)
Select (default p): p
Partition number (2-4, default 2):
First sector (6293504-41943039, default 6293504):
Last sector, +/-sectors or +/-size{K,M,G,T,P} (6293504-41943039, default 41943039): +3G

Created a new partition 2 of type 'Linux' and of size 3 GiB.

Command (m for help): p							# 第二个3G的主分区划分完毕
Disk /dev/sdc: 20 GiB, 21474836480 bytes, 41943040 sectors
Disk model: VMware Virtual S
Units: sectors of 1 * 512 = 512 bytes
Sector size (logical/physical): 512 bytes / 512 bytes
I/O size (minimum/optimal): 512 bytes / 512 bytes
Disklabel type: dos
Disk identifier: 0x5cc14a1f

Device     Boot   Start      End Sectors Size Id Type
/dev/sdc1          2048  6293503 6291456   3G 83 Linux
/dev/sdc2       6293504 12584959 6291456   3G 83 Linux

Command (m for help): n
Partition type
   p   primary (2 primary, 0 extended, 2 free)
   e   extended (container for logical partitions)
Select (default p): p
Partition number (3,4, default 3):
First sector (12584960-41943039, default 12584960):
Last sector, +/-sectors or +/-size{K,M,G,T,P} (12584960-41943039, default 41943039): +3G

Created a new partition 3 of type 'Linux' and of size 3 GiB.

Command (m for help): p							# 第三个3G的主分区划分完毕
Disk /dev/sdc: 20 GiB, 21474836480 bytes, 41943040 sectors
Disk model: VMware Virtual S
Units: sectors of 1 * 512 = 512 bytes
Sector size (logical/physical): 512 bytes / 512 bytes
I/O size (minimum/optimal): 512 bytes / 512 bytes
Disklabel type: dos
Disk identifier: 0x5cc14a1f

Device     Boot    Start      End Sectors Size Id Type
/dev/sdc1           2048  6293503 6291456   3G 83 Linux
/dev/sdc2        6293504 12584959 6291456   3G 83 Linux
/dev/sdc3       12584960 18876415 6291456   3G 83 Linux

Command (m for help):
使用fdisk工具,利用剩下空间创建1个MBR的扩展分区,并在其中创建2个逻辑分区
Command (m for help): p

Disk /dev/sdc: 20 GiB, 21474836480 bytes, 41943040 sectors
Disk model: VMware Virtual S
Units: sectors of 1 * 512 = 512 bytes
Sector size (logical/physical): 512 bytes / 512 bytes
I/O size (minimum/optimal): 512 bytes / 512 bytes
Disklabel type: dos
Disk identifier: 0x5cc14a1f

Device     Boot    Start      End Sectors Size Id Type
/dev/sdc1           2048  6293503 6291456   3G 83 Linux
/dev/sdc2        6293504 12584959 6291456   3G 83 Linux
/dev/sdc3       12584960 18876415 6291456   3G 83 Linux

Command (m for help): n
Partition type
   p   primary (3 primary, 0 extended, 1 free)
   e   extended (container for logical partitions)
Select (default e): e							# 创建扩展分区

Selected partition 4
First sector (18876416-41943039, default 18876416):
Last sector, +/-sectors or +/-size{K,M,G,T,P} (18876416-41943039, default 41943039): 	# 将剩余空间全部分配

Created a new partition 4 of type 'Extended' and of size 11 GiB.

Command (m for help): p							# 创建出11G的扩展分区
Disk /dev/sdc: 20 GiB, 21474836480 bytes, 41943040 sectors
Disk model: VMware Virtual S
Units: sectors of 1 * 512 = 512 bytes
Sector size (logical/physical): 512 bytes / 512 bytes
I/O size (minimum/optimal): 512 bytes / 512 bytes
Disklabel type: dos
Disk identifier: 0x5cc14a1f

Device     Boot    Start      End  Sectors Size Id Type
/dev/sdc1           2048  6293503  6291456   3G 83 Linux
/dev/sdc2        6293504 12584959  6291456   3G 83 Linux
/dev/sdc3       12584960 18876415  6291456   3G 83 Linux
/dev/sdc4       18876416 41943039 23066624  11G  5 Extended

Command (m for help): n							# 创建逻辑分区,由于4个分区已经划分出去,所以只能创建逻辑分区
All primary partitions are in use.
Adding logical partition 5
First sector (18878464-41943039, default 18878464):
Last sector, +/-sectors or +/-size{K,M,G,T,P} (18878464-41943039, default 41943039): +5G	# 5G的逻辑分区

Created a new partition 5 of type 'Linux' and of size 5 GiB.

Command (m for help): n
All primary partitions are in use.
Adding logical partition 6
First sector (29366272-41943039, default 29366272):
Last sector, +/-sectors or +/-size{K,M,G,T,P} (29366272-41943039, default 41943039): 	# 剩余空间全部分配

Created a new partition 6 of type 'Linux' and of size 6 GiB.

Command (m for help): p
Disk /dev/sdc: 20 GiB, 21474836480 bytes, 41943040 sectors
Disk model: VMware Virtual S
Units: sectors of 1 * 512 = 512 bytes
Sector size (logical/physical): 512 bytes / 512 bytes
I/O size (minimum/optimal): 512 bytes / 512 bytes
Disklabel type: dos
Disk identifier: 0x5cc14a1f

Device     Boot    Start      End  Sectors Size Id Type
/dev/sdc1           2048  6293503  6291456   3G 83 Linux
/dev/sdc2        6293504 12584959  6291456   3G 83 Linux
/dev/sdc3       12584960 18876415  6291456   3G 83 Linux
/dev/sdc4       18876416 41943039 23066624  11G  5 Extended
/dev/sdc5       18878464 29364223 10485760   5G 83 Linux
/dev/sdc6       29366272 41943039 12576768   6G 83 Linux

Command (m for help): n
All primary partitions are in use.
Adding logical partition 7
No free sectors available.			# 没有剩余空间

Command (m for help):
记得最后敲w进行保存配置,随后再使用fdisk命令查看新磁盘,可以看到创建的分区
Command (m for help): p

Disk /dev/sdc: 20 GiB, 21474836480 bytes, 41943040 sectors
Disk model: VMware Virtual S
Units: sectors of 1 * 512 = 512 bytes
Sector size (logical/physical): 512 bytes / 512 bytes
I/O size (minimum/optimal): 512 bytes / 512 bytes
Disklabel type: dos
Disk identifier: 0x5cc14a1f

Device     Boot    Start      End  Sectors Size Id Type
/dev/sdc1           2048  6293503  6291456   3G 83 Linux
/dev/sdc2        6293504 12584959  6291456   3G 83 Linux
/dev/sdc3       12584960 18876415  6291456   3G 83 Linux
/dev/sdc4       18876416 41943039 23066624  11G  5 Extended
/dev/sdc5       18878464 29364223 10485760   5G 83 Linux
/dev/sdc6       29366272 41943039 12576768   6G 83 Linux

Command (m for help): w
The partition table has been altered.
Calling ioctl() to re-read partition table.
Syncing disks.

root@LXH-Ubuntu:~# fdisk -l /dev/sdc
Disk /dev/sdc: 20 GiB, 21474836480 bytes, 41943040 sectors
Disk model: VMware Virtual S
Units: sectors of 1 * 512 = 512 bytes
Sector size (logical/physical): 512 bytes / 512 bytes
I/O size (minimum/optimal): 512 bytes / 512 bytes
Disklabel type: dos
Disk identifier: 0x5cc14a1f

Device     Boot    Start      End  Sectors Size Id Type
/dev/sdc1           2048  6293503  6291456   3G 83 Linux
/dev/sdc2        6293504 12584959  6291456   3G 83 Linux
/dev/sdc3       12584960 18876415  6291456   3G 83 Linux
/dev/sdc4       18876416 41943039 23066624  11G  5 Extended
/dev/sdc5       18878464 29364223 10485760   5G 83 Linux
/dev/sdc6       29366272 41943039 12576768   6G 83 Linux
root@LXH-Ubuntu:~#
文件系统
文件系统管理相关命令
mkfs
用途:创建各种类型的文件系统
案例:
root@LXH-Ubuntu:~# mkfs.ext4 /dev/sdc1			# 为分区/dev/sdc1创建类型为ext4的文件系统
mke2fs 1.47.0 (5-Feb-2023)
Creating filesystem with 786432 4k blocks and 196608 inodes
Filesystem UUID: 05801594-7b31-4b68-9b34-dec067f63261
Superblock backups stored on blocks:
        32768, 98304, 163840, 229376, 294912

Allocating group tables: done
Writing inode tables: done
Creating journal (16384 blocks): done
Writing superblocks and filesystem accounting information: done

root@LXH-Ubuntu:~#
lsblk
用途:查看分区的相关信息
注意:读取的信息来自于内存中,并不是实时读取硬盘上的信息。如果出现与fdisk的输出信息不一致的情况,则可以通过命令partprobe重新设置内存中的内核分区表版本,实现同步
选项:
- -p:显示设备的全路径
- -f:显示文件系统
- -d:不显示分区信息
案例:
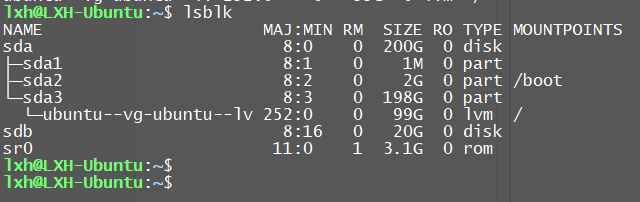
lxh@LXH-Ubuntu:~$ lsblk
NAME                      MAJ:MIN RM  SIZE RO TYPE MOUNTPOINTS
sda                         8:0    0  200G  0 disk
├─sda1                      8:1    0    1M  0 part
├─sda2                      8:2    0    2G  0 part /boot
└─sda3                      8:3    0  198G  0 part
  └─ubuntu--vg-ubuntu--lv 252:0    0   99G  0 lvm  /
sdb                         8:16   0   20G  0 disk
sr0                        11:0    1  3.1G  0 rom
lxh@LXH-Ubuntu:~$ lsblk -d
NAME
    MAJ:MIN RM  SIZE RO TYPE MOUNTPOINTS
sda   8:0    0  200G  0 disk
sdb   8:16   0   20G  0 disk
sr0  11:0    1  3.1G  0 rom
lxh@LXH-Ubuntu:~$
lxh@LXH-Ubuntu:~$ lsblk -f
NAME                  FSTYPE      FSVER            LABEL                           UUID                                   FSAVAIL FSUSE% MOUNTPOINTS
sda
├─sda1
├─sda2                ext4        1.0                                              cd6ed713-5bc0-45b4-ab57-0df2de18d134      1.6G    10% /boot
└─sda3                LVM2_member LVM2 001                                         WepAcc-08EM-cwFH-yckx-ZzSw-3AjU-8VtQNl
  └─ubuntu--vg-ubuntu--lv
                      ext4        1.0                                              e927ece8-f6e1-4b07-bd55-cb956fbe178f     85.4G     7% /
sdb                   ext4        1.0                                              144894f4-3f28-41c7-ad06-de4448dea0c3
sr0                   iso9660     Joliet Extension Ubuntu-Server 24.04.3 LTS amd64 2025-08-05-23-54-07-00
lxh@LXH-Ubuntu:~$
lxh@LXH-Ubuntu:~$ lsblk -p
NAME                                  MAJ:MIN RM  SIZE RO TYPE MOUNTPOINTS
/dev/sda                                8:0    0  200G  0 disk
├─/dev/sda1                             8:1    0    1M  0 part
├─/dev/sda2                             8:2    0    2G  0 part /boot
└─/dev/sda3                             8:3    0  198G  0 part
  └─/dev/mapper/ubuntu--vg-ubuntu--lv 252:0    0   99G  0 lvm  /
/dev/sdb                                8:16   0   20G  0 disk
/dev/sr0                               11:0    1  3.1G  0 rom
lxh@LXH-Ubuntu:~$
blkid
用途:查看分区的Label、UUID、设备文件路径
案例:
lxh@LXH-Ubuntu:~$ blkid
/dev/sdb: UUID="144894f4-3f28-41c7-ad06-de4448dea0c3" BLOCK_SIZE="4096" TYPE="ext4"
/dev/sr0: BLOCK_SIZE="2048" UUID="2025-08-05-23-54-07-00" LABEL="Ubuntu-Server 24.04.3 LTS amd64" TYPE="iso9660" PTTYPE="PMBR"
/dev/mapper/ubuntu--vg-ubuntu--lv: UUID="e927ece8-f6e1-4b07-bd55-cb956fbe178f" BLOCK_SIZE="4096" TYPE="ext4"
/dev/sda2: UUID="cd6ed713-5bc0-45b4-ab57-0df2de18d134" BLOCK_SIZE="4096" TYPE="ext4" PARTUUID="e0bf3b17-572a-44c4-876a-74d7893a30d3"
/dev/sda3: UUID="WepAcc-08EM-cwFH-yckx-ZzSw-3AjU-8VtQNl" TYPE="LVM2_member" PARTUUID="3bdfdb8a-a2be-497a-b69d-8af5bcecc3a1"
lxh@LXH-Ubuntu:~$
df
用途:查看分区的文件系统相关信息
注意:这个命令只能看到已经挂载设备的相关信息
案例:
root@LXH-Ubuntu:~# df -T
Filesystem                        Type  1K-blocks    Used Available Use% Mounted on
tmpfs                             tmpfs    196600    1276    195324   1% /run
/dev/mapper/ubuntu--vg-ubuntu--lv ext4  101590008 6820868  89562512   8% /
tmpfs                             tmpfs    982988       0    982988   0% /dev/shm
tmpfs                             tmpfs      5120       0      5120   0% /run/lock
/dev/sda2                         ext4    1992552  196436   1674876  11% /boot
tmpfs                             tmpfs    196596       8    196588   1% /run/user/1000
root@LXH-Ubuntu:~#
文件系统创建案例
确定创建文件系统的磁盘分区
通过blkid命令即可查看哪些分区没有创建文件系统(用lsblk -f也可以,选择一个命令查看即可)
root@LXH-Ubuntu:~# blkid
/dev/sdb: UUID="144894f4-3f28-41c7-ad06-de4448dea0c3" BLOCK_SIZE="4096" TYPE="ext4"
/dev/sr0: BLOCK_SIZE="2048" UUID="2025-08-05-23-54-07-00" LABEL="Ubuntu-Server 24.04.3 LTS amd64" TYPE="iso9660" PTTYPE="PMBR"
/dev/mapper/ubuntu--vg-ubuntu--lv: UUID="e927ece8-f6e1-4b07-bd55-cb956fbe178f" BLOCK_SIZE="4096" TYPE="ext4"
/dev/sda2: UUID="cd6ed713-5bc0-45b4-ab57-0df2de18d134" BLOCK_SIZE="4096" TYPE="ext4" PARTUUID="e0bf3b17-572a-44c4-876a-74d7893a30d3"
/dev/sda3: UUID="WepAcc-08EM-cwFH-yckx-ZzSw-3AjU-8VtQNl" TYPE="LVM2_member" PARTUUID="3bdfdb8a-a2be-497a-b69d-8af5bcecc3a1"
/dev/sdc2: PARTUUID="5cc14a1f-02"			# 新创建的磁盘分区
/dev/sdc5: PARTUUID="5cc14a1f-05"
/dev/sdc3: PARTUUID="5cc14a1f-03"
/dev/sdc1: PARTUUID="5cc14a1f-01"
/dev/sdc6: PARTUUID="5cc14a1f-06"
/dev/sda1: PARTUUID="8a9efb7b-8351-402b-be3f-5c3098f41dae"
root@LXH-Ubuntu:~#
使用mkfs命令创建文件系统
在/dev/sdc1上创建ext4文件系统
root@LXH-Ubuntu:~#
root@LXH-Ubuntu:~# mkfs.ext4 /dev/sdc1
mke2fs 1.47.0 (5-Feb-2023)
Creating filesystem with 786432 4k blocks and 196608 inodes
Filesystem UUID: 05801594-7b31-4b68-9b34-dec067f63261
Superblock backups stored on blocks:
        32768, 98304, 163840, 229376, 294912

Allocating group tables: done
Writing inode tables: done
Creating journal (16384 blocks): done
Writing superblocks and filesystem accounting information: done

root@LXH-Ubuntu:~#
root@LXH-Ubuntu:~# blkid
/dev/sdb: UUID="144894f4-3f28-41c7-ad06-de4448dea0c3" BLOCK_SIZE="4096" TYPE="ext4"
/dev/sr0: BLOCK_SIZE="2048" UUID="2025-08-05-23-54-07-00" LABEL="Ubuntu-Server 24.04.3 LTS amd64" TYPE="iso9660" PTTYPE="PMBR"
/dev/mapper/ubuntu--vg-ubuntu--lv: UUID="e927ece8-f6e1-4b07-bd55-cb956fbe178f" BLOCK_SIZE="4096" TYPE="ext4"
/dev/sda2: UUID="cd6ed713-5bc0-45b4-ab57-0df2de18d134" BLOCK_SIZE="4096" TYPE="ext4" PARTUUID="e0bf3b17-572a-44c4-876a-74d7893a30d3"
/dev/sda3: UUID="WepAcc-08EM-cwFH-yckx-ZzSw-3AjU-8VtQNl" TYPE="LVM2_member" PARTUUID="3bdfdb8a-a2be-497a-b69d-8af5bcecc3a1"
/dev/sdc2: PARTUUID="5cc14a1f-02"
/dev/sdc5: PARTUUID="5cc14a1f-05"
/dev/sdc3: PARTUUID="5cc14a1f-03"
/dev/sdc1: UUID="05801594-7b31-4b68-9b34-dec067f63261" BLOCK_SIZE="4096" TYPE="ext4" PARTUUID="5cc14a1f-01"
/dev/sdc6: PARTUUID="5cc14a1f-06"
/dev/sda1: PARTUUID="8a9efb7b-8351-402b-be3f-5c3098f41dae"
root@LXH-Ubuntu:~#
在/dev/sdc2和/dev/sdc3上创建xfs文件系统
root@LXH-Ubuntu:~# mkfs.xfs /dev/sdc2
meta-data=/dev/sdc2              isize=512    agcount=4, agsize=196608 blks
         =                       sectsz=512   attr=2, projid32bit=1
         =                       crc=1        finobt=1, sparse=1, rmapbt=1
         =                       reflink=1    bigtime=1 inobtcount=1 nrext64=0
data     =                       bsize=4096   blocks=786432, imaxpct=25
         =                       sunit=0      swidth=0 blks
naming   =version 2              bsize=4096   ascii-ci=0, ftype=1
log      =internal log           bsize=4096   blocks=16384, version=2
         =                       sectsz=512   sunit=0 blks, lazy-count=1
realtime =none                   extsz=4096   blocks=0, rtextents=0
root@LXH-Ubuntu:~#
root@LXH-Ubuntu:~# blkid
/dev/sdb: UUID="144894f4-3f28-41c7-ad06-de4448dea0c3" BLOCK_SIZE="4096" TYPE="ext4"
/dev/sr0: BLOCK_SIZE="2048" UUID="2025-08-05-23-54-07-00" LABEL="Ubuntu-Server 24.04.3 LTS amd64" TYPE="iso9660" PTTYPE="PMBR"
/dev/mapper/ubuntu--vg-ubuntu--lv: UUID="e927ece8-f6e1-4b07-bd55-cb956fbe178f" BLOCK_SIZE="4096" TYPE="ext4"
/dev/sda2: UUID="cd6ed713-5bc0-45b4-ab57-0df2de18d134" BLOCK_SIZE="4096" TYPE="ext4" PARTUUID="e0bf3b17-572a-44c4-876a-74d7893a30d3"
/dev/sda3: UUID="WepAcc-08EM-cwFH-yckx-ZzSw-3AjU-8VtQNl" TYPE="LVM2_member" PARTUUID="3bdfdb8a-a2be-497a-b69d-8af5bcecc3a1"
/dev/sdc1: UUID="05801594-7b31-4b68-9b34-dec067f63261" BLOCK_SIZE="4096" TYPE="ext4" PARTUUID="5cc14a1f-01"
/dev/sdc2: UUID="dca4e8e6-c76c-4920-9f51-228f0f1debb7" BLOCK_SIZE="512" TYPE="xfs" PARTUUID="5cc14a1f-02"
/dev/sdc5: PARTUUID="5cc14a1f-05"
/dev/sdc3: PARTUUID="5cc14a1f-03"
/dev/sdc6: PARTUUID="5cc14a1f-06"
/dev/sda1: PARTUUID="8a9efb7b-8351-402b-be3f-5c3098f41dae"
root@LXH-Ubuntu:~#
root@LXH-Ubuntu:~# mkfs.xfs /dev/sdc3
meta-data=/dev/sdc3              isize=512    agcount=4, agsize=196608 blks
         =                       sectsz=512   attr=2, projid32bit=1
         =                       crc=1        finobt=1, sparse=1, rmapbt=1
         =                       reflink=1    bigtime=1 inobtcount=1 nrext64=0
data     =                       bsize=4096   blocks=786432, imaxpct=25
         =                       sunit=0      swidth=0 blks
naming   =version 2              bsize=4096   ascii-ci=0, ftype=1
log      =internal log           bsize=4096   blocks=16384, version=2
         =                       sectsz=512   sunit=0 blks, lazy-count=1
realtime =none                   extsz=4096   blocks=0, rtextents=0
root@LXH-Ubuntu:~#
root@LXH-Ubuntu:~# blkid
/dev/sdb: UUID="144894f4-3f28-41c7-ad06-de4448dea0c3" BLOCK_SIZE="4096" TYPE="ext4"
/dev/sr0: BLOCK_SIZE="2048" UUID="2025-08-05-23-54-07-00" LABEL="Ubuntu-Server 24.04.3 LTS amd64" TYPE="iso9660" PTTYPE="PMBR"
/dev/mapper/ubuntu--vg-ubuntu--lv: UUID="e927ece8-f6e1-4b07-bd55-cb956fbe178f" BLOCK_SIZE="4096" TYPE="ext4"
/dev/sda2: UUID="cd6ed713-5bc0-45b4-ab57-0df2de18d134" BLOCK_SIZE="4096" TYPE="ext4" PARTUUID="e0bf3b17-572a-44c4-876a-74d7893a30d3"
/dev/sda3: UUID="WepAcc-08EM-cwFH-yckx-ZzSw-3AjU-8VtQNl" TYPE="LVM2_member" PARTUUID="3bdfdb8a-a2be-497a-b69d-8af5bcecc3a1"
/dev/sdc1: UUID="05801594-7b31-4b68-9b34-dec067f63261" BLOCK_SIZE="4096" TYPE="ext4" PARTUUID="5cc14a1f-01"
/dev/sdc2: UUID="dca4e8e6-c76c-4920-9f51-228f0f1debb7" BLOCK_SIZE="512" TYPE="xfs" PARTUUID="5cc14a1f-02"
/dev/sdc5: PARTUUID="5cc14a1f-05"
/dev/sdc3: UUID="4075e881-1b77-46c5-bed4-c7799464d038" BLOCK_SIZE="512" TYPE="xfs" PARTUUID="5cc14a1f-03"
/dev/sdc6: PARTUUID="5cc14a1f-06"
/dev/sda1: PARTUUID="8a9efb7b-8351-402b-be3f-5c3098f41dae"
root@LXH-Ubuntu:~#
在/dev/sdc5上创建ext3文件系统
root@LXH-Ubuntu:~# mkfs.ext3 /dev/sdc5
mke2fs 1.47.0 (5-Feb-2023)
Creating filesystem with 1310720 4k blocks and 327680 inodes
Filesystem UUID: f9d459f0-70a1-4493-af6a-449528c86d83
Superblock backups stored on blocks:
        32768, 98304, 163840, 229376, 294912, 819200, 884736

Allocating group tables: done
Writing inode tables: done
Creating journal (16384 blocks): done
Writing superblocks and filesystem accounting information: done

root@LXH-Ubuntu:~#
root@LXH-Ubuntu:~# lsblk -f
NAME        FSTYPE      FSVER      LABEL                           UUID                                   FSAVAIL FSUSE% MOUNTPOINTS
sda
├─sda1
├─sda2      ext4        1.0                                        cd6ed713-5bc0-45b4-ab57-0df2de18d134      1.6G    10% /boot
└─sda3      LVM2_member LVM2 001                                   WepAcc-08EM-cwFH-yckx-ZzSw-3AjU-8VtQNl
  └─ubuntu--vg-ubuntu--lv
            ext4        1.0                                        e927ece8-f6e1-4b07-bd55-cb956fbe178f     85.4G     7% /
sdb         ext4        1.0                                        144894f4-3f28-41c7-ad06-de4448dea0c3
sdc
├─sdc1      ext4        1.0                                        05801594-7b31-4b68-9b34-dec067f63261
├─sdc2      xfs                                                    dca4e8e6-c76c-4920-9f51-228f0f1debb7
├─sdc3      xfs                                                    4075e881-1b77-46c5-bed4-c7799464d038
├─sdc4
├─sdc5      ext3        1.0                                        f9d459f0-70a1-4493-af6a-449528c86d83
└─sdc6
sr0         iso9660     Joliet Ext Ubuntu-Server 24.04.3 LTS amd64 2025-08-05-23-54-07-00
root@LXH-Ubuntu:~#
RAID
旧称廉价磁盘冗余阵列(RedundantArray of Inexpensive Disks),现称独立硬盘冗余阵列(Redundant Arrayof IndependentDisks),简称磁盘阵列
基本原理
简单来说,RAID是在操作系统外把多个硬盘组合成为一个逻辑硬盘,因此,操作系统只会把它当作一个实体硬盘。RAID常被用在服务器电脑上,并且常使用完全相同的硬盘作为组合。由于硬盘价格的不断下降与RAID功能更加有效地与主板集成,它也成为普通用户的一个选择,特别是需要大容量存储空间的工作,如:视频与音频制作
RAID的重点在于以chunk单位进行存储数据
RAID级别
不同级别是指多块磁盘组织在一起的工作方式有所不同
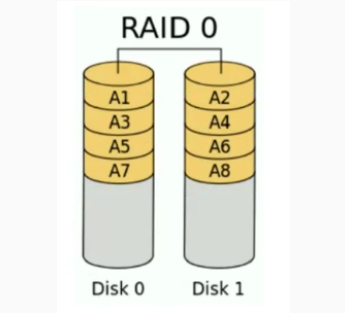
RAID 0
工作原理:数据完全不进行冗余备份
利用率:100%
冗余性:无冗余
性能:加快读写速度
所需磁盘数:至少需要2块磁盘
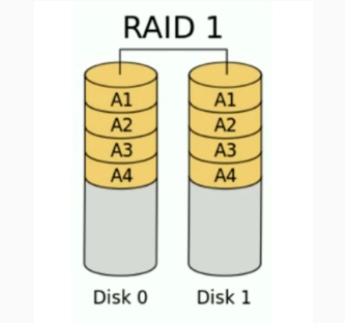
RAID 1
工作原理:数据完全冗余存储
利用率:1/N
冗余性:其他Disk都是冗余数据,实际只能存储一个Disk的数据
性能:写速度降低,读速度增加
所需磁盘数:至少需要2块磁盘
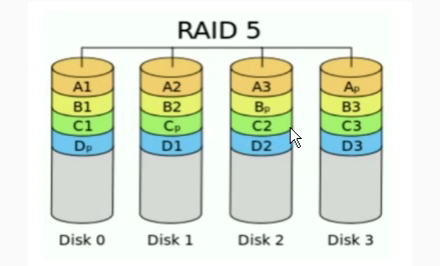
RAID 5
工作原理:通过校验值能够恢复数据
利用率:(N-1)/N
冗余性:总共有一个Disk的空间存放校验值
性能:读写速度均有提升
所需磁盘数:至少需要3块磁盘
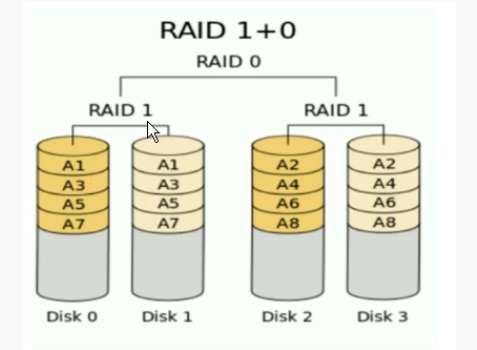
RAID 10
工作原理:先做RAID 1,然后整体做RAID 0
利用率:1/2
冗余性:一个组中存在相同的冗余数据
性能:读写速度均有提升
所需磁盘数:至少需要4块磁盘
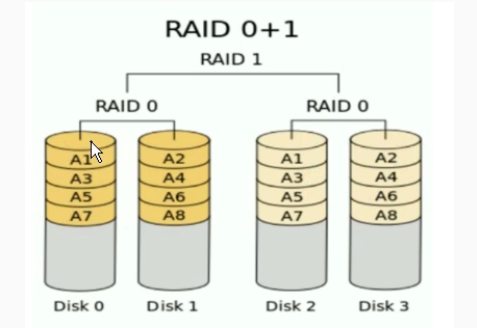
RAID 01
工作原理:先做RAID 0,然后整体做RAID 1
利用率:1/2
冗余性:两个组之间相互冗余
性能:读写速度均有提升
所需磁盘数:至少需要4块磁盘
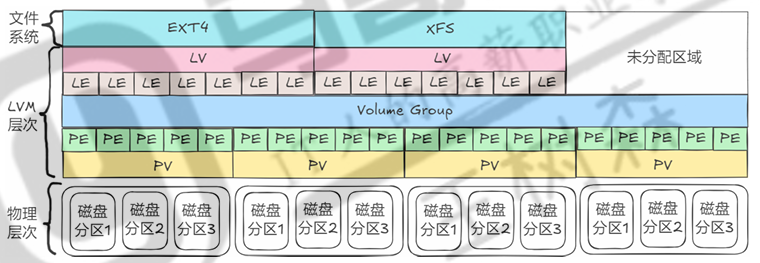
LVM
基本原理
LVM在硬盘分区和文件系统之间添加了一个逻辑层,为文件系统屏蔽了下层的磁盘分区布局,提供了一个抽象的卷组,用户可以在这个卷组上创建文件系统
实现过程
-
将设备或分区指定为物理卷,物理卷与其一一对应
-
用一个或者多个物理卷来创建一个卷组,物理卷是用固定大小的物理区域(Physical Extent,PE)来定义的
-
在卷组上创建逻辑卷,逻辑卷由逻辑区域(Logical Extent,LE)组成
-
逻辑卷创建后可以直接创建文件系统,再进行挂载;也可以对其分区后,针对分区创建文件系统,然后挂载
创建LVM并扩容案例
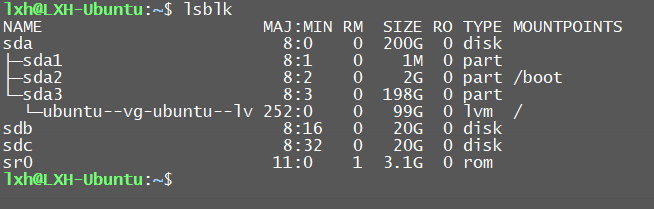
确定使用sdc磁盘进行演示
lxh@LXH-Ubuntu:~$ lsblk -f -o NAME,FSTYPE,UUID
NAME                      FSTYPE      UUID
sda
├─sda1
├─sda2                    ext4        cd6ed713-5bc0-45b4-ab57-0df2de18d134
└─sda3                    LVM2_member WepAcc-08EM-cwFH-yckx-ZzSw-3AjU-8VtQNl
  └─ubuntu--vg-ubuntu--lv ext4        e927ece8-f6e1-4b07-bd55-cb956fbe178f
sdb                       ext4        144894f4-3f28-41c7-ad06-de4448dea0c3
sdc
├─sdc1                    ext4        05801594-7b31-4b68-9b34-dec067f63261
├─sdc2                    xfs         dca4e8e6-c76c-4920-9f51-228f0f1debb7
├─sdc3                    xfs         4075e881-1b77-46c5-bed4-c7799464d038
├─sdc4
├─sdc5                    ext3        f9d459f0-70a1-4493-af6a-449528c86d83
└─sdc6
sr0                       iso9660     2025-08-05-23-54-07-00
lxh@LXH-Ubuntu:~$
使用命令pvcreate创建物理卷,创建时如果存在文件系统,会被擦除
root@LXH-Ubuntu:~# pvs											# 查看当前存在的物理卷
  PV         VG        Fmt  Attr PSize    PFree
  /dev/sda3  ubuntu-vg lvm2 a--  <198.00g 99.00g
root@LXH-Ubuntu:~#
root@LXH-Ubuntu:~# pvcreate /dev/sdc{1..6}						# 批量创建物理卷,并擦除文件系统
  Cannot use /dev/sdc4: device is too small (pv_min_size)
WARNING: ext4 signature detected on /dev/sdc1 at offset 1080. Wipe it? [y/n]: y
  Wiping ext4 signature on /dev/sdc1.
WARNING: xfs signature detected on /dev/sdc2 at offset 0. Wipe it? [y/n]: y
  Wiping xfs signature on /dev/sdc2.
WARNING: xfs signature detected on /dev/sdc3 at offset 0. Wipe it? [y/n]: y
  Wiping xfs signature on /dev/sdc3.
WARNING: ext3 signature detected on /dev/sdc5 at offset 1080. Wipe it? [y/n]: y
  Wiping ext3 signature on /dev/sdc5.
  Physical volume "/dev/sdc1" successfully created.
  Physical volume "/dev/sdc2" successfully created.
  Physical volume "/dev/sdc3" successfully created.
  Physical volume "/dev/sdc5" successfully created.
  Physical volume "/dev/sdc6" successfully created.
root@LXH-Ubuntu:~#
root@LXH-Ubuntu:~# pvs											# 物理卷创建成功
  PV         VG        Fmt  Attr PSize    PFree
  /dev/sda3  ubuntu-vg lvm2 a--  <198.00g 99.00g
  /dev/sdc1            lvm2 ---     3.00g  3.00g
  /dev/sdc2            lvm2 ---     3.00g  3.00g
  /dev/sdc3            lvm2 ---     3.00g  3.00g
  /dev/sdc5            lvm2 ---     5.00g  5.00g
  /dev/sdc6            lvm2 ---    <6.00g <6.00g
root@LXH-Ubuntu:~#
root@LXH-Ubuntu:~# lsblk -f -o NAME,FSTYPE,UUID					# 文件系统信息列已经变成LVM2_member
NAME                      FSTYPE      UUID
sda
├─sda1
├─sda2                    ext4        cd6ed713-5bc0-45b4-ab57-0df2de18d134
└─sda3                    LVM2_member WepAcc-08EM-cwFH-yckx-ZzSw-3AjU-8VtQNl
  └─ubuntu--vg-ubuntu--lv ext4        e927ece8-f6e1-4b07-bd55-cb956fbe178f
sdb                       ext4        144894f4-3f28-41c7-ad06-de4448dea0c3
sdc
├─sdc1                    LVM2_member CYYZTO-npeR-3XgK-ok4z-M2cJ-sGxw-KN4oVh
├─sdc2                    LVM2_member iQzjLQ-ri9B-Px53-ywFQ-JvIz-NK3j-3DeUVN
├─sdc3                    LVM2_member TuJoKV-BZ5f-3509-uHBu-BTOM-N9i8-9jgfSN
├─sdc4
├─sdc5                    LVM2_member Vi9G8y-ChGU-pbsK-8EJt-fyR3-Ub7o-cnScb8
└─sdc6                    LVM2_member Vp4tkF-ZLFe-Qhfh-w3zX-Rodg-gBmH-omjaCS
sr0                       iso9660     2025-08-05-23-54-07-00
root@LXH-Ubuntu:~#
使用命令vgcreate利用指定物理卷创建卷组,同时指定物理卷的PE大小(默认为4M大小)
root@LXH-Ubuntu:~# vgs											# 查看当前存在的卷组
  VG        #PV #LV #SN Attr   VSize    VFree
  ubuntu-vg   1   1   0 wz--n- <198.00g 99.00g
root@LXH-Ubuntu:~#
root@LXH-Ubuntu:~# pvs											# 查看当前存在的物理卷
  PV         VG        Fmt  Attr PSize    PFree
  /dev/sda3  ubuntu-vg lvm2 a--  <198.00g 99.00g
  /dev/sdc1            lvm2 ---     3.00g  3.00g
  /dev/sdc2            lvm2 ---     3.00g  3.00g
  /dev/sdc3            lvm2 ---     3.00g  3.00g
  /dev/sdc5            lvm2 ---     5.00g  5.00g
  /dev/sdc6            lvm2 ---    <6.00g <6.00g
root@LXH-Ubuntu:~#
root@LXH-Ubuntu:~# pvdisplay /dev/sdc1							# 查看物理卷的详细信息,当前PE大小未指定
  "/dev/sdc1" is a new physical volume of "3.00 GiB"
  --- NEW Physical volume ---
  PV Name               /dev/sdc1
  VG Name
  PV Size               3.00 GiB
  Allocatable           NO
  PE Size               0
  Total PE              0
  Free PE               0
  Allocated PE          0
  PV UUID               CYYZTO-npeR-3XgK-ok4z-M2cJ-sGxw-KN4oVh

root@LXH-Ubuntu:~# 												# 创建卷组并指定PE大小为100M
root@LXH-Ubuntu:~# vgcreate -s 100M myvg /dev/sdc1 /dev/sdc2 /dev/sdc3 /dev/sdc5 /dev/sdc6
  Volume group "myvg" successfully created
root@LXH-Ubuntu:~#
root@LXH-Ubuntu:~# vgs											# 卷组创建成功
  VG        #PV #LV #SN Attr   VSize    VFree
  myvg        5   0   0 wz--n-  <19.73g <19.73g
  ubuntu-vg   1   1   0 wz--n- <198.00g  99.00g
root@LXH-Ubuntu:~#
root@LXH-Ubuntu:~# pvdisplay /dev/sdc1							# 物理卷的PE大小显示为100M
  --- Physical volume ---
  PV Name               /dev/sdc1
  VG Name               myvg
  PV Size               3.00 GiB / not usable 72.00 MiB
  Allocatable           yes
  PE Size               100.00 MiB
  Total PE              30
  Free PE               30
  Allocated PE          0
  PV UUID               CYYZTO-npeR-3XgK-ok4z-M2cJ-sGxw-KN4oVh

root@LXH-Ubuntu:~#
使用命令lvcreate利用指定卷组创建逻辑卷,同时指定逻辑卷大小
root@LXH-Ubuntu:~# lvs											# 查看当前存在的逻辑卷
  LV        VG        Attr       LSize   Pool Origin Data%  Meta%  Move Log Cpy%Sync Convert
  ubuntu-lv ubuntu-vg -wi-ao---- <99.00g
root@LXH-Ubuntu:~#
root@LXH-Ubuntu:~# vgs											# 查看当前存在的卷组
  VG        #PV #LV #SN Attr   VSize    VFree
  myvg        5   0   0 wz--n-  <19.73g <19.73g
  ubuntu-vg   1   1   0 wz--n- <198.00g  99.00g
root@LXH-Ubuntu:~#
root@LXH-Ubuntu:~# lvcreate -L 5G -n mylvm1 myvg				# 创建一个5G大小的逻辑卷
  Rounding up size to full physical extent <5.08 GiB
  Logical volume "mylvm1" created.
root@LXH-Ubuntu:~#
root@LXH-Ubuntu:~# lvs
  LV        VG        Attr       LSize   Pool Origin Data%  Meta%  Move Log Cpy%Sync Convert
  mylvm1    myvg      -wi-a-----  <5.08g
  ubuntu-lv ubuntu-vg -wi-ao---- <99.00g
root@LXH-Ubuntu:~#
root@LXH-Ubuntu:~# lvcreate -l 10 -n mylvm2 myvg				# 创建一个10*100M大小的逻辑卷
  Logical volume "mylvm2" created.
root@LXH-Ubuntu:~#
root@LXH-Ubuntu:~# lvs
  LV        VG        Attr       LSize    Pool Origin Data%  Meta%  Move Log Cpy%Sync Convert
  mylvm1    myvg      -wi-a-----   <5.08g
  mylvm2    myvg      -wi-a----- 1000.00m
  ubuntu-lv ubuntu-vg -wi-ao----  <99.00g
root@LXH-Ubuntu:~#
root@LXH-Ubuntu:~# lvcreate -l 50%free -n mylvm3 myvg			# 创建一个大小为卷组剩余空间50%的逻辑卷
  Logical volume "mylvm3" created.
root@LXH-Ubuntu:~#
root@LXH-Ubuntu:~# lvs
  LV        VG        Attr       LSize    Pool Origin Data%  Meta%  Move Log Cpy%Sync Convert
  mylvm1    myvg      -wi-a-----   <5.08g
  mylvm2    myvg      -wi-a----- 1000.00m
  mylvm3    myvg      -wi-a-----   <6.84g
  ubuntu-lv ubuntu-vg -wi-ao----  <99.00g
root@LXH-Ubuntu:~#
root@LXH-Ubuntu:~# vgs
  VG        #PV #LV #SN Attr   VSize    VFree
  myvg        5   3   0 wz--n-  <19.73g <6.84g
  ubuntu-vg   1   1   0 wz--n- <198.00g 99.00g
root@LXH-Ubuntu:~#
对逻辑卷分别进行扩容
root@LXH-Ubuntu:~# lvscan										# 查看逻辑卷的设备文件路径
  ACTIVE            '/dev/myvg/mylvm1' [<5.08 GiB] inherit
  ACTIVE            '/dev/myvg/mylvm2' [1000.00 MiB] inherit
  ACTIVE            '/dev/myvg/mylvm3' [<6.84 GiB] inherit
  ACTIVE            '/dev/ubuntu-vg/ubuntu-lv' [<99.00 GiB] inherit
root@LXH-Ubuntu:~#
root@LXH-Ubuntu:~# lvs
  LV        VG        Attr       LSize    Pool Origin Data%  Meta%  Move Log Cpy%Sync Convert
  mylvm1    myvg      -wi-a-----   <5.08g
  mylvm2    myvg      -wi-a----- 1000.00m
  mylvm3    myvg      -wi-a-----   <6.84g
  ubuntu-lv ubuntu-vg -wi-ao----  <99.00g
root@LXH-Ubuntu:~#
root@LXH-Ubuntu:~#
root@LXH-Ubuntu:~# lvextend -L 6G -n /dev/myvg/mylvm1			# 将mylvm1扩容为6G
  Rounding size to boundary between physical extents: 6.05 GiB.
  Size of logical volume myvg/mylvm1 changed from <5.08 GiB (52 extents) to 6.05 GiB (62 extents).
  Logical volume myvg/mylvm1 successfully resized.
root@LXH-Ubuntu:~#
root@LXH-Ubuntu:~# lvs
  LV        VG        Attr       LSize    Pool Origin Data%  Meta%  Move Log Cpy%Sync Convert
  mylvm1    myvg      -wi-a-----    6.05g
  mylvm2    myvg      -wi-a----- 1000.00m
  mylvm3    myvg      -wi-a-----   <6.84g
  ubuntu-lv ubuntu-vg -wi-ao----  <99.00g
root@LXH-Ubuntu:~#
root@LXH-Ubuntu:~# lvextend -L +1000M -n /dev/myvg/mylvm2		# 将mylvm2扩容增加1000M大小
  Size of logical volume myvg/mylvm2 changed from 1000.00 MiB (10 extents) to 1.95 GiB (20 extents).
  Logical volume myvg/mylvm2 successfully resized.
root@LXH-Ubuntu:~#
root@LXH-Ubuntu:~# lvs
  LV        VG        Attr       LSize   Pool Origin Data%  Meta%  Move Log Cpy%Sync Convert
  mylvm1    myvg      -wi-a-----   6.05g
  mylvm2    myvg      -wi-a-----   1.95g
  mylvm3    myvg      -wi-a-----  <6.84g
  ubuntu-lv ubuntu-vg -wi-ao---- <99.00g
root@LXH-Ubuntu:~#
root@LXH-Ubuntu:~# lvextend -l +50%free -n /dev/myvg/mylvm3		# 将mylvm2扩容增加卷组剩余空间的50%
  Size of logical volume myvg/mylvm3 changed from <6.84 GiB (70 extents) to <9.28 GiB (95 extents).
  Logical volume myvg/mylvm3 successfully resized.
root@LXH-Ubuntu:~#
root@LXH-Ubuntu:~# lvs
  LV        VG        Attr       LSize   Pool Origin Data%  Meta%  Move Log Cpy%Sync Convert
  mylvm1    myvg      -wi-a-----   6.05g
  mylvm2    myvg      -wi-a-----   1.95g
  mylvm3    myvg      -wi-a-----  <9.28g
  ubuntu-lv ubuntu-vg -wi-ao---- <99.00g
root@LXH-Ubuntu:~#
变量
shell中变量命名法则
- 命名要求
- 区分大小写
- 不能使用程序中的保留字和内置变量:如:if,for
- 只能使用数字、字母及下划线,且不能以数字开头,注意:不支持短横线”-",和主机名的要求相反
- 命名习惯
- 见名知义,用英文单词命名,并体现出实际作用,不要用简写,如:ATM
- 变量名大写,局部变量小写,函数名小写
- 大驼峰StudentFirstName,由多个单词组成,且每个单词的首字母是大写,其它小写
- 小驼峰studentFirstName,由多个单词组成,第一个单词的首字母小写,后续每个单词的首字母是大写,其它小写
- 下划线:student_first_name
环境变量
通过export 变量名=变量值的方式定义
通过env命令可以查看所有环境变量
生效范围为本shell以及子进程中
一般只在系统级别的配置文件中使用,shell脚本中较少使用
root@LXH-Ubuntu:~# cat father.sh
#!/bin/bash

export a='I am a'		# father.sh中创建环境变量a
b='I am b'				# father.sh中创建普通变量b作为对照

/bin/bash child.sh
root@LXH-Ubuntu:~#
root@LXH-Ubuntu:~# cat child.sh
#!/bin/bash

echo $a					# child.sh中打印变量a和变量b的值
echo $b

root@LXH-Ubuntu:~#
root@LXH-Ubuntu:~# /bin/bash father.sh
I am a					# 最终运行结果表示,子进程只能获取到环境变量a

root@LXH-Ubuntu:~#
位置变量
位置变量指的是在shell脚本中常用的$N,N为大于等于0的整数
通过位置变量可以获取到shell脚本运行时传入的参数
root@LXH-Ubuntu:~# cat position.sh
#!/bin/bash

echo $#					# 打印传入的参数个数
echo $0					# 打印脚本文件名
echo $1					# 打印第一个参数
echo $2					# 打印第二个参数

root@LXH-Ubuntu:~#
root@LXH-Ubuntu:~# /bin/bash position.sh a b c 		# 传入三个参数 a b c
3
position.sh
a
b
root@LXH-Ubuntu:~#
只读变量
通过readonly 变量名=变量值的方式定义
一般用于定义PI这样数值不会变动的常数
相对于普通变量而言,只读变量的变量值无法修改
root@LXH-Ubuntu:~# echo $a

root@LXH-Ubuntu:~# echo $b

root@LXH-Ubuntu:~# readonly a='I am a'		# 创建只读变量a
root@LXH-Ubuntu:~# b='I am b'				# 创建普通变量b进行对照
root@LXH-Ubuntu:~#
root@LXH-Ubuntu:~# a='i am a'				# 只读变量a的值无法修改
-bash: a: readonly variable
root@LXH-Ubuntu:~#
root@LXH-Ubuntu:~# b='i an b'				# 普通变量b可以修改值
root@LXH-Ubuntu:~#
root@LXH-Ubuntu:~# echo $a
I am a
root@LXH-Ubuntu:~# echo $b
i an b
root@LXH-Ubuntu:~#
局部变量
局部变量定义在函数中,使用范围仅仅在该函数中
#!/bin/bash

# 全局变量
global_var="我是全局变量"

demo_function() {
    # 局部变量
    local local_var="我是局部变量"

    echo "函数内部:"
    echo "  local_var = $local_var"
    echo "  global_var = $global_var"
}

echo -e "\n=== 函数调用中 ==="
demo_function

echo -e "\n=== 函数调用后 ==="
echo "global_var = $global_var"
echo "local_var = $local_var"  # 这里会输出空值或报错
状态变量
状态变量$?用于查看命令是否执行成功,0表示成功,非0表示失败
root@LXH-Ubuntu:~# pwd
/root
root@LXH-Ubuntu:~#
root@LXH-Ubuntu:~# echo $?		# pwd命令执行成功
0
root@LXH-Ubuntu:~#
root@LXH-Ubuntu:~# lls
Command 'lls' not found, but there are 16 similar ones.
root@LXH-Ubuntu:~#
root@LXH-Ubuntu:~# echo $?		# 由于不存在lls这样的命令,所以执行识别,$?为非0值127
127
root@LXH-Ubuntu:~#
猜数字脚本
脚本内容:
targetnum=`expr $RANDOM % 11`
while true
do
        read -p "请输入一个数字:" inputnum
        if [ $inputnum -gt $targetnum ]; then
                echo -e "\e[31m输入的数字较大\e[0m"
        elif [ $inputnum -lt $targetnum ]; then
                echo -e "\e[31m输入的数字较小\e[0m"
        elif [ $inputnum -eq $targetnum ]; then
                echo -e "\e[32m输入的数字正确!!!\e[0m"
                break
        fi

done
解析:
通过expr命令以及变量$RANDOM计算一个0到10范围内的随机值
targetnum=`expr $RANDOM % 11`
通过read命令实现交互功能,让用户输入数字,并保存到变量inputnum
read -p "请输入一个数字:" inputnum
通过数字的条件判断来比较用户输入的数字和目标数字的大小,并给出相应的提示信息
[ $inputnum -gt $targetnum ]
[ $inputnum -lt $targetnum ]
[ $inputnum -eq $targetnum ]

 浙公网安备 33010602011771号